
深入剖析(JDK)ArrayQueue源码
 本篇文章主要跟大家介绍JDK容器ArrayQueue内部的实现原理以及他的源代码,各种操作直接用图描述,清晰明了!
深入剖析(JDK)ArrayQueue源码
前言
在本篇文章当中主要给大家介绍一个比较简单的JDK为我们提供的容器ArrayQueue,这个容器主要是用数组实现的一个单向队列,整体的结构相对其他容器来说就比较简单了。
ArrayQueue内部实现
在谈ArrayQueue的内部实现之前我们先来看一个ArrayQueue的使用例子:
public void testQueue() { ArrayQueue<Integer> queue = new ArrayQueue<>(10); queue.add(1); queue.add(2); queue.add(3); queue.add(4); System.out.println(queue); queue.remove(0); // 这个参数只能为0 表示删除队列当中第一个元素,也就是队头元素 System.out.println(queue); queue.remove(0); System.out.println(queue); } // 输出结果 [1, 2, 3, 4] [2, 3, 4] [3, 4]
首先ArrayQueue内部是由循环数组实现的,可能保证增加和删除数据的时间复杂度都是ArrayList删除数据的时间复杂度为ArrayQueue内部有两个整型数据head和tail,这两个的作用主要是指向队列的头部和尾部,它的初始状态在内存当中的布局如下图所示:
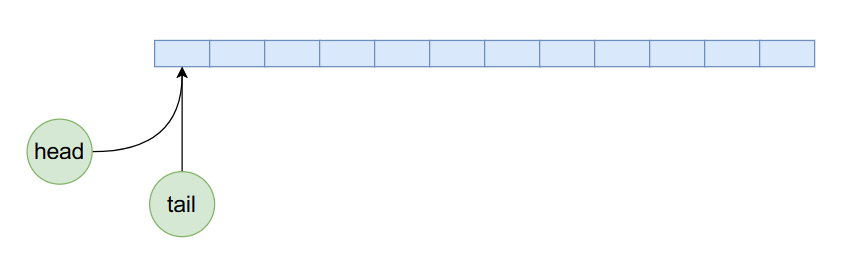
因为是初始状态head和tail的值都等于0,指向数组当中第一个数据。现在我们向ArrayQueue内部加入5个数据,那么他的内存布局将如下图所示:
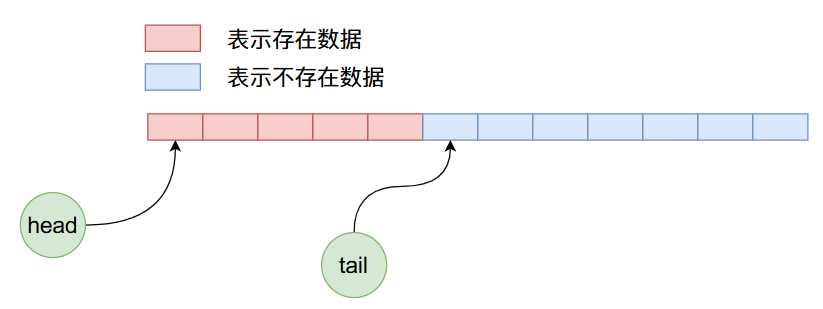
现在我们删除4个数据,那么上图经过4次删除操作之后,ArrayQueue内部数据布局如下:
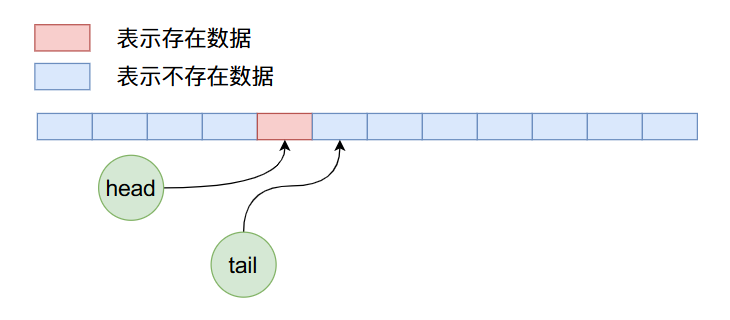
在上面的状态下,我们继续加入8个数据,那么布局情况如下:
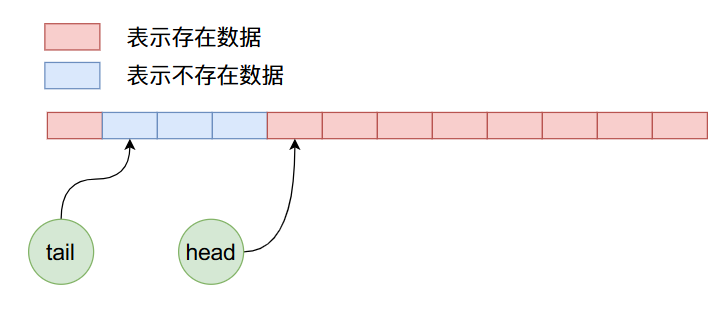
我们知道上图在加入数据的时候不仅将数组后半部分的空间使用完了,而且可以继续使用前半部分没有使用过的空间,也就是说在ArrayQueue内部实现了一个循环使用的过程。
ArrayQueue源码剖析
构造函数
public ArrayQueue(int capacity) { this.capacity = capacity + 1; this.queue = newArray(capacity + 1); this.head = 0; this.tail = 0; } @SuppressWarnings("unchecked") private T[] newArray(int size) { return (T[]) new Object[size]; }
上面的构造函数的代码比较容易理解,主要就是根据用户输入的数组空间长度去申请数组,不过他具体在申请数组的时候会多申请一个空间。
add函数
public boolean add(T o) { queue[tail] = o; // 循环使用数组 int newtail = (tail + 1) % capacity; if (newtail == head) throw new IndexOutOfBoundsException("Queue full"); tail = newtail; return true; // we did add something }
上面的代码也相对比较容易看懂,在上文当中我们已经提到了ArrayQueue可以循环将数据加入到数组当中去,这一点在上面的代码当中也有所体现。
remove函数
public T remove(int i) { if (i != 0) throw new IllegalArgumentException("Can only remove head of queue"); if (head == tail) throw new IndexOutOfBoundsException("Queue empty"); T removed = queue[head]; queue[head] = null; head = (head + 1) % capacity; return removed; }
从上面的代码当中可以看出,在remove函数当中我们必须传递参数0,否则会抛出异常。而在这个函数当中我们只会删除当前head下标所在位置的数据,然后将head的值进行循环加1操作。
get函数
public T get(int i) { int size = size(); if (i < 0 || i >= size) { final String msg = "Index " + i + ", queue size " + size; throw new IndexOutOfBoundsException(msg); } int index = (head + i) % capacity; return queue[index]; }
get函数的参数表示得到第i个数据,这个第i个数据并不是数组位置的第i个数据,而是距离head位置为i的位置的数据,了解这一点,上面的代码是很容易理解的。
resize函数
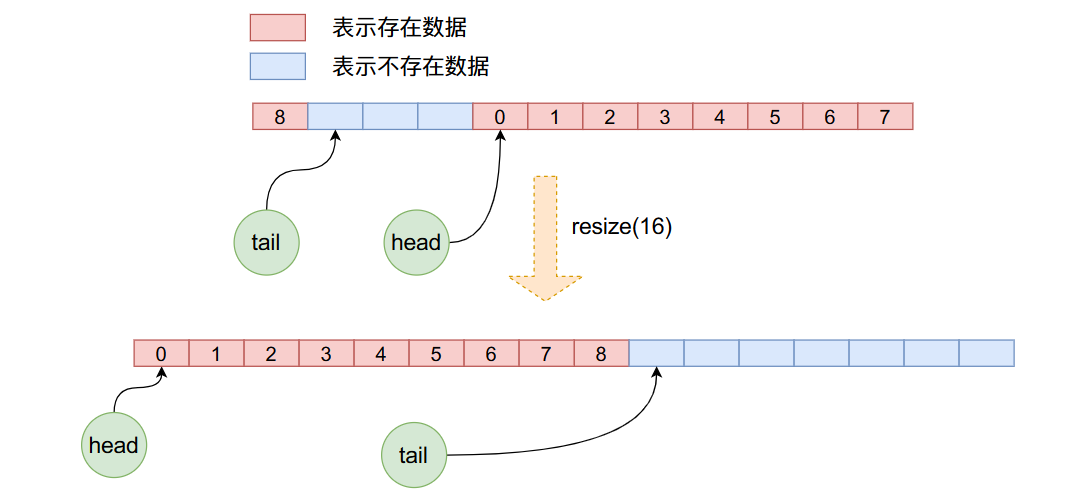
public void resize(int newcapacity) { int size = size(); if (newcapacity < size) throw new IndexOutOfBoundsException("Resizing would lose data"); newcapacity++; if (newcapacity == this.capacity) return; T[] newqueue = newArray(newcapacity); for (int i = 0; i < size; i++) newqueue[i] = get(i); this.capacity = newcapacity; this.queue = newqueue; this.head = 0; this.tail = size; }
在resize函数当中首先申请新长度的数组空间,然后将原数组的数据一个一个的拷贝到新的数组当中,注意在这个拷贝的过程当中,重新更新了head与tail,而且并不是简单的数组拷贝,因为在之前的操作当中head可能已经不是了0,因此新的拷贝需要我们一个一个的从就数组拿出来,然后放到新数组当中。下图可以很直观的看出这个过程:
总结
在本篇文章当中主要给大家介绍了ArrayQueue的内部实现过程和原理,并且看了ArrayQueue的源代码,有图的辅助整个阅读的过程应该是比较清晰的,ArrayQueue也是一个比较简单的容器,JDK对他的实现也比较简单。
以上就是本文所有的内容了,希望大家有所收获,我是LeHung,我们下期再见!!!(记得点赞收藏哦!)
更多精彩内容合集可访问项目:https://github.com/Chang-LeHung/CSCore
关注公众号:一无是处的研究僧,了解更多计算机(Java、Python、计算机系统基础、算法与数据结构)知识。


【推荐】国内首个AI IDE,深度理解中文开发场景,立即下载体验Trae
【推荐】编程新体验,更懂你的AI,立即体验豆包MarsCode编程助手
【推荐】抖音旗下AI助手豆包,你的智能百科全书,全免费不限次数
【推荐】轻量又高性能的 SSH 工具 IShell:AI 加持,快人一步
· winform 绘制太阳,地球,月球 运作规律
· 震惊!C++程序真的从main开始吗?99%的程序员都答错了
· AI与.NET技术实操系列(五):向量存储与相似性搜索在 .NET 中的实现
· 超详细:普通电脑也行Windows部署deepseek R1训练数据并当服务器共享给他人
· 【硬核科普】Trae如何「偷看」你的代码?零基础破解AI编程运行原理