浅谈OpenCV 粗略计算工件轮廓面积和外接圆直径(Emgu.CV)
前言
最近领导在做库房工具管理这块的功能,希望能集成OpenCV 粗略的计算出工具的长度,以方便用户再归还工具的时候,提示用户该放在那种尺寸的盒子里面,这便是这篇文章的由来。
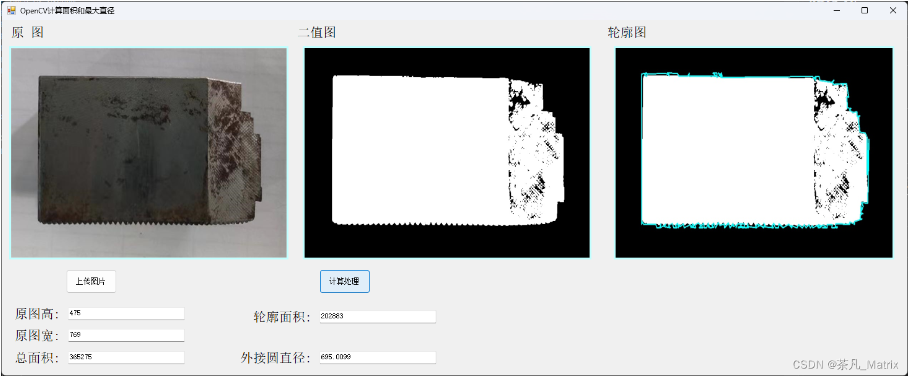
我们的系统是基于.net开发的,所以采用的是 Emgu.CV这个框架来开发相应的功能,首先我们来看看效果吧,如下图。在这里我们的高宽、面积、直径都是计算的像素值,实际情况中我们需要根据自己的相片尺寸和拍照背景板与摄像头的距离,得出比例尺,根据比例尺大概计算出物体的实际面积和长度。
实现思路
我们业务中不需要太高的精度,所以采用一些简单的调用OpenCV 函数就能实现,注意本文的背景采用的是A4纸白色背景,如果背景不同,二值化的过程中需要你自己调节对应的参数。
- 对照片进行灰度和二值处理
- 去除照片中的阴影
- 描绘物体的轮廓、和外接圆,就可以得出面积和物体长度
代码(主要逻辑代码,关于页面的代码需要自己采用 winform设计)
 public partial class Form1 : Form
 {
     public Form1()
     {
         InitializeComponent();
     }

     string imagePath = string.Empty;
     string result_path = string.Empty;
     /// <summary>
     ///  上传图片
     /// </summary>
     /// <param name="sender"></param>
     /// <param name="e"></param>
     private void button_up_Click(object sender, EventArgs e)
     {


         OpenFileDialog openFileDialog = new OpenFileDialog();
         if (openFileDialog.ShowDialog() == DialogResult.OK)
         {
             imagePath = openFileDialog.FileName; //得到文件全路径名
             // 使用Image.FromFile方法加载图片
             System.Drawing.Image image = System.Drawing.Image.FromFile(imagePath);
             // 设置PictureBox的图片
             src.Image = image;
             // (可选)设置PictureBox的大小以适应图片
             src.SizeMode = PictureBoxSizeMode.StretchImage;
            // AreaCalculate(imagePath);
             BinaryTreatment(imagePath);
         }
     }

     private void button_calculate_Click(object sender, EventArgs e)
     {
         AreaCalculate(result_path);
     }

     /// <summary>
     /// 去除图片阴影
     /// </summary>
     /// <param name="path"></param>
     private string RemoveShadow(string path)
     {
         // 加载图像
         Mat image = CvInvoke.Imread(path, ImreadModes.Color);

         // 将图像转换为灰度图像
         Mat grayImage = new Mat();
         CvInvoke.CvtColor(image, grayImage, ColorConversion.Bgr2Gray);

         // 增加对比度和亮度来减少阴影
         double alpha = 1.2; // 对比度增强因子
         int beta = 20; // 亮度增强因子
         grayImage.ConvertTo(grayImage, DepthType.Cv8U, alpha, beta);

         DateTime now = DateTime.Now; // 获取当前本地时间
         long timestamp = (long)(now - new DateTime(1970, 1, 1, 0, 0, 0, DateTimeKind.Utc)).TotalSeconds;
         string shadow_path = "C:\\Users\\Administrator\\Desktop\\openCV\\" + timestamp.ToString() + "dilated.jpg";
         CvInvoke.Imwrite(shadow_path, grayImage);
         return shadow_path;
     }


     /// <summary>
     /// 灰度和二值处理
     /// </summary>
     /// <param name="file_path"></param>
     private void BinaryTreatment(string file_path)
     {
         string shadow_path = RemoveShadow(file_path);

         // 读取图片文件
         Mat src = CvInvoke.Imread(shadow_path);
         // 创建一个与源图像大小相同的目标图像
         Mat dst = new Mat(src.Size, DepthType.Cv8U, 3);
         // 将目标图像设置为黑色
         dst.SetTo(new MCvScalar(0, 0, 0));


         // 显示输入图像
         //CvInvoke.Imshow("input", src);

        // 创建一个灰度图像
         Mat grayImg = new Mat();
         // 将源图像转换为灰度图像
         CvInvoke.CvtColor(src, grayImg, ColorConversion.Bgr2Gray);

         // 对灰度图像进行阈值处理,得到二值化图像
         CvInvoke.Threshold(grayImg, grayImg, 127, 255, ThresholdType.BinaryInv);
         // 创建一个用于膨胀的核,通常使用3x3或5x5的矩形核
         Mat kernel = CvInvoke.GetStructuringElement(ElementShape.Rectangle, new Size(3, 3), new Point(-1, -1));
         // 对灰度图像进行膨胀处理
         CvInvoke.Dilate(grayImg, dst, kernel, new Point(-1, -1), 1, new BorderType(), new MCvScalar());
         DateTime now = DateTime.Now; // 获取当前本地时间
         long timestamp = (long)(now - new DateTime(1970, 1, 1, 0, 0, 0, DateTimeKind.Utc)).TotalSeconds;
         result_path = "C:\\Users\\Administrator\\Desktop\\openCV\\" + timestamp.ToString() + "dilated.jpg";
         CvInvoke.Imwrite(result_path, dst);
         // 使用Image.FromFile方法加载图片
         System.Drawing.Image image = System.Drawing.Image.FromFile(result_path);
         // 设置PictureBox的图片
         result.Image = image;
         // (可选)设置PictureBox的大小以适应图片
         result.SizeMode = PictureBoxSizeMode.StretchImage;
     }

     /// <summary>
     /// 计算面积和长度
     /// </summary>
     /// <param name="read_path"></param>
     private  void AreaCalculate( string  read_path)
     {

         // 读取图片
         Mat src = CvInvoke.Imread(read_path);
         // 克隆源图像,用于绘制结果
         Mat dst = src.Clone();
         // 创建一个新的Mat对象用于存储灰度图像
         Mat grayImg = new Mat();
         // 将源图像转换为灰度图像
         CvInvoke.CvtColor(src, grayImg, ColorConversion.Bgr2Gray);
         CvInvoke.Imwrite(result_path, grayImg);
         // 初始化轮廓和层次结构向量
         VectorOfVectorOfPoint contours = new VectorOfVectorOfPoint();

         VectorOfRect hierarchy = new VectorOfRect();

         // 查找轮廓,这里只查找最外层的轮廓
         CvInvoke.FindContours(grayImg, contours, hierarchy, RetrType.External, ChainApproxMethod.ChainApproxNone);

         double maxArea = 0.0;
         int max_coutours = 0;

         for (int i = 0; i < contours.Size; i++)
         {
             //求取面积、周长、多边形逼近
             double length = CvInvoke.ArcLength(contours[i], true); //计算轮廓周长
             double area = CvInvoke.ContourArea(contours[i], false); //计算轮廓面积
             if (area > maxArea)
             {
                 maxArea = area;
                 max_coutours = i;
             }
             VectorOfPoint approxPoly = new VectorOfPoint();
             CvInvoke.ApproxPolyDP(contours[max_coutours], approxPoly, length * 0.001, true); //多变形轮廓拟合  0.001 值越小拟合程度高
             CvInvoke.Polylines(dst, approxPoly, true, new MCvScalar(255, 255, 0), 2); //绘制拟合多边形
         }

         if (!grayImg.IsEmpty)
         {
             Console.WriteLine("图像的宽度是:{0}", grayImg.Cols);
             textBox_width.Text = grayImg.Cols.ToString();

             Console.WriteLine("图像的高度是:{0}", grayImg.Rows);
             textBox_height.Text = grayImg.Rows.ToString();

             Console.WriteLine("图像的面积(总像素数)是:{0}", grayImg.Cols * grayImg.Rows);
             textBox_total.Text = (grayImg.Cols * grayImg.Rows).ToString();
         }
         Console.WriteLine("图像轮廓最大面积:" + maxArea);

         textBox_area.Text = maxArea.ToString();

         CircleF circleF1 = CvInvoke.MinEnclosingCircle(contours[max_coutours]);
         Console.WriteLine("最大半径: " + circleF1.Radius );
         textBox_length.Text = (circleF1.Radius*2 ).ToString();

         DateTime now = DateTime.Now; // 获取当前本地时间
         long timestamp = (long)(now - new DateTime(1970, 1, 1, 0, 0, 0, DateTimeKind.Utc)).TotalSeconds;
         string c_path = "C:\\Users\\Administrator\\Desktop\\openCV\\" + timestamp.ToString() + "dilated.jpg";
         CvInvoke.Imwrite(c_path, dst);
         // 使用Image.FromFile方法加载图片
         System.Drawing.Image image2 = System.Drawing.Image.FromFile(c_path);
         // 设置PictureBox的图片
         pictureBox_contoures.Image = image2;
         // (可选)设置PictureBox的大小以适应图片
         pictureBox_contoures.SizeMode = PictureBoxSizeMode.StretchImage;

     }
 }
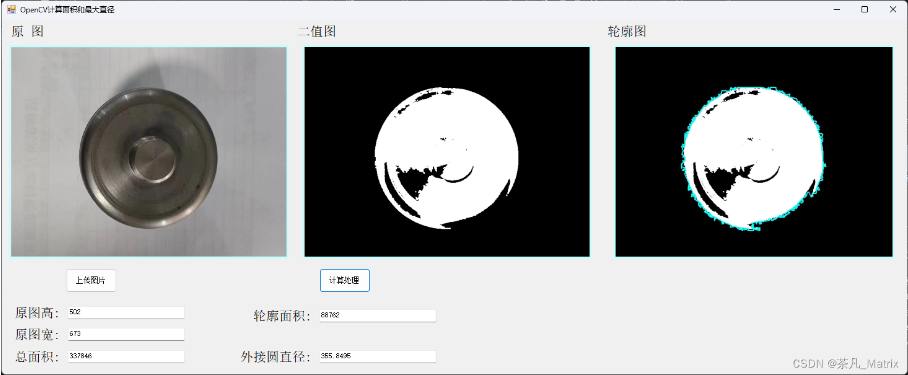
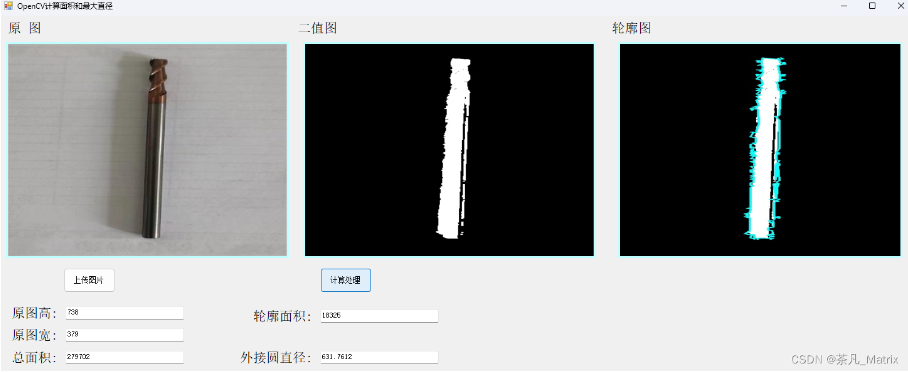
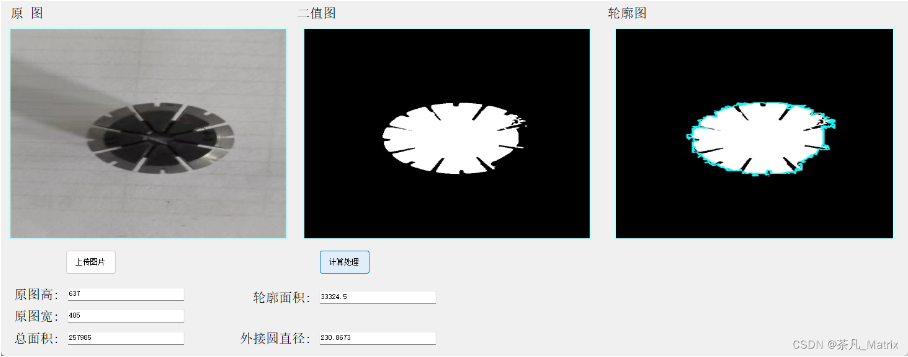
其他实列图
结语
作为一个新手接触,记录一下学习成果,不喜勿喷。

 浙公网安备 33010602011771号