转:ASP.NET Core Identity 系列之六
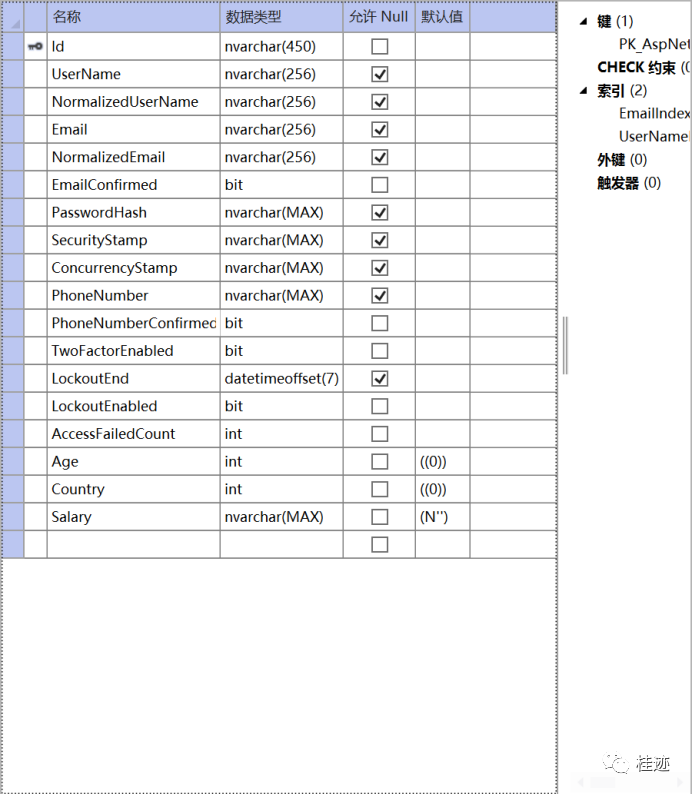
这节我们主要介绍在Identity中添加自定义属性。如果我们想在Users类中添加自定义属性像"Age, Country & Salary",我们该如何做呢?User 类继承了 IdentityUser 类,把客户自定义的属性添加到 Identity 数据库的 AspNetUsers 表中
我们添加三个自定义属性到AppUser类中:Country属性是一个Enum类型,Age 属性是一个int类型,Salary 属性是一个 string类型,将Salary属性设置为必填属性通过在属性上新增[Required] 特性,接下来我们定义一个Country的枚举类型。 代码如下:
public class AppUser : IdentityUser
{
    public int Age
    {
        get; set;
    }
    public Country Country
    {
        get;
        set;
    }
    [Required]
    public string Salary
    {
        get; set;
    } = null!;
}
public enum Country
{
    USA,
    UK,
    France,
    Germany,
    Russia
}
我们已经添加ASP.NET Core Identity客户自定义属性到我们应用程序,接下来我们将属性更新到数据库中。我们将运行Entity Framework Core Migration 命令

打开 PMC窗口(使用Microsoft.EntityFrameworkCore.Tools命令),运行下面两个命令:
- Add-Migration Migration-New
- Update-Database

我们看到我们新增加的属性已经被同步到数据库中
1. 新增和修改用户方法
现在我们更新AdminController的新增和修改方法, 并将我们自定义的属性添加进去,在User类中添加3个属性(Country, Age & Salary)
public class User
{
    [Required]
    [DisplayName("用户名")]
    public string Name { get; set; } = null!;
    [Required]
    [DisplayName("邮箱")]
    [RegularExpression("^[a-zA-Z0-9_\\.-]+@([a-zA-Z0-9-]+\\.)+[a-zA-Z]{2,6}$", ErrorMessage = "电子邮件格式不正确")]
    public string Email { get; set; } = null!;
    [Required]
    [DataType(DataType.Password)]
    [DisplayName("密码")]
    public string Password { get; set; } = null!;
    [DisplayName("年龄")]
    public int Age
    {
        get; set;
    }
    [DisplayName("国家")]
    public Country Country
    {
        get;
        set;
    }
    [DisplayName("薪水")]
    [Required]
    public string Salary
    {
        get; set;
    } = null!;
}
public class UpdateUserDTO
{
    [Required]
    [DisplayName("编号")]
    public string Id { get; set; } = null!;
    [Required]
    [DisplayName("用户名")]
    public string Name { get; set; }=null!;
    [Required]
    [DisplayName("邮箱")]
    [RegularExpression("^[a-zA-Z0-9_\\.-]+@([a-zA-Z0-9-]+\\.)+[a-zA-Z]{2,6}$", ErrorMessage = "E-mail is not valid")]
    public string Email { get; set; } = null!;
    [Required]
    [DataType(DataType.Password)]
    [DisplayName("密码")]
    public string Password { get; set; } = null!;
    [DisplayName("年龄")]
    public int Age
    {
        get; set;
    }
    [DisplayName("国家")]
    public Country Country
    {
        get;
        set;
    }
    [DisplayName("薪水")]
    [Required]
    public string Salary
    {
        get; set;
    } = null!;
}
接下来,我们添加3个HTML标记在Create和Update视图,我们注册一个新用户的时候可以输入这些信息,也可以更新之前的用户,Age和Salary使用输入框,Country属性使用了选择框
View/Admin/Create.cshtml
<div class="mb-3 row">
    <label asp-for="Age" class="col-sm-1 control-label"></label>
    <div class="col-sm-11">
        <input asp-for="Age" class="form-control" />
    </div>
</div>
<div class="mb-3 row">
    <label asp-for="Country" class="col-sm-1 control-label"></label>
    <div class="col-sm-11">
        <select asp-for="Country" class="form-control" asp-items="@new SelectList(Enum.GetNames(typeof(Country)))">
            <option selected disabled value="选择">选择国家</option>
        </select>
    </div>
</div>
<div class="mb-3 row">
    <label asp-for="Salary" class="col-sm-1 control-label"></label>
    <div class="col-sm-11">
        <input asp-for="Salary" class="form-control" />
    </div>
</div>
<div class="mb-3 row">
    <div class="col-sm-11 offset-sm-1">
        <button type="submit" class="btn btn-primary">保存</button>
        <button asp-action="Index" class="btn btn-secondary">
            返回
        </button>
    </div>
</div>
View/Admin/Update.cshtml
<div class="mb-3 row">
    <label asp-for="Age" class="col-sm-1 control-label"></label>
    <div class="col-sm-11">
        <input asp-for="Age" class="form-control" />
    </div>
</div>
<div class="mb-3 row">
    <label asp-for="Country" class="col-sm-1 control-label"></label>
    <div class="col-sm-11">
        <select asp-for="Country" class="form-control" asp-items="@new SelectList(Enum.GetNames(typeof(Country)))">
            <option selected disabled value="选择">选择国家</option>
        </select>
    </div>
</div>
<div class="mb-3 row">
    <label asp-for="Salary" class="col-sm-1 control-label"></label>
    <div class="col-sm-11">
        <input asp-for="Salary" class="form-control" />
    </div>
</div>
<div class="row mb-3">
    <div class="col-sm-11 offset-sm-1">
        <button class="btn btn-primary">保存</button>
        <button asp-action="index" class="btn btn-secondary">返回</button>
    </div>
</div>
View/Admin/Index.cshtml
@model IEnumerable<AppUser>
@{
    ViewData["Title"] = "用户列表";
}
<div class="container">
    <div class="row mb-3">
        <div class="col-sm-3">
            <a asp-action="Create" class="btn btn-primary">新增</a>
        </div>
        <div class="col-sm-3"></div>
        <div class="col-sm-3"></div>
        <div class="col-sm-3"></div>
    </div>
    <div class="row mb-3">
        <div class="col-sm">
            <table class="table table-bordered align-middle">
                <thead>
                    <tr>
                        <th>编号</th>
                        <th>名称</th>
                        <th>邮件</th>
                        <td>年龄</td>
                        <td>国家</td>
                        <td>薪水</td>
                        <th>编辑</th>
                        <td>删除</td>
                    </tr>
                </thead>
                <tbody>
                    @foreach (AppUser user in Model)
                    {
                        <tr>
                            <td>@user.Id</td>
                            <td>@user.UserName</td>
                            <td>@user.Email</td>
                            <td>@user.Age</td>
                            <td>@user.Country</td>
                            <td>@user.Salary</td>
                            <td>
                                <a class="btn btn-primary btn-sm" asp-action="Update" asp-route-id="@user.Id">编辑</a>
                            </td>
                            <td>
                                <form method="post" asp-action="Delete" asp-route-id="@user.Id" role="form">
                                    <button type="submit" class="btn btn-danger btn-sm">删除</button>
                                </form>
                            </td>
                        </tr>
                    }
                </tbody>
            </table>
        </div>
    </div>
</div>
最后,更新一下AdminController的Create和Update方法
Create方法
[HttpPost]
public async Task<IActionResult> Create(User user)
{
    if (ModelState.IsValid)
    {
        AppUser appUser = new AppUser
        {
            UserName = user.Name,
            Email = user.Email,
            Age = user.Age,
            Country = user.Country,
            Salary = user.Salary
        };
        var identityResult = await _userManager.CreateAsync(appUser, user.Password);
        if (identityResult.Succeeded)
            return RedirectToAction("Index", "Admin");
        else
            foreach (IdentityError error in identityResult.Errors)
                ModelState.AddModelError("", error.Description);
    }
    return View(user);
}
[HttpPost]
public async Task<IActionResult> Update(UpdateUserDTO updateUserDTO)
{
    var appUser = await _userManager.FindByIdAsync(updateUserDTO.Id);
    if (appUser != null)
    {
        IdentityResult validEmail = null;
        if (!string.IsNullOrEmpty(updateUserDTO.Name) && !string.IsNullOrEmpty(updateUserDTO.Email))
        {
            appUser.UserName = updateUserDTO.Name;
            appUser.Email = updateUserDTO.Email;
            validEmail = await _userValidator.ValidateAsync(_userManager, appUser);
            if (!validEmail.Succeeded)
                Errors(validEmail);
        }
        else
            ModelState.AddModelError("", "用户名和邮件不能为空");

        appUser.Age = updateUserDTO.Age;
        appUser.Country = updateUserDTO.Country;
        if (!string.IsNullOrEmpty(updateUserDTO.Salary))
            appUser.Salary = updateUserDTO.Salary;

        IdentityResult validPass = null;
        if (!string.IsNullOrEmpty(updateUserDTO.Password))
        {
            validPass = await _passwordValidator.ValidateAsync(_userManager, appUser, updateUserDTO.Password);
            if (validPass.Succeeded)
                appUser.PasswordHash = _passwordHasher.HashPassword(appUser, updateUserDTO.Password);
            else
                Errors(validPass);
        }
        else
            ModelState.AddModelError("", "密码不能为空");
        if (!string.IsNullOrEmpty(updateUserDTO.Name) &&
            !string.IsNullOrEmpty(updateUserDTO.Email) &&
            !string.IsNullOrEmpty(updateUserDTO.Password) &&
            validEmail.Succeeded &&
            validPass.Succeeded)
        {
            var result = await _userManager.UpdateAsync(appUser);
            if (result.Succeeded)
                return RedirectToAction("Index");
            else
            {
                foreach (IdentityError error in result.Errors)
                {
                    ModelState.AddModelError("", error.Description);
                }
            }
        }
    }
    else
        ModelState.AddModelError("", "没有发现该用户");
    return View(updateUserDTO);
}
2. 测试客户自定义属性
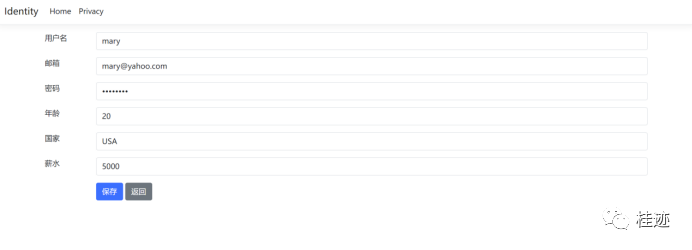
测试客户自定义属性,运行应用程序并且进入地址 https://localhost:7296/Admin/Create ,我们创建如下用户:
- 姓名 – mary
- 邮件 – mary@yahoo.com
- 密码 – Coder77@
- 年龄 – 20
- 国家 – USA
- 薪水 – 5000

我们看到刚才创建用户

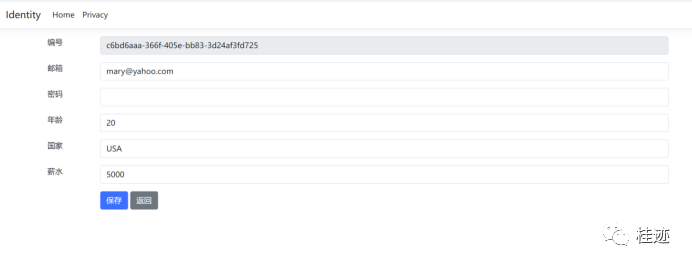
用户被创建成功之后,点击更新操作Update View将会显示刚才新增的用户:

3. 总结
这节我们主要介绍了在ASP.NET Core Identity用户自定义属性,现在我们很容易添加用户自定义字段到用户表中
源代码地址:
https://github.com/bingbing-gui/Asp.Net-Core-Skill/tree/master/AspNetCore.Identity/Identity

 浙公网安备 33010602011771号