RayTracingInOneWeekend项目总结
 花费一天时间抄完了这个小的软件光线追踪渲染器,通过这篇笔记学习到了很多有用的知识~
项目介绍
RayTracingInOneWeekend是一个在github上的开源教程,目标是实现一个简单的软件光线追踪渲染器,全部用C++代码实现。
参考
在实现过程中,参考了很多非常优秀的笔记和博客,对我的学习提供了非常大的便利,在此一并感谢。
- Ray Tracing in One Weekend V3.0中文翻译(上)
- Ray Tracing in One Weekend V3.0中文翻译(下)
- Ray Tracing in One Weekend(中文翻译)
- 【学习总结】Ray Tracing in One Weekend(梳理与总结)
目的
笔记的目的是对整个项目从知识和代码的角度上进行分析,从而加深对知识和项目的理解。
项目最后实现的图片效果不错:

类设计分析
思维导图

类设计图

vec3.h类
vec3从数据结构上是一个数组,长度为3,分别存储x,y,z三个方向上的值。
public:
    double e[3];
类的成员函数
    public:

    //类的构造函数
        vec3() : e{0,0,0} {}
        vec3(double e0, double e1, double e2) : e{e0, e1, e2} {}
    //返回x,y,z三个分量的值
        double x() const { return e[0]; }
        double y() const { return e[1]; }
        double z() const { return e[2]; }
    //运算符重载
        vec3 operator-() const { return vec3(-e[0], -e[1], -e[2]); }
        double operator[](int i) const { return e[i]; }
        double& operator[](int i) { return e[i]; }

        vec3& operator+=(const vec3 &v) {
            e[0] += v.e[0];
            e[1] += v.e[1];
            e[2] += v.e[2];
            return *this;
        }

        vec3& operator*=(const double t) {
            e[0] *= t;
            e[1] *= t;
            e[2] *= t;
            return *this;
        }

        vec3& operator/=(const double t) {
            return *this *= 1/t;
        }
               double length() const {
            return sqrt(length_squared());
        }
        //返回长度的平方
        double length_squared() const {
            return e[0]*e[0] + e[1]*e[1] + e[2]*e[2];
        }
        //返回是否在维度上接近0(近似)
        bool near_zero() const {
            // Return true if the vector is close to zero in all dimensions.
            const auto s = 1e-8;
            return (fabs(e[0]) < s) && (fabs(e[1]) < s) && (fabs(e[2]) < s);
        }
        //返回随机vec3值
        inline static vec3 random() {
            return vec3(random_double(), random_double(), random_double());
        }
        //指定范围返回随机vec3值
        inline static vec3 random(double min, double max) {
            return vec3(random_double(min,max), random_double(min,max), random_double(min,max));
        }
普通函数
// 基本运算
inline std::ostream& operator<<(std::ostream &out, const vec3 &v) {
    return out << v.e[0] << ' ' << v.e[1] << ' ' << v.e[2];
}

inline vec3 operator+(const vec3 &u, const vec3 &v) {
    return vec3(u.e[0] + v.e[0], u.e[1] + v.e[1], u.e[2] + v.e[2]);
}

inline vec3 operator-(const vec3 &u, const vec3 &v) {
    return vec3(u.e[0] - v.e[0], u.e[1] - v.e[1], u.e[2] - v.e[2]);
}

inline vec3 operator*(const vec3 &u, const vec3 &v) {
    return vec3(u.e[0] * v.e[0], u.e[1] * v.e[1], u.e[2] * v.e[2]);
}

inline vec3 operator*(double t, const vec3 &v) {
    return vec3(t*v.e[0], t*v.e[1], t*v.e[2]);
}

inline vec3 operator*(const vec3 &v, double t) {
    return t * v;
}

inline vec3 operator/(vec3 v, double t) {
    return (1/t) * v;
}
//点积
inline double dot(const vec3 &u, const vec3 &v) {
    return u.e[0] * v.e[0]
         + u.e[1] * v.e[1]
         + u.e[2] * v.e[2];
}
//叉积
inline vec3 cross(const vec3 &u, const vec3 &v) {
    return vec3(u.e[1] * v.e[2] - u.e[2] * v.e[1],
                u.e[2] * v.e[0] - u.e[0] * v.e[2],
                u.e[0] * v.e[1] - u.e[1] * v.e[0]);
}
//向量normalized
inline vec3 unit_vector(vec3 v) {
    return v / v.length();
}
inline vec3 random_in_unit_disk() {
    while (true) {
        auto p = vec3(random_double(-1,1), random_double(-1,1), 0);
        if (p.length_squared() >= 1) continue;
        return p;
    }
}
//在球体内生成随机点
//文中用到的随机方法基本都是球模拟法。
//用一个球体来随机采样得到随机的反射结果
//不论是漫反射材质还是金属球的模糊效果都是用这个方法来做
inline vec3 random_in_unit_sphere() {
    while (true) {
        auto p = vec3::random(-1,1);
        if (p.length_squared() >= 1) continue;
        return p;
    }
}
//返回一个在球体内标准化的vector
inline vec3 random_unit_vector() {
    return unit_vector(random_in_unit_sphere());
}
//另一种方法:从入射点开始选取一个随机的方向, 然后再判断是否在法向量所在的那个半球
inline vec3 random_in_hemisphere(const vec3& normal) {
    vec3 in_unit_sphere = random_in_unit_sphere();
    if (dot(in_unit_sphere, normal) > 0.0) // In the same hemisphere as the normal
        return in_unit_sphere;
    else
        return -in_unit_sphere;
}
color.h类
为了对多重采样的颜色值进行计算, 我们升级了vec3::write_color()函数。我们不会在每次发出射线采样时都计算一个0-1之间的颜色值, 而是一次性把所有的颜色都加在一起, 然后最后只需要简单的一除(除以采样点个数)。
最开始输出颜色值为255.999是因为颜色值是取不到256的,在后面加上了clamp函数进行限制。
void write_color(std::ostream &out, color pixel_color, int samples_per_pixel) {

    //提取r,g,b的值
    auto r = pixel_color.x();
    auto g = pixel_color.y();
    auto b = pixel_color.z();

    //值校验,将NaN的值替换为0.0
    if (r != r) r = 0.0;
    if (g != g) g = 0.0;
    if (b != b) b = 0.0;

    //除累加一次得到值,不需要多次计算
    auto scale = 1.0 / samples_per_pixel;
    //gamma值为2.0进行伽马校正
    r = sqrt(scale * r);
    g = sqrt(scale * g);
    b = sqrt(scale * b);

    // Write the translated [0,255] value of each color component.
    out << static_cast<int>(256 * clamp(r, 0.0, 0.999)) << ' '
        << static_cast<int>(256 * clamp(g, 0.0, 0.999)) << ' '
        << static_cast<int>(256 * clamp(b, 0.0, 0.999)) << '\n';
}
clamp函数
inline double clamp(double x, double min, double max) {
    if (x < min) return min;
    if (x > max) return max;
    return x;
}
ray.h类

ray类是最重要的光线类,这里用的是射线线性模拟:

class ray {
    public:
        ray() {}
        ray(const point3& origin, const vec3& direction)
            : orig(origin), dir(direction), tm(0)
        {}

        ray(const point3& origin, const vec3& direction, double time)
            : orig(origin), dir(direction), tm(time)
        {}

        point3 origin() const  { return orig; }
        vec3 direction() const { return dir; }
        double time() const    { return tm; }

        point3 at(double t) const {
            return orig + t*dir;
        }

    public:
        point3 orig;
        vec3 dir;
        // time射线持续的时间
        double tm;
};
Camera.h类
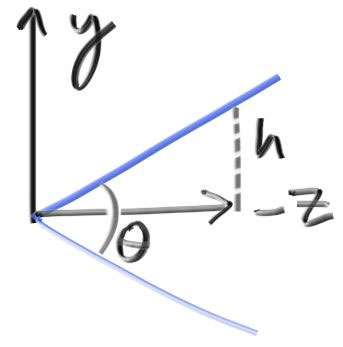
- fov是你的视角。因为我们的图片不是方的, 所以垂直和水平的fov值是不同的。我总是使用垂直方向的fov。并且我总是使用角度制来传参, 在构造函数中再将其转化为弧度
- h = tan(theta/2)

class camera {
public:
camera() : camera(point3(0,0,-1), point3(0,0,0), vec3(0,1,0), 40, 1, 0, 10) {}
camera(
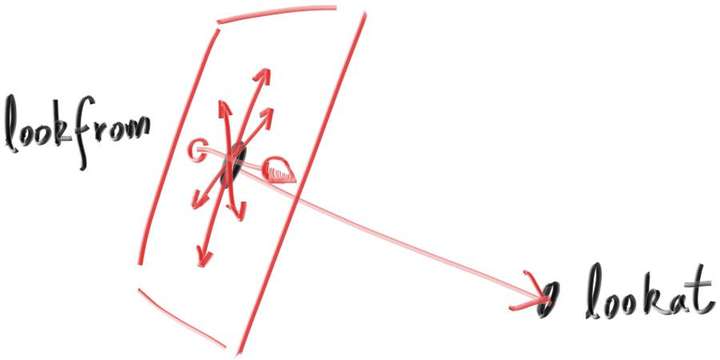
point3 lookfrom,
point3 lookat,
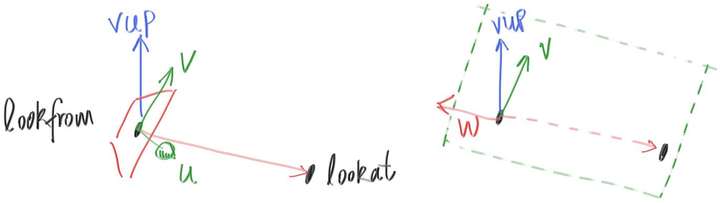
vec3 vup,
double vfov, // vertical field-of-view in degrees
double aspect_ratio,
double aperture,
double focus_dist,
double _time0 = 0,
double _time1 = 0
) {
auto theta = degrees_to_radians(vfov);
auto h = tan(theta/2);
auto viewport_height = 2.0 * h;
auto viewport_width = aspect_ratio * viewport_height;
w = unit_vector(lookfrom - lookat);
u = unit_vector(cross(vup, w));
v = cross(w, u);
origin = lookfrom;
horizontal = focus_dist * viewport_width * u;
vertical = focus_dist * viewport_height * v;
lower_left_corner = origin - horizontal/2 - vertical/2 - focus_dist*w;
lens_radius = aperture / 2;
time0 = _time0;
time1 = _time1;
}
ray get_ray(double s, double t) const {
vec3 rd = lens_radius * random_in_unit_disk();
vec3 offset = u * rd.x() + v * rd.y();
return ray(
origin + offset,
lower_left_corner + s*horizontal + t*vertical - origin - offset,
random_double(time0, time1)
);
}
private:
point3 origin;
point3 lower_left_corner;
vec3 horizontal;
vec3 vertical;
vec3 u, v, w;
double lens_radius;
double time0, time1; // shutter open/close times
};
meterial.h类
一个材质类应该封装两个功能进去:
1.生成散射后的光线(或者说它吸收了入射光线)
2.如果发生散射, 决定光线会变暗多少(attenuate)
- 我们在函数中使用hit_record作为传入参数。
class material {
    public:
        //是否发生了
        virtual bool scatter(
            const ray& r_in, const hit_record& rec, color& attenuation, ray& scattered
        ) const = 0;
};
- 漫反射材质

class lambertian : public material {
    public:
        lambertian(const vec3& a) : albedo(a) {}

        virtual bool scatter(
            const ray& r_in, const hit_record& rec, vec3& attenuation, ray& scattered
        ) const {
            //scatter_direction 发生散射的位置
            vec3 scatter_direction = rec.normal + random_unit_vector();
            //scattered是一种光线,应该是经过散射的光线
            scattered = ray(rec.p, scatter_direction);
            //衰减率是由散射率决定的
            attenuation = albedo;
            //返回布尔值
            return true;
        }

    public:
        //散射率
        vec3 albedo;
};
- 金属材质
金属不会发生散射而是会发生反射
//类似的写法
class metal : public material {
    public:
        metal(const color& a, double f) : albedo(a), fuzz(f < 1 ? f : 1) {}

        virtual bool scatter(
            const ray& r_in, const hit_record& rec, color& attenuation, ray& scattered
        ) const override {
            vec3 reflected = reflect(unit_vector(r_in.direction()), rec.normal);
            scattered = ray(rec.p, reflected + fuzz*random_in_unit_sphere());
            attenuation = albedo;
            return (dot(scattered.direction(), rec.normal) > 0);
        }

    public:
        color albedo;
        //引入一个变量来表示模糊的程度
        //如果fuzz, 也就是随机球的半径很大, 光线可能会散射到物体内部去。
        //这时候我们可以认为物体吸收了光线
        double fuzz;
};
反射函数实现:
//反射
inline vec3 reflect(const vec3& v, const vec3& n) {
    return v - 2*dot(v,n)*n;
}
- 绝缘体材质
绝缘体材质会发生折射:
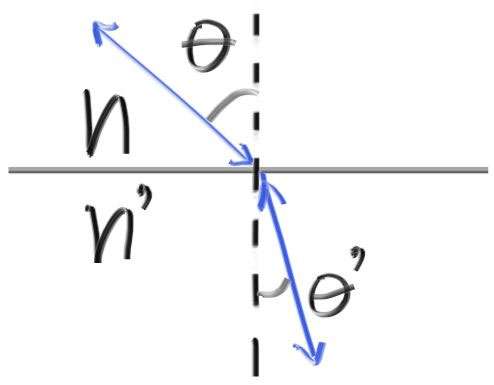
具体解释详见原文或者翻译,此处因为篇幅限制,不具体展开说明。
class dielectric : public material {
    public:
        dielectric(double index_of_refraction) : ir(index_of_refraction) {}

        virtual bool scatter(
            const ray& r_in, const hit_record& rec, color& attenuation, ray& scattered
        ) const override {
            attenuation = color(1.0, 1.0, 1.0);
            double refraction_ratio = rec.front_face ? (1.0/ir) : ir;

            vec3 unit_direction = unit_vector(r_in.direction());
            //计算角度
            double cos_theta = fmin(dot(-unit_direction, rec.normal), 1.0);
            double sin_theta = sqrt(1.0 - cos_theta*cos_theta);
            //能发生折射吗?
            bool cannot_refract = refraction_ratio * sin_theta > 1.0;
            //位置
            vec3 direction;

            if (cannot_refract || reflectance(cos_theta, refraction_ratio) > random_double())
                direction = reflect(unit_direction, rec.normal);
            else
                direction = refract(unit_direction, rec.normal, refraction_ratio);

            scattered = ray(rec.p, direction);
            return true;
        }

    public:
        double ir; // Index of Refraction

    private:
        static double reflectance(double cosine, double ref_idx) {
            // Use Schlick's approximation for reflectance.
            auto r0 = (1-ref_idx) / (1+ref_idx);
            r0 = r0*r0;
            return r0 + (1-r0)*pow((1 - cosine),5);
        }
};
折射函数实现:
//折射
inline vec3 refract(const vec3& uv, const vec3& n, double etai_over_etat) {
    auto cos_theta = fmin(dot(-uv, n), 1.0);
    vec3 r_out_perp =  etai_over_etat * (uv + cos_theta*n);
    vec3 r_out_parallel = -sqrt(fabs(1.0 - r_out_perp.length_squared())) * n;
    return r_out_perp + r_out_parallel;
}
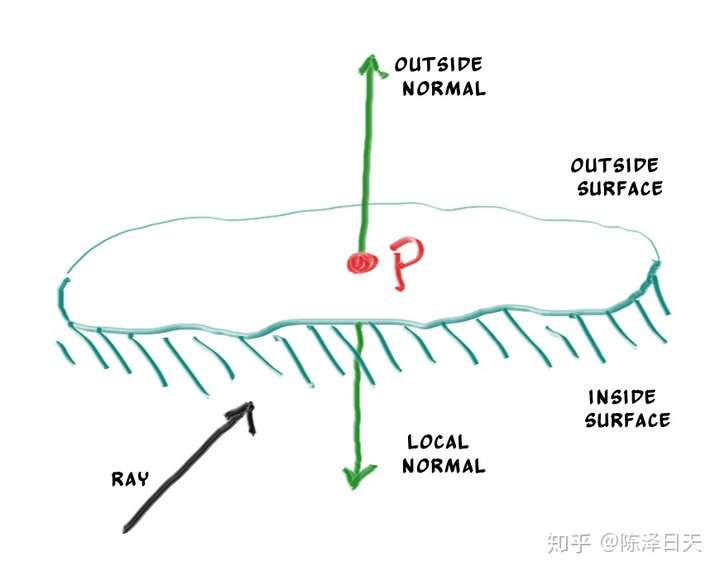
hittable.h类
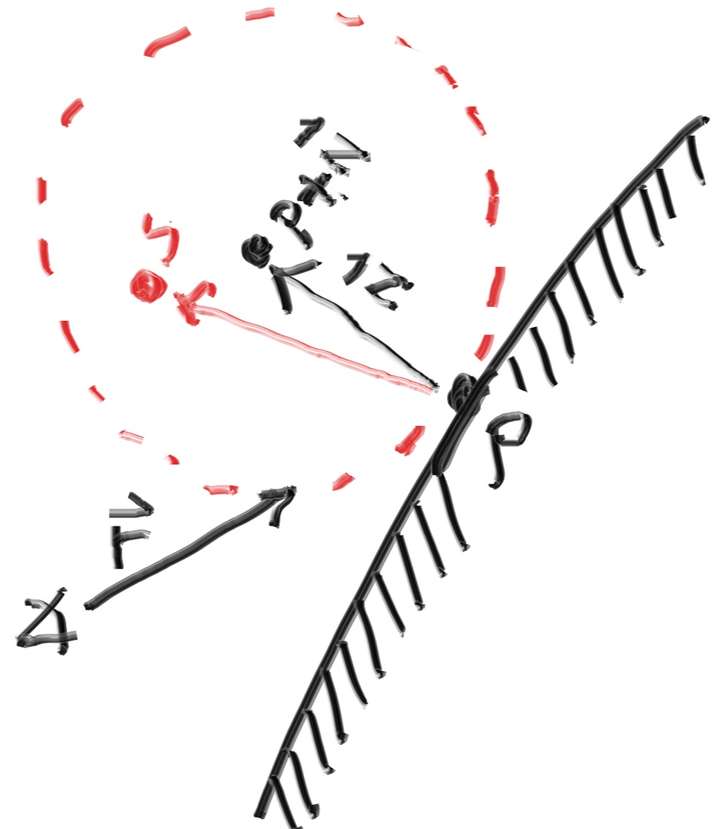
如果光线从球体外部击中球体, 那么法相也是朝外的, 与射线的方向相反(不是数学意义上的严格相反, 只是大致逆着)。如果光线从内部射向球面时, 此时的面法相依然朝外, 与射线方向相同。相对的, 我们也可以总是让法相向量与射线方向相反, 即射线从外部射向球面, 法向量朝外, 射线从内部射向球面, 法向量向着球心。
如果我们决定让法相永远朝外, 那在我们就得在射入的时候判断是从表面的哪一侧射入的, 我们可以简单的将光线与法相做点乘来判断。如果法相与光线方向相同, 那就是从内部击中内表面, 如果相反则是从外部击中外表面
我们在代码中使用智能指针的目的是为了能让多个几何图元共享一个实例(举个栗子, 一堆不同球体使用同一个纹理材质), 并且这样内存管理比起普通的指针更加的简单方便。
class material;//下面指针要指向一种材质

//建立记录信息的结构体
struct hit_record {
    point3 p;//碰撞点
    vec3 normal;//法线
    shared_ptr<material> mat_ptr;//使多个实例可以指向一种指定材质的指针
    double t;//时间变量,与动态模糊有关
    bool front_face;//法线朝向


    //判断法线朝向
    inline void set_face_normal(const ray& r, const vec3& outward_normal) {
        front_face = dot(r.direction(), outward_normal) < 0;
        normal = front_face ? outward_normal :-outward_normal;
    }
};

//继承hittable的类都需要实现hit方法,定义是如何发生hit的
class hittable {
    public:
        virtual bool hit(const ray& r, double t_min, double t_max, hit_record& rec) const = 0;
};
hittable_list.h类
class hittable_list : public hittable  {
    public:
        //构造方法
        hittable_list() {}
        hittable_list(shared_ptr<hittable> object) { add(object); }
        //清空方法
        void clear() { objects.clear(); }
        //添加方法
        void add(shared_ptr<hittable> object) { objects.push_back(object); }
        //再类内部声明了Hit函数,在类外进行实现
        virtual bool hit(
            const ray& r, double t_min, double t_max, hit_record& rec) const override;

    public:

    //hitable_list是一个vector类型的数据结构
        std::vector<shared_ptr<hittable>> objects;
};

//判断是否发生hit
bool hittable_list::hit(const ray& r, double t_min, double t_max, hit_record& rec) const {
    hit_record temp_rec;//建立结构体
    auto hit_anything = false;//默认为false
    auto closest_so_far = t_max;//默认为最大值
    //遍历数组
    for (const auto& object : objects) {
        if (object->hit(r, t_min, closest_so_far, temp_rec)) {
            hit_anything = true;//发生了hit,设置为true
            closest_so_far = temp_rec.t;//使用实际的值
            rec = temp_rec; //信息覆盖
        }
    }

    return hit_anything;//返回布尔值
}
sphere.h类
class sphere : public hittable {
    public:
    //构造方法
        sphere() {}

        sphere(point3 cen, double r, shared_ptr<material> m)
            : center(cen), radius(r), mat_ptr(m) {};
    //声明
        virtual bool hit(
            const ray& r, double t_min, double t_max, hit_record& rec) const override;

    public:
        //圆心
        point3 center;
        //半径
        double radius;
        //使多个实例可以指向一种指定材质的指针
        shared_ptr<material> mat_ptr;
};

//判断是否发生了hit
bool sphere::hit(const ray& r, double t_min, double t_max, hit_record& rec) const {
    //处理数据,设置方程
    vec3 oc = r.origin() - center;
    auto a = r.direction().length_squared();
    auto half_b = dot(oc, r.direction());
    auto c = oc.length_squared() - radius*radius;
    // discriminant = delta
    auto discriminant = half_b*half_b - a*c;
    if (discriminant < 0) return false;// false说明无根
    auto sqrtd = sqrt(discriminant);

    //寻找合适范围内最近的解,求根公式
    auto root = (-half_b - sqrtd) / a;
    if (root < t_min || t_max < root) {
        root = (-half_b + sqrtd) / a;
        if (root < t_min || t_max < root)
            return false;
    }
    //向结构体存储碰撞的信息
    rec.t = root;
    rec.p = r.at(rec.t);
    vec3 outward_normal = (rec.p - center) / radius;
    rec.set_face_normal(r, outward_normal);
    rec.mat_ptr = mat_ptr;

    return true;
}
main函数
- 整体流程


详见这里学习。
- 主要函数调用

//采样
color ray_color(const ray& r, const hittable& world, int depth) {
    hit_record rec;

    // If we've exceeded the ray bounce limit, no more light is gathered.
    if (depth <= 0)
        return color(0,0,0);

    if (world.hit(r, 0.001, infinity, rec)) {
        ray scattered;
        color attenuation;
        if (rec.mat_ptr->scatter(r, rec, attenuation, scattered))
            return attenuation * ray_color(scattered, world, depth-1);
        return color(0,0,0);
    }

    vec3 unit_direction = unit_vector(r.direction());
    auto t = 0.5*(unit_direction.y() + 1.0);
    return (1.0-t)*color(1.0, 1.0, 1.0) + t*color(0.5, 0.7, 1.0);
}

//设置场景world
hittable_list random_scene() {
    hittable_list world;

    auto ground_material = make_shared<lambertian>(color(0.5, 0.5, 0.5));
    world.add(make_shared<sphere>(point3(0,-1000,0), 1000, ground_material));

    for (int a = -11; a < 11; a++) {
        for (int b = -11; b < 11; b++) {
            auto choose_mat = random_double();
            point3 center(a + 0.9*random_double(), 0.2, b + 0.9*random_double());

            if ((center - point3(4, 0.2, 0)).length() > 0.9) {
                shared_ptr<material> sphere_material;

                if (choose_mat < 0.8) {
                    // diffuse
                    auto albedo = color::random() * color::random();
                    sphere_material = make_shared<lambertian>(albedo);
                    world.add(make_shared<sphere>(center, 0.2, sphere_material));
                } else if (choose_mat < 0.95) {
                    // metal
                    auto albedo = color::random(0.5, 1);
                    auto fuzz = random_double(0, 0.5);
                    sphere_material = make_shared<metal>(albedo, fuzz);
                    world.add(make_shared<sphere>(center, 0.2, sphere_material));
                } else {
                    // glass
                    sphere_material = make_shared<dielectric>(1.5);
                    world.add(make_shared<sphere>(center, 0.2, sphere_material));
                }
            }
        }
    }

    auto material1 = make_shared<dielectric>(1.5);
    world.add(make_shared<sphere>(point3(0, 1, 0), 1.0, material1));

    auto material2 = make_shared<lambertian>(color(0.4, 0.2, 0.1));
    world.add(make_shared<sphere>(point3(-4, 1, 0), 1.0, material2));

    auto material3 = make_shared<metal>(color(0.7, 0.6, 0.5), 0.0);
    world.add(make_shared<sphere>(point3(4, 1, 0), 1.0, material3));

    return world;
}


int main() {

    // 图像相关参数

    const auto aspect_ratio = 16.0 / 9.0;
    const int image_width = 1200;
    const int image_height = static_cast<int>(image_width / aspect_ratio);
    const int samples_per_pixel = 10;
    const int max_depth = 50;

    // 世界生成

    auto world = random_scene();

    // 摄像机设置及生成

    point3 lookfrom(13,2,3);
    point3 lookat(0,0,0);
    vec3 vup(0,1,0);
    auto dist_to_focus = 10.0;
    auto aperture = 0.1;

    camera cam(lookfrom, lookat, vup, 20, aspect_ratio, aperture, dist_to_focus);

    // 渲染

    std::cout << "P3\n" << image_width << ' ' << image_height << "\n255\n";

    for (int j = image_height-1; j >= 0; --j) {
        std::cerr << "\rScanlines remaining: " << j << ' ' << std::flush;
        for (int i = 0; i < image_width; ++i) {
            color pixel_color(0,0,0);
            for (int s = 0; s < samples_per_pixel; ++s) {
                auto u = (i + random_double()) / (image_width-1);
                auto v = (j + random_double()) / (image_height-1);
                ray r = cam.get_ray(u, v);
                pixel_color += ray_color(r, world, max_depth);
            }
            write_color(std::cout, pixel_color, samples_per_pixel);
        }
    }

    std::cerr << "\nDone.\n";
}


【推荐】国内首个AI IDE,深度理解中文开发场景,立即下载体验Trae
【推荐】编程新体验,更懂你的AI,立即体验豆包MarsCode编程助手
【推荐】抖音旗下AI助手豆包,你的智能百科全书,全免费不限次数
【推荐】轻量又高性能的 SSH 工具 IShell:AI 加持,快人一步
· 震惊!C++程序真的从main开始吗?99%的程序员都答错了
· 【硬核科普】Trae如何「偷看」你的代码?零基础破解AI编程运行原理
· 单元测试从入门到精通
· 上周热点回顾(3.3-3.9)
· winform 绘制太阳,地球,月球 运作规律