【译】在Asp.Net中操作PDF – iTextSharp - 使用表格
使用Asp.Net生成PDF最常用的元素应该是表格,表格可以帮助比如订单或者发票类型的文档更加格式化和美观。本篇文章并不会深入探讨表格,仅仅是提供一个使用iTextSharp生成表格的方法介绍,本文需要阅读我之前iTextSharp系列文章作为基础:
在Asp.Net中操作PDF - iTextSharp - 使用字体
在Asp.Net中操作PDF – iTextSharp -利用块,短语,段落添加文本
在Asp.Net中操作PDF – iTextSharp-列表
在Asp.Net中操作PDF – iTextSharp - 使用链接和书签
使用iTextSharp来操作表格是一件简单的事,尤其是iTextSharp中表格元素的命名方式和HTML与CSS中非常类似。iTextSharp提供了多个类用于创建表格,为了不让读者产生混淆,这里我使用PdfPTable这个专门为在PDF中创建表格的类,下面代码展示了如何创建一个表格并将其加入PDF中:
PdfPTable table = new PdfPTable(3);

PdfPCell cell = new PdfPCell(new Phrase("Header spanning 3 columns"));

cell.Colspan = 3;

cell.HorizontalAlignment = 1; //0=Left, 1=Centre, 2=Right

table.AddCell(cell);

table.AddCell("Col 1 Row 1");

table.AddCell("Col 2 Row 1");

table.AddCell("Col 3 Row 1");

table.AddCell("Col 1 Row 2");

table.AddCell("Col 2 Row 2");

table.AddCell("Col 3 Row 2");

doc.Add(table);
通过为pdfpTable的构造函数传入整数3,pdfpTable被初始化为一个三列的表格.为pdfpTabled添加单元格有多种方式,第一个单元格是通过PdfPCell对象添加进去的,PdfPCell的构造函数接受一个Phrase对象作为参数,然后将Cell的colspan设置为3,这样这个单元格占了整个一行.就像HTML中表格那样,单元格的水平对齐方式使用了三个值中的一个(译者:左对齐,居中,右对齐),这三个值我加在了注释中。后面的单元格我都通过AddCell方法加入,最后文档的效果如下:
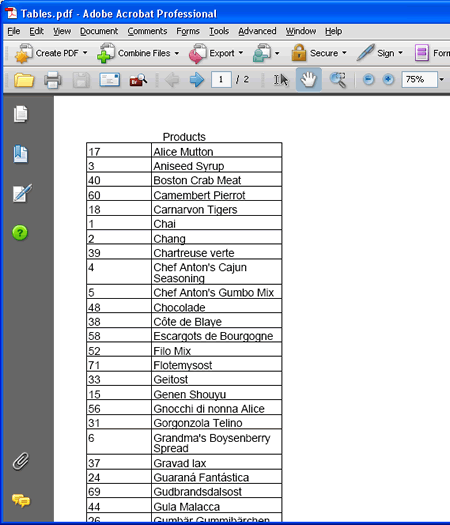
下面代码从数据库抽取值,并将数据插入到iTextSharp生成的表格中,下面代码还设置了一些表格的展现方式:
PdfPTable table = new PdfPTable(2);

//actual width of table in points

table.TotalWidth = 216f;

//fix the absolute width of the table

table.LockedWidth = true;


//relative col widths in proportions - 1/3 and 2/3

float[] widths = new float[] { 1f, 2f };

table.SetWidths(widths);

table.HorizontalAlignment = 0;

//leave a gap before and after the table

table.SpacingBefore = 20f;

table.SpacingAfter = 30f;


PdfPCell cell = new PdfPCell(new Phrase("Products"));

cell.Colspan = 2;

cell.Border = 0;

cell.HorizontalAlignment = 1;

table.AddCell(cell);

string connect = "Server=.\\SQLEXPRESS;Database=Northwind;Trusted_Connection=True;";

using (SqlConnection conn = new SqlConnection(connect))

{

  string query = "SELECT ProductID, ProductName FROM Products";

  SqlCommand cmd = new SqlCommand(query, conn);

  try

  {

    conn.Open();

    using (SqlDataReader rdr = cmd.ExecuteReader())

    {

      while (rdr.Read())

      {

        table.AddCell(rdr[0].ToString());

        table.AddCell(rdr[1].ToString());

      }

    }

  }

  catch(Exception ex)

  {

    Response.Write(ex.Message);

  }

  doc.Add(table);

}
这个表格一开始被初始化为两列的表格,然后设置了表格的固定宽度,然后对每一列设置相对宽度为别为整个表格的三分之一和三分之二。如果你想将宽度设置为5分之一和是5分之四,只需要将参数分别改为1f和4f.如果你想设置每列的绝对宽度,只需要将列宽度和表格的总宽度传入,例如:
float[] widths = new float[] { 100f, 116f };
通过设置表格的SpacingBefore和SpacingAfter属性,可以分别设置表格头部离上一个元素的距离以及表格结束离下一个元素的距离.在文档中有几个表格紧挨着时,这个功能尤其有效。如果不设置上述属性,那表格之间的距离就像在word中一个回车的距离一样,那会和针一样细。接下来我们通过设置第一个单元格的边框为0,colspan为列数,居中使其像表格的标题一样。接下来就是我们用编程的方式将从SqlDataReader读取到的数据动态的添加到单元格中最后加入表格:
接下来的代码展示了格式化单元格的一些选项,正如你所见,iTextSharp的作者遵循CSS的命名规则来设置单元格的选项使格式化单元格更加容易(当然,我假设你了解CSS。。。):
PdfPTable table = new PdfPTable(3);

table.AddCell("Cell 1");

PdfPCell cell = new PdfPCell(new Phrase("Cell 2", new Font(Font.HELVETICA, 8f, Font.NORMAL, Color.YELLOW)));

cell.BackgroundColor = new Color(0, 150, 0);

cell.BorderColor = new Color(255,242,0);

cell.Border = Rectangle.BOTTOM_BORDER | Rectangle.TOP_BORDER;

cell.BorderWidthBottom = 3f;

cell.BorderWidthTop = 3f;

cell.PaddingBottom = 10f;

cell.PaddingLeft = 20f;

cell.PaddingTop = 4f;

table.AddCell(cell);

table.AddCell("Cell 3");

doc.Add(table);
上面代码中不难看出,通过设置colspan来让一个单元格在水平上跨多行十分容易。那如果是在垂直上使单元格跨越多行呢?在HTML中,你可以使用Rowspan属性,但是在iTextSharp中并没有Rowspan属性。所以达到这个目的的方法只有嵌套表格。下面代码创建了一个四列的表格,右下的表格横跨三列,竖跨三行。当然,这是表面看起来这样,但实际上是通过在表格左下角的单元格中嵌套一个三行一列的子表格,我们将左下角嵌套子表格的单元格的padding全部设置为0使被嵌入的子表格占据了整个左下单元格:
PdfPTable table = new PdfPTable(4);

table.TotalWidth = 400f;

table.LockedWidth = true;

PdfPCell header = new PdfPCell(new Phrase("Header"));

header.Colspan = 4;

table.AddCell(header);

table.AddCell("Cell 1");

table.AddCell("Cell 2");

table.AddCell("Cell 3");

table.AddCell("Cell 4");

PdfPTable nested = new PdfPTable(1);

nested.AddCell("Nested Row 1");

nested.AddCell("Nested Row 2");

nested.AddCell("Nested Row 3");

PdfPCell nesthousing = new PdfPCell(nested);

nesthousing.Padding = 0f;

table.AddCell(nesthousing);

PdfPCell bottom = new PdfPCell(new Phrase("bottom"));

bottom.Colspan = 3;

table.AddCell(bottom);

doc.Add(table);
最后,在这篇阐述使用表格的文章末尾,我们来看看如何将一个单元格中的文本进行旋转:
PdfPTable table = new PdfPTable(3);

table.TotalWidth = 144f;

table.LockedWidth = true;

table.HorizontalAlignment = 0;

PdfPCell left = new PdfPCell(new Paragraph("Rotated"));

left.Rotation = 90;

table.AddCell(left);

PdfPCell middle = new PdfPCell(new Paragraph("Rotated"));

middle.Rotation = -90;

table.AddCell(middle);

table.AddCell("Not Rotated");

doc.Add(table);
Rotation属性必须设置成90的倍数,否则就会引发错误,middle单元格的Rotation在这里设置成-90和270效果一样,这个度数默认是按逆时针算的:
实际上iTextSharp可以操作表格的功能非常强大,在未来的文章中我会更加详细的阐述。于此同时,大家可以使用Visual Studio的智能感知和对象浏览器充分挖掘iTextSharp的潜力,并看看最终生成的结果如何.
--------------------------------
原文链接:iTextSharp-Introducing-Tables
translated by CareySon


