【译】在Asp.Net中操作PDF – iTextSharp - 使用链接和书签
用户和PDF文档的交互可以通过锚(链接)和书签进行,接着我前面iTextSharp的系列文章,本篇文章主要讲通过iTextSharp创建的PDF中链接和书签的基础知识,你或许想复习一下之前的文章,如果你还没有阅读过之前的文章,那么:
在Asp.Net中操作PDF - iTextSharp - 使用字体
在Asp.Net中操作PDF – iTextSharp -利用块,短语,段落添加文本
在Asp.Net中操作PDF – iTextSharp-列表
链接
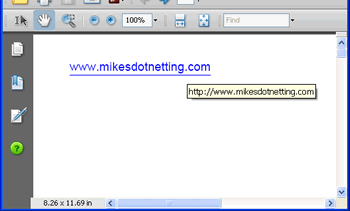
iTextSharp的Anchor对象和HTML中的锚非常相似,它们都允许创建链接到外部文档或是内部文档的链接。但和HTML中的链接不同的是,iTextSharp的链接默认没有任何样式,有鉴于此,我建议对于链接来说,都应该加下划线并且使用蓝色字体来告诉用户这段文字有着链接的功能:
string path = Server.MapPath("PDFs");

Document doc = new Document();
try

{

    PdfWriter.GetInstance(doc, new FileStream(path + "/Anchors.pdf", FileMode.Create));

    doc.Open();

    Font link = FontFactory.GetFont("Arial", 12, Font.UNDERLINE, new Color(0, 0, 255));

    Anchor anchor = new Anchor("www.mikesdotnetting.com", link);

    anchor.Reference = "http://www.mikesdotnetting.com";

    doc.Add(anchor);

}

catch (DocumentException dex)

{

    Response.Write(dex.Message);

}

catch (IOException ioex)

{

    Response.Write(ioex.Message);

}

finally

{

    doc.Close();

}
上面代码创建了一个外部链接,当点击链接后会打开浏览器并导向指定链接.
内部链接在HTML中是通过为<a>标签添加NAME属性来实现的,iTextSharp也是用的这种方法:
Anchor click = new Anchor("Click to go to Target");

click.Reference = "#target";

Paragraph p1 = new Paragraph();

p1.Add(click);

doc.Add(p1);


Paragraph p2 = new Paragraph();

p2.Add(new Chunk("\n\n\n\n\n\n\n\n"));

doc.Add(p2);


Anchor target = new Anchor("This is the Target");

target.Name = "target";

Paragraph p3 = new Paragraph();

p3.Add(target);

doc.Add(p3);
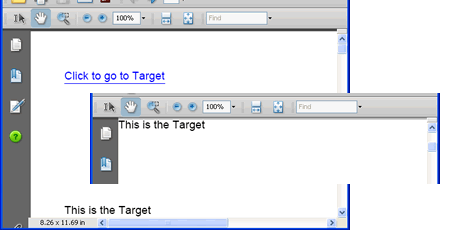
第一个段落包含一个就像HTML中<a>一样的指向”#target”的锚记,第二个段落包含了多个换行符,第三个段落包含了一个锚记,并设置成和第一个段落引用名一样的Name.结果是当你点击”Click to go to target”时,PDF现在无论读到哪了,都会导向这个锚记,现在”This is target”会出现在PDF顶端.
锚记的一个代替方案是使用Chunk类的SetLocalGoto()和 SetLocalDestination()方法:
Paragraph p4 = new Paragraph();

p4.Add(new Chunk("Click "));

p4.Add(new Chunk("here", link).SetLocalGoto("GOTO"));

p4.Add(new Chunk(" to find local goto"));

p4.Add(new Chunk("\n\n\n\n\n\n\n\n\n"));


Paragraph p5 = new Paragraph();

p5.Add(new Chunk("Local Goto Destination").SetLocalDestination("GOTO"));


doc.Add(p4);

doc.Add(p5);
第一个段落使用的字体传达的意思告诉用户这个是一个超链接,Chunk.SetLocalGoto()接受一个String类型的参数,这个String是锚记的名称。接下来又加入了几个换行符。接下来使用了SetLocalDestination()方法设置当前位置的名称,他和之前定义的SetLocalGoto()方法中的指定的位置名称相对应。当生成PDF时,”Here”有下划线并且是蓝色的,点击后会将PDF导向到”Local Goto Destination”处于最顶端。
书签
很多时候你打开一个PDF时,你的PDF浏览程序都会显示一个数状的文档结构,每一个树枝或者叶节点都会链接到一章或者一节,iTextSharp通过Chapter和Section对象提供了生成树状导航的功能.
书签最大的对象是Chapter,每一个Chapter对象都会另起一页,而Section对象必须加在Chapter对象或其他Section对象之中:
Chapter chapter1 = new Chapter(new Paragraph("This is Chapter 1"),1);

Section section1 = chapter1.AddSection(20f, "Section 1.1", 2);

Section section2 = chapter1.AddSection(20f, "Section 1.2", 2);

Section subsection1 = section2.AddSection(20f, "Subsection 1.2.1", 3);

Section subsection2 = section2.AddSection(20f, "Subsection 1.2.2", 3);

Section subsubsection = subsection2.AddSection(20f, "Sub Subsection 1.2.2.1", 4);

Chapter chapter2 = new Chapter(new Paragraph("This is Chapter 2"), 1);

Section section3 = chapter2.AddSection("Section 2.1", 2);

Section subsection3 = section3.AddSection("Subsection 2.1.1", 3);

Section section4 = chapter2.AddSection("Section 2.2", 2);

chapter1.BookmarkTitle = "Changed Title";

chapter1.BookmarkOpen = true;

chapter2.BookmarkOpen = false;

doc.Add(chapter1);

doc.Add(chapter2);
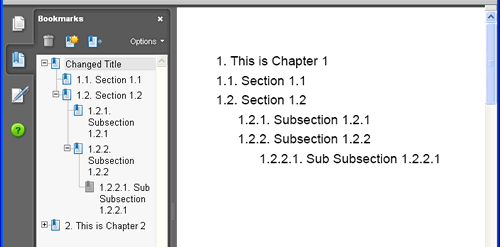
上面的图片清楚解释了之前的代码。代码开始,创建了一个Chapter对象并传入了一个Paragraph对象作为参数,第二个参数表示当前章是第几章。这里设置为1,然后把一个Section对象加入到当前章,为Section的构造函数传入的三个参数分别为,Float类型的参数代表左边的缩进,第二个String参数代表在书签和页面上显示的节点名称,最后一个参数是当前节点的缩进层次.这个例子中,Section 1.1是树的第二层,SubSection1被加入了Section1.1所以SubSection1是树的第三层。弄懂了上面的解释后,剩下的代码看起来就直接多了。
最后的代码(chapter1.BookmarkTitle = "Changed Title";)可以通过设置BookmarkTitle属性将树状导航的名字改了,上面代码将Chapter1的BookmarkOpen设置为True将Chapter2的BookmarkOpen设置为False.最后将所有Chapter加入到Document中.
Chapter和Section对内存的消耗是惊人的,所以对于它们的使用也要十分谨慎,如果你需要创建手册一类的PDF文档时,最好将其安排在你的Web服务器空闲时做。
-----
原文链接:iTextSharp - Links and Bookmarks
translated by CareySon


