
Unity3d-Particle System 5.x系统的学习(四)
Unity3d-Particle System 5.x系统的学习(四)
今天,我们来聊聊unity5.x的粒子系统和unity4.x粒子系统的区别。
我大致看了下,区别还是蛮多的,但是总体的粒子制作思路一样,只不过添加了很多子模块方便我们制作出更加美观的粒子。
下面是总体的粒子系统组件:
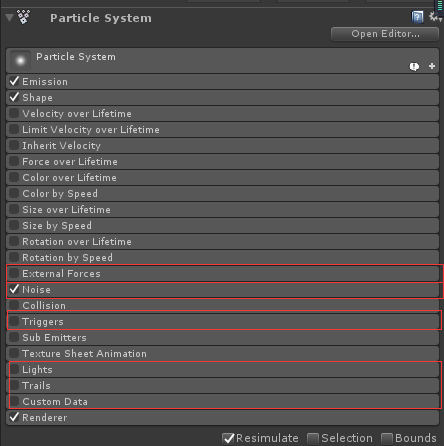
红色边框划出的就是unity5.x新增的子模块。
ok,我们接下来分析每个模块的特征和参数:
External Forces:(风(wind zone)对粒子的影响)
从英文表面意思解析:就是外部的力。(风力就是外部力)
External Forces module
This property modifies the effect of wind zones on particles emitted by the system.

官方对他的解析是:此参数是影响风力对粒子发射的。
我做了个实验,就是在场景中添加Wind Zone组件,看他是否对粒子有影响:
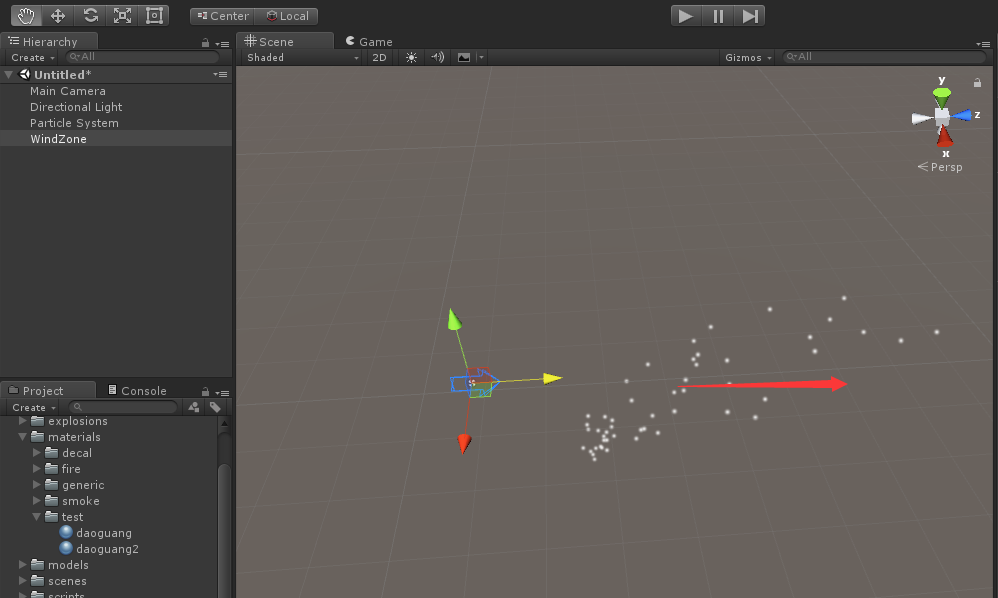
实验证明确实如此,粒子会受到风力的影响,往风力的方向发射。当增加Multiplier的值,会加大风力对粒子影响的力度,那么偏的也就越大。
Noise:(噪声模块)

这个模块是采用噪声的算法来改变粒子的运动轨迹。下面来看看官方对他的特征描述:
Details
Adding noise to your particles is a simple and effective way to create interesting patterns and effects. For example, imagine how embers from a fire move around, or how smoke swirls as it moves. Strong, high frequency noise could be used to simulate the fire embers, while soft, low frequency noise would be better suited to modeling a smoke effect.
For maximum control over the noise, you can enable the Separate Axes option. This allows you to control the strength and remapping on each axis independently.
翻译来的意思就是:
向粒子添加噪声是创建有趣模式和效果的一种简单而有效的方法。例如,想象一下火中的余烬是如何移动的,或者烟雾在移动时是如何旋转的。强、高频噪声可以用来模拟火烬,而软、低频噪声更适合模拟烟雾效果。
说人话就是,噪声可以改变粒子运动轨迹,模拟余烬和烟雾,他们都有个特征就是螺旋上升。
我们来看下增加噪声模块和没有噪声的区别:
1.没有噪声:

2.有噪声
可以看到区别了吧,明显加了噪声的粒子十分暴动,呈现上下螺旋运动。非常符合我们火的余烬这种运动不规则的粒子。
Triggers:(触发器模块)
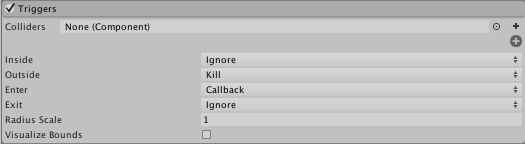
从第一个参数看,是要传入一个触发器。
然后下面是粒子和触发器不同的状态:
1.Inside(粒子在触发器里面)
2.Outside(粒子在触发器外面)
3.Enter(粒子进入触发器)
4.Exit(粒子退出触发器)
那么后面的选项是什么东西:
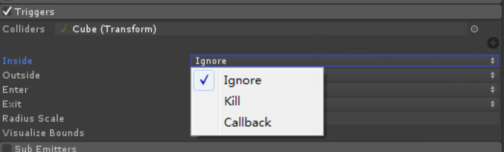
可以看到总共有三种:
1.Ignore:表示粒子不做任何处理。
2.Kill:表示粒子会消亡。
3.Callback:回到函数,我们需要代码添加。
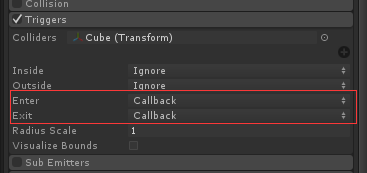
ok,举个例子。比如粒子进入到这个触发器要销毁,那么我们在Enter后面选项选择Kill就行了。
Callback的使用方法:
我们具体来看看Callback怎么实现代码传入:
using System.Collections;
using System.Collections.Generic;
using UnityEngine;

public class ParticleCallbackTest : MonoBehaviour
{
    ParticleSystem ps;//粒子系统,这里和粒子区分开,一个是系统,一个是粒子
    List<ParticleSystem.Particle> enter = new List<ParticleSystem.Particle>();//进入触发器的粒子链表
    List<ParticleSystem.Particle> exit = new List<ParticleSystem.Particle>();//退出触发器的粒子链表
    void Start()
    {
        ps = GetComponent<ParticleSystem>();
    }
    private void OnParticleTrigger()
    {
        int numEnter = ps.GetTriggerParticles(ParticleSystemTriggerEventType.Enter, enter);
        int numExit = ps.GetTriggerParticles(ParticleSystemTriggerEventType.Exit, exit);
        //进入触发器的粒子改变颜色为红色
        for (int i = 0; i < numEnter; i++)
        {
            ParticleSystem.Particle p = enter[i];
            p.startColor = new Color32(255, 0, 0, 255);
            enter[i] = p;
        }
        //退出触发器的粒子改变颜色为绿色
        for (int i = 0; i < numExit; i++)
        {
            ParticleSystem.Particle p = exit[i];
            p.startColor = new Color32(0, 255, 0, 255);
            exit[i] = p;
        }
        //需要重新为粒子系统设置改版后的粒子
        ps.SetTriggerParticles(ParticleSystemTriggerEventType.Enter, enter);
        ps.SetTriggerParticles(ParticleSystemTriggerEventType.Exit, exit);
    }
}

可以看到粒子进入触发器变红,退出变绿,这都是代码控制的。
注意,在Enter和Exit必须选择Callback,否则是没有效果的哦。

 浙公网安备 33010602011771号