

单节点部署K8S
K使用Kubeadm搭建单节点
安装前注意进行快照,方便多次安装练习。
虚拟机基础信息
系统:Ubuntu 20.04.6 LTS
内核:5.15.0-67-generic
硬盘:60G
内存:12G
CPU:4C4U
本次安装参考博客地址:
安装前准备
1.关闭防火墙
systemctl status ufw
systemctl stop ufw
systemctl disable ufw
2.关闭swap分区
配置/etc/fstab文件,注释/swapfile一行即可
cat /etc/fstab
.......
#/swapfile                                 none            swap    sw              0       0
.......
重启后使用free -h,swap为0b即可
free -h
              total        used        free      shared  buff/cache   available
Mem:           11Gi       660Mi       8.4Gi       7.0Mi       2.6Gi        10Gi
Swap:            0B          0B          0B
一、安装配置docker
最新版K8S不在原生集成docker-cni,所以最新K8S一般使用podman或container作为底层容器引擎。但由于docker与K8s搭配相关学习教程最多,出于学习考虑,这里配置K8S依旧使用K8S+docker的组合。
docker安装过程与原博客全程一致,这里仅进行简单搬运工作
1、删除docker相关组件
sudo apt-get autoremove docker docker-ce docker-engine docker.io containerd runc
2、更新apt-get
sudo apt-get update
3、安装 apt 依赖包,用于通过HTTPS来获取仓库
sudo apt-get install apt-transport-https ca-certificates curl gnupg-agent software-properties-common
4、添加 Docker 的官方 GPG 密钥
curl -fsSL https://download.docker.com/linux/ubuntu/gpg | sudo apt-key add -
5、设置稳定版仓库(添加到/etc/apt/sources.list中)
sudo add-apt-repository "deb [arch=amd64] https://download.docker.com/linux/ubuntu $(lsb_release -cs) stable"
6、更新apt-get
sudo apt-get update
7、查询docker-ce版本
sudo apt-cache policy docker-ce
8、安装指定版本
sudo apt-get install docker-ce=5:20.10.7~3-0~ubuntu-focal
9、验证安装是否成功
docker --version
更新 cgroupdriver 为systemd
tee /etc/docker/daemon.json <<-'EOF'
{
  "registry-mirrors": ["https://uy35zvn6.mirror.aliyuncs.com"],
  "exec-opts": ["native.cgroupdriver=systemd"]
}
EOF

systemctl daemon-reload
systemctl restart docker
二、kubernetes安装
1.iptables配置
cat <<EOF | sudo tee /etc/modules-load.d/k8s.conf
br_netfilter
EOF

cat <<EOF | sudo tee /etc/sysctl.d/k8s.conf
net.bridge.bridge-nf-call-ip6tables = 1
net.bridge.bridge-nf-call-iptables = 1
EOF

sudo sysctl --system
bridge-nf
bridge-nf 使得 netfilter 可以对 Linux 网桥上的 IPv4/ARP/IPv6 包过滤。比如,设置net.bridge.bridge-nf-call-iptables=1后,二层的网桥在转发包时也会被 iptables的 FORWARD 规则所过滤。常用的选项包括:
net.bridge.bridge-nf-call-arptables:是否在 arptables 的 FORWARD 中过滤网桥的 ARP 包
net.bridge.bridge-nf-call-ip6tables:是否在 ip6tables 链中过滤 IPv6 包
net.bridge.bridge-nf-call-iptables:是否在 iptables 链中过滤 IPv4 包
net.bridge.bridge-nf-filter-vlan-tagged:是否在 iptables/arptables 中过滤打了 vlan 标签的包。
防火墙是保护服务器和基础设施安全的重要工具。在 Linux 生态系统中,iptables 是使 用很广泛的防火墙工具之一,它基于内核的包过滤框架(packet filtering framework) netfilter。
Linux 上最常用的防火墙工具是 iptables。iptables 与协议栈内有包过滤功能的 hook 交 互来完成工作。这些内核 hook 构成了 netfilter 框架。
每个进入网络系统的包(接收或发送)在经过协议栈时都会触发这些 hook,程序 可以通过注册 hook 函数的方式在一些关键路径上处理网络流量。iptables 相关的内核模 块在这些 hook 点注册了处理函数,因此可以通过配置 iptables 规则来使得网络流量符合 防火墙规则。
2.apt包更新
sudo apt-get update
sudo apt-get install -y apt-transport-https ca-certificates curl
3.添加GPG 密钥
sudo curl -s https://mirrors.aliyun.com/kubernetes/apt/doc/apt-key.gpg | sudo apt-key add -
4.添加 Kubernetes apt 存储库,安装kubelet, kubeadm and kubectl
sudo tee /etc/apt/sources.list.d/kubernetes.list <<-'EOF'
deb https://mirrors.aliyun.com/kubernetes/apt kubernetes-xenial main
EOF


sudo apt-get update
sudo apt-get install -y kubelet=1.22.2-00 kubeadm=1.22.2-00 kubectl=1.22.2-00
sudo apt-mark hold kubelet kubeadm kubectl           //代表这三个组件不更新

指定版本 apt-get install -y kubelet=1.22.2-00 kubeadm=1.22.2-00 kubectl=1.22.2-00
最新版本 apt-get install -y kubelet kubeadm kubectl
备注:
apt-mark用法
apt-mark [选项] {auto|manual} 软件包1 [软件包2 …]
apt-mark常用命令
auto – 标记指定软件包为自动安装
manual – 标记指定软件包为手动安装
minimize-manual – Mark all dependencies of meta packages as automatically installed.
hold – 标记指定软件包为保留(held back),阻止软件自动更新
unhold – 取消指定软件包的保留(held back)标记,解除阻止自动更新
showauto – 列出所有自动安装的软件包
showmanual – 列出所有手动安装的软件包
showhold – 列出设为保留的软件包
5.使用kubeadm init初始化集群
kubeadm init \
 --image-repository registry.aliyuncs.com/google_containers \
 --kubernetes-version v1.22.2 \
 --pod-network-cidr=172.10.0.0/16 \
 --apiserver-advertise-address=192.168.80.10

apiserver-advertise-address: 表示你的kubernetes集群的控制平面节点的 API server 的广播地址
pod-network-cidr:表示你的kubernetes集群的pod网段

输出信息类似如下,该信息对后续添加子节点作用很大:
root@K8s-master:/etc/docker# kubeadm init \
>  --image-repository registry.aliyuncs.com/google_containers \
>  --kubernetes-version v1.22.2 \
>  --pod-network-cidr=172.10.0.0/16 \
>  --apiserver-advertise-address=192.168.80.10
[init] Using Kubernetes version: v1.22.2
[preflight] Running pre-flight checks
[preflight] Pulling images required for setting up a Kubernetes cluster
[preflight] This might take a minute or two, depending on the speed of your internet connection
[preflight] You can also perform this action in beforehand using 'kubeadm config images pull'
[certs] Using certificateDir folder "/etc/kubernetes/pki"
[certs] Generating "ca" certificate and key
[certs] Generating "apiserver" certificate and key
[certs] apiserver serving cert is signed for DNS names [k8s-master kubernetes kubernetes.default kubernetes.default.svc kubernetes.default.svc.cluster.local] and IPs [10.96.0.1 192.168.80.10]
[certs] Generating "apiserver-kubelet-client" certificate and key
[certs] Generating "front-proxy-ca" certificate and key
[certs] Generating "front-proxy-client" certificate and key
[certs] Generating "etcd/ca" certificate and key
[certs] Generating "etcd/server" certificate and key
[certs] etcd/server serving cert is signed for DNS names [k8s-master localhost] and IPs [192.168.80.10 127.0.0.1 ::1]
[certs] Generating "etcd/peer" certificate and key
[certs] etcd/peer serving cert is signed for DNS names [k8s-master localhost] and IPs [192.168.80.10 127.0.0.1 ::1]
[certs] Generating "etcd/healthcheck-client" certificate and key
[certs] Generating "apiserver-etcd-client" certificate and key
[certs] Generating "sa" key and public key
[kubeconfig] Using kubeconfig folder "/etc/kubernetes"
[kubeconfig] Writing "admin.conf" kubeconfig file
[kubeconfig] Writing "kubelet.conf" kubeconfig file
[kubeconfig] Writing "controller-manager.conf" kubeconfig file
[kubeconfig] Writing "scheduler.conf" kubeconfig file
[kubelet-start] Writing kubelet environment file with flags to file "/var/lib/kubelet/kubeadm-flags.env"
[kubelet-start] Writing kubelet configuration to file "/var/lib/kubelet/config.yaml"
[kubelet-start] Starting the kubelet
[control-plane] Using manifest folder "/etc/kubernetes/manifests"
[control-plane] Creating static Pod manifest for "kube-apiserver"
[control-plane] Creating static Pod manifest for "kube-controller-manager"
[control-plane] Creating static Pod manifest for "kube-scheduler"
[etcd] Creating static Pod manifest for local etcd in "/etc/kubernetes/manifests"
[wait-control-plane] Waiting for the kubelet to boot up the control plane as static Pods from directory "/etc/kubernetes/manifests". This can take up to 4m0s
[apiclient] All control plane components are healthy after 19.505395 seconds
[upload-config] Storing the configuration used in ConfigMap "kubeadm-config" in the "kube-system" Namespace
[kubelet] Creating a ConfigMap "kubelet-config-1.22" in namespace kube-system with the configuration for the kubelets in the cluster
[upload-certs] Skipping phase. Please see --upload-certs
[mark-control-plane] Marking the node k8s-master as control-plane by adding the labels: [node-role.kubernetes.io/master(deprecated) node-role.kubernetes.io/control-plane node.kubernetes.io/exclude-from-external-load-balancers]
[mark-control-plane] Marking the node k8s-master as control-plane by adding the taints [node-role.kubernetes.io/master:NoSchedule]
[bootstrap-token] Using token: 5d6yqs.3jmn7ih0ha4wj8pt
[bootstrap-token] Configuring bootstrap tokens, cluster-info ConfigMap, RBAC Roles
[bootstrap-token] configured RBAC rules to allow Node Bootstrap tokens to get nodes
[bootstrap-token] configured RBAC rules to allow Node Bootstrap tokens to post CSRs in order for nodes to get long term certificate credentials
[bootstrap-token] configured RBAC rules to allow the csrapprover controller automatically approve CSRs from a Node Bootstrap Token
[bootstrap-token] configured RBAC rules to allow certificate rotation for all node client certificates in the cluster
[bootstrap-token] Creating the "cluster-info" ConfigMap in the "kube-public" namespace
[kubelet-finalize] Updating "/etc/kubernetes/kubelet.conf" to point to a rotatable kubelet client certificate and key
[addons] Applied essential addon: CoreDNS
[addons] Applied essential addon: kube-proxy

Your Kubernetes control-plane has initialized successfully!

To start using your cluster, you need to run the following as a regular user:

  mkdir -p $HOME/.kube
  sudo cp -i /etc/kubernetes/admin.conf $HOME/.kube/config
  sudo chown $(id -u):$(id -g) $HOME/.kube/config

Alternatively, if you are the root user, you can run:

  export KUBECONFIG=/etc/kubernetes/admin.conf

You should now deploy a pod network to the cluster.
Run "kubectl apply -f [podnetwork].yaml" with one of the options listed at:
  https://kubernetes.io/docs/concepts/cluster-administration/addons/

Then you can join any number of worker nodes by running the following on each as root:

kubeadm join 192.168.80.10:6443 --token 5d6yqs.3jmn7ih0ha4wj8pt \
	--discovery-token-ca-cert-hash sha256:4e9cae977b6d2b33b1b5a787e116ad396b064c0ce4038d126d870c5d92a4cf22
6.复制kubeconfig文件
//输出信息提示内容
 mkdir -p $HOME/.kube
 sudo cp -i /etc/kubernetes/admin.conf $HOME/.kube/config
 sudo chown $(id -u):$(id -g) $HOME/.kube/config
7.去除master节点的污点
K8S中默认master节点是不能调度任何pod的,因此需要提前将主节点污点去除
kubectl taint nodes --all node-role.kubernetes.io/master-
8.安装calico cni 插件
kubectl create -f https://projectcalico.docs.tigera.io/archive/v3.23/manifests/tigera-operator.yaml
kubectl create -f https://projectcalico.docs.tigera.io/archive/v3.23/manifests/custom-resources.yaml
如果初始化 --pod-network-cidr非192.168.0.0/16需要先
wget https://projectcalico.docs.tigera.io/archive/v3.23/manifests/custom-resources.yaml

修改custom-resources.yaml  cidr为自己配置的--pod-network-cidr
---
# This section includes base Calico installation configuration.
# For more information, see: https://projectcalico.docs.tigera.io/v3.23/reference/installation/api#operator.tigera.io/v1.Installation
apiVersion: operator.tigera.io/v1
kind: Installation
metadata:
  name: default
spec:
  # Configures Calico networking.
  calicoNetwork:
    # Note: The ipPools section cannot be modified post-install.
    ipPools:
    - blockSize: 26
      cidr: 172.10.0.0/16
      encapsulation: VXLANCrossSubnet
      natOutgoing: Enabled
      nodeSelector: all()

---

使用kubectl apply -f custom-resources.yaml  应用修改
9.验证集群状态
root@K8s-master:/etc/docker# kubectl get cs
Warning: v1 ComponentStatus is deprecated in v1.19+
NAME                 STATUS      MESSAGE                                                                                       ERROR
scheduler            Unhealthy   Get "http://127.0.0.1:10251/healthz": dial tcp 127.0.0.1:10251: connect: connection refused
controller-manager   Healthy     ok
etcd-0               Healthy     {"health":"true","reason":""}
scheduler 出现该报错是因为是/etc/kubernetes/manifests/下的kube-controller-manager.yaml和kube-scheduler.yaml设置的默认端口是0导致的,解决方式是注释掉对应的port即可,操作如下:
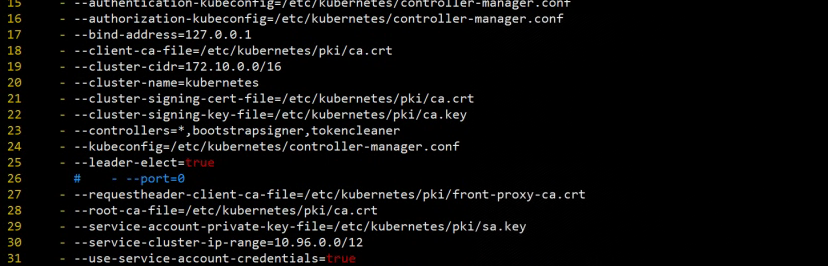
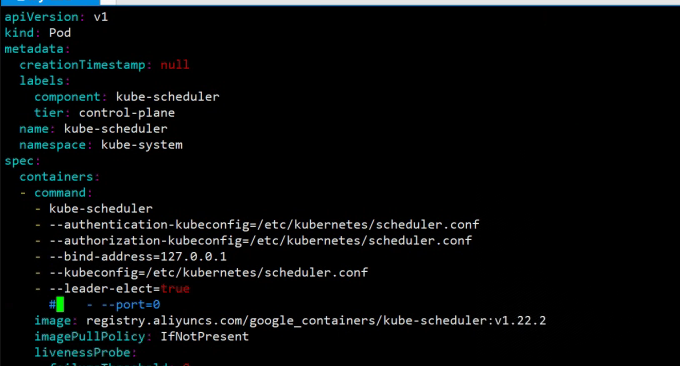
然后在master节点上重启kubelet,systemctl restart kubelet.service,然后重新查看就正常了
port=0是做什么用的? 关闭非安全端口

root@K8s-master:/etc/kubernetes/manifests# kubectl get cs
Warning: v1 ComponentStatus is deprecated in v1.19+
NAME                 STATUS    MESSAGE                         ERROR
scheduler            Healthy   ok
controller-manager   Healthy   ok
etcd-0               Healthy   {"health":"true","reason":""}
10.Kubernetes还原
集群初始化如果遇到问题,可以使用下面的命令进行清理
# 1.卸载服务

kubeadm reset

# 2.删除相关容器  #删除镜像

docker rm $(docker  ps -aq) -f
docker rmi $(docker images -aq) -f

# 3.删除上一个集群相关的文件

rm -rf  /var/lib/etcd
rm -rf  /etc/kubernetes
rm -rf $HOME/.kube
rm -rf /var/etcd
rm -rf /var/lib/kubelet/
rm -rf /run/kubernetes/
rm -rf ~/.kube/

# 4.清除网络

systemctl stop kubelet
systemctl stop docker
rm -rf /var/lib/cni/*
rm -rf /var/lib/kubelet/*
rm -rf /etc/cni/*
ifconfig cni0 down
ifconfig flannel.1 down
ifconfig docker0 down
ip link delete cni0
ip link delete flannel.1
systemctl start docker

# 5.卸载工具

apt autoremove -y kubelet kubectl kubeadm kubernetes-cni
删除/var/lib/kubelet/目录,删除前先卸载

for m in $(sudo tac /proc/mounts | sudo awk '{print $2}'|sudo grep /var/lib/kubelet);do

sudo umount $m||true

done

# 6.删除所有的数据卷

sudo docker volume rm $(sudo docker volume ls -q)

# 7.再次显示所有的容器和数据卷,确保没有残留

sudo docker ps -a

sudo docker volume ls
Kubernetes测试
部署 Deployment
kubectl apply -f https://k8s.io/examples/application/deployment.yaml
apiVersion: apps/v1
kind: Deployment
metadata:
name: nginx-deployment
spec:
selector:
matchLabels:
app: nginx
replicas: 2 # tells deployment to run 2 pods matching the template
template:
metadata:
labels:
app: nginx
spec:
containers:
- name: nginx
image: nginx:1.14.2
ports:
- containerPort: 80
部署 NodePort
kubectl apply -f - <<EOF
apiVersion: v1
kind: Service
metadata:
  name: my-nginx
spec:
  selector:
    app: nginx
  type: NodePort
  ports:
    - protocol: TCP
      port: 80
EOF
验证
root@K8s-master:/etc/kubernetes/manifests# kubectl get pods
NAME                                READY   STATUS    RESTARTS   AGE
nginx-deployment-66b6c48dd5-vb9gt   1/1     Running   0          47s
nginx-deployment-66b6c48dd5-wflwh   1/1     Running   0          47s

root@K8s-master:/etc/kubernetes/manifests# kubectl get services
NAME         TYPE        CLUSTER-IP     EXTERNAL-IP   PORT(S)        AGE
kubernetes   ClusterIP   10.96.0.1      <none>        443/TCP        62m
my-nginx     NodePort    10.111.23.11   <none>        80:32235/TCP   107s

root@K8s-master:/etc/kubernetes/manifests# curl 192.168.80.10:32235     //本机ip+本地暴露端口
<!DOCTYPE html>
<html>
<head>
<title>Welcome to nginx!</title>
<style>
    body {
        width: 35em;
        margin: 0 auto;
        font-family: Tahoma, Verdana, Arial, sans-serif;
    }
</style>
</head>
<body>
<h1>Welcome to nginx!</h1>
<p>If you see this page, the nginx web server is successfully installed and
working. Further configuration is required.</p>

<p>For online documentation and support please refer to
<a href="http://nginx.org/">nginx.org</a>.<br/>
Commercial support is available at
<a href="http://nginx.com/">nginx.com</a>.</p>

<p><em>Thank you for using nginx.</em></p>
</body>
</html>
三、K8Snode节点加入
3.1在node节点中重复执行主节点2.5之前的所有步骤
在node节点中重复执行主节点2.5之前的所有步骤
在2.5步骤直接加入主节点集群即可
kubeadm join 192.168.80.10:6443 --token 5d6yqs.3jmn7ih0ha4wj8pt \
	--discovery-token-ca-cert-hash sha256:4e9cae977b6d2b33b1b5a787e116ad396b064c0ce4038d126d870c5d92a4cf22

如果加入一直卡在[preflight] Running pre-flight checks  代表token过期需要在主节点重新生成下

root@K8s-master:~# kubeadm token create
o1f5gq.1ev981a3s71iepvn

在从节点替换下执行命令即可

kubeadm join 192.168.80.10:6443 --token o1f5gq.1ev981a3s71iepvn \
	--discovery-token-ca-cert-hash sha256:4e9cae977b6d2b33b1b5a787e116ad396b064c0ce4038d126d870c5d92a4cf22

该命令每24小时会重置,超出24小时可以通过在主节点执行
kubeadm token create --print-join-command  获取最新的加入集群的hash
3.2 从节点复制主节点config文件
如果从节点没有config文件执行kubectl 命令会报错
The connection to the server localhost:8080 was refused - did you specify the right host or port?
所以需要从主节点复制对应文件
 mkdir -p $HOME/.kube
 sudo scp root@192.168.80.10:/etc/kubernetes/admin.conf $HOME/.kube/config
 sudo chown $(id -u):$(id -g) $HOME/.kube/config
3.3 网络插件
通过3.1加入到集群中后,不需要额外自行安装calico插件,该插件通过DaemonSet控制,自动在新加入节点创建部署。
可以看到新加入到集群的25节点正在初始化calico容器


【推荐】国内首个AI IDE,深度理解中文开发场景,立即下载体验Trae
【推荐】编程新体验,更懂你的AI,立即体验豆包MarsCode编程助手
【推荐】抖音旗下AI助手豆包,你的智能百科全书,全免费不限次数
【推荐】轻量又高性能的 SSH 工具 IShell:AI 加持,快人一步
· 无需6万激活码!GitHub神秘组织3小时极速复刻Manus,手把手教你使用OpenManus搭建本
· C#/.NET/.NET Core优秀项目和框架2025年2月简报
· 什么是nginx的强缓存和协商缓存
· 一文读懂知识蒸馏
· Manus爆火,是硬核还是营销?