K8s-小型综合实验(k8s+keeplived+nginx+iptables)
K8S小型综合实验(k8s+keeplived+nginx+iptables)
实验目的
1.Kubernetes 区域可采用 Kubeadm 方式进行安装。
2.要求在 Kubernetes 环境中,通过yaml文件的方式,创建2个Nginx Pod分别放置在两个不同的节点上,Pod使用hostPath类型的存储卷挂载,节点本地目录共享使用 /data,2个Pod副本测试页面二者要不同,以做区分,测试页面可自己定义。
3.编写service对应的yaml文件,使用NodePort类型和TCP 30000端口将Nginx服务发布出去。
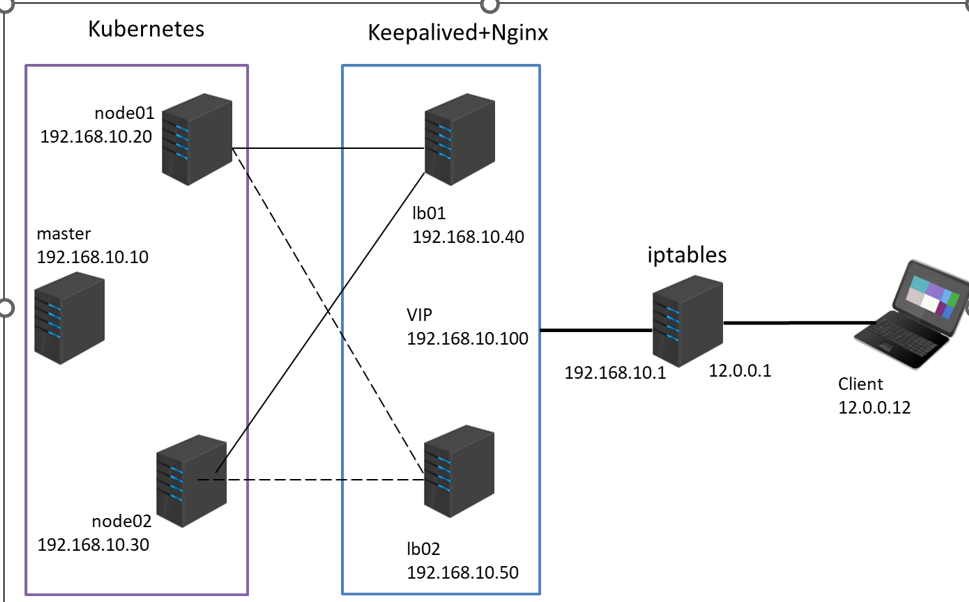
4.负载均衡区域配置Keepalived+Nginx,实现负载均衡高可用,通过VIP 192.168.10.100和自定义的端口号即可访问K8S发布出来的服务。
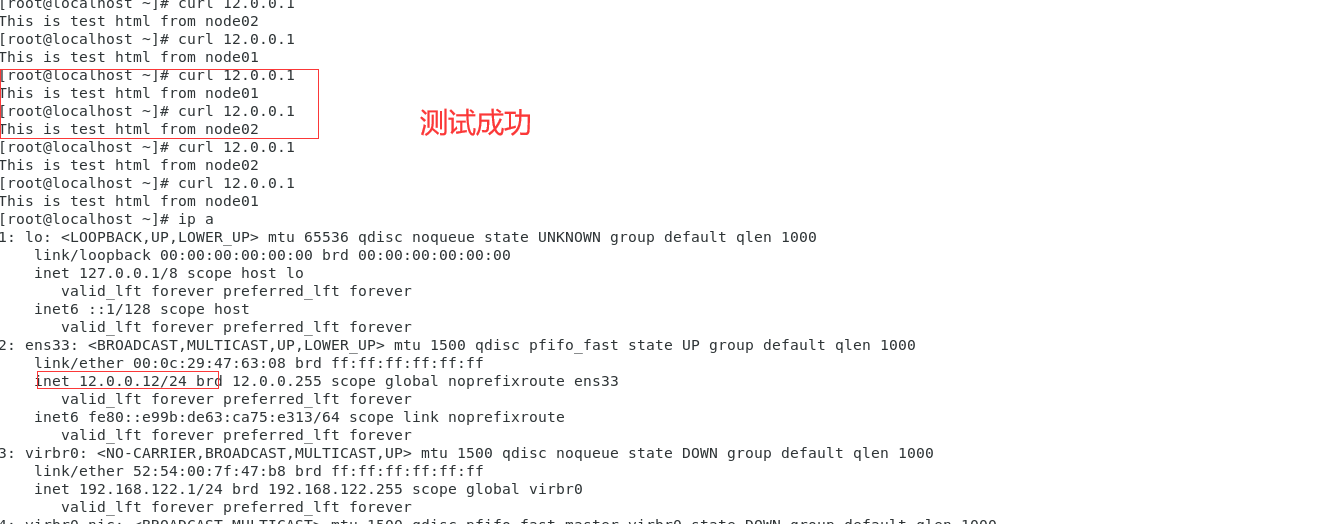
5.iptables防火墙服务器,设置双网卡,并且配置SNAT和DNAT转换实现外网客户端可以通过12.0.0.1访问内网的Web服务。
IP规划
| 服务节点 | IP地址 | 服务组件 |
|---|---|---|
| master | 192.168.10.10 | |
| node01 | 192.168.10.20 | |
| node02 | 192.168.10.30 | |
| LB01 | 192.168.10.40 vip:192.168.10.100 |
|
| LB02 | 192.168.10.50 vip:192.168.10.100 |
|
| IPTABLES | 192.168.10.1 12.0.0.1 |
|
| Client | 12.0.0.12 |
实验步骤:
1.安装K8s集群(master01、node01、node02)
1.1 环境准备
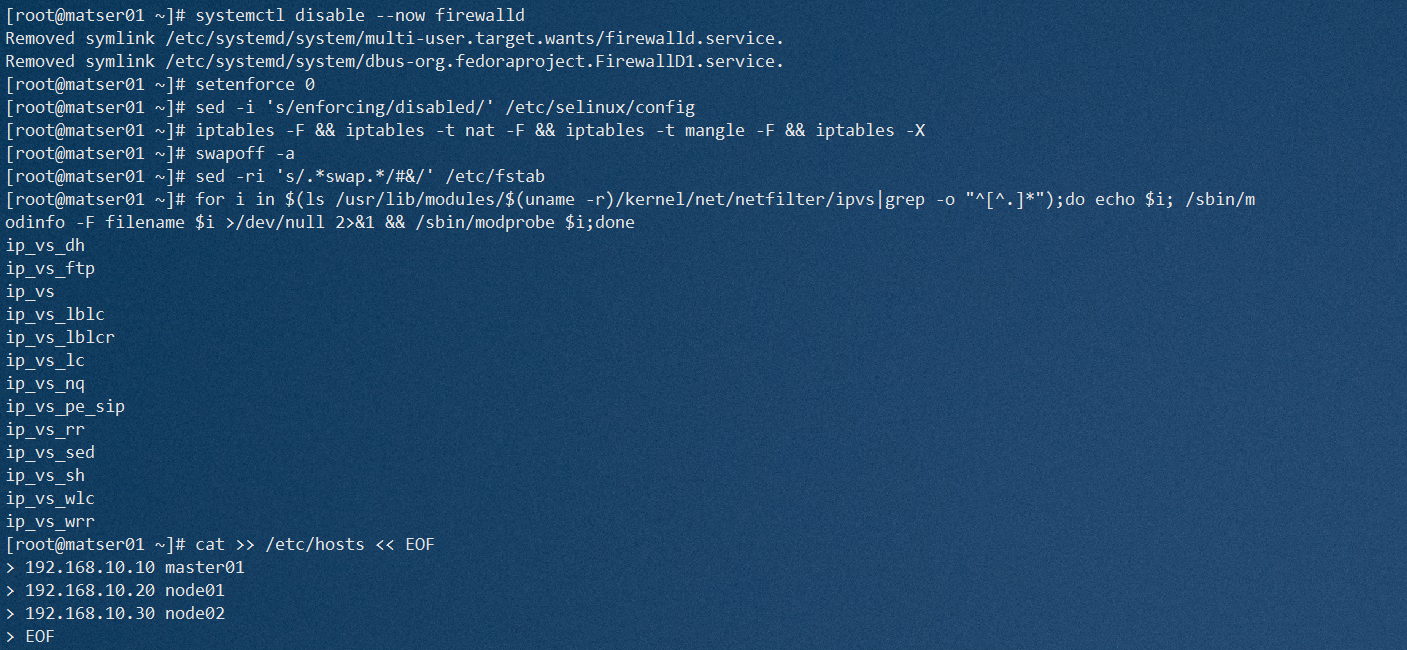
//所有节点,关闭防火墙规则,关闭selinux,关闭swap交换
systemctl disable --now firewalld
setenforce 0
sed -i 's/enforcing/disabled/' /etc/selinux/config
iptables -F && iptables -t nat -F && iptables -t mangle -F && iptables -X
swapoff -a						#交换分区必须要关闭
sed -ri 's/.*swap.*/#&/' /etc/fstab		#永久关闭swap分区,&符号在sed命令中代表上次匹配的结果
#加载 ip_vs 模块
for i in $(ls /usr/lib/modules/$(uname -r)/kernel/net/netfilter/ipvs|grep -o "^[^.]*");do echo $i; /sbin/modinfo -F filename $i >/dev/null 2>&1 && /sbin/modprobe $i;done

//所有节点修改hosts文件
cat >> /etc/hosts << EOF
192.168.10.10 master01
192.168.10.20 node01
192.168.10.30 node02
EOF

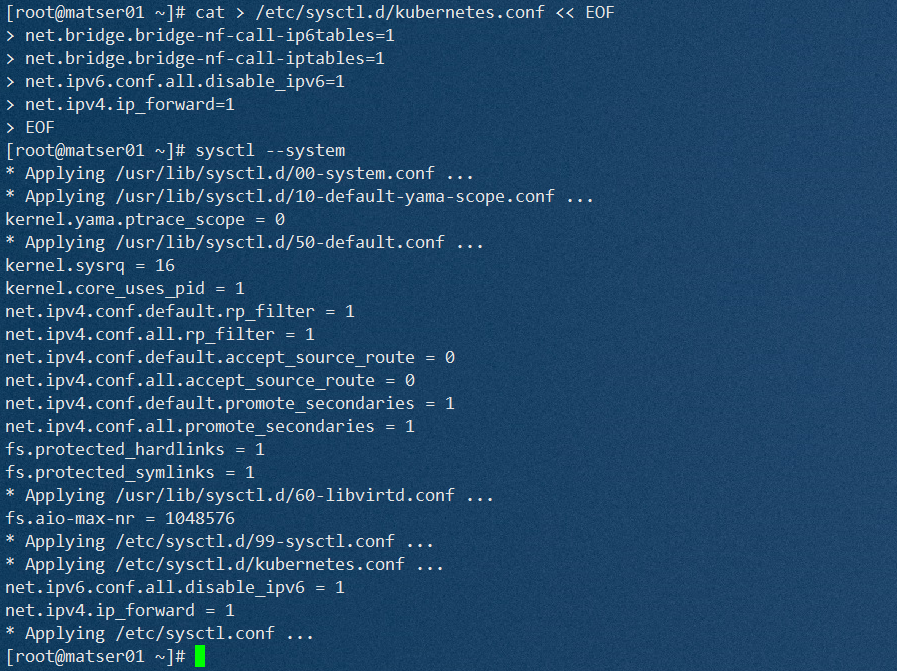
//调整内核参数
cat > /etc/sysctl.d/kubernetes.conf << EOF
#开启网桥模式,可将网桥的流量传递给iptables链
net.bridge.bridge-nf-call-ip6tables=1
net.bridge.bridge-nf-call-iptables=1
#关闭ipv6协议
net.ipv6.conf.all.disable_ipv6=1
net.ipv4.ip_forward=1
EOF

//生效参数
sysctl --system
操作截图(以MASTER01为例)
1.2 安装docker
//所有节点安装docker
yum install -y yum-utils device-mapper-persistent-data lvm2
yum-config-manager --add-repo https://mirrors.aliyun.com/docker-ce/linux/centos/docker-ce.repo
yum install -y docker-ce docker-ce-cli containerd.io

mkdir /etc/docker
cat > /etc/docker/daemon.json <<EOF
{
  "registry-mirrors": ["https://6ijb8ubo.mirror.aliyuncs.com"],
  "exec-opts": ["native.cgroupdriver=systemd"],
  "log-driver": "json-file",
  "log-opts": {
    "max-size": "100m"
  }
}
EOF
#使用Systemd管理的Cgroup来进行资源控制与管理,因为相对Cgroupfs而言,Systemd限制CPU、内存等资源更加简单和成熟稳定。
#日志使用json-file格式类型存储,大小为100M,保存在/var/log/containers目录下,方便ELK等日志系统收集和管理日志。

systemctl daemon-reload
systemctl restart docker.service
systemctl enable docker.service

docker info | grep "Cgroup Driver"
Cgroup Driver: systemd
操作截图(以MASTER01为例)


1.3 所有节点安装kubeadm,kubelet和kubectl
//定义kubernetes源
cat > /etc/yum.repos.d/kubernetes.repo << EOF
[kubernetes]
name=Kubernetes
baseurl=https://mirrors.aliyun.com/kubernetes/yum/repos/kubernetes-el7-x86_64
enabled=1
gpgcheck=0
repo_gpgcheck=0
gpgkey=https://mirrors.aliyun.com/kubernetes/yum/doc/yum-key.gpg https://mirrors.aliyun.com/kubernetes/yum/doc/rpm-package-key.gpg
EOF

yum install -y kubelet-1.20.11 kubeadm-1.20.11 kubectl-1.20.11

//开机自启kubelet
systemctl enable kubelet.service
#K8S通过kubeadm安装出来以后都是以Pod方式存在,即底层是以容器方式运行,所以kubelet必须设置开机自启
操作截图(以master01为例)


1.4 部署K8S集群
//查看初始化需要的镜像
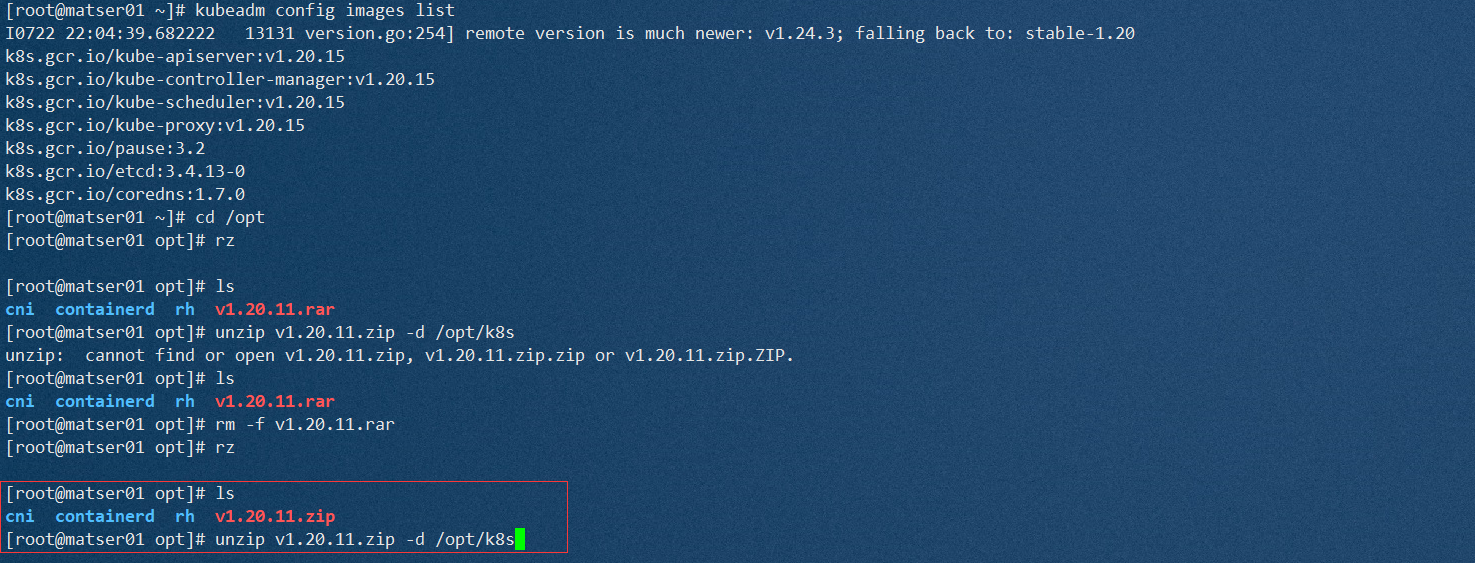
kubeadm config images list

//在 master 节点上传 v1.20.11.zip 压缩包至 /opt 目录
unzip v1.20.11.zip -d /opt/k8s
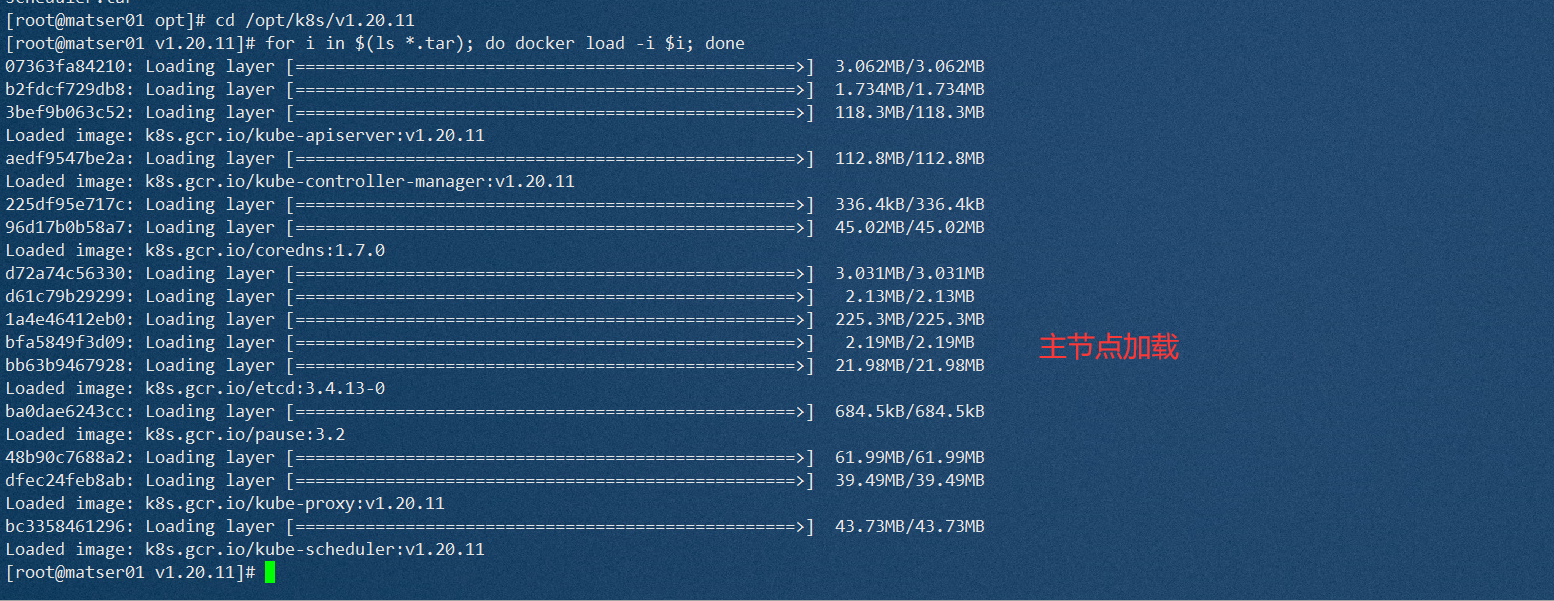
cd /opt/k8s/v1.20.11
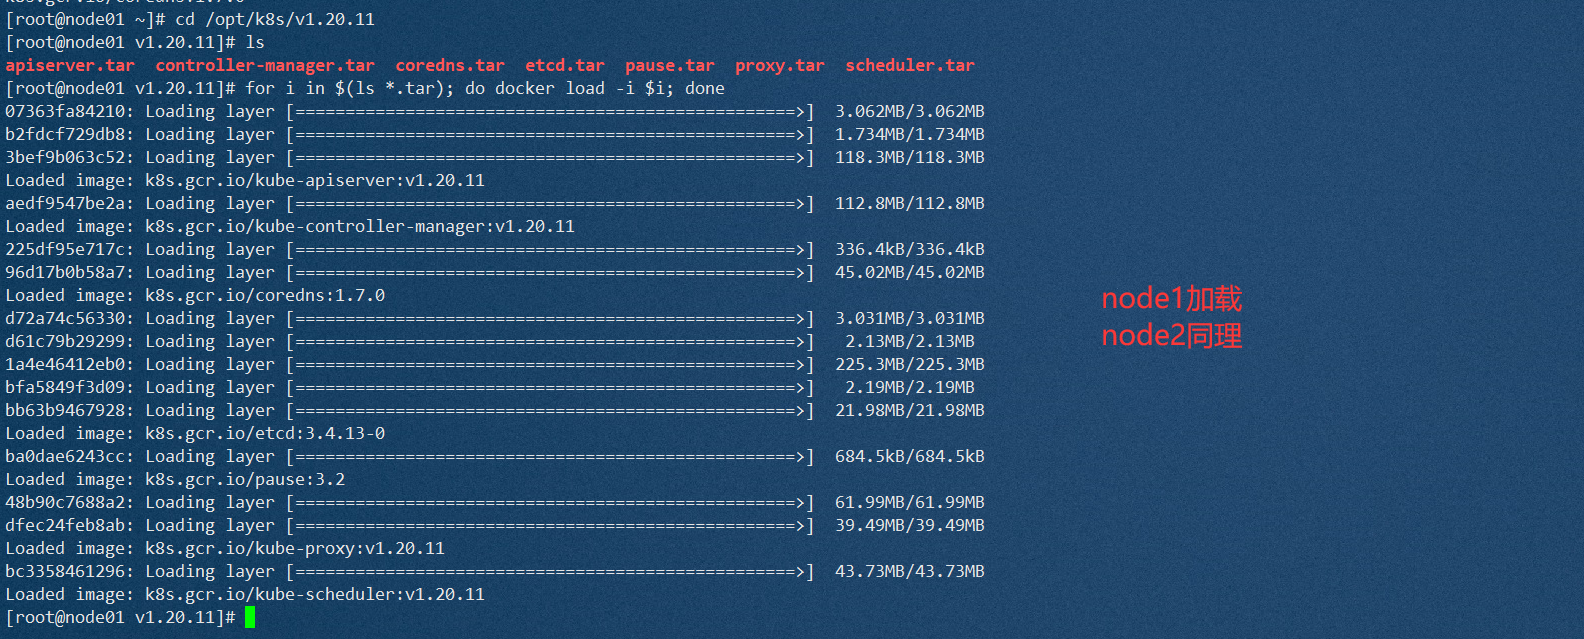
for i in $(ls *.tar); do docker load -i $i; done

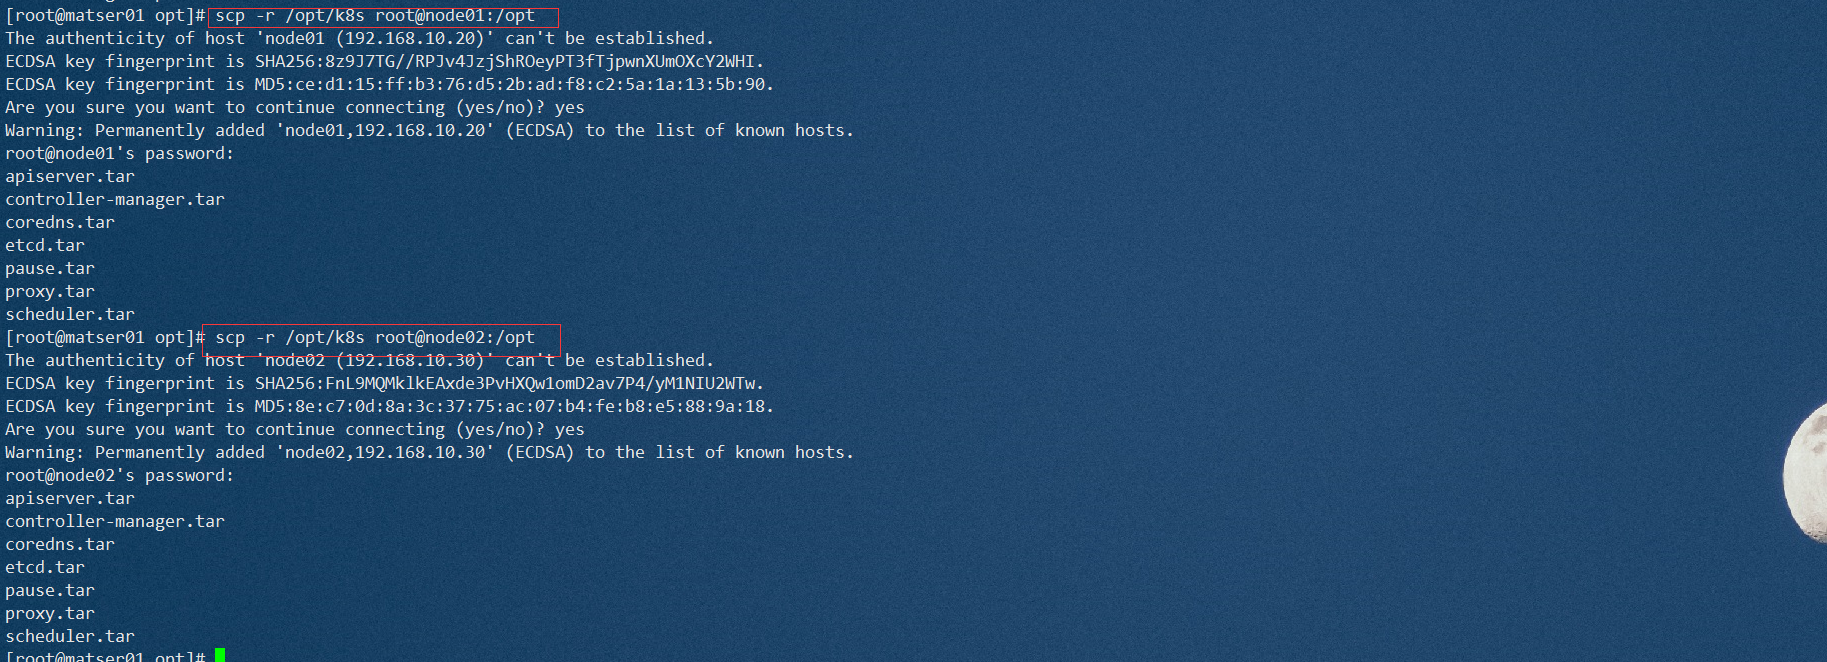
//复制镜像和脚本到 node 节点,并在 node 节点上执行脚本加载镜像文件
scp -r /opt/k8s root@node01:/opt
scp -r /opt/k8s root@node02:/opt

//master初始化kubeadm
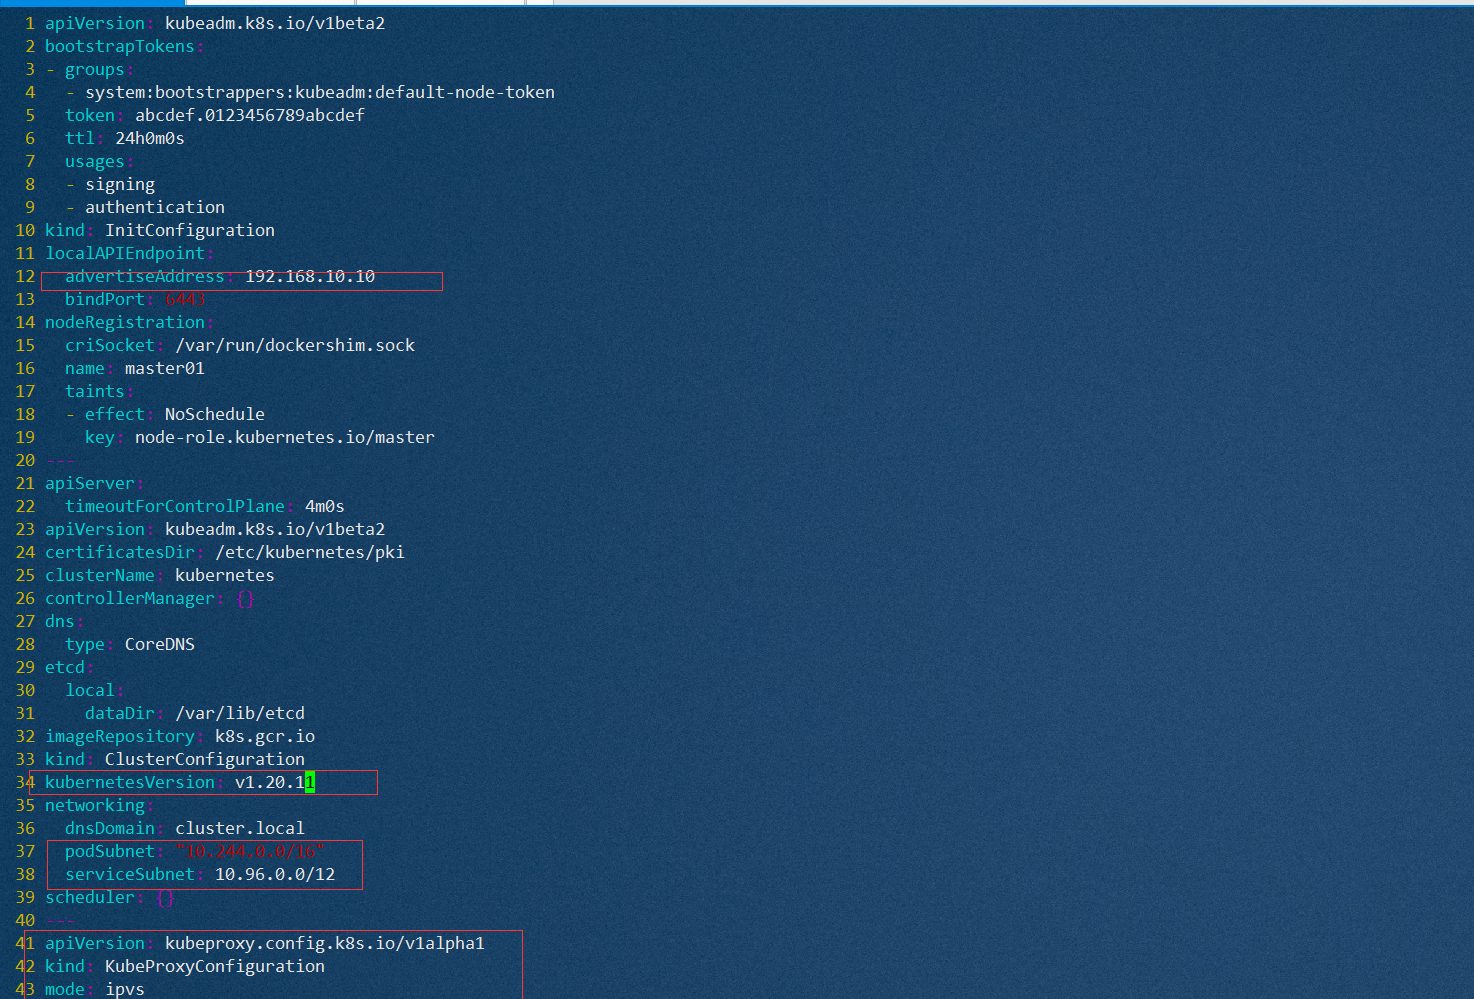
kubeadm config print init-defaults > /opt/kubeadm-config.yaml

cd /opt/
vim kubeadm-config.yaml
......
11 localAPIEndpoint:
12   advertiseAddress: 192.168.10.10		#指定master节点的IP地址
13   bindPort: 6443
......
34 kubernetesVersion: v1.20.11				#指定kubernetes版本号
35 networking:
36   dnsDomain: cluster.local
37   podSubnet: "10.244.0.0/16"				#指定pod网段,10.244.0.0/16用于匹配flannel默认网段
38   serviceSubnet: 10.96.0.0/16			#指定service网段
39 scheduler: {}
#末尾再添加以下内容
---
apiVersion: kubeproxy.config.k8s.io/v1alpha1
kind: KubeProxyConfiguration
mode: ipvs									#把默认的kube-proxy调度方式改为ipvs模式

kubeadm init --config=kubeadm-config.yaml --upload-certs | tee kubeadm-init.log
#--experimental-upload-certs 参数可以在后续执行加入节点时自动分发证书文件,K8S V1.16版本开始替换为 --upload-certs
#tee kubeadm-init.log 用以输出日志

提示:
......
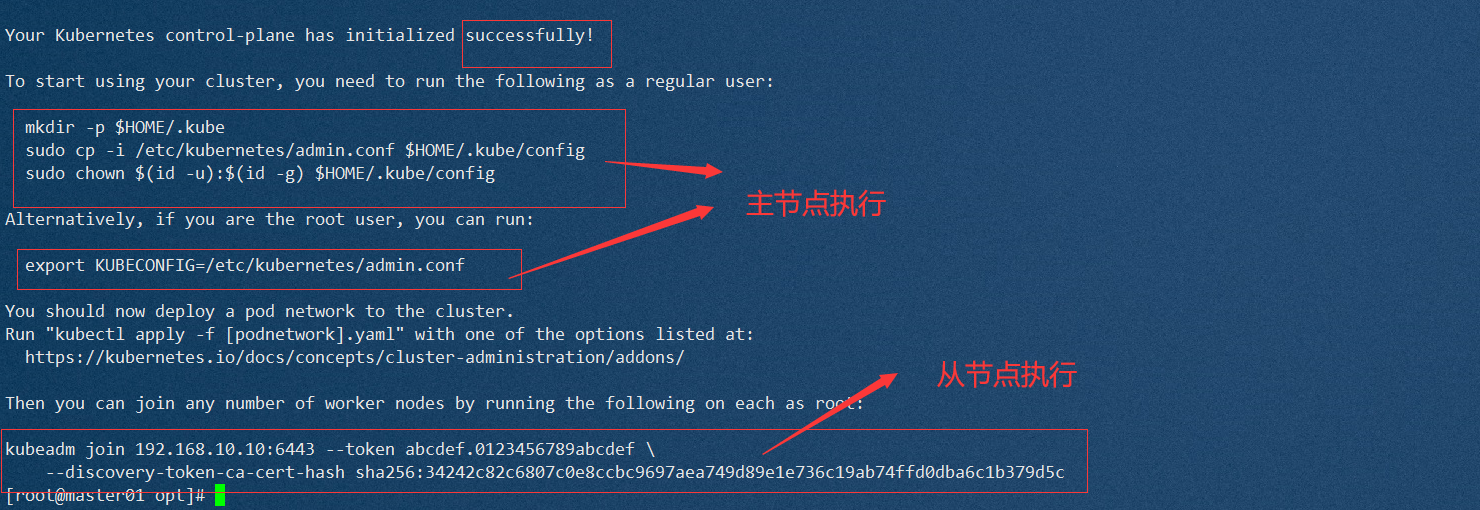
Your Kubernetes control-plane has initialized successfully!

To start using your cluster, you need to run the following as a regular user:

  mkdir -p $HOME/.kube
  sudo cp -i /etc/kubernetes/admin.conf $HOME/.kube/config
  sudo chown $(id -u):$(id -g) $HOME/.kube/config

Alternatively, if you are the root user, you can run:

  export KUBECONFIG=/etc/kubernetes/admin.conf

You should now deploy a pod network to the cluster.
Run "kubectl apply -f [podnetwork].yaml" with one of the options listed at:
  https://kubernetes.io/docs/concepts/cluster-administration/addons/

Then you can join any number of worker nodes by running the following on each as root:

kubeadm join 192.168.10.10:6443 --token abcdef.0123456789abcdef \
    --discovery-token-ca-cert-hash sha256:34242c82c6807c0e8ccbc9697aea749d89e1e736c19ab74ffd0dba6c1b379d5c


//主节点执行
  mkdir -p $HOME/.kube
  sudo cp -i /etc/kubernetes/admin.conf $HOME/.kube/config
  sudo chown $(id -u):$(id -g) $HOME/.kube/config

//从节点执行
kubeadm join 192.168.10.10:6443 --token abcdef.0123456789abcdef \
    --discovery-token-ca-cert-hash sha256:34242c82c6807c0e8ccbc9697aea749d89e1e736c19ab74ffd0dba6c1b379d5c

//查看节点和服务状态
kubectl get nodes
NAME       STATUS     ROLES                  AGE     VERSION
master01   NotReady   control-plane,master   2m39s   v1.20.11
node01     NotReady   <none>                 46s     v1.20.11
node02     NotReady   <none>                 50s     v1.20.11
kubectl get cs
Warning: v1 ComponentStatus is deprecated in v1.19+
NAME                 STATUS      MESSAGE                                                                                       ERROR
controller-manager   Unhealthy   Get "http://127.0.0.1:10252/healthz": dial tcp 127.0.0.1:10252: connect: connection refused
scheduler            Unhealthy   Get "http://127.0.0.1:10251/healthz": dial tcp 127.0.0.1:10251: connect: connection refused
etcd-0               Healthy     {"health":"true"}

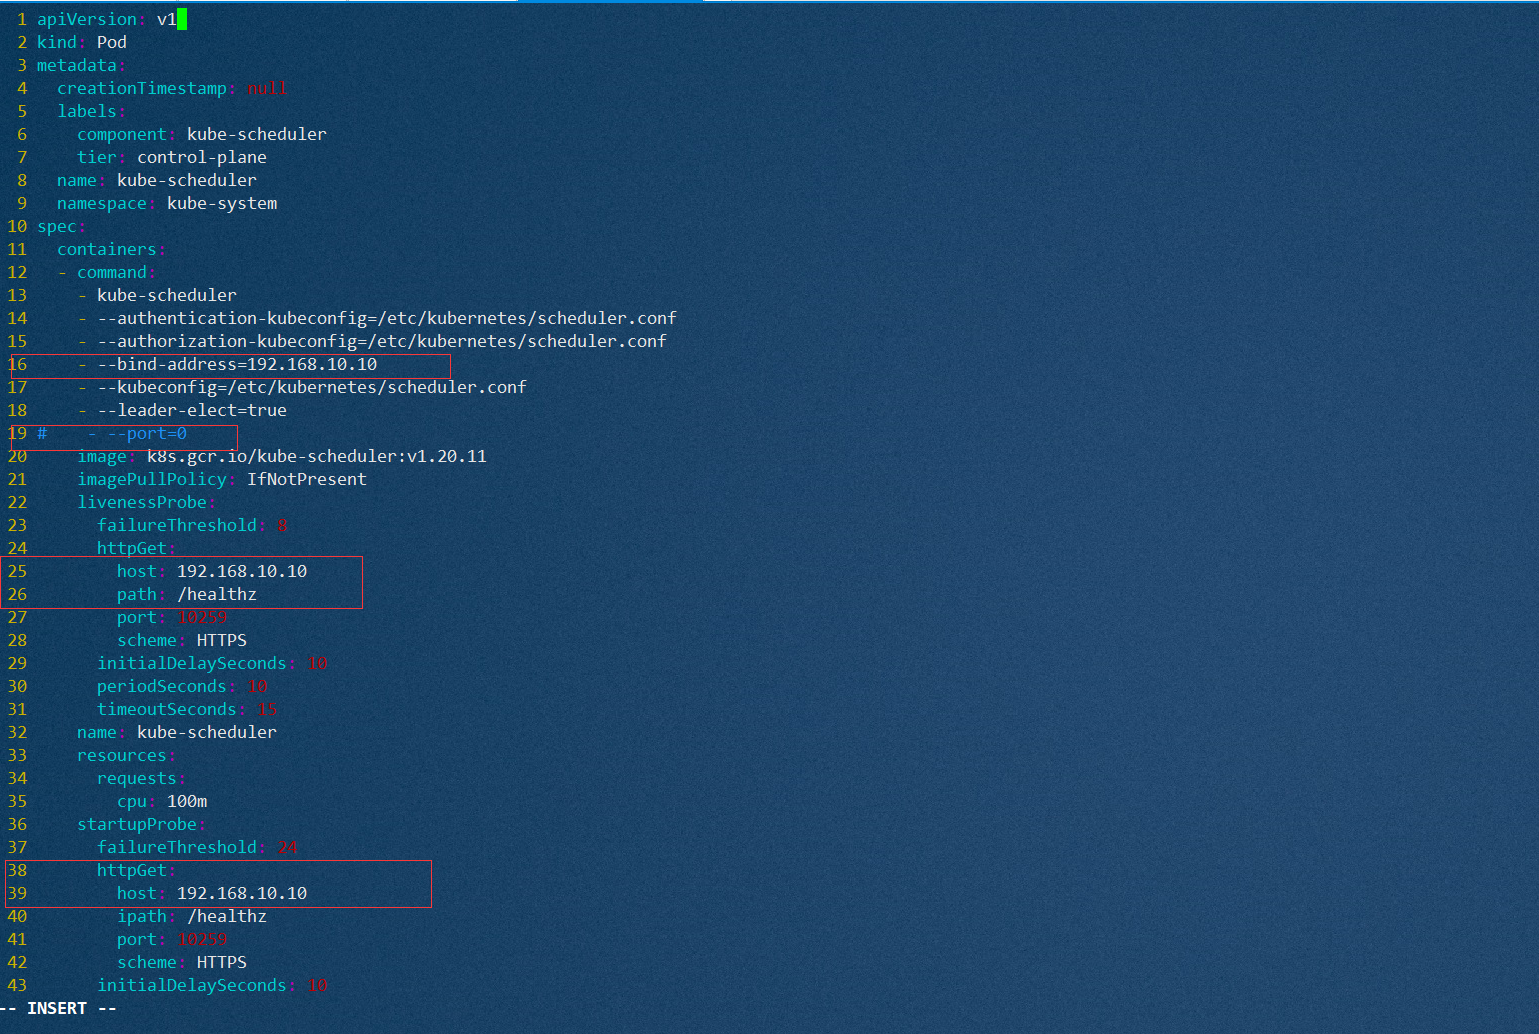
//修改kube-scheduler配置文件
vim /etc/kubernetes/manifests/kube-scheduler.yaml
 10 spec:
 11   containers:
 12   - command:
 13     - kube-scheduler
 14     - --authentication-kubeconfig=/etc/kubernetes/scheduler.conf
 15     - --authorization-kubeconfig=/etc/kubernetes/scheduler.conf
 16     - --bind-address=192.168.10.10         #修改为masterip
 17     - --kubeconfig=/etc/kubernetes/scheduler.conf
 18     - --leader-elect=true
 19 #    - --port=0                            #注释
............
 22     livenessProbe:
 23       failureThreshold: 8
 24       httpGet:
 25         host: 192.168.10.10       #修改为masterip
 26         path: /healthz
 27         port: 10259
............
 36     startupProbe:
 37       failureThreshold: 24
 38       httpGet:
 39         host: 192.168.10.10          #修改为masterip
 40         ipath: /healthz
 41         port: 10259

//修改controller-manager配置文件
 vim /etc/kubernetes/manifests/kube-controller-manager.yaml
 11   containers:
 12   - command:
 13     - kube-controller-manager
 14     - --allocate-node-cidrs=true
 15     - --authentication-kubeconfig=/etc/kubernetes/controller-manager.conf
 16     - --authorization-kubeconfig=/etc/kubernetes/controller-manager.conf
 17     - --bind-address=192.168.10.10            #修改为masterip
 18     - --client-ca-file=/etc/kubernetes/pki/ca.crt
 19     - --cluster-cidr=10.244.0.0/16
 20     - --cluster-name=kubernetes
 21     - --cluster-signing-cert-file=/etc/kubernetes/pki/ca.crt
 22     - --cluster-signing-key-file=/etc/kubernetes/pki/ca.key
 23     - --controllers=*,bootstrapsigner,tokencleaner
 24     - --kubeconfig=/etc/kubernetes/controller-manager.conf
 25     - --leader-elect=true
 26 #    - --port=0                             # 注释
 ........................
 34     livenessProbe:
 35       failureThreshold: 8
 36       httpGet:
 37         host: 192.168.10.10                   #修改为masterip
 38         path: /healthz
 39         port: 10257
................................
 48     startupProbe:
 49       failureThreshold: 24
 50       httpGet:
 51         host: 192.168.10.10                   #修改为masterip
 52         path: /healthz
 53         port: 10257


//查看 kubeadm-init 日志
less kubeadm-init.log

//kubernetes配置文件目录
ls /etc/kubernetes/

//存放ca等证书和密码的目录
ls /etc/kubernetes/pki
操作截图






1.5 添加网络组件
//所有节点部署网络插件flannel
//所有节点上传flannel镜像 flannel.tar 到 /opt 目录,master节点上传 kube-flannel.yml 文件
cd /opt
docker load < flannel.tar

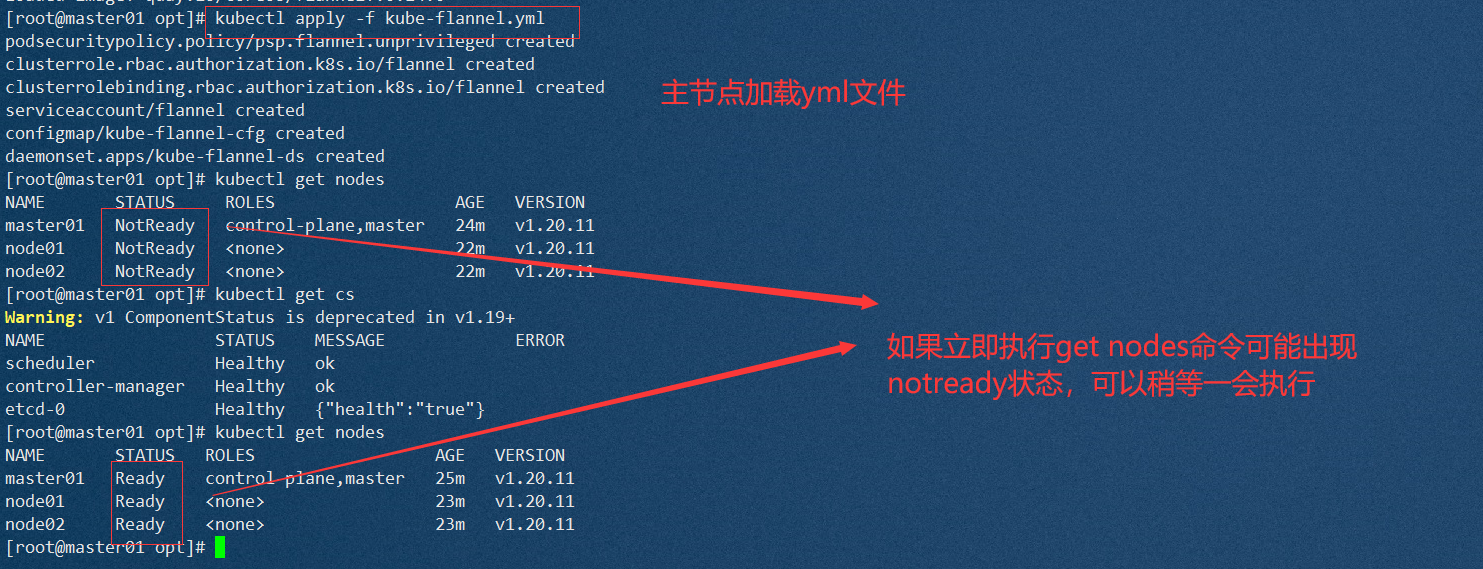
//在 master 节点创建 flannel 资源
kubectl apply -f kube-flannel.yml

//在master节点查看节点状态
kubectl get nodes

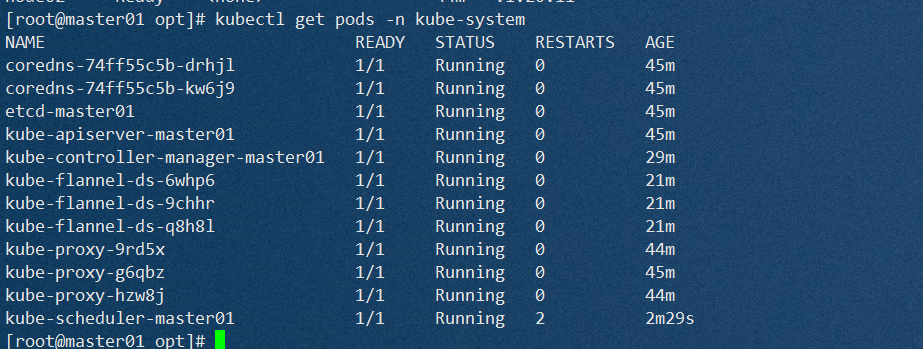
[root@master01 opt]# kubectl get pods -n kube-system
NAME                               READY   STATUS    RESTARTS   AGE
coredns-74ff55c5b-drhjl            1/1     Running   0          44m
coredns-74ff55c5b-kw6j9            1/1     Running   0          44m
etcd-master01                      1/1     Running   0          44m
kube-apiserver-master01            1/1     Running   0          44m
kube-controller-manager-master01   1/1     Running   0          28m
kube-flannel-ds-6whp6              1/1     Running   0          20m
kube-flannel-ds-9chhr              1/1     Running   0          20m
kube-flannel-ds-q8h8l              1/1     Running   0          20m
kube-proxy-9rd5x                   1/1     Running   0          43m
kube-proxy-g6qbz                   1/1     Running   0          44m
kube-proxy-hzw8j                   1/1     Running   0          43m
kube-scheduler-master01            1/1     Running   2          96s
操作截图


2.部署nginx服务,配置service
2.1创建本地网页目录
mkdir /data
cd /data
echo "This is test html from node01/node02" > index.html
ls
index.html
操作截图

2.2 编写yaml文件,配置nginx与service (master)
mkdir demo1.yml
---------------
apiVersion: v1
kind: Pod
metadata:
  creationTimestamp: null
  labels:
    app: nginx
  name: nginx-node01
spec:
  nodeName: node01
  containers:
  - image: nginx:1.15
    name: nginx
    ports:
    - containerPort: 80
    volumeMounts:
    - name: html-dir
      mountPath: /usr/share/nginx/html/
  volumes:
  - name: html-dir
    hostPath:
      path: /data
---
apiVersion: v1
kind: Pod
metadata:
  creationTimestamp: null
  labels:
    app: nginx
  name: nginx-node02
spec:
  nodeName: node02
  containers:
  - image: nginx:1.15
    name: nginx
    ports:
    - containerPort: 80
    volumeMounts:
    - name: html-dir
      mountPath: /usr/share/nginx/html/
  volumes:
  - name: html-dir
    hostPath:
      path: /data
---
apiVersion: v1
kind: Service
metadata:
  labels:
    app: nginx
  name: nginx
spec:
  type: NodePort                  #service选择NodePort可以使用宿主机IP访问服务
  ports:
  - port: 30000
    protocol: TCP
    targetPort: 80
    nodePort: 30003               #使用宿主机30003端口访问服务
  selector:
    app: nginx

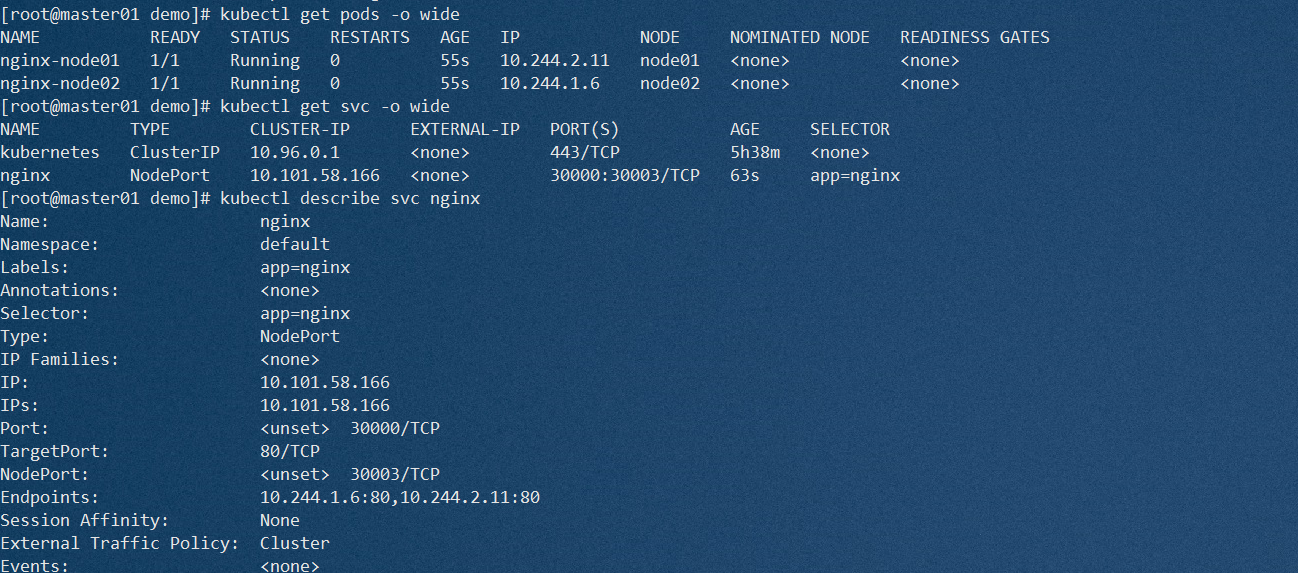
 kubectl apply -f demo1.yml
操作截图



3.配置nginx与keeplived实现高可用
###lb01/lb02步骤一致,除个别ip和配置需修改
###机器初始化
systemctl disable --now firewalld.service
Removed symlink /etc/systemd/system/multi-user.target.wants/firewalld.service.
Removed symlink /etc/systemd/system/dbus-org.fedoraproject.FirewallD1.service.
setenforce 0


###nginx yum源配置
cat > /etc/yum.repos.d/nginx.repo << 'EOF'
[nginx]
name=nginx repo
baseurl=http://nginx.org/packages/centos/7/$basearch/
gpgcheck=0
EOF

yum install nginx -y

###nginx配置文件修改,配置负载均衡
vim /etc/nginx/nginx.conf
events {
    worker_connections  1024;
}

#添加
stream {
    log_format  main  '$remote_addr $upstream_addr - [$time_local] $status $upstream_bytes_sent';

	access_log  /var/log/nginx/k8s-access.log  main;

    upstream k8s-apiserver {
        server 192.168.10.20:30003;
        server 192.168.10.30:30003;
    }
    server {
        listen 30003;
        proxy_pass k8s-apiserver;
    }
}

http {
......

###启动nginx服务,监听6443端口
nginx -t
systemctl start nginx
systemctl enable nginx
netstat -natp | grep nginx

###安装并配置keeplived
yum install keepalived -y

vim /etc/keepalived/keepalived.conf
! Configuration File for keepalived

global_defs {
   # 接收邮件地址(不变)
   notification_email {
     acassen@firewall.loc
     failover@firewall.loc
     sysadmin@firewall.loc
   }
   # 邮件发送地址
   notification_email_from Alexandre.Cassen@firewall.loc
   smtp_server 127.0.0.1					##修改为127.0.0.1
   smtp_connect_timeout 30
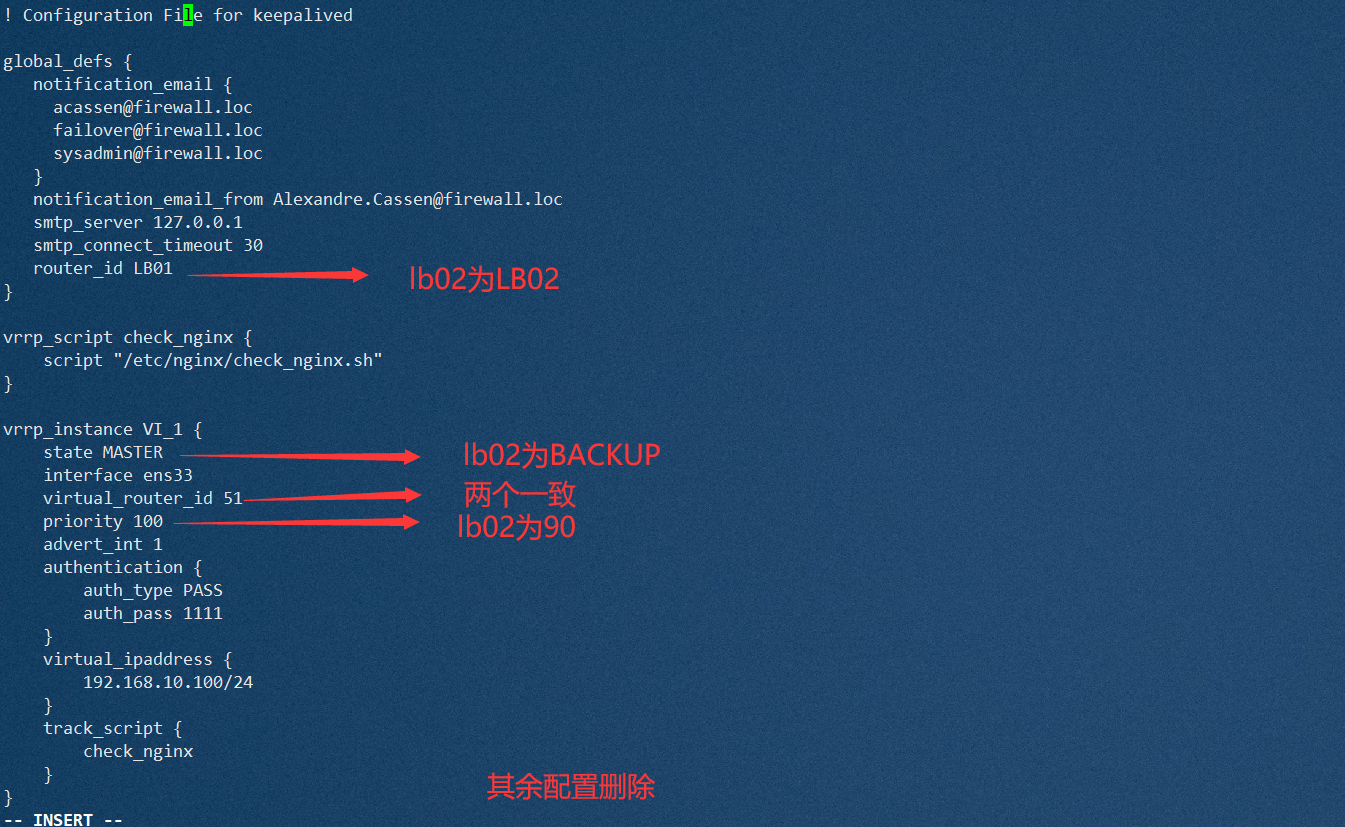
   router_id LB01	#lb01节点的为 LB01,lb02节点的为 LB02
}
#添加一个周期性执行的脚本
vrrp_script check_nginx {
    script "/etc/nginx/check_nginx.sh"	#指定检查nginx存活的脚本路径
}

vrrp_instance VI_1 {
    state MASTER			#lb01节点的为 MASTER,lb02节点的为 BACKUP
    interface ens33			#指定网卡名称 ens33
    virtual_router_id 51	#指定vrid,两个节点要一致
    priority 100			#lb01节点的为 100,lb02节点的为 90
    advert_int 1
    authentication {
        auth_type PASS
        auth_pass 1111
    }
    virtual_ipaddress {
        192.168.10.100/24	#指定 VIP
    }
    track_script {
        check_nginx			#指定vrrp_script配置的脚本
    }
}
其余配置删除

### 配置nginx检查脚本
vim /etc/nginx/check_nginx.sh
#!/bin/bash
#egrep -cv "grep|$$" 			#用于过滤掉包含grep 或者 $$ 表示的当前Shell进程ID
count=$(ps -ef | grep nginx | egrep -cv "grep|$$")

if [ "$count" -eq 0 ];then
    systemctl stop keepalived
fi


chmod +x /etc/nginx/check_nginx.sh

###启动keeplived(nginx服务必须先启动)
systemctl start keepalived
systemctl enable keepalived
ip a				#查看VIP是否生成
操作截图(以lb01为例)




4.配置iptables
\\关闭防火墙
systemctl stop firewalld.service
setenforce 0


\\开启路由转发功能
echo "net.ipv4.ip_forward = 1" >> /etc/sysctl.conf
sysctl -p
net.ipv4.ip_forward = 1

iptables -t nat -F           #清除原有规则


iptables -t nat -A PREROUTING -i ens37 -d 12.0.0.1 -p tcp --dport 80 -j DNAT --to 192.168.10.100:30003
iptables -t nat -I POSTROUTING -s 12.0.0.0/24 -o ens33 -j SNAT --to-source 192.168.10.1

iptables -nL -t nat
操作截图


