学习Go语言WEB开发类--gin
1、Restful风格编程
REST(英文:Representational State Transfer,简称REST)描述了一个架构样式的网络系统,比如 web 应用程序。它首次出现在 2000 年 Roy Fielding 的博士论文中,Roy Fielding是 HTTP 规范的主要编写者之一。在目前主流的三种Web服务交互方案中,REST相比于SOAP(Simple Object Access protocol,简单对象访问协议)以及XML-RPC更加简单明了,无论是对URL的处理还是对Payload的编码,REST都倾向于用更加简单轻量的方法设计和实现。值得注意的是REST并没有一个明确的标准,而更像是一种设计的风格。
Restful就是一个资源定位、资源操作的风格。不是标准也不是协议,只是一种风格。基于这个风格设计的软件可以更简洁,更有层次,更易于实现缓存等机制。
资源: 互联网所有的事物都可以被抽象为资源
资源操作: 分为POST、DELETE、PUT、GET四种方法,使用不同方法对资源进行操作(增、删、改、查)
1.1、传统风格与RestFul风格对比
1.1.1、传统方式操作资源
通过不同的参数来实现不同的效果!方法单一!
http://127.0.0.1/item/queryItem.action?id=1 (查询,GET)
http://127.0.0.1/item/saveItem.action (新增,POST)
http://127.0.0.1/item/updateItem.action (更新,POST)
http://127.0.0.1/item/deleteItem.action?id=1 (删除,GET或POST)
1.1.2、RestFul方式操作资源
可以通过不同的请求方式来实现不同的效果!请求地址一样,但是功能可以不同!
http://127.0.0.1/item/1 (查询,GET)
http://127.0.0.1/item (新增,POST)
http://127.0.0.1/item (更新,PUT)
http://127.0.0.1/item/1 (删除,DELETE)
2、http标准库
http标准库了http客户端和服务器的实现,注意了,客户端实现可以发出http请求,并解析响应。服务器可以实现http server功能。市面上的所有golang web框架都是基于http标准库实现的。
2.1、http标准库客户端功能
2.1.1、发出GET请求
package main

import (
	"fmt"
	"io/ioutil"
	"log"
	"net/http"
	"net/url"
	"time"
)

func testGet() {
	// https://www.juhe.cn/box/index/id/73
	url := "http://apis.juhe.cn/simpleWeather/query?key=087d7d10f700d20e27bb753cd806e40b&city=北京"
	r, err := http.Get(url)
	if err != nil {
		log.Fatal(err)
	}
	defer r.Body.Close()
	b, _ := ioutil.ReadAll(r.Body)
	fmt.Printf("b: %v\n", string(b))
}
运行结果
{
	"reason":"查询成功!",
	"result":{
		"city":"北京",
		"realtime":{
			"temperature":"3",
			"humidity":"94",
			"info":"阴",
			"wid":"02",
			"direct":"东北风",
			"power":"2级",
			"aqi":"117"
		},
		"future":[
			{
				"date":"2021-12-09",
				"temperature":"-1\/7℃",
				"weather":"多云转晴",
				"wid":{
					"day":"01",
					"night":"00"
				},
				"direct":"北风"
			},
			{
				"date":"2021-12-10",
				"temperature":"-1\/8℃",
				"weather":"多云",
				"wid":{
					"day":"01",
					"night":"01"
				},
				"direct":"北风转西南风"
			},
			{
				"date":"2021-12-11",
				"temperature":"-2\/10℃",
				"weather":"多云转晴",
				"wid":{
					"day":"01",
					"night":"00"
				},
				"direct":"北风"
			},
			{
				"date":"2021-12-12",
				"temperature":"-5\/4℃",
				"weather":"晴",
				"wid":{
					"day":"00",
					"night":"00"
				},
				"direct":"西北风转西南风"
			},
			{
				"date":"2021-12-13",
				"temperature":"-6\/5℃",
				"weather":"晴",
				"wid":{
					"day":"00",
					"night":"00"
				},
				"direct":"西南风"
			}
		]
	},
	"error_code":0
}
本实例我们使用到了:https://www.juhe.cn/box/index/id/73 天气查询api
2.1.2、GET请求,把一些参数做成变量而不是直接放到url
func testGet2() {
	params := url.Values{}
	Url, err := url.Parse("http://apis.juhe.cn/simpleWeather/query")
	if err != nil {
		return
	}
	params.Set("key", "087d7d10f700d20e27bb753cd806e40b")
	params.Set("city", "北京")
	//如果参数中有中文参数,这个方法会进行URLEncode
	Url.RawQuery = params.Encode()
	urlPath := Url.String()
	fmt.Println(urlPath)
	resp, err := http.Get(urlPath)
	if err != nil {
		log.Fatal(err)
	}
	defer resp.Body.Close()
	body, _ := ioutil.ReadAll(resp.Body)
	fmt.Println(string(body))
}
2.1.3、解析JSON类型的返回结果
package main

import (
	"encoding/json"
	"fmt"
	"io/ioutil"
	"log"
	"net/http"
	"net/url"
	"time"
)

func testParseJson() {
	type result struct {
		Args    string            `json:"args"`
		Headers map[string]string `json:"headers"`
		Origin  string            `json:"origin"`
		Url     string            `json:"url"`
	}

	resp, err := http.Get("http://httpbin.org/get")
	if err != nil {
		return
	}
	defer resp.Body.Close()
	body, _ := ioutil.ReadAll(resp.Body)
	fmt.Println(string(body))
	var res result
	_ = json.Unmarshal(body, &res)
	fmt.Printf("%#v", res)
}
运行结果
{
  "args": {},
  "headers": {
    "Accept-Encoding": "gzip",
    "Host": "httpbin.org",
    "User-Agent": "Go-http-client/1.1",
    "X-Amzn-Trace-Id": "Root=1-61b16029-731c99ba4591c9bd3db53edd"
  },
  "origin": "115.171.25.28",
  "url": "http://httpbin.org/get"
}

main.result{Args:"", Headers:map[string]string{"Accept-Encoding":"gzip", "Host":"httpbin.org", "User-Agent":"Go-http-client/1.1", "X-Amzn-Trace-Id":"Root=1-61b16029-731c99ba4591c9bd3db53edd"}, Origin:"115.171.25.28", Url:"http://httpbin.org/get"}
2.1.4、GET请求添加请求头
package main

import (
	"encoding/json"
	"fmt"
	"io/ioutil"
	"log"
	"net/http"
	"net/url"
	"time"
)

func testAddHeader() {
	client := &http.Client{}
	req, _ := http.NewRequest("GET", "http://httpbin.org/get", nil)
	req.Header.Add("name", "老郭")
	req.Header.Add("age", "80")
	resp, _ := client.Do(req)
	body, _ := ioutil.ReadAll(resp.Body)
	fmt.Printf(string(body))
}
运行结果
{
  "args": {},
  "headers": {
    "Accept-Encoding": "gzip",
    "Age": "3",
    "Host": "httpbin.org",
    "Name": "zhaofan",
    "User-Agent": "Go-http-client/1.1",
    "X-Amzn-Trace-Id": "Root=1-61b16107-5814e133649862c20ab1c26f"
  },
  "origin": "115.171.25.28",
  "url": "http://httpbin.org/get"
}
2.2、发出POST请求
func testPost() {
	path := "http://apis.juhe.cn/simpleWeather/query"
	urlValues := url.Values{}
	urlValues.Add("key", "087d7d10f700d20e27bb753cd806e40b")
	urlValues.Add("city", "北京")
	r, err := http.PostForm(path, urlValues)
	if err != nil {
		log.Fatal(err)
	}
	defer r.Body.Close()
	b, _ := ioutil.ReadAll(r.Body)
	fmt.Printf("b: %v\n", string(b))
}
另外一种方式
func testPost2() {
	urlValues := url.Values{
		"name": {"老郭"},
		"age":  {"80"},
	}
	reqBody := urlValues.Encode()
	resp, _ := http.Post("http://httpbin.org/post", "text/html", strings.NewReader(reqBody))
	body, _ := ioutil.ReadAll(resp.Body)
	fmt.Println(string(body))
}
2.2.1、发送JSON数据的post请求
func testPostJson() {
	data := make(map[string]interface{})
	data["site"] = "www.duoke360.com"
	data["name"] = "多课网"
	bytesData, _ := json.Marshal(data)
	resp, _ := http.Post("http://httpbin.org/post", "application/json", bytes.NewReader(bytesData))
	body, _ := ioutil.ReadAll(resp.Body)
	fmt.Println(string(body))
}
2.2.2、使用Client自定义请求
func testClient() {
	client := http.Client{
		Timeout: time.Second * 5,
	}
	url := "http://apis.juhe.cn/simpleWeather/query?key=087d7d10f700d20e27bb753cd806e40b&city=北京"
	req, err := http.NewRequest(http.MethodGet, url, nil)
	if err != nil {
		log.Fatal(err)
	}
	req.Header.Add("referer", "http://apis.juhe.cn/")
	res, err2 := client.Do(req)
	if err2 != nil {
		log.Fatal(err2)
	}
	defer res.Body.Close()
	b, _ := ioutil.ReadAll(res.Body)
	fmt.Printf("b: %v\n", string(b))
}
2.3、HTTP Server
使用golang实现一个http server非常简单,代码如下:
func testHttpServer() {
	// 请求处理函数
	f := func(resp http.ResponseWriter, req *http.Request) {
		io.WriteString(resp, "hello world")
	}
	// 响应路径,注意前面要有斜杠 /
	http.HandleFunc("/hello", f)
	// 设置监听端口,并监听,注意前面要有冒号:
	err := http.ListenAndServe(":9999", nil)
	if err != nil {
		log.Fatal(err)
	}
}
在浏览器输入:
http://localhost:9999/hello
运行结果:
hello world
2.4、使用Handler实现并发处理
type countHandler struct {
	mu sync.Mutex // guards n
	n  int
}

func (h *countHandler) ServeHTTP(w http.ResponseWriter, r *http.Request) {
	h.mu.Lock()
	defer h.mu.Unlock()
	h.n++
	fmt.Fprintf(w, "count is %d\n", h.n)
}

func testHttpServer2() {
	http.Handle("/count", new(countHandler))
	log.Fatal(http.ListenAndServe(":8080", nil))
}
在浏览器输入:http://localhost:8080/count,刷新查看结果
count is 8
3、template
templates包定义了数据驱动的文本输出。生成html文件的模板在html/template包下面。模板使用插值语法{{.var}}格式,也可以使用一些流程控制,例如判断if else、循环range还可以使用一些函数,包括内建函数和自定义函数。
3.1、第一个模板实例
package main

import (
	"os"
	"text/template"
)

func main() {
	//数据
	name := "Caidd123"
	//定义模板
	muban := "hello, {{.}}"
	//解析模板
	tmpl, err := template.New("test").Parse(muban)
	if err != nil {
		panic(err)
	}
	//执行模板,输出到终端
	err = tmpl.Execute(os.Stdout, name)
	if err != nil {
		panic(err)
	}
}
运行结果
hello, Caidd123
3.2、也可以是结构体
package main

import (
	"os"
	"text/template"
)

type Person struct {
	Name string
	Age  int
}

func main() {
	Caidd123 := Person{"Caidd123", 80}
	muban := "hello, {{.Name}}, Your age {{.Age}}"
	tmpl, err := template.New("test").Parse(muban)
	if err != nil {
		panic(err)
	}
	err = tmpl.Execute(os.Stdout, Caidd123)
	if err != nil {
		panic(err)
	}
}
运行结果
hello, Caidd123, Your age 80
3.3、html模板
定义一个HTML文件
<!DOCTYPE html>
<html lang="en">
<head>
    <title>Test golang template</title>
</head>
<body>

   {{.}}

</body>
</html>
定义一个HttpServer
package main

import (
	"html/template"
	"net/http"
)

func tmpl(w http.ResponseWriter, r *http.Request) {
	t1, err := template.ParseFiles("test.html")
	if err != nil {
		panic(err)
	}
	t1.Execute(w, "hello world")
}

func main() {
	server := http.Server{
		Addr: "127.0.0.1:8080",
	}
	http.HandleFunc("/tmpl", tmpl)
	server.ListenAndServe()
}
客户端访问
http://localhost:8080/tmpl
运行结果
hello,Caidd123
3.4、文本和空格
模板引擎在进行替换的时候,是完全按照文本格式进行替换的。除了需要评估和替换的地方,所有的行分隔符、空格等等空白都原样保留。所以,对于要解析的内容,不要随意缩进、随意换行。
例如:
{{23}} < {{45}}        -> 23 < 45
{{23}} < {{- 45}}      ->  23 <45
{{23 -}} < {{45}}      ->  23< 45
{{23 -}} < {{- 45}}    ->  23<45
去掉后空格
xxxx -}},去掉前空格{{- xxxx
3.5、模板注释
注释方式:{{/* a comment */}}。
注释后的内容不会被引擎进行替换。但需要注意,注释行在替换的时候也会占用行,所以应该去除前缀和后缀空白,否则会多一空行。
{{- /* a comment without prefix/suffix space */}}
{{/* a comment without prefix/suffix space */ -}}
{{- /* a comment without prefix/suffix space */ -}}
3.6、管道pipeline
管道就是一系列命令的链式调用。当然,也可以是一个命令,例如:计算表达式的值{{.}}、{{.Name}},或者是一个函数调用或者方法调用。
可以使用管道符号|链接多个命令,用法和unix下的管道类似:|前面的命令将运算结果(或返回值)传递给后一个命令的最后一个位置。
需要注意的是,并非只有使用了
|才是pipeline。Go template中,pipeline的概念是传递数据,只要能产生数据的,都是pipeline。
下面是Pipeline的几种示例,它们都输出"output":
{{`"output"`}}
{{printf "%q" "output"}}
{{"output" | printf "%q"}}
{{printf "%q" (print "out" "put")}}
{{"put" | printf "%s%s" "out" | printf "%q"}}
{{"output" | printf "%s" | printf "%q"}}
可以在HTML中测试
<!DOCTYPE html>
<html lang="en">
<head>
    <title>Test golang template</title>
</head>
<body>
    {{`"output"`}} <br>
    {{printf "%q" "output"}}<br>
    {{"output" | printf "%q"}}<br>
    {{printf "%q" (print "out" "put")}}<br>
    {{"put" | printf "%s%s" "out" | printf "%q"}}<br>
    {{"output" | printf "%s" | printf "%q"}}<br>
</body>
</html>
运行结果
"output"
"output"
"output"
"output"
"output"
"output"
3.7、变量
变量的语法
// 未定义过的变量
$var := pipeline
// 已定义过的变量
$var = pipeline
例如
<!DOCTYPE html>
<html lang="en">
<head>
    <title>Test golang template</title>
</head>
<body>
    {{$Name := "tom"}}
    {{$Name = "kite"}}
    {{$Name}}<br>

    {{$len := (len "hello,Caidd123")}}

    {{$len}}
</body>
</html>
运行结果
kite
9
3.8、条件判断
语法
{{if pipeline}} T1 {{end}}
{{if pipeline}} T1 {{else}} T0 {{end}}
{{if pipeline}} T1 {{else if pipeline}} T0 {{end}}
{{if pipeline}} T1 {{else}}{{if pipeline}} T0 {{end}}{{end}}
pipeline为false的情况是各种数据对象的0值:数值0,指针或接口是nil,数组、slice、map或string则是len为0。
可以使用如下运算符表达式
eq
	Returns the boolean truth of arg1 == arg2
ne
	Returns the boolean truth of arg1 != arg2
lt
	Returns the boolean truth of arg1 < arg2
le
	Returns the boolean truth of arg1 <= arg2
gt
	Returns the boolean truth of arg1 > arg2
ge
	Returns the boolean truth of arg1 >= arg2
实例
<!DOCTYPE html>
<html lang="en">
<head>
    <title>Test golang template</title>
</head>
<body>

    {{$Age := 18}}

    {{if (ge $Age 18)}}
    <h3>你已经成年!</h3>
    {{else}}
    <h3>你还未成年!</h3>
    {{end}}

</body>
</html>
运行结果
你已经成年!
3.9、循环迭代
语法
{{range pipeline}} T1 {{end}}
{{range pipeline}} T1 {{else}} T0 {{end}}
range可以迭代slice、数组、map或channel。迭代的时候,会设置"."为当前正在迭代的元素。对于第一个表达式,当迭代对象的值为0值时,则range直接跳过,就像if一样。对于第二个表达式,则在迭代到0值时执行else语句。
实例演示
go代码
func tmpl(w http.ResponseWriter, r *http.Request) {
	t1, err := template.ParseFiles("test.html")
	if err != nil {
		panic(err)
	}
	s := []string{"xe", "golang 学习", "Caidd123"}
	t1.Execute(w, s)
}
html
<!DOCTYPE html>
<html lang="en">
<head>
    <title>Test golang template</title>
</head>
<body>

    {{range $x := . -}}
        {{println $x}}
    {{- end}}

</body>
</html>
运行结果
xe golang 学习 Caidd123
3.10、with...end
with用来设置"."的值,语法如下:
{{with pipeline}} T1 {{end}}
{{with pipeline}} T1 {{else}} T0 {{end}}
对于第一种格式,当pipeline不为0值的时候,点"."设置为pipeline运算的值,否则跳过。对于第二种格式,当pipeline为0值时,执行else语句块,否则"."设置为pipeline运算的值,并执行T1。
实例演示
{{with "xe-golang-Caidd123"}}{{println .}}{{end}}
运行结果
xe-golang-Caidd123
3.11、内置函数
and
	返回第
	一个空参数或最后一个参数返回其参数的布尔值 AND ,即
	“and x y”表现为“if x then y else x”。
	评估所有参数。
call
	返回调用第一个参数的结果,该参数
	必须是一个函数,其余参数作为参数。
	因此,“call .XY 1 2”在 Go 表示法中是 dot.XY(1, 2),其中
	Y 是函数值字段、映射条目等。
	第一个参数必须是
	产生函数类型值的评估结果(不同于
	预定义的函数,如打印)。该函数必须
	返回一个或两个结果值,其中第二个
	是类型错误。如果参数与函数不匹配
	或返回的错误值为非零,则执行停止。
html
	返回等效
	于其参数文本表示的转义 HTML 。此功能
	在 html/template 中不可用,但有一些例外。
index
	返回通过
	以下参数对其第一个参数进行索引的结果。因此,在 Go 语法中,“索引 x 1 2 3”是
	x[1][2][3]。每个索引项必须是映射、切片或数组。
slice
	slice 返回其第一个参数被
	其余参数切片的结果。因此,"slice x 1 2" 在 Go 语法中是 x[1:2],
	而 "slice x" 是 x[:],"slice x 1" 是 x[1:],
	是 x[1:2:3]。第一个参数必须是字符串、切片或数组。
js
	返回转义的 JavaScript 等效
	于其参数的文本表示。
len
	返回其参数的整数长度。
not
	返回其单个参数的布尔否定。
or
	通过返回第
	一个非空参数或最后一个参数来返回其参数的布尔 OR ,即
	“or x y”表现为“if x then x else y”。
	评估所有参数。
print
	fmt.Sprint
	的别名
printf fmt.Sprintf
	的别名
println fmt.Sprint的别名
urlquery
	以适合嵌入 URL 查询的形式
	返回其参数的文本表示的转义值。
	此功能在 html/template 中不可用,但有一些
	例外。
3.12、嵌套template:define和template
define可以直接在待解析内容中定义一个模板,这个模板会加入到common结构组中,并关联到关联名称上。
{{template "name"}}
{{template "name" pipeline}}
{{define "name"}}
实例演示
假设我们有一个header.html、footer.html和index.html,index.html包含header.html和footer.html
header.html
{{define "header"}}
     <head>
         <title>{{.Title}}</title>
     </head>
{{end}}
footer.html
{{define "footer"}}
这是footer

{{end}}
index.html
<!DOCTYPE html>
<html lang="en">
<head>
    <title>Document</title>
</head>
<body>
    {{template "header" .}}
    <h1>首页...</h1>
    {{template "footer"}}

</body>
</html>
go code
package main

import (
	"html/template"
	"net/http"
)

func tmpl(w http.ResponseWriter, r *http.Request) {
	t1, err := template.ParseFiles("templates/index.html", "templates/header.html", "templates/footer.html")

	if err != nil {
		panic(err)
	}
	t1.Execute(w, nil)
}

func main() {
	server := http.Server{
		Addr: "127.0.0.1:8080",
	}
	http.HandleFunc("/tmpl", tmpl)
	server.ListenAndServe()
}
运行结果
这是header
首页...
这是footer
4、HttpRouter
HttpRouter是一种轻量级高性能的,golang HTTP请求路由器。
与Golang默认路由相比,此路由器支持路由模式中的变量并匹配请求方法。它还可以更好地扩展。
该路由器针对高性能和小内存占用进行了优化。即使有很长的路径和大量的路线,它也能很好地扩展。压缩动态特里(基数树)结构用于有效匹配。
gin框架就是以httprouter为基础开发的,下面我们来学习一下httprouter。
4.1、下载安装
go get github.com/julienschmidt/httprouter
4.2、第一个路由实例
package main

import (
	"fmt"
	"log"
	"net/http"

	"github.com/julienschmidt/httprouter"
)

func Index(w http.ResponseWriter, r *http.Request, _ httprouter.Params) {
	fmt.Fprint(w, "Welcome!\n")
}

func Hello(w http.ResponseWriter, r *http.Request, ps httprouter.Params) {
	fmt.Fprintf(w, "hello, %s!\n", ps.ByName("name"))
}

func main() {
	router := httprouter.New()
	router.GET("/", Index)
	router.GET("/hello/:name", Hello)
	//http.ListenAndServe(":8888", router)
	log.Fatal(http.ListenAndServe(":8080", router))
}
在浏览器输入:http://localhost:8080/,输出:Welcome!
在浏览器输入:http://localhost:8080/hello/ghz,输出:hello, ghz!
4.3、http router 请求方法
httprouter 为所有的HTTP Method 提供了快捷的使用方式,只需要调用对应的方法即可。
func (r *Router) GET(path string, handle Handle) {
    r.Handle("GET", path, handle)
}

func (r *Router) HEAD(path string, handle Handle) {
    r.Handle("HEAD", path, handle)
}

func (r *Router) OPTIONS(path string, handle Handle) {
    r.Handle("OPTIONS", path, handle)
}

func (r *Router) POST(path string, handle Handle) {
    r.Handle("POST", path, handle)
}

func (r *Router) PUT(path string, handle Handle) {
    r.Handle("PUT", path, handle)
}

func (r *Router) PATCH(path string, handle Handle) {
    r.Handle("PATCH", path, handle)
}

func (r *Router) DELETE(path string, handle Handle) {
    r.Handle("DELETE", path, handle)
}
4.4、restful 风格路由
package main

import (
    "fmt"
    "log"
    "net/http"

    "github.com/julienschmidt/httprouter"
)

func Index(w http.ResponseWriter, r *http.Request, _ httprouter.Params) {
    fmt.Fprint(w, "Welcome!\n")
}

func Hello(w http.ResponseWriter, r *http.Request, ps httprouter.Params) {
    fmt.Fprintf(w, "hello, %s!\n", ps.ByName("name"))
}

func getuser(w http.ResponseWriter, r *http.Request, ps httprouter.Params) {
    uid := ps.ByName("uid")
    fmt.Fprintf(w, "you are get user %s", uid)
}

func modifyuser(w http.ResponseWriter, r *http.Request, ps httprouter.Params) {
    uid := ps.ByName("uid")
    fmt.Fprintf(w, "you are modify user %s", uid)
}

func deleteuser(w http.ResponseWriter, r *http.Request, ps httprouter.Params) {
    uid := ps.ByName("uid")
    fmt.Fprintf(w, "you are delete user %s", uid)
}

func adduser(w http.ResponseWriter, r *http.Request, ps httprouter.Params) {
    // uid := r.FormValue("uid")
    uid := ps.ByName("uid")
    fmt.Fprintf(w, "you are add user %s", uid)
}

func main() {
    router := httprouter.New()
    router.GET("/", Index)
    router.GET("/hello/:name", Hello)

    router.GET("/user/:uid", getuser)   //user、adduser,什么的可以随便起,就是一个耳机目录的名称,为了规范,所以用user
    router.POST("/adduser/:uid", adduser)
    router.DELETE("/deluser/:uid", deleteuser)
    router.PUT("/moduser/:uid", modifyuser)
	//http.ListenAndServe(":8888", router)
    log.Fatal(http.ListenAndServe(":8080", router))
}
使用postman测试
5、Gin
5.1、Gin官网
https://gin-gonic.com/
5.2、gin简介
Gin是一个golang的微框架,基于httprouter,封装比较优雅,API友好,源码注释比较明确,具有快速灵活,容错方便等特点。
5.3、gin特征
5.3.1、速度快
基于基数树的路由,内存占用小。没有反射。可预测的 API 性能。
5.3.2、中间件支持
传入的 HTTP 请求可以由中间件链和最终操作处理。例如:Logger、Authorization、GZIP 最后在 DB 中发布一条消息。
5.3.3、Crash-free
Gin 可以捕获 HTTP 请求期间发生的panic并恢复它。这样,你的服务器将始终可用。
5.3.4、JSON 验证
Gin 可以解析和验证请求的 JSON - 例如,检查所需值的存在。
5.3.5、路由分组
更好地组织您的路线。需要授权与不需要授权,不同的 API 版本……此外,组可以无限嵌套,而不会降低性能。
5.3.6、错误管理
Gin 提供了一种方便的方法来收集 HTTP 请求期间发生的所有错误。最终,中间件可以将它们写入日志文件、数据库并通过网络发送它们。
5.3.7、内置渲染
Gin 为 JSON、XML 和 HTML 渲染提供了一个易于使用的 API。
5.3.8、可扩展
创建一个新的中间件非常简单,只需查看示例代码即可。
5.4、第一个gin
5.4.1、安装gin
go get -u github.com/gin-gonic/gin
5.4.2、导入项目
import "github.com/gin-gonic/gin"
5.4.3、实现代码1
package main

import "github.com/gin-gonic/gin"

func main() {
	r := gin.Default()
	r.GET("/ping", func(c *gin.Context) {
		c.JSON(200, gin.H{
			"message": "pong",
		})
	})
	r.Run() // listen and serve on 0.0.0.0:8080
}
运行
浏览器输入:http://localhost:8080/ping
{"message":"pong"}
5.4.4、实现代码2
package main

import "github.com/gin-gonic/gin"

func hello(c *gin.Context) {
	c.String(200, "hello,%s\n", "Caidd123")
	c.JSON(200, gin.H{
		"name": "Caidd123",
		"age":  "23",
	})
}

func main() {
	e := gin.Default()
	e.GET("hello", hello)
	e.Run(":8888") //不指定端口的话默认8080端口
}
运行结果:
hello,Caidd123
{"age":"23","name":"Caidd123"}
5.5、Gin实现用户登录
5.5.1、创建一个文件tempates
在项目跟目录下面创建给文件夹tempates,用来保存静态文件
5.5.2、创建一个登录html文件
<!DOCTYPE html>
<html lang="en">
<head>
    <meta charset="UTF-8">
    <meta http-equiv="X-UA-Compatible" content="IE=edge">
    <meta name="viewport" content="width=device-width, initial-scale=1.0">
    <title>Login</title>
</head>
<body>

    <form action="/login" method="post">
        Username: <input type="text" name="username"><br>
        Password: <input type="password" name="password"><br>
        <input type="submit" value="Login">
    </form>

</body>
</html>
5.5.3、创建一个欢迎html页面
<!DOCTYPE html>
<html lang="en">
<head>
    <meta charset="UTF-8">
    <meta http-equiv="X-UA-Compatible" content="IE=edge">
    <meta name="viewport" content="width=device-width, initial-scale=1.0">
    <title>Welcome</title>
</head>
<body>

    Welcome, {{.username}}

</body>
</html>
5.5.4、使用Gin处理逻辑
package main

import "github.com/gin-gonic/gin"

func MyHandler(c *gin.Context) {
	c.JSON(200, gin.H{
		"hello": "hello world",
	})
}

func Login(c *gin.Context) {
	c.HTML(200, "login.html", nil)
}

func DoLogin(c *gin.Context) {
	username := c.PostForm("username")
	password := c.PostForm("password")

	c.HTML(200, "welcome.html", gin.H{
		"username": username,
		"password": password,
	})

}

func main() {
	e := gin.Default()
	e.LoadHTMLGlob("templates/*")

	e.GET("/login", Login)
	e.POST("/login", DoLogin)
	e.Run()
}
5.6、Gin请求参数
5.6.1、Get请求参数
使用
c.Query("key")、或者c.DefaultQuery("key")方法
package main

import "github.com/gin-gonic/gin"

func TestGet(c *gin.Context) {
	s := c.Query("username")
	s2 := c.DefaultQuery("password", "123")
	c.String(200, "username:%s,password:%s", s, s2)

}

func main() {
	e := gin.Default()
	e.GET("/testget", TestGet)
	e.Run(":8888")
}
运行结果
username:Caidd123, password:123
5.6.2、Post参数
使用c.PostForm("key")、或者 c.DefaultQuery("key")方法
func DoLogin(c *gin.Context) {
	username := c.PostForm("username")
	password := c.DefaultPostForm("password", "123")

	c.HTML(200, "welcome.html", gin.H{
		"username": username,
		"password": password,
	})
}
使用Postman或者Post表单测试
5.6.3、路劲参数(restful风格)
使用c.Param("key")方法
package main

import "github.com/gin-gonic/gin"


func TestPatchParam(c *gin.Context) {
	s := c.Param("name")
	s2 := c.Param("age")
	c.String(200, "name:%s,age:%s", s, s2)
}

func main() {
	e := gin.Default()
	e.GET("/hello/:name/:age", TestPatchParam)
	e.Run()
}
运行结果
name:Caidd123,age:23
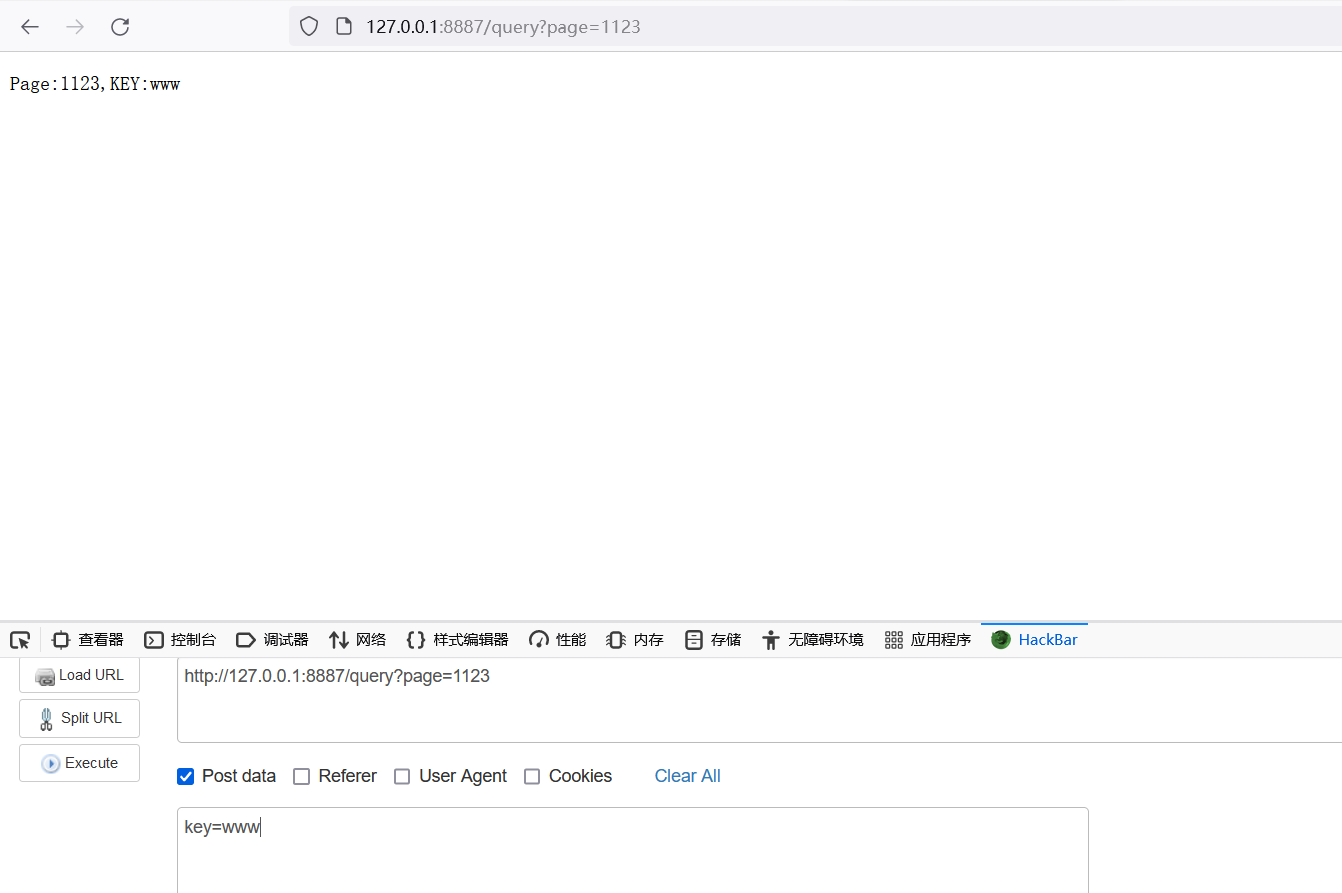
5.6.4、既有Get也有Post
package main

import "github.com/gin-gonic/gin"


func TestGetAndPost(c *gin.Context) {
	page := c.DefaultQuery("page", "1")
	key := c.PostForm("key")
	c.String(200, "Page:%s,KEY:%s", page, key)

}

func main() {
	e := gin.Default()
	e.GET("/query", TestGetAndPost)
	e.POST("/query", TestGetAndPost)
	e.Run(":8887")
	//e.Run()
}
使用Postman或者Post表单测试
5.7、表单处理
5.7.1、创建一个HTML表单
<!DOCTYPE html>
<html lang="en">
<head>
    <meta charset="UTF-8">
    <meta http-equiv="X-UA-Compatible" content="IE=edge">
    <meta name="viewport" content="width=device-width, initial-scale=1.0">
    <title>多课网,听老郭讲golang</title>
</head>
<body>

    <h1>用户注册页面</h1>

    <form action="/register" method="post">

        用户名: <input type="text" name="username"><br>
        密码: <input type="password" name="password"><br>
        爱好:
        <input type="checkbox" name="hobby" value="swiming">游泳
        <input type="checkbox" name="hobby" value="basketball">篮球
        <br>
        性别:<input type="radio" name="gender" id="1" value="m">男
        <input type="radio" name="gender" id="2" value="f">女
        <br>
        城市: <select name="city">
            <option value="beijing">北京</option>
            <option value="shanghai">上海</option>
        </select>
        <br>
        <input type="submit" value="注册">
    </form>

</body>
</html>
5.7.2、Go code
package main

import "github.com/gin-gonic/gin"

func Regsiter(c *gin.Context) {
	username := c.PostForm("username")
	password := c.PostForm("password")
	hobby := c.PostFormArray("hobby")
	gender := c.PostForm("gender")
	city := c.PostForm("city")

	c.String(200, "Username:%s, Password:%s, hobby:%s, gender:%s, city:%s", username, password, hobby, gender, city)

}

func GoRegister(c *gin.Context) {
	c.HTML(200, "register.html", nil)
}

func main() {
	e := gin.Default()
	e.LoadHTMLGlob("templates/*")
	e.POST("/register", Regsiter)
	e.GET("/register", GoRegister)
	e.Run()
}
运行结果
Username:Caidd123, Password:123456, hobby:[swiming basketball], gender:m, city:beijing
5.8、数据绑定
5.8.1、绑定Form表单
package main

import (
	"github.com/gin-gonic/gin"
)

type User struct {
	Username string   `form:"username"`
	Password string   `form:"password"`
	Hobby    []string `form:"hobby"`
	Gender   string   `form:"gender"`
	City     string   `form:"city"`
}

func Regsiter(c *gin.Context) {
	var user User
	c.ShouldBind(&user)
	c.String(200, "User:%s", user)
}

func GoRegister(c *gin.Context) {
	c.HTML(200, "register.html", nil)
}

func main() {
	e := gin.Default()
	e.LoadHTMLGlob("templates/*")
	e.POST("/register", Regsiter)
	e.GET("/register", GoRegister)
	e.Run()
}
5.8.2、绑定查询参数
package main

import (
	"log"

	"github.com/gin-gonic/gin"
)

type User struct {
	Username string `form:"username"`
	Password string `form:"password"`
}

func TestGetBind(c *gin.Context) {
	var user User
	err := c.ShouldBind(&user)
	if err != nil {
		log.Fatal(err)
	}
	c.String(200, "User:%s", user)
}

func main() {
	e := gin.Default()
	// http://localhost:8080/testGetBind?username=ghz&password=123
	e.GET("/testGetBind", TestGetBind)
	e.Run()
}
5.8.3、路径请求参数绑定
package main

import (
	"log"

	"github.com/gin-gonic/gin"
)

type User struct {
	Username string `uri:"username"`
	Password string `uri:"password"`
}

func TestGetBind(c *gin.Context) {
	var user User
	err := c.ShouldBindUri(&user)
	if err != nil {
		log.Fatal(err)
	}
	c.String(200, "User:%s", user)
}

func main() {
	e := gin.Default()
	// http://localhost:8080/testGetBind/ghz/123
	e.GET("/testGetBind/:username/:password", TestGetBind)
	e.Run()
}
5.9、Gin访问静态文件集成BootStrap框架
5.9.1、下载BootStrap
下载地址:https://getbootstrap.com/
5.9.2、添加bootstrap css和js文件
创建一个assets文件夹,将css和js文件添加到该文件夹
5.9.3、创建html文件
<!DOCTYPE html>
<html lang="en">
<head>
    <meta charset="UTF-8">
    <meta http-equiv="X-UA-Compatible" content="IE=edge">
    <meta name="viewport" content="width=device-width, initial-scale=1.0">
    <link rel="stylesheet" href="/assets/css/bootstrap.min.css">

    <title>Login</title>
</head>
<body>

   <div class="container">

    <form>
        <div class="mb-3">
          <label for="exampleInputEmail1" class="form-label">Email address</label>
          <input type="email" class="form-control" id="exampleInputEmail1" aria-describedby="emailHelp">
          <div id="emailHelp" class="form-text">We'll never share your email with anyone else.</div>
        </div>
        <div class="mb-3">
          <label for="exampleInputPassword1" class="form-label">Password</label>
          <input type="password" class="form-control" id="exampleInputPassword1">
        </div>
        <div class="mb-3 form-check">
          <input type="checkbox" class="form-check-input" id="exampleCheck1">
          <label class="form-check-label" for="exampleCheck1">Check me out</label>
        </div>
        <button type="submit" class="btn btn-primary">Submit</button>
      </form>
   </div>

</body>
</html>
5.9.4、Go Code
package main

import (
	"net/http"

	"github.com/gin-gonic/gin"
)

func Login(c *gin.Context) {
	c.HTML(200, "login.html", nil)
}

func main() {
	e := gin.Default()
	e.LoadHTMLGlob("templates/*")

	e.Static("/assets", "./assets")
	e.StaticFS("/croot", http.Dir("c:/"))
	e.StaticFile("/favicon.ico", "./assets/favicon.ico")

	e.GET("/login", Login)
	//e.POST("/login", DoLogin)
	e.Run()
}
5.10、Gin使用中间件
中间件听起来非常高大上的名字,实际非常简单,就是在请求中间起到拦截作用的处理函数。
5.10.1、Gin默认中间件
如果你使用Gin.Default()实例化gin引擎,默认有两个中间件,Logger和Recovery,分别用来处理日志和处理错误。如果使用gin.New()需要重新添加。
// 新建一个没有任何默认中间件的路由
r := gin.New()

// 全局中间件
// Logger 中间件将日志写入 gin.DefaultWriter,即使你将 GIN_MODE 设置为 release。
// By default gin.DefaultWriter = os.Stdout
r.Use(gin.Logger())

// Recovery 中间件会 recover 任何 panic。如果有 panic 的话,会写入 500。
r.Use(gin.Recovery())
5.10.2、自定义中间件
- 自定义中间件非常简单,定义一个符合下面格式的处理函数
type HandlerFunc func(*Context)
- 使用
Use方法调用
package main

import (
	"fmt"

	"github.com/gin-gonic/gin"
)

func TestMW(c *gin.Context) {
	c.String(200, "hello,%s", "ghz")
}

func MyMiddleware1(c *gin.Context) {
	fmt.Println("我的第一个中间件")
}

func MyMiddleware2(c *gin.Context) {
	fmt.Println("我的第二个中间件")
}

func main() {

	/* 	func Default() *Engine {
		debugPrintWARNINGDefault()
		engine := New()
		engine.Use(Logger(), Recovery())
		return engine
	} */
	// e := gin.Default()
	// e := gin.New()

	e := gin.Default()

	e.Use(MyMiddleware1, MyMiddleware2)

	e.GET("testmw", TestMW)

	e.Run()

}

5.10.3、BasicAuth中间件
5.10.3.1、代码实现1
Gin提供了BasicAuth中间件,用来对网站资源的访问保护。
package main

import (
	"fmt"
	"net/http"

	"github.com/gin-gonic/gin"
)

// 模拟一些私人数据
var secrets = gin.H{
	"foo":    gin.H{"email": "foo@bar.com", "phone": "123433"},
	"austin": gin.H{"email": "austin@example.com", "phone": "666"},
	"lena":   gin.H{"email": "lena@guapa.com", "phone": "523443"},
}

func main() {
	r := gin.Default()

	// 路由组使用 gin.BasicAuth() 中间件
	// gin.Accounts 是 map[string]string 的一种快捷方式
	authorized := r.Group("/admin", gin.BasicAuth(gin.Accounts{
		"foo":    "bar",
		"austin": "1234",
		"lena":   "hello2",
		"manu":   "4321",
	}))

	// /admin/secrets 端点
	// 触发 "localhost:8080/admin/secrets
	authorized.GET("/secrets", func(c *gin.Context) {
		// 获取用户,它是由 BasicAuth 中间件设置的
		user := c.MustGet(gin.AuthUserKey).(string)
		fmt.Println(user)
		if secret, ok := secrets[user]; ok {
			c.JSON(http.StatusOK, gin.H{"user": user, "secret": secret})
		} else {
			c.JSON(http.StatusOK, gin.H{"user": user, "secret": "NO SECRET :("})
		}
	})

	// 监听并在 0.0.0.0:8080 上启动服务
	r.Run(":8080")
}
测试
在浏览器输入localhost:8080/admin/secrets时,会弹出一个对话框,要求输入正确的用户名和密码,才能访问资源。
5.10.3.2、代码实现2
package main

import (
	"fmt"
	"net/http"

	"github.com/gin-gonic/gin"
)

// 模拟一些私人数据
var secrets = gin.H{
	"foo":    gin.H{"email": "foo@bar.com", "phone": "123433"},
	"austin": gin.H{"email": "austin@example.com", "phone": "666"},
	"lena":   gin.H{"email": "lena@guapa.com", "phone": "523443"},
}

func Handler(c *gin.Context) {
	// 获取用户,它是由 BasicAuth 中间件设置的
	user := c.MustGet(gin.AuthUserKey).(string)
	fmt.Println(user)
	if secret, ok := secrets[user]; ok {
		c.JSON(http.StatusOK, gin.H{"user": user, "secret": secret})
	} else {
		c.JSON(http.StatusOK, gin.H{"user": user, "secret": "NO SECRET :("})
	}
}

func main() {
	e := gin.Default()
	//这些用户数据可以从数据库查询 gorm
	// 路由组使用 gin.BasicAuth() 中间件
	// gin.Accounts 是 map[string]string 的一种快捷方式
	e1 := e.Group("/admin", gin.BasicAuth(gin.Accounts{
		"foo":    "bar",
		"austin": "1234",
		"lena":   "hello2",
		"manu":   "4321",
	}))
	// /admin/secrets 端点
	// 触发 "localhost:8888/admin/secrets
	e1.GET("/secrets", Handler)
	e.Run(":8888")
}
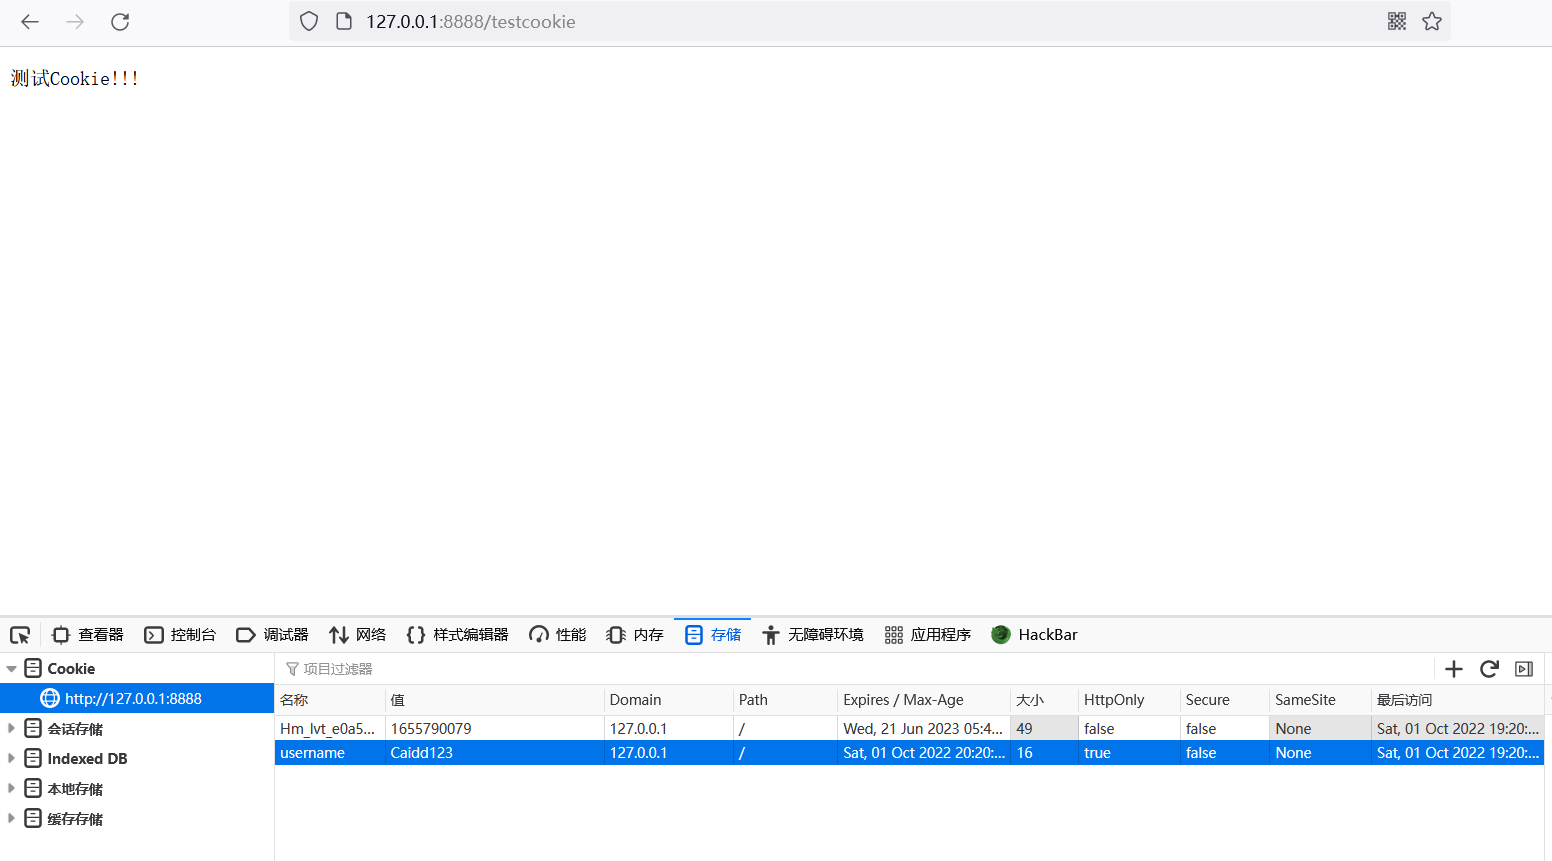
5.11、Gin cookie的使用
cookie是服务器向客户端写的一些数据,可以实现像自动登录等功能。
package main

import "github.com/gin-gonic/gin"

func Handler(c *gin.Context) {
	s, err := c.Cookie("username")
	if err != nil {
		s = "Caidd123"
		//设置cookie
		//名称   值  最大存活时间  路径 域   是否必须使用https  是否必须使用http访问
		c.SetCookie("username", s, 60*60, "/", "127.0.0.1", false, true)
	}
	c.String(200, "测试Cookie!!!")
}

func main() {
	e := gin.Default()
	e.GET("/testcookie", Handler)
	e.Run(":8888")

}
基于安全的考虑,需要给cookie加上
Secure和HttpOnly属性,HttpOnly比较好理解,设置HttpOnly=true的cookie不能被js获取到,无法用document.cookie打出cookie的内容。
Secure属性是说如果一个cookie被设置了Secure=true,那么这个cookie只能用https协议发送给服务器,用http协议是不发送的。
5.12、Gin 使用Session
因为http是无状态、短连接,如何保存客户端和服务器直接的会话状态呢?可以使用session。
5.12.1、使用gin session中间件
gin 本身没有对session的支持,可以使用第三方中间件。
go get github.com/gin-contrib/sessions
import "github.com/gin-contrib/sessions"
该中间件提供了很多后端支持:
5.12.2、实例代码1
package main

import (
  "github.com/gin-contrib/sessions"
  "github.com/gin-contrib/sessions/cookie"
  "github.com/gin-gonic/gin"
)

func main() {
  r := gin.Default()
  store := cookie.NewStore([]byte("secret"))
  r.Use(sessions.Sessions("mysession", store))

  r.GET("/hello", func(c *gin.Context) {
    session := sessions.Default(c)

    if session.Get("hello") != "world" {
      session.Set("hello", "world")
      session.Save()
    }

    c.JSON(200, gin.H{"hello": session.Get("hello")})
  })
  r.Run(":8000")
}
更多用法:https://pkg.go.dev/github.com/gin-contrib/sessions#section-readme
5.12.3、实例代码2
package main

import (
	"github.com/gin-contrib/sessions"
	"github.com/gin-contrib/sessions/cookie"
	"github.com/gin-gonic/gin"
)

func Handler(c *gin.Context) {
	session := sessions.Default(c)
	//获得session值  get
	if session.Get("hello") != "word" {
		//设置
		session.Set("hello", "world")
		//保存
		session.Save()
	}
	c.JSON(200, gin.H{"hello": session.Get("hello")})
}

func main() {
	e := gin.Default()
	store := cookie.NewStore([]byte("secret"))
	//注入中间件
	e.Use(sessions.Sessions("mysession", store))
	e.GET("/hello", Handler)
	e.Run(":8888")
}
5.13、Gin 实现restful风格的CRUD
package main

import (
	"fmt"
	"strconv"
	"github.com/gin-gonic/gin"
)

type User struct {
	UId  int    `json:"uid"`
	Name string `json:"name"`
	Age  int    `json:"age"`
}

var users = make([]User, 3)

func init() {
	u1 := User{1, "tom", 20}
	u2 := User{2, "kite", 30}
	u3 := User{3, "rose", 40}
	users = append(users, u1)
	users = append(users, u2)
	users = append(users, u3)
	fmt.Println(users)
}

func find(uid int) (*User, int) {
	for i, u := range users {
		if u.UId == uid {
			return &u, i
		}
	}
	return nil, -1
}

func AddUser(c *gin.Context) {
	u4 := User{4, "Joe", 50}
	users = append(users, u4)
	c.JSON(200, users)
}
func DelUser(c *gin.Context) {
	uid := c.Param("uid")
	id, _ := strconv.Atoi(uid)
	_, i := find(id)
	users = append(users[:i], users[i+1:]...)
	c.JSON(200, users)
}

func UpdateUser(c *gin.Context) {
	uid := c.Param("uid")
	id, _ := strconv.Atoi(uid)
	u, _ := find(id)
	u.Name = "修改的Name"
	c.JSON(200, u)
}

func FindUser(c *gin.Context) {
	uid := c.Param("uid")
	id, _ := strconv.Atoi(uid)
	u, _ := find(id)
	c.JSON(200, u)
}
func main() {

	e := gin.Default()
	e.GET("/user/:uid", FindUser)
	e.PUT("/user/:uid", UpdateUser)
	e.DELETE("/user/:uid", DelUser)
	e.POST("/user/", AddUser)
	e.Run()

}
5.14、Gin 实现路由分组
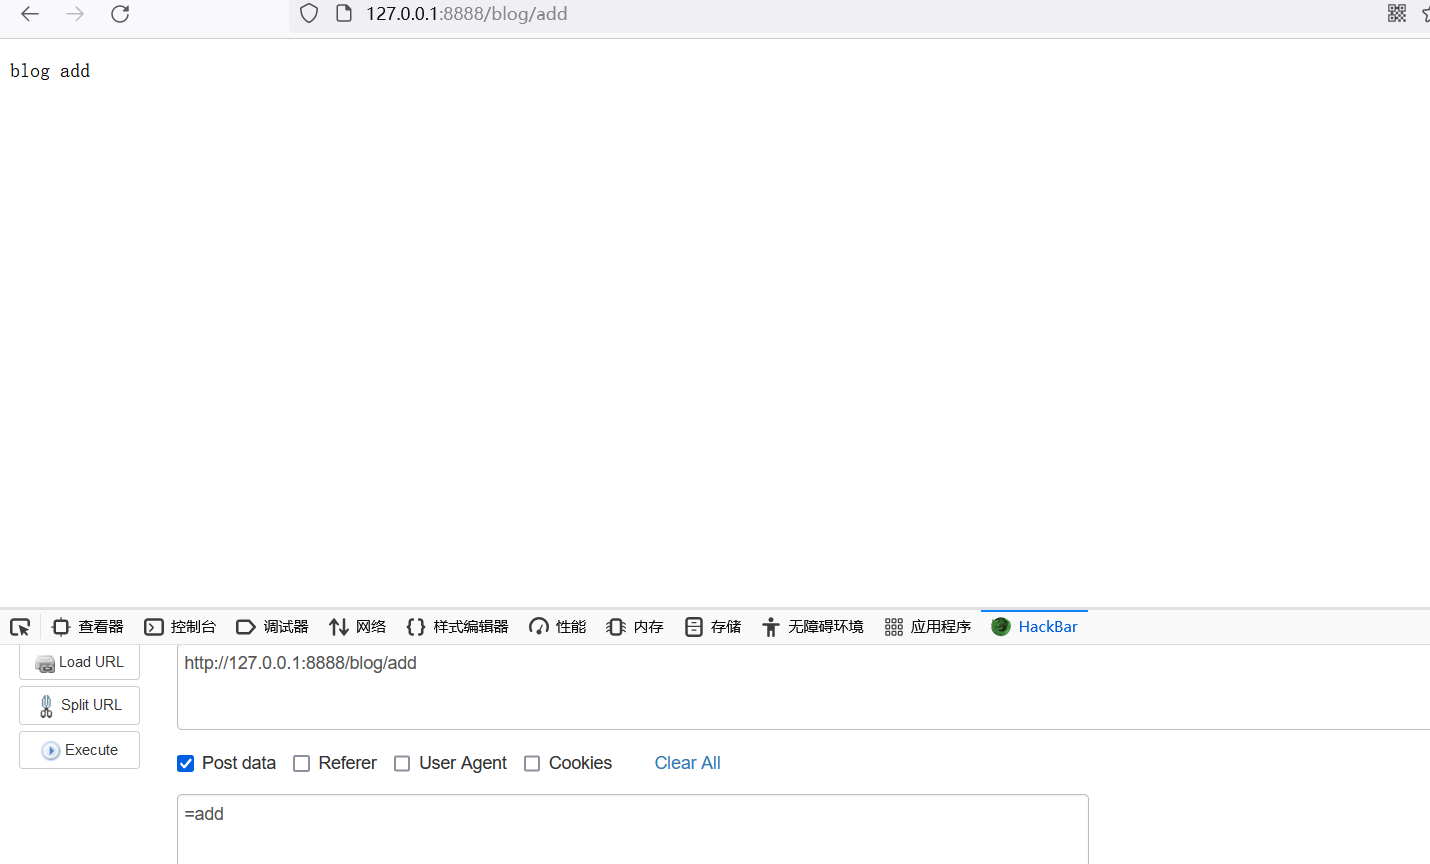
假如你的网站有多个模块:博客、教程、视频、问答,每个模块又有多个路由,这样就可以进行路由分组,使用的方法是router.Group(“分组名称”)
package main

import "github.com/gin-gonic/gin"

func F1(c *gin.Context) {
	c.String(200, "blog list")
}
func F2(c *gin.Context) {
	c.String(200, "blog post")
}
func F3(c *gin.Context) {
	c.String(200, "blog add")
}
func F4(c *gin.Context) {
	c.String(200, "video list")
}
func F5(c *gin.Context) {
	c.String(200, "video post")
}
func F6(c *gin.Context) {
	c.String(200, "video add")
}

func main() {
	router := gin.Default()

	// 博客
	// 访问:http://localhost:8888/blog/list
	v1 := router.Group("/blog")
	{
		v1.GET("/list", F1)
		v1.POST("/post", F2)
		v1.POST("/add", F3)
	}

	// 视频
	// 访问:http://localhost:8888/video/list
	v2 := router.Group("/video")
	{
		v2.GET("/list", F4)
		v2.POST("/post", F5)
		v2.POST("/add", F6)
	}

	router.Run(":8888")
}
5.15、Gin 输出渲染
Gin支持很多种输出渲染,可以是简单的字符串、JSON、XML、HTML、ProtoBuf。使用的方法如下:
c.JSON(200, nil)
c.XML(200, nil)
c.HTML(200, "", nil)
c.String(200, "")
c.ProtoBuf(200, nil)
这里像字符串、JSON、HTML我们都用过,这里我们再总结一下。
package main

import "github.com/gin-gonic/gin"

func TestJson(c *gin.Context) {
	c.JSON(200, gin.H{
		"name": "Caidd123",
		"age":  "23",
	})
}

func TestXML(c *gin.Context) {
	c.XML(200, gin.H{
		"name": "Caidd123",
		"age":  "23",
	})
}

func TestHtml(c *gin.Context) {
	c.HTML(200, "login.html", nil)
}

func TestString(c *gin.Context) {
	c.String(200, "Caidd123,23")
}

func main() {
	e := gin.Default()

	e.GET("/test_json", TestJson)
	e.GET("/test_xml", TestXML)
	e.LoadHTMLGlob("templates/*")
	e.GET("/test_html", TestHtml)
	e.GET("/test_string", TestString)

	e.Run(":8888")
}
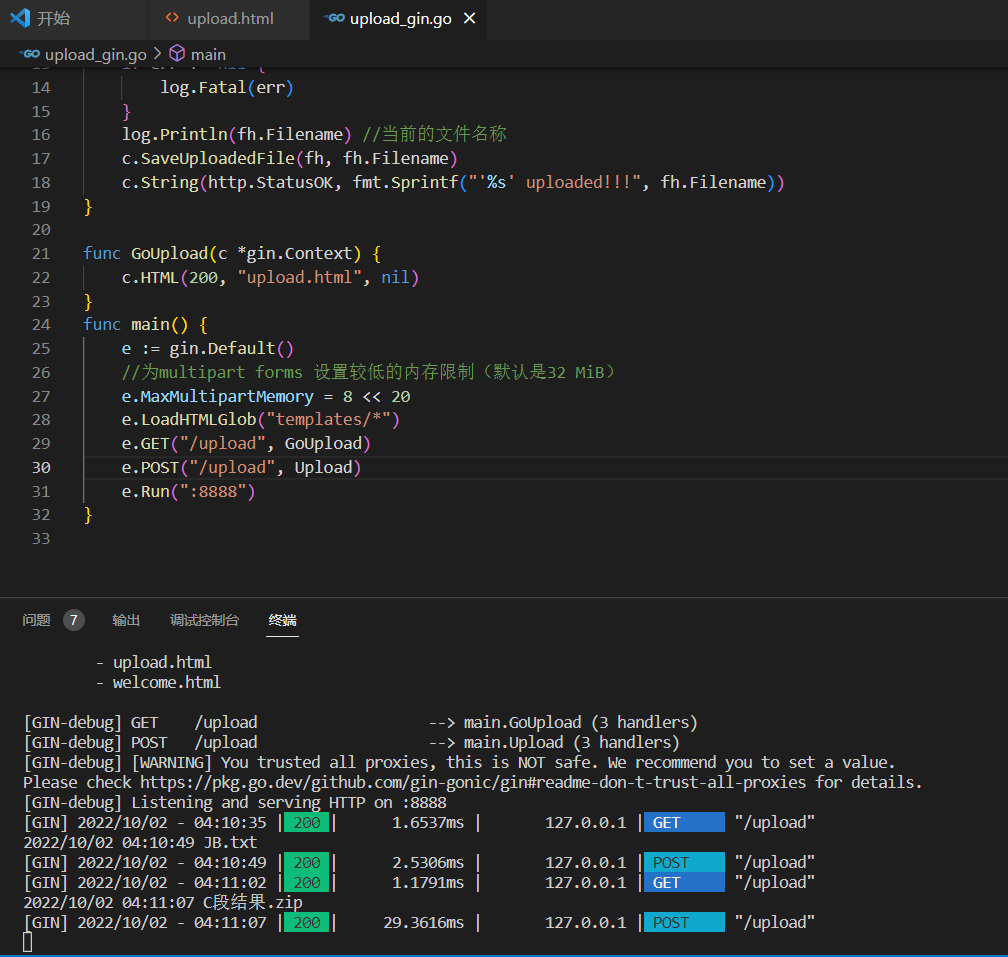
5.16、Gin实现文件上传
5.16.1、创建html文件
<!DOCTYPE html>
<html lang="en">
<head>
    <meta charset="UTF-8">
    <meta http-equiv="X-UA-Compatible" content="IE=edge">
    <meta name="viewport" content="width=device-width, initial-scale=1.0">
    <title>Document</title>
</head>
<body>

    <form action="/upload" method="post" enctype="multipart/form-data">
    请选择上传文件:<input type="file" name="file" id=""><br>
    <input type="submit" value="上传">
    </form>

</body>
</html>
5.16.2、Go Code
package main

import (
	"fmt"
	"log"
	"net/http"

	"github.com/gin-gonic/gin"
)

func Upload(c *gin.Context) {
	// 单文件
	file, _ := c.FormFile("file")
	log.Println(file.Filename)

	// 上传文件到项目根目录,使用原文件名
	c.SaveUploadedFile(file, file.Filename)

	c.String(http.StatusOK, fmt.Sprintf("'%s' uploaded!", file.Filename))
}

func GoUpload(c *gin.Context) {
	c.HTML(200, "upload.html", nil)
}

func main() {
	router := gin.Default()
	// 为 multipart forms 设置较低的内存限制 (默认是 32 MiB)
	router.MaxMultipartMemory = 8 << 20 // 8 MiB
	router.LoadHTMLGlob("templates/*")
	router.GET("/upload", GoUpload)
	router.POST("/upload", Upload)
	router.Run(":8888")
}

 浙公网安备 33010602011771号