仿牛客网社区开发——第1章 初识Spring Boot,开发社区首页
开发社区首页
DAO 层
1.先写 entity 包中的实体类
- 依据数据库中表的字段建立相应的属性,并且生成其get和set方法,以及toString方法;
2.编写对应的 Mapper 接口,规定需要实现的方法
- selectDiscussPosts 查询帖子,参数 userid,offset-起始页,limit-每一页显示的数据
- userid==0 表示查询全部帖子,!=0 表示查询对应用户的帖子
- countDiscussPosts 表示查询一共有多少帖子,去除被拉黑的帖子,为了下一步的分页
@Mapper
public interface DiscussPostMapper {

    List<DiscussPost> selectDiscussPosts(@Param("userId") int userId, @Param("offset") int offset, @Param("limit") int limit);

    int selectDiscussPostRows(@Param("userId") int userId);

}
注意:
- 一定写 @Mapper 注解!不准写 @Repository 注解,找 bug 找半天
- 老师讲到,如果只有一个参数,并且在 <if> 里使用,则必须加 @Param 注解(这个具体也不清楚为什么)
- 我用的 IDEA 2017,多个参数不加@Param注解会报错,但是 IDEA 2019 貌似没有这个问题。具体见关于Mybatis的Mapper中多参数方法不使用@param注解报错的问题
3.编写 Mapper 对应的 xml 文件,编写 sql 语句
<?xml version="1.0" encoding="UTF-8" ?>
<!DOCTYPE mapper
        PUBLIC "-//mybatis.org//DTD Mapper 3.0//EN"
        "http://mybatis.org/dtd/mybatis-3-mapper.dtd">
<mapper namespace="com.zwc.community.dao.DiscussPostMapper">
    <sql id="selectFields">
        id, user_id, title, content, `type`, status, create_time, comment_count, score
    </sql>

    <select id="selectDiscussPosts" resultType="com.zwc.community.entity.DiscussPost">
        SELECT <include refid="selectFields"/>
        FROM discuss_post
        WHERE status != 2
        <if test="userId != 0">
            AND user_id = #{userId}
        </if>
        ORDER BY `type` DESC, create_time DESC
        limit #{offset}, #{limit}
    </select>

    <select id="selectDiscussPostRows" resultType="int">
        SELECT count(id)
        FROM discuss_post
        WHERE status != 2
        <if test="userId != 0">
            AND user_id = #{userId}
        </if>
    </select>
</mapper>
Service 层
4.编写与 Mapper 对应的 Service 层,实现相应的方法
@Service
public class DiscussPostService {

    @Autowired
    private DiscussPostMapper discussPostMapper;

    public List<DiscussPost> findDisscussPosts(int userId, int offset, int limit) {
        return discussPostMapper.selectDiscussPosts(userId, offset, limit);
    }

    public int findDisscussPostRows(int userId) {
        return discussPostMapper.selectDiscussPostRows(userId);
    }

}- 为了把用户表和帖子表相关联,通过 userid 查询到 username 可以有两种办法:
1、在写 sql 查询的时候通过语句查询到 username 返回;
2、在查询到帖子后通过 UserService 层的方法查询到 User,再返回其 User 对象,从而获得其它详细信息;一般使用这种方法,代码比较直观,使用Redis 缓存数据会更加方便。
@Service
public class UserService {

    @Autowired
    private UserMapper userMapper;

    public User findUserById(int id) {
        return userMapper.selectById(id);
    }

}
5.导入前端资源
把css、img、js静态资源放在static下,html网页放在templates下

Controller 层
- 编写对应的 Controller,调用 Service 层中的方法;
- 调用 DiscussPostService 找到帖子的前十条数据,并把其放到 List 集合中;
- 创建一个新的集合,遍历查询每一条帖子,通过 userid 找到对应的详细 User 信息,并且把它们放到 map 中,最后加入新集合中
- 把新集合加入到 model 模型中
- 返回主页面
@Controller
public class HomeController {

    @Autowired
    private DiscussPostService discussPostService;

    @Autowired
    private UserService userService;

    @GetMapping("/index")
    public String getIndexPage(Model model) {
        List<DiscussPost> list = discussPostService.findDisscussPosts(0, 0, 10);
        List<Map<String, Object>> discussPosts = new ArrayList<>();
        for(DiscussPost post : list) {
            Map<String, Object> map = new HashMap<>();
            map.put("post", post);
            User user = userService.findUserById(post.getUserId());
            map.put("user", user);
            discussPosts.add(map);
        }
        model.addAttribute("discussPosts", discussPosts);
        return "index";
    }
Thymeleaf
- 声明 Thymeleaf
<html lang="en" xmlns:th="http://www.thymeleaf.org">- 绝对路径不需要修改,相对路径需要修改防止找不到资源。方法是,把相对路径用 @{} 包起来,这样就会寻找到正确的路径(thymeleaf里面*{},@{},${}的用法)
<link rel="stylesheet" th:href="@{/css/global.css}" />显示帖子列表的代码如下:
<!-- 帖子列表 -->
<ul class="list-unstyled">
    <li class="media pb-3 pt-3 mb-3 border-bottom" th:each="map:${discussPosts}">
        <a href="site/profile.html">
            <img th:src="${map.user.headerUrl}" class="mr-4 rounded-circle" alt="用户头像" style="width:50px;height:50px;">
        </a>
        <div class="media-body">
            <h6 class="mt-0 mb-3">
                <a href="#" th:utext="${map.post.title}">备战春招,面试刷题跟他复习,一个月全搞定!</a>
                <span class="badge badge-secondary bg-primary" th:if="${map.post.type==1}">置顶</span>
                <span class="badge badge-secondary bg-danger" th:if="${map.post.status==1}">精华</span>
            </h6>
            <div class="text-muted font-size-12">
                <u class="mr-3" th:utext="${map.user.username}">寒江雪</u> 发布于 <b th:text="${#dates.format(map.post.createTime, 'yyyy-MM-dd HH:mm:ss')}">2019-04-15 15:32:18</b>
                <ul class="d-inline float-right">
                    <li class="d-inline ml-2">赞 11</li>
                    <li class="d-inline ml-2">|</li>
                    <li class="d-inline ml-2">回帖 7</li>
                </ul>
            </div>
        </div>
    </li>

</ul>
其中,例如 ${map.user.headerUrl} 具体会按照如下的步骤访问到对应的值。
-
使用 utext 会把转义字符(如<)进行相应的转义,text 则不会
-
Thymeleaf 的日期格式化工具,#dates.format(xxx, 'yyyy-MM-dd HH:mm:ss')
分页组件开发
思路:
浏览器和服务器之间:
- 从浏览器传回的参数得知当前页码和显示上限,即每一页最多显示几条数据;
- 要有查询路径,即点击分页跳转的页面路径
跟数据库相关的操作:
- 告诉数据库查询的 offset 起始行数,和 limit 每页显示帖子数
- offset 通过当前页的页码 current 计算得出,公式:offset = (current - 1) * limit
页面显示:
- 要计算总页数,需要先查询帖子总数,再把帖子总数 / limit 就能够得到一共有多少页,如果 % 取余 !=0,总页数等于结果加1;
- 显示从多少页 from 到多少页 to(具体逻辑见代码)。
操作:
1.建立Page实体类
- 编写对应属性和 get、set 方法,以及其它方法
- set方法增加条件判断
public class Page {
// 当前页码
private int current = 1;
// 显示上限
private int limit = 10;
// 数据总数(用于计算总页数)
private int rows;
// 查询路径
private String path;
public int getCurrent() {
return current;
}
public void setCurrent(int current) {
if (current >= 1)
this.current = current;
}
public int getLimit() {
return limit;
}
public void setLimit(int limit) {
if (limit > 0 && limit <= 100)
this.limit = limit;
}
public int getRows() {
return rows;
}
public void setRows(int rows) {
if (rows >= 0)
this.rows = rows;
}
public String getPath() {
return path;
}
public void setPath(String path) {
this.path = path;
}
/**
* 获取当前页的起始行
* @return
*/
public int getOffset() {
return (current - 1) * limit;
}
/**
* 获取总页数
* @return
*/
public int getTotal() {
int total = rows / limit;
return rows % limit == 0 ? total : total + 1;
}
/**
* 获取起始页码
* @return
*/
public int getFrom() {
int from = current - 2;
return from > 0 ? from : 1;
}
/**
* 获取结束页码
* @return
*/
public int getTo() {
int to = current + 2;
int total = getTotal();
return to <= total ? to :total;
}
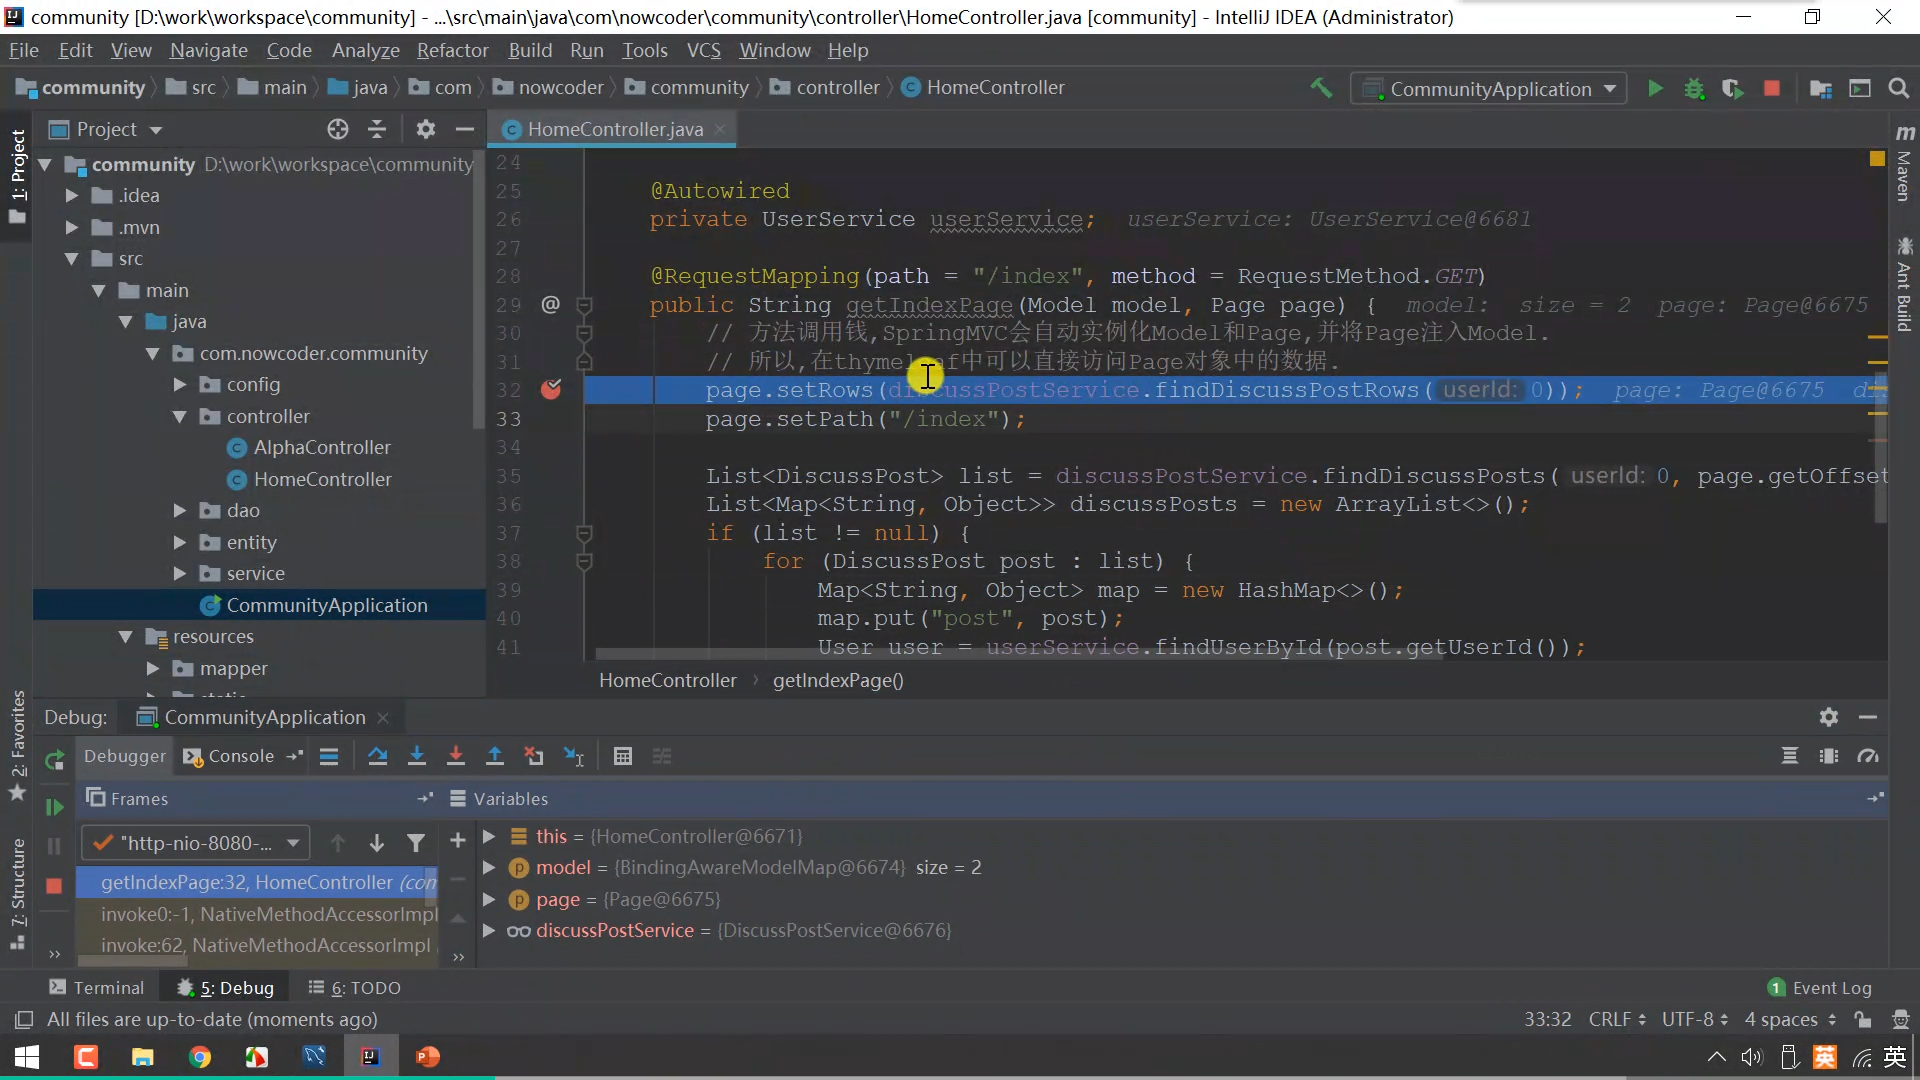
}2.修改Controller
- 增加 Page 对象
- 设置 rows 和 path,修改 offset 和 limit 使其为动态
- 不需要向 model 中添加 Page 对象,因为方法调用前,SpringMVC会自动实例化 Model 和 Page,并将 Page 注入 Model。所以,在 Thymeleaf 中可以直接访问 Page 对象中的数据
@GetMapping("/index")
public String getIndexPage(Model model, Page page) {
    page.setRows(discussPostService.findDisscussPostRows(0));
    page.setPath("/index");
    List<DiscussPost> list = discussPostService.findDisscussPosts(0, page.getOffset(), page.getLimit());
    List<Map<String, Object>> discussPosts = new ArrayList<>();
    for(DiscussPost post : list) {
        Map<String, Object> map = new HashMap<>();
        map.put("post", post);
        User user = userService.findUserById(post.getUserId());
        map.put("user", user);
        discussPosts.add(map);
    }
    model.addAttribute("discussPosts", discussPosts);
    return "index";
}
3.修改分页
- 首先判断 rows 即帖子数量是否大于 0,否则不显示分页
- 修改首页和末页、修改其 current 的值
- 修改上一页和下一页,使各自的 current 的值减 1 和加 1
- 循环每一页,使用 Thymeleaf 的 #numbers.sequence(from, to) 工具,生成一组连续的数字,遍历
- 当页数为第一页和最后一页的时候,把上一页和下一页的按钮变成灰色
- 判断当前页数,修改 active 点亮当前页面
<!-- 分页 -->
<nav class="mt-5" th:if="${page.rows>0}">
    <ul class="pagination justify-content-center">
        <li class="page-item">
            <a class="page-link" th:href="@{${page.path}(current=1)}">首页</a>
        </li>
        <li th:class="|page-item ${page.current==1?'disabled':''}|">
            <a class="page-link" th:href="@{${page.path}(current=${page.current!=1?page.current-1:1})}">上一页</a>
        </li>
        <li th:class="|page-item ${page.current==i?'active':''}|" th:each="i:${#numbers.sequence(page.from, page.to)}">
            <a class="page-link" th:href="@{${page.path}(current=${i})}" th:text="${i}">1</a>
        </li>
        <li th:class="|page-item ${page.current==page.total?'disabled':''}|">
            <a class="page-link" th:href="@{${page.path}(current=${page.current!=page.total?page.current+1:page.total})}">下一页</a>
        </li>
        <li class="page-item">
            <a class="page-link" th:href="@{${page.path}(current=${page.total})}">末页</a>
        </li>
    </ul>
</nav>自己写代码时碰到的问题:
- 第一个就是上面提到的把 @Mapper 注解写成了 @Repository
- 写html时,总是漏右括号或者右边的引号
- 注意 @Param 注解
- 注意 Thymeleaf 的语法,href 的 @{} 以及其中的参数的写法,class的 | | 包含到哪以及其语法。
项目调试技巧
响应状态码的含义
具体见以下网址。重点关注:200(成功)、302(重定向)、404(4 开头为客户端的问题)、500(5 开头为服务端的问题)
https://developer.mozilla.org/zh-CN/docs/Web/HTTP/Status
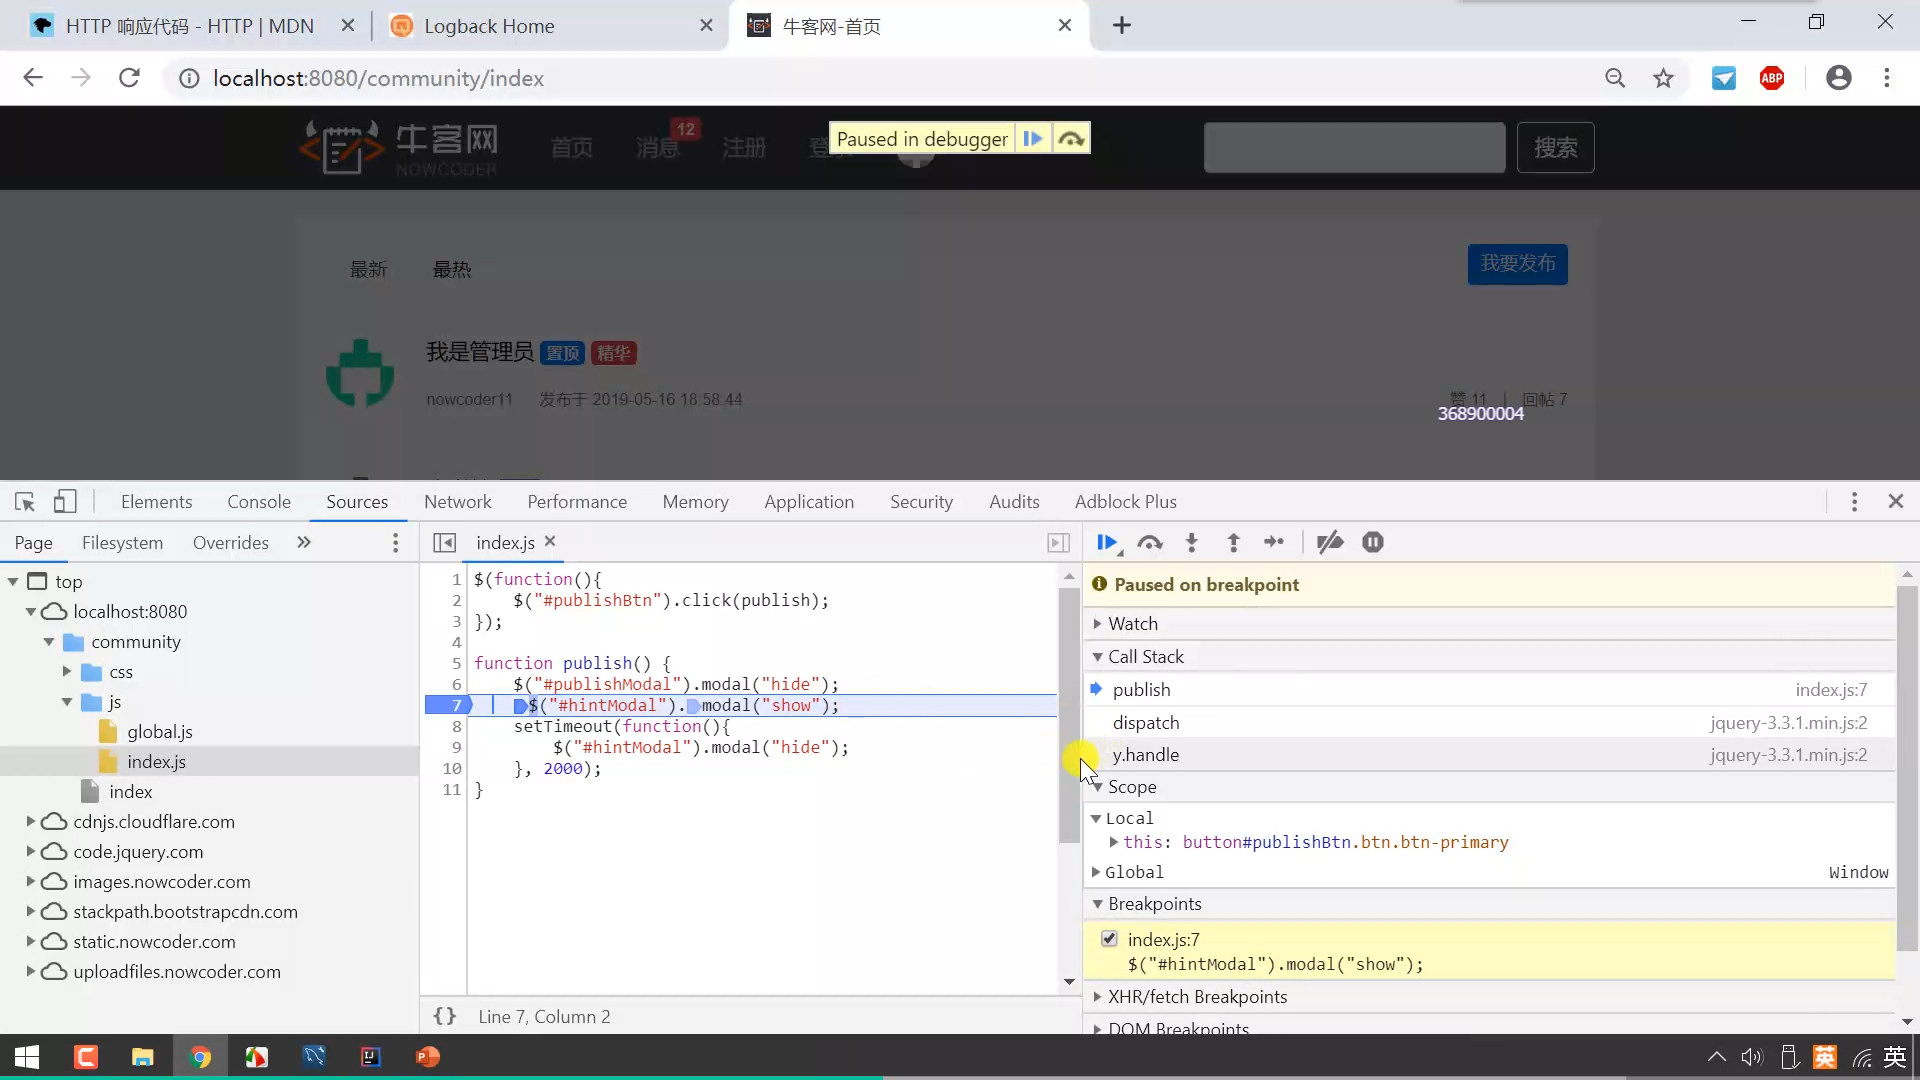
服务端断点调试
主要就是在 IDEA 中进行 Debug,平时也都用过。
客户端断点调试
在浏览器进行调试,感觉后端的话应该不大用得到。
设置日志级别,并将日志输出到不同的终端
日志有 5 个级别:trace(跟踪)、debug(调试)、info(普通)、warn(警告)、error(错误)。
严重性 / 级别从左到右逐渐递增。一般项目在开发阶段需要用到 debug 级别,项目上线后只需要 info 甚至更高级别即可。(trace 不怎么用得到)
在配置文件中启用对应的级别。启用了对应的级别后,大于等于该级别的日志都会被记录。
# logger
logging.level.com.zwc.community=debug
通过 LoggerFactory 工厂得到 Logger 类,传的参数 LoggerTests.class,即把类名作为 Logger 的名字。
//@RunWith(SpringRunner.class)
@SpringBootTest
@ContextConfiguration(classes = CommunityApplication.class)
public class LoggerTests {

    private static Logger logger = LoggerFactory.getLogger(LoggerTests.class);

    @Test
    public void test1() {
        logger.debug("debug log");
        logger.info("info log");
        logger.warn("warn log");
        logger.error("error log");
    }

}
以上仅仅将日志打印到控制台。
为了能够长久的保存日志,需要将日志存到指定的文件里。
在实际的开发中,通常把日志按照不同的级别存到不同的文件里,并且在文件达到一定大小后,再建一个新文件,将日志记录到新的文件里。
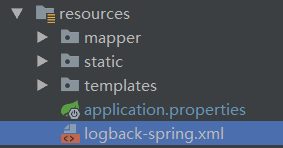
配置文件 logback-spring.xml(取这种名字并且放到 resources 目录下,SpringBoot 就能够自动启用这个文件里的配置)。
具体配置如下:
<?xml version="1.0" encoding="UTF-8"?>
<configuration>
    <contextName>community</contextName>
    <property name="LOG_PATH" value="D:/Java/project"/>
    <property name="APPDIR" value="community"/>

    <!-- error file -->
    <appender name="FILE_ERROR" class="ch.qos.logback.core.rolling.RollingFileAppender">
        <file>${LOG_PATH}/${APPDIR}/log_error.log</file>
        <rollingPolicy class="ch.qos.logback.core.rolling.TimeBasedRollingPolicy">
            <fileNamePattern>${LOG_PATH}/${APPDIR}/error/log-error-%d{yyyy-MM-dd}.%i.log</fileNamePattern>
            <timeBasedFileNamingAndTriggeringPolicy class="ch.qos.logback.core.rolling.SizeAndTimeBasedFNATP">
                <maxFileSize>5MB</maxFileSize>
            </timeBasedFileNamingAndTriggeringPolicy>
            <maxHistory>30</maxHistory>
        </rollingPolicy>
        <append>true</append>
        <encoder class="ch.qos.logback.classic.encoder.PatternLayoutEncoder">
            <pattern>%d %level [%thread] %logger{10} [%file:%line] %msg%n</pattern>
            <charset>utf-8</charset>
        </encoder>
        <filter class="ch.qos.logback.classic.filter.LevelFilter">
            <level>error</level>
            <onMatch>ACCEPT</onMatch>
            <onMismatch>DENY</onMismatch>
        </filter>
    </appender>

    <!-- warn file -->
    <appender name="FILE_WARN" class="ch.qos.logback.core.rolling.RollingFileAppender">
        <file>${LOG_PATH}/${APPDIR}/log_warn.log</file>
        <rollingPolicy class="ch.qos.logback.core.rolling.TimeBasedRollingPolicy">
            <fileNamePattern>${LOG_PATH}/${APPDIR}/warn/log-warn-%d{yyyy-MM-dd}.%i.log</fileNamePattern>
            <timeBasedFileNamingAndTriggeringPolicy class="ch.qos.logback.core.rolling.SizeAndTimeBasedFNATP">
                <maxFileSize>5MB</maxFileSize>
            </timeBasedFileNamingAndTriggeringPolicy>
            <maxHistory>30</maxHistory>
        </rollingPolicy>
        <append>true</append>
        <encoder class="ch.qos.logback.classic.encoder.PatternLayoutEncoder">
            <pattern>%d %level [%thread] %logger{10} [%file:%line] %msg%n</pattern>
            <charset>utf-8</charset>
        </encoder>
        <filter class="ch.qos.logback.classic.filter.LevelFilter">
            <level>warn</level>
            <onMatch>ACCEPT</onMatch>
            <onMismatch>DENY</onMismatch>
        </filter>
    </appender>

    <!-- info file -->
    <appender name="FILE_INFO" class="ch.qos.logback.core.rolling.RollingFileAppender">
        <file>${LOG_PATH}/${APPDIR}/log_info.log</file>
        <rollingPolicy class="ch.qos.logback.core.rolling.TimeBasedRollingPolicy">
            <fileNamePattern>${LOG_PATH}/${APPDIR}/info/log-info-%d{yyyy-MM-dd}.%i.log</fileNamePattern>
            <timeBasedFileNamingAndTriggeringPolicy class="ch.qos.logback.core.rolling.SizeAndTimeBasedFNATP">
                <maxFileSize>5MB</maxFileSize>
            </timeBasedFileNamingAndTriggeringPolicy>
            <maxHistory>30</maxHistory>
        </rollingPolicy>
        <append>true</append>
        <encoder class="ch.qos.logback.classic.encoder.PatternLayoutEncoder">
            <pattern>%d %level [%thread] %logger{10} [%file:%line] %msg%n</pattern>
            <charset>utf-8</charset>
        </encoder>
        <filter class="ch.qos.logback.classic.filter.LevelFilter">
            <level>info</level>
            <onMatch>ACCEPT</onMatch>
            <onMismatch>DENY</onMismatch>
        </filter>
    </appender>

    <!-- console -->
    <appender name="STDOUT" class="ch.qos.logback.core.ConsoleAppender">
        <encoder>
            <pattern>%d %level [%thread] %logger{10} [%file:%line] %msg%n</pattern>
            <charset>utf-8</charset>
        </encoder>
        <filter class="ch.qos.logback.classic.filter.ThresholdFilter">
            <level>debug</level>
        </filter>
    </appender>

    <logger name="com.zwc.community" level="debug"/>

    <root level="info">
        <appender-ref ref="FILE_ERROR"/>
        <appender-ref ref="FILE_WARN"/>
        <appender-ref ref="FILE_INFO"/>
        <appender-ref ref="STDOUT"/>
    </root>

</configuration>
一般使用时,直接复制即可,无需记忆。注意修改其中的日志存储路径、项目名等即可。最大文件大小、日志最长保存时间等视情况进行修改。
版本控制
认识 Git
Git 介绍:Git - Book
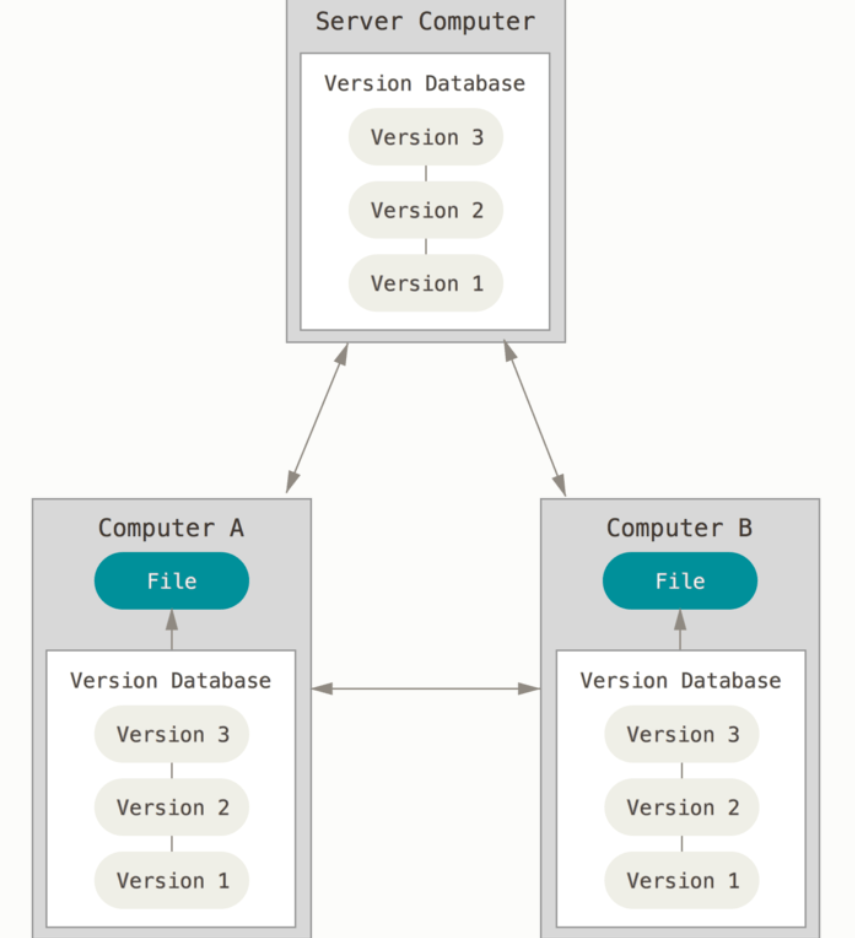
分布式版本控制:
代码先存储在本地仓库,然后再去推送到远程仓库。
Git 常用命令
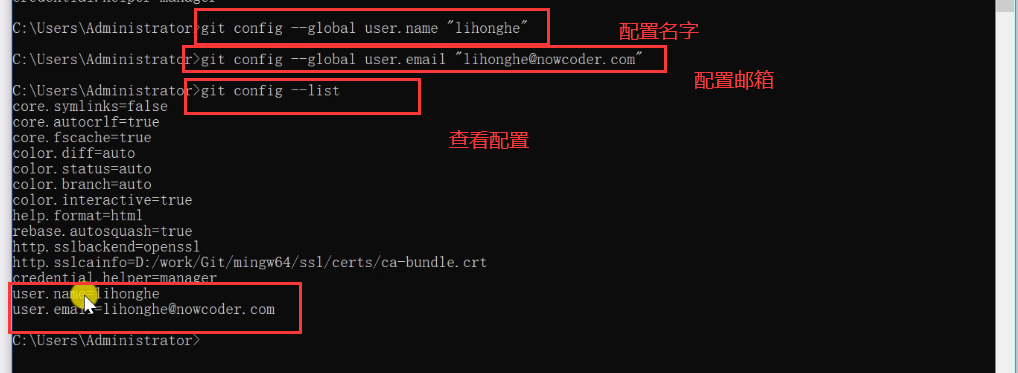
基本配置
上传本地仓库
首先 cd 到要管理的本地的代码文件夹下。
git.init:初始化
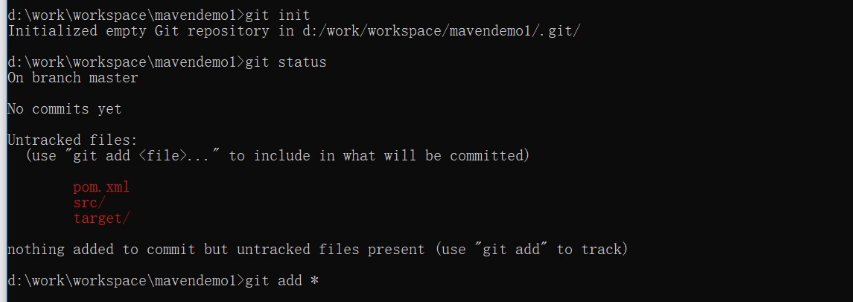
git add *:将文件夹中所有文件都添加到 git 中
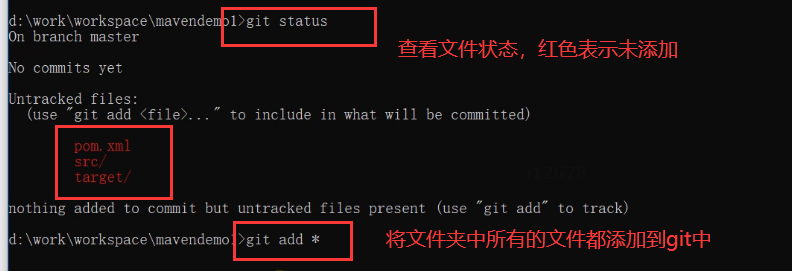
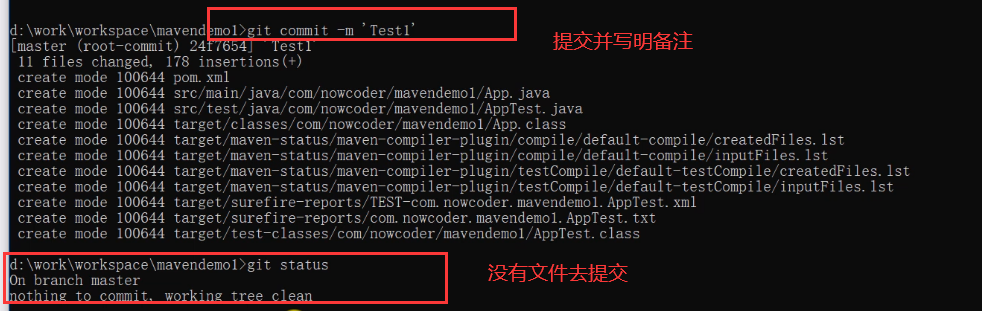
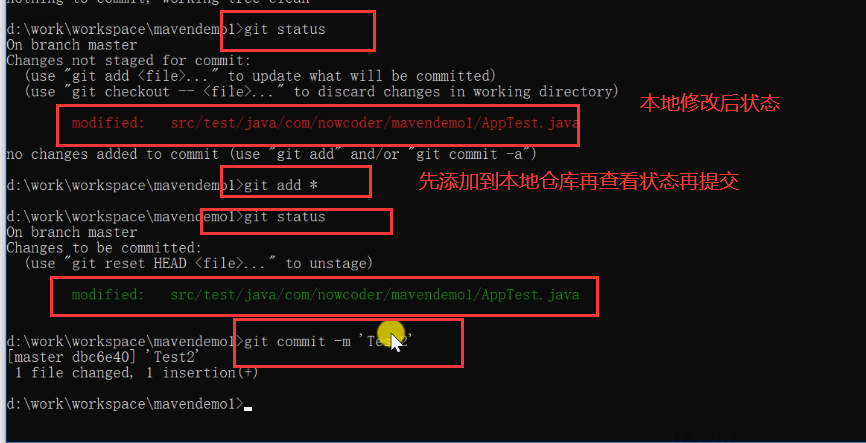
添加到本地仓库后,再查看状态就变成了绿色,这是只是加进去了,未提交。
git commit -m 'Test1':提交
提交后,再查看状态就会显示“nothing to commit, working tree clean”
此时再去修改代码,再看状态会有提示(modified)。
上传远程仓库
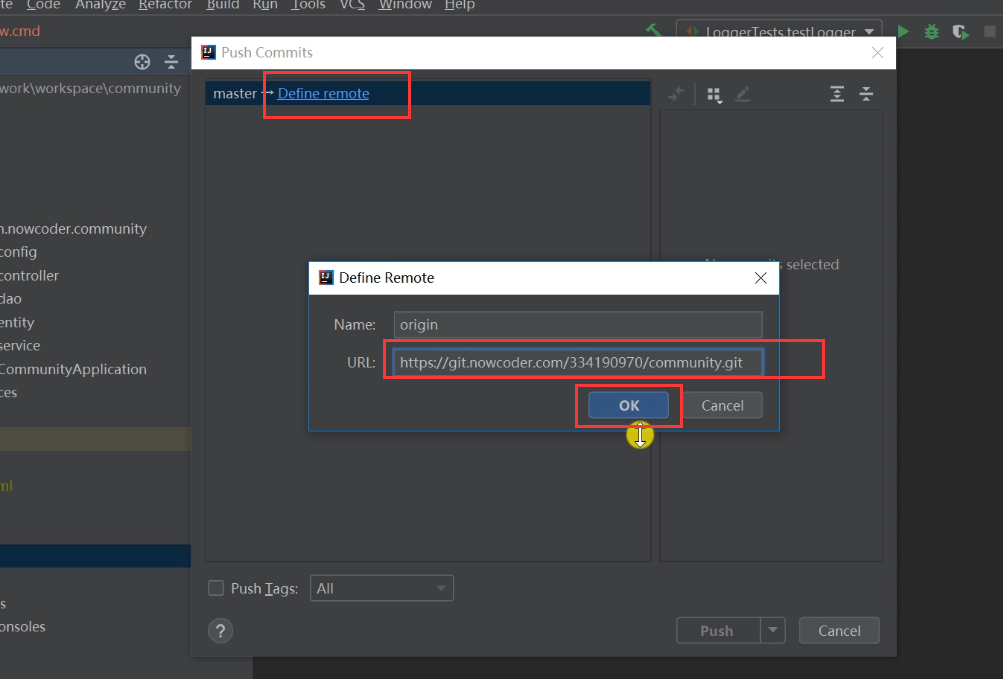
想将本地仓库的代码上传到远程仓库上,必须先在远程仓库上设置秘钥。
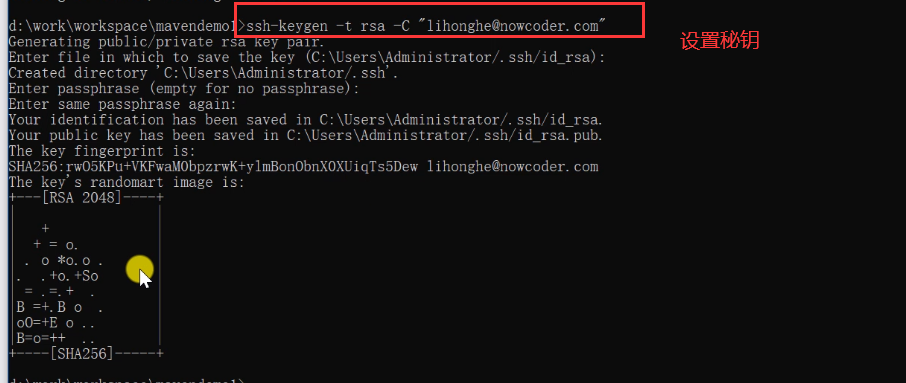
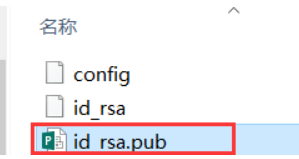
找到生成秘钥的位置,打开文件,复制秘钥,将秘钥添加到远程仓库中。
然后关联远程仓库,取别名 origin,以便每次不用再去敲网址。

克隆命令 git clone + 网址
IDEA 集成 Git
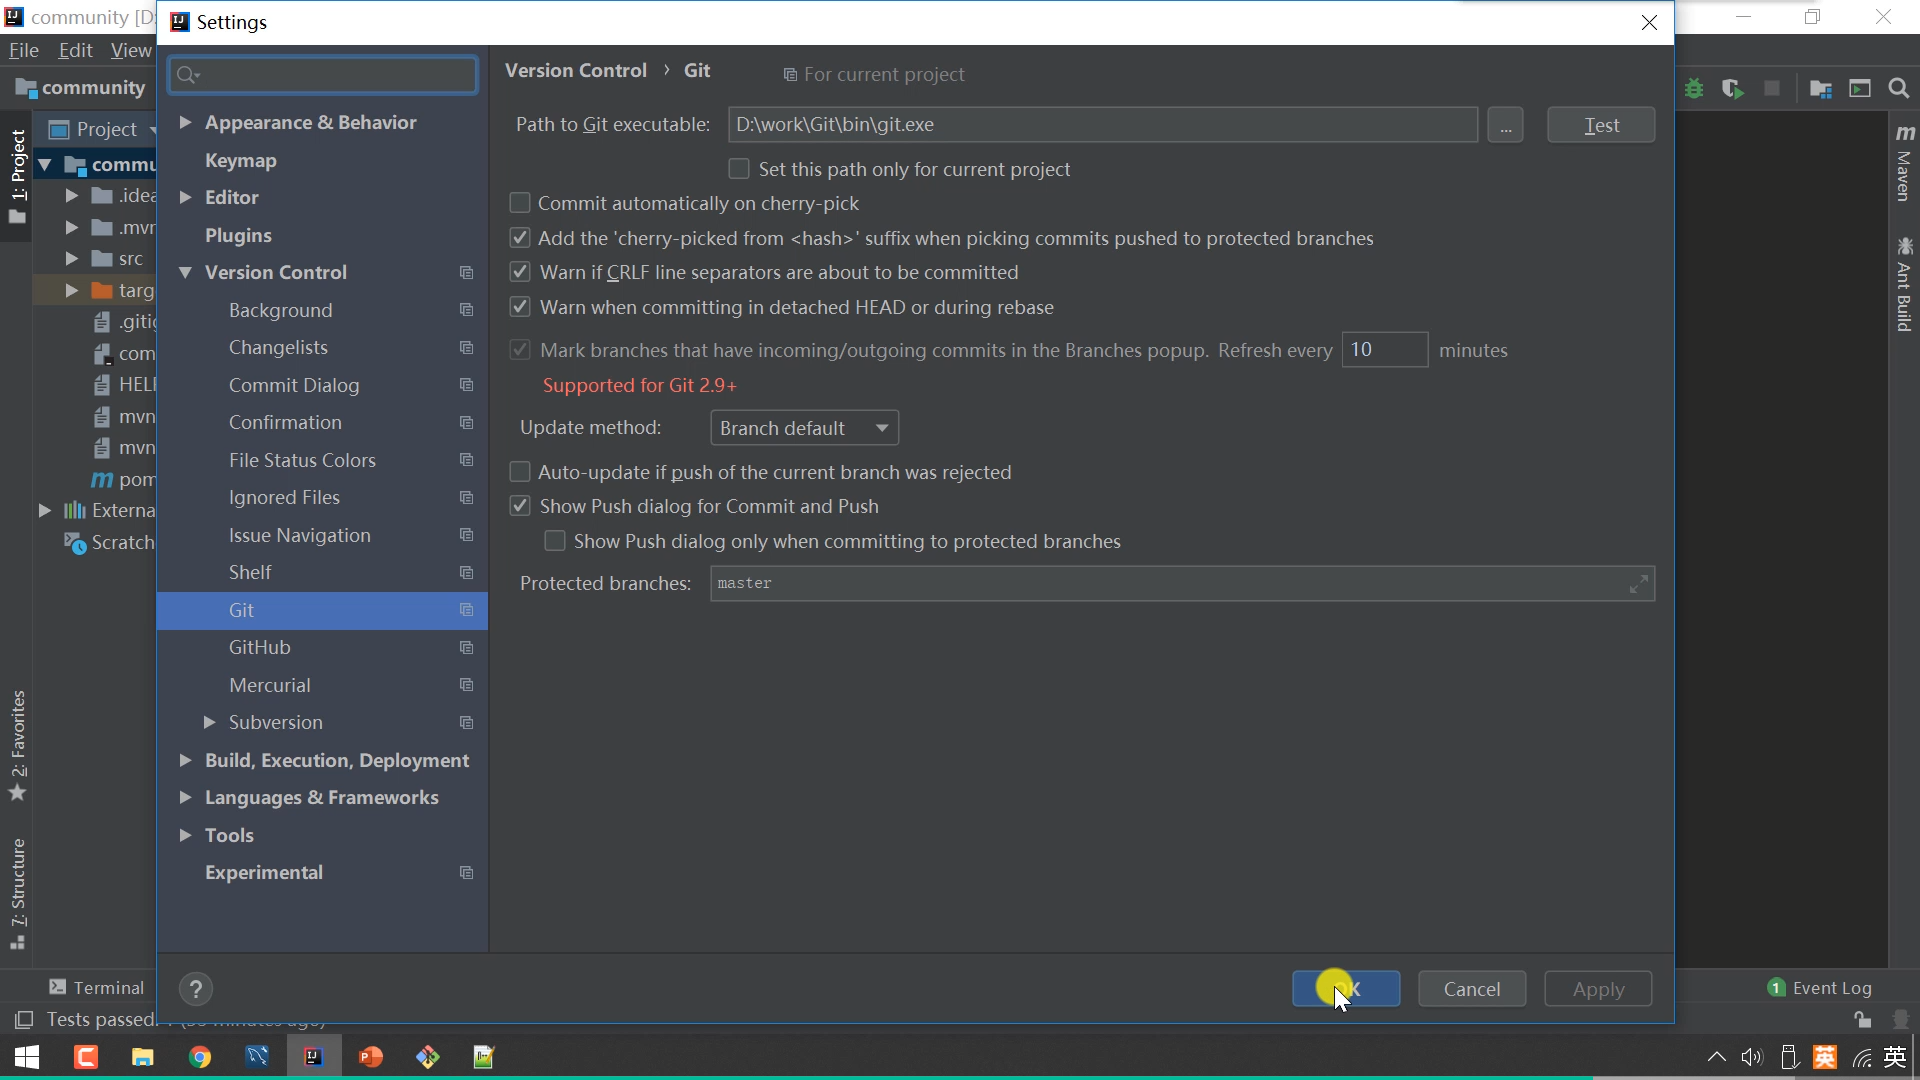
设置 Git 执行文件路径
先添加并提交到本地仓库,再提交到远程仓库中。
初始化和添加到本地仓库
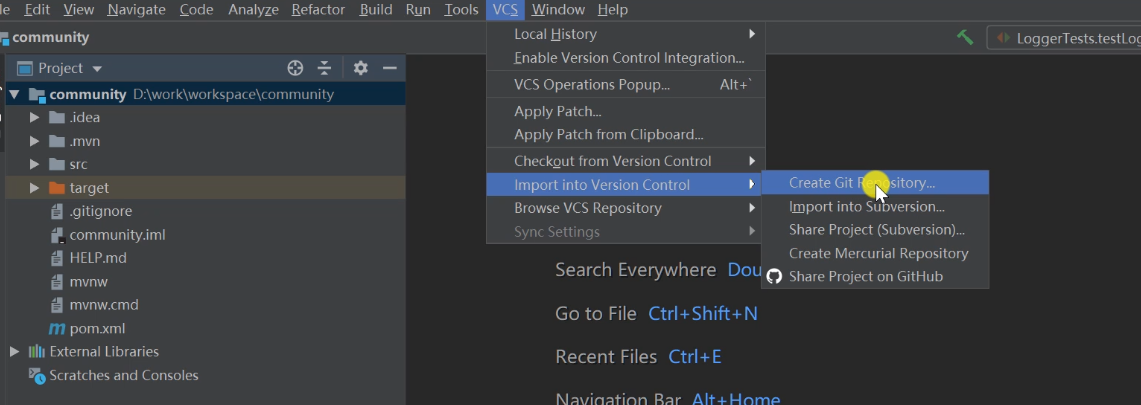
将项目添加到本地仓库后,代码变红。
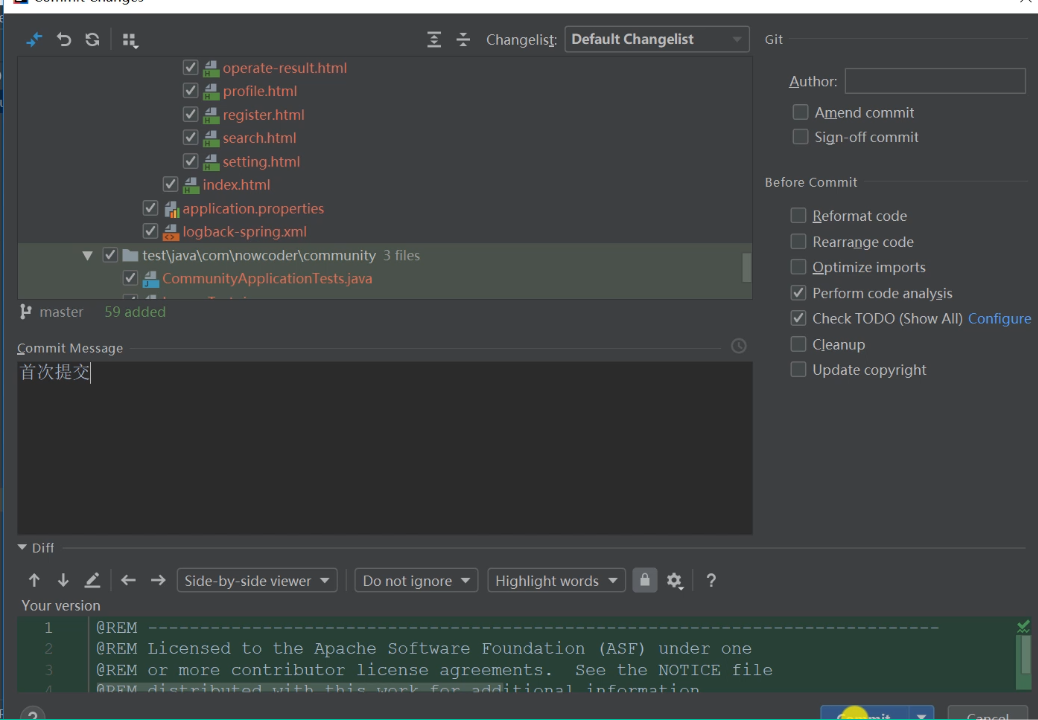
提交到本地仓库

选择要提交的代码提交
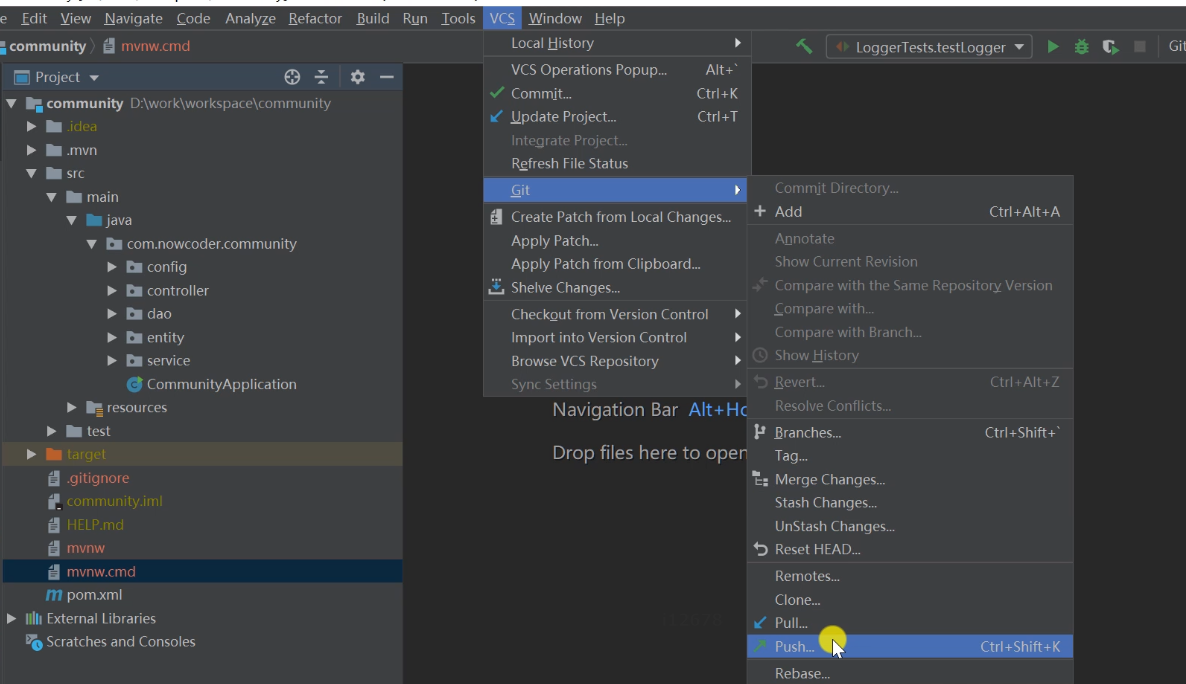
提交到远程仓库
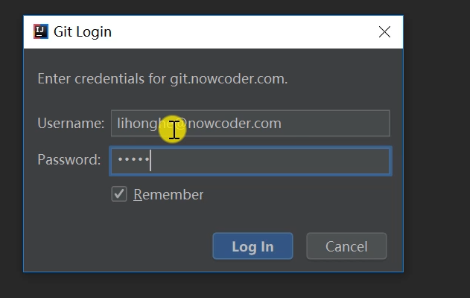
先在远程仓库上建一个项目,并复制项目网址。
再提交 git 的账号密码

 浙公网安备 33010602011771号