[MoE] Tutel源码解读
[MoE] Tutel源码解读
前言
最近MoE变得火了起来。但我在和别人讨论MoE时,总有一些说不清楚地方,就算读了论文也一知半解。于是我决定还是要看一看具体的代码,看看每个细节究竟都是怎么实现的。
作为实现参考,Tutel这篇工作就很不错。最近的工作基本都拿Tutel作为Baseline比较,于是我决定读一读Tutel的源代码,学习一下MoE编程。
在读这篇博客之前,希望你已经大致读过Tutel的论文。如果对下面的代码有不清楚的地方,建议多参考下面的几张图。
论文理解
Tutel的主要贡献就是提供了若干种可切换的并行策略。那么首先,我们就来理解一下Tutel的并行策略。
Tutel考虑了所有DP(数据并行),MP(模型并行)和EP(专家并行)的组合,并分析它们的通信复杂度,最终选择了最优的两种:DP和EP+DP+MP。
其中是每个expert的容量(处理token的数量),是所有expert的总参数量,是GPU数量,是expert数量,为MP的度数。

我们再看图理解一下这两种并行策略
DP

Tutel的DP参考了ZeRO-DP的stage 3,即对模型参数的划分。关于ZeRO-DP的理解可以参考我之前的博客:ZeRO-DP技术简析。
ZeRO-DP的主要好处是避免了在每个GPU上都保存完整的模型(以及优化器状态,主要是优化器状态占显存较高),造成冗余的保存,导致显存浪费。简单来说,在(修改版)ZeRO-DP中,每个GPU都只保存一部分模型。在前向对模型参数进行all-gather,使每个GPU获取到全部参数;在反向对梯度进行reduce-scatter,每个GPU都只更新自己的那部分模型参数。
(修改版)ZeRO-DP的通信量是,与传统DP(需要一次all-reduce,通信量也是)相同。
EP+DP+MP
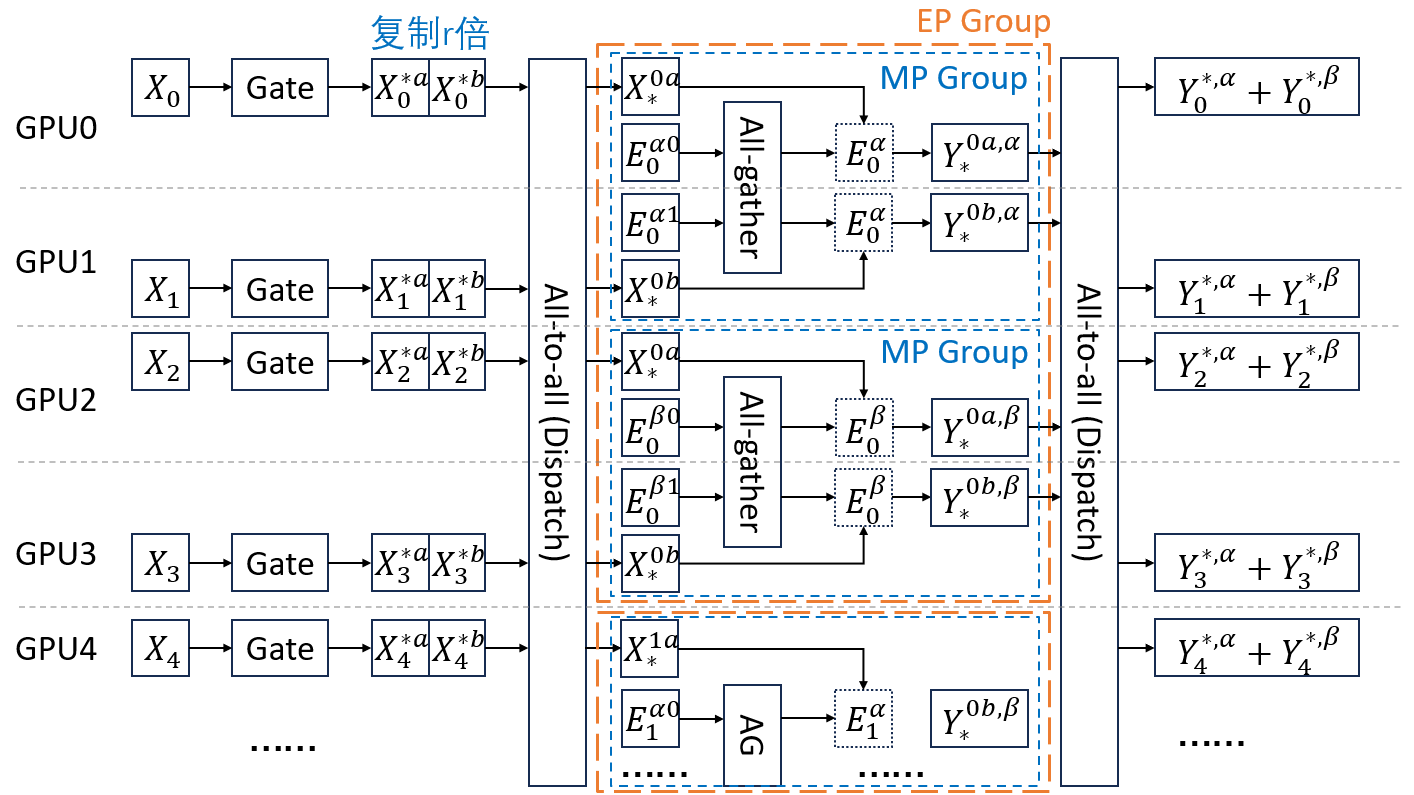
相对的,EP+DP+MP就比较复杂了。由于原论文的图有点过于简略,我这里手动画了一个图。图中,图里只画了前5个GPU。
其中表示输入数据。是第个GPU上的输入数据。为原本在第个GPU上,要发往第个expert的处理的数据。为了实现MP,Tutel把数据复制了份。因为这里,所以将复制为和。
表示expert,其中为第个expert。图中,所以Tutel将一个模型切成4块,即将切成。又由于,所以要把这4块分成2组做MP,即一组,一组。在每个MP组内部,还要做ZeRO-DP,即在前向传播时,进行all-gather,得到。
表示输出,只这个输出来自于上的输入,是第个复制,发往expert 0,被第块处理得到的结果。
这里解释一下图中的EP,DP,MP究竟是怎么运作的。
- 首先,GPU0-3是一个EP Group,它们每个GPU都拥有expert 0的1/4切片。
- 不过虽然GPU0-3拿到的都是1/4切片,不过取决于并行策略不同,这些1/4切片的同步方式也不同。比如在上图中,,所以有2个MP Group:GPU0-1,GPU2-3。
- 在每个MP Group内部,做的是ZeRO-DP。例如GPU0和1,它们在前向时需要对expert参数进行All-gather,GPU0和1都拿到expert 0的前1/2参数,然后使用不同的数据进行计算。
- 而在不同的MP Group间做的是MP。例如GPU0-1和GPU2-3,它们各自具有expert 0的1/2参数。在前向时,这两个MP Group使用相同的数据进行计算,最后再将它们的结果相加。
- 最后看整体的EP。
- 在前向,首先是Gate,决定每个token发往哪个expert。
- 接着进行把数据复制份,然后准备进行第一次all-to-all(dispatch)。
- 在all-to-all(dispatch)时,要先考虑EP:将发往相同expert的token放到一起。
- 然后考虑ZeRO-DP,例如这里ZeRO-DP的度数(即MP Group的大小)为2,因此将expert 0的前1/2个token发给GPU0和2,后1/2个token发给GPU1和3。
- 在expert计算完成后,再进行all-to-all(combine),将token发回原来的位置。
复杂度:在前向和反向各需要两次all-to-all,又由于数据被复制了倍,所以开销是。另外,由于引入了EP和MP,all-gather的规模缩小了倍,所以开销是。因此总通信量是。
注意到在上面两张图中,每个GPU保存的模型参数是相同的,因此Tutel可以实现无缝切换并行策略。只需修改参数即可:

PP
关于Pipeline Paralism,Tutel的处理方法如下

MoE的PP与传统PP的一个主要区别在于:传统的PP是以层为粒度的;而MoE的PP要比层更细,是在层内的Dispatch-FFN-Combine之间做PP。因此体现在代码上面,传统的PP直接调度不同层就可以了,不用改每层的逻辑;但MoE的PP必须要写在层内的处理逻辑里,看起来会稍微麻烦一些。
代码阅读
API
首先看一下Tutel的API,看看一下大致有哪些参数
* Usage of MOELayer Args:
        gate_type        : 对gate的描述
        gate_type        : dict-type gate description, e.g. {'type': 'top', 'k': 2, 'capacity_factor': -1.5, ..},
                              or a list of dict-type gate descriptions, e.g. [{'type': 'top', 'k', 2}, {'type': 'top', 'k', 2}],
                              the value of k in top-gating can be also negative, like -2, which indicates one GPU will hold 1/(-k) parameters of an expert
                              capacity_factor X can be positive (factor = X), zero (factor = max(needed_volumes)) or negative (factor = min(-X, max(needed_volumes))).
        model_dim        : MoE输入的维度
        model_dim        : the number of channels for MOE's input tensor
        experts          : 对expert的描述,具体选项在下面
        experts          : a dict-type config for builtin expert network
        scan_expert_func : 在初始化时,对expert的每个参数执行此函数
        scan_expert_func : allow users to specify a lambda function to iterate each experts param, e.g. `scan_expert_func = lambda name, param: setattr(param, 'expert', True)`
        result_func      : 在forward末尾,对输出执行此函数
        result_func      : allow users to specify a lambda function to format the MoE output and aux_loss, e.g. `result_func = lambda output: (output, output.l_aux)`
        group            : all-to-all的world
        group            : specify the explicit communication group of all_to_all
        seeds            : 种子,一个三元组
        seeds            : a tuple containing a tripple of int to specify manual seed of (shared params, local params, others params after MoE's)
        a2a_ffn_overlap_degree : 对应上图中PP的度数
        a2a_ffn_overlap_degree : the value to control a2a overlap depth, 1 by default for no overlap, 2 for overlap a2a with half gemm, ..
        parallel_type    : 并行策略,可以是'data', 'model', 'adaptive:x', 或者'auto'
        parallel_type    : the parallel method to compute MoE, valid types: 'auto', 'data', 'model'
        pad_samples      : deprecated

* Usage of dict-type Experts Config:

        这些都比较好理解,就不解释了
        num_experts_per_device : the number of local experts per device (by default, the value is 1 if not specified)
        hidden_size_per_expert : the hidden size between two linear layers for each expert (used for type == 'ffn' only)
        type             : available built-in experts implementation, e.g: ffn
        activation_fn    : the custom-defined activation function between two linear layers (used for type == 'ffn' only)
        has_fc1_bias     : If set to False, the expert bias parameters `batched_fc1_bias` is disabled. Default: True
        has_fc2_bias     : If set to False, the expert bias parameters `batched_fc2_bias` is disabled. Default: True
接着我们直接看主体部分,即MOELayer,代码位于 tutel/impls/moe_layer.py
Gate
首先一上来是Gate
def __init__(self, ...):
    # 初始化experts
    # 对于ffn,expert_module为fused_experts.ExpertModule
    expert_modules = expert_module(**experts)
    # 初始化gate
    # 对于gate_type为top-k的情况,single_gate具体用的是LinearTopKGate
    gate_module = single_gate(model_dim=self.model_dim, num_global_experts=self.num_global_experts, **single_gate_type)

def forward(self, input: Tensor, ...):
    # 记住最开始输入的形状
    original_shape, original_dtype  = input.shape, input.dtype
    assert len(original_shape) >= 2, "Input data must be at least 2D tensor: (s)amples, .., (m)odel_dim"
    # reserve_dims默认为1,用途为将输入数据x转换为2d,保持最后一个维度不变
    # 如(10, 20, 300) -> (200, 300)
    # 为了方便,我们记转换后的x形状为(s, h)
    x = input.reshape(-1, original_shape[-reserve_dims:].numel())

    # 定义路由函数
    def routing():
        # 经过gate
        # 我们记expert的数量为e,GPU数量为w
        # 则num_global_experts=e
        # 则logits形状为(s, e)
        logits = gctx(x)

        # 对logits加noise的结果求softmax,得到scores
        scores = F.softmax(logits_w_noise, dim=1)

        # 省略一些对logits的处理

        # 默认self.sharded_count = self.world_size // self.num_global_experts
        # 代表每个expert被切块的数目
        # 这个切块要么用于ZeRO-DP,要么用于MP
        # 所以sharded_count*a2a_ffn_overlap_degree为每个expert的副本数量
        mega_up = max(megablocks_size, 1)
        alignment = (self.sharded_count * a2a_ffn_overlap_degree + mega_up - 1) // mega_up * mega_up
        if alignment > 256:
            alignment = (alignment + 127) // 128 * 128

        # extract_critical会计算出每一个token要发往的expert,以及在expert内的编号
        return logits.dtype, extract_critical(scores,
            top_k = top_k,
            loss_fn = _loss_fn,
            capacity_factor = capacity_factor or gctx.capacity_factor,
            batch_prioritized_routing = self.batch_prioritized_routing,
            normalize_gate = self.normalize_gate,
            group = self.group,
            alignment = alignment,
            inequivalent_tokens = inequivalent_tokens,
        )
这里有必要详细解释一下extract_critical函数
def extract_critical(scores, top_k, ...):
    # 对scores求topk的索引
    # topk_indices的形状为(s, k)
    topk_indices = torch.topk(scores, top_k, dim=1).indices

    # 将topk_indices转换为列表
    # indices_s长度为k的列表,每个元素是形状为s的tensor
    indices_s = [x.view(-1) for x in topk_indices.chunk(top_k, dim=1)]

    # 计算one-hot编码
    # masks_se中的每个元素是一个形状为(s, e)的tensor,
    # 若第i个token的t第1个expert是j,则对应masks_se的第1个元素的第(i, j)位是1;否则是0
    masks_se = [losses._one_hot_with_dtype(x, num_classes=num_global_experts, dtype=x.dtype) for x in indices_s]

    # gates_s的每个元素形状为(s)
    gates_s = [(scores * x).sum(dim=1) for x in masks_se]

    # top-k的loss
    l_loss = loss_fn(scores, topk_indices) if loss_fn is not None else None

    # 计算location,其中compute_location = fast_cumsum_sub_one,即对维度0求前缀和再减1
    # locations_s的元素形状为(s, e),其中(i,j)的值>=0表示token i是发往expert j的第几个token
    locations1 = compute_location(masks_se[0])
    locations_s = [torch.sum(locations1 * masks_se[0], dim=1).to(torch.int32)]

    # 为top 1..k都计算locations_s,将结果求和
    if top_k > 1:
        acc_base = None
        for k in range(1, top_k):
            # acc_base是这个expert的top0..k-1的token数量,形状为(1, e)
            acc_base = torch.sum(masks_se[k - 1], dim=0, keepdim=True) if acc_base is None else acc_base + torch.sum(masks_se[k - 1], dim=0, keepdim=True)
            locations2 = compute_location(masks_se[k])
            # locations_s的元素表示当前token的top-k是expert发往expert j的第几个token(考虑所有的top_k)
            locations2 += acc_base
            locations_s.append(torch.sum(locations2 * masks_se[k], dim=1).to(torch.int32))
    locations2 = locations2[-1] + 1

    # num_samples = s
    num_samples = int(scores.size(0))

    samples_per_expert = (num_samples + num_global_experts - 1) // num_global_experts
    if capacity_factor > 0:
        # 若capacity_factor>0,则根据capacity_factor计算每个expert的capicity
        capacity = top_k * int(capacity_factor * samples_per_expert)
    else:
        # 若capacity_factor=0,expert的capicity是所有expert的capacity的最大值
        capacity = locations2.max()
        capacity = int(simple_all_reduce(capacity, group=group, op=torch.distributed.ReduceOp.MAX))
        if capacity_factor < 0:
            # 若capacity_factor>0,则capacity_factor是capicity的upper_bound
            capacity = min(capacity, top_k * int(-capacity_factor * samples_per_expert))

    # 对齐到所有expert副本的数量
    remainder = capacity % alignment
    if remainder > 0:
        capacity = capacity + alignment - remainder

    return (num_global_experts, indices_s, locations_s, gates_s, capacity, locations2), l_loss
Encode
继续看forward
def forward(self, input: Tensor, ...):
    # 在routing之后
    logits_dtype, (crit, l_aux) = routing()

    # fast_encode内部使用kernel进行encode操作
    # 用c代表expert的capacity。则encode后y的形状为(e, c, h)
    y = fast_encode(x.to(logits_dtype), crit, self.is_postscore).to(x.dtype)
接下来就和并行策略有关了
def forward(self, input: Tensor, ...):
    # 在encode之后
    if self.adaptive_degree == 0:
        # 只有DP,在前向不需要传任何东西
        y = self.expert_local(y, original_shape[-reserve_dims:])
    else:
        if self.auto_parallel:
            # 比较数据量和模型参数量,
            # 因为DP+EP通信量是4*数据量+2*参数量,若MP度数维r,则DP+EP+MP的通信量为
            # 4*数据量*r+2*参数量/r,所以如果2*数据量<参数量,而可以使用MP
            self.use_model_parallel = (y.numel() * (self.sharded_count - 1) * 2 < sum([x.numel() for x in self.experts.parameters()]))

        if self.num_global_experts < self.world_size:
            if self.use_model_parallel:
                # 记adaptive_degree=r(参照论文)。把数据复制r份
                # 即上面图中的[X_0^{0}]复制为[X_0^{0a},X_0^{0b},X_0^{0a},X_0^{0b}]
                # y的形状为(w, c*e*r/w, h)
                y = y.repeat(1, self.adaptive_degree, 1).view(self.world_size, -1, y.size(2))
            else:
                # 记world_size为w
                # 将y的形状改为(w, c*e/w, h)
                y = y.view(self.world_size, -1, y.size(2))

        if a2a_ffn_overlap_degree > 1 and y.is_cuda:
            def expert_fn(expert_input):
                return self.expert_local(expert_input, original_shape[-reserve_dims:])
            # 在all-to-all和FNN之间做overlap
            y = a2a_ffn_overlap_forward(y, expert_fn=expert_fn, a2a_ffn_overlap_degree=a2a_ffn_overlap_degree, use_2dh=self.use_2dh, group=self.group)
        else:
            # 不做overlap
            y = C.all_to_all(y, 1, 0, use_2dh=self.use_2dh, group=self.group)
            y = self.expert_local(y, original_shape[-reserve_dims:])
            y = C.all_to_all(y, 0, 1, use_2dh=self.use_2dh, group=self.group)

        if self.num_global_experts < self.world_size:
            if self.use_model_parallel:
                y = torch.sum(y.view(self.num_global_experts, self.adaptive_degree, -1, y.size(2)), dim=1)
            else:
                y = y.view(self.num_global_experts, -1, y.size(2))
接下来详细讲一讲两个all-to-all和expert_local的部分,为了方便,我们先从不做overlap的开始看,也不考虑2dh。
第一次all-to-all
在不做overlap的分支里,第一次all-to-all的内部如下
# 根据前文所讲,reshaped_input的形状是(max(e, w), -1, h)
reshaped_input = input
# 异步的调用pytorch的all_to_all_single函数,执行all-to-all
output, f_wait = simple_all_to_all(reshaped_input, group, background=True)
# all_to_all_single的接口如下
#   def all_to_all_single(
#       output,
#       input,
#       output_split_sizes=None,
#       input_split_sizes=None,
#       group=group.WORLD,
#   ):
    """
    Each process splits input tensor and then scatters the split list to all processes in a group.

    Then concatenate the received tensors from all the processes in the group and return single output tensor.

    Arguments:
        output (Tensor): Gathered concatenated output tensor.
        input (Tensor): Input tensor to scatter.
        output_split_sizes: (list[Int], optional): Output split sizes for dim 0
            if specified None or empty, dim 0 of ``output`` tensor must divide
            equally by ``world_size``.
        input_split_sizes: (list[Int], optional): Input split sizes for dim 0
            if specified None or empty, dim 0 of ``input`` tensor must divide
            equally by ``world_size``.

    Returns:
        Tensor: Output of the collective.

    """
# 在Tutel调用all_to_all_single时,并没有指定output_split_sizes和input_split_sizes
# 也就是说all-to-all是直接按照第0个维度进行的
# 在all_to_all_single之后,output的形状还是(max(e, w), -1, h),
# 只不过第0维的意义不再是``发往哪个expert/GPU'',而是``来自哪个expert/GPU''

def f_async():
    # 等待all-to-all结束
    f_wait()
    # local_input = output
    local_input = RestoreBackward.apply(output, reshaped_input)
    # 将local_input的形状变为(w, num_local_experts, -1, h)
    # 其中num_local_experts=max(e/w, 1)
    local_input = local_input.view([world_size, -1] + list(local_input.shape[1:]))
    # 这里input_dim=1
    # 作用是将local_input的前两个维度对调,形状变为(num_local_experts, w, -1, h)
    local_input = local_input.permute(list(range(1, input_dim + 1)) + [0] + list(range(input_dim + 1, local_input.dim())))
    # 将local_input的形状变为(num_local_experts, -1, h)
    local_input = local_input.contiguous().view(list(local_input.shape[:input_dim]) + [-1] + list(local_input.shape[input_dim + 2:]))
    return local_input

# 异步执行上述过程
return f_async
Expert
expert_local内容如下
def expert_local(self, x, reserve_shape):
    # 输入形状为(num_local_experts, -1, h)
    y = self.experts(x.view(x.size(0), x.size(1), *reserve_shape), self)
    self.protected_shape = y.shape
    # 输出形状为(num_local_experts, -1, h)
    return y.reshape(y.size(0), y.size(1), -1)
我们一会再看expert内的细节,先继续往下。
第二次all-to-all
紧接着是第二个all-to-all
# 输入形状为(num_local_experts, -1, h)
# 这里output_dim=1
# reshaped_input形状为(num_local_experts, w, -1, h)
reshaped_input = input.view(list(input.shape[:output_dim]) + [world_size, -1] + list(input.shape[output_dim + 1:]))
# 将reshaped_input前两个维度对调,形状变为(w, num_local_experts, -1, h)
reshaped_input = reshaped_input.permute([output_dim] + list(range(output_dim)) + list(range(output_dim + 1, reshaped_input.dim())))
# 进行simple_all_to_all
output, f_wait = simple_all_to_all(reshaped_input, group, background=True)

def f_async():
    f_wait()
    local_input = RestoreBackward.apply(output, reshaped_input)
    # 将local_input形状变为(max(w, e), -1, h)
    local_input = local_input.view([-1] + list(local_input.shape[2:]))
    return local_input

return f_async
Decode
再回到forward函数,最后是decode
def forward(self, input: Tensor, ...):
    # 在[all-to-all, FFN, all-to-all]之后

    # 使用kernel进行decode
    # decode之后y的形状为(-1, h)
    y = fast_decode(y.to(logits_dtype), crit, self.is_postscore)

    # 将输出的形状变得与最开始输入的形状相同
    y = y.view(list(original_shape[:-reserve_dims]) + list(self.protected_shape[-reserve_dims:])).to(original_dtype)
    self.l_aux = y.l_aux = l_aux
    return self.result_func(y) if self.result_func is not None else y
到目前为止,MOELayer的流程我们已经走下来了,其中每个tensor的形状我们也都大致了解了。不过,我们还没有讲两个东西:
expert_local中,expert究竟是如何执行的。因为Tutel使用了ZeRO-DP,所以在前向传播时,要对expert参数进行all-gather。这部分的逻辑不在MOELayer中,而是在expert内部。a2a_ffn_overlap_forward是如何实现PP的。
Expert内部逻辑
Tutel默认的expert是FusedExpertsNetwork,我们简单看一下它的结构
class FusedExpertsNetwork(torch.nn.Module):
    def __init__(self, model_dim, hidden_size_per_expert, num_experts_per_device, sharded_count, activation_fn=None, activation_fn_with_self=None, output_dim=None, has_fc1_bias=True, has_fc2_bias=True):
        # 模型为两层FFN,其中沿着中间的隐藏层切成了sharded_count块
        self.hidden_size = hidden_size_per_expert // sharded_count
        self.batched_fc1_w = torch.nn.Parameter(torch.empty(num_experts_per_device, self.hidden_size, model_dim))
        self.batched_fc2_w = torch.nn.Parameter(torch.empty(num_experts_per_device, self.hidden_size, self.output_dim))

        for i in range(self.batched_fc1_w.size(0)):
            fc1 = torch.nn.Linear(self.model_dim, self.hidden_size)
            fc2 = torch.nn.Linear(self.hidden_size, self.output_dim)
            self.batched_fc1_w[i] = fc1.weight
            self.batched_fc1_bias[i] = fc1.bias
            self.batched_fc2_w[i] = fc2.weight.t()
        	# 这里注意batched_fc2_bias作用于最终的输出,它的切块是沿着输出维度切的
            self.batched_fc2_bias[i] = fc2.bias[:((self.output_dim + sharded_count - 1) // sharded_count)]
然后来看它的forward函数
def forward(self, x, ctx):
    # 输入的x形状为(num_local_experts, -1, h)

    if ctx.adaptive_degree == 0:
        # 如果只有DP,那就是对所有的GPU进行all_gather
        # num_local_experts就是num_global_experts
        # zero_gather内部调用pytorch的all_gather,获取得到完整的fc1_w
        batched_fc1_w = net.zero_gather(batched_fc1_w, group=ctx.group).view(ctx.num_global_experts, -1, batched_fc1_w.size(2))
        batched_fc2_w = net.zero_gather(batched_fc2_w, group=ctx.group).view(ctx.num_global_experts, -1, batched_fc2_w.size(2))
        if self.batched_fc1_bias is not None:
            batched_fc1_bias = net.zero_gather(batched_fc1_bias, group=ctx.group).view(ctx.num_global_experts, 1, -1)
        if self.batched_fc2_bias is not None:
            batched_fc2_bias = net.zero_gather(batched_fc2_bias, group=ctx.group).view(ctx.num_global_experts, 1, -1)
    else:
        # 否则,DP+EP+MP
        if ctx.sharded_count > 1:
            # 如果expert被切块了(因为ZeRO-DP或者MP)
            mesh_size = net.get_world_size(ctx.group)
            if mesh_size > 1 and mesh_size < net.get_world_size():
                ctx.adaptive_degree = ctx.sharded_count
            group_size = ctx.sharded_count // ctx.adaptive_degree

            if group_size > 1:
                # expert因为DP而被切块,则这些块需要进行all-gather
                # 在前面图中的MP Group内部进行all-gather
                # 即合并E^{alpha0}和E^{alpha1}得到E^{alpha}
                ffn_zero_group = net.create_groups_from_world(group_count=-group_size, parent_group=ctx.group).model_group
                batched_fc1_w = net.zero_gather(batched_fc1_w, group=ffn_zero_group).view(1, -1, ctx.model_dim)
                batched_fc2_w = net.zero_gather(batched_fc2_w, group=ffn_zero_group).view(1, -1, self.output_dim)
                if self.batched_fc1_bias is not None:
                    batched_fc1_bias = net.zero_gather(batched_fc1_bias, group=ffn_zero_group).view(1, 1, -1)

            if self.batched_fc2_bias is not None:
                # fc_bias2也要all-gather
                # 在前面图中的EP Group内部进行all-gather
                # 得到的是完整的fc_bias2
                batched_fc2_bias = net.zero_gather(batched_fc2_bias, group=net.create_groups_from_world(group_count=ctx.num_global_experts, parent_group=ctx.group).model_group)
                batched_fc2_bias = batched_fc2_bias.view(1, 1, -1)

                # 因为数据被复制了r份,所以fc2_bias也被加了r次
                # 为了使最后累加的y不变,这里把fc2_bias除以r
                if ctx.adaptive_degree > 1:
                    batched_fc2_bias = torch.mul(batched_fc2_bias, 1.0 / ctx.adaptive_degree)

    # 进行计算
    y = torch.matmul(x, batched_fc1_w.permute(0, 2, 1))
    if self.batched_fc1_bias is not None:
        y = torch.add(y, batched_fc1_bias)
    y = self.activation_fn(y)
    y = torch.matmul(y, batched_fc2_w)
    if self.batched_fc2_bias is not None:
        y = torch.add(y, batched_fc2_bias)
All-gather的部分最好参照着前面的图理解一下。
PP实现
最后我们看a2a_ffn_overlap_forward函数。为了方便我们依然不考虑2dh。
def a2a_ffn_overlap_forward(input, expert_fn, a2a_ffn_overlap_degree, use_2dh, group):
    # input的形状为(max(e,w), -1, h)
    split_dim = 1
    # 设置AllToAllStatus.num_split = a2a_ffn_overlap_degree
    # 为了方便,我们记a2a_ffn_overlap_degree=p
    # 即PP沿着input的维度1切分,切成p块
    # init会初始化nccl环境
    C.AllToAllStatus.init(group, a2a_ffn_overlap_degree, split_dim)

    # 首先等待之前的计算任务完成
    # num_slices_per_split是input的第一维大小,即max(e, w)
    # num_slices_per_split = input.shape[:split_dim].numel()
    # length = input.nbytes();
    # num_slices = num_slices_per_split * num_split;
    # slice_size = length / num_slices;
    input_ready = C.CurrentStreamRelease.apply(input, 0)
    # 对于每一个PP块进行all-to-all操作
    # 具体来说,all-to-all是对每个expert都进行send-recv实现的
    # 在每一个PP块的操作后,都向cuda流中插入一个事件,用来检测这个块是否完成
    input_scattered_after_a2a = C.AllToAllScatterAsync.apply(input_ready)

    # 这段要从下往上看
    expert_output_scattered = [
        # 再插入一个事件i
        C.CurrentStreamRelease.apply(
            # 跟pre_expert_permute相反
            # 最终x的形状是(max(e, w), -1/p, h)
            C.post_expert_permute(
                # expert函数,前边已经讲过了
                expert_fn(
                    # 跟前面的permute作用相同
                    # 先把x拆成(w, max(e/w, 1), -1/p, h)
                    # 再把前两位对调(max(e/w), w, -1/p, h)
                    # 再把x变成(max(e/w), w*-1/p, h)
                    C.pre_expert_permute(
                        # 等待第i个事件完成
                        C.CurrentStreamAcquire.apply(
                            x,
                        i),
                    group=group)
                ),
            group=group),
        i)
        # 枚举每一个PP块
        # 其中x是第i个块的输出,形状为(max(e,w), -1/p, h),即把input的维度1切成/p块
        for i, x in enumerate(input_scattered_after_a2a)
    ]

    # 对于每个PP块,等待第i个事件,然后使用send-recv进行all-to-all
    expert_output_gathered_after_a2a = C.AllToAllGatherAsync.apply(*expert_output_scattered)
    # 等待所有all-to-all完成
    input = C.CurrentStreamAcquire.apply(expert_output_gathered_after_a2a, 0)

    return input
backward跟forward流程差不多,这里就不讲了。
| 欢迎来原网站坐坐! >原文链接<


【推荐】国内首个AI IDE,深度理解中文开发场景,立即下载体验Trae
【推荐】编程新体验,更懂你的AI,立即体验豆包MarsCode编程助手
【推荐】抖音旗下AI助手豆包,你的智能百科全书,全免费不限次数
【推荐】轻量又高性能的 SSH 工具 IShell:AI 加持,快人一步
· 10年+ .NET Coder 心语 ── 封装的思维:从隐藏、稳定开始理解其本质意义
· 地球OL攻略 —— 某应届生求职总结
· 提示词工程——AI应用必不可少的技术
· Open-Sora 2.0 重磅开源!
· 周边上新:园子的第一款马克杯温暖上架