


Debugging Applications for Microsoft .NET and Microsoft Windows: Notes-The Debugging Process
The Debugging Process
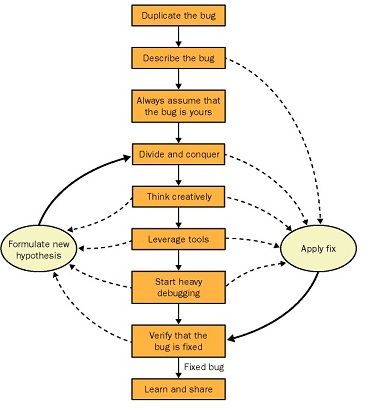
Step 1: Duplicate the bug
The most critical step in the debugging process is the first one: duplicating the bug.
My definition is duplicating the bug on a single machine once in a 24-hour period.
Once you've duplicated the bug by using one general set of steps, you should evaluate whether you can duplicate the bug through a different set of steps.You can get to some bugs via one code path only, but you can get to other bugs through multiple paths. The idea is to try to see the behavior from all possible angles. By duplicating the bug from multiple paths, you have a much better sense of the data and boundary conditions that are causing the problems.
Even if you can't duplicate the bug, you should still log it into your bug tracking system. If I have a bug that I can't duplicate, I always log it into the system anyway, but I leave a note that says I couldn't duplicate it.
Step 2: Describe the bug
In the real world, your writing skills are almost more important than your engineering skills because you need to be able to describe your bugs, both verbally and in writing. When faced with a tough bug, you should always stop right after you duplicate it and describe it.
Step 3: Always assume that the bug is yours
Reading the code will force you to take the extra time to look at the problem. Starting with the state of the machine at the time of the crash or problem, work through the various scenarios that could cause you to get to that section of code.
Step 4: Divide and conquer
Step 5: Think creatively
If the bug you're trying to eliminate is one of those nasty ones that happens only on certain machines or is hard to duplicate, start looking at the bug from different perspectives. This is the step in which you should start thinking about version mismatches, operating system differences, problems with your program's binaries or its installation, and other external factors.
Step 6: Leverage tools
Step 7: Start heavy debugging
Just as when you're doing light debugging, when you're doing heavy debugging, you should have an idea of where you think your bug is before you start using the debugger, and then use the debugger to prove or disprove your hypothesis.
Step 8: Verify that the bug is fixed
When testing your fix, especially in critical code, you should verify that it works with all data conditions, good and bad. Nothing is worse than a fix for one bug that causes two other bugs.
Step 9: Learn and share
Each time you fix a "good" bug (that is, one that was challenging to find and fix), you should take the time to quickly summarize what you learned.You learn the most about development when you're debugging, so you should take every opportunity to learn from it.
Final Debugging Process Secret
Again, I'm suggesting that you need to have a hypothesis in mind—something you want to prove or disprove—before the debugger can help you.As I recommended earlier in Step 7 I write out my hypothesis before I ever touch the debugger to ensure that I have a purpose each time I use it.
