C# 发送邮件
一、首先,使用VisualStudio2019创建一个名为“SendMail”的WPF项目,并修改窗口名称。
1.打开App.xmal文件,如下图:

2.修改App.xmal文件中的启动项,如下图:

二、在项目中引入HandyControl的NuGet包。
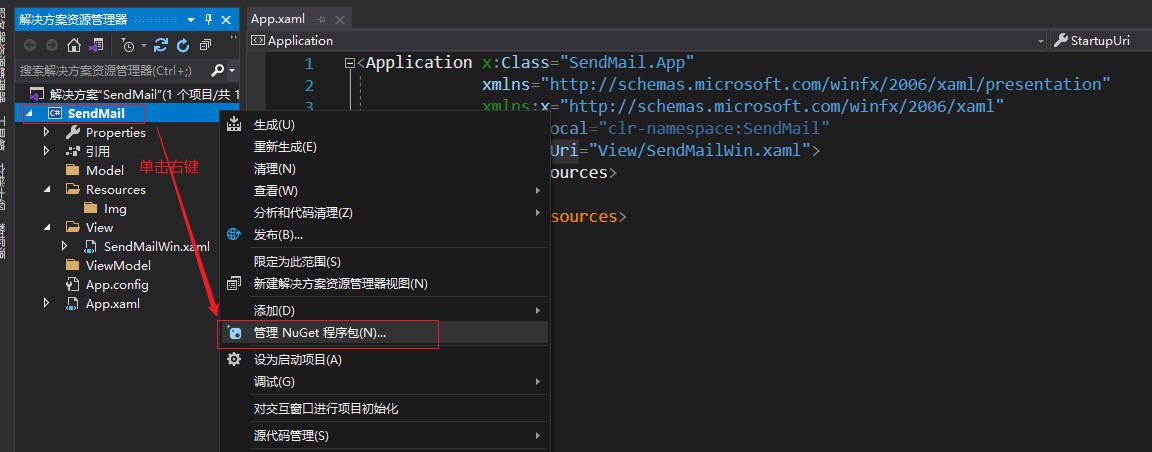
1.在项目上单击右键,打开NuGet包,如下图:
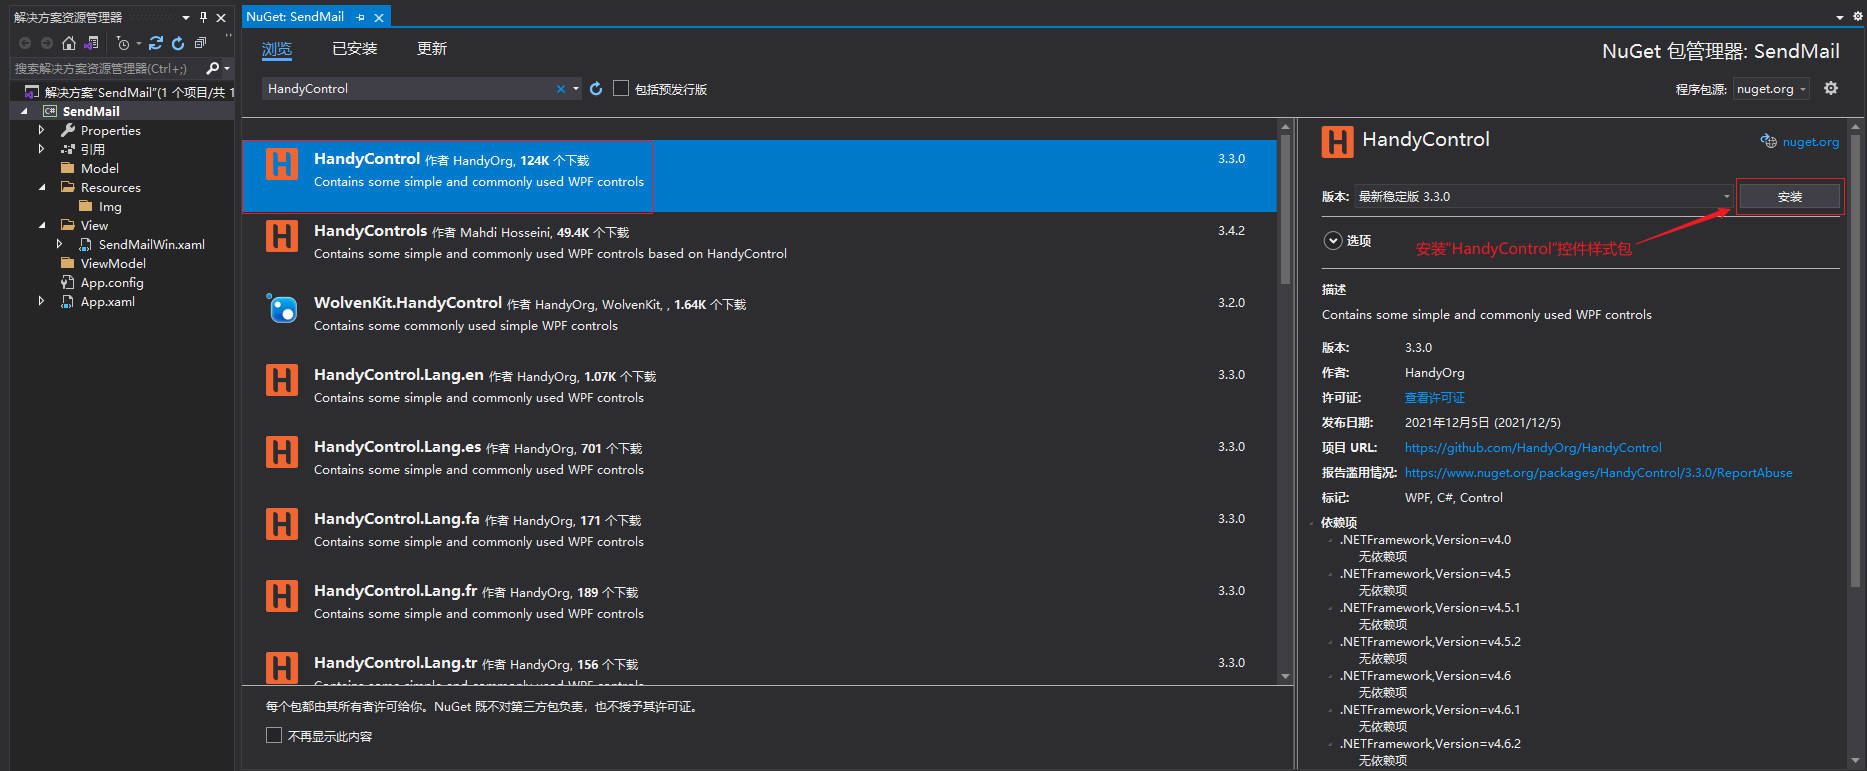
2.在NuGet窗口中搜索HandyControl包,如下图:
3.在项目中引入HandyControl样式文件,如下图:

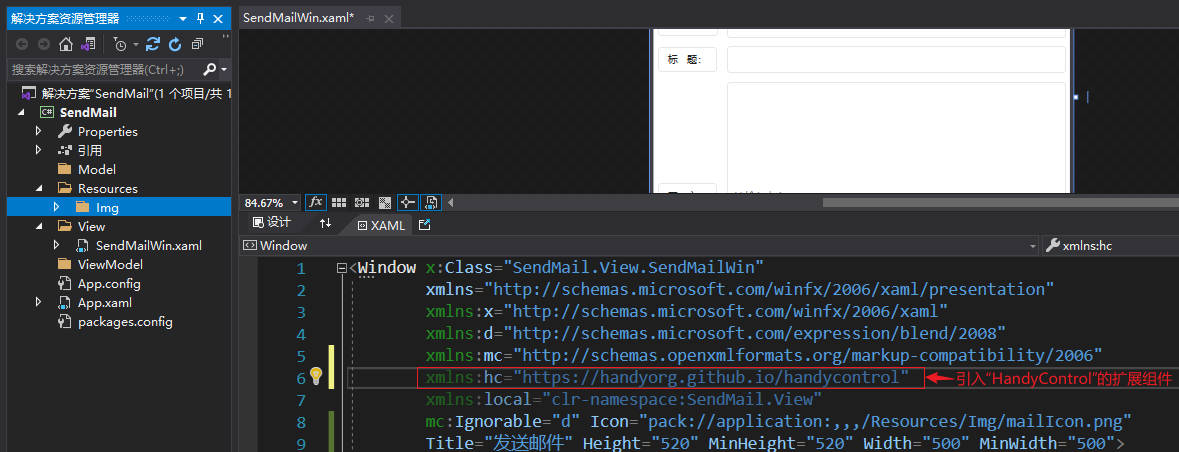
4.在项目中引入HandyControl扩展控件文件,如下图:
三、WPF窗口页面代码
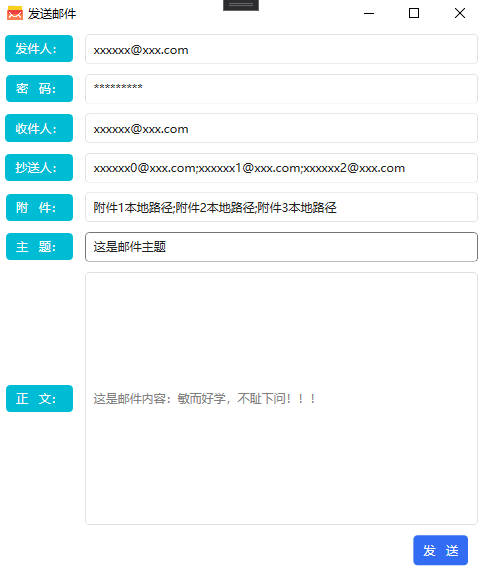
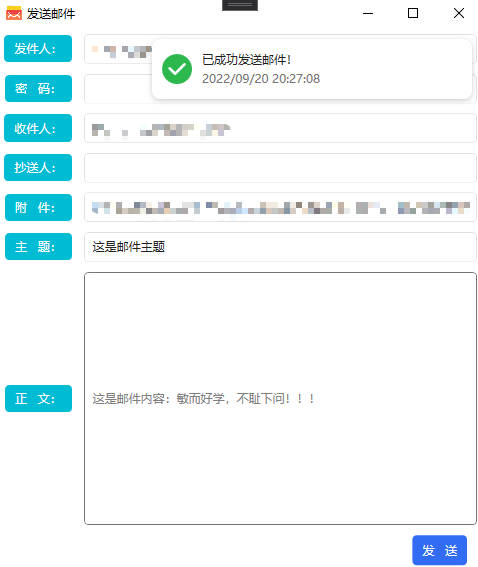
1.WPF窗口,如下图:
2.WPF页面代码,如下图:
点击查看代码
<Window x:Class="SendMail.Views.SendMailWin"
        xmlns="http://schemas.microsoft.com/winfx/2006/xaml/presentation"
        xmlns:x="http://schemas.microsoft.com/winfx/2006/xaml"
        xmlns:d="http://schemas.microsoft.com/expression/blend/2008"
        xmlns:mc="http://schemas.openxmlformats.org/markup-compatibility/2006"
        xmlns:hc="https://handyorg.github.io/handycontrol"
        xmlns:local="clr-namespace:SendMail.Views"
        xmlns:Helpers="clr-namespace:SendMail.Events"
        xmlns:viewmodels="clr-namespace:SendMail.ViewModels"
        d:DataContext="{d:DesignInstance Type=viewmodels:SendMailVM}"
        mc:Ignorable="d" Icon="pack://application:,,,/Resources/Img/mailIcon.png"
        Title="发送邮件" Height="520" MinHeight="580" Width="500" MinWidth="500">
    <Grid>
        <Grid.RowDefinitions>
            <RowDefinition Height="0.15*"/>
            <RowDefinition Height="0.15*"/>
            <RowDefinition Height="0.15*"/>
            <RowDefinition Height="0.15*"/>
            <RowDefinition Height="0.15*"/>
            <RowDefinition Height="0.15*"/>
            <RowDefinition Height="*"/>
            <RowDefinition Height="0.15*"/>
        </Grid.RowDefinitions>
        <Grid.ColumnDefinitions>
            <ColumnDefinition Width="0.2*"/>
            <ColumnDefinition/>
        </Grid.ColumnDefinitions>
        <Label Content="发件人:" Style="{StaticResource LabelInfo}"/>
        <TextBox Text="{Binding MailFrom}" Grid.Column="1" Margin="5"/>
        <Label Content="密   码:" Style="{StaticResource LabelInfo}" Grid.Row="1"/>
        <TextBox Text="{Binding MailPwd}" Grid.Row="1" Grid.Column="1" Margin="5"/>
        <Label Content="收件人:" Style="{StaticResource LabelInfo}" Grid.Row="2"/>
        <TextBox Text="{Binding MailAddressee}" Grid.Row="2" Grid.Column="1" Margin="5" />
        <Label Content="抄送人:" Style="{StaticResource LabelInfo}" Grid.Row="3"/>
        <TextBox Text="{Binding MailCc}" Grid.Row="3" Grid.Column="1" Margin="5"/>
        <Label Content="附   件:" Style="{StaticResource LabelInfo}" Grid.Row="4"/>
        <TextBox Text="{Binding MailEnclosure}" Grid.Row="4" Grid.Column="1" Margin="5"/>
        <Label Content="主   题:" Style="{StaticResource LabelInfo}" Grid.Row="5"/>
        <TextBox Text="{Binding MailTheme}" Grid.Row="5" Grid.Column="1" Margin="5"/>
        <Label Content="正   文:" Style="{StaticResource LabelInfo}" Grid.Row="6"/>
        <TextBox Text="{Binding MailText}" TextWrapping="Wrap" Foreground="Gray" Grid.Row="6" Grid.Column="1" Margin="5"/>
        <Button Content="发   送" Command="{Binding MailSendCommand}" Style="{StaticResource ButtonPrimary}" Grid.Row="7" Grid.Column="1" HorizontalAlignment="Right" Margin="15 0"/>
    </Grid>
</Window>
四、WPF窗口后台代码
1.C#发送邮件核心代码,如下:
点击查看代码
 /// <summary>
/// 发送邮件
/// </summary>
/// <param name="mailFrom">发件人</param>
/// <param name="mailPwd">发件人密码</param>
/// <param name="mailAddressee">收件人</param>
/// <param name="mailCc">抄送人</param>
/// <param name="mailTheme">主题</param>
/// <param name="mailText">内容</param>
/// <param name="mailEnclosure">附件</param>
/// <param name="isTextHtml">HTML格式</param>
/// <param name="SMTPMailServer">SMTP服务器</param>
/// <returns></returns>
public static bool MailSend(string mailFrom, string mailPwd, string mailAddressee, string mailCc, string mailTheme, string mailText, string mailEnclosure, bool isTextHtml, string SMTPMailServer)
{
    //使用指定的邮件地址初始化MailAddress实例
    MailAddress mailAddress = new MailAddress(mailFrom);
    //初始化MailMessage实例
    MailMessage mailMsg = new MailMessage();

    //将收件人添加到邮件消息集合
    if (!string.IsNullOrWhiteSpace(mailAddressee))
    {
        string[] mailAddressees = mailAddressee.Split(';');
        if (mailAddressees.Length > 0)
        {
            for (int i = 0; i < mailAddressees.Length; i++)
            {
                mailMsg.To.Add(mailAddressees[i].ToString());
            }
        }
        else
        {
            Growl.Info("收件人之间请使用分号“;”进行分隔!");
        }
    }

    //将抄送人添加到邮件消息集合
    if (!string.IsNullOrWhiteSpace(mailCc))
    {
        string[] mailCcs = mailCc.Split(';');
        if (mailCcs.Length > 0)
        {
            for (int i = 0; i < mailCcs.Length; i++)
            {
                mailMsg.CC.Add(mailCcs[i].ToString());
            }
        }
        else
        {
            Growl.Info("抄送人之间请使用分号“;”进行分隔!");
        }
    }
    //发件人地址
    mailMsg.From = mailAddress;

    //电子邮件的标题
    mailMsg.Subject = mailTheme;

    //电子邮件的主题内容使用的编码
    mailMsg.SubjectEncoding = Encoding.UTF8;

    //电子邮件正文
    mailMsg.Body = mailText;

    //电子邮件正文的编码
    mailMsg.BodyEncoding = Encoding.Default;
    mailMsg.Priority = MailPriority.High;
    mailMsg.IsBodyHtml = isTextHtml;

    //在有附件的情况下添加附件
    try
    {
        if (!string.IsNullOrWhiteSpace(mailEnclosure))
        {
            string[] mailEnclosures = mailEnclosure.Split(';');
            if (mailEnclosures != null && mailEnclosures.Length > 0)
            {
                Attachment attachFile = null;
                foreach (string path in mailEnclosures)
                {
                    attachFile = new Attachment(path);
                    mailMsg.Attachments.Add(attachFile);
                }
            }
            else
            {
                Growl.Info("附件之间请使用分号“;”进行分隔!");
            }
        }
    }
    catch (Exception err)
    {
        Growl.Error("在添加附件时有错误:" + err);
        //throw new Exception("在添加附件时有错误:" + err);
    }

    SmtpClient smtp = new SmtpClient();
    //指定发件人的邮件地址和密码以验证发件人身份
    smtp.Credentials = new System.Net.NetworkCredential(mailFrom, mailPwd);
    //设置SMTP邮件服务器
    smtp.Host = SMTPMailServer;

    try
    {
        //将邮件发送到SMTP邮件服务器
        smtp.Send(mailMsg);
        return true;
    }
    catch(SmtpException ex)
    {
        return false;
    }
}
备注:
1.本测试程序是基于.Net Framework4.5框架进行开发的


 浙公网安备 33010602011771号