小白创建Maven工程(eclipse IDE 配图详解)
eclipse IDE创建Maven工程(以window10为例)
配图详解过程详细配图详解过程详细配图详解过程详细配图详解
| 主要步骤 |
| 配置开发环境 |
|
创建Maven工程 |
| 单元测试 |
· 配置开发环境
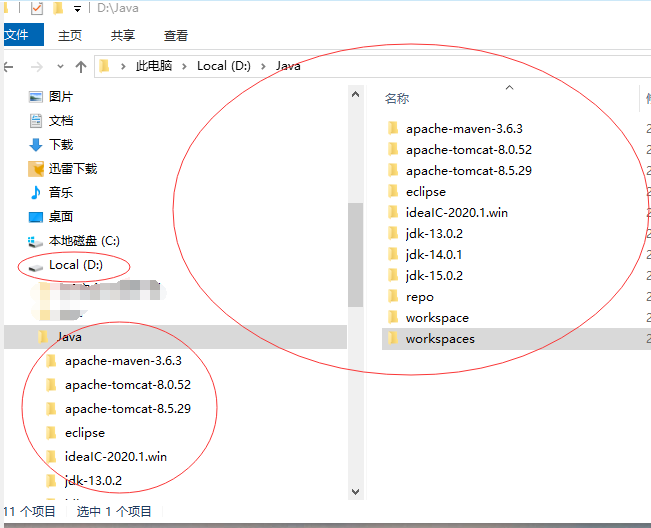
1. 创建简单清晰的Java目录(虽然这一步很easy,但是如果不加注意可能对以后的Java环境开发程序设计产生影响)
2. 下载安装 Eclipse IDE

镜像链接:https://mirrors.neusoft.edu.cn/eclipse/technology/epp/downloads/release/2020-12/R/eclipse-jee-2020-12-R-win32-x86_64.zip
3.下载安装 Maven
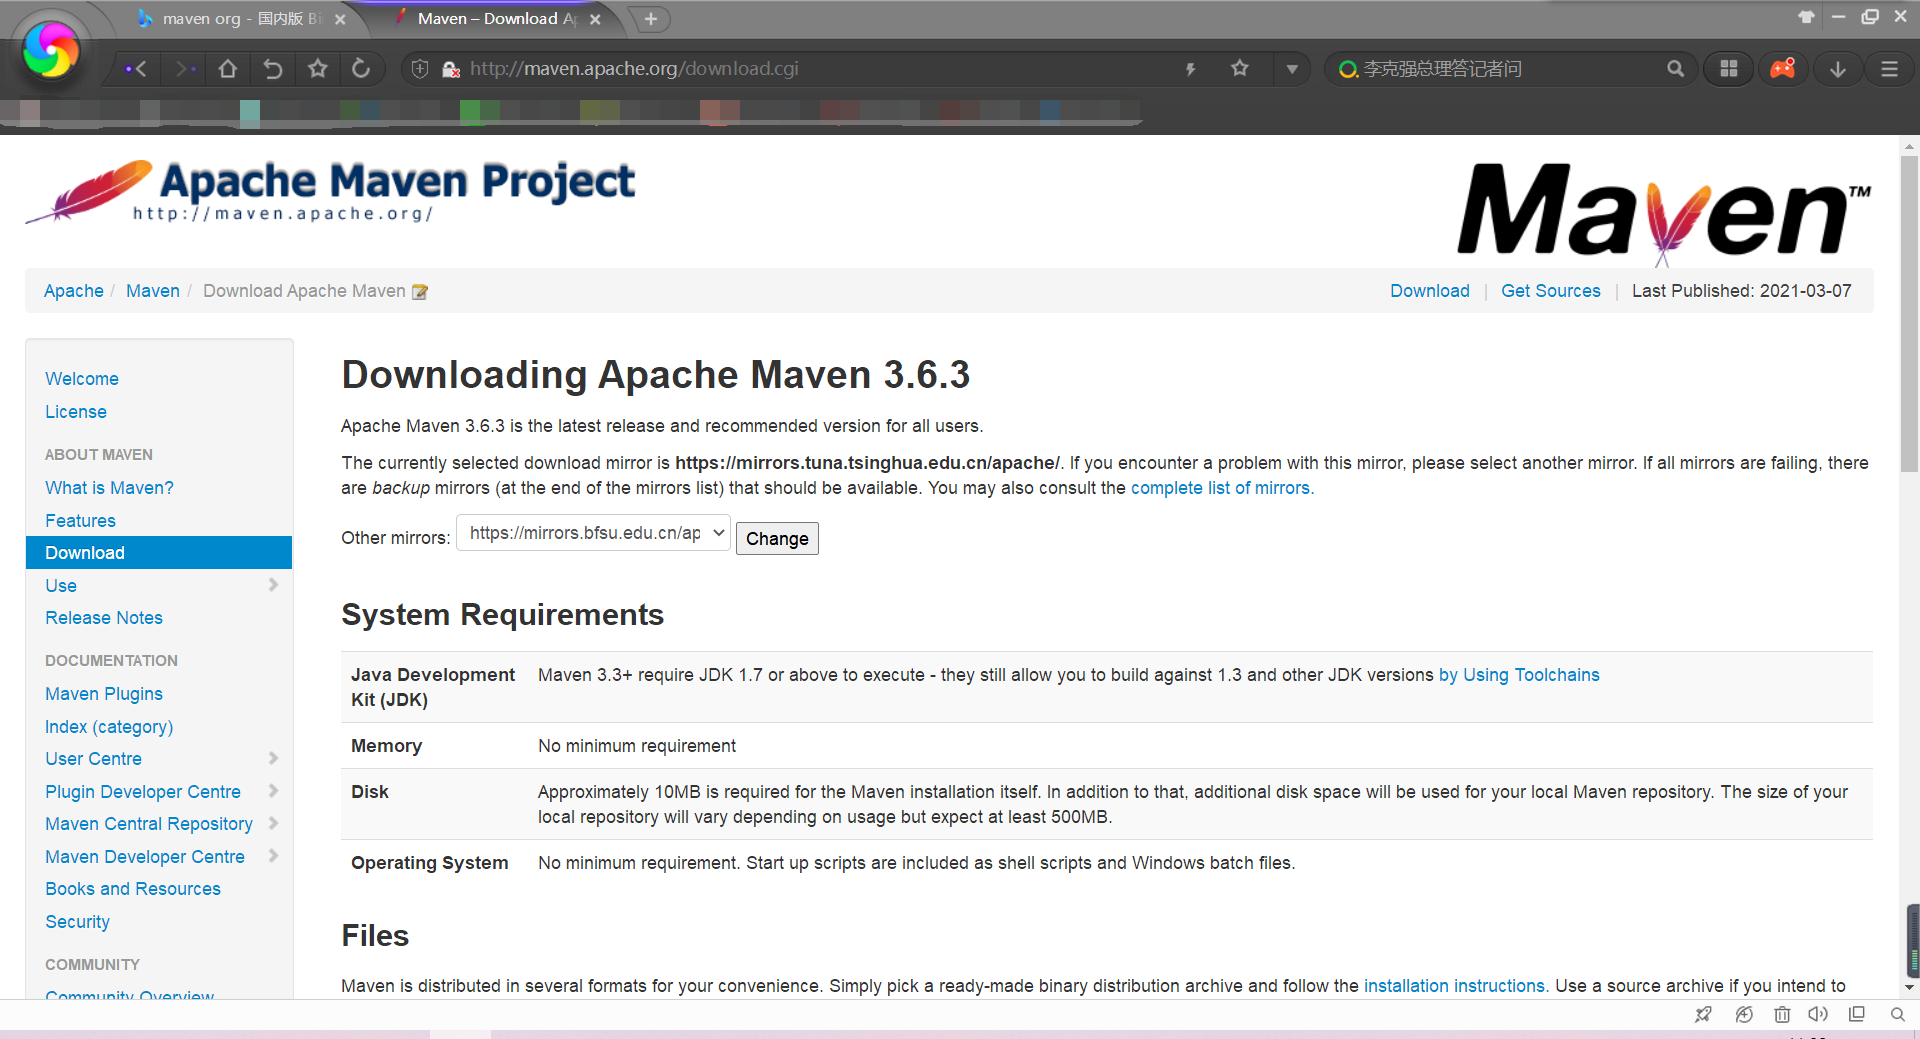
(别忘了下载JDK,这里不再赘述!)
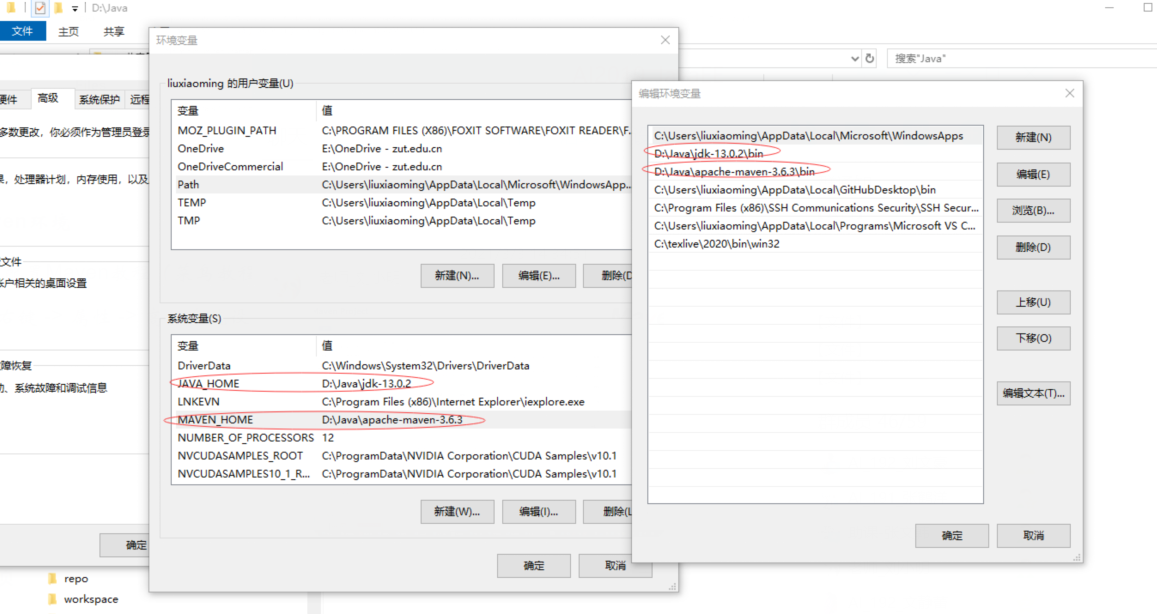
4.配置Maven环境
推荐安装配置Maven教程(菜鸟教程)链接:https://www.runoob.com/maven/maven-tutorial.html
① “此电脑”右键 -> 属性 -> 高级系统设置 -> 环境变量 -> 按照如下图根据自己下的版本配置环境 -> 确定×N
② 打开D:\Java\apache-maven-3.6.3\conf\settings.xml
加本地仓库(用来保存Maven管理的类库、jar包,方便查找),代码附下,注意仓库repo的位置,尽量不要放在Maven目录下
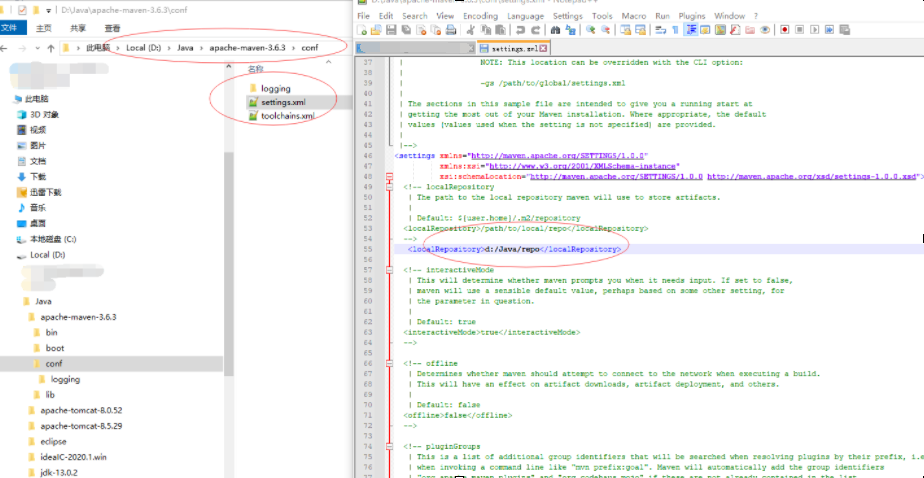
<localRepository>D:\Java\repo</localRepository>
加远端镜像链接阿里云,代码附下注意位置
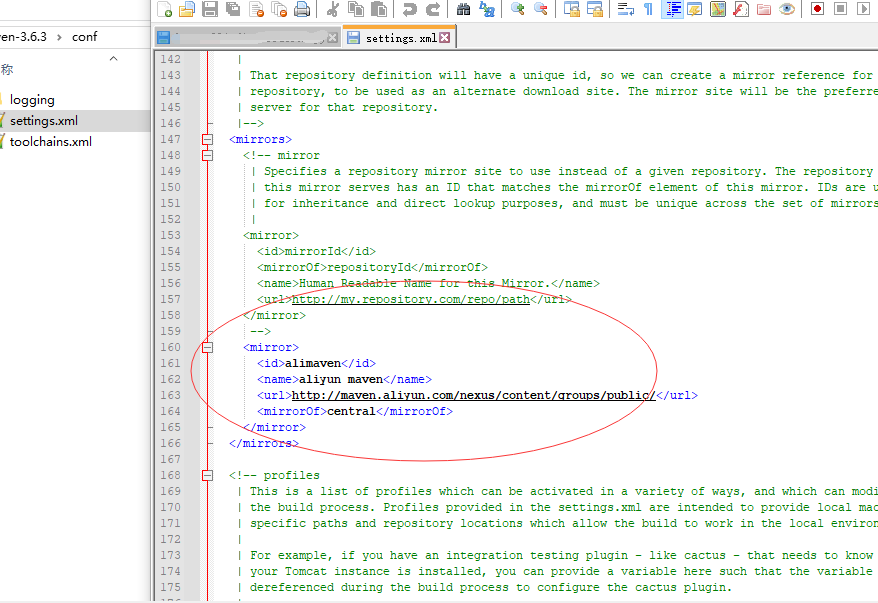
   <mirror>
      <id>alimaven</id>
      <name>aliyun maven</name>
      <url>http://maven.aliyun.com/nexus/content/groups/public/</url>
      <mirrorOf>central</mirrorOf>
   </mirror>
settings.xml 保存完成!
另:若之后的配置运行中出现一些关于仓库的Error,且在settings.xml中没有出现代码、仓库位置等主观错误的情况下,建议将settings.xml中的所有内容由如下代码替换,即可成功。
<?xml version="1.0" encoding="UTF-8"?>
<settings xmlns="http://maven.apache.org/SETTINGS/1.0.0"
    xmlns:xsi="http://www.w3.org/2001/XMLSchema-instance"
    xsi:schemaLocation="http://maven.apache.org/SETTINGS/1.0.0 http://maven.apache.org/xsd/settings-1.0.0.xsd">

    <pluginGroups />
    <proxies />
    <servers />

    <!-- maven自动下载的jar包,会存放到该目录下 -->
    <localRepository>D:\Java\repo</localRepository>


    <!-- 阿里云镜像 -->
    <mirrors>
        <mirror>
            <id>alimaven-central</id>
            <mirrorOf>central</mirrorOf>
            <name>aliyun maven</name>
            <url>http://maven.aliyun.com/nexus/content/repositories/central/</url>
        </mirror>
        <mirror>
            <id>jboss-public-repository-group</id>
            <mirrorOf>central</mirrorOf>
            <name>JBoss Public Repository Group</name>
            <url>http://repository.jboss.org/nexus/content/groups/public</url>
        </mirror>

    </mirrors>


    <profiles>
        <profile>
            <id>jdk18</id>
            <activation>
                <jdk>1.8</jdk>
                <activeByDefault>true</activeByDefault>
            </activation>
            <properties>
                <maven.compiler.source>1.8</maven.compiler.source>
                <maven.compiler.target>1.8</maven.compiler.target>
                <maven.compiler.compilerVersion>1.8</maven.compiler.compilerVersion>
            </properties>
        </profile>
    </profiles>

</settings>
5.Eclipse IDE 中Maven环境配置
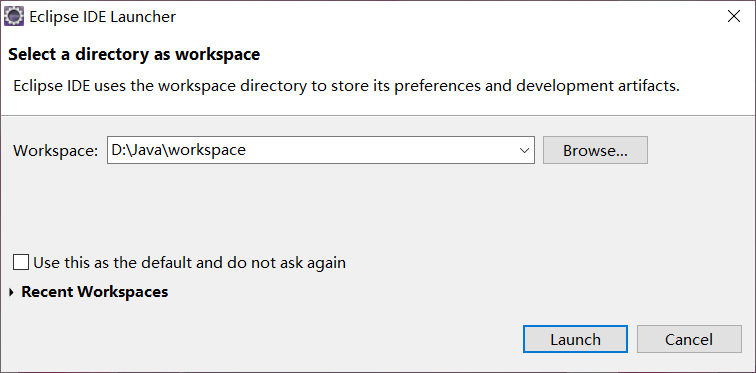
① 在Java目录下创建workspace文件夹用来存储eclipse里创建运行的文件 -> 打开 Eclipse IDE ->选择workspace文件夹位置 -> Launch -> 进入页面
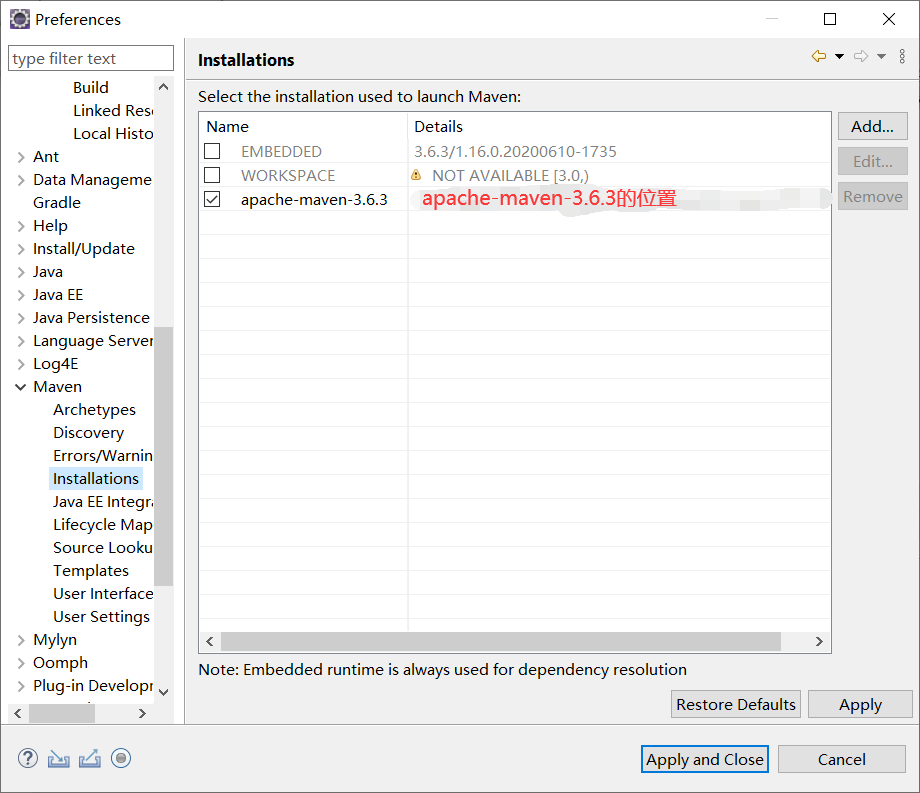
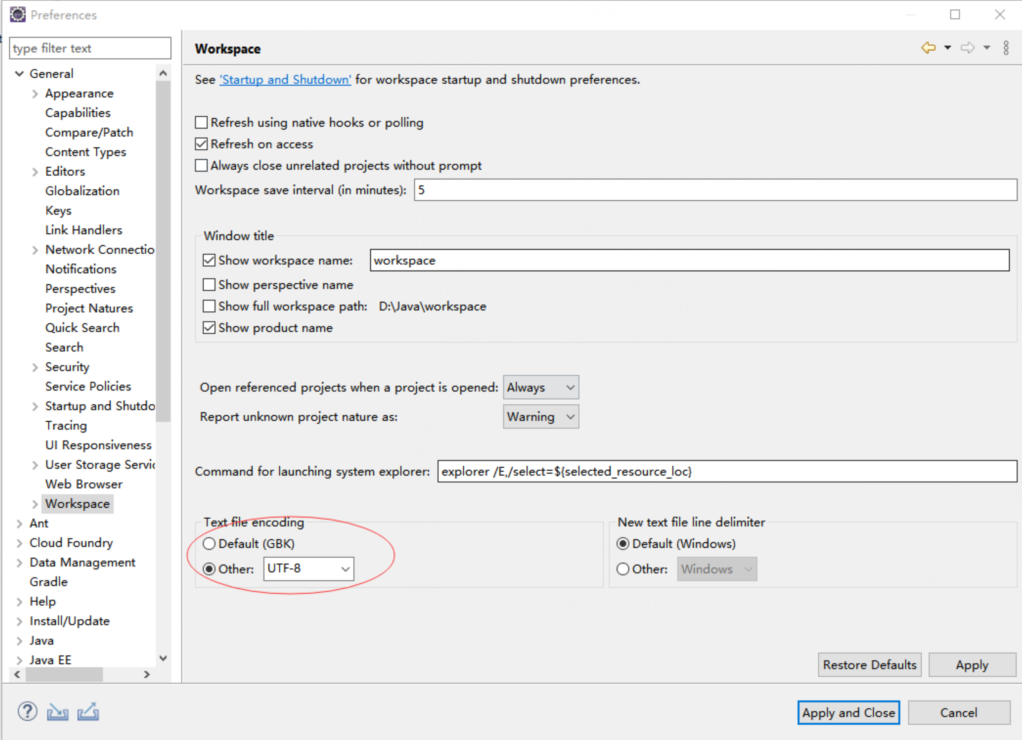
② 打开Window -> Preference -> 分别如指引操作
Maven -> Installations -> Add -> 加入下载解压的Maven
General -> Workspace
Web -> JSP Files
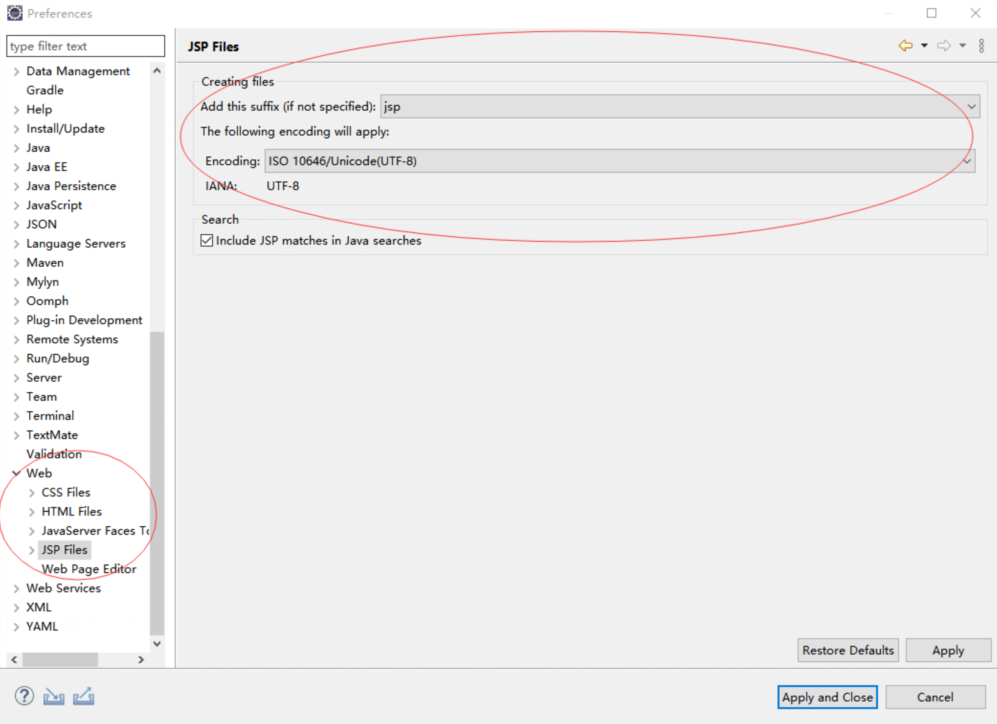
Validation

·创建Maven工程
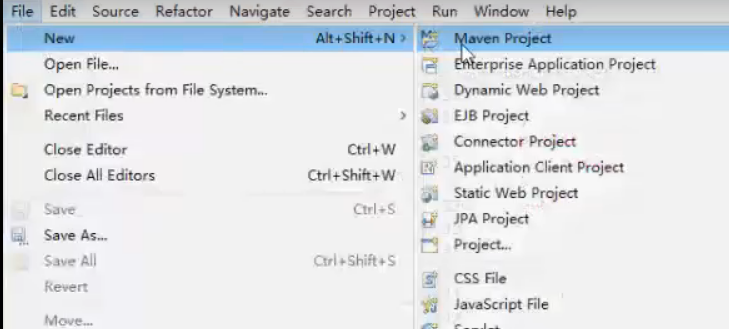
1."File"右键 -> new -> Maven Project
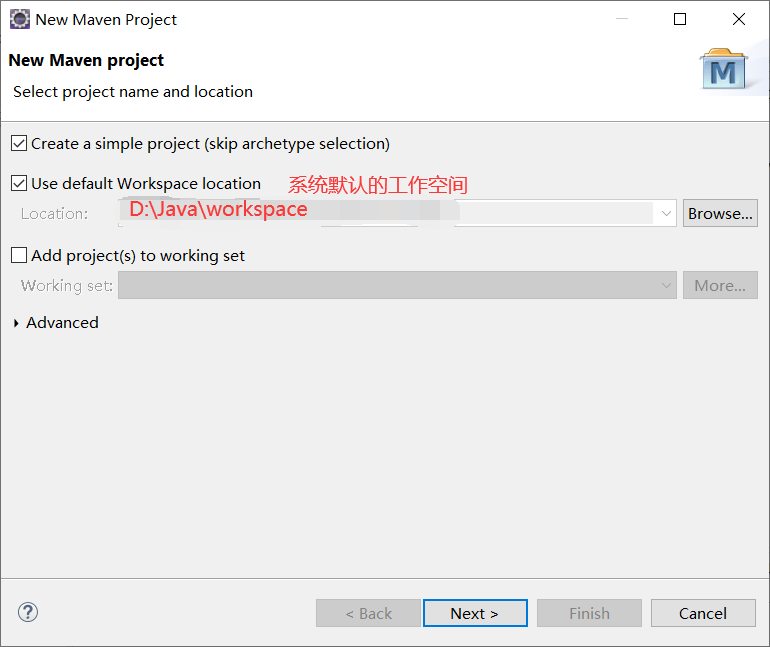
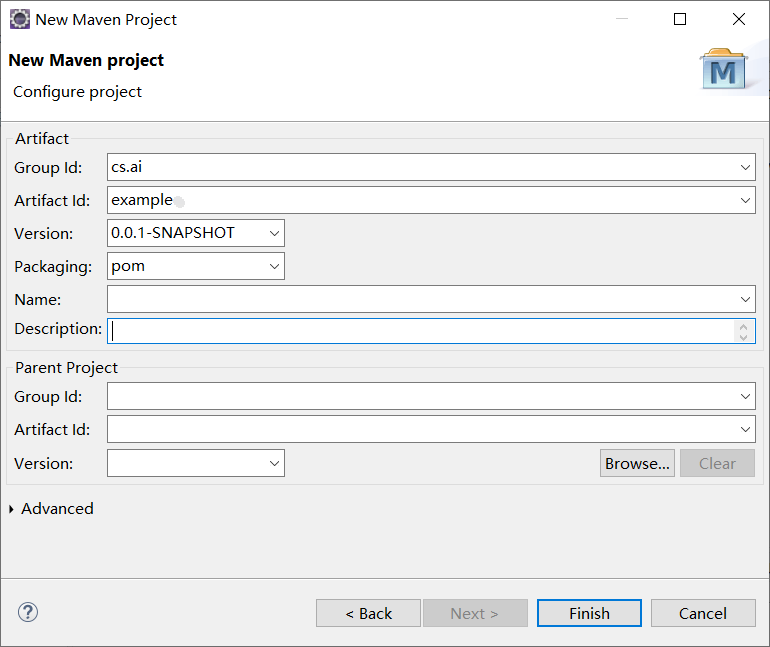
填写Group Id、Artifact Id -> Packaging -> pom -> Finish
‼说明:从此处开始若之后的操作与所附图片不符,莫名其妙报错,建议执行如下两个解决办法,成功率80%~90%。另外,一定要按照要求操作,防止因为某些版本问题出错!
① 更新工程:右键点击报错工程 -> Maven -> Update Project
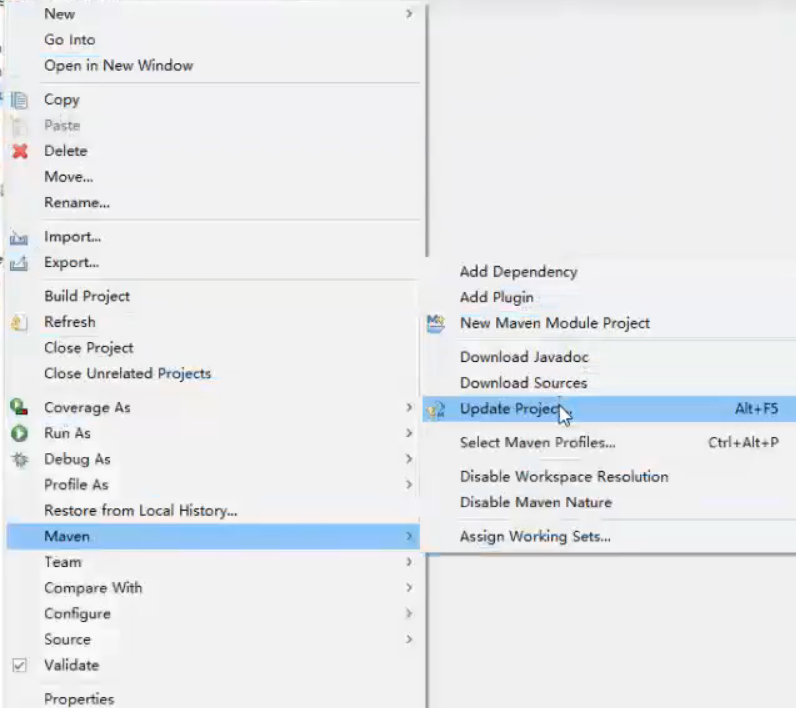
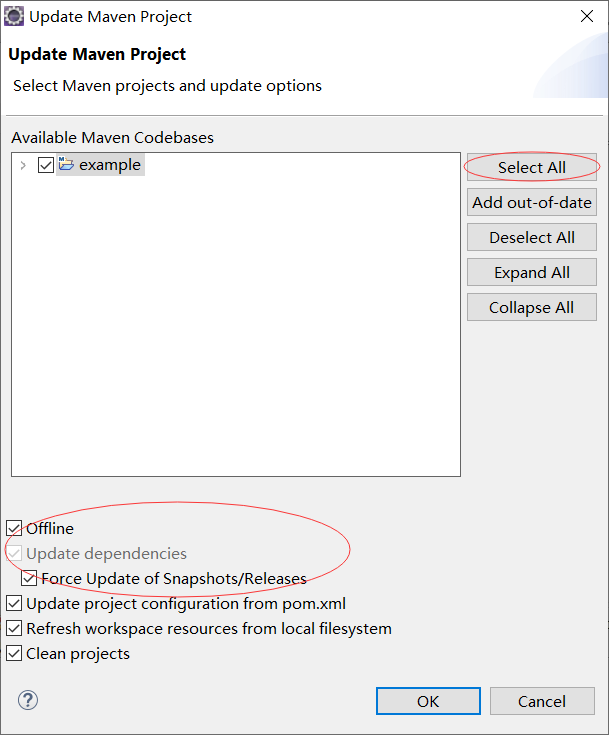
②重启Eclipse IDE (之后有具体解释)
2.example右键 -> New -> Project... -> Maven -> Maven Module -> Next -> 打勾并填写Module Name -> Finish
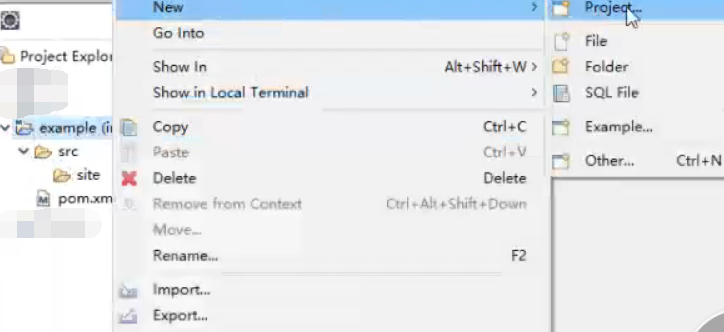
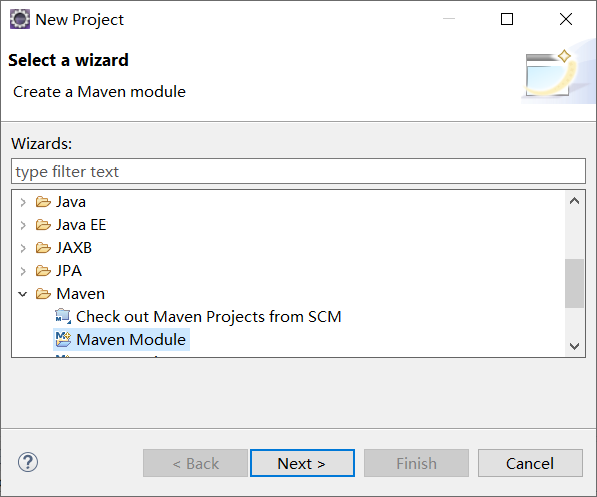
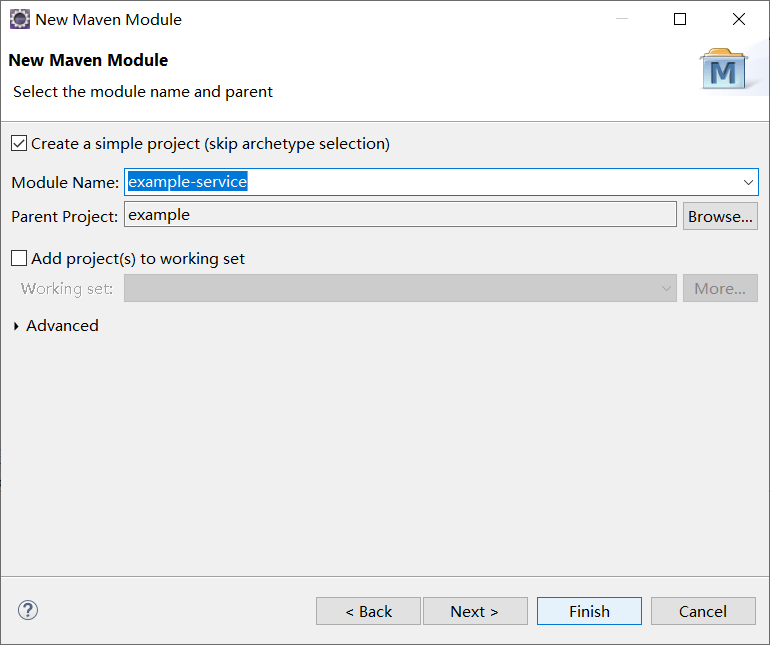
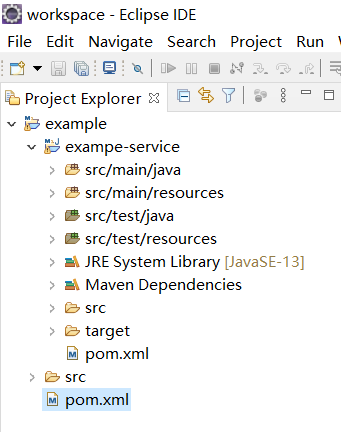
完成之后的界面目录(JRE System Library之后的黄框等内容可能不同,没有关系请忽略,之后有说明)
❌若出现如下报错
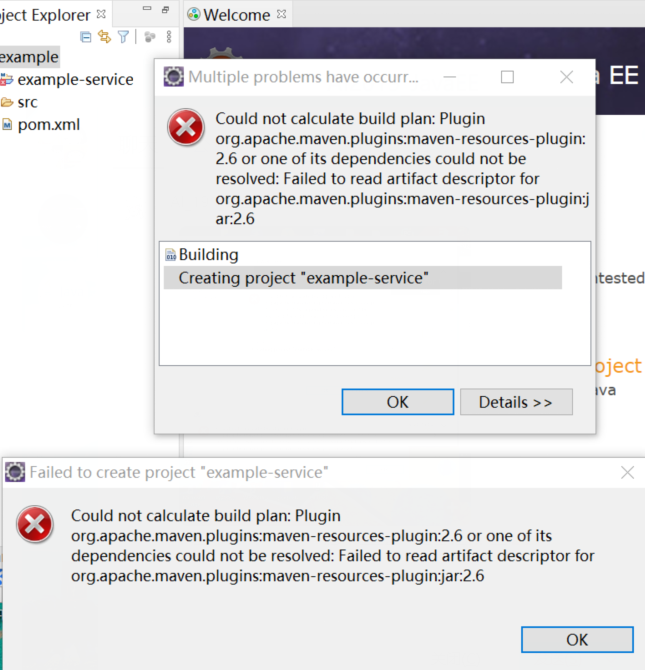
报错原因:大概是因为maven本地仓库中缺少maven-resource-plugin:2.6这个相应的依赖文件;
解决办法:在Maven项目example下pom.xml 添加以下代码内容(以图片代码为准,注意修改相应的版本号),重启即可;

<dependencies>

         <dependency>

            <groupId>org.apache.maven.plugins</groupId>

            <artifactId>maven-resources-plugin</artifactId>

            <version>3.8.1</version>

         </dependency>

   </dependencies>
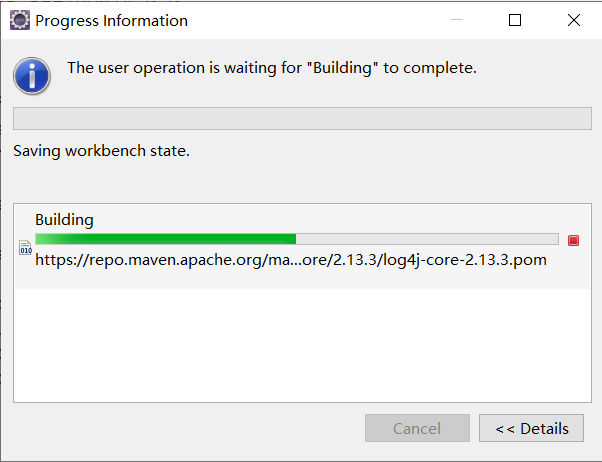
注意:一定要重启,因为添加依赖后文件需要保存eclipse才能自动下载,下载也是需要时间的,为了保证下载所需依赖文件成功,重启更新eclipse至关重要;之后添加依赖也是如此。(如图为添加依赖,关闭eclipse后,出现的界面表示需要下载文件的进程)
3.在example/pom.xml中设置属性和build文件
注意:不是example-service下的pom.xml ,加错位置无效!!
<properties>
    <project.build.sourceEncoding>UTF-8</project.build.sourceEncoding>
    <maven.compiler.encoding>UTF-8</maven.compiler.encoding>
    <maven.compiler.target>13</maven.compiler.target>
    <maven.compiler.source>13</maven.compiler.source>
  </properties>

<build>
    <plugins>
      <plugin>
        <groupId>org.apache.maven.plugins</groupId>
        <artifactId>maven-compiler-plugin</artifactId>
        <version>3.8.1</version>
        <configuration>
          <source>${maven.compiler.source}</source>
          <target>${maven.compiler.target}</target>
          <encoding>${maven.compiler.encoding}</encoding>
        </configuration>
      </plugin>
    </plugins>
  </build>
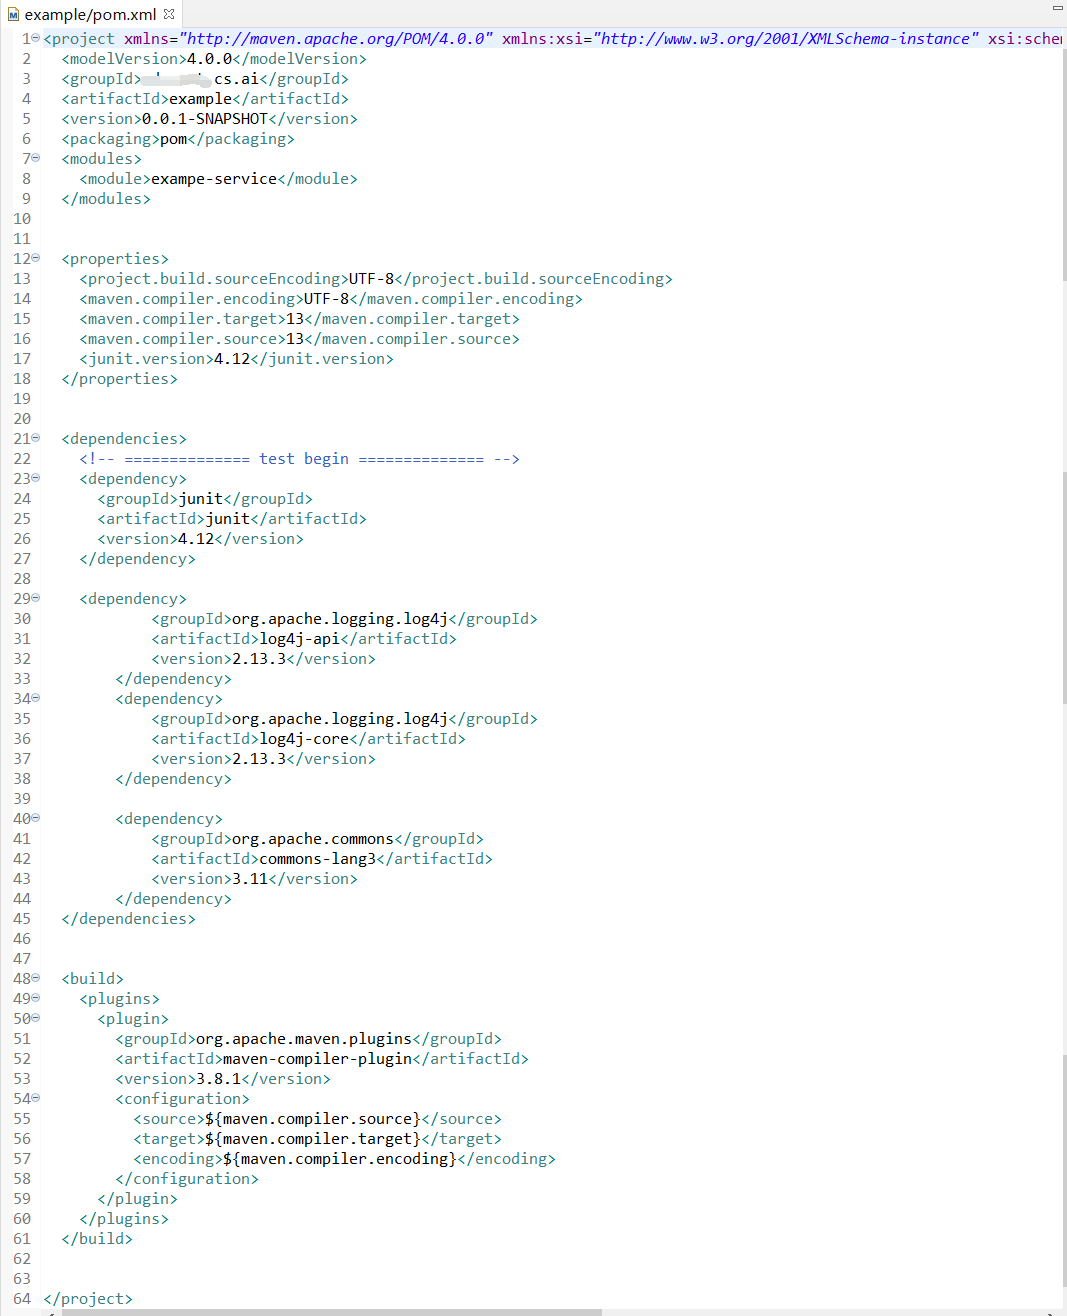
保存并更新后,可发现example目录的变化,工程结构出现
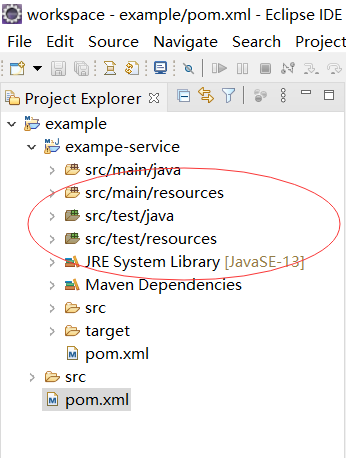
·开始举栗子
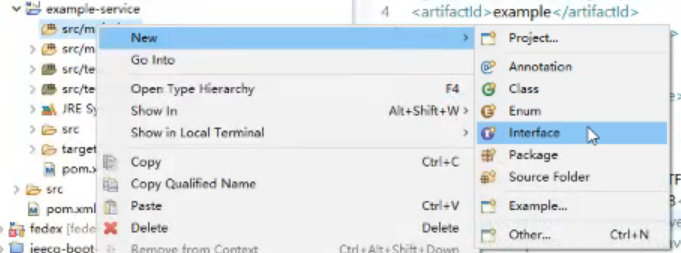
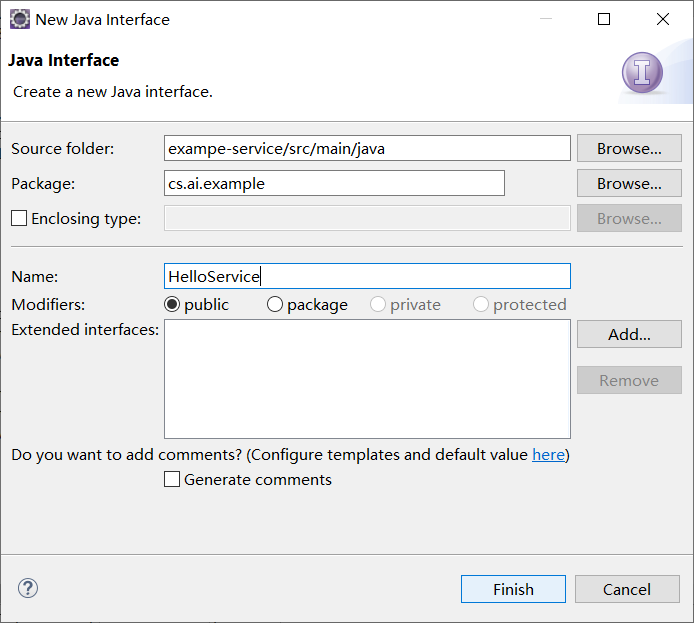
1.创建接口:example -> example-service -> src/main/java右键 -> New -> Interface -> 填写Package、Name -> Finish
添加接口方法(Java基础内容,不解释)
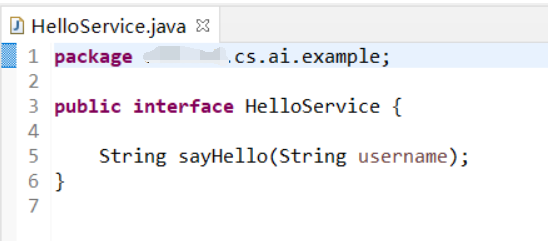
2.做单元测试(用于面向接口开发,也常常讲业务先行、重设计轻开发)
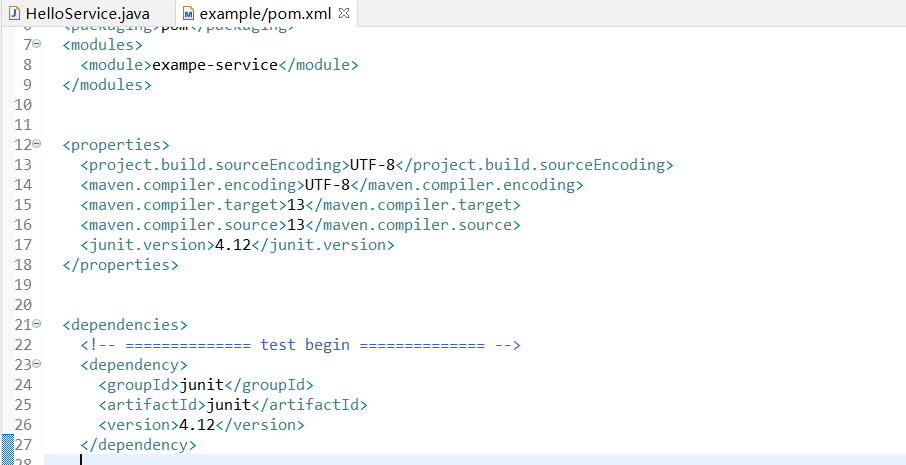
①加依赖(以图片位置为准),更新或重启eclipse
<junit.version>4.12</junit.version>


  <dependencies>
    <!-- ============== test begin ============== -->
    <dependency>
      <groupId>junit</groupId>
      <artifactId>junit</artifactId>
      <version>4.12</version>
    </dependency>
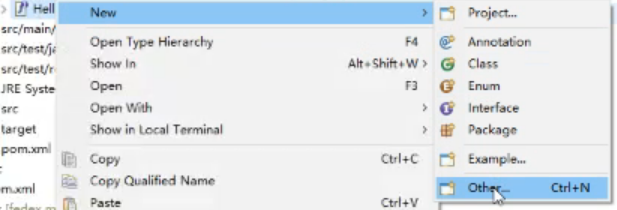
②HelloService右键 -> New -> Other -> Java -> JUnit -> JUnit Test Case -> Next -> Select All -> Finish -> Not Now ->OK
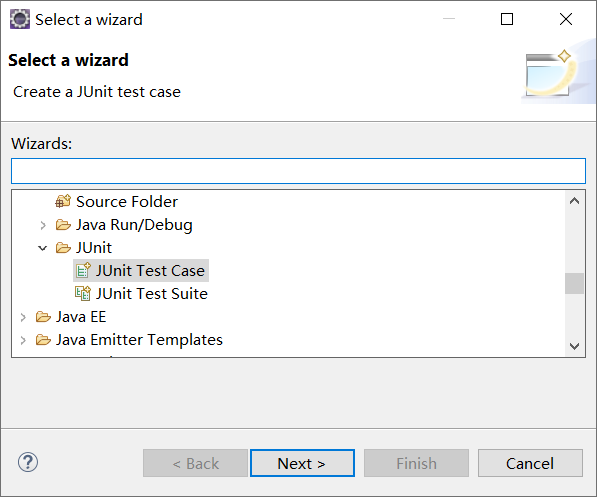
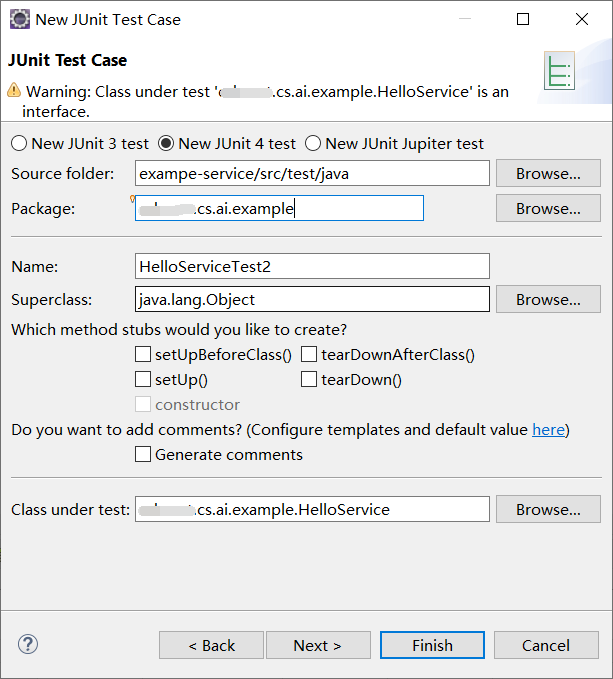
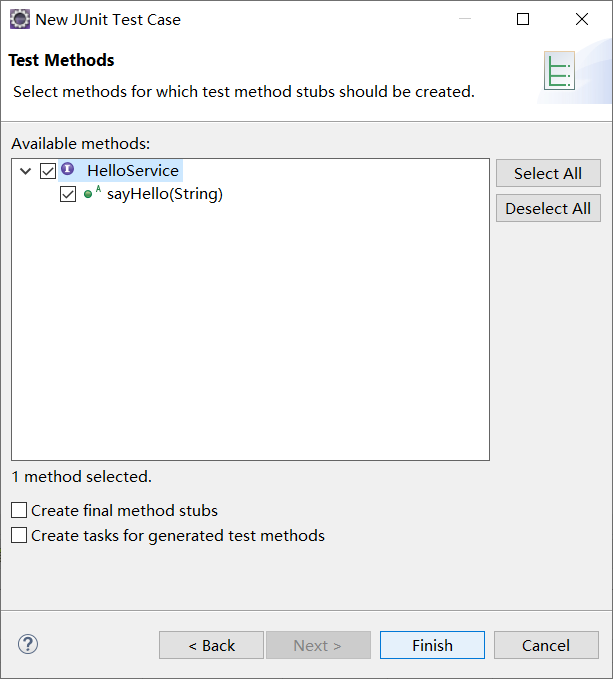
完成,没有报错,但不能运行,需要添加实现
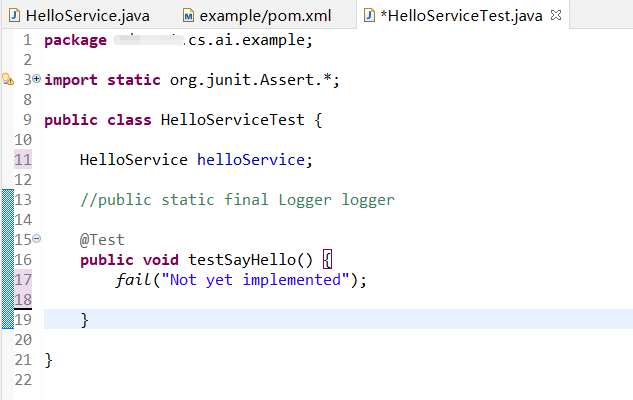
③添加实现
在src/main/java目录下右键点击cs.ai.example -> New -> Class -> 如下图操作 -> Finish
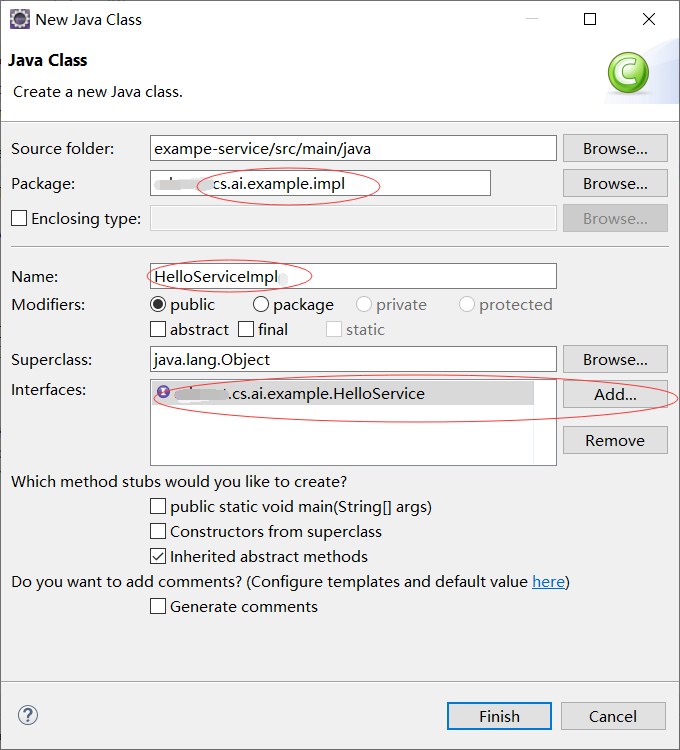
生成后的HelloServiceImpl,java添加如下代码(附图)
    String result = "Hello" + username + "!";
    return result;
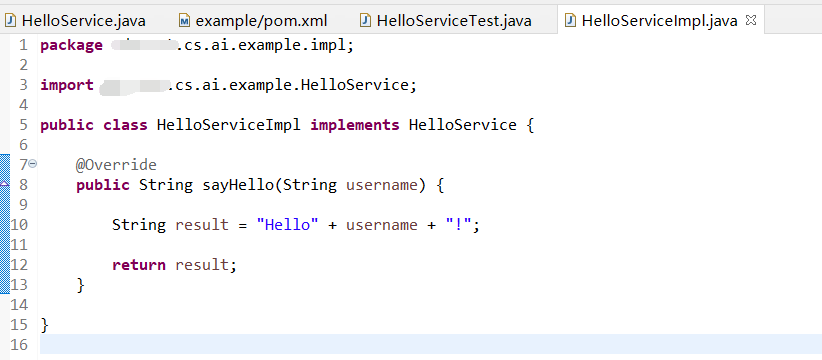
在HelloServiceTest.java下添加如下代码(以图片位置为准)
HelloService helloService = new HelloServiceImpl();

//        fail("Not yet implemented");

        String username = "World";
        String expected = "Hello" + username + "!";
        String result = this.helloService.sayHello(username);
        assertEquals(expected,result);
        System.out.print(result);
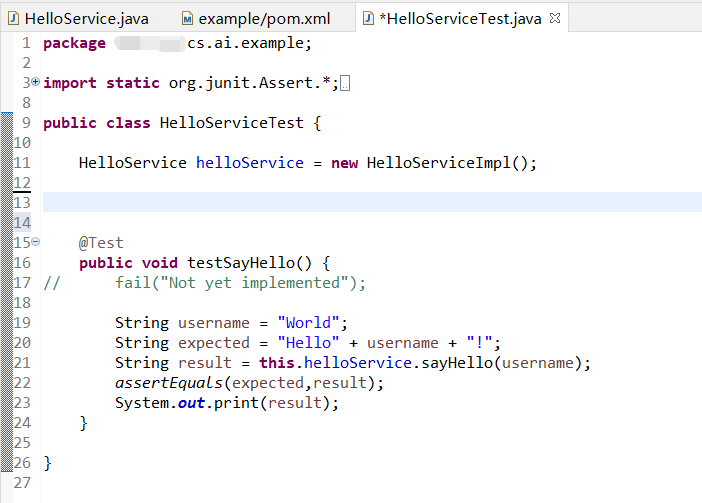
④运行HelloSeviceTest.java成功
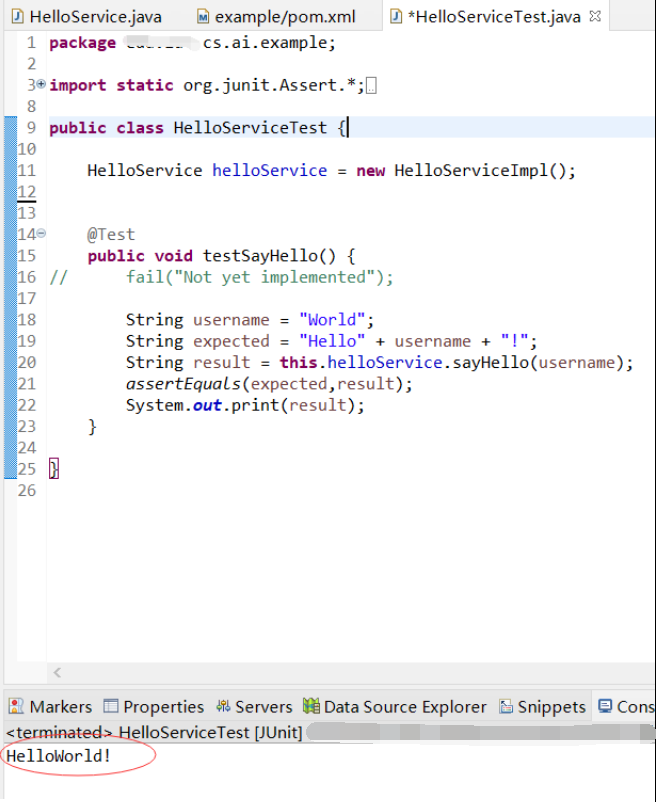
恭喜你,创建Maven工程成功!!!
(若有问题,请留言,必回复)


 浙公网安备 33010602011771号