使用 Zuul、Ribbon、Feign、Eureka 和 Sleuth、Zipkin 创建简单spring cloud微服务用例-spring cloud 入门教程
作者其他技术文章
1) 初识 Spring Boot-Spring Boot教程深入浅出系列
2)spring cloud 入门教程
3)application.yml 与 application.properties详解
4)SpringCloud入门之Spring Boot多环境配置切换指南
6) Kibana从入门到精通
13)BDD 如何让产品负责人、设计师、开发人员和测试人员的生活更轻松
Spring 框架提供了一组用于在 Java 生态中创建微服务的库。它们是 Spring Cloud 项目的一部分。今天我将向您展示如何使用 Spring Boot 和以下技术创建简单的微服务支手架:
- Zuul – 提供动态路由、监控、弹性、安全性等的网关服务
- Ribbon– 客户端负载均衡器
- Feign – 声明式 REST 客户端
- Eureka – 服务注册和发现
- Sleuth – 通过日志进行分布式跟踪
- Zipkin – 具有请求可视化的分布式跟踪系统。
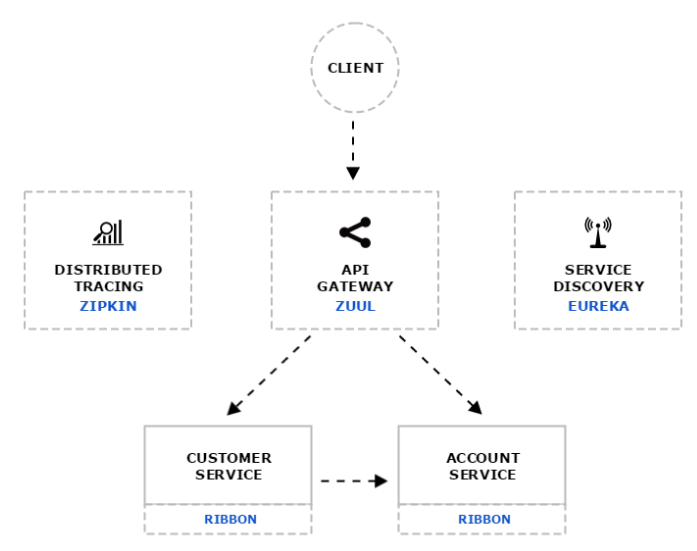
本文介绍spring cloud微服务快速入门实例的应用程序架构以下图所示。客户端调用customer-service内部可用的端点,该端点通过 Zuul 网关存储基本客户数据。此端点与 account-service 交互以收集有关由 account-service 中的端点提供服务的客户帐户的信息。每个服务在 Eureka 上注册自己,并使用 spring-cloud-sleuth 将其日志发送到 Zipkin。

这是一个account-service控制器。我们通过 id, 使用findByCustomer方法来获取客户帐户。
@RestController
public class Api {
   private List<Account> accounts;
   protected Logger logger = Logger.getLogger(Api.class.getName());

   public Api() {
      accounts = new ArrayList<>();
      accounts.add(new Account(1, 1, "111111"));
      accounts.add(new Account(2, 2, "222222"));
      accounts.add(new Account(3, 3, "333333"));
      accounts.add(new Account(4, 4, "444444"));
      accounts.add(new Account(5, 1, "555555"));
      accounts.add(new Account(6, 2, "666666"));
      accounts.add(new Account(7, 2, "777777"));
   }

   @RequestMapping("/accounts/{number}")
   public Account findByNumber(@PathVariable("number") String number) {
      logger.info(String.format("Account.findByNumber(%s)", number));
      return accounts.stream().filter(it -> it.getNumber().equals(number)).findFirst().get();
   }

   @RequestMapping("/accounts/customer/{customer}")
   public List<Account> findByCustomer(@PathVariable("customer") Integer customerId) {
      logger.info(String.format("Account.findByCustomer(%s)", customerId));
      return accounts.stream().filter(it -> it.getCustomerId().intValue()==customerId.intValue()).collect(Collectors.toList());
   }

   @RequestMapping("/accounts")
   public List<Account> findAll() {
      logger.info("Account.findAll()");
      return accounts;
   }
}
这是customer-service控制器。有一个findById方法可以与account-service使用Feign客户端进行交互。
@RestController
public class Api {

   @Autowired
   private AccountClient accountClient;

   protected Logger logger = Logger.getLogger(Api.class.getName());
   private List<Customer> customers;

   public Api() {
      customers = new ArrayList<>();
      customers.add(new Customer(1, "12345", "Adam Kowalski", CustomerType.INDIVIDUAL));
      customers.add(new Customer(2, "12346", "Anna Malinowska", CustomerType.INDIVIDUAL));
      customers.add(new Customer(3, "12347", "Paweł Michalski", CustomerType.INDIVIDUAL));
      customers.add(new Customer(4, "12348", "Karolina Lewandowska", CustomerType.INDIVIDUAL));
   }

   @RequestMapping("/customers/pesel/{pesel}")
   public Customer findByPesel(@PathVariable("pesel") String pesel) {
      logger.info(String.format("Customer.findByPesel(%s)", pesel));
      return customers.stream().filter(it -> it.getPesel().equals(pesel)).findFirst().get();
   }

   @RequestMapping("/customers")
   public List<Customer> findAll() {
      logger.info("Customer.findAll()");
      return customers;
   }

   @RequestMapping("/customers/{id}")
   public Customer findById(@PathVariable("id") Integer id) {
      logger.info(String.format("Customer.findById(%s)", id));
      Customer customer = customers.stream().filter(it -> it.getId().intValue()==id.intValue()).findFirst().get();
      List<Account> accounts = accountClient.getAccounts(id);
      customer.setAccounts(accounts);
      return customer;
   }
}
下面是 Feign 客户端与account-service.
@FeignClient("account-service")
public interface AccountClient {

   @RequestMapping(method = RequestMethod.GET, value = "/accounts/customer/{customerId}")
   List<Account> getAccounts(@PathVariable("customerId") Integer customerId);

}
为了能够使用 Feign 客户端,我们只需要在我们的主类中启用它。
@SpringBootApplication
@EnableDiscoveryClient
@EnableFeignClients
public class Application {

   public static void main(String[] args) {
      SpringApplication.run(Application.class, args);
   }
}
请注意customer-service中application.yml里面配置信息。需要启用ribbon负载平衡器。我还建议在 Eureka 客户端上设置租约更新和到期,以便在我们的服务关闭时从发现服务中取消注册。
server:
  port: ${PORT:3333}

eureka:
  client:
    serviceUrl:
      defaultZone: http://127.0.0.1:8761/eureka/
  instance:
    leaseRenewalIntervalInSeconds: 1
    leaseExpirationDurationInSeconds: 2

ribbon:
  eureka:
    enabled: true
我们已经实现并配置了两个微服务。Eureka server为我们的提供注册及发现服务功能,因此我们必须创建并运行基于 Eureka server的发现服务。创建此服务非常简单,我们只需要导入一个依赖项spring-cloud-starter-eureka-server并使用@EnableEurekaServer注释在应用程序主类中启用它。以下是 application.yml 文件中 Eureka 服务器的配置:
server:
  port: ${PORT:8761}

eureka:
  instance:
    hostname: localhost
  client:
    registerWithEureka: false
    fetchRegistry: false
  server:
    enableSelfPreservation: false
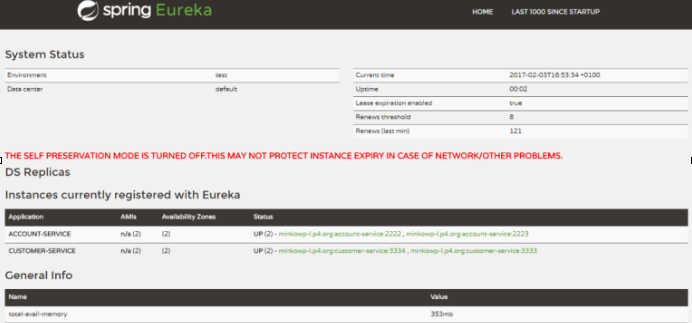
运行 discovery-service 后,我们看可以通过8761端口访问此控制台。现在让我们在 application.yml 配置文件中设置的默认端口上运行我们的两个微服务,并使用-DPORT VM参数在另一个端口上运行它们的更多两个实例,例如端口2223上的帐户服务和端口 3334 上的客户服务。现在我们来看看 Eureka 监控控制台。我们有两个在2222、2223端口上运行的帐户服务实例和两个在3333、3334端口上运行的客户服务实例。

我们在eureka上为每个微服务注册了两个实例。但是我们需要向外界隐藏我们的系统复杂性。在一个端口上应该只有一个 IP 地址可供入站客户端使用。这就是为什么我们需要 API 网关——Zuul原因。Zuul 将根据其代理配置将我们的请求转发到特定的微服务。此类请求也将由Ribbon客户端进行负载均衡。要启用 Zuul 网关依赖项,spring-cloud-starter-zuul应在 pom.xml 中添加并@EnableZuulProxy在主类中添加注释。这是 application.yml 中为我们的服务设置的 Zuul 配置。
server:
  port: 8765

zuul:
  prefix: /api
  routes:
    account:
      path: /account/**
      serviceId: account-service
    customer:
      path: /customer/**
      serviceId: customer-service
...
就像我们看到的 Zuul 被配置为在其默认端口8765下可用;它转发来自/api/account/路径请求给account-service处理,来自/api/customer/的请求给customer-service处理。当 URL http://localhost:8765/api/customer/customers/1被多次调用时,我们将看到它在每个微服务的两个实例之间会进行客户端的负载均衡。此外,当我们关闭一个微服务实例时,我们可以查看它是否已从 Eureka 服务器注销。
在文章的第二部分,我将介绍如何使用 Spring Cloud Sleuth、Zipkin 和 ELK。


 浙公网安备 33010602011771号