集成SPRINGDOC OPENAPI 的微服务实践-spring cloud 入门教程
在文章集成SWAGGER2服务-spring cloud 入门教程中我们学习了使用swagger2来生成微服务的文档方法。但SpringFox 库最重要的问题是缺乏对最新版本 3 中的 OpenAPI 和 Spring 的支持使用 WebFlux 构建的反应式 API。所有这些特性都是由Springdoc OpenAPI 库实现的。因此,它可能会取代 SpringFox 作为 Swagger 和用于 Spring Boot 应用程序的 OpenAPI 3 生成工具。
例子
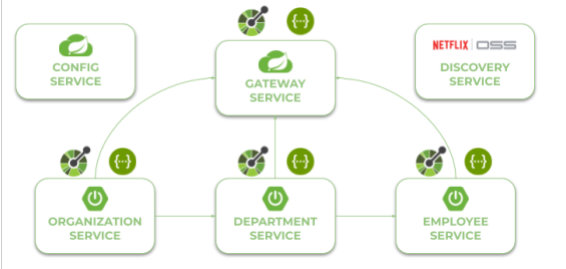
作为本文中的代码示例,我们将使用使用 Spring Cloud 构建的典型微服务架构。它由 Spring Cloud Config Server、Eureka 发现和作为 API 网关的 Spring Cloud Gateway 组成。我们还有三个微服务,外部客户端只能通过网关才能访问它们暴露 REST API 。下图显示了本文所提及的系统简单架构图。

执行
与 Springdoc OpenAPI 库相关的第一个好消息是它可以与 SpringFox 库一起存在而不会发生任何冲突。如果有人使用您的 Swagger 文档,要为基于标准 Spring MVC 的应用程序启用 Springdoc,您需要将以下依赖项包含到 Maven 中pom.xml。
|
1
2
3
4
5
|
<dependency> <groupId>org.springdoc</groupId> <artifactId>springdoc-openapi-webmvc-core</artifactId> <version>1.2.32</version></dependency> |
我们的每个 Spring Boot 微服务都构建在 Spring MVC 之上,并为标准同步 REST 通信提供端点。但是,构建在 Spring Cloud Gateway 之上的 API 网关使用 Netty 作为嵌入式服务器,并基于响应式 Spring WebFlux。它还提供 Swagger UI 以访问所有微服务公开的文档,因此它必须包含启用 UI 的库。必须包含以下两个库才能为基于 Spring WebFlux 的响应式应用程序启用 Springdoc 支持。
|
1
2
3
4
5
6
7
8
9
10
|
<dependency> <groupId>org.springdoc</groupId> <artifactId>springdoc-openapi-webflux-core</artifactId> <version>1.2.31</version></dependency><dependency> <groupId>org.springdoc</groupId> <artifactId>springdoc-openapi-webflux-ui</artifactId> <version>1.2.31</version></dependency> |
我们可以通过在 Spring Boot 配置文件中设置属性或使用@Beans. 例如,我们不想为应用程序公开的所有 HTTP 端点(如 Spring 特定端点)生成 OpenAPI 清单,因此我们可以定义一个基本包属性用于扫描,如下所示。在我们的源代码示例中,每个应用程序 YAML 配置文件都位于config-service模块中。
|
1
2
|
springdoc: packagesToScan: pl.piomin.services.department |
这是员工服务的主要类。我们使用@OpenAPIDefinition注释来定义 Swagger 站点上显示的应用程序的描述。如您所见,我们仍然可以使用@EnableSwagger2.
|
1
2
3
4
5
6
7
8
9
10
11
12
13
|
@SpringBootApplication@EnableDiscoveryClient@EnableSwagger2@OpenAPIDefinition(info = @Info(title = "Employee API", version = "1.0", description = "Documentation Employee API v1.0"))public class EmployeeApplication { public static void main(String[] args) { SpringApplication.run(EmployeeApplication.class, args); }} |
一旦您启动每个微服务,它将公开端点/v3/api-docs。我们可以通过使用springdoc.api-docs.pathSpring 配置文件中的属性来自定义该上下文。由于不是必须的,我们可以继续在 Spring Cloud Gateway 上实现。Springdoc 没有提供与 SpringFox 类似的类SwaggerResource,它在上一篇文章中用于暴露来自不同微服务的多个 API。幸运的是,有一种分组机制允许将 OpenAPI 定义分成具有给定名称的不同组。要使用它,我们需要声明一个GroupOpenAPIbean列表。
这是网关服务中负责创建由网关处理的 OpenAPI 资源列表的代码片段。首先,我们使用RouteDefinitionLocator豆。然后我们获取每个路由的 id 并将其设置为组名。因此,我们在 path 下有多个 OpenAPI 资源/v3/api-docs/{SERVICE_NAME},例如/v3/api-docs/employee。
|
1
2
3
4
5
6
7
8
9
10
11
12
13
|
@AutowiredRouteDefinitionLocator locator;@Beanpublic List<GroupedOpenApi> apis() { List<GroupedOpenApi> groups = new ArrayList<>(); List<RouteDefinition> definitions = locator.getRouteDefinitions().collectList().block(); definitions.stream().filter(routeDefinition -> routeDefinition.getId().matches(".*-service")).forEach(routeDefinition -> { String name = routeDefinition.getId().replaceAll("-service", ""); GroupedOpenApi.builder().pathsToMatch("/" + name + "/**").setGroup(name).build(); }); return groups;} |
API 路径 like/v3/api-docs/{SERVICE_NAME}并不是我们想要实现的,因为我们到下游服务的路由是基于从发现中获取的服务名称。因此,如果您调用 address 就像http://localhost:8060/employee/**它会在employee-service. 这是网关服务配置中的路由定义。
|
1
2
3
4
5
6
7
8
9
10
11
12
13
14
15
16
17
18
19
20
21
22
23
24
25
|
spring: cloud: gateway: discovery: locator: enabled: true routes: - id: employee-service uri: lb://employee-service predicates: - Path=/employee/** filters: - RewritePath=/employee/(?<path>.*), /$\{path} - id: department-service uri: lb://department-service predicates: - Path=/department/** filters: - RewritePath=/department/(?<path>.*), /$\{path} - id: organization-service uri: lb://organization-service predicates: - Path=/organization/** filters: - RewritePath=/organization/(?<path>.*), /$\{path} |
由于 Springdoc 不允许自定义分组机制的默认行为来更改生成的路径,因此我们需要提供一些解决方法。我的提议只是在专用于 Open API 路径处理的网关配置中添加一个新的路由定义。它将路径重写/v3/api-docs/{SERVICE_NAME}为/{SERVICE_NAME}/v3/api-docs,由另一个负责与 Eureka 发现交互的路由处理。
|
1
2
3
4
5
6
|
- id: openapi uri: http://localhost:${server.port} predicates: - Path=/v3/api-docs/** filters: - RewritePath=/v3/api-docs/(?<path>.*), /$\{path}/v3/api-docs |
测试
为了测试我们的简单示例,我们需要运行所有微服务、配置服务器、发现和网关。微服务在动态生成的端口下可用,配置服务器在 下可用8888,发现在 下8061,网关在 下8060。我们可以通过调用访问每个微服务http://localhost:8060/{SERVICE_PATH}/**,例如http://localhost:8060/employee/**。Swagger UI 在 address 下可用http://localhost:8060/swagger-ui.html。在运行所有必需的 Spring Boot 应用程序之后,让我们先来看看 Eureka。

访问在网关上公开的 Swagger UI 后,您可能会看到我们可以在发现中注册的所有三个微服务之间进行选择。这正是我们想要实现的。

结论
Springdoc OpenAPI 兼容 OpenAPI 3,并支持 Spring WebFlux,而 SpringFox 不支持。因此,选择似乎是显而易见的,特别是如果您使用的是响应式 API 或 Spring Cloud Gateway。在本文中,我向您展示了如何在具有网关模式的微服务架构中使用 Springdoc。
使用 Zuul、Ribbon、Feign、Eureka 和 Sleuth、Zipkin 创建简单spring cloud微服务用例-spring cloud 入门教程
微服务集成SPRING CLOUD SLEUTH、ELK 和 ZIPKIN 进行监控-spring cloud 入门教程
使用Hystrix 、Feign 和 Ribbon构建微服务-spring cloud 入门教程
使用 Spring Boot Admin 监控微服务-spring cloud 入门教程


 浙公网安备 33010602011771号