EasyExcel使用
作者:Java菜鸟联盟
出处: https://www.bilibili.com/read/cv5544908
EasyExcel官方API:https://www.yuque.com/easyexcel/doc/easyexcel
首先我们需要引入 EasyExcel pom 依赖:
1.easyexcel 2.1.6 依赖↓
2.slf4j-api-1.7.25.jar
3.poi-4.0.1 2018(2003)
4.poi-ooxml-4.0.1(poi的扩展含XSSF,对excel大数据量性能的扩展) 2018(2007)
5.xmlbeans-3.0.2 2018
6.commons-collections-4.2
7.commons-compress-1.18
8.ooxml-schemas-1.4
这里建议大家使用 2.0 以上的正式版本,不要再使用 1.0 的老版本,两者使用 API 差别很大。另外 beta 版本可能会存在某些 bug,大家谨慎使用。
普通方式
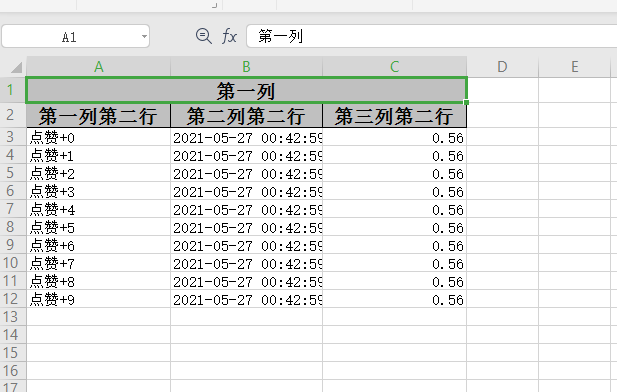
一行代码生成 Excel
// 写法1
public class EasyExcelDemo {
    public static void main(String[] args) throws IOException {
        write();
//        annotationWrite();

}
 /**
     * 写操作
*/
public static void write() throws IOException {
        String fileName = "E:test/" + "test" + System.currentTimeMillis() + ".xlsx";
EasyExcel.write(fileName)
                // 设置表头
.head(head())
                // 设置 sheet 的名字
.sheet("sheet1")
                // 自适应列宽
.registerWriteHandler(new LongestMatchColumnWidthStyleStrategy())
                // 写入数据
.doWrite(dataList());

// 模板注意 用{} 来表示你要用的变量 如果本来就有"{","}" 特殊字符 用"\{","\}"代替
//        String templateFileName = "E:\\test\\sample.xls";
//
//        // 这里 会填充到第一个sheet, 然后文件流会自动关闭
//        Map<String, Object> map = new HashMap<String, Object>();
//        map.put("name", "知春秋");
//        map.put("number", 25);
//        EasyExcel.write(fileName)
//                //使用的模板 输出到write
//                .withTemplate(templateFileName)
//                .sheet().doFill(map);
}
/**
     * 创建表头,可以创建复杂的表头
*
     * @return
*/
private static List<List<String>> head() {
        List<List<String>> list = new ArrayList<List<String>>();
// 第一列表头
List<String> head0 = new ArrayList<String>();
head0.add("第一列");
head0.add("第一列第二行");
// 第二列表头
List<String> head1 = new ArrayList<String>();
head1.add("第一列");
head1.add("第二列第二行");
// 第三列
List<String> head2 = new ArrayList<String>();
head2.add("第一列");
head2.add("第三列第二行");
list.add(head0);
list.add(head1);
list.add(head2);
        return list;
}

    private static List dataList() {
        List<List<Object>> list = new ArrayList<List<Object>>();
        for (int i = 0; i < 10; i++) {
            List<Object> data = new ArrayList<Object>();
data.add("点赞+" + i);
// date 将会安装 yyyy-MM-dd HH:mm:ss 格式化
data.add(new Date());
data.add(0.56);
list.add(data);
}
        return list;
}
}
看完这个是不是想立刻体验一下?等等,上面使用方式还是有点繁琐,使用 EasyExcel 还可以更快。我们可以使用注解方式,无需手动设置表头与表体。

注解方式
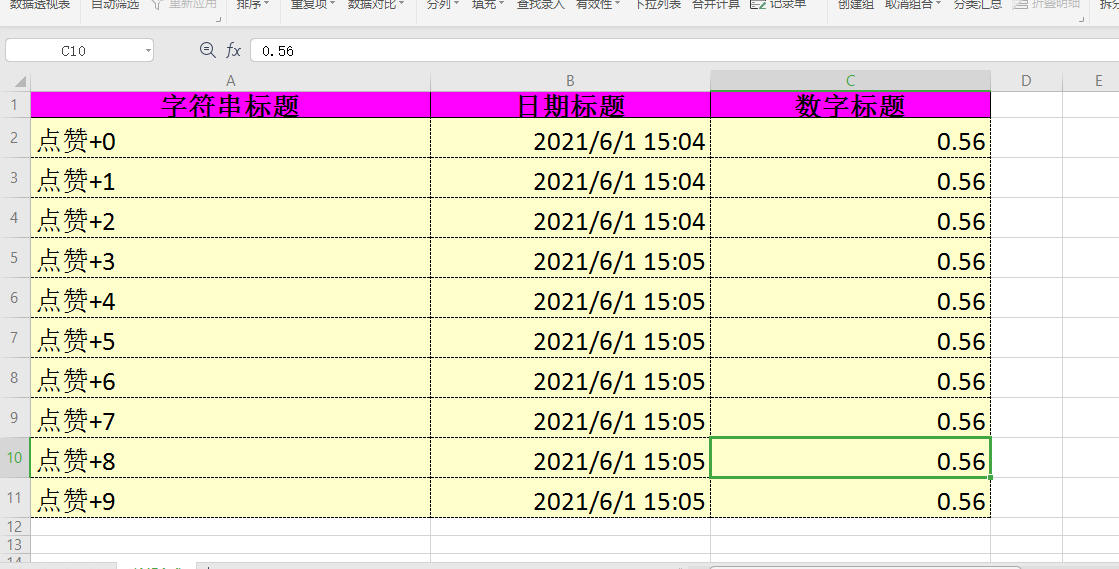
注解方式生成 Excel 代码如下:
@ContentRowHeight(30)// 表体行高
@HeadRowHeight(20)// 表头行高
@ColumnWidth(35)// 列宽
@Data
public class DemoData {

    /**
     * 单独设置该列宽度
*/
@ColumnWidth(50)
    @ExcelProperty(value = {"主标题", "字符串标题"},index = 0)
    private String string;
/**
     * 年月日时分秒格式
*/
@ColumnWidth(60)
//    @DateTimeFormat(value = "yyyy年MM月dd日HH时mm分ss秒")
@ExcelProperty(value = {"主标题", "日期标题"},index = 1)
    private Date date;
/**
     * 格式化百分比
*/
@ColumnWidth(60)
    @NumberFormat(value = "#.##%")
    @ExcelProperty(value = {"主标题", "数字标题"},index = 2)
    private Double doubleData;

@ColumnWidth(50)
    @ExcelProperty(value = {"主标题", "图片"},index = 3)
    //只在标题起作用
private Integer file;
/**
     * 忽略这个字段
*/
@ExcelIgnore
private String ignore;


}
public class EasyExcelWriterDemo {

    public static void main(String[] args) throws IOException {
//        write();
annotationWrite();

}


    /**annotation
     * 注解写操作
*/
public static void annotationWrite() throws IOException {
        String fileName = "E:test/annotationtest" + System.currentTimeMillis() + ".xlsx";

// 每隔2行会合并 第一列会合并。
LoopMergeStrategy loopMergeStrategy = new LoopMergeStrategy(2, 0);
EasyExcel
                .write(fileName, DemoData.class)
                .sheet("注解方式")
                // Excel 表格样式
.registerWriteHandler(loopMergeStrategy)
                .doWrite(dataList());
}

    /***
     * 设置 excel 的样式
* @return
*/
private static WriteHandler createTableStyle() {
        // 头的策略
WriteCellStyle headWriteCellStyle = new WriteCellStyle();
// 背景设置为红色
headWriteCellStyle.setFillForegroundColor(IndexedColors.PINK.getIndex());
// 设置字体
WriteFont headWriteFont = new WriteFont();
headWriteFont.setFontHeightInPoints((short) 20);
headWriteCellStyle.setWriteFont(headWriteFont);
// 内容的策略
WriteCellStyle contentWriteCellStyle = new WriteCellStyle();
// 这里需要指定 FillPatternType 为FillPatternType.SOLID_FOREGROUND 不然无法显示背景颜色.头默认了 FillPatternType所以可以不指定
contentWriteCellStyle.setFillPatternType(FillPatternType.SOLID_FOREGROUND);
// 背景绿色
contentWriteCellStyle.setFillForegroundColor(IndexedColors.LEMON_CHIFFON.getIndex());

WriteFont contentWriteFont = new WriteFont();
// 字体大小
contentWriteFont.setFontHeightInPoints((short) 20);
contentWriteCellStyle.setWriteFont(contentWriteFont);
// 设置边框的样式
contentWriteCellStyle.setBorderBottom(BorderStyle.DASHED);
contentWriteCellStyle.setBorderLeft(BorderStyle.DASHED);
contentWriteCellStyle.setBorderRight(BorderStyle.DASHED);
contentWriteCellStyle.setBorderTop(BorderStyle.DASHED);

// 这个策略是 头是头的样式 内容是内容的样式 其他的策略可以自己实现
HorizontalCellStyleStrategy horizontalCellStyleStrategy =
                new HorizontalCellStyleStrategy(headWriteCellStyle, contentWriteCellStyle);
        return horizontalCellStyleStrategy;
}

    /**
     * 数据
* @return
*/
private static List dataList() throws IOException {
        List<List<Object>> list = new ArrayList<List<Object>>();
        for (int i = 0; i < 10; i++) {
            List<Object> data = new ArrayList<Object>();
data.add("点赞+" + i);
// date 将会按照 yyyy-MM-dd HH:mm:ss 格式化
data.add(new Date());
data.add(0.56);
String imagePath = "E:/test" + File.separator + "1622531517(1).jpg";
data.add(new File(imagePath));

list.add(data);
}
        return list;
}

    /**
     * web数据写出
* @param response
* @throws IOException
     */
//    @GetMapping("download")
//    public void download(HttpServletResponse response) throws IOException {
//        response.setContentType("application/vnd.ms-excel");
//        response.setCharacterEncoding("utf-8");
//        // 这里URLEncoder.encode可以防止中文乱码 当然和easyexcel没有关系
//        String fileName = URLEncoder.encode("数据写出", "UTF-8");
//        response.setHeader("Content-disposition", "attachment;filename=" + fileName + ".xlsx");
//        EasyExcel.write(response.getOutputStream(), DownloadData.class).sheet("模板").doWrite(data());
//    }

/**
     * web读取
* @param file
* @return
* @throws IOException
     */
//    @PostMapping("upload")
//    @ResponseBody
//    public String upload(MultipartFile file) throws IOException {
//        EasyExcel.read(file.getInputStream(), UploadData.class, new UploadDataListener(uploadDAO)).sheet().doRead();
//        return "SUCCESS";
//    }
}
效果

使用注意点
poi 冲突问题
理论上当前 easyexcel兼容支持 poi 的3.17,4.0.1,4.1.0所有较新版本,但是如果项目之前使用较老版本的 poi,由于 poi 内部代码调整,某些类已被删除,这样直接运行时很大可能会抛出以下异常:
· NoSuchMethodException
· ClassNotFoundException
· NoClassDefFoundError
所以使用过程中一定要注意统一项目中的 poi 的版本。
以上是写操作
读操作
public class EasyExcelReadDemo {
    public static void main(String[] args) throws FileNotFoundException {
        // 写法1:
String fileName = "E:/test/annotationtest1622535522385.xlsx";
// 这里 需要指定读用哪个class去读,然后读取第一个sheet 文件流会自动关闭
ExcelReaderBuilder readerBuilder = EasyExcel.read();
readerBuilder.file(fileName);
readerBuilder.sheet("注解方式");
readerBuilder.excelType(ExcelTypeEnum.XLSX);
readerBuilder.autoCloseStream(true);
readerBuilder.registerReadListener(new DemoDataListener());
ExcelReader reader = readerBuilder.build();
reader.readAll();
reader.finish();

// 写法2:
//EasyExcel.read(fileName, DemoData.class, new DemoDataListener()).sheet("注解方式").doRead();

        // 读取全部sheet
        // 这里需要注意 DemoDataListener的doAfterAllAnalysed 会在每个sheet读取完毕后调用一次。然后所有sheet都会往同一个DemoDataListener里面写
//        EasyExcel.read(fileName, DemoData.class, new DemoDataListener()).doReadAll();

        // 读取部分sheet
//        String fileName = "E:/test/annotationtest1622539468479.xlsx";
//        ExcelReader excelReader = EasyExcel.read(fileName).build();
        // 这里为了简单 所以注册了 同样的head 和Listener 自己使用功能必须不同的Listener
        // readSheet参数设置读取sheet的序号
//        ReadSheet readSheet1 =
//                EasyExcel.readSheet(0).head(DemoData.class).registerReadListener(new DemoDataListener()).build();
//        ReadSheet readSheet2 =
//                EasyExcel.readSheet(1).head(DemoData.class).registerReadListener(new DemoDataListener()).build();
        // 这里注意 一定要把sheet1 sheet2 一起传进去,不然有个问题就是03版的excel 会读取多次,浪费性能
//        excelReader.read(readSheet1);
        // 这里千万别忘记关闭,读的时候会创建临时文件,到时磁盘会崩的
//        excelReader.finish();
}
}
// 如果没有特殊说明,下面的案例将默认使用这个监听器
public class DemoDataListener extends AnalysisEventListener<Map<Integer,Object>> {

    /**
     * 每隔5条存储数据库,实际使用中可以3000条,然后清理list ,方便内存回收
*/
private static final int BATCH_COUNT = 5;
List<Map<Integer,Object>> list = new ArrayList<>();
List<DemoData> listData = new ArrayList<>();
/**
     * 如果使用了spring,请使用这个构造方法。每次创建Listener的时候需要把spring管理的类传进来
*/
private DemoService demoService;
    public DemoDataListener() {}
    public DemoDataListener(DemoService demoService) {
        demoService = demoService;
}

    /**
     * 这个每一条数据解析都会来调用
*
     * @param map
* @param context
*/
@SneakyThrows
    @Override
public void invoke(Map<Integer,Object> map, AnalysisContext context) {
        System.out.println("解析到一条数据:{}"+JSON.toJSONString(map));
list.add(map);

// 达到BATCH_COUNT了,需要去存储一次数据库,防止数据几万条数据在内存,容易OOM
if (list.size() >= BATCH_COUNT) {
//            demoService.save(list);

int i=0;
DemoData demoData =new DemoData();
            for (Map<Integer,Object> map1:list){
                i++;
Set<Integer> keyset = map.keySet();
Iterator<Integer> iterator = keyset.iterator();
List<Object> val = new ArrayList<>();
                while (iterator.hasNext()){
                    Integer key = iterator.next();
System.err.print(key+":"+map1.get(key));

val.add(map1.get(key));
}
                String[] newArr = val.toArray(new String[val.size()]);

//第一次循环,是表头
if(i>1) {
                    demoData.setString((String) map1.get(0));
SimpleDateFormat sdf = new SimpleDateFormat("yyyy-MM-dd HH:mm:ss");
                    try {
                        Date date = sdf.parse((String) map1.get(1));
demoData.setDate(date);
}catch (Exception exception){
                        System.out.println(exception);
}
                    demoData.setDoubleData(Double.parseDouble((String) map1.get(2)));
listData.add(demoData);
}
                System.err.println("=");
}

            // 存储完成清理 list
list.clear();
}
    }

    //读取表头的内容
@Override
public void invokeHeadMap(Map<Integer,String> headMap, AnalysisContext context) {
        System.out.println("表头:" + headMap);
}

    /**
     * 所有数据解析完成了 都会来调用
*
     * @param context
*/
@Override
public void doAfterAllAnalysed(AnalysisContext context) {
        System.out.println(JSON.toJSONString(list));
}
}
public interface DemoService {
    public void save(List<Map<Integer,Object>> data);
}
    public static void main(String[] args) throws IOException {
        write();
//        annotationWrite();

}


【推荐】国内首个AI IDE,深度理解中文开发场景,立即下载体验Trae
【推荐】编程新体验,更懂你的AI,立即体验豆包MarsCode编程助手
【推荐】抖音旗下AI助手豆包,你的智能百科全书,全免费不限次数
【推荐】轻量又高性能的 SSH 工具 IShell:AI 加持,快人一步
· go语言实现终端里的倒计时
· 如何编写易于单元测试的代码
· 10年+ .NET Coder 心语,封装的思维:从隐藏、稳定开始理解其本质意义
· .NET Core 中如何实现缓存的预热?
· 从 HTTP 原因短语缺失研究 HTTP/2 和 HTTP/3 的设计差异
· 分享一个免费、快速、无限量使用的满血 DeepSeek R1 模型,支持深度思考和联网搜索!
· 基于 Docker 搭建 FRP 内网穿透开源项目(很简单哒)
· ollama系列01:轻松3步本地部署deepseek,普通电脑可用
· 25岁的心里话
· 按钮权限的设计及实现