Maven Profiles 多环境配置(开发、测试、生产)
profiles标签
在pom.xml中配置profiles标签
<profiles>
    <profile>
        <id>dev</id>
        <activation>
            <activeByDefault>true</activeByDefault>
        <activation>
        <properties>
            <build.profile>dev</build.profile>
            <packageing.type>jar</packageing.type>
        </properties>
    <profile/>

    <profile>
        <id>test</id>
        <activation>
            <activeByDefault>false</activeByDefault>
        <activation>
        <properties>
            <build.profile>test</build.profile>
            <packageing.type>war</packageing.type>
        </properties>
    <profile/>

    <profile>
        <id>prod</id>
        <activation>
            <activeByDefault>false</activeByDefault>
        <activation>
        <properties>
            <build.profile>prod</build.profile>
            <packageing.type>jar</packageing.type>
        </properties>
    <profile/>
</profiles>
activeByDefault标签
不显式指定环境时, 会取 activeByDefault true 的环境变量, 需要注意的是: 没指定 activeByDefault true 的其他相同 profile id 的 properties 是不会生效的
- 当我们没有显式指定环境时, maven 会默认取activeByDefault 为 true 的 profile
- 当父子 pom 都有相同的 profile id 时, 都需要显式指定 activeByDefault true, 如果不指定, 那么并不会加载没有指定 activeByDefault true 的 properties
- 结论: 对于父子 pom 相同 id 的 profile, 每个 profile 节点都要指定 activeByDefault true
build标签
<build>
    <finalName>bdcs</finalName>
    <resources>
        <resource>
            <directory>src/main/resources</directory>
        </resource>
        <resource>
            <directory>src/main/profiles/${build.profile}</directory>
        </resource>
    </resources>
</build>
使用filter
profiles标签
<profiles>
    <!-- 开发环境 -->
    <profile>
        <id>dev</id>
        <properties>
            <env>dev</env>
        </properties>
    </profile>
    <!-- 生产环境 -->
    <profile>
        <id>publish</id>
        <properties>
            <env>publish</env>
        </properties>
    </profile>
    <!-- 本地环境 -->
    <profile>
        <id>local</id>
        <properties>
            <env>local</env>
        </properties>
        <!--默认启用-->
        <activation>
            <activeByDefault>true</activeByDefault>
        </activation>
    </profile>
</profiles>
build标签
 <build>
    <!-- 指定使用filter -->
    <filters>
        <filter>src/main/resources/profiles/${env}/env.properties</filter>
    </filters>
    <resources>
        <resource>
            <directory>src/main/resources</directory>
            <includes>
                <include>**/**</include>
            </includes>
            <excludes>
                <exclude>profiles/**</exclude>
            </excludes>
            <filtering>true</filtering>
        </resource>
    </resources>
</build>
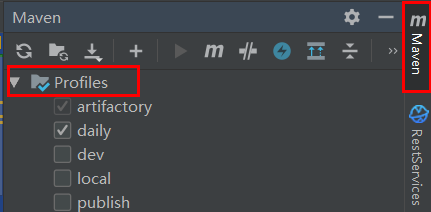
切换配置环境
如果使用idea,直接打开右侧的maven在Profiels下勾选切换即可
如果使用命令行则通过添加后缀 -P
clean -U package -P dev -DskipTests=true -f pom.xml
论读书
睁开眼,书在面前 闭上眼,书在心里
睁开眼,书在面前 闭上眼,书在心里

 浙公网安备 33010602011771号