Redis主从复制,CAP,Sentinel,Cluster分片,Twemproxy
集群方式
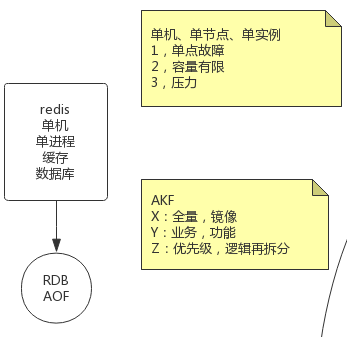
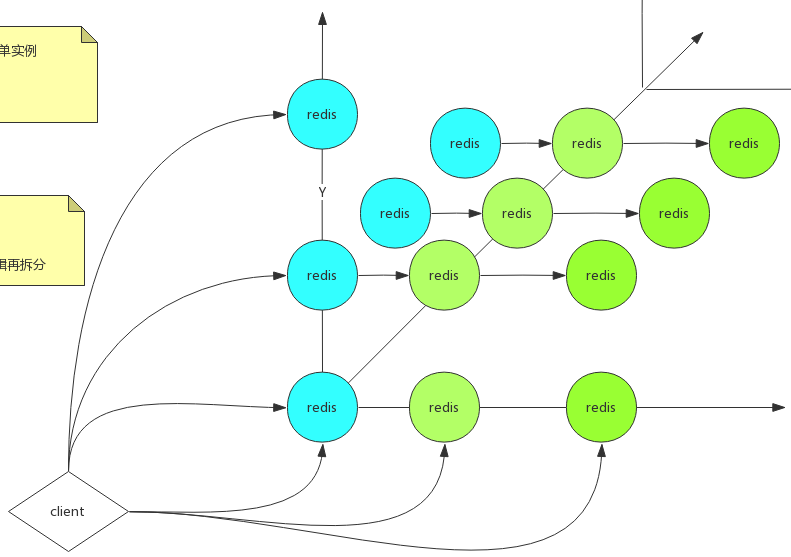
AKF
AKF 立方体也叫做scala cube,它在《The Art of Scalability》一书中被首次提出,旨在提供一个系统化的扩展思路
AKF 把系统扩展分为以下三个维度:
- X 轴:直接水平复制应用进程来扩展系统
- Y 轴:将功能拆分出来扩展系统
- Z 轴:基于用户信息扩展系统
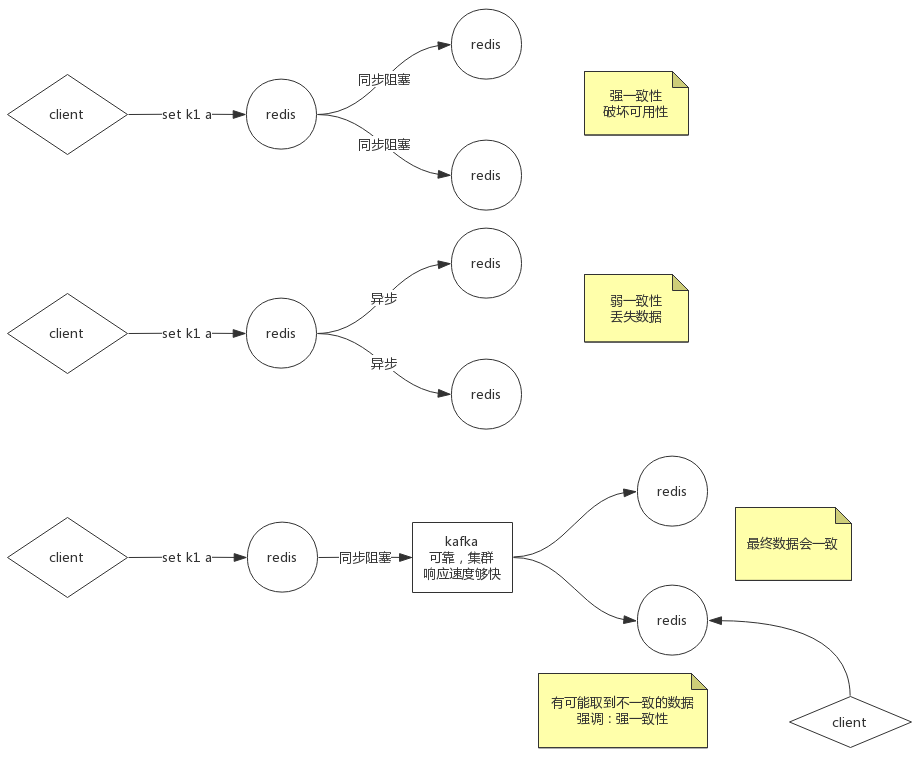
数据一致性
如果采用同步阻塞模式,数据全部保留,但是破坏了可用性
所以使用异步方式,容忍数据对视一部分
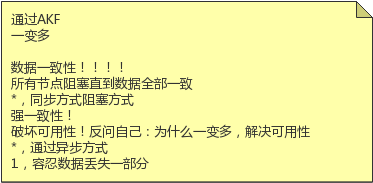
redis + kafka,强一致性,结果一致
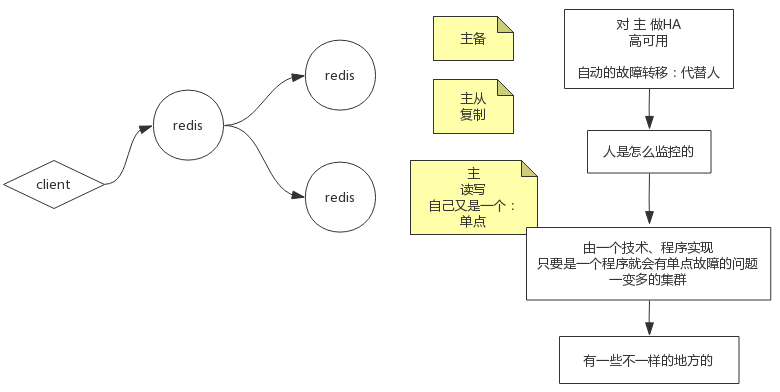
主备、主从
主备,客户端只能访问主,主挂掉以后,备用机接替主机
主从,客户端可以访问主也可以访问从
CAP原则
指的是在一个分布式系统中
- 一致性(Consistency)、可用性(Availability)、分区容错性(Partition tolerance)
- CAP 原则指的是,这三个要素最多只能同时实现两点,不可能三者兼顾
脑裂
脑裂(split-brain)就是“大脑分裂”,也就是本来一个“大脑”被拆分了两个或多个“大脑”
脑裂通常会出现在集群环境中,比如ElasticSearch、Zookeeper集群,而这些集群环境有一个统一的特点,就是它们有一个大脑
比如ElasticSearch集群中有Master节点,Zookeeper集群中有Leader节点
Zookeeper集群中的脑裂场景
对于一个集群,想要提高这个集群的可用性,通常会采用多机房部署,比如现在有一个由6台zkServer所组成的一个集群,部署在了两个机房:

正常情况下,此集群只会有一个Leader,那么如果机房之间的网络断了之后,两个机房内的zkServer还是可以相互通信的
如果不考虑过半机制,那么就会出现每个机房内部都将选出一个Leader。

这就相当于原本一个集群,被分成了两个集群,出现了两个“大脑”,这就是脑裂
- 对于这种情况,我们也可以看出来,原本应该是统一的一个集群对外提供服务的,现在变成了两个集群同时对外提供服务
- 如果过了一会,断了的网络突然联通了,那么此时就会出现问题了,两个集群刚刚都对外提供服务了,数据该怎么合并,数据冲突怎么解决等等问题
- 刚刚在说明脑裂场景时,有一个前提条件就是没有考虑过半机制,所以实际上Zookeeper集群中是不会出现脑裂问题的,而不会出现的原因就跟过半机制有关
过半机制
在领导者选举的过程中,如果某台zkServer获得了超过半数的选票,则此zkServer就可以成为Leader了
奇数台最合适
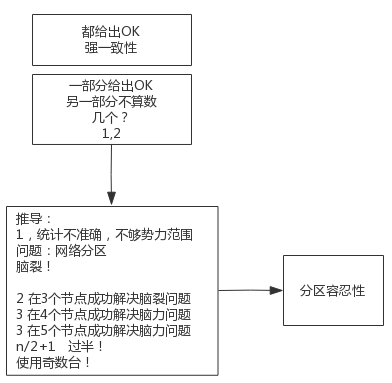
偶数台更容易出现"脑裂"
复制
官方地址:http://redis.cn/topics/replication.html
redis就是为了快,所以容忍丢失少量数据
Redis复制
Redis 使用异步复制,slave 和 master 之间异步地确认处理的数据量
-
一个 master 可以拥有多个 slave,slave 可以接受其他 slave 的连接
-
除了多个 slave 可以连接到同一个 master 之外, slave 之间也可以像层叠状的结构(cascading-like structure)连接到其他 slave
自 Redis 4.0 起,所有的 sub-slave 将会从 master 收到完全一样的复制流
-
Redis 复制在 master 侧是非阻塞的,这意味着 master 在一个或多个 slave 进行初次同步或者是部分重同步时,可以继续处理查询请求
-
复制在 slave 侧大部分也是非阻塞的
当 slave 进行初次同步时,它可以使用旧数据集处理查询请求
-
也可以配置如果复制流断开, Redis slave 会返回一个 error 给客户端
-
在初次同步之后,旧数据集必须被删除,同时加载新的数据集
-
slave 在这个短暂的时间窗口内(如果数据集很大,会持续较长时间),会阻塞到来的连接请求
-
自 Redis 4.0 开始,可以配置 Redis 使删除旧数据集的操作在另一个不同的线程中进行
-
加载新数据集的操作依然需要在主线程中进行并且会阻塞 slave 。
复制既可以被用在可伸缩性,以便只读查询可以有多个 slave 进行(例如 O(N) 复杂度的慢操作可以被下放到 slave ),或者仅用于数据安全
-
可以使用复制来避免 master 将全部数据集写入磁盘造成的开销
-
一种典型的技术是配置你的 master Redis.conf 以避免对磁盘进行持久化,然后连接一个 slave ,其配置为不定期保存或是启用 AOF
-
这个设置必须小心处理,因为重新启动的 master 程序将从一个空数据集开始:如果一个 slave 试图与它同步,那么这个 slave 也会被清空
主从复制
Redis5.0以前
slaveof ip port
Redis5.0以后
replicaof ip port

Redis如果开启了AOF,是不碰RDB的
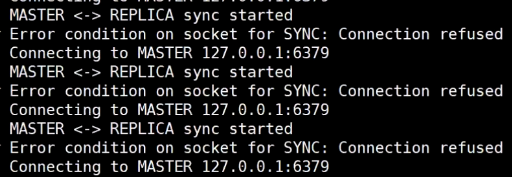
master挂掉以后,slave报错
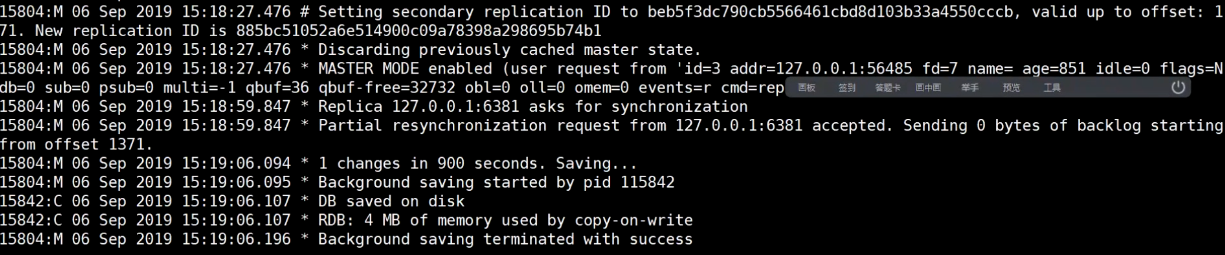
切换slave追随的master
配置文件
参考文章:https://www.cnblogs.com/YC-L/p/14453234.html#329427530
replicaof
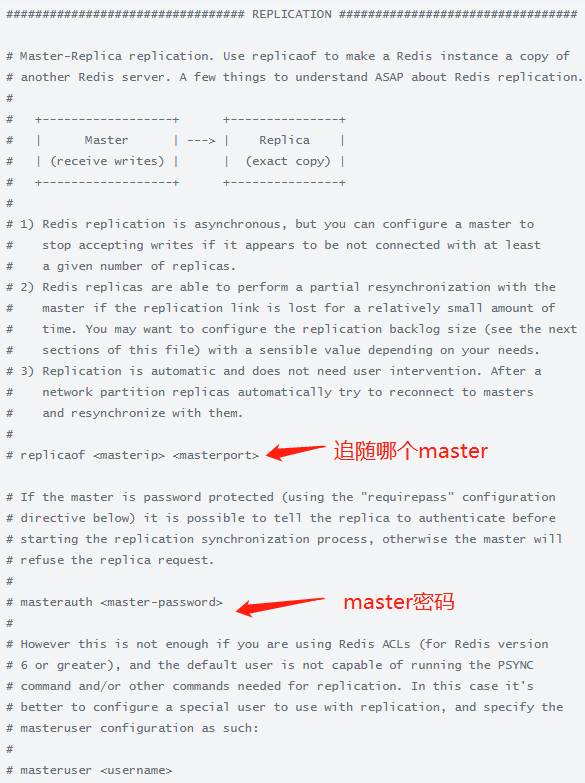
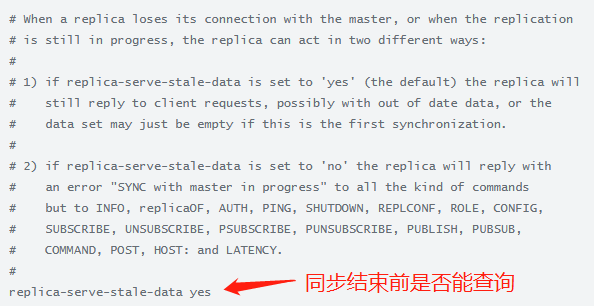
replica-serve-stale-data
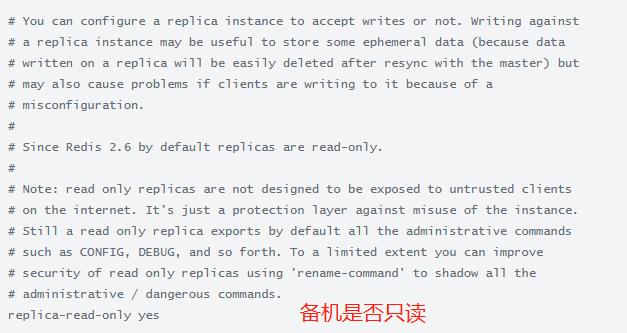
replica-read-only
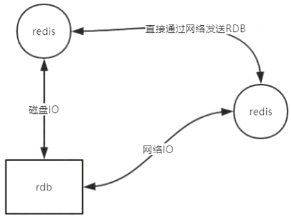
repl-diskless-sync no
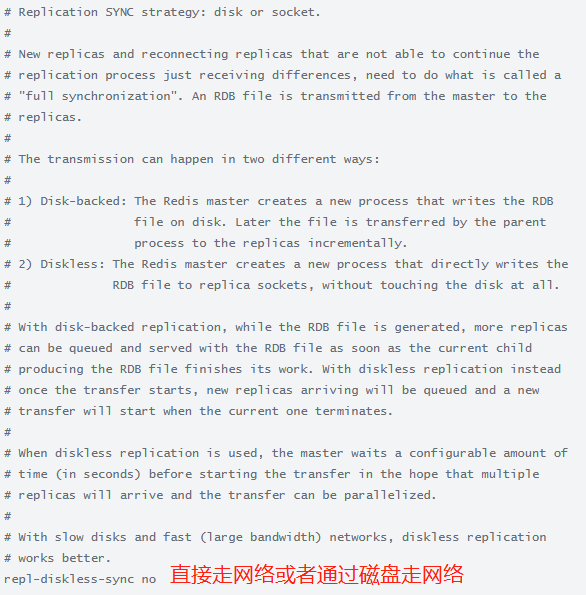
yes网络,no走磁盘
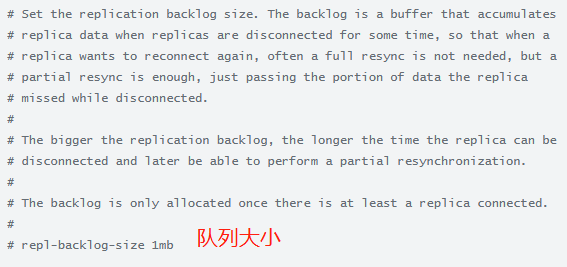
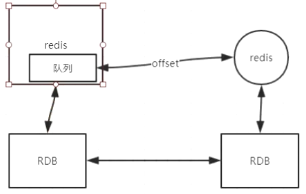
repl-backlog-size 增量复制
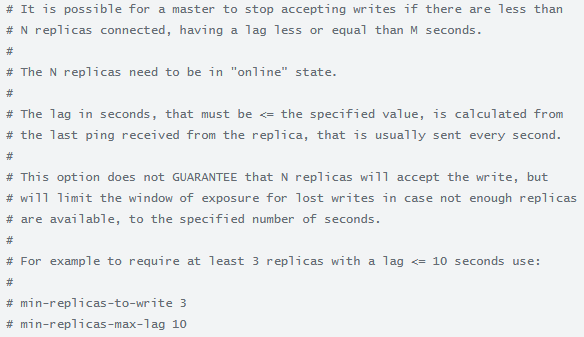
min-replicas-to-write 3,min-replicas-max-lag 10
该参数可以向强一致(同步阻塞)靠拢
-
min-replicas-to-write 最少写几个写成功
-
min-replicas-max-lag 最小时延
Sentinel 哨兵
官方地址:http://redis.cn/topics/sentinel.html
Redis 的 Sentinel 系统用于管理多个 Redis 服务器(instance), 该系统执行以下三个任务:
监控(Monitoring)
- Sentinel 会不断地检查你的主服务器和从服务器是否运作正常
提醒(Notification)
-
当被监控的某个 Redis 服务器出现问题时, Sentinel 可以通过 API 向管理员或者其他应用程序发送通知
自动故障迁移(Automatic failover)
- 当一个主服务器不能正常工作时, Sentinel 会开始一次自动故障迁移操作
- 它会将失效主服务器的其中一个从服务器升级为新的主服务器, 并让失效主服务器的其他从服务器改为复制新的主服务器
- 当客户端试图连接失效的主服务器时, 集群也会向客户端返回新主服务器的地址, 使得集群可以使用新主服务器代替失效服务器
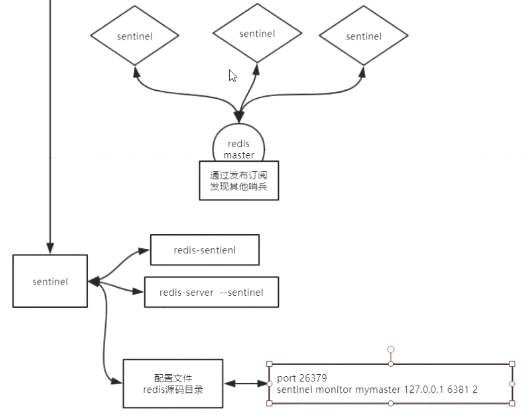
Redis Sentinel 是一个分布式系统
你可以在一个架构中运行多个 Sentinel 进程(progress), 这些进程使用流言协议(gossip protocols)来接收关于主服务器是否下线的信息
- 使用投票协议(agreement protocols)来决定是否执行自动故障迁移, 以及选择哪个从服务器作为新的主服务器
- Redis Sentinel 释出为一个单独的可执行文件 redis-sentinel , 但实际上它只是一个运行在特殊模式下的 Redis 服务器
- 可以在启动一个普通 Redis 服务器时通过给定 –sentinel 选项来启动 Redis Sentinel
获取 Sentinel
目前 Sentinel 系统是 Redis 的 unstable 分支的一部分
- 到 Redis 项目的 Github 页面 克隆一份 unstable 分值, 然后通过编译来获得 Sentinel 系统
- Sentinel 程序可以在编译后的 src 文档中发现, 它是一个命名为 redis-sentinel 的程序
- 你也可以通过下一节介绍的方法, 让 redis-server 程序运行在 Sentinel 模式之下
- 另外, 一个新版本的 Sentinel 已经包含在了 Redis 2.8.0 版本的释出文件中
启动 Sentinel
对于 redis-sentinel 程序, 可以用以下命令来启动 Sentinel 系统
对于 redis-server 程序, 可以用以下命令来启动一个运行在 Sentinel 模式下的 Redis 服务器
redis-server /path/to/sentinel.conf --sentinel
两种方法都可以启动一个 Sentinel 实例
启动 Sentinel 实例必须指定相应的配置文件, 系统会使用配置文件来保存 Sentinel 的当前状态, 并在 Sentinel 重启时通过载入配置文件来进行状态还原
如果启动 Sentinel 时没有指定相应的配置文件, 或者指定的配置文件不可写(not writable), 那么 Sentinel 会拒绝启动
Sentinel配置
redis文件夹下有一个自带的sentinel配置文件

sentinel.conf
# Example sentinel.conf

# *** IMPORTANT ***
#
# By default Sentinel will not be reachable from interfaces different than
# localhost, either use the 'bind' directive to bind to a list of network
# interfaces, or disable protected mode with "protected-mode no" by
# adding it to this configuration file.
#
# Before doing that MAKE SURE the instance is protected from the outside
# world via firewalling or other means.
#
# For example you may use one of the following:
#
# bind 127.0.0.1 192.168.1.1
#
# protected-mode no

# port <sentinel-port>
# The port that this sentinel instance will run on
port 26379

# By default Redis Sentinel does not run as a daemon. Use 'yes' if you need it.
# Note that Redis will write a pid file in /var/run/redis-sentinel.pid when
# daemonized.
daemonize no

# When running daemonized, Redis Sentinel writes a pid file in
# /var/run/redis-sentinel.pid by default. You can specify a custom pid file
# location here.
pidfile /var/run/redis-sentinel.pid

# Specify the log file name. Also the empty string can be used to force
# Sentinel to log on the standard output. Note that if you use standard
# output for logging but daemonize, logs will be sent to /dev/null
logfile ""

# sentinel announce-ip <ip>
# sentinel announce-port <port>
#
# The above two configuration directives are useful in environments where,
# because of NAT, Sentinel is reachable from outside via a non-local address.
#
# When announce-ip is provided, the Sentinel will claim the specified IP address
# in HELLO messages used to gossip its presence, instead of auto-detecting the
# local address as it usually does.
#
# Similarly when announce-port is provided and is valid and non-zero, Sentinel
# will announce the specified TCP port.
#
# The two options don't need to be used together, if only announce-ip is
# provided, the Sentinel will announce the specified IP and the server port
# as specified by the "port" option. If only announce-port is provided, the
# Sentinel will announce the auto-detected local IP and the specified port.
#
# Example:
#
# sentinel announce-ip 1.2.3.4

# dir <working-directory>
# Every long running process should have a well-defined working directory.
# For Redis Sentinel to chdir to /tmp at startup is the simplest thing
# for the process to don't interfere with administrative tasks such as
# unmounting filesystems.
dir /tmp

# sentinel monitor <master-name> <ip> <redis-port> <quorum>
#
# Tells Sentinel to monitor this master, and to consider it in O_DOWN
# (Objectively Down) state only if at least <quorum> sentinels agree.
#
# Note that whatever is the ODOWN quorum, a Sentinel will require to
# be elected by the majority of the known Sentinels in order to
# start a failover, so no failover can be performed in minority.
#
# Replicas are auto-discovered, so you don't need to specify replicas in
# any way. Sentinel itself will rewrite this configuration file adding
# the replicas using additional configuration options.
# Also note that the configuration file is rewritten when a
# replica is promoted to master.
#
# Note: master name should not include special characters or spaces.
# The valid charset is A-z 0-9 and the three characters ".-_".
sentinel monitor mymaster 127.0.0.1 6379 2

# sentinel auth-pass <master-name> <password>
#
# Set the password to use to authenticate with the master and replicas.
# Useful if there is a password set in the Redis instances to monitor.
#
# Note that the master password is also used for replicas, so it is not
# possible to set a different password in masters and replicas instances
# if you want to be able to monitor these instances with Sentinel.
#
# However you can have Redis instances without the authentication enabled
# mixed with Redis instances requiring the authentication (as long as the
# password set is the same for all the instances requiring the password) as
# the AUTH command will have no effect in Redis instances with authentication
# switched off.
#
# Example:
#
# sentinel auth-pass mymaster MySUPER--secret-0123passw0rd

# sentinel auth-user <master-name> <username>
#
# This is useful in order to authenticate to instances having ACL capabilities,
# that is, running Redis 6.0 or greater. When just auth-pass is provided the
# Sentinel instance will authenticate to Redis using the old "AUTH <pass>"
# method. When also an username is provided, it will use "AUTH <user> <pass>".
# In the Redis servers side, the ACL to provide just minimal access to
# Sentinel instances, should be configured along the following lines:
#
#     user sentinel-user >somepassword +client +subscribe +publish \
#                        +ping +info +multi +slaveof +config +client +exec on

# sentinel down-after-milliseconds <master-name> <milliseconds>
#
# Number of milliseconds the master (or any attached replica or sentinel) should
# be unreachable (as in, not acceptable reply to PING, continuously, for the
# specified period) in order to consider it in S_DOWN state (Subjectively
# Down).
#
# Default is 30 seconds.
sentinel down-after-milliseconds mymaster 30000

# requirepass <password>
#
# You can configure Sentinel itself to require a password, however when doing
# so Sentinel will try to authenticate with the same password to all the
# other Sentinels. So you need to configure all your Sentinels in a given
# group with the same "requirepass" password. Check the following documentation
# for more info: https://redis.io/topics/sentinel

# sentinel parallel-syncs <master-name> <numreplicas>
#
# How many replicas we can reconfigure to point to the new replica simultaneously
# during the failover. Use a low number if you use the replicas to serve query
# to avoid that all the replicas will be unreachable at about the same
# time while performing the synchronization with the master.
sentinel parallel-syncs mymaster 1

# sentinel failover-timeout <master-name> <milliseconds>
#
# Specifies the failover timeout in milliseconds. It is used in many ways:
#
# - The time needed to re-start a failover after a previous failover was
#   already tried against the same master by a given Sentinel, is two
#   times the failover timeout.
#
# - The time needed for a replica replicating to a wrong master according
#   to a Sentinel current configuration, to be forced to replicate
#   with the right master, is exactly the failover timeout (counting since
#   the moment a Sentinel detected the misconfiguration).
#
# - The time needed to cancel a failover that is already in progress but
#   did not produced any configuration change (SLAVEOF NO ONE yet not
#   acknowledged by the promoted replica).
#
# - The maximum time a failover in progress waits for all the replicas to be
#   reconfigured as replicas of the new master. However even after this time
#   the replicas will be reconfigured by the Sentinels anyway, but not with
#   the exact parallel-syncs progression as specified.
#
# Default is 3 minutes.
sentinel failover-timeout mymaster 180000

# SCRIPTS EXECUTION
#
# sentinel notification-script and sentinel reconfig-script are used in order
# to configure scripts that are called to notify the system administrator
# or to reconfigure clients after a failover. The scripts are executed
# with the following rules for error handling:
#
# If script exits with "1" the execution is retried later (up to a maximum
# number of times currently set to 10).
#
# If script exits with "2" (or an higher value) the script execution is
# not retried.
#
# If script terminates because it receives a signal the behavior is the same
# as exit code 1.
#
# A script has a maximum running time of 60 seconds. After this limit is
# reached the script is terminated with a SIGKILL and the execution retried.

# NOTIFICATION SCRIPT
#
# sentinel notification-script <master-name> <script-path>
#
# Call the specified notification script for any sentinel event that is
# generated in the WARNING level (for instance -sdown, -odown, and so forth).
# This script should notify the system administrator via email, SMS, or any
# other messaging system, that there is something wrong with the monitored
# Redis systems.
#
# The script is called with just two arguments: the first is the event type
# and the second the event description.
#
# The script must exist and be executable in order for sentinel to start if
# this option is provided.
#
# Example:
#
# sentinel notification-script mymaster /var/redis/notify.sh

# CLIENTS RECONFIGURATION SCRIPT
#
# sentinel client-reconfig-script <master-name> <script-path>
#
# When the master changed because of a failover a script can be called in
# order to perform application-specific tasks to notify the clients that the
# configuration has changed and the master is at a different address.
#
# The following arguments are passed to the script:
#
# <master-name> <role> <state> <from-ip> <from-port> <to-ip> <to-port>
#
# <state> is currently always "failover"
# <role> is either "leader" or "observer"
#
# The arguments from-ip, from-port, to-ip, to-port are used to communicate
# the old address of the master and the new address of the elected replica
# (now a master).
#
# This script should be resistant to multiple invocations.
#
# Example:
#
# sentinel client-reconfig-script mymaster /var/redis/reconfig.sh

# SECURITY
#
# By default SENTINEL SET will not be able to change the notification-script
# and client-reconfig-script at runtime. This avoids a trivial security issue
# where clients can set the script to anything and trigger a failover in order
# to get the program executed.

sentinel deny-scripts-reconfig yes

# REDIS COMMANDS RENAMING
#
# Sometimes the Redis server has certain commands, that are needed for Sentinel
# to work correctly, renamed to unguessable strings. This is often the case
# of CONFIG and SLAVEOF in the context of providers that provide Redis as
# a service, and don't want the customers to reconfigure the instances outside
# of the administration console.
#
# In such case it is possible to tell Sentinel to use different command names
# instead of the normal ones. For example if the master "mymaster", and the
# associated replicas, have "CONFIG" all renamed to "GUESSME", I could use:
#
# SENTINEL rename-command mymaster CONFIG GUESSME
#
# After such configuration is set, every time Sentinel would use CONFIG it will
# use GUESSME instead. Note that there is no actual need to respect the command
# case, so writing "config guessme" is the same in the example above.
#
# SENTINEL SET can also be used in order to perform this configuration at runtime.
#
# In order to set a command back to its original name (undo the renaming), it
# is possible to just rename a command to itsef:
#
# SENTINEL rename-command mymaster CONFIG CONFIG
最少配置如下
sentinel monitor mymaster 127.0.0.1 6379 2
sentinel down-after-milliseconds mymaster 60000
sentinel failover-timeout mymaster 180000
sentinel parallel-syncs mymaster 1

sentinel monitor resque 192.168.1.3 6380 4
sentinel down-after-milliseconds resque 10000
sentinel failover-timeout resque 180000
sentinel parallel-syncs resque 5
启动Sentinel
redis-server /path/to/sentinel.conf --sentinel
故障转移,哨兵会rewrite自己的配置文件
一次故障转移操作由以下步骤组成
- 发现主服务器已经进入客观下线状态
- 对我们的当前纪元进行自增(详情请参考 Raft leader election ), 并尝试在这个纪元中当选
- 如果当选失败, 那么在设定的故障迁移超时时间的两倍之后, 重新尝试当选。 如果当选成功, 那么执行以下步骤
- 选出一个从服务器,并将它升级为主服务器
- 向被选中的从服务器发送
SLAVEOF NO ONE命令,让它转变为主服务器 - 通过发布与订阅功能, 将更新后的配置传播给所有其他 Sentinel , 其他 Sentinel 对它们自己的配置进行更新
- 向已下线主服务器的从服务器发送 SLAVEOF 命令, 让它们去复制新的主服务器
- 当所有从服务器都已经开始复制新的主服务器时, 领头 Sentinel 终止这次故障迁移操作
每当一个 Redis 实例被重新配置(reconfigured)
- 无论是被设置成主服务器、从服务器、又或者被设置成其他主服务器的从服务器
- Sentinel 都会向被重新配置的实例发送一个 CONFIG REWRITE 命令, 从而确保这些配置会持久化在硬盘里
Sentinel 使用以下规则来选择新的主服务器
- 在失效主服务器属下的从服务器当中, 那些被标记为主观下线、已断线、或者最后一次回复 PING 命令的时间大于五秒钟的从服务器都会被淘汰
- 在失效主服务器属下的从服务器当中, 那些与失效主服务器连接断开的时长超过 down-after 选项指定的时长十倍的从服务器都会被淘汰
- 在经历了以上两轮淘汰之后剩下来的从服务器中, 我们选出复制偏移量(replication offset)最大的那个从服务器作为新的主服务器
- 如果复制偏移量不可用, 或者从服务器的复制偏移量相同, 那么带有最小运行 ID 的那个从服务器成为新的主服务器
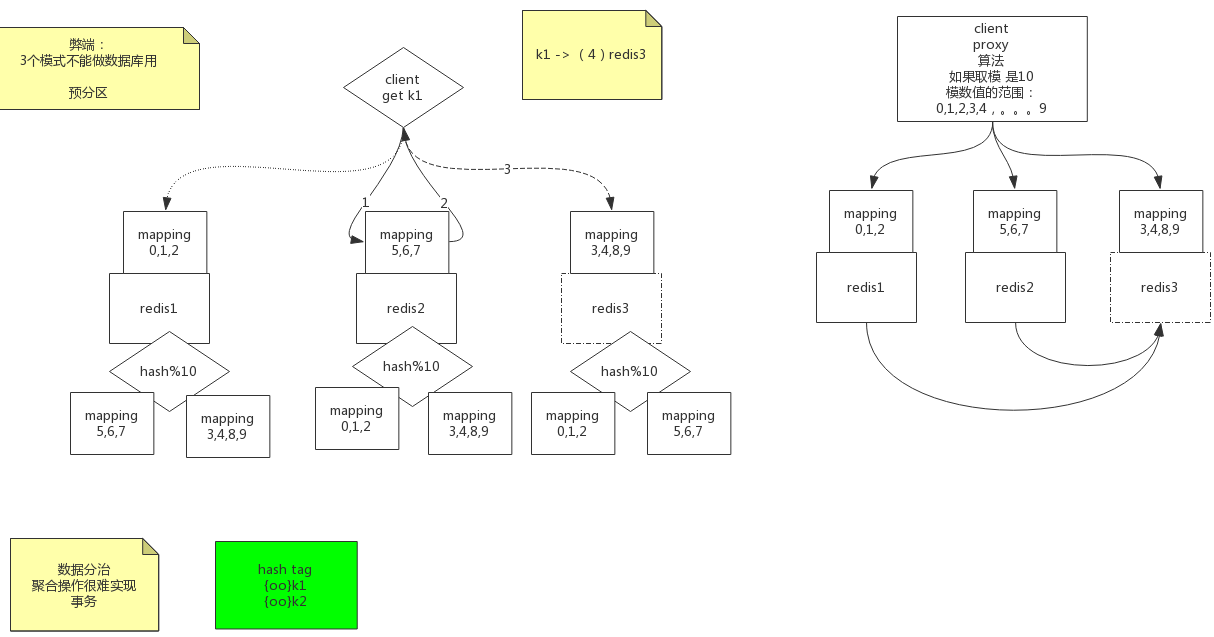
Cluster
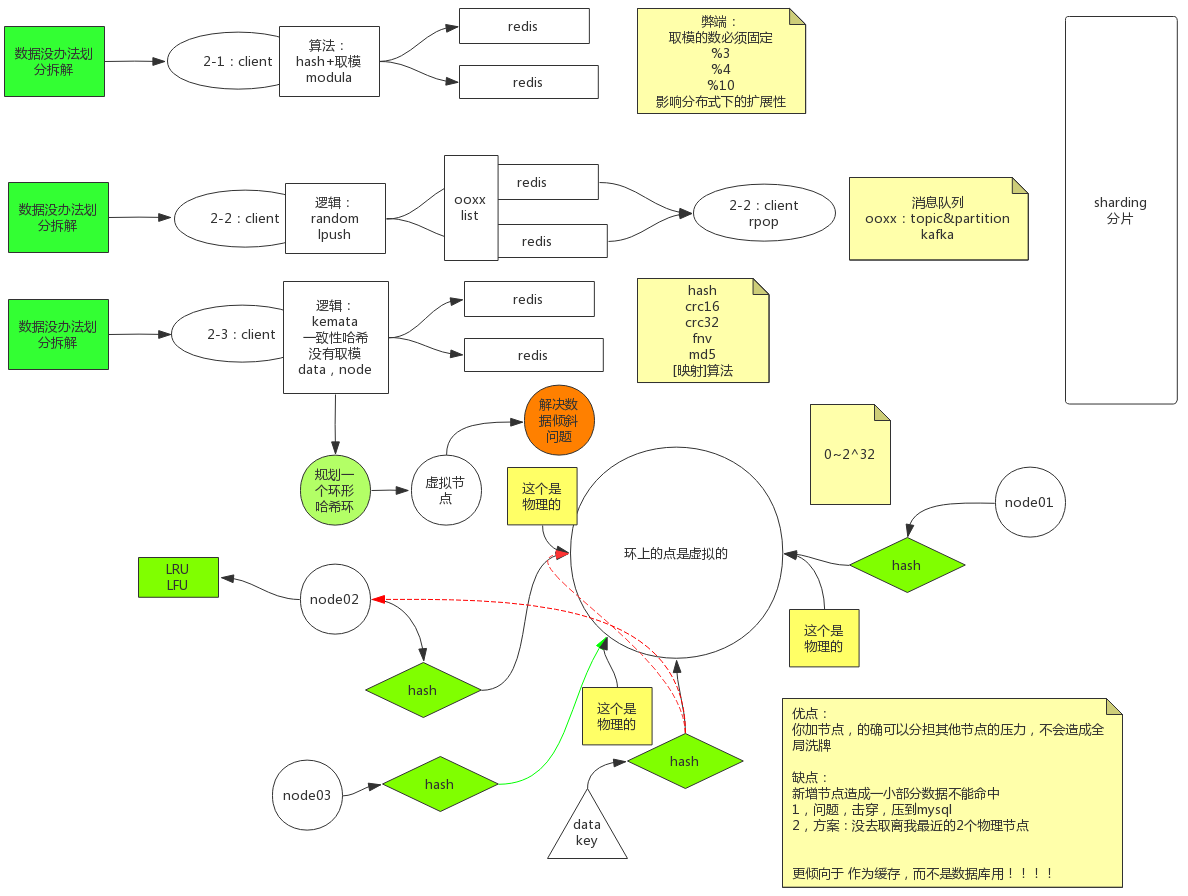
一致性hash,环形hash:https://www.cnblogs.com/YC-L/p/14456939.html
redis连接成本高
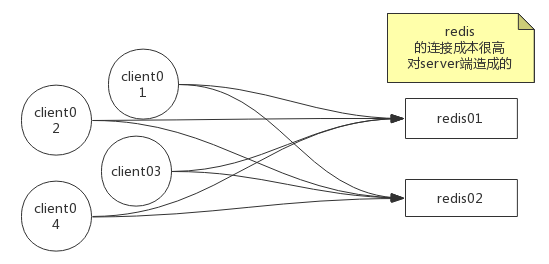
添加代理层,关注代理层性能
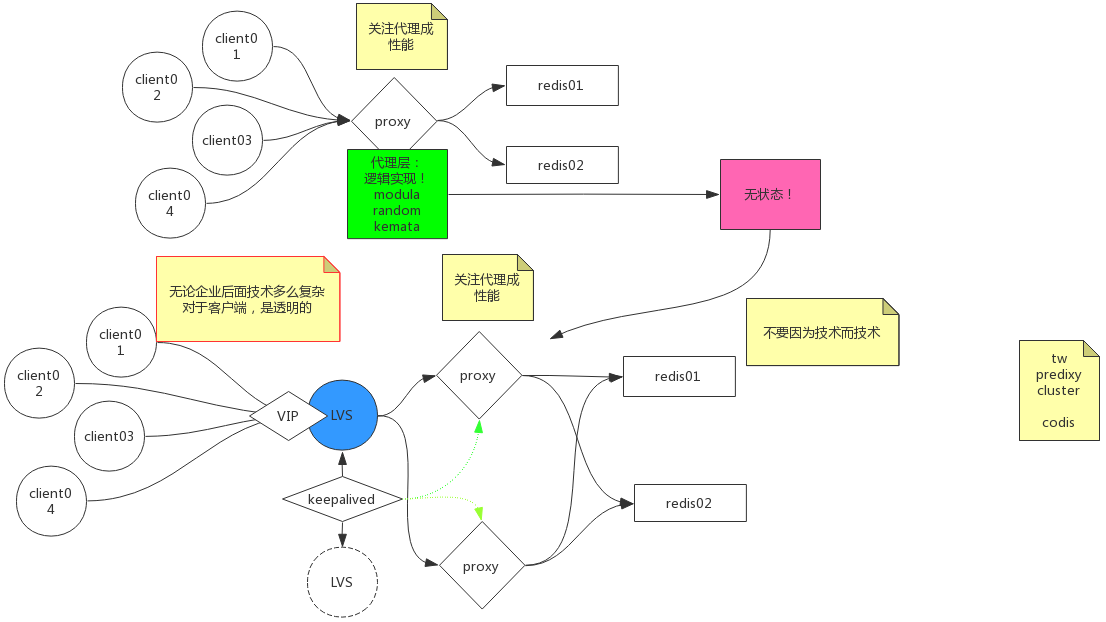
Cluster模式
Redis分区:http://redis.cn/topics/partitioning.html
RedisCluster:http://redis.cn/topics/cluster-tutorial.html
Twemproxy
github地址:https://github.com/twitter/twemproxy
Build
Install automake and libtool
yum install automake libtool
可以用阿里云镜像使用最新版本的依赖
官方地址:https://developer.aliyun.com/mirror/centos
To build twemproxy from distribution tarball
$ ./configure
$ make
$ sudo make install
To build twemproxy from distribution tarball in debug mode
$ CFLAGS="-ggdb3 -O0" ./configure --enable-debug=full
$ make
$ sudo make install
To build twemproxy from source with debug logs enabled and assertions enabled
$ git clone git@github.com:twitter/twemproxy.git
$ cd twemproxy
$ autoreconf -fvi
$ ./configure --enable-debug=full
$ make
$ src/nutcracker -h
A quick checklist
- Use newer version of gcc (older version of gcc has problems)
- Use CFLAGS="-O1" ./configure && make
- Use CFLAGS="-O3 -fno-strict-aliasing" ./configure && make
autoreconf -fvi && ./configureneedsautomakeandlibtoolto be installed
scripts目录下的nutcracker.init
#! /bin/sh
#
# chkconfig: - 55 45
# description:  Twitter's twemproxy nutcracker
# processname: nutcracker
# config: /etc/sysconfig/nutcracker

# Source function library.
. /etc/rc.d/init.d/functions

USER="nobody"
OPTIONS="-d -c /etc/nutcracker/nutcracker.yml"

if [ -f /etc/sysconfig/nutcracker ];then
    . /etc/sysconfig/nutcracker
fi

# Check that networking is up.
if [ "$NETWORKING" = "no" ]
then
    exit 0
fi

RETVAL=0
prog="nutcracker"

start () {
    echo -n $"Starting $prog: "
    #Test the config before start.
    daemon --user ${USER} ${prog} $OPTIONS -t >/dev/null  2>&1
    RETVAL=$?
    if [ $RETVAL -ne 0 ] ; then
        echo  "Config check fail! Please  use 'nutcracker -c /etc/nutcracker/nutcracker.yml' for detail."
        echo_failure;
        echo;
        exit 1
    fi

    daemon --user ${USER} ${prog} $OPTIONS
    RETVAL=$?
    echo
    [ $RETVAL -eq 0 ] && touch /var/lock/subsys/${prog}
}
stop () {
    echo -n $"Stopping $prog: "
    killproc ${prog}
    RETVAL=$?
    echo
    if [ $RETVAL -eq 0 ] ; then
        rm -f /var/lock/subsys/${prog}
    fi
}

restart () {
    stop
    start
}


# See how we were called.
case "$1" in
  start)
    start
    ;;
  stop)
    stop
    ;;
  status)
    status ${prog}
    ;;
  restart|reload)
    restart
    ;;
  condrestart)
    [ -f /var/lock/subsys/nutcracker ] && restart || :
    ;;
  *)
    echo $"Usage: $0 {start|stop|status|restart|reload|condrestart}"
    exit 1
esac

exit $?
创建OPTIONS中指定的目录
mkdir /etc/init.d/twemproxy
copy到/etc/init.d文件下,配置为服务
从源码中copy配置文件nutcracker.init到/etc/init.d/twemproxy
nutcracker.yml
alpha:
  listen: 127.0.0.1:22121
  hash: fnv1a_64
  distribution: ketama
  auto_eject_hosts: true
  redis: true
  server_retry_timeout: 2000
  server_failure_limit: 1
  servers:
   - 127.0.0.1:6379:1

beta:
  listen: 127.0.0.1:22122
  hash: fnv1a_64
  hash_tag: "{}"
  distribution: ketama
  auto_eject_hosts: false
  timeout: 400
  redis: true
  servers:
   - 127.0.0.1:6380:1 server1
   - 127.0.0.1:6381:1 server2
   - 127.0.0.1:6382:1 server3
   - 127.0.0.1:6383:1 server4

gamma:
  listen: 127.0.0.1:22123
  hash: fnv1a_64
  distribution: ketama
  timeout: 400
  backlog: 1024
  preconnect: true
  auto_eject_hosts: true
  server_retry_timeout: 2000
  server_failure_limit: 3
  servers:
   - 127.0.0.1:11212:1
   - 127.0.0.1:11213:1

delta:
  listen: 127.0.0.1:22124
  hash: fnv1a_64
  distribution: ketama
  timeout: 100
  auto_eject_hosts: true
  server_retry_timeout: 2000
  server_failure_limit: 1
  servers:
   - 127.0.0.1:11214:1
   - 127.0.0.1:11215:1
   - 127.0.0.1:11216:1
   - 127.0.0.1:11217:1
   - 127.0.0.1:11218:1
   - 127.0.0.1:11219:1
   - 127.0.0.1:11220:1
   - 127.0.0.1:11221:1
   - 127.0.0.1:11222:1
   - 127.0.0.1:11223:1

omega:
  listen: /tmp/gamma
  hash: hsieh
  distribution: ketama
  auto_eject_hosts: false
  servers:
   - 127.0.0.1:11214:100000
   - 127.0.0.1:11215:1
将可执行程序copy的/usr/bin/local
# 下面是我的路径
cp ~/twemproxy/src/nutcracker /etc/bin
twemproxy配置
官方地址:https://github.com/twitter/twemproxy#configuration
修改nutcracker.yml
alpha:
  listen: 127.0.0.1:22121
  hash: fnv1a_64
  distribution: ketama
  auto_eject_hosts: true
  redis: true
  server_retry_timeout: 2000
  server_failure_limit: 1
  # servers修改为自己的redis IP PORT WEIGHT
  servers:
   - 127.0.0.1:6379:1
启动
service twemproxy start
Predixy
github地址:https://github.com/joyieldInc/predixy
下载编译后的压缩包
wget https://github.com/joyieldInc/predixy/releases/download/1.0.5/predixy-1.0.5-bin-amd64-linux.tar.gz
根据需要修改各种配置
Cluster集群
官方地址:http://redis.cn/topics/cluster-tutorial.html
Creating a Redis Cluster using the create-cluster script
If you don’t want to create a Redis Cluster by configuring and executing individual instances manually as explained above, there is a much simpler system (but you’ll not learn the same amount of operational details).
Just check utils/create-cluster directory in the Redis distribution.
cd yourredisroot/utils
There is a script called create-cluster inside (same name as the directory it is contained into),it’s a simple bash script.
In order to start a 6 nodes cluster with 3 masters and 3 slaves just type the following commands:
./create-cluster start
./create-cluster create
Reply to yes in step 2 when the redis-trib utility wants you to accept the cluster layout.
You can now interact with the cluster, the first node will start at port 30001 by default. When you are done, stop the cluster with:
./create-cluster stop
Please read the README inside this directory for more information on how to run the script.
睁开眼,书在面前 闭上眼,书在心里

 浙公网安备 33010602011771号