网络协议原理和lvs三种模型,调度算法和keepalived
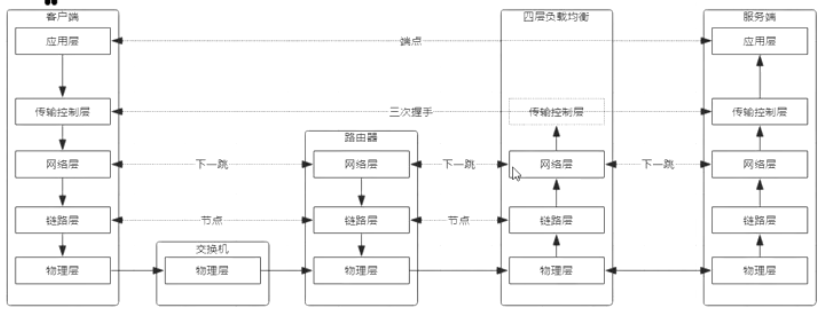
OSI七层模型,自顶向下#
TCP三次握手#
第一次握手
- 建立连接时,客户端发送 syn 包(syn=j)到服务器,并进入 SYN_SEND 状态,等待服务器确认
- 服务器收到 syn 包,必须确认客户的 SYN(ack=j+1),同时自己也发送一个 SYN 包(syn=k),即 SYN+ACK 包,此时服务器进入 SYN_RECV 状态
第三次握手
- 客户端收到服务器的 SYN+ACK 包,向服务器发送确认包 ACK(ack=k+1),此包发送完毕,客户端和服务器进入 ESTABLISHED 状态,完成三次握手
通过这样的三次握手,客户端与服务端建立起可靠的双工的连接,开始传送数据
三次握手的最主要目的是保证连接是双工的,可靠更多的是通过重传机制来保证的
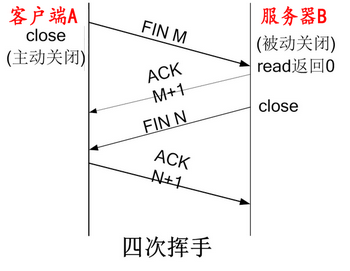
TCP四次分手#
- 客户端 A 发送一个 FIN,用来关闭客户 A 到服务器 B 的数据传送
- 服务器 B 收到这个 FIN,它发回一个 ACK,确认序号为收到的序号加 1 和 SYN 一样,一个 FIN 将占用一个序号
- 服务器 B 关闭与客户端 A 的连接,发送一个 FIN 给客户端 A
- 客户端 A 发回 ACK 报文确认,并将确认序号设置为收到序号加 1
lvs原理和网络#
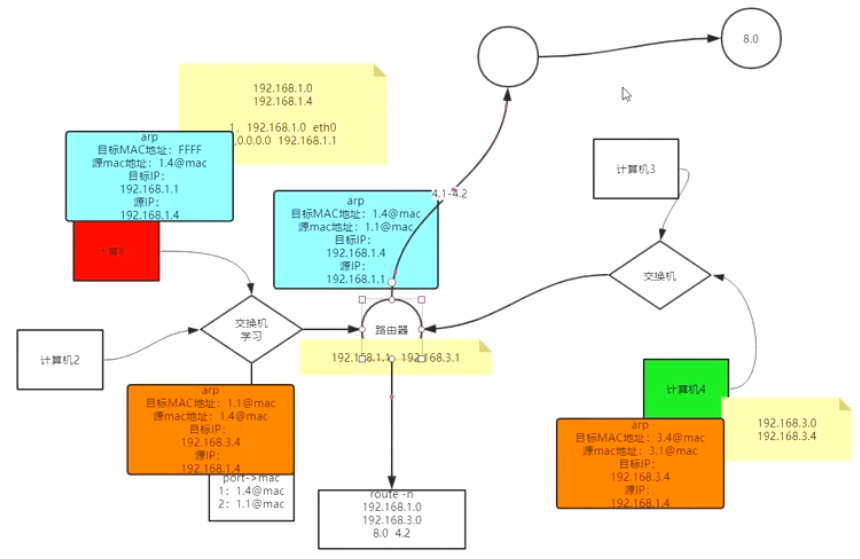
route -n#
下一跳机制
将目标IP与每一条记录的子网掩码(Genmask)一一按位与运算,匹配度最高的Destination字段的IP就是下一跳的IP
也就是网关地址GATEWAY
TCP/IP协议基于下一跳的机制#
IP是端点间,mac地址是结点间
交换机学习ARP协议#
arp -an#
交换机接同一网络,路由器接设备
添加host和网关#
route add -host *.*.*.* gw *.*.*.*
同一网关,ip地址不能重复出现
lvs(4层)hold流量,nginx(7层)hold握手,然后转到tomcat做具体计算#
socket是四层,是对网络的一种封装,规范的接口
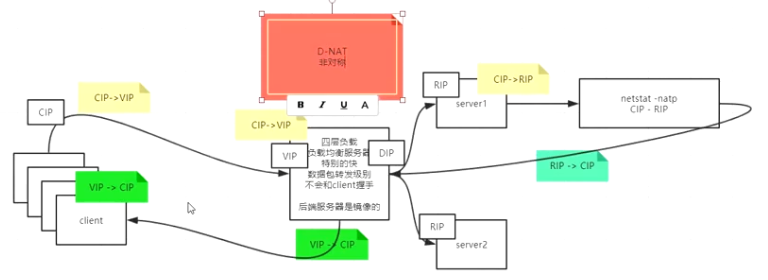
CIP 客户端地址,VIP 监听端口地址,DIP lvs调度,RIP真实服务器#
- client ip
- vitrual ip
- director ip
- real ip
如果数据包中没有RIP,数据包会被丢弃#
NAT模型(端口映射)#
SNAT,Source nat
DNat,Destination nat (非对称)
带宽成为瓶颈,消耗算力
TUN模型(tunnel)(VPN,FQ)#
数据包包裹着数据包
DIP->RIP,触发跳跃,然后把外面的包撕掉,然后继续处理直接返回
可以解决物理位置限制问题
隐藏VIP方法:对外隐藏,对内可见
ifconfig#
enp0s3,物理网卡
lo,虚拟网卡
lvs调度算法#
静态调度#
轮询调度 RR#
轮询调度(Round Robin 简称'RR')算法就是按依次循环的方式将请求调度到不同的服务器上
- 该算法最大的特点就是实现简单
- 轮询算法假设所有的服务器处理请求的能力都一样的,调度器会将所有的请求平均分配给每个真实服务器
加权轮询调度 WRR#
加权轮询(Weight Round Robin 简称'WRR')算法主要是对轮询算法的一种优化与补充
- LVS会考虑每台服务器的性能,并给每台服务器添加一个权值
- 如果服务器A的权值为1,服务器B的权值为2,则调度器调度到服务器B的请求会是服务器A的两倍
- 权值越高的服务器,处理的请求越多
目标地址散列调度#
目标地址散列调度(Destination Hashing 简称'DH')算法先根据请求的目标IP地址
- 作为散列键(Hash Key)从静态分配的散列表找出对应的服务器
- 若该服务器是可用的且并未超载,将请求发送到该服务器,否则返回空
源地址散列调度U#
源地址散列调度(Source Hashing 简称'SH')算法先根据请求的源IP地址
- 作为散列键(Hash Key)从静态分配的散列表找出对应的服务器,若该服务器是可用的且并未超载,将请求发送到该服务器,否则返回空
- 它采用的散列函数与目标地址散列调度算法的相同,它的算法流程与目标地址散列调度算法的基本相似
动态调度#
最小连接调度 LC(具有偷窥能力)#
最小连接调度(Least Connections 简称'LC')算法是把新的连接请求分配到当前连接数最小的服务器
- 最小连接调度是一种动态的调度算法,它通过服务器当前活跃的连接数来估计服务器的情况
- 调度器需要记录各个服务器已建立连接的数目,当一个请求被调度到某台服务器,其连接数加1;当连接中断或者超时,其连接数减1
- 集群系统的真实服务器具有相近的系统性能,采用最小连接调度算法可以比较好地均衡负载
加权最小连接调度 WLC#
加权最少连接(Weight Least Connections 简称'WLC')算法是最小连接调度的超集,各个服务器相应的权值表示其处理性能
- 服务器的缺省权值为1,系统管理员可以动态地设置服务器的权值
- 加权最小连接调度在调度新连接时尽可能使服务器的已建立连接数和其权值成比例
- 调度器可以自动问询真实服务器的负载情况,并动态地调整其权值
基于局部的最少连接 LBLC#
基于局部的最少连接调度(Locality-Based Least Connections 简称'LBLC')算法是针对请求报文的目标IP地址的负载均衡调度
- 目前主要用于Cache集群系统,因为在Cache集群客户请求报文的目标IP地址是变化的
- 这里假设任何后端服务器都可以处理任一请求
- 算法的设计目标是在服务器的负载基本平衡情况下,将相同目标IP地址的请求调度到同一台服务器
- 提高各台服务器的访问局部性和Cache命中率,从而提升整个集群系统的处理能力
- LBLC调度算法先根据请求的目标IP地址找出该目标IP地址最近使用的服务器
- 若该服务器是可用的且没有超载,将请求发送到该服务器
- 若服务器不存在,或者该服务器超载且有服务器处于一半的工作负载,则使用'最少连接'的原则选出一个可用的服务器,将请求发送到服务器
带复制的基于局部性的最少连接#
带复制的基于局部性的最少连接(Locality-Based Least Connections with Replication 简称'LBLCR')算法也是针对目标IP地址的负载均衡
- 目前主要用于Cache集群系统,它与LBLC算法不同之处是它要维护从一个目标IP地址到一组服务器的映射
- LBLC算法维护从一个目标IP地址到一台服务器的映射
- 按'最小连接'原则从该服务器组中选出一一台服务器,若服务器没有超载,将请求发送到该服务器
- 若服务器超载,则按'最小连接'原则从整个集群中选出一台服务器,将该服务器加入到这个服务器组中,将请求发送到该服务器
- 同时,当该服务器组有一段时间没有被修改,将最忙的服务器从服务器组中删除,以降低复制的程度
最短的期望的延迟#
最短的期望的延迟调度(Shortest Expected Delay 简称'SED')算法基于WLC算法
- 举个例子吧,ABC三台服务器的权重分别为1、2、3
- 那么如果使用WLC算法的话一个新请求进入时它可能会分给ABC中的任意一个
- 使用SED算法后会进行一个运算
- A:(1+1)/1=2 B:(1+2)/2=3/2 C:(1+3)/3=4/3 就把请求交给得出运算结果最小的服务器
最少队列调度#
最少队列调度(Never Queue 简称'NQ')算法,无需队列
- 如果有realserver的连接数等于0就直接分配过去,不需要在进行SED运算
lvs负载均衡内核模块ipvs#
装一个壳子来使用这个内核
yum install ipvsadm -y
ubuntu用 apt-get install 指令
管理集群服务#
ipvsadm --help
Usage:
  ipvsadm -A|E virtual-service [-s scheduler] [-p [timeout]] [-M netmask] [--pe persistence_engine] [-b sched-flags]
  ipvsadm -D virtual-service
  ipvsadm -C
  ipvsadm -R
  ipvsadm -S [-n]
  ipvsadm -a|e virtual-service -r server-address [options]
  ipvsadm -d virtual-service -r server-address
  ipvsadm -L|l [virtual-service] [options]
  ipvsadm -Z [virtual-service]
  ipvsadm --set tcp tcpfin udp
  ipvsadm --start-daemon state [--mcast-interface interface] [--syncid sid]
  ipvsadm --stop-daemon state
  ipvsadm -h

Commands:
Either long or short options are allowed.
  --add-service     -A        add virtual service with options
  --edit-service    -E        edit virtual service with options
  --delete-service  -D        delete virtual service
  --clear           -C        clear the whole table
  --restore         -R        restore rules from stdin
  --save            -S        save rules to stdout
  --add-server      -a        add real server with options
  --edit-server     -e        edit real server with options
  --delete-server   -d        delete real server
  --list            -L|-l     list the table
  --zero            -Z        zero counters in a service or all services
  --set tcp tcpfin udp        set connection timeout values
  --start-daemon              start connection sync daemon
  --stop-daemon               stop connection sync daemon
  --help            -h        display this help message

virtual-service:
  --tcp-service|-t  service-address   service-address is host[:port]
  --udp-service|-u  service-address   service-address is host[:port]
  --sctp-service    service-address   service-address is host[:port]
  --fwmark-service|-f fwmark          fwmark is an integer greater than zero

Options:
  --ipv6         -6                   fwmark entry uses IPv6
  --scheduler    -s scheduler         one of rr|wrr|lc|wlc|lblc|lblcr|dh|sh|sed|nq,
                                      the default scheduler is wlc.
  --pe            engine              alternate persistence engine may be sip,
                                      not set by default.
  --persistent   -p [timeout]         persistent service
  --netmask      -M netmask           persistent granularity mask
  --real-server  -r server-address    server-address is host (and port)
  --gatewaying   -g                   gatewaying (direct routing) (default)
  --ipip         -i                   ipip encapsulation (tunneling)
  --masquerading -m                   masquerading (NAT)
  --weight       -w weight            capacity of real server
  --u-threshold  -x uthreshold        upper threshold of connections
  --l-threshold  -y lthreshold        lower threshold of connections
  --mcast-interface interface         multicast interface for connection sync
  --syncid sid                        syncid for connection sync (default=255)
  --connection   -c                   output of current IPVS connections
  --timeout                           output of timeout (tcp tcpfin udp)
  --daemon                            output of daemon information
  --stats                             output of statistics information
  --rate                              output of rate information
  --exact                             expand numbers (display exact values)
  --thresholds                        output of thresholds information
  --persistent-conn                   output of persistent connection info
  --nosort                            disable sorting output of service/server entries
  --sort                              does nothing, for backwards compatibility
  --ops          -o                   one-packet scheduling
  --numeric      -n                   numeric output of addresses and ports
  --sched-flags  -b flags             scheduler flags (comma-separated)
添加#
-A -t|u|f service-address [-s scheduler]
-t: TCP
-U: UDP
service-address: IP:PORT
-f: FWM: 防火墙标记
service-address: Mark Number
修改: E
删除: -D -t|u|f service-address

ipvsadm -A -t 192.18.1.1:80 -s rr
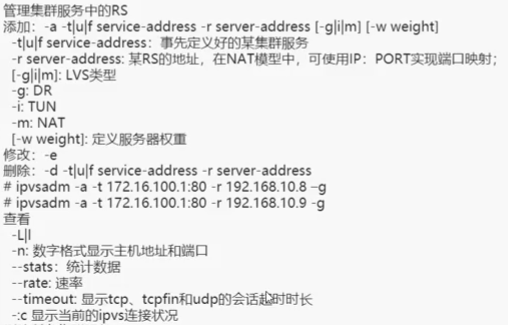
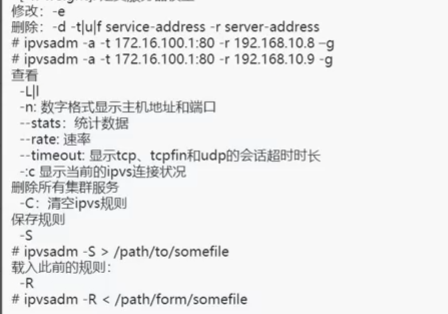
管理集群中的RS#
DR模型#
direct routing
设置eth0的子接口#
ifconfig eth0:2 192.168.150.100/24
# 或者下面这种写法
ifconfig eth0:2 192.168.150.100 netmask 255.255.255.0
/24 即 3个byte,255.255.255.0
撤销结点#
ifconfig eth0:2 down
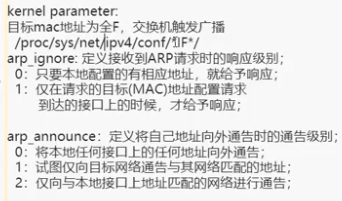
调整arp协议#
cd /proc/sys/net/ipv4/conf
我的机器是ubuntu,列表如下
如果是centos,enp0s3应该是eth0
为什么要调整内核协议#
参考文章:https://www.cnblogs.com/YC-L/p/14444790.html
不要使用vim,使用echo重定向#
echo 1 > arp_ignore
echo 2 > arp_announce
4个255,分配到不同的子网,不会产生环回
先改内核协议,改完以后配置ip
echo 1 > /proc/sys/net/ipv4/conf/eht0/arp_ignore
echo 1 > /proc/sys/net/ipv4/conf/all/arp_ignore
echo 2 > /proc/sys/net/ipv4/conf/eht0/arp_announce
echo 2 > /proc/sys/net/ipv4/conf/all/arp_announce
设置隐藏vip#
ifconfig lo:8 192.168.150.100 netmask 255.255.255.255
安装tomcat或者httpd当作RIP#
yum install httpd
启动httpd
service httpd start
创建一个主页做测试#
vim /var/www/html/index.html
添加内容 gogogogogogo
通过壳子使用内核管理lvs#
ipvsadm -A -t 192.168.150.100:80 -s rr
ipvsadm -a -t 192.168.150.100:80 -s 192.168.150.12 -g -w 1
ipvsadm -a -t 192.168.150.100:80 -s 192.168.150.13 -g -w 1
ipvsadm -ln
验证#
node01
netstat -natp
看不到socket
node02~node03
netstat -natp
看得到socket
node01,查看偷窥记录本
ipvsadm -lnc
Keepalived#
为什么用keepalived#
lvs会挂,业务下线,单点故障
RS会挂,一部分用户请求异常,lvs还存有这个RS的负载记录
单点故障的解决方式#
- 主备
- 主主
ping测试的是网络层
自动运维,解决单点故障,实现HA(HIghly Available)
keepalived的好处#
- 监控自己的服务
- Master通告自己生存状态,Backup监听Master状态,Master挂了,Backup中推举出新的Master
- 配置VIP,添加ipvs,keepalived有配置文件
nginx也可以做负载均衡,但存在单点故障
安装keepalived#
yum install keepalived -y
ubuntu下使用apt安装
apt-cache search keepalived
#keepalived - Failover and monitoring daemon for LVS clusters
apt-get install keepalived
apt安装的keepalived没有配置文件
配置的官方地址:https://www.keepalived.org/doc/configuration_synopsis.html
global_defs {
    notification_email {
        email
        email
    }
    notification_email_from email
    smtp_server host
    smtp_connect_timeout num
    lvs_id string
}
virtual_server (@IP PORT)|(fwmark num) {
    delay_loop num
    lb_algo rr|wrr|lc|wlc|sh|dh|lblc
    lb_kind NAT|DR|TUN
    (nat_mask @IP)
    persistence_timeout num
    persistence_granularity @IP
    virtualhost string
    protocol TCP|UDP

    sorry_server @IP PORT
    real_server @IP PORT {
        weight num
        TCP_CHECK {
            connect_port num
            connect_timeout num
        }
    }
    real_server @IP PORT {
        weight num
        MISC_CHECK {
            misc_path /path_to_script/script.sh
            (or misc_path “ /path_to_script/script.sh <arg_list>”)
        }
    }
}
real_server @IP PORT {
    weight num
    HTTP_GET|SSL_GET {
        url { # You can add multiple url block
            path alphanum
            digest alphanum
        }
        connect_port num
        connect_timeout num
        retry num
        delay_before_retry num
    }
}
vrrp_sync_group string {
    group {
        string
        string
    }
    notify_master /path_to_script/script_master.sh
        (or notify_master “ /path_to_script/script_master.sh <arg_list>”)
    notify_backup /path_to_script/script_backup.sh
        (or notify_backup “/path_to_script/script_backup.sh <arg_list>”)
    notify_fault /path_to_script/script_fault.sh
        (or notify_fault “ /path_to_script/script_fault.sh <arg_list>”)
}
vrrp_instance string {
    state MASTER|BACKUP
    interface string
    mcast_src_ip @IP
    lvs_sync_daemon_interface string
    virtual_router_id num
    priority num
    advert_int num
    smtp_alert
    authentication {
        auth_type PASS|AH
        auth_pass string
    }
    virtual_ipaddress { # Block limited to 20 IP addresses
        @IP
        @IP
        @IP
    }
    virtual_ipaddress_excluded { # Unlimited IP addresses
        @IP
        @IP
        @IP
    }
    notify_master /path_to_script/script_master.sh
        (or notify_master “ /path_to_script/script_master.sh <arg_list>”)
    notify_backup /path_to_script/script_backup.sh
        (or notify_backup “ /path_to_script/script_backup.sh <arg_list>”)
    notify_fault /path_to_script/script_fault.sh
        (or notify_fault “ /path_to_script/script_fault.sh <arg_list>”)
}
也可以使用man帮助指令#
man 5 keepalived.conf
vrrp,虚拟冗余协议
node1配置#
vrrp_instance VI_1{
  state MASTER
  interface eth0
  virtual_router_id 51
  priority 100
  advert_int 1
  authentication{
    auth_type PASS
    auth_pass 1111
  }
  virtual_ipaddress{
    192.168.150.100/24 dev eth0 label eht0:3
  }
}
# VIP
virtual_server 192.168.150.100 80{
  lb_algo rr # loadbanlance 调度算法
  lb_kind DR # loadbanlance 调度算法类型
  nat_mask 255.255.255.0
  persistence_timeout 0
  protocol TCP

  real_server 192.168.150.12 80{
    weight 1
    HTTP_GET{
      url {
        path /
        status_code 200
      }
      conect_timeout 3
      nb_get_retry 3
      delay_before_retry 3
    }
  }

  real_server 192.168.150.13 80{
    weight 1
    HTTP_GET{
      url {
        path /
        status_code 200
      }
      conect_timeout 3
      nb_get_retry 3
      delay_before_retry 3
    }
  }
}
node4配置#
修改state和priority
vrrp_instance VI_1{
  state BACKUP
  interface eth0
  virtual_router_id 51
  priority 50
  advert_int 1
  authentication{
    auth_type PASS
    auth_pass 1111
  }
  virtual_ipaddress{
    192.168.150.100/24 dev eth0 label eht0:3
  }
}
# VIP
virtual_server 192.168.150.100 80{
  lb_algo rr # loadbanlance 调度算法
  lb_kind DR # loadbanlance 调度算法类型
  nat_mask 255.255.255.0
  persistence_timeout 0
  protocol TCP

  real_server 192.168.150.12 80{
    weight 1
    HTTP_GET{
      url {
        path /
        status_code 200
      }
      conect_timeout 3
      nb_get_retry 3
      delay_before_retry 3
    }
  }

  real_server 192.168.150.13 80{
    weight 1
    HTTP_GET{
      url {
        path /
        status_code 200
      }
      conect_timeout 3
      nb_get_retry 3
      delay_before_retry 3
    }
  }
}
启动keepalived#
service keepalived start
node4不会有VIP,但会配置内核模块
主挂掉以后,backup会变成主,主修复好后,主会把从抢走,keepalived不存在数据同步问题,所以主从切换消耗低,不需要考量切换主从的成本
RIP挂掉后会自动清出列表,起来后自动加入列表
查看keepalived进程#
ps -fe | grep keepalived
kill -9杀死所有进程
MASTER会死掉,backup会出现VIP,导致数据包混乱,所以需要zookeeper
作者:BigBender
出处:https://www.cnblogs.com/BigBender/p/14442293.html
版权:本作品采用「署名-非商业性使用-相同方式共享 4.0 国际」许可协议进行许可。












【推荐】国内首个AI IDE,深度理解中文开发场景,立即下载体验Trae
【推荐】编程新体验,更懂你的AI,立即体验豆包MarsCode编程助手
【推荐】抖音旗下AI助手豆包,你的智能百科全书,全免费不限次数
【推荐】轻量又高性能的 SSH 工具 IShell:AI 加持,快人一步
· Linux系列:如何用heaptrack跟踪.NET程序的非托管内存泄露
· 开发者必知的日志记录最佳实践
· SQL Server 2025 AI相关能力初探
· Linux系列:如何用 C#调用 C方法造成内存泄露
· AI与.NET技术实操系列(二):开始使用ML.NET
· 被坑几百块钱后,我竟然真的恢复了删除的微信聊天记录!
· 没有Manus邀请码?试试免邀请码的MGX或者开源的OpenManus吧
· 【自荐】一款简洁、开源的在线白板工具 Drawnix
· 园子的第一款AI主题卫衣上架——"HELLO! HOW CAN I ASSIST YOU TODAY
· Docker 太简单,K8s 太复杂?w7panel 让容器管理更轻松!