多线程基础
线程的创建
继承Thread
public class MyThread extends Thread{
  @Override
  public void run(){
    for(int i = 0; i < 10; i++{
      System.out.println(Thread.currentThread().getName());
    }
  }
}

pulbic class Test{
  public static void main(String[] args){
    MyThread tt = new TestThread();
    Thread t = new Thread(tt);
    t.start();
  }
}
实现Runnable接口
public class MyThread implements Runnable{
  @Override
  public void run(){
    for(int i = 0; i < 10; i++{
      System.out.println(Thread.currentThread().getName());
    }
  }
}

pulbic class Test{
  public static void main(String[] args){
    MyThread tt = new TestThread();
    Thread t = new Thread(tt);
    t.start();
  }
}
实现Callable接口
public class TestRandomNum implements Callable<Integer>{
  @Override
  public Integer call() throws Exception{
    return new Random().nextInt(10);// 返回10以内的随机数
  }
}

public class Test{
  public static void main(String[] args){
    TestRandomNum trn = new TestRandomNum();
    FutureTask ft = new FutureTask(trn);
    Thread t = new Thread(ft);
    t.start();
    Object obj = ft.get();
    System.out.println(obj);
  }
}
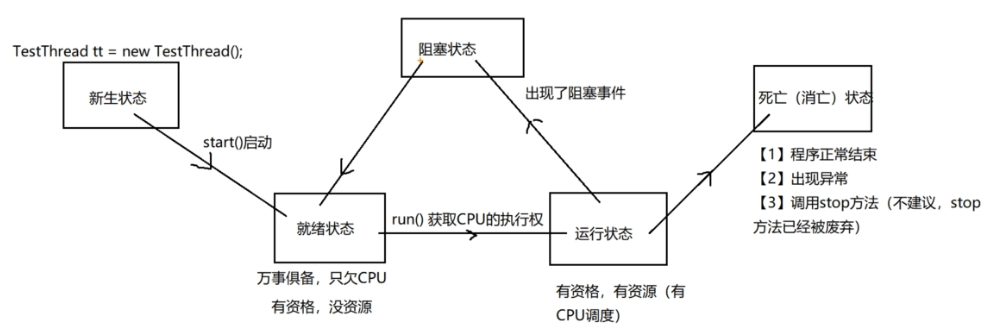
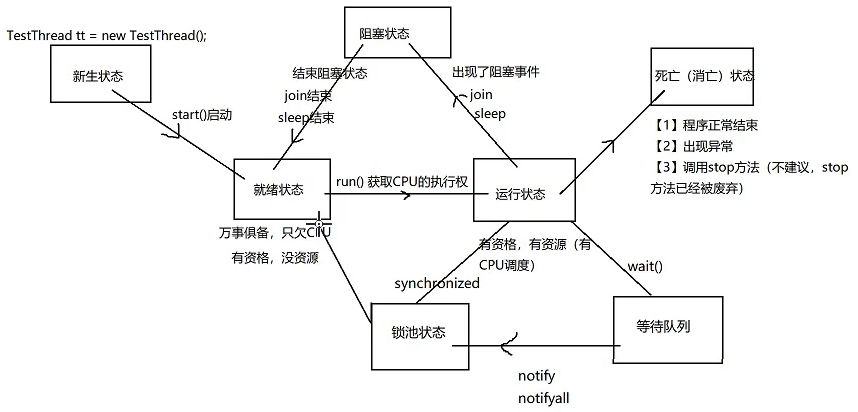
线程的生命周期
五态模型
线程常见方法
start()
启动当前线程,表面上调用start方法,实际在调用线程中的run方法
run()
线程类 继承thread类 或者 实现Runnable接口的时候,都要重新实现run方法
run方法里面就是线程要执行的内容
currentThread()
Thread类中的一个静态方法,获取当前正在执行的线程
setName()
设置线程名字
getName()
读取线程名字
级别
同优先级别的线程,采取的策略就是FCFS,使用时间片策略
如果优先级别高,被CPU调度的概率就高
- 1,最小
- 5,普通
- 10,最大

设置优先级
public class TestThread01 extends Thread{
  @Override
  public void run(){
    for(int i = 1; i <= 10; i++){
      System.out.println(i);
    }
  }
}

public class TestThread02 extends Thread{
  @Override
  public void run(){
    for(int i = 20; i <= 30; i++){
      System.out.println(i);
    }
  }
}

class Test{
  public static void main(String[] args){
    // 两个线程抢夺CPU, 可以通过设置优先级来调整
    // 数字越小, 优先级越低

    TestThread01 t1 = new TestThread01();
    t1.setPriority(10);
    t1.start();

    TestThread01 t2 = new TestThread02();
    t1.setPriority(1);
    t2.start();
  }

}
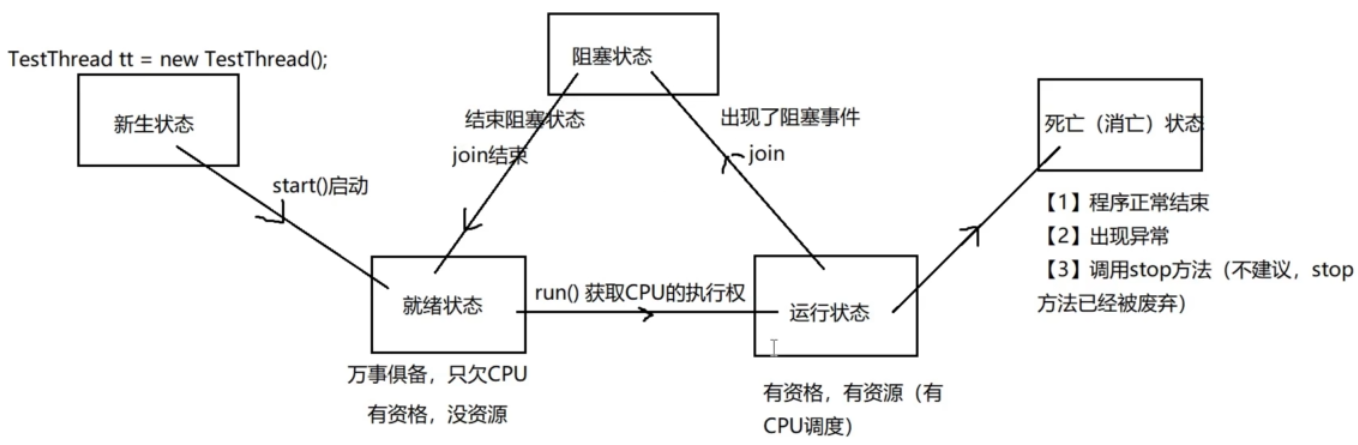
join方法
当一个线程调用了join方法,这个线程会被先执行,结束后执行其他线程
必须先start,join才能生效
public class TestThread extends Thread{
  public TestThread(String name){
    super(name);
  }
  @Override
  public void run(){
    for(int i = 1; i <= 10; i++){
      System.out.println(i);
    }
  }
}

class Test{
  public static void main(String[] args){
    for(int i = 1; i <= 100; i++){
      System.out.println("main..." + i);
      if(i == 6){
        // 创建子线程:
        TestThread tt = new TestThread("子线程");
        tt.start();
        tt.join();
      }
  }
}
sleep方法
人为阻塞
public class Test{
  public static void main(String[] args){
    Thread.sleep(10);// ms
    System.out.println(".....");
  }
}
setDaemon方法
设置伴随线程,将子线程设置为主线程的伴随线程,主线程停止的时候,子线程也不继续执行了
public class Test{
  public void run(String[] args){
    for(int i = 1; i <= 1000; i++){
      System.out.println(".....");
    }
  }
}

public class TestThread extends Thread{
  public static void main(String[] args){
    TestThread tt = new TestThread();
    tt.setDaemon(true);// 设置伴随线程, 注意: 先设置, 再启动
    tt.start();

    for(int i = 1; i <= 10; i++){
      System.out.println("main...." + i);
    }
  }
}
stop方法
public class Demo{
  public static void main(String[] args){
    for(int i = 1; i <= 100; i++){
      if(i == 6){
        Thread.currentThread().stop();// 过期方法, 不建议使用
      }
      System.out.println(i);
    }
  }
}
线程安全
本质上是线程同步问题,需要加锁和同步监视器
public class MyThread implements Runnable{
  int num = 0;
  @Override
  public void run(){
    for(int i = 0; i <= 100; i++){
      synchronized(this){
        if(num > 0){
          // coding
        }
      }
    }
  }
}
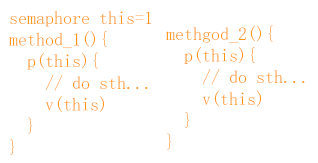
synchronized关键字就是一个普通的排他锁(mutex)
synchronized就是对mutex=1的锁使用pv操作
public class MyThread implements Runnable{
  int num = 0;
  @Override
  public void run(){
    for(int i = 0; i <= 100; i++){
      synchronized(this){
        if(num > 0){
          // coding
        }
      }
    }
  }
}
尽量不要用String和Integer做同步监视器
建议使用final关键字修饰同步监视器(final只是锁定了地址值)
同步就是pv操作

同步代码块可以发生CPU的切换,但是其他线程无法执行同步代码块
同步代码块--临界区

同步方法
public class MyThread implements Runnable{
  int num = 0;
  @Override
  public static synchronized void do(){
  for(int i = 0; i <= 100; i++){
    if(num > 0){
      // coding
    }
  }
}
不要将run方法定义为同步方法
非静态同步方法同步监视器是this
静态同步方法同步监视器是字节码信息
同步方法的锁是this,同步代码块将线程挡在代码块之外,在方法内部
效率:同步代码块 > 同步方法
Lock锁
lock是一个api,多态
public MyThreaqd implements Runnable{
  int num = 0;
  Lock lock = new ReentrantLock();
  @Override
  public void run(){
    for(int i = 1; i <= 100; i++){
      lock.lock();
      try{
        if(num > 0){
          System.out.println(Thread.currentThread().getName());
        }
      }catch(Exception ex){
        ex.printStackTrace();
      }finally{
        lock.unlock();
      }
    }
  }
}
使用顺序
Lock > synchronized > 同步代码块
Lock和synchronized的区别
- Lock是显式锁,synchronized是隐式锁
- Lock只有代码块锁,synchronized有代码块锁和方法锁
- 使用Lock锁,Jvm花费较少时间调度线程,性能更好,有更好的拓展性(提供更多原子类)
线程同步的缺点
- 线程安全,效率低
- 线程不安全,效率高
可能造成死锁
死锁,四个必要条件,两个充分条件
线程通信
利用同步代码块解决数据错乱
public class ProducerThread extends Thread{
  // 共享商品
  private Product p;

  public ProducerThread(Product p) {
    this.p = p;
  }
  @Override
  public void run(){
    for(int i = 1; i <= 10; i++){
      synchronized(p){
        if(i % 2 == 0){
          p.setBrand("");
          try{
            Thread.sleep(100);
          }catch(InterruptedException e){
            e.printStackTrace();
          }
          p.setName("");
        }else{
          p.setBrand("");
          try{
            Thread.sleep(100);
          }catch(InterruptedException e){
            e.printStackTrace();
          }
          p.setName("");
        }
      }
    }
  }
}

public class CustomerThread extends Thread{
  // 共享商品
  private Product p;

  public CustomerThread(Product p) {
    this.p = p;
  }
  @Override
  public void run(){
    for(int i = 1; i <= 10; i++){
      synchronized(p){
        // coding
      }
    }
  }
}

public class Test{
  public static void main(String[] args){
    Product p = new Product();
    ProducerThread pt = new ProducerThread();
    CustomerThread ct = new CustomerThread();

    pt.start();
    ct.start();
  }
}
利用同步方法解决问题
public class Product{
  public synchronized void setProduct(String brand, String name){
    this.setBrand(brand);
    try{
      Thread.sleep(100);
    }catch(InterruptedException e){
      e.printStackTrace();
    }
    this.setName();
  }

  public synchronized void getProduct(){
    // coding
  }
}

public class ProducerThread extends Thread{
  // 共享商品
  private Product p;

  public ProducerThread(Product p) {
    this.p = p;
  }
  @Override
  public void run(){
    for(int i = 1; i <= 10; i++){
      if(i % 2 == 0){
        p.setProduct("", "");
      }
    }
  }
}

public class CustomerThread extends Thread{
  // 共享商品
  private Product p;

  public CustomerThread(Product p) {
    this.p = p;
  }
  @Override
  public void run(){
    for(int i = 1; i <= 10; i++){
      p.getProduct();
    }
  }
}

public class Test{
  public static void main(String[] args){
    Product p = new Product();
    ProducerThread pt = new ProducerThread();
    CustomerThread ct = new CustomerThread();

    pt.start();
    ct.start();
  }
}
生产消费交替执行
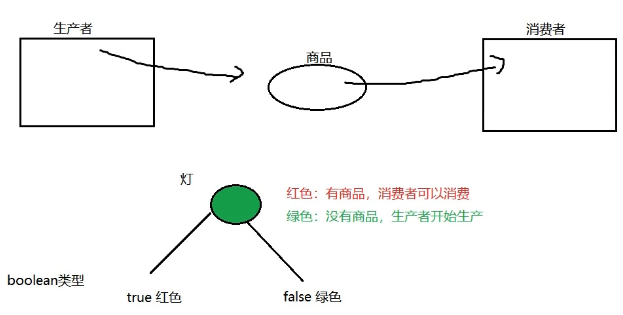
添加一个标志位
public class Product{

  boolean flag = false;

  public synchronized void setProduct(String brand, String name){
    if(flag == true){
      try{
        wait();
      }catch(InterruptedException e){
        e.printStackTrace();
      }
    }else{
      this.setBrand(brand);
      try{
        Thread.sleep(100);
      }catch(InterruptedException e){
        e.printStackTrace();
      }
      this.setName();
      flag = true;
      notify();
    }
  }

  public synchronized void getProduct(){
    if(!flag){
      try{
        wait();
      }catch(InterruptedException e){
        e.printStackTrace();
      }
    }
    // coding
    flag = false;
    notify();
  }
}

public class ProducerThread extends Thread{
  // 共享商品
  private Product p;

  public ProducerThread(Product p) {
    this.p = p;
  }
  @Override
  public void run(){
    for(int i = 1; i <= 10; i++){
      if(i % 2 == 0){
        p.setProduct("", "");
      }else{
        p.setProduct("", "");
      }
    }
  }
}

public class CustomerThread extends Thread{
  // 共享商品
  private Product p;

  public CustomerThread(Product p) {
    this.p = p;
  }
  @Override
  public void run(){
    for(int i = 1; i <= 10; i++){
      p.getProduct();
    }
  }
}

public class Test{
  public static void main(String[] args){
    Product p = new Product();
    ProducerThread pt = new ProducerThread();
    CustomerThread ct = new CustomerThread();

    pt.start();
    ct.start();
  }
}
锁池
synchronized
等待池
wait(),notify(),notifyAll()
当一个线程调用了某个对象的wait方法,该线程进入该对象的等待池(并已将锁释放)
如果之后,其他线程调用了notify或者notifyAll
该等待池中的线程会唤起,进入对象的锁池获取该锁,获得锁成功,线程沿着wait方法的路径继续执行
Lock锁情况下的线程通信
public class Product{

  boolean flag = false;

  Lock lock = new ReentrantLock();

  Condition produceCondition = lock.newCondition();

  Condition consumeCondition = lock.newCondition();

  public void setProduct(String brand, String name){
    lock.lock();
    try{
      if(flag == true){
      try{
        // 生产者阻塞, 生产者进入等待队列中
        produceCondition.await();
      }catch(InterruptedException e){
        e.printStackTrace();
      }
    }else{
      this.setBrand(brand);
      try{
        Thread.sleep(100);
      }catch(InterruptedException e){
        e.printStackTrace();
      }
      this.setName();
      flag = true;
      consumeCondition.signal();
    }finally{
      lock.unlock();
    }
  }

  public void getProduct(){
    lock.lock();
    try{
      if(!flag){
        try{
          consumeCondition.await();
        }catch(InterruptedException e){
          e.printStackTrace();
        }
      }
      // coding
      flag = false;
      produceCondition.signal();
    }finally{
      lock.unlock();
    }
  }
}

public class ProducerThread extends Thread{
  // 共享商品
  private Product p;

  public ProducerThread(Product p) {
    this.p = p;
  }
  @Override
  public void run(){
    for(int i = 1; i <= 10; i++){
      if(i % 2 == 0){
        p.setProduct("", "");
      }else{
        p.setProduct("", "");
      }
    }
  }
}

public class CustomerThread extends Thread{
  // 共享商品
  private Product p;

  public CustomerThread(Product p) {
    this.p = p;
  }
  @Override
  public void run(){
    for(int i = 1; i <= 10; i++){
      p.getProduct();
    }
  }
}

public class Test{
  public static void main(String[] args){
    Product p = new Product();
    ProducerThread pt = new ProducerThread();
    CustomerThread ct = new CustomerThread();

    pt.start();
    ct.start();
  }
}
Condition是在jdk1.5之后出现的,用来替代传统的await和notify
可以使用多个锁池和多个锁
睁开眼,书在面前 闭上眼,书在心里

 浙公网安备 33010602011771号