Redis简介(数据结构,哨兵、集群和SpringDataRedis)
NoSQL简介

Redis简介
Redis单机版安装
安装依赖C语言依赖
yum install -y gcc-c++ automake autoconf libtool make tcl
进入/usr/local/tmp下载redis
cd /usr/local/tmp
git clone https://github.com/redis/redis.git
进入redis安装目录,编译和安装
make
make install PREFIX=/usr/local/redis
开启守护进程
复制/usr/local/tmp/redis/中的redis.conf配置文件
cp redis.conf /usr/local/redis/bin
修改配置文件
cd /usr/local/redis/bin/
vim redis.conf
修改 daemonize no 为 yes
daemonize yes
修改外部访问,注释掉bind 127.0.0.1,protected-mode 改为 no
启动redis并测试
./redis-server redis.conf
重启redis
./redis-cli shutdown
./redis-server redis.conf
启动客户端工具
./redis-cli
Redis常用五大类型
String(字符串)
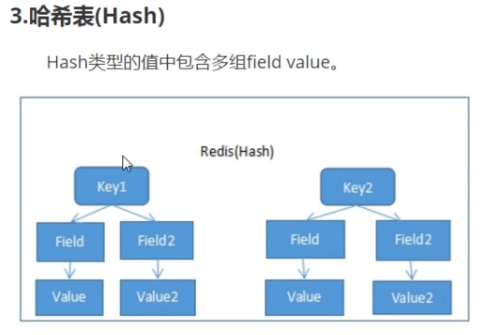
Hash(哈希)


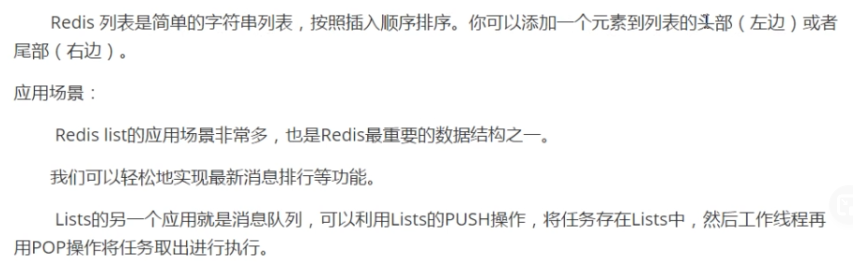
List(列表)
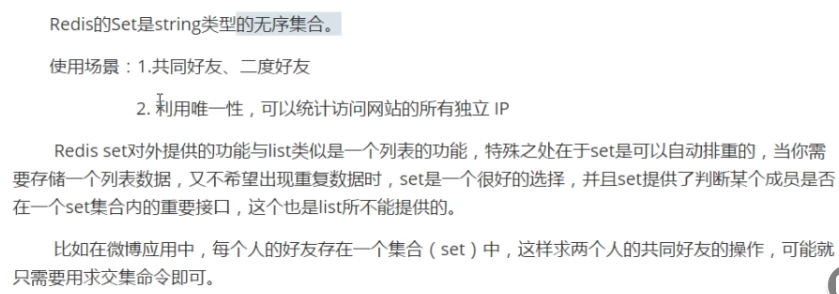
Set(集合)

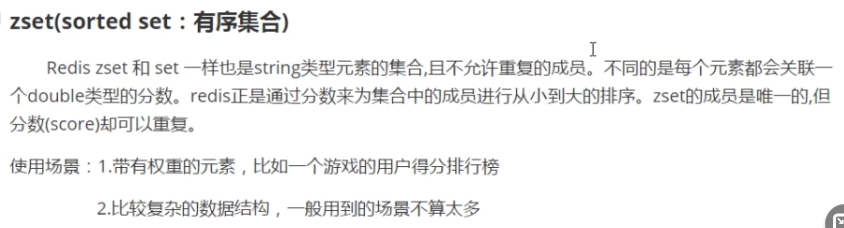
zset(有序集合)
Redis常用命令
官方地址:https://www.redis.net.cn/order
Key操作
exists
- 判断key是否存在
- 语法:exists key 名称
- 返回:存在返回数字,不存在返回0
expire
- 设置key的过期时间,单位s
- 语法:expire key 秒数
- 返回:成功返回1,失败返回0
ttl
- 查看key的剩余过期时间
- 语法:ttl key
- 返回:存在返回数字,不存在返回0
del
- 根据key删除键值对
- 语法:del key
- 返回:被删除key的数量
String(字符串)
get
- 获取指定key的值
- 语法:get key
- 返回:key的值,不存在返回null
setnx
- 当且仅当key不存在时才新增
- 语法:setnx key value
- 返回:不存在时返回1,存在时返回0
setex
- 设置key的存活时间,无论是否存在指定key都能新增,如果存在key覆盖旧值,同时必须指定过期时间
- 语法:setex key seconds value
- 返回:OK
Hash(哈希)
hset
- 给key中field设置值
- 语法:hset key field value
- 返回值:成功1,失败0
hget
- 获取key中某个field的值
- 语法:hset key field value
- 返回值:成功1,失败0
hmset
- 给key中多个field的设置值
- 语法:hmset key field value field value
- 返回值:成功OK
hmget
- 获取key中多个field值
- 语法:hmget key field field
- 返回值:value列表
hvals
- 获取key中所有field值
- 语法:hvals key
- 返回值:value列表
hgetall
- 获取所有的field和value
- 语法:hgetall key
- 返回值:field和value交替显示列表
hdel
- 删除key中任意个field
- 语法:hdel key field field
- 返回值:成功删除field的数量
列表(List)
Rpush
- 想列表末尾中插入一个或多个值
- 语法:rpush key value value
- 返回值:列表长度
Lrange
- 返回列表中指定区间内的值,可以使用-1代表列表末尾
- 语法:lrange list 0 -1
- 返回值:查询到的值
Lpush
- 将一个或多个值插入到列表前面
- 语法:lpush key value value
- 返回值:列表长度
Llen
- 获取列表长度
- 语法:llen key
- 返回值:列表长度
Lrem
- 删除列表中元素。count为正数表示从左往右删除的数量。负数从右往左删除的数量。
- 语法:lrem key count value
- 返回值:删除数量
集合(Set)
set和java中的集合一样
sadd
- 向集合中添加内容,不允许重复
- 语法:sadd key value value value
- 返回值:集合长度
scard
- 向集合中添加内容,不允许重复
- 语法:sadd key value value value
- 返回值:集合长度
smemebers
- 查看集合中元素内容
- 语法:smembers key
- 返回值:集合中元素
有序集合(Sorted set)
zadd
- 向有序集合中添加数据
- 语法:smembers key
- 返回值:集合中元素
zrange
- 返回区间内容,withscores表示带有分数
- 语法:zrange key 区间 [withscores]
- 返回值:值列表
Redis持久化策略
RDB
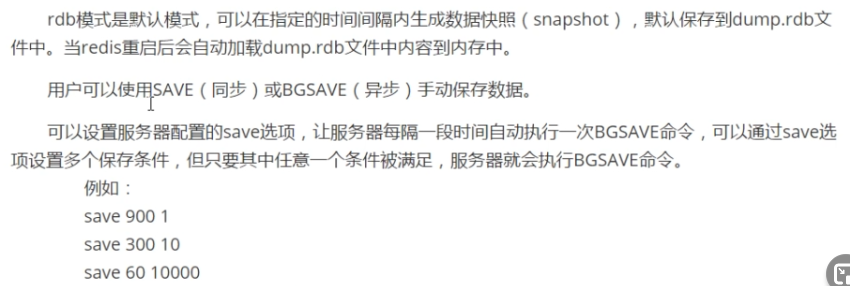

优点

缺点

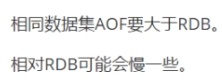
AOF

优点

缺点
开启办法
修改redis.conf配置
# 默认no
appendonly yes
# aof文件名
appendfilename "appendonly.aof"
Redis主从复制
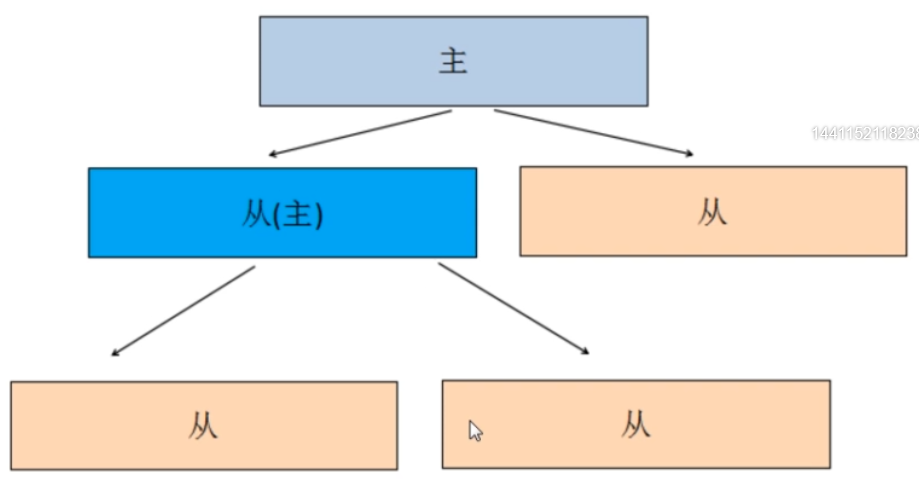
主从优点

一主多从搭建
关闭redis单机版
./redis-cli shutdown
新建目录
mkdir /usr/local/replica
复制目录
cp -r /usr/local/redis/bin /usr/local/replica/master
cp -r /usr/local/redis/bin /usr/local/replica/slave1
cp -r /usr/local/redis/bin /usr/local/replica/slave2
修改2个从的ip和port
vim /usr/local/replica/slave1/redis.conf
指定主机ip和端口
replicaof 192.168.93.10 6379
修改自己端口
port 6380
启动三个redis实例
cd /usr/local/replica
vim startup.sh
在文件下添加内容
cd /usr/local/replica/master/
./redis-server redis.conf
cd /usr/local/replica/slave1/
./redis-server redis.conf
cd /usr/local/replica/slave2/
./redis-server redis.conf
修改权限
chmod a+x startup.sh
查看启动状态
ps aux|grep redis
测试
cd /usr/local/replica/master/
./redis-cli
查看信息
info replication
进去slave查看数据是否同步
cd /usr/local/replica/slave1
./redis-cli -p 6380
哨兵(Sentinel)

搭建多哨兵
新建目录
mkdir /usr/local/sentinel
复制redis
cp -r /usr/local/redis/bin/* /usr/local/sentinel
复制配置文件,从redis解压目录中复制sentinel配置文件
cd /usr/local/tmp/redis-5.0.5
cp sentinel.conf /usr/local/sentinel
修改主的配置文件
cd /usr/local/sentinel
vim sentinel.conf
修改内容
port 26379
daemonize yes
logFile "/usr/local/sentinel/26379.log"
sentinel monitor mymaster 192.168.93.10 6379 2
配置两个哨兵
复制sentinel.conf 命名为 sentinel-26380.conf
cp sentinel.conf sentinel-26380.conf
修改内容
port 26380
daemonize yes
logFile "/usr/local/sentinel/26380.log"
sentinel monitor mymaster 192.168.93.10 6379 2
复制sentinel.conf 命名为 sentinel-26381.conf
cp sentinel.conf sentinel-26381.conf
修改内容
port 26381
daemonize yes
logFile "/usr/local/sentinel/26381.log"
sentinel monitor mymaster 192.168.93.10 6379 2
杀掉进程
ps aux|grep redis
kill -9 进程号
启动redis主从和哨兵
cd /usr/local/replica
./startup.sh
启动三个哨兵
cd /usr/local/sentinel
./redis-sentinel sentinel.conf
./redis-sentinel sentinel-26380.conf
./redis-sentinel sentinel-26381.conf
查看日志
cat 26379.log
测试宕机
查看redis端口号
ps aux|grep redis
killmaster,之后看哨兵端口,slave会变成master
集群(Cluster)
集群中超过或等于1/2节点不可用时,整个集群不可用。为了搭建稳定集群,都采用奇数节点
复制redis配置文件
从/usr/local/redis/bin 下把redis.conf复制到当前目录中,命名为redis-7001.conf
cp /usr/local/redis/bin/redis.conf /usr/local/redis/bin/redis-7001.conf
修改redis-7001.conf
cd /usr/local/redis/bin
vim redis-7001.conf
需要修改如下
port 7001
cluster-enabled yes
cluster-config-file ndoes-7001.conf
cluster-node-timeout 15000
# appendonly yes 如果开启aof默认,需要修改为yes,如果使用rdb,不需要修改
daemonize yes
protected-mode no
pidfile /var/run/redis_7001.pid
复制配置文件,并修改内容
把redis-7001.conf复制为5份
cp redis-7001.conf redis-7002.conf
cp redis-7001.conf redis-7003.conf
cp redis-7001.conf redis-7004.conf
cp redis-7001.conf redis-7005.conf
cp redis-7001.conf redis-7006.conf
修改各自的文件内容的7001为当前文件的编号
启动6个redis
rm -f dump.rdb
vim startup.sh
./redis-server redis-7001.conf
./redis-server redis-7002.conf
./redis-server redis-7003.conf
./redis-server redis-7004.conf
./redis-server redis-7005.conf
查看启动状态
建立集群
在redis需要借助ruby脚本建立集群,在redis5可以用自带的redis-cli实现集群功能,比redis3方便
建议配置静态ip,ip改变,集群失效
./redis-cli --cluster create 192.168.93.10:7001 192.168.93.10:7002 192.168.93.10:7003 192.168.93.10:7004 192.168.93.10:7005 192.168.93.10:7006 --cluster-replicas 1
测试
注意不要忘记最后一个参数-c
./redis-cli -p 7001 -c
set age 18
编写关闭脚本
vim stop.sh
chmod a+x stop.sh
./redis-cli -p 7001 shutdown
./redis-cli -p 7002 shutdown
./redis-cli -p 7003 shutdown
./redis-cli -p 7004 shutdown
./redis-cli -p 7005 shutdown
./redis-cli -p 7006 shutdown
Jedis

public class JedisTest{
    @Test
    public void testStandalone(){
        Jedis jedis = new Jedis("192.168.93.10", 6379);
        Jedis.set("name", "test-standalone");
        String value = jedis.get("name");
        System.out.println(value);
    }
}
带有连接池
public void testPool(){
    JedisPoolConfig jedisPoolConfig = new JedisPoolConfig();
    jedisPoolConfig.setMaxTotal(20);
    jedisPoolConfig.setMaxIdle(5);
    jedisPoolConfig.setMinIdle(3);
    JedisPool jedisPool = new JedisPool(jedisPoolConfig, "192.168.93.10", 6379);
    Jedis jedis = jedisPool.getResource();
    jedis.set("name", "test-pool");
    String value = jedis.get("name");
    System.out.println(value);
}
@Test
public void testCluster(){
    Set<HostAndPort> set = new HashSet<HostAndPort>();
    set.add(new HostAndPort("192.168.93.10", 7001));
    set.add(new HostAndPort("192.168.93.10", 7002));
    set.add(new HostAndPort("192.168.93.10", 7003));
    set.add(new HostAndPort("192.168.93.10", 7004));
    set.add(new HostAndPort("192.168.93.10", 7005));
    set.add(new HostAndPort("192.168.93.10", 7006));

    JedisCluster jedisCluster = new JedisCluster(set);
    jedisCluster.set("name", "test");
    String value = jedisCluster.get("name");

    System.out.println(value);
}
使用SpringBoot整合SpringDataRedis操作redis
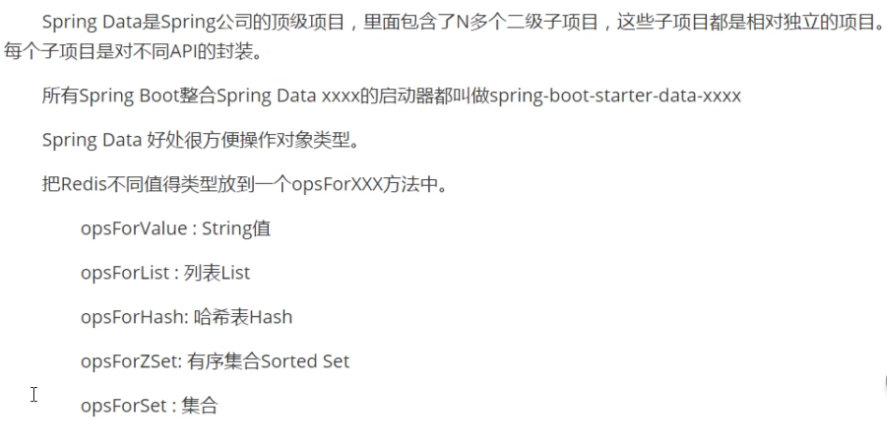
添加parent和web的启动器依赖,然后添加redis和mybatis的依赖
添加依赖,官方地址:https://mvnrepository.com/artifact/org.springframework.boot/spring-boot-starter-data-redis
<!-- https://mvnrepository.com/artifact/org.springframework.boot/spring-boot-starter-data-redis -->
<dependency>
    <groupId>org.springframework.boot</groupId>
    <artifactId>spring-boot-starter-data-redis</artifactId>
</dependency>
添加依赖,官方地址:https://mvnrepository.com/artifact/org.mybatis.spring.boot/mybatis-spring-boot-starter/1.3.2
<!-- https://mvnrepository.com/artifact/org.mybatis.spring.boot/mybatis-spring-boot-starter -->
<dependency>
    <groupId>org.mybatis.spring.boot</groupId>
    <artifactId>mybatis-spring-boot-starter</artifactId>
    <version>1.3.2</version>
</dependency>
pojo.Product
public class Product implements Serializable{
    private Integer id;
    private String name;
    private Double price;
    // getter setter
}
mapper.ProductMapper
public interface ProductMapper{
    public Product findProductById(Integer id);
}
ProductMapper.xml
<mapper namespace="com.test.mapper.ProductMapper">
    <select id="findProductById" resultType="com.test.pojo.Product">
        select id, name, price from t_product where id = #{id}
    </select>
</mapper>
ProductService
public interface ProductService{
    public Product findProductById(Integer id);
}
ProductServiceImpl
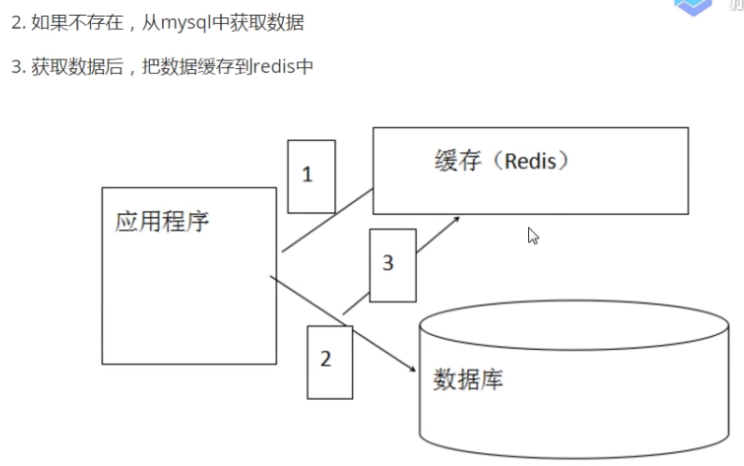
@Service
public class ProductServiceImpl implements ProductService {

    @Autowired
    private ProductMapper productMapper;

    @Override
    public Product findProductById(Integer id){
        String key = "product:" + id;
        // 先从redis中获取数据
        if(redisTemplate.hasKey(key)){
            System.out.println("执行缓存");
            redisTemplate.setValueSerializer(new Jackson2JsonRedisSerializer<Product>(Product.class));
            Product product = (Product)redisTemplate.opsForValue().get(key);
            return product;
        }
        // 执行mysql
        Product product = productMapper.findProductById(id);
        redisTemplate.opsForValue().set(key, product);
        return product;
    }
}
ProductController
@Controller
public class ProductController{
    @Autowired
    private ProductService productService;

    @GetMapping("/show")
    public String select(Integer id, Model model){
        Product product = new productService.findProductById(id);
        model.addAttribute("product", product);

        return "show";
    }
}
SpringBootApplication
@SpringBootApplication
@MapperScan("com.test.mapper")
public class ProductApplication{
    public static void main(String[] args){
        SpringApplication.run(ProductApplication.class, args);
    }
}
application.yml
spring:
    datasource:
        driver-class-name: com.mysql.jdbc.Driver
        url: jdbc:mysql://localhost:3306/test
        username: root
        password: root
mybatis:
    type-aliases-package: com.test.pojo
    mapper-localtions: classpath: com/test/mapper/*.xml
RedisConfig
@Configuration
public class RedisConfig{
    public RedisTemplate<String, Object> redisTemplate(RedisConnectionFactory factory){
        RedisTemplateString<String, Object> redisTemplate = new RedisTemplate<String, Objec>();
        redisTemplate.setKeySerializer(new StiringRedisSerializer());
        redisTemplate.setValueSerializer(new Jackson2JsonRedisSerializer<Object>(Object.class));
        redisTemplate.setConnectionFactory(factory);
        return redisTemplate;
    }
}
睁开眼,书在面前 闭上眼,书在心里

 浙公网安备 33010602011771号