Transformer模型原理及其应用
Transformer模型
FrameWork
- 第一步:数据的预处理阶段(将文本处理为输入模型的数据类型)
以文本翻译任务(英译中)为例,并且Transform结构为encoder-decoder.那么对于模型的输入有两部分:src:目标原文本(英文);trg:预测文本(中文).
src:'Some analysts argue that the negative effects of such an outcome would only last for “months.”'
trg:'某些分析家认为军事行动的负面效果只会持续短短“几个月”'
对于输入到的文本通过tokenizer将文本转化为数字编码(tokenizer).
分词处理完成之后会把每个文本用一个数字就行表示(#mark: 1.如果文本过长如何处理呢?).这样一来将输入的文本:
src:\((batch\_size, vocab\_size)\); trg: \((batch\_size, vocab\_size)\)那么在输入Transformer之前会对文本进行两部分处理(假设输入文本以及输出文本为:\(32 \times 72\), \(32 \times 24\)):
1.通过embedding进行处理: 将输入和输出处理(假设Embedding为: nn.Embedding(10000, 512)(前面一个参数为词汇数量,后面一个参数为编码维度(将一个词处理为多少维度)))为:\(32 \times 72 \times 512\), \(32 \times 72 \times 512\)
mark: 掩码以及位置编码的作用是什么呢?
2.生成位置编码:
3.生成mask掩码:输入输出对于mask掩码为:\(src\_mask = 32 \times 1 \times 72\), \(trg\_mask= 32 \times 24 \times 24\)
mask如何参与计算,参考代码中输出结果以及下面两部分注意力计算方法
src_mask对于文本中非文字内容标记为False,trg_mask中下三角格式对数据进行标记,实践过程中在计算完\(Q\times K^T\)之后会补充一个mask操作
scores = torch.matmul(query, key.transpose(-2, -1)) / math.sqrt(d_k)
# 如果存在要进行mask的内容,则将那些为0的部分替换成一个很大的负数
if mask is not None:
    scores = scores.masked_fill(mask == 0, -1e9)
- 第二步:
transformer模型处理
假设输入数据4部分:\(src= 32 \times 72 \times 512, trg= 32 \times 24 \times 512, src\_mask = 32 \times 1 \times 72\), \(trg\_mask= 32 \times 24 \times 24\).那么数据首先传入encoder处理:d_model以及n_heads(在计算上: \(512 / n\_heads = d\_model\)这是因为要将输入的句子通过多头进行处理,就需要吧数据分成不同的头处理的"一部分",在处理完成之后在"汇聚"起来).在计算注意力得分时:
⭐注:因为运用多头注意力计算,会将输入进行”拆分“给每个head,比如说对于
src: \(32 \times 72 \times 512\)假设 \(head=8\)那么处理为:\(src = 32 \times 8 \times 72 \times 64, trg= 32 \times 8 \times 24 \times 64\) 。计算完成之后再进行合并(方式很简单:直接将1 2维度交换之后保持前面两个维度不变,后面两个维度合并即可)
# 拆分
query, key, value = [l(x).view(nbatches, -1, self.h, self.d_k).transpose(1, 2)
                             for l, x in zip(self.linears, (query, key, value))]
# 合并
x = x.transpose(1, 2).contiguous().view(nbatches, -1, self.h * self.d_k)
Encoder计算单头注意力(\(Q=K=V=32 \times 8 \times 72 \times 64\)):
\(QK^T= 32 \times 8 \times 72 \times 72\),在和\(V\)计算时得到:\(32 \times 8 \times 72 \times 64\)
Deocder计算单头注意力(两部分都涉及计算):
1、输入部分计算(\(Q=K=V= 32 \times 8 \times 24 \times 64\)):
\(QK^T= 32 \times 8 \times 24 \times 24\),在和\(V\)计算时得到:\(32 \times 8 \times 24 \times 64\)
2、encoder-decoder计算(\(Q= 32 \times 8 \times 24 \times 64,K=V=32 \times 8 \times 72 \times 64\))(Q、V为encoder计算得到的输出):
\(QK^T= 32 \times 8 \times 24 \times 72\),在和\(V\)计算时得到:\(32 \times 8 \times 24 \times 64\)
# 方式一:
class CausalSelfAttention(nn.Module):
    def __init__(self, config):
        super().__init__()
        assert config.n_embd % config.n_head == 0
        # 直接通过一层线性而后输出3部分进而实现 对Q K V的线性计算
        self.c_attn = nn.Linear(config.n_embd, 3 * config.n_embd, bias=config.bias)
        # output projection
        self.c_proj = nn.Linear(config.n_embd, config.n_embd, bias=config.bias)
        # regularization
        self.attn_dropout = nn.Dropout(config.dropout)
        self.resid_dropout = nn.Dropout(config.dropout)
        self.n_head = config.n_head
        self.n_embd = config.n_embd
        self.dropout = config.dropout
        self.flash = hasattr(torch.nn.functional, 'scaled_dot_product_attention')
        if not self.flash:
            print("WARNING: using slow attention. Flash Attention requires PyTorch >= 2.0")
            # causal mask to ensure that attention is only applied to the left in the input sequence
            self.register_buffer("bias", torch.tril(torch.ones(config.block_size, config.block_size))
                                        .view(1, 1, config.block_size, config.block_size))
    def forward(self, x):
        B, T, C = x.size() # batch size, sequence length, embedding dimensionality (n_embd)
        # calculate query, key, values for all heads in batch and move head forward to be the batch dim
        q, k, v  = self.c_attn(x).split(self.n_embd, dim=2)
        k = k.view(B, T, self.n_head, C // self.n_head).transpose(1, 2) # (B, nh, T, hs)
        q = q.view(B, T, self.n_head, C // self.n_head).transpose(1, 2) # (B, nh, T, hs)
        v = v.view(B, T, self.n_head, C // self.n_head).transpose(1, 2) # (B, nh, T, hs)
        # causal self-attention; Self-attend: (B, nh, T, hs) x (B, nh, hs, T) -> (B, nh, T, T)
        # 通过 is_causal 和 masked_fill实现因果注意力.拆分C为n_heads * head_size(方便和上面对呀)计算注意力的时:让词汇直接进行交互
        if self.flash:
            # efficient attention using Flash Attention CUDA kernels
            y = torch.nn.functional.scaled_dot_product_attention(q, k, v, attn_mask=None,
                                                                 dropout_p=self.dropout if self.training else 0,
                                                                 is_causal=True)
        else:
            # manual implementation of attention
            att = (q @ k.transpose(-2, -1)) * (1.0 / math.sqrt(k.size(-1)))
            att = att.masked_fill(self.bias[:,:,:T,:T] == 0, float('-inf'))
            att = F.softmax(att, dim=-1)
            att = self.attn_dropout(att)
            y = att @ v # (B, nh, T, T) x (B, nh, T, hs) -> (B, nh, T, hs)
        y = y.transpose(1, 2).contiguous().view(B, T, C) # re-assemble all head outputs side by side
        # output projection
        y = self.resid_dropout(self.c_proj(y))
        return y
# 方式二
def attention(query, key, value, mask=None, dropout=None):
    # 将query矩阵的最后一个维度值作为d_k
    d_k = query.size(-1)
    # 将key的最后两个维度互换(转置),才能与query矩阵相乘,乘完了还要除以d_k开根号
    scores = torch.matmul(query, key.transpose(-2, -1)) / math.sqrt(d_k)
    # 如果存在要进行mask的内容,则将那些为0的部分替换成一个很大的负数
    if mask is not None:
        scores = scores.masked_fill(mask == 0, -1e9)
    # 将mask后的attention矩阵按照最后一个维度进行softmax
    p_attn = F.softmax(scores, dim=-1)
    # 如果dropout参数设置为非空,则进行dropout操作
    if dropout is not None:
        p_attn = dropout(p_attn)
    # 最后返回注意力矩阵跟value的乘积,以及注意力矩阵
    return torch.matmul(p_attn, value), p_attn
class MultiHeadedAttention(nn.Module):
    def __init__(self, h, d_model, dropout=0.1):
        super(MultiHeadedAttention, self).__init__()
        # 保证可以整除
        assert d_model % h == 0
        # 得到一个head的attention表示维度
        self.d_k = d_model // h
        # head数量
        self.h = h
        # 定义4个全连接函数,供后续作为WQ,WK,WV矩阵和最后h个多头注意力矩阵concat之后进行变换的矩阵
        self.linears = clones(nn.Linear(d_model, d_model), 4)
        self.attn = None
        self.dropout = nn.Dropout(p=dropout)
    def forward(self, query, key, value, mask=None):
        if mask is not None:
            mask = mask.unsqueeze(1)
        # query的第一个维度值为batch size
        nbatches = query.size(0)
        # 将embedding层乘以WQ,WK,WV矩阵(均为全连接)
        # 并将结果拆成h块,然后将第二个和第三个维度值互换(具体过程见上述解析)
        query, key, value = [l(x).view(nbatches, -1, self.h, self.d_k).transpose(1, 2)
                             for l, x in zip(self.linears, (query, key, value))]
        # 调用上述定义的attention函数计算得到h个注意力矩阵跟value的乘积,以及注意力矩阵
        x, self.attn = attention(query, key, value, mask=mask, dropout=self.dropout)
        # 将h个多头注意力矩阵concat起来(注意要先把h变回到第三维的位置)
        x = x.transpose(1, 2).contiguous().view(nbatches, -1, self.h * self.d_k)
        # 使用self.linears中构造的最后一个全连接函数来存放变换后的矩阵进行返回
        return self.linears[-1](x)
def clones(module, N):
    """克隆模型块,克隆的模型块参数不共享"""
    return nn.ModuleList([copy.deepcopy(module) for _ in range(N)])
值得注意的是,假设encoder处理之后得到的数据形状为:\(32 \times 72 \times 512\)在输入decoder中(decder的输入首先会通过一个multi-head-attention处理得到:\(32 \times 24 \times 512\))在通过第二个multi-head-attention时:会将encoder的输出作为\(K,V\)这样得到结果为:\(32 \times 24 \times 512\)
CV 中对Transform使用
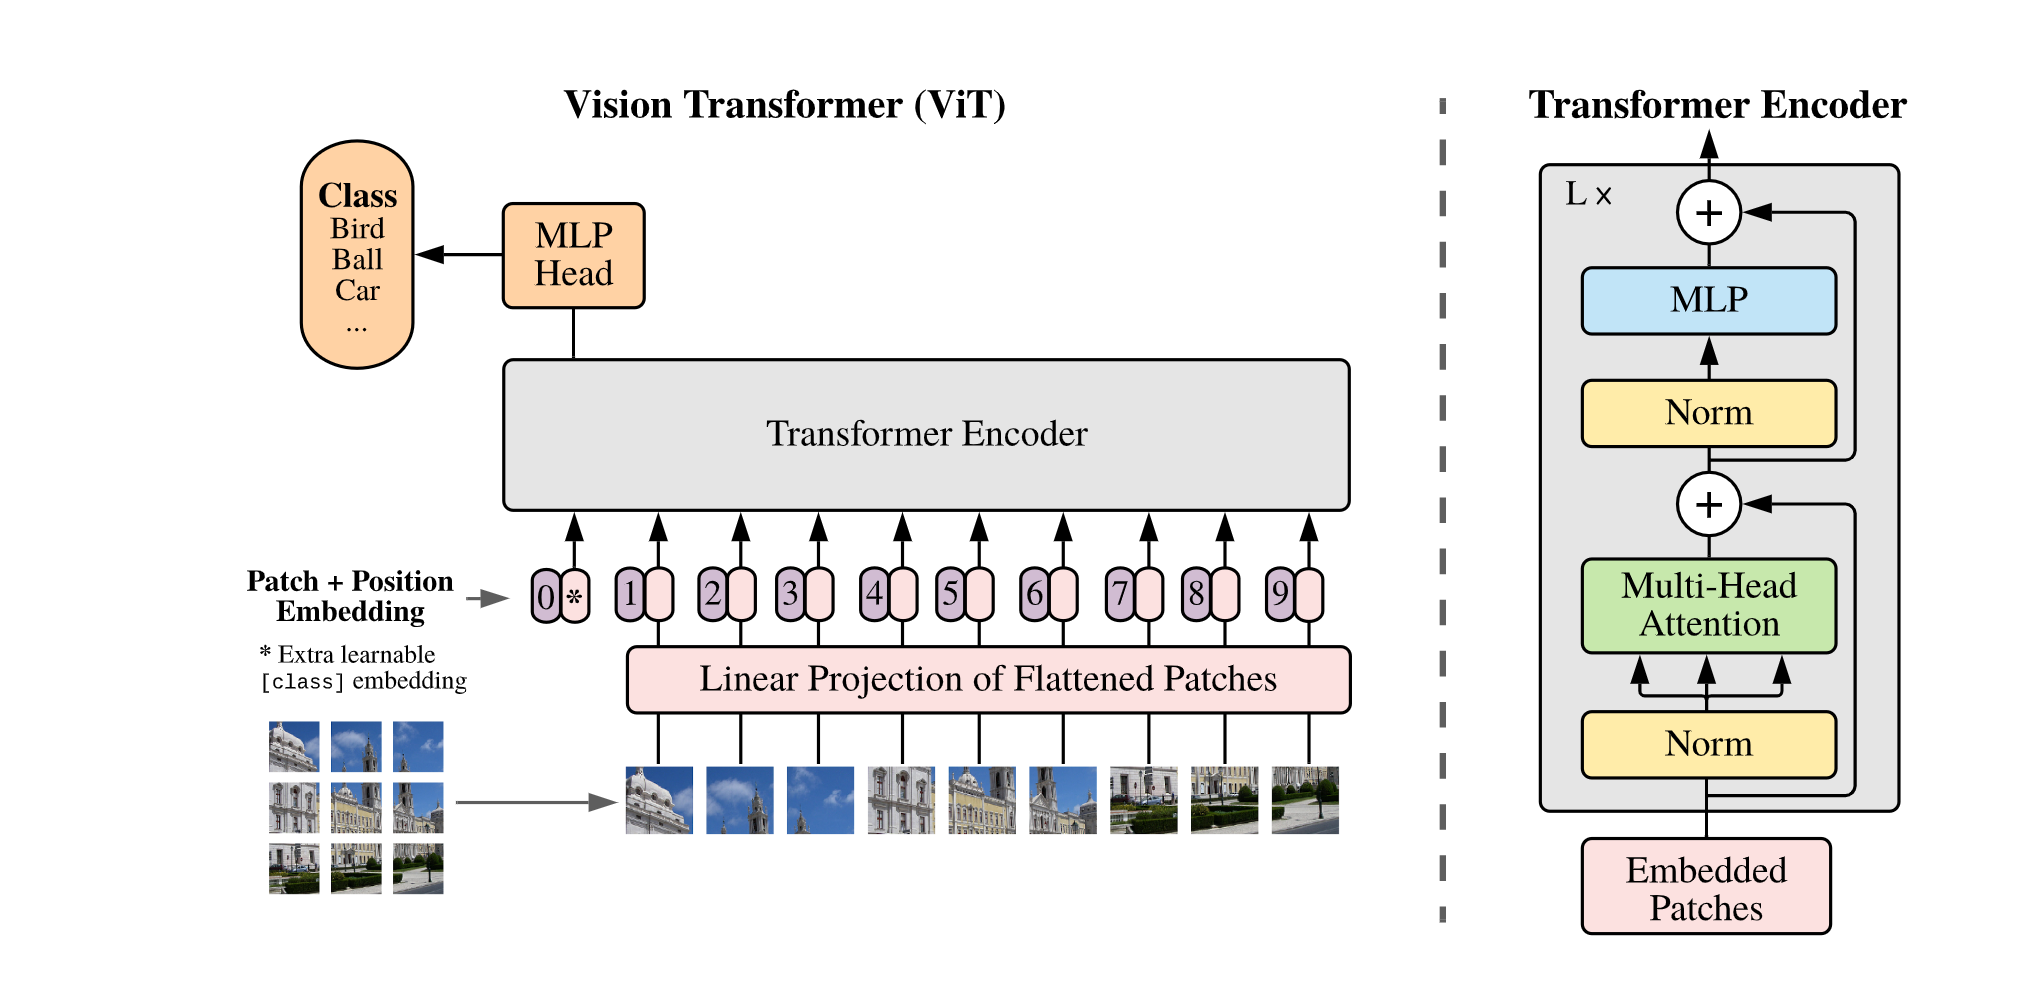
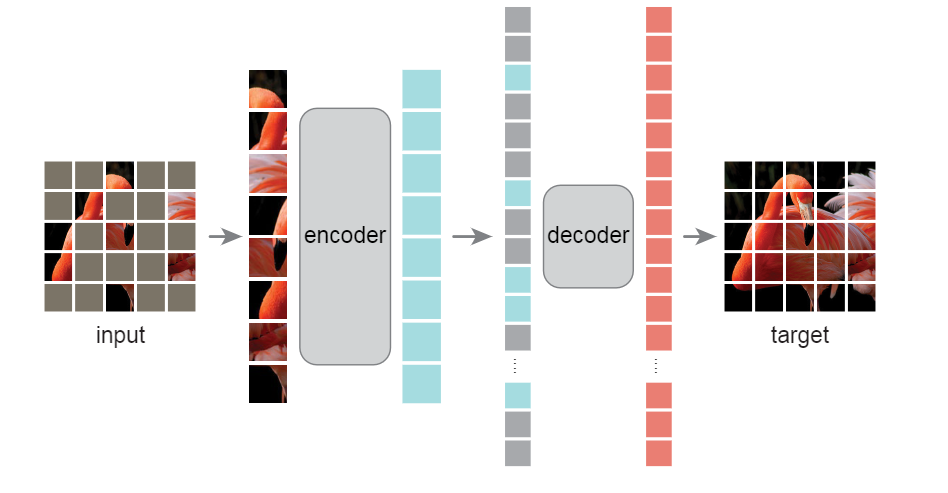
cv中使用transformer主要介绍如下几类模型:1.DETR;2.Vit;3.MAE.三类模型之间还是比较相似,基本都是只在细节上有所区别
1. DETR

非严格意义上的视觉transformer的开山鼻祖,模型的处理思路也是十分简单,将传统的transform在NLP中应用直接"无痛"的拼接到CV中.
简单概述[1]:物体检测的任务是预测图片中目标物体的边界框(bounding box)及类别(labels)。目前,大多数物体检测的方法会预先构造一系列“参考”,如 proposals, anchors, window centers,然后判断这些参考内有无目标,目标距离参考有多远,从而避免多尺度遍历滑窗造成的时间消耗等问题。输出检测结果后,还需要通过 非极大抑制(non-maximum suppression) 等后处理步骤消除冗余的边界框。这些过程都需要先验知识,手动设置完成。
DETR 的目的是摆脱上述预处理和后处理步骤的限制,将物体检测视作集合预测问题(set prediction problem)。总体思路是:将训练数据输入CNN网络构成的backbone,得到图像的高维特征feature map。这些特征作为 Transformer Encoder 的输入,结合图像的位置编码,经过 Decoder 后得到固定数目(大于该数据集最大物体数)query 的特征信息,最后通过前向网络将 query 所包含的信息映射到图片中物体的边界框及标签。
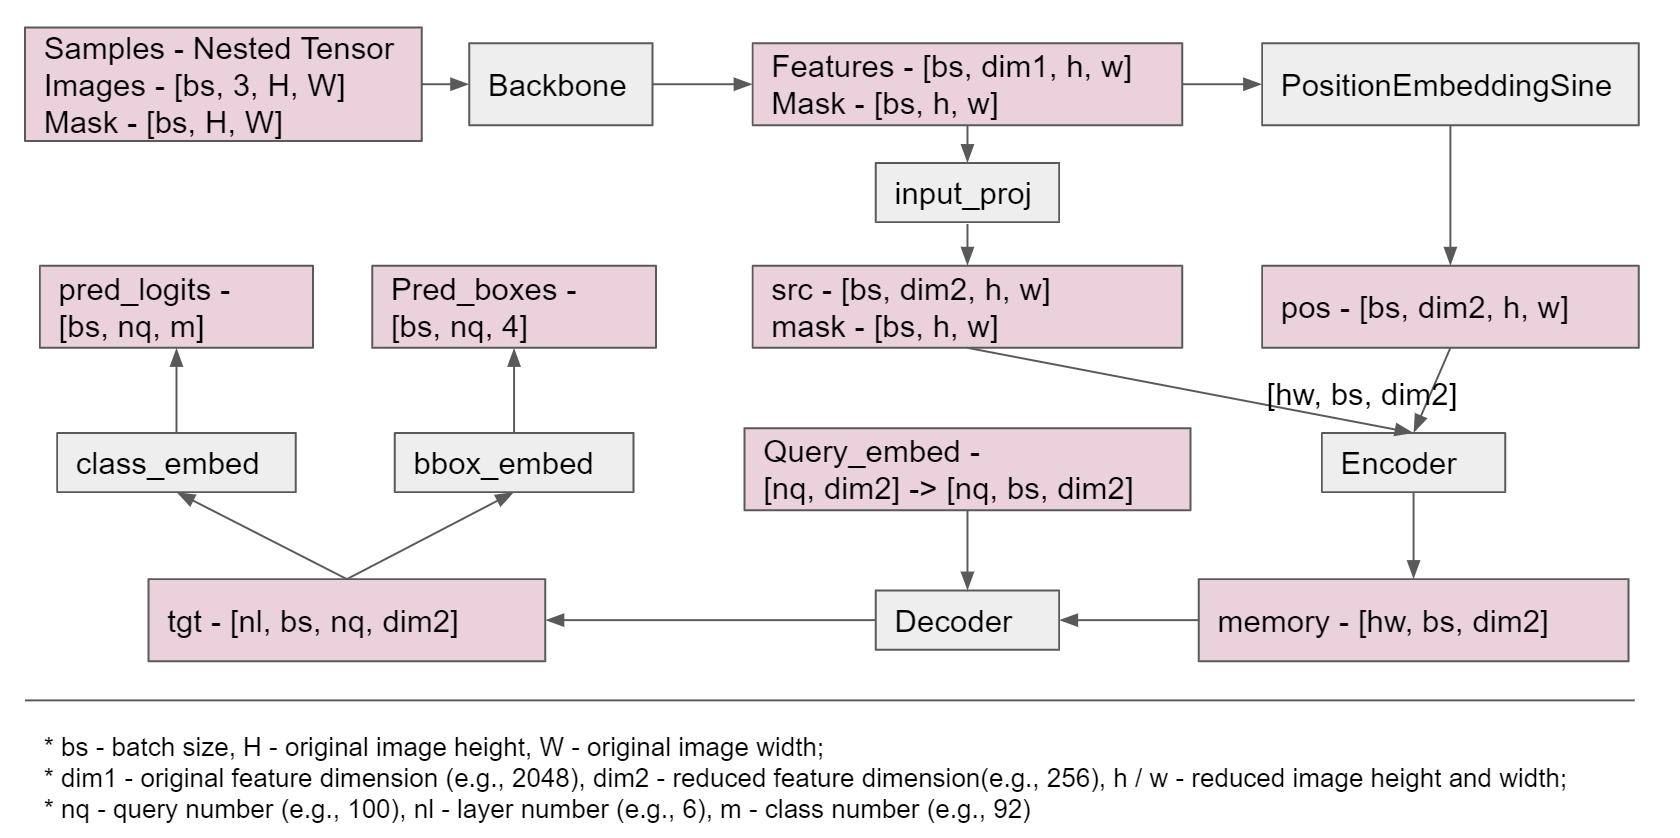
模型具体细节:因为在标准的transformer中输入数据为3个维度:在DETR中通过backbone处理得到的数据维度为4维:\([bs, dim2, h, w]\)这样是和传统的数据结构不同,因此在DETR中会通过如下处理:
# flatten NxCxHxW to HWxNxC
bs, c, h, w = src.shape
src = src.flatten(2).permute(2, 0, 1) # bs(1) c(2) hw --> hw bs flatten代表从2开始后面的数据维度组合到一起
pos_embed = pos_embed.flatten(2).permute(2, 0, 1)
query_embed = query_embed.unsqueeze(1).repeat(1, bs, 1)
mask = mask.flatten(1)
tgt = torch.zeros_like(query_embed)
后续处理就和传统的Transformer没多大区别在最后Decoder处理之后得到为:[nl. bs, nq, dim2]。然后分别通过:
self.bbox_embed = MLP(hidden_dim, hidden_dim, 4, 3)
self.query_embed = nn.Embedding(num_queries, hidden_dim)

outputs_class = self.class_embed(hs)
outputs_coord = self.bbox_embed(hs).sigmoid()
out = {"pred_logits": outputs_class[-1], "pred_boxes": outputs_coord[-1]}
if self.aux_loss:
    out["aux_outputs"] = self._set_aux_loss(outputs_class, outputs_coord)
2. Vit
3. MAE
补充细节
一.分词器
原理:tokenizer的原理十分简单,就是将文本进行切割,然后用数字去代表这些文本.
BPE(Byte Pair Encoding) 分词
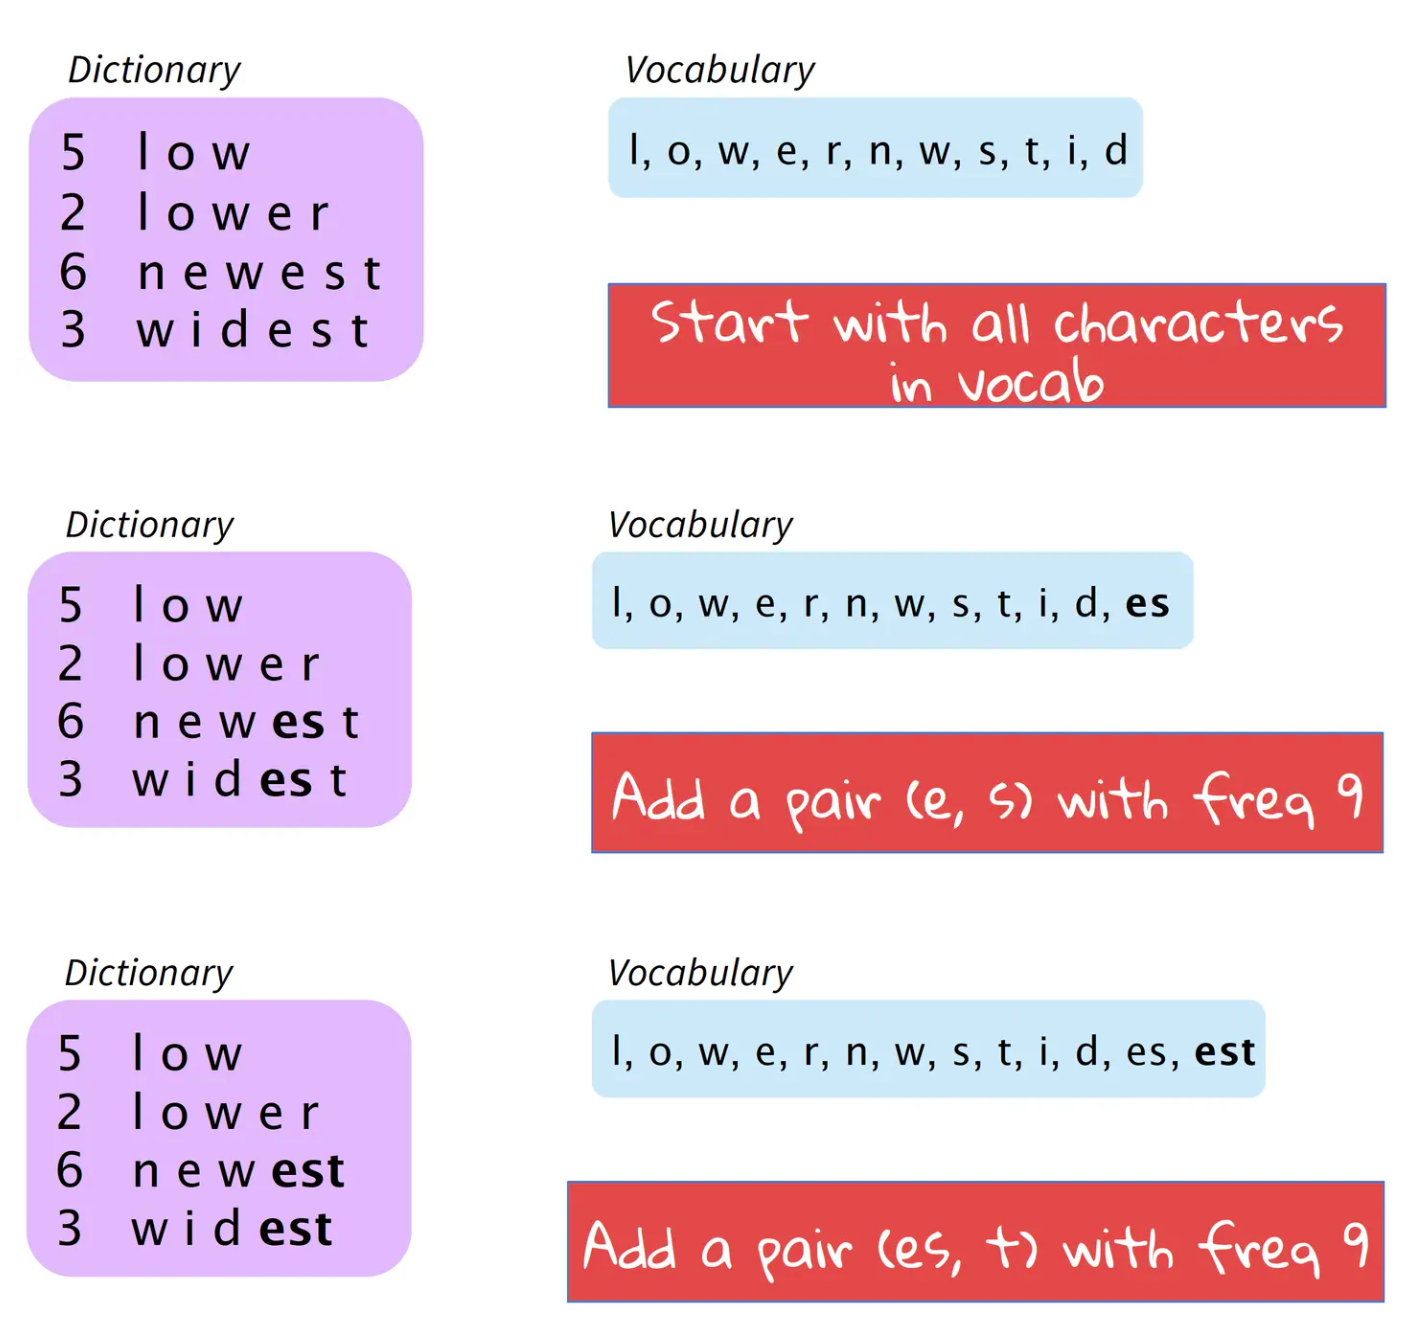
基本思路是将使用最频繁的字节用一个新的字节组合代替,比如用字符的n-gram替换各个字符.例如,假设('A', 'B') 经常顺序出现,则用一个新的标志'AB'来代替它们.分词算法(word segmentation)构建BPE,并将其应用于机器翻译任务中.论文提出的基本思想是,给定语料库,初始词汇库仅包含所有的单个字符.然后,模型不断地将出现频率最高的n-gram pair作为新的n-gram加入到词汇库中,直到词汇库的大小达到我们所设定的某个目标为止.
sentencepiece是一个google开源的自然语言处理工具包,支持bpe、unigram等多种分词方法。其优势在于:bpe、unigram等方法均假设输入文本是已经切分好的,只有这样bpe才能统计词频(通常直接通过空格切分)。但问题是,汉语、日语等语言的字与字之间并没有空格分隔。sentencepiece提出,可以将所有字符编码成Unicode码(包括空格),通过训练直接将原始文本(未切分)变为分词后的文本,从而避免了跨语言的问题。[2]
论文中给出的算法例子如上图所示。算法从所有的字符开始,首先将出现频率最高的 (e, s) 作为新的词汇加入表中,然后是(es, t)。以此类推,直到词汇库大小达到我们设定的值。更清晰的过程如下图所示。其中,Dictionary左列表示单词出现的频率。
以sentencepiece测试为例(输入模型的句子必须是单独成行(每一个文本都是单独一行)):
# 第一步预训练一个分词
def train(input_file, vocab_size, model_name, model_type, character_coverage):
    """
    search on https://github.com/google/sentencepiece/blob/master/doc/options.md to learn more about the parameters
    :param input_file: one-sentence-per-line raw corpus file. No need to run tokenizer, normalizer or preprocessor.
                       By default, SentencePiece normalizes the input with Unicode NFKC.
                       You can pass a comma-separated list of files.
    :param vocab_size: vocabulary size, e.g., 8000, 16000, or 32000
    :param model_name: output model name prefix. <model_name>.model and <model_name>.vocab are generated.
    :param model_type: model type. Choose from unigram (default), bpe, char, or word.
                       The input sentence must be pretokenized when using word type.
    :param character_coverage: amount of characters covered by the model, good defaults are: 0.9995 for languages with
                               rich character set like Japanse or Chinese and 1.0 for other languages with
                               small character set.
    """
    input_argument = '--input=%s --model_prefix=%s --vocab_size=%s --model_type=%s --character_coverage=%s ' \
                     '--pad_id=0 --unk_id=1 --bos_id=2 --eos_id=3 '
    cmd = input_argument % (input_file, model_name, vocab_size, model_type, character_coverage)
    spm.SentencePieceTrainer.Train(cmd)

if __name__ == "__main__":
  en_input = '../data/corpus.en'
    en_vocab_size = 32000
    en_model_name = 'eng'
    en_model_type = 'bpe'
    en_character_coverage = 1
    train(en_input, en_vocab_size, en_model_name, en_model_type, en_character_coverage)

    sp = spm.SentencePieceProcessor()
    text = "ZUEL was established in 2000 with the merge of the then Central South University of Finance and Economics and then Central South Political Science and Law College. Its root could be traced to 1948 when then Zhongyuan University was founded in the Province of Henan and later moved to Wuhan."
    sp.load('../Zh-En-translate/tokenizer/eng.model')
    print(sp.EncodeAsPieces(text))
    print(sp.EncodeAsIds(text))
    a = [24588, 3276, 219, 2589, 26, 3203, 115, 10, 20943, 34, 10, 1041, 1929, 1204, 3640, 34, 6958, 39, 8385, 39, 1041, 1929, 1204, 6235, 9093, 39, 6024, 12285, 31843, 3362, 3899, 397, 55, 18112, 31, 20864, 479, 1041, 6723, 201, 31838, 6193, 3640, 219, 8186, 26, 10, 16839, 34, 8643, 18, 39, 2234, 4813, 31, 153, 28941, 31843]
    print(sp.decode_ids(a))

输出结果:
['▁ZU', 'EL', '▁was', '▁established', '▁in', '▁2000', '▁with', '▁the', '▁merge', '▁of', '▁the', '▁then', '▁Central', '▁South', '▁University', '▁of', '▁Finance', '▁and', '▁Economics', '▁and', '▁then', '▁Central', '▁South', '▁Political', '▁Science', '▁and', '▁Law', '▁College', '.', '▁Its', '▁root', '▁could', '▁be', '▁traced', '▁to', '▁1948', '▁when', '▁then', '▁Zh', 'ong', 'y', 'uan', '▁University', '▁was', '▁founded', '▁in', '▁the', '▁Province', '▁of', '▁Hen', 'an', '▁and', '▁later', '▁moved', '▁to', '▁W', 'uhan', '.']
[24588, 3276, 219, 2589, 26, 3203, 115, 10, 20943, 34, 10, 1041, 1929, 1204, 3640, 34, 6958, 39, 8385, 39, 1041, 1929, 1204, 6235, 9093, 39, 6024, 12285, 31843, 3362, 3899, 397, 55, 18112, 31, 20864, 479, 1041, 6723, 201, 31838, 6193, 3640, 219, 8186, 26, 10, 16839, 34, 8643, 18, 39, 2234, 4813, 31, 153, 28941, 31843]
ZUEL was established in 2000 with the merge of the then Central South University of Finance and Economics and then Central South Political Science and Law College. Its root could be traced to 1948 when then Zhongyuan University was founded in the Province of Henan and later moved to Wuhan.
第三方提供:
1.OpenAI:https://platform.openai.com/tokenizer
2.Huggingface:https://github.com/huggingface/tokenizers
3.sentencepiece:https://github.com/google/sentencepiece
以openai测试(实际效果上OpenAI的tokenizer对于中文的标记效果不是很好,所以主要以英文进行测试机)为例
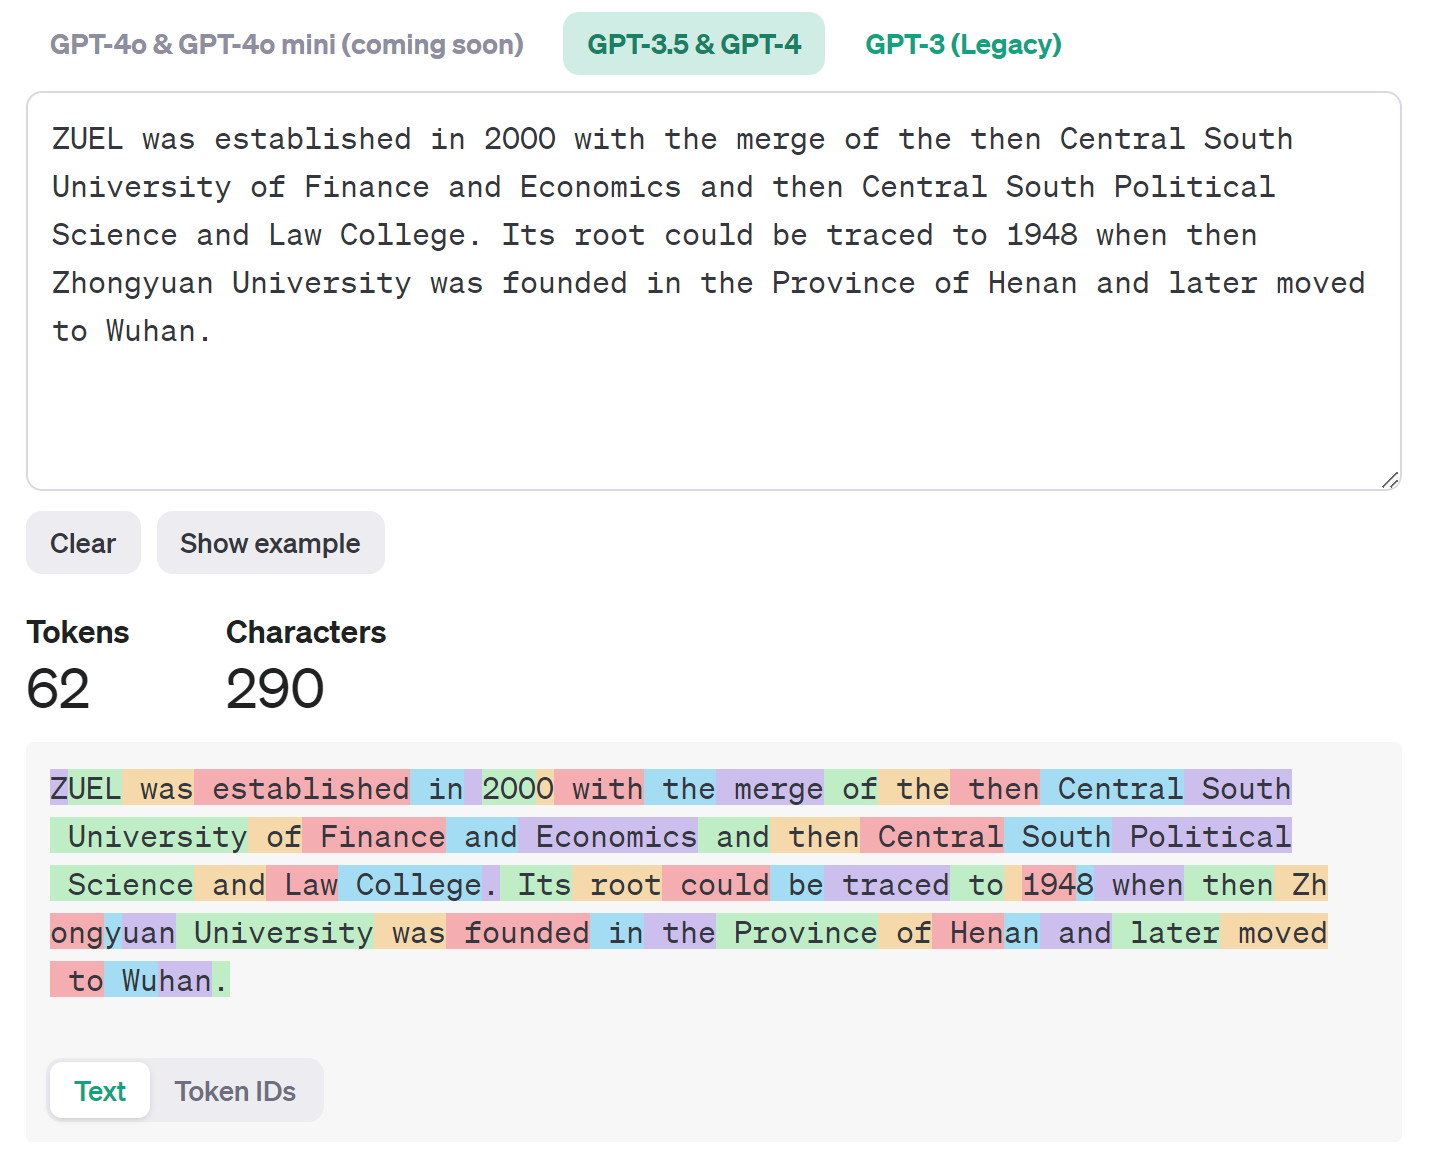
输入文本: ZUEL was established in 2000 with the merge of the then Central South University of Finance and Economics and then Central South Political Science and Law College . Its root could be traced to 1948 when then Zhongyuan University was founded in the Province of Henan and later moved to Wuhan.
输出Token IDs:[57, 68195, 574, 9749, 304, 220, 1049, 15, 449, 279, 11117, 315, 279, 1243, 10913, 4987, 3907, 315, 23261, 323, 35300, 323, 1243, 10913, 4987, 31597, 10170, 323, 7658, 9304, 662, 11699, 3789, 1436, 387, 51400, 311, 220, 6393, 23, 994, 1243, 34449, 647, 88, 10602, 3907, 574, 18538, 304, 279, 38894, 315, 13370, 276, 323, 3010, 7882, 311, 37230, 10118, 13]
二.数据预处理
2.1 长文本处理
常见容易出现长文本的 下游任务 比如说:摘要生成等(翻译任务也可能出现文本超出限定的长度问题)。基本上比较常见的方法就是:拆解文本,然后根据拆解文本再进行分析[3][4][5]。
TODO: 待完善
2.2 去重
三.Dataloader生成
NLP
以翻译任务为例对于两部分文本( 英译中 )按照每个句子单独成行进行排列,并且每一行句子之间都是相互对应的。一般的输入 Transformer 模型数据分为4部分:src,src_mask,trg,trg_mask(分别代表:源文本, 源文本mask,目标文本,目标文本mask)
- 首先,按照每一行对句子进行读取,并且对句子进行分词处理,并对句子的前后添分别添加:
BOS和EOS标记
src_text = [x[0] for x in batch]
tgt_text = [x[1] for x in batch]

src_tokens = [[self.BOS] + self.sp_eng.EncodeAsIds(sent) + [self.EOS] for sent in src_text] # self.BOS, self.EOS 2, 3
tgt_tokens = [[self.BOS] + self.sp_chn.EncodeAsIds(sent) + [self.EOS] for sent in tgt_text]

batch_input = pad_sequence([torch.LongTensor(np.array(l_)) for l_ in src_tokens],
                           batch_first=True, padding_value=self.PAD)
batch_target = pad_sequence([torch.LongTensor(np.array(l_)) for l_ in tgt_tokens],
                            batch_first=True, padding_value=self.PAD)
- 而后,对于处理后的标记了的数据,进一步后处理生成输入模型的4各部分数据
def subsequent_mask(size):
    # 设定subsequent_mask矩阵的shape
    attn_shape = (1, size, size)
    # 生成一个右上角(不含主对角线)为全1,左下角(含主对角线)为全0的subsequent_mask矩阵
    subsequent_mask = np.triu(np.ones(attn_shape), k=1).astype('uint8')
    # 返回一个右上角(不含主对角线)为全False,左下角(含主对角线)为全True的subsequent_mask矩阵
    return torch.from_numpy(subsequent_mask) == 0
class Batch:
    def __init__(self, src_text, trg_text, src, trg=None, pad=0):
        self.src_text = src_text
        self.trg_text = trg_text
        self.src = src
        # 对于当前输入的句子非空部分进行判断成bool序列
        # 并在seq length前面增加一维,形成维度为 1×seq length 的矩阵
        self.src_mask = (src != pad).unsqueeze(-2)
        # 如果输出目标不为空,则需要对decoder要使用到的target句子进行mask
        if trg is not None:
            # decoder要用到的target输入部分
            self.trg = trg[:, :-1]
            # decoder训练时应预测输出的target结果
            self.trg_y = trg[:, 1:]
            # 将target输入部分进行attention mask
            self.trg_mask = self.make_std_mask(self.trg, pad)
            # 将应输出的target结果中实际的词数进行统计
            self.ntokens = (self.trg_y != pad).data.sum()
    @staticmethod
    def make_std_mask(tgt, pad):
        """Create a mask to hide padding and future words."""
        tgt_mask = (tgt != pad).unsqueeze(-2)
        tgt_mask = tgt_mask & Variable(subsequent_mask(tgt.size(-1)).type_as(tgt_mask.data))
        return tgt_mask
完整代码:
def subsequent_mask(size):
    """Mask out subsequent positions."""
    # 设定subsequent_mask矩阵的shape
    attn_shape = (1, size, size)
    # 生成一个右上角(不含主对角线)为全1,左下角(含主对角线)为全0的subsequent_mask矩阵
    subsequent_mask = np.triu(np.ones(attn_shape), k=1).astype('uint8')
    # 返回一个右上角(不含主对角线)为全False,左下角(含主对角线)为全True的subsequent_mask矩阵
    return torch.from_numpy(subsequent_mask) == 0

class Batch:
    """Object for holding a batch of data with mask during training."""
    def __init__(self, src_text, trg_text, src, trg=None, pad=0):
        self.src_text = src_text
        self.trg_text = trg_text
        self.src = src
        # 对于当前输入的句子非空部分进行判断成bool序列
        # 并在seq length前面增加一维,形成维度为 1×seq length 的矩阵
        self.src_mask = (src != pad).unsqueeze(-2)
        # 如果输出目标不为空,则需要对decoder要使用到的target句子进行mask
        if trg is not None:
            # decoder要用到的target输入部分
            self.trg = trg[:, :-1]
            # decoder训练时应预测输出的target结果
            self.trg_y = trg[:, 1:]
            # 将target输入部分进行attention mask
            self.trg_mask = self.make_std_mask(self.trg, pad) # 下三角举证
            # 将应输出的target结果中实际的词数进行统计
            self.ntokens = (self.trg_y != pad).data.sum()
    @staticmethod
    def make_std_mask(tgt, pad):
        """Create a mask to hide padding and future words."""
        tgt_mask = (tgt != pad).unsqueeze(-2)
        tgt_mask = tgt_mask & Variable(subsequent_mask(tgt.size(-1)).type_as(tgt_mask.data))
        return tgt_mask

class MTDataset(Dataset):
    def __init__(self, data_path):
        self.out_en_sent, self.out_cn_sent = self.get_dataset(data_path, sort=True)
        self.sp_eng = english_tokenizer_load()
        self.sp_chn = chinese_tokenizer_load()
        self.PAD = self.sp_eng.pad_id()  # 0
        self.BOS = self.sp_eng.bos_id()  # 2
        self.EOS = self.sp_eng.eos_id()  # 3

    @staticmethod
    def len_argsort(seq):
        """传入一系列句子数据(分好词的列表形式),按照句子长度排序后,返回排序后原来各句子在数据中的索引下标"""
        return sorted(range(len(seq)), key=lambda x: len(seq[x]))

    def get_dataset(self, data_path, sort=False):
        """把中文和英文按照同样的顺序排序, 以英文句子长度排序的(句子下标)顺序为基准"""
        dataset = json.load(open(data_path, 'r'))
        out_en_sent = []
        out_cn_sent = []
        for idx, _ in enumerate(dataset):
            out_en_sent.append(dataset[idx][0])
            out_cn_sent.append(dataset[idx][1])
        if sort:
            sorted_index = self.len_argsort(out_en_sent)
            out_en_sent = [out_en_sent[i] for i in sorted_index]
            out_cn_sent = [out_cn_sent[i] for i in sorted_index]
        return out_en_sent, out_cn_sent

    def __getitem__(self, idx):
        eng_text = self.out_en_sent[idx]
        chn_text = self.out_cn_sent[idx]
        return [eng_text, chn_text]

    def __len__(self):
        return len(self.out_en_sent)

    def collate_fn(self, batch):
        src_text = [x[0] for x in batch]
        tgt_text = [x[1] for x in batch]

        src_tokens = [[self.BOS] + self.sp_eng.EncodeAsIds(sent) + [self.EOS] for sent in src_text]
        tgt_tokens = [[self.BOS] + self.sp_chn.EncodeAsIds(sent) + [self.EOS] for sent in tgt_text]

        batch_input = pad_sequence([torch.LongTensor(np.array(l_)) for l_ in src_tokens],
                                   batch_first=True, padding_value=self.PAD)
        batch_target = pad_sequence([torch.LongTensor(np.array(l_)) for l_ in tgt_tokens],
                                    batch_first=True, padding_value=self.PAD)

        return Batch(src_text, tgt_text, batch_input, batch_target, self.PAD)

if __name__ == "__main__":
    from torch.utils.data import Dataset, DataLoader
    train_data = MTDataset(data_path= './data/json/train.json')
    train_dataloader = DataLoader(train_data, collate_fn= train_data.collate_fn, shuffle= True, batch_size= 32)
    for batch_i, batch in enumerate(train_dataloader):
        if batch_i <=1:
            print(batch.trg.size(), batch.src.size(), batch.trg_mask.size(), batch.src_mask.size(), batch.trg_y.size())
            print(f"目标文本:{batch.trg_text[0]} || 源文本:{batch.src_text[0]}\n")
            print(f"输入模型源 trg :{batch.trg[0]} \n 输入模型 src :{batch.src[0]}")
            print(f"输入模型源 trg_mask :{batch.trg_mask[0]} \n src_mask:{batch.src_mask[0]}")
            print(f"输入模型源文本 trg_y 内容:{batch.trg_y[0]}")
            break
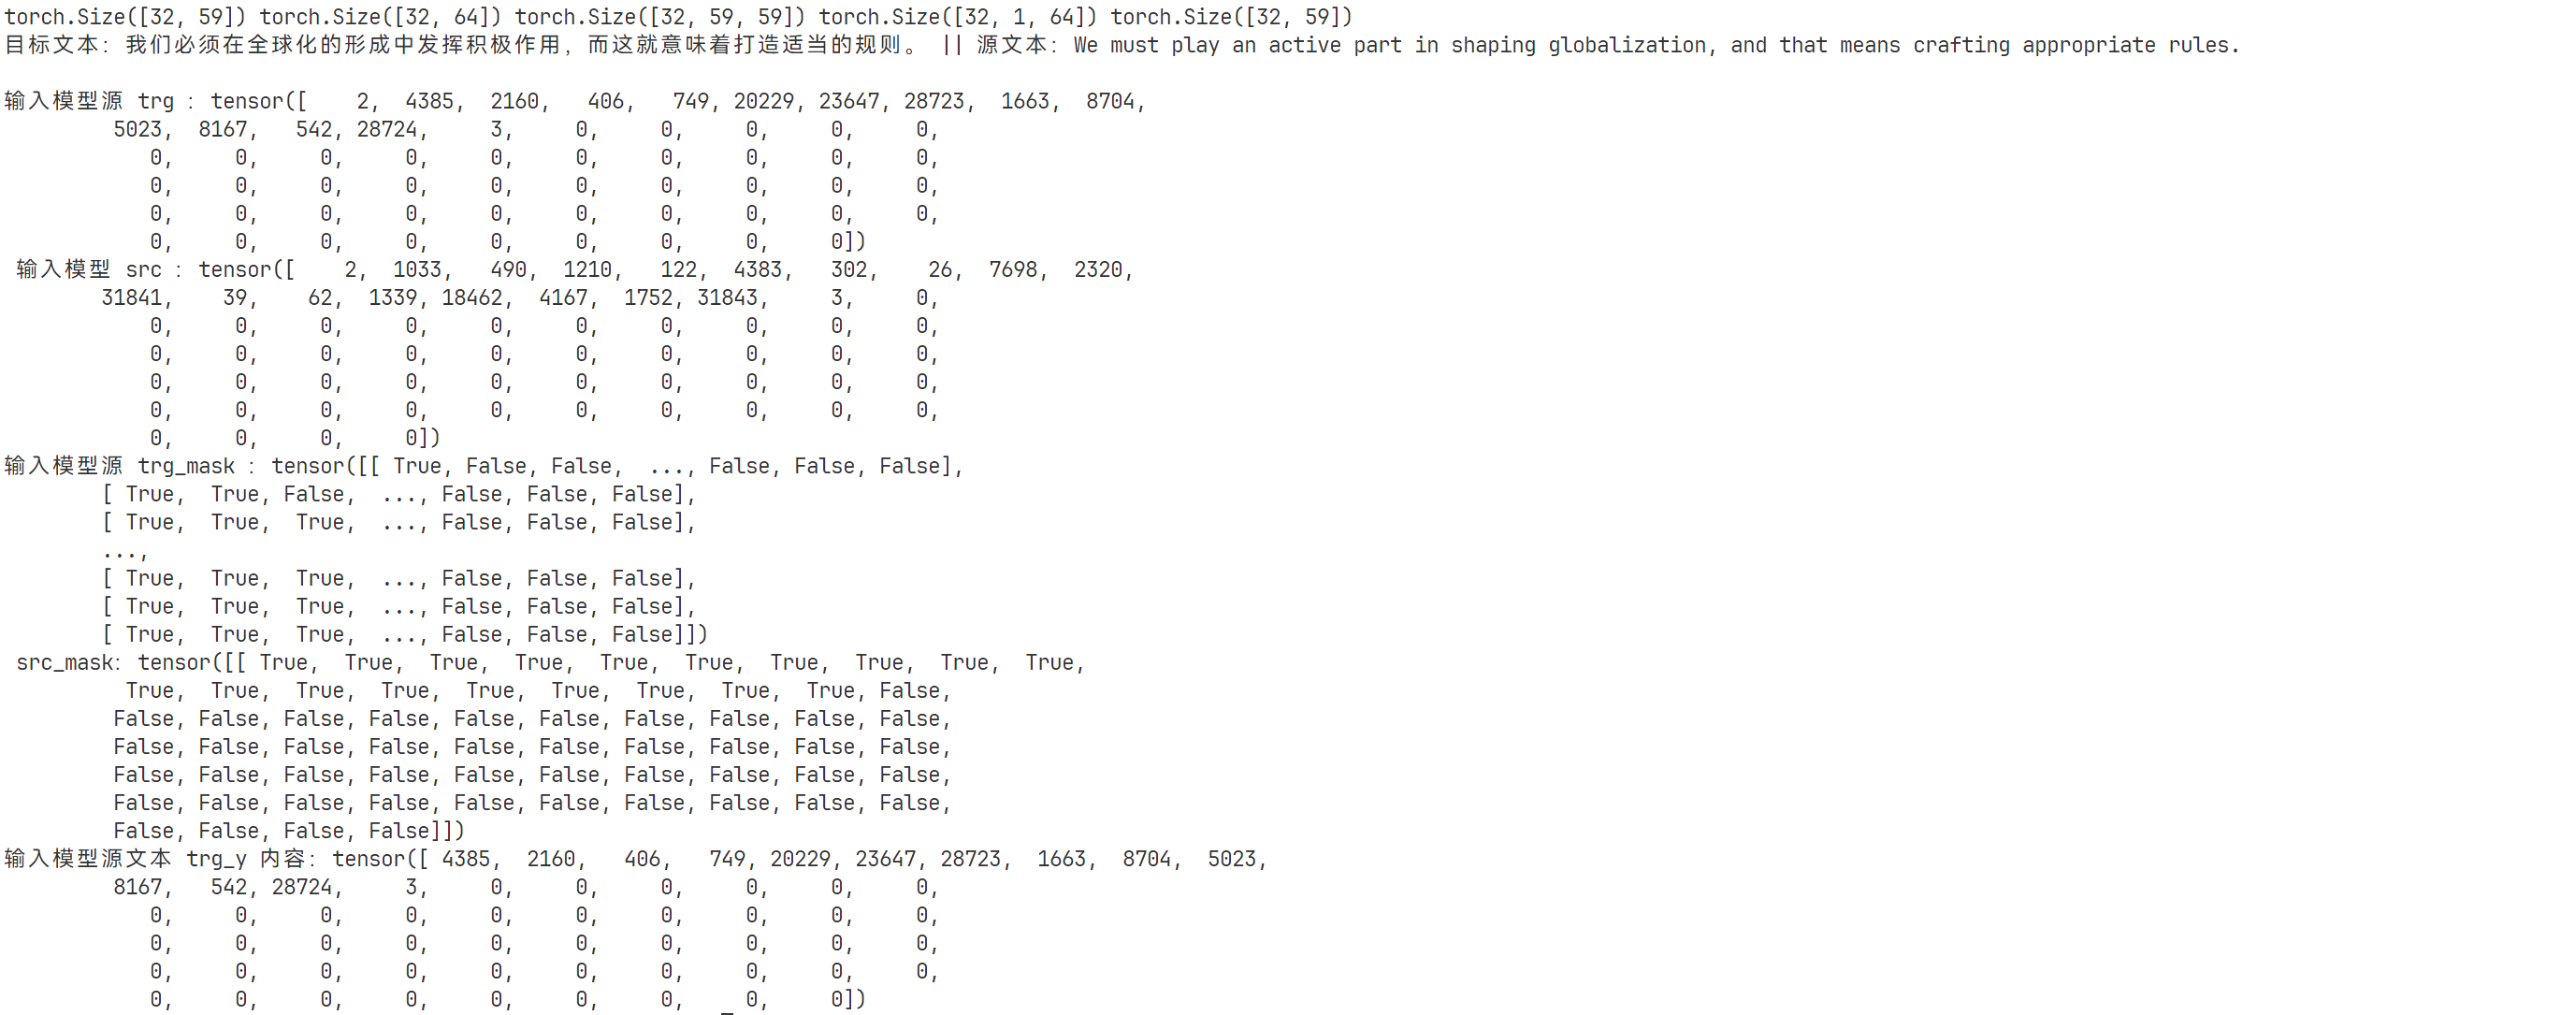
输出结果:
四.位置编码
在transformer模型中输入数据分别通过embedding+ positional-embedding两部分进行处理,对于 位置编码在论文中用的是正弦余弦编码,在视觉处理中每个图片都是二维的,因此用一维的思路去处理肯定不合适的,因此在DETR论文中就会拓展到二维。常用方法
第一类:基于正弦余弦函数的编码
class PositionEmbeddingSine(nn.Module):
    """
    This is a more standard version of the position embedding, very similar to the one
    used by the Attention is all you need paper, generalized to work on images.
    """
    def __init__(self, num_pos_feats=64, temperature=10000, normalize=False, scale=None):
        super().__init__()
        self.num_pos_feats = num_pos_feats
        self.temperature = temperature
        self.normalize = normalize
        if scale is not None and normalize is False:
            raise ValueError("normalize should be True if scale is passed")
        if scale is None:
            scale = 2 * math.pi
        self.scale = scale

    def forward(self, tensor_list: NestedTensor):
        # tensor_list: 在detr中输入数据有两部分:图像编码+图像的mask编码
        x = tensor_list.tensors
        mask = tensor_list.mask
        assert mask is not None

        not_mask = ~mask
        y_embed = not_mask.cumsum(1, dtype=torch.float32)
        x_embed = not_mask.cumsum(2, dtype=torch.float32)

        if self.normalize:
            eps = 1e-6
            y_embed = y_embed / (y_embed[:, -1:, :] + eps) * self.scale
            x_embed = x_embed / (x_embed[:, :, -1:] + eps) * self.scale

        dim_t = torch.arange(self.num_pos_feats, dtype=torch.float32, device=x.device)
        dim_t = self.temperature ** (2 * (dim_t // 2) / self.num_pos_feats)

        pos_x = x_embed[:, :, :, None] / dim_t
        pos_y = y_embed[:, :, :, None] / dim_t
        pos_x = torch.stack((pos_x[:, :, :, 0::2].sin(), pos_x[:, :, :, 1::2].cos()), dim=4).flatten(3)
        pos_y = torch.stack((pos_y[:, :, :, 0::2].sin(), pos_y[:, :, :, 1::2].cos()), dim=4).flatten(3)
        pos = torch.cat((pos_y, pos_x), dim=3).permute(0, 3, 1, 2)
        return pos
第二类:基于学习的编码:把位置编码作为可学习参数,让网络去学习
class PositionEmbeddingLearned(nn.Module):
    """
    Absolute pos embedding, learned.
    """
    def __init__(self, num_pos_feats=256):
        super().__init__()
        self.row_embed = nn.Embedding(50, num_pos_feats)
        self.col_embed = nn.Embedding(50, num_pos_feats)
        self.reset_parameters()

    def reset_parameters(self):
        nn.init.uniform_(self.row_embed.weight)
        nn.init.uniform_(self.col_embed.weight)

    def forward(self, tensor_list: NestedTensor):
        x = tensor_list.tensors
        h, w = x.shape[-2:]
        i = torch.arange(w, device=x.device)
        j = torch.arange(h, device=x.device)
        x_emb = self.col_embed(i)
        y_emb = self.row_embed(j)
        pos = torch.cat([
            x_emb.unsqueeze(0).repeat(h, 1, 1),
            y_emb.unsqueeze(1).repeat(1, w, 1),
        ], dim=-1).permute(2, 0, 1).unsqueeze(0).repeat(x.shape[0], 1, 1, 1)
        return pos
第三类:旋转位置编码 #TODO: 待补充
五.评价指标
- BLEU[8]
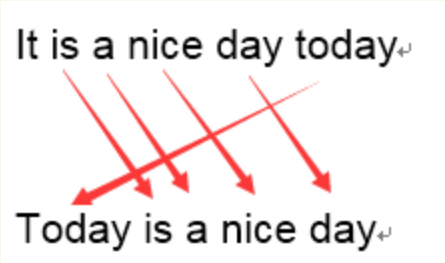
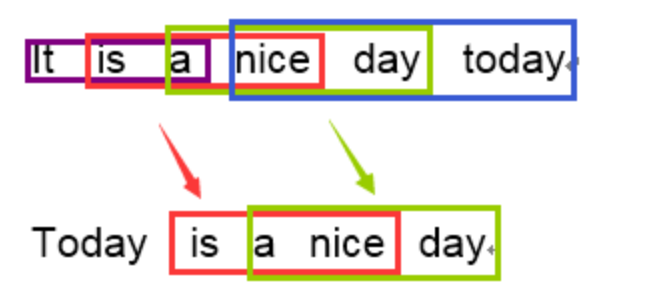
BLEU 采用一种N-gram的匹配规则,原理比较简单,就是比较译文和参考译文之间n组词的相似的一个占比
原文:今天天气不错
机器译文:It is a nice day today
人工译文:Today is a nice day
1-gram:
命中5个词,那么计算得到匹配度为:\(5/6\)
3-gram:
计算得到匹配度为:\(2/4\)
在通过结合召回率和惩罚因子之后得到BLEU计算公式为:
使用例子,直接使用第三方库sacrebleu
import sacrebleu
hyps = ['我有一个帽衫', '大大的帽子']
refs = ['你好,我有一个帽衫', '帽子大大的']
bleu = sacrebleu.corpus_bleu(hyps, [refs], tokenize='zh')
print(float(bleu.score))
# 59.809989126151606
六.优化方法
- Beam search
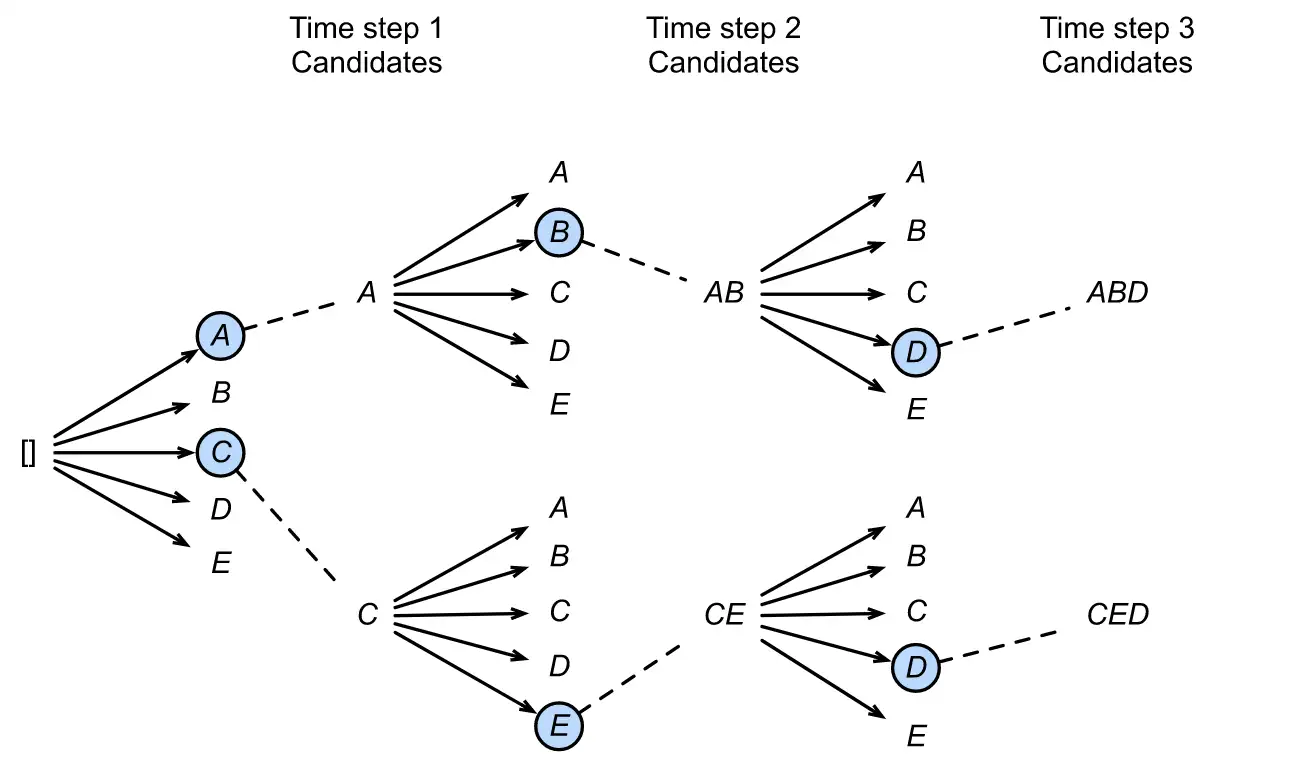
简单理解为类似贪心算法的一种,比如说翻译任务,对于每个词哦都去选择最优(概率最大的作为输出),在理论上得到的效果是最优。简单的就是说:你每个每个单词都去取对应的中文,你最后得到的句子难道翻译得很好?Beam search思路就是,比如说翻译任务(beam size = 2):在生成一个词的时候我会选择概率最大的2个词,在生成第二个词的时候我结合第一步选择的那两个词并且选择概率最高的
七.LLM技术细节[9]:
| 模型 | 激活函数 | 位置编码 | 归一化处理 | 分词器 | 其他 | 技术报告 | 官方代码 |
|---|---|---|---|---|---|---|---|
Qwen2 |
SwiGLU |
RoPE(旋转位置编码) |
RMSNorm |
混合专家模型(MoE) |
Qwen2技术报告📃 | Github🎢 | |
Llama2 |
SwiGLU |
RoPE(旋转位置编码) |
RMSNorm |
BPE算法 |
AdamW+余弦学习率调整 |
Llam2中文技术报告📃 | Github🎢 |
https://shihan-ma.github.io/posts/2021-04-15-DETR_annotation ↩︎
https://www.reddit.com/r/ChatGPT/comments/15q2xk5/some_views_when_using_llm_for_long_text/ ↩︎
https://js.langchain.com/v0.1/docs/use_cases/extraction/how_to/handle_long_text/ ↩︎
https://keg.cs.tsinghua.edu.cn/jietang/publications/NIPS20-Ding-et-al-CogLTX.pdf ↩︎
https://github.com/DLLXW/baby-llama2-chinese/blob/98a20dbb35e686a62188f61f479809cb2d4f8d6e/data_clean/clear.py#L145 ↩︎


