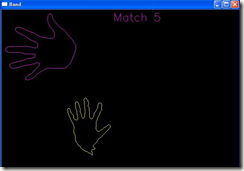
利用KINECT+OPENCV检测手势的演示程序
1,原理:读入KINECT深度数据,转换为二值图像,找到轮廓,与轮廓模板比较,找到HU矩阵最小的为匹配结果
2,基础:OPENNI, OPENCV2.2 以及http://blog.163.com/gz_ricky/blog/static/182049118201122311118325/
的例程基础上修改
3,结果:仅仅用于演示利用OPENCV+OPENNI编程,对结果精度,处理速度等没有优化,仅供参考
对0,1和5的比较比较准确
代码如下:
view plaincopy to clipboardprint?
// KinectOpenCVTest.cpp : 定义控制台应用程序的入口点。
//

#include "stdafx.h"


#include <stdlib.h>
#include <iostream>
#include <string>
#include <XnCppWrapper.h>
#include <opencv2/opencv.hpp>

//#include "opencv/cv.h"
//#include "opencv/highgui.h"
using namespace std;
using namespace cv;

#define SAMPLE_XML_PATH "http://www.cnblogs.com/Data/SamplesConfig.xml"

//全局模板轮廓
vector<vector<Point>> g_TemplateContours;

//模板个数
int g_handTNum = 6;

void CheckOpenNIError( XnStatus eResult, string sStatus )
{
if( eResult != XN_STATUS_OK )
{
cerr << sStatus << " Error: " << xnGetStatusString( eResult ) << endl;
return;
}
}

//载入模板的轮廓
void init_hand_template()
{
//int handTNum = 10;
string temp = "HandTemplate/";

int i = 0;


for(i=0; i<g_handTNum; i++)
{
stringstream ss;
ss << i << ".bmp";

string fileName = temp + ss.str();

//读入灰度图像
Mat src = imread(fileName, 0);

if(!src.data)
{
printf("未找到文件: %s\n", fileName);
continue;
}

vector<vector<Point>> contours;
vector<Vec4i> hierarchy;

findContours(src, contours, hierarchy, CV_RETR_EXTERNAL, CV_CHAIN_APPROX_SIMPLE);
//findContours(src, contours, CV_RETR_EXTERNAL, CV_CHAIN_APPROX_NONE);

g_TemplateContours.push_back(contours[0]);
}
}

//模板匹配手
int hand_template_match(Mat& hand)
{
//int handTNum = 10;
int minId = -1;
double minHu = 1;

double hu;
int method = CV_CONTOURS_MATCH_I1;

//match_num = 0;

for(int i=0; i<g_handTNum; i++){

Mat temp(g_TemplateContours.at(i));
hu = matchShapes(temp, hand, method, 0);

//找到hu矩最小的模板
if(hu < minHu){
minHu = hu;
minId = i;
}

//printf("%f ", hu);
}

//显示匹配结果
int Hmatch_value = 25;//模板匹配系数

if(minHu<((double)Hmatch_value)/100)
return minId;
else
return -1;
}

void findHand(Mat& src, Mat& dst)
{
vector<vector<Point>> contours;
vector<Vec4i> hierarchy;

//找到外部轮廓
//findContours(src, contours, hierarchy, CV_RETR_EXTERNAL, CV_CHAIN_APPROX_SIMPLE);
findContours(src, contours, CV_RETR_EXTERNAL, CV_CHAIN_APPROX_SIMPLE); //CV_CHAIN_APPROX_NONE);
//findContours(src, contours, CV_RETR_LIST, CV_CHAIN_APPROX_SIMPLE);

Mat dst_r = Mat::zeros(src.rows, src.cols, CV_8UC3);
dst_r.copyTo(dst);

// iterate through all the top-level contours,
// draw each connected component with its own random color
int idx = 0;
double maxArea = 0.0;
int maxId = -1;

for(unsigned int i = 0; i<contours.size(); i++)
{
Mat temp(contours.at(i));
double area = fabs(contourArea(temp));
if(area > maxArea)
{
maxId = i;
maxArea = area;
}
}

//for( ; idx >= 0; idx = hierarchy[idx][0] )
//{
// //Scalar color( rand()&255, rand()&255, rand()&255 );
// //drawContours(dst, contours, idx, color, CV_FILLED, 8, hierarchy );

// double area = contourArea(contours.at(idx));
// if(area > maxArea)
// {
// maxId = idx;
// maxArea = area;
// }
//}

//显示最大轮廓外形,以及最佳匹配的模板ID
if(contours.size() > 0)
{
Scalar color(0, 255, 255 );
drawContours(dst, contours, maxId, color);

Mat hand(contours.at(maxId));
int value = hand_template_match(hand);

if(value >= 0)
{
Scalar templateColor(255, 0, 255 );
drawContours(dst, g_TemplateContours, value, templateColor);

printf("Match %d \r\n", value);

stringstream ss;
ss << "Match " << value;
string text = ss.str();
putText(dst, text, Point(300, 30), FONT_HERSHEY_SIMPLEX, 1.0, templateColor);
}
}
}


int HandDetect()
{
init_hand_template();

XnStatus eResult = XN_STATUS_OK;

// 1. initial val
xn::DepthMetaData m_DepthMD;
xn::ImageMetaData m_ImageMD;

// for opencv Mat
Mat m_depth16u( 480,640,CV_16UC1);
Mat m_rgb8u( 480,640,CV_8UC3);
Mat m_DepthShow( 480,640,CV_8UC1);
Mat m_ImageShow( 480,640,CV_8UC3);

Mat m_DepthThreshShow( 480,640,CV_8UC1);
Mat m_HandShow( 480,640,CV_8UC3);

//cvNamedWindow("depth");
//cvNamedWindow("image");
//cvNamedWindow("depthThresh");

char key=0;

// 2. initial context
xn::Context mContext;

eResult = mContext.Init();

//xn::EnumerationErrors errors;
//eResult = mContext.InitFromXmlFile(SAMPLE_XML_PATH, &errors);

CheckOpenNIError( eResult, "initialize context" );

//Set mirror
mContext.SetGlobalMirror(!mContext.GetGlobalMirror());

// 3. create depth generator
xn::DepthGenerator mDepthGenerator;
eResult = mDepthGenerator.Create( mContext );
CheckOpenNIError( eResult, "Create depth generator" );

// 4. create image generator
xn::ImageGenerator mImageGenerator;
eResult = mImageGenerator.Create( mContext );
CheckOpenNIError( eResult, "Create image generator" );

// 5. set map mode
XnMapOutputMode mapMode;
mapMode.nXRes = 640;
mapMode.nYRes = 480;
mapMode.nFPS = 30;
eResult = mDepthGenerator.SetMapOutputMode( mapMode );
eResult = mImageGenerator.SetMapOutputMode( mapMode );

//由于 Kinect 的深度摄像机和彩色摄像机是在不同的位置,而且镜头本身的参数也不完全相同,所以两个摄像机所取得的画面会有些微的差异
//将深度摄像机的视角调整到RGB摄像机位置
// 6. correct view port
mDepthGenerator.GetAlternativeViewPointCap().SetViewPoint( mImageGenerator );

// 7. start generate data
eResult = mContext.StartGeneratingAll();

// 8. read data
eResult = mContext.WaitNoneUpdateAll();
while( (key!=27) && !(eResult = mContext.WaitNoneUpdateAll( )) )
{
// 9a. get the depth map
mDepthGenerator.GetMetaData(m_DepthMD);
memcpy(m_depth16u.data,m_DepthMD.Data(), 640*480*2);

// 9b. get the image map
mImageGenerator.GetMetaData(m_ImageMD);
memcpy(m_rgb8u.data,m_ImageMD.Data(),640*480*3);

//将未知深度转为白色,便于在OPENCV中分析
XnDepthPixel* pDepth = (XnDepthPixel*)m_depth16u.data;

for (XnUInt y = 0; y < m_DepthMD.YRes(); ++y)
{
for (XnUInt x = 0; x < m_DepthMD.XRes(); ++x, ++pDepth)
{
if (*pDepth == 0)
{
*pDepth = 0xFFFF;
}
}
}


//由于OpenNI获得的深度图片是16位无符号整数,而OpenCV显示的是8位的,所以要作转换。

//将距离转换为灰度值(0-2550mm 转换到 0-255),例如1000毫米转换为 1000×255/2550 = 100
//m_depth16u.convertTo(m_DepthShow,CV_8U, 255/2096.0);
m_depth16u.convertTo(m_DepthShow,CV_8U, 255/2550.0);

//可以考虑根据数据缩减图像大小到有效范围

//在此对灰度图像进行处理,平滑和去噪声
//medianBlur(m_DepthShow, m_DepthThreshShow, 3);
//m_DepthThreshShow.copyTo(m_DepthShow);
//medianBlur(m_DepthThreshShow, m_DepthShow, 3);
blur(m_DepthShow, m_DepthThreshShow, Size(3, 3));
//m_DepthThreshShow.copyTo(m_DepthShow);
blur(m_DepthThreshShow, m_DepthShow, Size(3, 3));

Mat pyrTemp( 240,320,CV_8UC1);
pyrDown(m_DepthShow, pyrTemp);
pyrUp(pyrTemp, m_DepthShow);

//dilate(m_DepthShow, m_DepthThreshShow, Mat(), Point(-1,-1), 3);
//erode(m_DepthThreshShow, m_DepthShow, Mat(), Point(-1,-1), 3);

//for(int i = 0; i < m_depth16u.rows; i++)
// for(int j = 0; j < m_depth16u.cols; j++)
// {
// if(m_depth16u.at<unsigned short>(i,j) < 1)
// m_depth16u.at<unsigned short>(i,j) == 0xFFFF;

// //m_depth16u.at<double>(i,j)=1./(i+j+1);
// }

//RGB和BGR在内存对应的位置序列不同,所以也要转换。
cvtColor(m_rgb8u,m_ImageShow,CV_RGB2BGR);

//imshow("depth", m_DepthShow);
//imshow("image", m_ImageShow);

double thd_max = 0xFFFF;
double thd_val = 100.0;

//反转黑白图像,以便找到最大外部轮廓
//threshold(m_DepthShow, m_DepthThreshShow, thd_val, thd_max, CV_THRESH_BINARY);
threshold(m_DepthShow, m_DepthThreshShow, thd_val, thd_max, CV_THRESH_BINARY_INV);
imshow("depthThresh", m_DepthThreshShow);

findHand(m_DepthThreshShow, m_HandShow);
imshow( "Hand", m_HandShow );

key=cvWaitKey(20);
}

// 10. stop
mContext.StopGeneratingAll();
mContext.Shutdown();

return 0;
}

int _tmain(int argc, _TCHAR* argv[])
{
HandDetect();
}
=====================================================
【边国龙】BianGuoLong
中国计算机学会(CCF)CNCC项目组Tel: 13874237733
E-mail: bianguolong@hotmai.com为计算领域的专业人士服务
Serving the Professionals in Computing
=====================================================


