ShardingSphere分表与分库分表
分库分表中间件
MyCat
官方地址:https://mycat.org.cn MyCat 是一个要部署在服务器上的软件,类似于 Proxy,使用 MyCat 需要有一定的运维能力。
ShardingSphere
官方地址:http://shardingsphere.apache.org/index_zh.html
简介
Apache ShardingSphere 是一套开源的分布式数据库解决方案组成的生态圈,由 JDBC、Proxy 和 Sidecar(规划中)这 3 款既能够独立部署,又支持混合部署配合使用的产品组成,提供标准化的数据水平扩展、分布式事务和分布式治理等功能,ShardingSphere 定位为关系型数据库中间件,旨在充分合理地在分布式的场景下利用关系型数据库的计算和存储能力
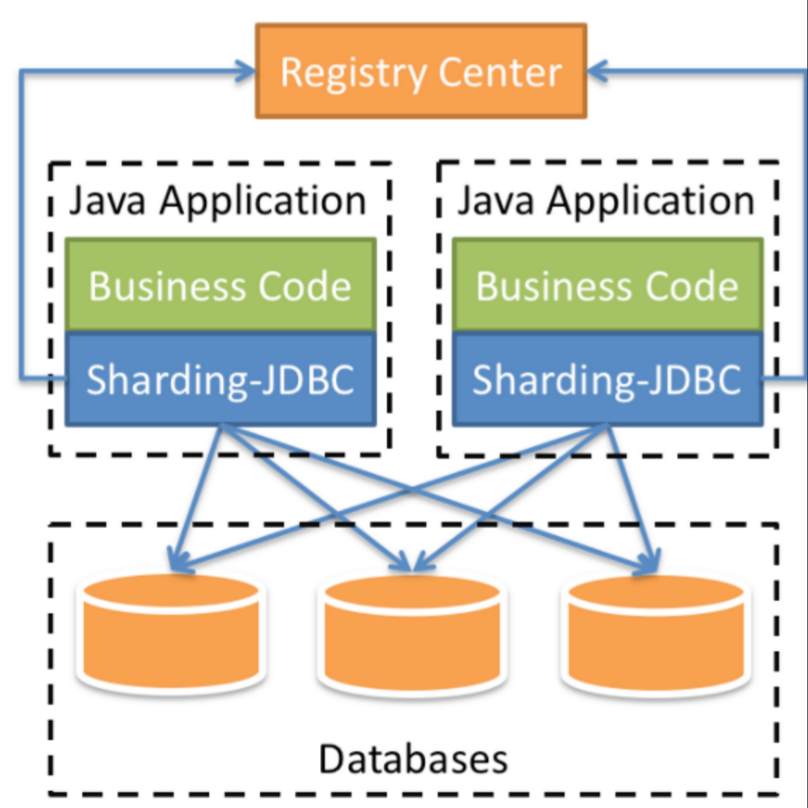
Sharding-JDBC
Sharding-JDBC 定位为轻量级 Java 框架,以 jar 包形式提供服务,无需额外部署和依赖,核心功能,数据分片,读写分离。
结构
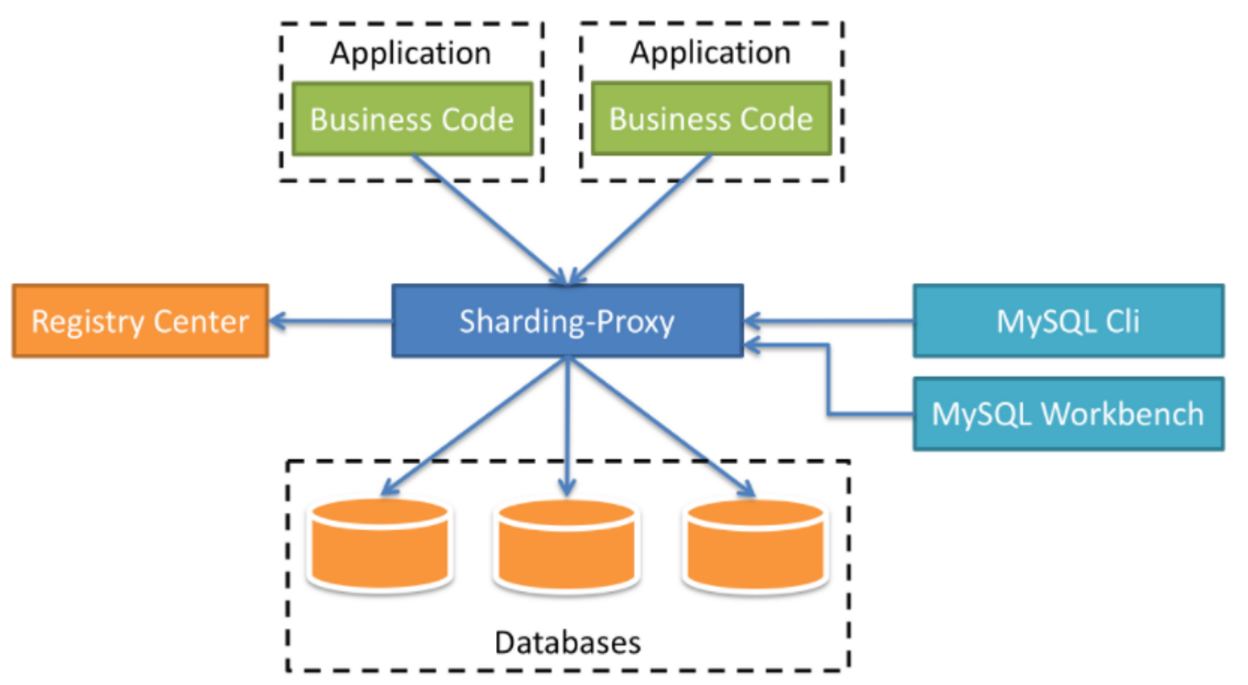
Sharding-Proxy
Sharding-Proxy 类似于 MyCat,它定位为透明化的数据库代理端,提供封装了数据库二进制协议的服务端版本,用于完成对异构语言的支持。目前仅支持 MySQL、PstgreSQL。
结构
Sharding-Sidecar
Sharding-Sidecar 目前正在规划中,定位为 Kubernetes 的云原生数据库代理,以 Sidecar 的形式代理所有对数据库的访问。
核心概念
逻辑表
水平拆分的数据库(表)的相同逻辑和数据结构表的总称。拆分之后的表,t_order_0、t_order_1,逻辑表名为 t_order。
真实表
在分片的数据库中真实存在的物理表。t_order_0 就是一张具体的表。
数据节点
数据分片的最小单元。由数据源名称和数据表组成。
绑定表
指分片规则一致的主表和子表。
广播表
指所有的分片数据源中都存在的表,表结构和表中的数据在每个数据库中均完全一致。适用于数据量不大且需要与海量数据的表进行关联查询的场景,例如:字典表。
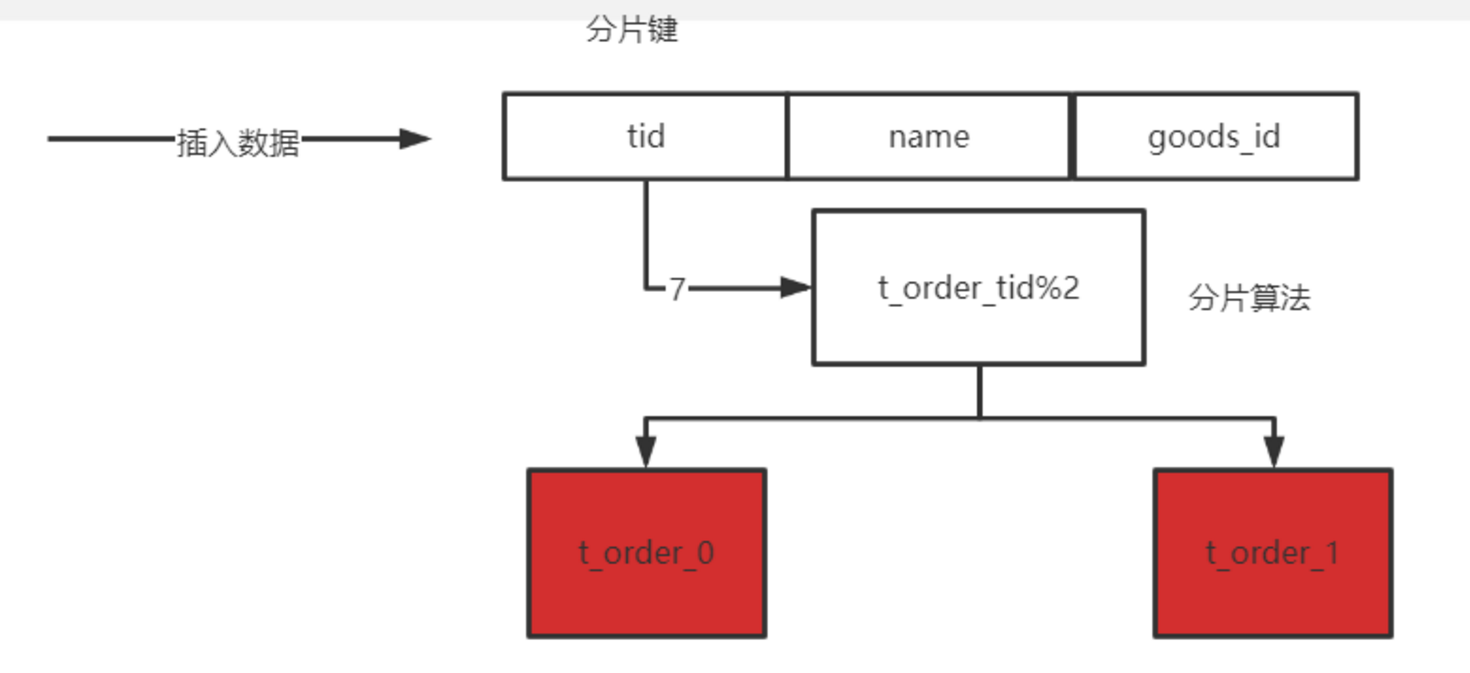
分片键
用于分片的数据库字段,是将数据库(表)水平拆分的关键字段。
分片算法
通过分片算法将数据分片,支持通过 =、>=、<=、>、<、BETWEEN 和 IN 分片。
分片策略
真正可用于分片操作的是分片键 + 分片算法,也就是分片策略。
分片键与分片算法原理图
建立 JDBC 环境
创建表
t_order:
CREATE TABLE `t_order` (
  `tid` bigint(20) NOT NULL,
  `tname` varchar(255) DEFAULT NULL,
  `goods_id` bigint(20) DEFAULT NULL,
  `tstatus` varchar(255) DEFAULT NULL,
  PRIMARY KEY (`tid`)
) ENGINE=InnoDB DEFAULT CHARSET=utf8;
建立 SpringBoot 工程
修改 pom.xml:
<parent>
    <groupId>org.springframework.boot</groupId>
    <artifactId>spring-boot-starter-parent</artifactId>
    <version>2.3.7.RELEASE</version>
    <relativePath/> <!-- lookup parent from repository -->
</parent>
<dependencies>
    <dependency>
        <groupId>org.springframework.boot</groupId>
        <artifactId>spring-boot-starter-web</artifactId>
    </dependency>
    <dependency>
        <groupId>org.projectlombok</groupId>
        <artifactId>lombok</artifactId>
        <scope>provided</scope>
    </dependency>
    <dependency>
        <groupId>org.springframework.boot</groupId>
        <artifactId>spring-boot-starter-test</artifactId>
        <scope>test</scope>
    </dependency>
    <dependency>
        <groupId>mysql</groupId>
        <artifactId>mysql-connector-java</artifactId>
    </dependency>
    <dependency>
        <groupId>com.alibaba</groupId>
        <artifactId>druid</artifactId>
        <version>1.1.22</version>
    </dependency>
    <dependency>
        <groupId>com.baomidou</groupId>
        <artifactId>mybatis-plus-boot-starter</artifactId>
        <version>3.0.5</version>
    </dependency>
    <dependency>
        <groupId>org.apache.shardingsphere</groupId>
        <artifactId>shardingsphere-jdbc-core-spring-boot-starter</artifactId>
        <version>5.0.0-beta</version>
    </dependency>
</dependencies>
创建实体类:
/**
 * 订单
 *
 * @author BNTang
 * @date 2021/10/11
 */
@Data
@TableName("t_order")
public class Order {
    private Long tid;
    private String tname;
    private Long goodsId;
    private String tstatus;
}
创建 Mapper:
/**
 * @author BNTang
 * @version 1.0
 * @project ShardingSpherePro
 * @description
 * @since Created in 2021/10/11 011 20:47
 **/
public interface OrderMapper extends BaseMapper<Order> {
}
修改启动类,添加注解:
@MapperScan("top.it6666.shardingspherepro.mapper")
在修改 application.properties 之前首先来看看 shardingsphere 官网所给出的配置内容,这里有一个小坑如下:
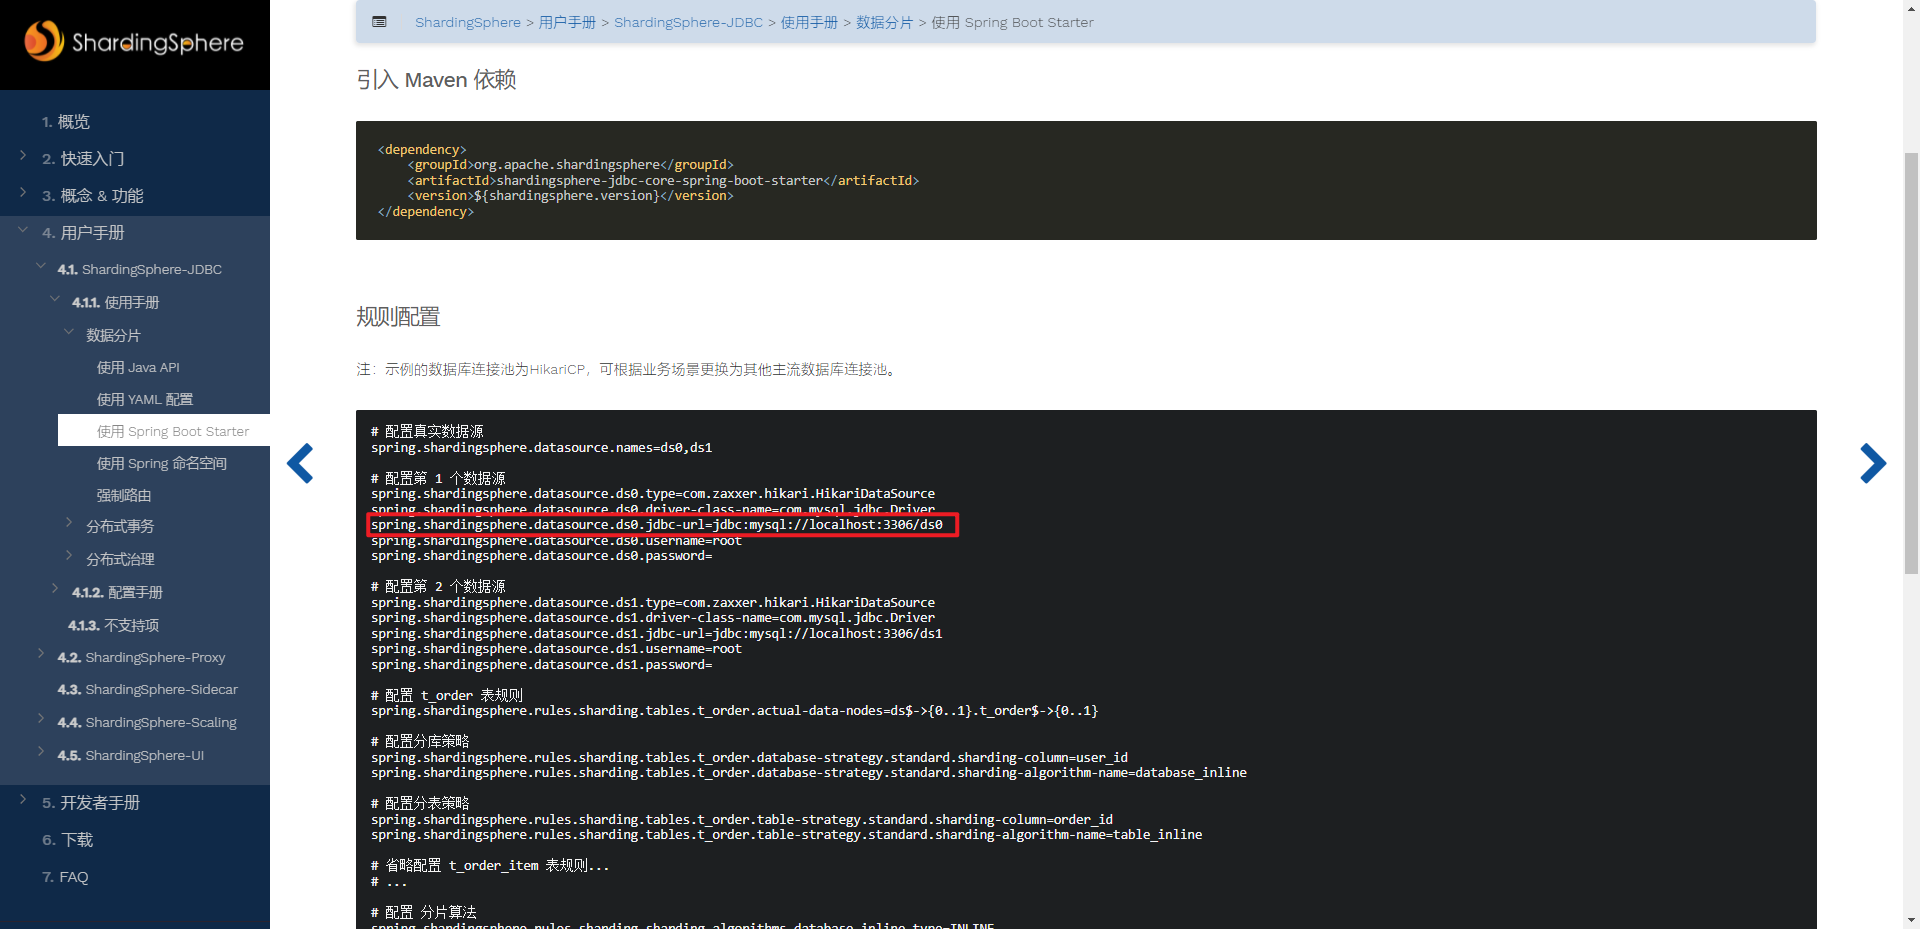
我这里就先照着它所给出的配置来进行,先演示一下这个坑然后在进行解决这个坑点,然后我拷贝了它的配置到了自己的工程当中内容如下:
spring.shardingsphere.datasource.names=shardingspheredb1
spring.shardingsphere.datasource.shardingspheredb1.type=com.alibaba.druid.pool.DruidDataSource
spring.shardingsphere.datasource.shardingspheredb1.driver-class-name=com.mysql.cj.jdbc.Driver
spring.shardingsphere.datasource.shardingspheredb1.jdbc-url=jdbc:mysql://localhost:3310/shardingspheredb1?serverTimezone=GMT%2B8
spring.shardingsphere.datasource.shardingspheredb1.username=root
spring.shardingsphere.datasource.shardingspheredb1.password=root
mybatis-plus.configuration.log-impl=org.apache.ibatis.logging.stdout.StdOutImpl
需要注意的是如上配置的 shardingspheredb1 它代表着一个 databases 也就是一个数据源,那么下面的配置也要跟着改:

编写测试类:
@SpringBootTest
@RunWith(SpringRunner.class)
class ShardingSphereProApplicationTests {

    @Resource
    private OrderMapper orderMapper;

    @Test
    void addOrder() {
        for (int i = 0; i < 10; i++) {
            Order order = new Order();
            order.setTid((long) i);
            order.setTname("订单" + i);
            order.setGoodsId(Long.valueOf("" + (1000 + i)));
            order.setTstatus("1");
            System.out.println(order);
            this.orderMapper.insert(order);
        }
    }
}
运行测试类插入数据,结果发现报错了:

说找不到 database URL,然后我们在将进行改正,只需要将 jdbc-url 改为 url 即可修改 application.properties 配置文件:
spring.shardingsphere.datasource.names=shardingspheredb1

spring.shardingsphere.datasource.shardingspheredb1.type=com.alibaba.druid.pool.DruidDataSource
spring.shardingsphere.datasource.shardingspheredb1.driver-class-name=com.mysql.cj.jdbc.Driver
spring.shardingsphere.datasource.shardingspheredb1.url=jdbc:mysql://localhost:3306/shardingspheredb1?serverTimezone=GMT%2B8
spring.shardingsphere.datasource.shardingspheredb1.username=root
spring.shardingsphere.datasource.shardingspheredb1.password=root

mybatis-plus.configuration.log-impl=org.apache.ibatis.logging.stdout.StdOutImpl
数据分片存储
建立分片真实表,t_order_0,t_order_1 SQL如下:
CREATE TABLE `t_order_0` (
  `tid` bigint(20) NOT NULL,
  `tname` varchar(255) DEFAULT NULL,
  `goods_id` bigint(20) DEFAULT NULL,
  `tstatus` varchar(255) DEFAULT NULL,
  PRIMARY KEY (`tid`)
) ENGINE=InnoDB DEFAULT CHARSET=utf8;
CREATE TABLE `t_order_1` (
  `tid` bigint(20) NOT NULL,
  `tname` varchar(255) DEFAULT NULL,
  `goods_id` bigint(20) DEFAULT NULL,
  `tstatus` varchar(255) DEFAULT NULL,
  PRIMARY KEY (`tid`)
) ENGINE=InnoDB DEFAULT CHARSET=utf8;
分表配置
修改 application.properties 添加如下相关的配置内容:
# 配置t_order真实表规则
spring.shardingsphere.rules.sharding.tables.t_order.actual-data-nodes=shardingspheredb1.t_order_$->{0..1}

# 配置分表策略 主键+分片算法
spring.shardingsphere.rules.sharding.tables.t_order.table-strategy.standard.sharding-column=tid
spring.shardingsphere.rules.sharding.tables.t_order.table-strategy.standard.sharding-algorithm-name=table-inline

# 配置 分片算法
spring.shardingsphere.rules.sharding.sharding-algorithms.table-inline.type=INLINE
spring.shardingsphere.rules.sharding.sharding-algorithms.table-inline.props.algorithm-expression=t_order_$->{tid % 2}

# 主键盘生成策略
spring.shardingsphere.rules.sharding.tables.t_order.key-generate-strategy.column=tid
spring.shardingsphere.rules.sharding.tables.t_order.key-generate-strategy.key-generator-name=snowflake
spring.shardingsphere.rules.sharding.key-generators.snowflake.type=SNOWFLAKE
spring.shardingsphere.rules.sharding.key-generators.snowflake.props.worker-id=1

# 打印执行sql
spring.shardingsphere.props.sql-show=true
- 这里就来一一解释一下如上配置当中比较关键的几个内容
spring.shardingsphere.rules.sharding.tables.t_order.actual-data-nodes该内容就是配置t_order真实表规则, 我如上配置的就是 0,1 spring.shardingsphere.rules.sharding.sharding-algorithms.table-inline.props.algorithm-expression配置的内容就是真实表的寻找算法spring.shardingsphere.rules.sharding.tables.t_order.table-strategy.standard.sharding-column指定了分表以 tid 进行分表操作
如上的内容配置完毕之后再次运行测试类,在运行测试类之前其实可以将 id 的设置给去除因为如上配置了 主键盘生成策略,然后查看分片表的数据如下图所示:


分库分表
添加第二个数据源,修改 application.properties:
spring.shardingsphere.datasource.names=shardingspheredb1,shardingspheredb2
# 配置第 2 个数据源
spring.shardingsphere.datasource.shardingspheredb2.type=com.alibaba.druid.pool.DruidDataSource
spring.shardingsphere.datasource.shardingspheredb2.driver-class-name=com.mysql.cj.jdbc.Driver
spring.shardingsphere.datasource.shardingspheredb2.url=jdbc:mysql://localhost:3306/shardingspheredb2?serverTimezone=GMT%2B8
spring.shardingsphere.datasource.shardingspheredb2.username=root
spring.shardingsphere.datasource.shardingspheredb2.password=root

修改表规则,修改配置文件,都是同一个配置文件内容修改,不再强调了:
# 水平拆分  水平分片
# 配置 t_order 表规则                                                 数据源.真实表
# 配置t_order真实表规则
spring.shardingsphere.rules.sharding.tables.t_order.actual-data-nodes=shardingspheredb$->{1..2}.t_order_$->{0..1}
配置配置分库,主键 + 分片算法策略:
# 配置分库策略  主键+分片算法
spring.shardingsphere.rules.sharding.tables.t_order.database-strategy.standard.sharding-column=goods_id
spring.shardingsphere.rules.sharding.tables.t_order.database-strategy.standard.sharding-algorithm-name=database-inline
spring.shardingsphere.rules.sharding.sharding-algorithms.database-inline.type=INLINE
spring.shardingsphere.rules.sharding.sharding-algorithms.database-inline.props.algorithm-expression=shardingspheredb$->{goods_id % 2 + 1}
最终 application.properties 配置文件内容如下:
spring.shardingsphere.datasource.names=shardingspheredb1,shardingspheredb2
spring.shardingsphere.datasource.shardingspheredb1.type=com.alibaba.druid.pool.DruidDataSource
spring.shardingsphere.datasource.shardingspheredb1.driver-class-name=com.mysql.cj.jdbc.Driver
spring.shardingsphere.datasource.shardingspheredb1.url=jdbc:mysql://www.yangbuyi.top:3310/shardingspheredb1?serverTimezone=GMT%2B8
spring.shardingsphere.datasource.shardingspheredb1.username=root
spring.shardingsphere.datasource.shardingspheredb1.password=yangbuyiya
# 配置第 2 个数据源
spring.shardingsphere.datasource.shardingspheredb2.type=com.alibaba.druid.pool.DruidDataSource
spring.shardingsphere.datasource.shardingspheredb2.driver-class-name=com.mysql.cj.jdbc.Driver
spring.shardingsphere.datasource.shardingspheredb2.url=jdbc:mysql://www.yangbuyi.top:3310/shardingspheredb2?serverTimezone=GMT%2B8
spring.shardingsphere.datasource.shardingspheredb2.username=root
spring.shardingsphere.datasource.shardingspheredb2.password=yangbuyiya
mybatis-plus.configuration.log-impl=org.apache.ibatis.logging.stdout.StdOutImpl
# 水平拆分  水平分片
# 配置 t_order 表规则                                                 数据源.真实表
# 配置t_order真实表规则
spring.shardingsphere.rules.sharding.tables.t_order.actual-data-nodes=shardingspheredb$->{1..2}.t_order_$->{0..1}
# 配置分表策略 主键+分片算法
spring.shardingsphere.rules.sharding.tables.t_order.table-strategy.standard.sharding-column=tid
spring.shardingsphere.rules.sharding.tables.t_order.table-strategy.standard.sharding-algorithm-name=table-inline
# 配置 分片算法
spring.shardingsphere.rules.sharding.sharding-algorithms.table-inline.type=INLINE
spring.shardingsphere.rules.sharding.sharding-algorithms.table-inline.props.algorithm-expression=t_order_$->{tid % 2}
# 主键盘生成策略
spring.shardingsphere.rules.sharding.tables.t_order.key-generate-strategy.column=tid
spring.shardingsphere.rules.sharding.tables.t_order.key-generate-strategy.key-generator-name=snowflake
spring.shardingsphere.rules.sharding.key-generators.snowflake.type=SNOWFLAKE
spring.shardingsphere.rules.sharding.key-generators.snowflake.props.worker-id=1
# 打印执行sql
spring.shardingsphere.props.sql-show=true
# 配置分库策略  主键+分片算法
spring.shardingsphere.rules.sharding.tables.t_order.database-strategy.standard.sharding-column=goods_id
spring.shardingsphere.rules.sharding.tables.t_order.database-strategy.standard.sharding-algorithm-name=database-inline
spring.shardingsphere.rules.sharding.sharding-algorithms.database-inline.type=INLINE
spring.shardingsphere.rules.sharding.sharding-algorithms.database-inline.props.algorithm-expression=shardingspheredb$->{goods_id % 2 + 1}
运行测试类,运行 SQL 如下图所示:
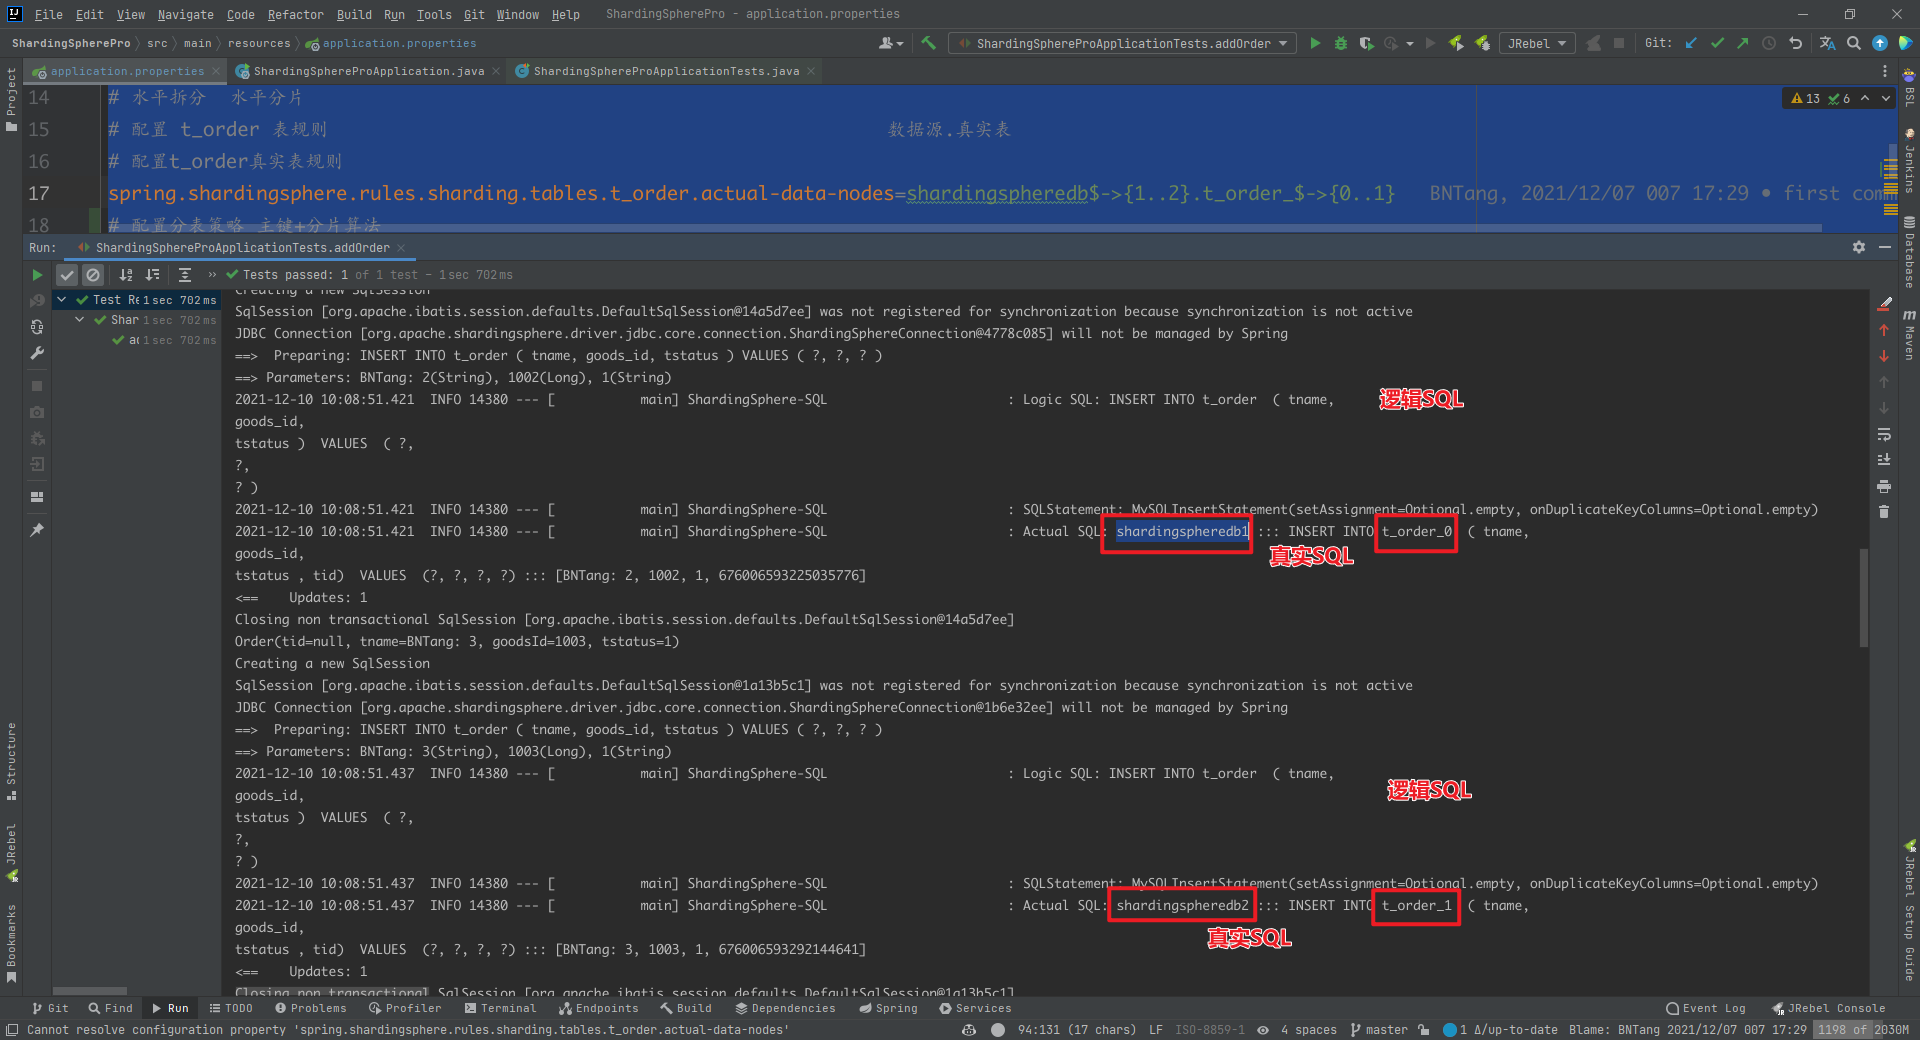
最终数据库数据存储结果:
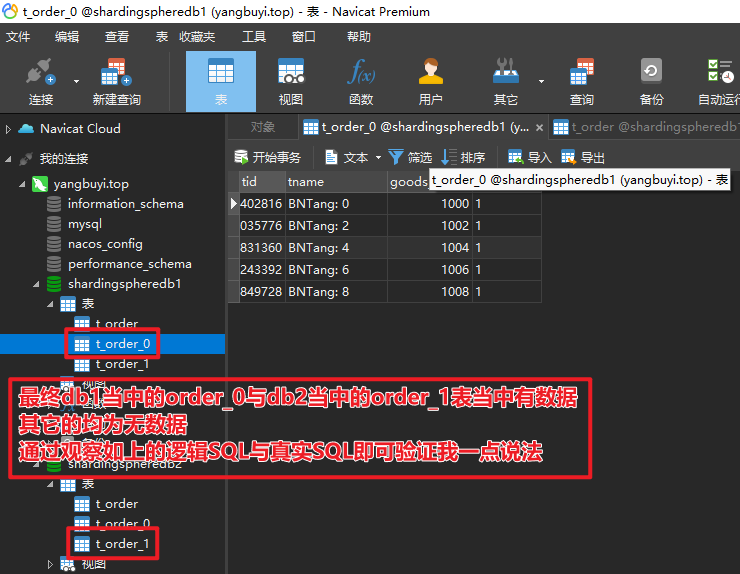
最终如上 application.yml 当中的配置含义为分表是按照 tid 进行分表,分库是按照 goods_id 进行的分库,到此该章节的内容到此结束。

 浙公网安备 33010602011771号