WPF2D绘制图形方法
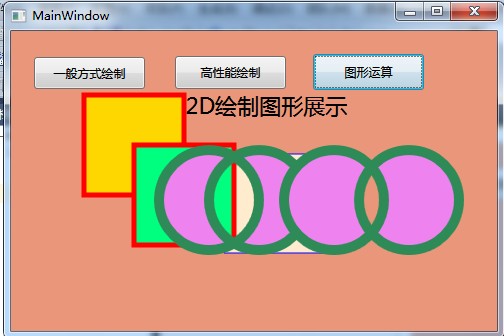
我们先看看效果如何:
xaml文件:
<Window x:Class="WPF2D绘制图形方法.MainWindow"
        xmlns="http://schemas.microsoft.com/winfx/2006/xaml/presentation"
        xmlns:x="http://schemas.microsoft.com/winfx/2006/xaml"
        Title="MainWindow" Height="338" Width="502" Background="DarkSalmon">
    <Grid Name="Grid1" Height="272" Width="440">
        <Button Content="一般方式绘制" Height="32" HorizontalAlignment="Right" Margin="0,12,329,0" Name="button1" VerticalAlignment="Top" Width="111" />
        <Button Content="高性能绘制" Height="33" HorizontalAlignment="Left" Margin="141,11,0,0" Name="button2" VerticalAlignment="Top" Width="111" />
        <Button Content="图形运算" Height="36" HorizontalAlignment="Left" Margin="279,9,0,0" Name="button3" VerticalAlignment="Top" Width="111" />
        <Label Content="WPF2D绘制图形展示" Height="38" HorizontalAlignment="Left" Margin="99,41,0,0" Name="label1" VerticalAlignment="Top" FontSize="22" Width="263" />
    </Grid>
</Window>
我们具体看看代码:
using System;
using System.Collections.Generic;
using System.Linq;
using System.Text;
using System.Windows;
using System.Windows.Controls;
using System.Windows.Data;
using System.Windows.Documents;
using System.Windows.Input;
using System.Windows.Media;
using System.Windows.Media.Imaging;
using System.Windows.Navigation;
using System.Windows.Shapes;

namespace WPF2D绘制图形方法
{
    /// <summary>
    /// MainWindow.xaml 的交互逻辑
    /// </summary>
    public partial class MainWindow : Window
    {
        public MainWindow()
        {
            InitializeComponent();
            this.button1.Click += new RoutedEventHandler(button1_Click);
            this.button2.Click += new RoutedEventHandler(button2_Click);
            this.button3.Click += new RoutedEventHandler(button3_Click);
        }


        void button1_Click(object sender, RoutedEventArgs e)
        {
            //绘制一个简单的矩形,System.Windows.Shapes 基类
            //http://msdn.microsoft.com/zh-cn/library/vstudio/system.windows.shapes(v=vs.100).aspx
            Rectangle MyRectangle = new Rectangle();
            MyRectangle.Margin = new Thickness(40, 45, 0, 0);
            MyRectangle.Width = 100;
            MyRectangle.Height = 100;
            MyRectangle.Fill = Brushes.BlanchedAlmond;
            MyRectangle.Stroke = Brushes.Blue;
            Grid1.Children.Add(MyRectangle);
        }
        void button2_Click(object sender, RoutedEventArgs e)
        {
            //绘制一个简单的矩形,Geometry 类
            //http://msdn.microsoft.com/zh-cn/library/vstudio/system.windows.media.geometry.aspx
            RectangleGeometry myRectangleGeometry1 = new RectangleGeometry(new Rect(new Size(100, 100)));
            Path myPath1 = new Path();
            myPath1.Margin = new Thickness(50, 50, 0, 0);
            myPath1.Stroke = Brushes.Red;
            myPath1.Fill = Brushes.Gold;
            myPath1.StrokeThickness = 5;
            myPath1.Data = myRectangleGeometry1;
            Grid1.Children.Add(myPath1);


            RectangleGeometry myRectangleGeometry2 = new RectangleGeometry(new Rect(new Size(100, 100)));
            Path myPath2 = new Path();
            myPath2.Margin = new Thickness(100, 100, 0, 0);
            myPath2.Stroke = Brushes.Red;
            myPath2.Fill = Brushes.SpringGreen;
            myPath2.StrokeThickness = 5;
            myPath2.Data = myRectangleGeometry2;

            Grid1.Children.Add(myPath2);


        }
        void button3_Click(object sender, RoutedEventArgs e)
        {
            //绘制圆
            EllipseGeometry eg1 = new EllipseGeometry(new Point(75, 75), 50, 50);
            EllipseGeometry eg2 = new EllipseGeometry(new Point(125, 75), 50, 50);
            EllipseGeometry eg3 = new EllipseGeometry(new Point(200, 75), 50, 50);
            EllipseGeometry eg4 = new EllipseGeometry(new Point(275, 75), 50, 50);


            //区域进行合并,可以求交集,并集....其它等;

            CombinedGeometry cg1 = new CombinedGeometry(GeometryCombineMode.Xor, eg1, eg2);
            CombinedGeometry cg2 = new CombinedGeometry(GeometryCombineMode.Xor, eg3, eg4);


            //绘制
            Path myPath = new Path();
            myPath.Margin = new Thickness(100, 80, 0, 0);
            myPath.Stroke = Brushes.SeaGreen;
            myPath.Fill = Brushes.Violet;
            myPath.StrokeThickness = 10;
            myPath.Data = cg1;
            Grid1.Children.Add(myPath);

            Path myPath1 = new Path();
            myPath1.Margin = new Thickness(100, 80, 0, 0);
            myPath1.Stroke = Brushes.SeaGreen;
            myPath1.Fill = Brushes.Violet;
            myPath1.StrokeThickness = 10;
            myPath1.Data = cg2;
            Grid1.Children.Add(myPath1);


        }

    }
}
上面的实例也简单的展示了效果,更多的运用我们可以从msdn上,上面有详细的说明,以及运用方法
demo示例:https://files.cnblogs.com/BABLOVE/WPF2D%E7%BB%98%E5%88%B6%E5%9B%BE%E5%BD%A2%E6%96%B9%E6%B3%95.rar


