Spring&SpringBoot中常用的注解
参考:https://javaguide.cn/system-design/framework/spring/spring-common-annotations.html
一、Spring实现IOC——控制翻转,即将对象的创建、属性注入交给容器
1.@Component、@Repository、@Service、@Controller——将一个类声明为 Bean 的注解
@Component:通用的注解,可标注任意类为Spring组件。如果一个 Bean 不知道属于哪个层,可以使用@Component注解标注。@Repository: 对应持久层即 Dao 层,主要用于数据库相关操作。@Service: 对应服务层,主要涉及一些复杂的逻辑,需要用到 Dao 层。@Controller: 对应 Spring MVC 控制层,主要用于接受用户请求并调用Service层返回数据给前端页面。
2.@Bean——将方法返回的对象声明为 Bean 装载到容器中的注解
@Component注解作用于类,而@Bean注解作用于方法。@Component通常是通过类路径扫描来自动侦测以及自动装配到 Spring 容器中(我们可以使用@ComponentScan注解定义要扫描的路径从中找出标识了需要装配的类自动装配到 Spring 的 bean 容器中)。@Bean注解通常是我们在标有该注解的方法中定义产生这个 bean,@Bean告诉了 Spring 这是某个类的实例,当我需要用它的时候还给我。@Bean注解比@Component注解的自定义性更强,而且很多地方我们只能通过@Bean注解来注册 bean。比如当我们引用第三方库中的类需要装配到Spring容器时,则只能通过@Bean来实现
示例
 @Configuration
public class AppConfig {
    @Bean
    public TransferService transferService() {
        return new TransferServiceImpl();
    }

}
3.@Autowired 、@Resource
@Component将一个类声明为Bean,将此类的实例化、属性赋值都交由IOC容器进行管理,
而@Autowired和@Resouce则表示从IOC容器中取出实例化、初始化后的对象,之后就可以直接使用此对象进行属性访问和方法调用了;
示例
 package com.tzc.springboot.service.impl;

import com.baomidou.mybatisplus.core.conditions.query.QueryWrapper;
import com.tzc.springboot.entity.Role;
import com.tzc.springboot.entity.RoleMenu;
import com.tzc.springboot.mapper.RoleMapper;
import com.tzc.springboot.mapper.RoleMenuMapper;
import com.tzc.springboot.service.IRoleService;
import com.baomidou.mybatisplus.extension.service.impl.ServiceImpl;
import org.springframework.stereotype.Service;
import org.springframework.transaction.annotation.Transactional;

import javax.annotation.Resource;
import java.util.List;

/**
 * <p>
 *  服务实现类
 * </p>
 *
 * @author Mr汤
 * @since 2023-05-27
 */
@Service
public class RoleServiceImpl extends ServiceImpl<RoleMapper, Role> implements IRoleService {

    @Resource
    private RoleMenuMapper roleMenuMapper;

    @Transactional  //保证下面的两个操作要么全部成功,要么全部失败
    @Override
    public void setRoleMenu(Integer roleId, List<Integer> menuIds) {
        //先删除当前角色id所有的绑定关系
        QueryWrapper<RoleMenu> queryWrapper = new QueryWrapper<>();
        queryWrapper.eq("role_id",roleId);
        roleMenuMapper.delete(queryWrapper);

        //再把前端传过来的菜单id数组绑定到当前的这个角色id上去
        for(Integer menuId : menuIds){
            RoleMenu roleMenu = new RoleMenu();
            roleMenu.setMenuId(menuId);
            roleMenu.setRoleId(roleId);
            roleMenuMapper.insert(roleMenu);
        }
    }

    @Override
    public List<Integer> getRoleMenu(Integer roleId) {
        return roleMenuMapper.selectByRoleId(roleId);
    }
}
补充——@Autowired和@Resouce的区别
参考文章:https://blog.csdn.net/xhbzl/article/details/126765893
1. 来源不同:@Autowired 来自 Spring 框架,而 @Resource 来自于(Java)JSR-250;
2. 依赖查找的顺序不同:@Autowired 先根据类型再根据名称查询,而 @Resource 先根据名称再根据类型查询;
3. 支持的参数不同:@Autowired 只支持设置 1 个参数,而 @Resource 支持设置 7 个参数;
4. 依赖注入的用法支持不同:@Autowired 既支持构造方法注入,又支持属性注入和 Setter 注入,而 @Resource 只支持属性注入和 Setter 注入;
5. 编译器 IDEA 的提示不同:当注入 Mapper 对象时,使用 @Autowired 注解编译器会提示错误,而使用 @Resource 注解则不会提示错误。
当一个接口存在多个实现类的情况下,@Autowired 和@Resource都需要通过名称才能正确匹配到对应的 Bean。Autowired 可以通过 @Qualifier 注解来显式指定名称,@Resource可以通过 name 属性来显式指定名称。
示例
 // 报错,byName 和 byType 都无法匹配到 bean
@Autowired
private SmsService smsService;
// 正确注入 SmsServiceImpl1 对象对应的 bean
@Autowired
private SmsService smsServiceImpl1;
// 正确注入  SmsServiceImpl1 对象对应的 bean
// smsServiceImpl1 就是我们上面所说的名称
@Autowired
@Qualifier(value = "smsServiceImpl1")
private SmsService smsService;


// 报错,byName 和 byType 都无法匹配到 bean
@Resource
private SmsService smsService;
// 正确注入 SmsServiceImpl1 对象对应的 bean
@Resource
private SmsService smsServiceImpl1;
// 正确注入 SmsServiceImpl1 对象对应的 bean(比较推荐这种方式)
@Resource(name = "smsServiceImpl1")
private SmsService smsService;
5.@Primary
6.@Mapper & @MapperScan
@Mapper注解写在每个Dao接口层的接口类上,@MapperScan注解写在SpringBoot的启动类上。
当我们的一个项目中存在多个Dao层接口的时候,此时我们需要对每个接口类都写上@Mapper注解,非常的麻烦,此时可以使用@MapperScan注解来解决这个问题。让这个接口进行一次性的注入,不需要在写@Mapper注解
查看代码
 @SpringBootApplication
@MapperScan("cn.gyyx.mapper")
// 这个注解可以扫描 cn.gyyx.mapper 这个包下面的所有接口类,可以把这个接口类全部的进行动态代理。
public class WardenApplication {
    public static void main(String[] args) {
        SpringApplication.run(WardenApplication.class,args);
    }
}
二、Spring实现AOP——切面编程,将多段代码中重复调用的非核心业务代码(例如事务处理、日志管理、权限控制等)用动态代理统一实现
1.@Aspect
表明这是一个切面类
2.@Pointcut
指定切点位置
3.@Before、@After、@AfterReturning、@AfterThrowing、@Around
@Before 在切点方法之前执行
@After 在切点方法之后执行
@AfterReturning 切点方法返回后执行
@AfterThrowing 切点方法抛异常执行
@Around 属于环绕增强,能控制切点执行前,执行后
AOP特性尚未在项目中应用过,待实践,对AOP的理解可以参考这篇博文:
https://blog.csdn.net/weixin_38860401/article/details/124908507
4.@Transactional——Spring实现事务
一般用于标识service业务层Impl实现方法,标识的方法内所有语句要不全部成功执行,要不全都不执行(也可以标识service业务层类,相当于给类中的所有方法都标识上)
①属性1——只读readOnly
对一个查询操作来说,如果我们把它设置成只读,就能够明确告诉数据库,这个操作不涉及写操作。这样数据库就能够针对查询操作来进行优化;
对增删改操作设置只读会抛出下面异常Caused by: java.sql.SQLException: Connection is read-only. Queries leading to data modificationare not allowed
示例
 @Transactional(readOnly = true)
public void buyBook(Integer bookId, Integer userId) {
    //查询图书的价格
    Integer price = bookDao.getPriceByBookId(bookId);
    //更新图书的库存
    bookDao.updateStock(bookId);
    //更新用户的余额
    bookDao.updateBalance(userId, price);
    //System.out.println(1/0);
}
②属性2——超时timeout
事务在执行过程中,有可能因为遇到某些问题,导致程序卡住,从而长时间占用数据库资源,此时这个很可能出问题的程序应该被回滚,撤销它已做的操作,事务结束,把资源让出来,让其他正常
程序可以执行,概括来说就是一句话:超时回滚,释放资源。
查看代码
@Transactional(timeout = 3)
public void buyBook(Integer bookId, Integer userId) {
    try {
        TimeUnit.SECONDS.sleep(5);
    } catch (InterruptedException e) {
        e.printStackTrace();
    }
    //查询图书的价格
    Integer price = bookDao.getPriceByBookId(bookId);
    //更新图书的库存
    bookDao.updateStock(bookId);
    //更新用户的余额
    bookDao.updateBalance(userId, price);
    //System.out.println(1/0);
}


//若发生超时则会在执行过程中抛出异常:
//org.springframework.transaction.TransactionTimedOutException: Transaction timed out:deadline was Fri Jun 04 16:25:39 CST 2022
③属性3——回滚策略
声明式事务默认只针对运行时异常回滚,编译时异常不回滚。
可以通过@Transactional中相关属性设置回滚策略
rollbackFor属性:需要设置一个Class类型的对象
rollbackForClassName属性:需要设置一个字符串类型的全类名
noRollbackFor属性:需要设置一个Class类型的对象
rollbackFor属性:需要设置一个字符串类型的全类名
示例
 @Transactional(noRollbackFor = ArithmeticException.class)
//@Transactional(noRollbackForClassName = "java.lang.ArithmeticException")
public void buyBook(Integer bookId, Integer userId) {
    //查询图书的价格
    Integer price = bookDao.getPriceByBookId(bookId);
    //更新图书的库存
    bookDao.updateStock(bookId);
    //更新用户的余额
    bookDao.updateBalance(userId, price);
    System.out.println(1/0);
}
虽然购买图书功能中出现了数学运算异常(ArithmeticException),但是我们设置的回滚策略是,当出现ArithmeticException不发生回滚,因此购买图书的操作正常执行
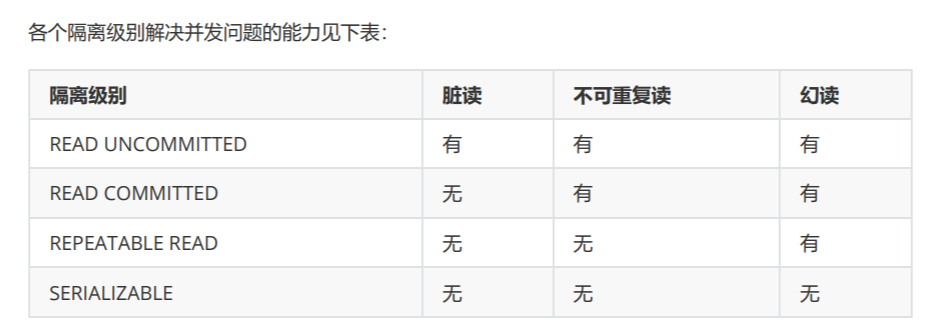
④属性4——事务隔离级别isolation
隔离级别一共有四种:
读未提交:READ UNCOMMITTED
允许Transaction01读取Transaction02未提交的修改。
读已提交:READ COMMITTED、
要求Transaction01只能读取Transaction02已提交的修改。
可重复读:REPEATABLE READ
确保Transaction01可以多次从一个字段中读取到相同的值,即Transaction01执行期间禁止其它事务对这个字段进行更新。
串行化:SERIALIZABLE
确保Transaction01可以多次从一个表中读取到相同的行,在Transaction01执行期间,禁止其它事务对这个表进行添加、更新、删除操作。可以避免任何并发问题,但性能十分低下。

示例
 @Transactional(isolation = Isolation.DEFAULT)//使用数据库默认的隔离级别
@Transactional(isolation = Isolation.READ_UNCOMMITTED)//读未提交
@Transactional(isolation = Isolation.READ_COMMITTED)//读已提交
@Transactional(isolation = Isolation.REPEATABLE_READ)//可重复读
@Transactional(isolation = Isolation.SERIALIZABLE)//串行化
三、SpringMVC
1.@RequestMapping(以及衍生的@GetMapping/@PostMapping/@PutMapping/@DeleteMapping)
作用是将从前端传来的url请求与控制层的指定方法关联起来,当后端收到此url请求时就会调用对应的控制层方法;
①此注解既可以标识控制层类,也可以标识其中具体的方法
@RequestMapping标识一个类:设置映射请求的请求路径的初始信息
@RequestMapping标识一个方法:设置映射请求请求路径的具体信息
示例
@Controller
@RequestMapping("/test")
public class RequestMappingController {
//此时请求映射所映射的请求的请求路径为:/test/testRequestMapping
@RequestMapping("/testRequestMapping")
    public String testRequestMapping(){
        return "success";
    }
}
②@RequestMapping的两个重要属性value和method
value属性是一个字符串数组,表示该请求映射能够匹配多个请求地址所对应的请求 ;
method属性是一个RequestMethod类型的数组,表示该请求映射能够匹配多种请求方式的请求;
示例
@RequestMapping(
value = {"/testRequestMapping", "/test"},
method = {RequestMethod.GET, RequestMethod.POST}
)
public String testRequestMapping(){
    return "success";
}
③@GetMapping/@PostMapping/@PutMapping/@DeleteMapping
对于处理指定请求方式的控制器方法,SpringMVC中提供了@RequestMapping的派生注解
处理get请求的映射-->@GetMapping
处理post请求的映射-->@PostMapping
处理put请求的映射-->@PutMapping
处理delete请求的映射-->@DeleteMapping
④SpringMVC支持ant风格的路径
?:表示任意的单个字符
*:表示任意的0个或多个字符
**:表示任意层数的任意目录
注意:在使用**时,只能使用/**/xxx的方式
2.@PathVariable、@RequestParam ——在后端获取前端请求url中的路径参数、或是xx=xx形式的查询参数
@PathVariable使用方式:
    @GetMapping("pre_chapter_id/{chapterId}")
    public RestResp<Long> getPreChapterId(@PathVariable Long chapterId){
        return bookService.getPreChapterId(chapterId);
    }
@GetMapping("pre_chapter_id/{id}")
//传入参数与url路径中占位符名称不同时,可以在@PathVariable注解中显示表明映射关系
public RestResp<Long> getPreChapterId(@PathVariable("id") Long chapterId){
return bookService.getPreChapterId(chapterId);
}请求url格式:/pre_chapter_id/1334318186313654272
@RequestParam使用方式:
①因为?xx=xx是默认的一种读取参数的方式,所以当以这种格式发送url请求且与传入参数名相同时,可以直接省略@RequestParam注解
    @GetMapping("comment/newest_list")
    public RestResp<BookCommentRespDto> listNewestComments(Long bookId){
        return bookService.listNewestComments(bookId);
    }
请求 url 格式:/comment/newest_list?bookId=1334318182169681920
②当url请求且与传入参数名不相同时,或是需要对@RequestParam注解的参数进行设置时,也可以显式地标出来;
@RequestParam注解有三个参数:
value:指定要绑定的请求参数的名称。例如:@RequestParam(value = "username"),这样会将名为 "username" 的请求参数的值绑定到方法的参数上。required:指定该请求参数是否是必需的,默认为true。如果设置为false,当请求中没有传递该参数时,方法的参数将为null。defaultValue:指定请求参数的默认值。如果请求中没有传递该参数,则方法的参数将使用默认值。例如:@RequestParam(value = "page", defaultValue = "1"),当请求中没有名为 "page" 的参数时,方法的参数将默认为 1。
    @GetMapping("comment/newest_list")
    public RestResp<BookCommentRespDto> listNewestComments(@RequestParam(value = "type", required = false, defaultValue = 114514)Long bookId){
        return bookService.listNewestComments(bookId);
    }
请求 url 格式:/comment/newest_list?bookId=1334318182169681920
3.@ParameterObject——将参数组装成对象,与前端请求的Param一一对应
所需依赖:
        <!-- 使@ParameterObject注解生效 -->
        <dependency>
            <groupId>org.springdoc</groupId>
            <artifactId>springdoc-openapi-starter-webmvc-ui</artifactId>
            <version>2.0.0</version>
        </dependency>
①示例
url:
小说搜索接口:/api/front/search/books?pageNum=0&pageSize=0&fetchAll=false&keyword=&workDirection=0&categoryId=0&isVip=0&bookStatus=0&wordCountMin=0&wordCountMax=0&updateTimeMin=&sort=
Controller:
@Operation(summary = "小说搜索接口")
@GetMapping("books")
public RestResp<PageRespDto<BookInfoRespDto>> searchBooks(
        //注解@ParameterObject将前端请求中的Param和类BookSearchReqDto中的各属性对应起来
    @ParameterObject BookSearchReqDto condition) {
    return searchService.searchBooks(condition);
}
BookSearchReqDto
 @Data
public class BookSearchReqDto extends PageReqDto {

    /**
     * 搜索关键字
     */
    @Parameter(description = "搜索关键字")
    private String keyword;

    /**
     * 作品方向
     */
    @Parameter(description = "作品方向")
    private Integer workDirection;

    /**
     * 分类ID
     */
    @Parameter(description = "分类ID")
    private Integer categoryId;

    /**
     * 是否收费,1:收费,0:免费
     */
    @Parameter(description = "是否收费,1:收费,0:免费")
    private Integer isVip;

    /**
     * 小说更新状态,0:连载中,1:已完结
     */
    @Parameter(description = "小说更新状态,0:连载中,1:已完结")
    private Integer bookStatus;

    /**
     * 字数最小值
     */
    @Parameter(description = "字数最小值")
    private Integer wordCountMin;

    /**
     * 字数最大值
     */
    @Parameter(description = "字数最大值")
    private Integer wordCountMax;

    /**
     * 最小更新时间
     * 如果使用Get请求,直接使用对象接收,则可以使用@DateTimeFormat注解进行格式化;
     * 如果使用Post请求,@RequestBody接收请求体参数,默认解析日期格式为yyyy-MM-dd HH:mm:ss ,
     * 如果需要接收其他格式的参数,则可以使用@JsonFormat注解
     * */
    @Parameter(description = "最小更新时间")
    @DateTimeFormat(pattern = "yyyy-MM-dd")
    @JsonFormat(pattern = "yyyy-MM-dd")
    private Date updateTimeMin;

    /**
     * 排序字段
     */
    @Parameter(description = "排序字段")
    private String sort;
}
PageReqDto
 @Data
public class PageReqDto {

    /**
     * 请求页码,默认第 1 页
     */
    @Parameter(description = "请求页码,默认第 1 页")
    private int pageNum = 1;

    /**
     * 每页大小,默认每页 10 条
     */
    @Parameter(description = "每页大小,默认每页 10 条")
    private int pageSize = 10;

    /**
     * 是否查询所有,默认不查所有 为 true 时,pageNum 和 pageSize 无效
     */
    @Parameter(hidden = true)
    private boolean fetchAll = false;

}
可以看到,参数对象中的属性与前端请求的Param中的字段一一对应,从而实现了对前端传来的参数的接收;
②使用@ParameterObject的要求
1.参数对象的属性名必须和其对应的前端参数名完全相同;
2.前端参数必须写作这种形式,xx=xx,以&隔开:
?pageNum=0&pageSize=0&fetchAll=false&keyword=&workDirection=0&categoryId=0&isVip=0&bookStatus=0&wordCountMin=0&wordCountMax=0&updateTimeMin=&sort=
4.@RequestBody——将json/xml格式的请求转换为java对象
@RequestBody 是 Spring MVC 框架中用于将 HTTP 请求的内容(如 JSON、XML 等)绑定到方法参数上的注解。通过 @RequestBody 注解,你可以将请求的内容转换为 Java 对象,并直接传递给方法的参数
使用示例:
    @PostMapping("comment")
    public RestResp<Void> comment(@Valid @RequestBody UserCommentReqDto userCommentReqDto){
        userCommentReqDto.setUserId(UserHolder.getUserId());
        return userService.saveComment(userCommentReqDto);
    }
请求 url 格式:/comment
请求体RequestBody:
{
  "bookId": 1337958745514233856,
  "commentContent": "特别喜欢这本书,作者速速更新"
}
5.@ResponseBody——标识控制层方法,可以将此方法的返回值直接或转换为json格式再响应给浏览器
①@ResponseBody用于标识一个控制器方法,可以将该方法的返回值直接作为响应报文的响应体响应到浏览器
示例
 @RequestMapping("/testResponseBody")
public String testResponseBody(){
    //此时会跳转到逻辑视图success所对应的页面
    return "success";
}
@RequestMapping("/testResponseBody")
@ResponseBody
public String testResponseBody(){
    //此时响应浏览器数据success
    return "success";
}
②使用@ResponseBody注解标识控制器方法,可以将此方法的返回值转换为json字符串并响应到浏览器
示例
//响应浏览器list集合
@RequestMapping("/test/ResponseBody/json")
@ResponseBody
public List<User> testResponseBody(){
    User user1 = new User(1001,"admin1","123456",23,"男");
    User user2 = new User(1002,"admin2","123456",23,"男");
    User user3 = new User(1003,"admin3","123456",23,"男");
    List<User> list = Arrays.asList(user1, user2, user3);
    return list;
}
//响应浏览器map集合
@RequestMapping("/test/ResponseBody/json")
@ResponseBody
public Map<String, Object> testResponseBody(){
    User user1 = new User(1001,"admin1","123456",23,"男");
    User user2 = new User(1002,"admin2","123456",23,"男");
    User user3 = new User(1003,"admin3","123456",23,"男");
    Map<String, Object> map = new HashMap<>();
    map.put("1001", user1);
    map.put("1002", user2);
    map.put("1003", user3);
    return map;
}
//响应浏览器实体类对象
@RequestMapping("/test/ResponseBody/json")
@ResponseBody
    public User testResponseBody(){
    return user;
}
6.@RestController——控制层类的复合注解,作用相当于@ResponseBody+@Controller
在类上加@ResponseBody相当于给其中的所有方法都加上@ResponseBody注解
四、SpringBoot中引入的注解
1.@SpringBootApplication
@SpringBootApplication:标识该类为Spring Boot应用程序的入口点,包含了多个注解,如@Configuration、@EnableAutoConfiguration和@ComponentScan,
声明它就可以让springboot自动给程序进行必要的配置(简单的说,开启组件扫描和自己配置的功能),一般用于SpringBoot项目的启动类;

 package com.tzc;

import org.springframework.boot.SpringApplication;
import org.springframework.boot.autoconfigure.SpringBootApplication;

@SpringBootApplication
public class SpringSecurityApplication {

    public static void main(String[] args) {
        SpringApplication.run(SpringSecurityApplication.class, args);
    }

}
2.@Value、@ConfigurationProperties——读取配置信息
application.yml
 wuhan2020: 2020年初武汉爆发了新型冠状病毒,疫情严重,但是,我相信一切都会过去!武汉加油!中国加油!

my-profile:
  name: Guide哥
  email: koushuangbwcx@163.com

library:
  location: 湖北武汉加油中国加油
  books:
    - name: 天才基本法
      description: 二十二岁的林朝夕在父亲确诊阿尔茨海默病这天,得知自己暗恋多年的校园男神裴之即将出国深造的消息——对方考取的学校,恰是父亲当年为她放弃的那所。
    - name: 时间的秩序
      description: 为什么我们记得过去,而非未来?时间“流逝”意味着什么?是我们存在于时间之内,还是时间存在于我们之中?卡洛·罗韦利用诗意的文字,邀请我们思考这一亘古难题——时间的本质。
    - name: 了不起的我
      description: 如何养成一个新习惯?如何让心智变得更成熟?如何拥有高质量的关系? 如何走出人生的艰难时刻?
①@Value
使用 @Value("${property}") 读取比较简单的配置信息:
查看代码
 @Value("${wuhan2020}")
String wuhan2020;
②@ConfigurationProperties
通过@ConfigurationProperties读取配置信息并与 bean 绑定
查看代码
 @Component
@ConfigurationProperties(prefix = "library")
class LibraryProperties {
    @NotEmpty
    private String location;
    private List<Book> books;

    @Setter
    @Getter
    @ToString
    static class Book {
        String name;
        String description;
    }
  省略getter/setter
  ......
}
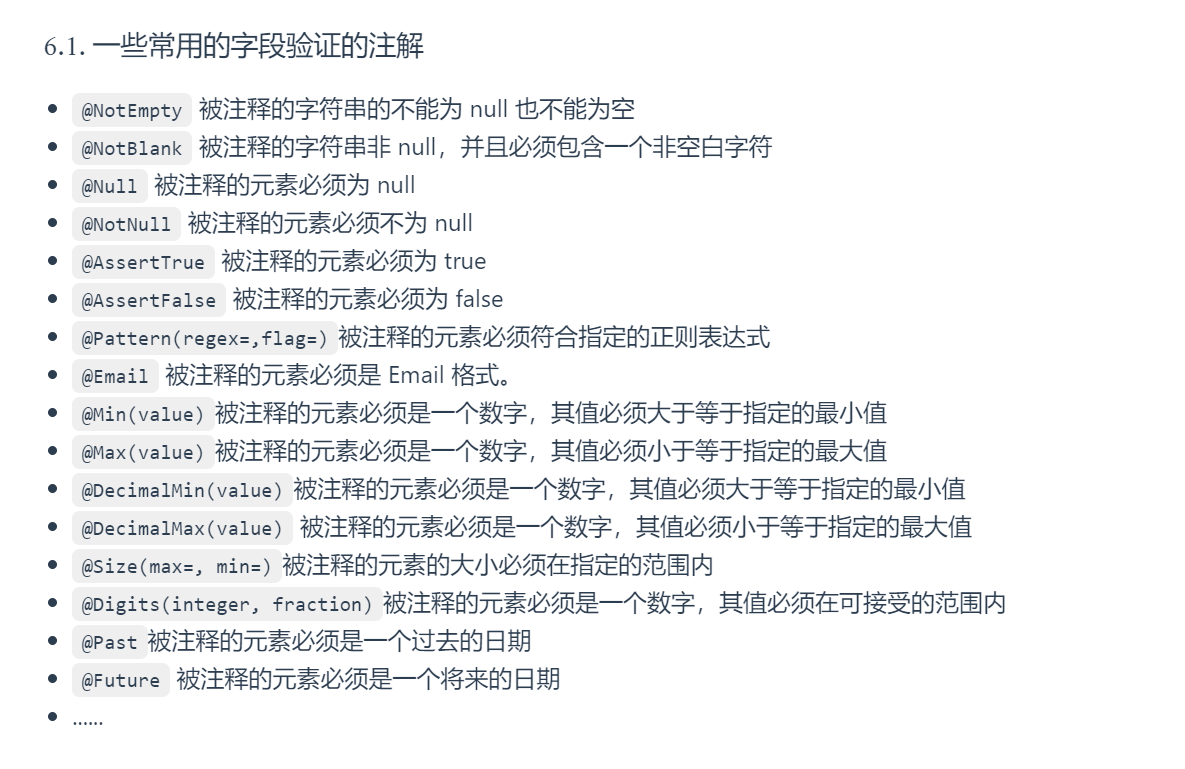
3.参数校验

验证请求体@Valid
 @RestController
@RequestMapping("/api")
public class PersonController {

    @PostMapping("/person")
    public ResponseEntity<Person> getPerson(@RequestBody @Valid Person person) {
        return ResponseEntity.ok().body(person);
    }
}
4.全局处理 Controller 层异常——@ControllerAdvice、@ExceptionHandler
@ControllerAdvice:注解定义全局异常处理类@ExceptionHandler:注解声明异常处理方法
查看代码
@ControllerAdvice
@ResponseBody
public class GlobalExceptionHandler {

    /**
     * 请求参数异常处理
     */
    @ExceptionHandler(MethodArgumentNotValidException.class)
    public ResponseEntity<?> handleMethodArgumentNotValidException(MethodArgumentNotValidException ex, HttpServletRequest request) {
       ......
    }
}如果方法参数不对的话就会抛出MethodArgumentNotValidException,我们来手动处理这个异常。
5.@ConditionalOnProperty——控制配置生效的条件
参考文章:https://www.cnblogs.com/secbro/p/12011522.html
①注解分析
@ConditionalOnProperty注解类源码如下:
 @Retention(RetentionPolicy.RUNTIME)
@Target({ ElementType.TYPE, ElementType.METHOD })
@Documented
@Conditional(OnPropertyCondition.class)
public @interface ConditionalOnProperty {

	// 数组,获取对应property名称的值,与name不可同时使用
	String[] value() default {};

	// 配置属性名称的前缀,比如spring.http.encoding
	String prefix() default "";

	// 数组,配置属性完整名称或部分名称
	// 可与prefix组合使用,组成完整的配置属性名称,与value不可同时使用
	String[] name() default {};

	// 可与name组合使用,比较获取到的属性值与havingValue给定的值是否相同,相同才加载配置
	String havingValue() default "";

	// 缺少该配置属性时是否可以加载。如果为true,没有该配置属性时也会正常加载;反之则不会生效
	boolean matchIfMissing() default false;

}
总结:
首先看matchIfMissing属性,默认情况下matchIfMissing为false,也就是说如果未进行属性配置,则自动配置不生效。如果matchIfMissing为true,则表示如果没有对应的属性配置,则自动配置默认生效;
接着看prefix和name,这两项确定了其在配置文件中对应的字段;
最后看havingValue,当配置文件中的字段值等于havingValue的值时,配置生效,若不相同则配置不生效;
②示例
DbSearchServiceImpl implements SearchService
@ConditionalOnProperty(prefix = "spring.elasticsearch", name = "enabled", havingValue = "false")
@Service
@RequiredArgsConstructor
@Slf4j
public class DbSearchServiceImpl implements SearchService {

    private final BookInfoMapper bookInfoMapper;

    @Override
    public RestResp<PageRespDto<BookInfoRespDto>> searchBooks(BookSearchReqDto condition) {
        Page<BookInfoRespDto> page = new Page<>();
        page.setCurrent(condition.getPageNum());
        page.setSize(condition.getPageSize());
        List<BookInfo> bookInfos = bookInfoMapper.searchBooks(page, condition);
        return RestResp.ok(
            PageRespDto.of(condition.getPageNum(), condition.getPageSize(), page.getTotal(),
                bookInfos.stream().map(v -> BookInfoRespDto.builder()
                    .id(v.getId())
                    .bookName(v.getBookName())
                    .categoryId(v.getCategoryId())
                    .categoryName(v.getCategoryName())
                    .authorId(v.getAuthorId())
                    .authorName(v.getAuthorName())
                    .wordCount(v.getWordCount())
                    .lastChapterName(v.getLastChapterName())
                    .build()).toList()));
    }

}
EsSearchServiceImpl implements SearchService
 @ConditionalOnProperty(prefix = "spring.elasticsearch", name = "enabled", havingValue = "true")
@Service
@RequiredArgsConstructor
@Slf4j
public class EsSearchServiceImpl implements SearchService {

    private final ElasticsearchClient esClient;

    @SneakyThrows
    @Override
    public RestResp<PageRespDto<BookInfoRespDto>> searchBooks(BookSearchReqDto condition) {

        SearchResponse<EsBookDto> response = esClient.search(s -> {

                SearchRequest.Builder searchBuilder = s.index(EsConsts.BookIndex.INDEX_NAME);
                // 构建检索条件
                buildSearchCondition(condition, searchBuilder);
                // 排序
                if (!StringUtils.isBlank(condition.getSort())) {
                    searchBuilder.sort(o -> o.field(f -> f
                        .field(StringUtils.underlineToCamel(condition.getSort().split(" ")[0]))
                        .order(SortOrder.Desc))
                    );
                }
                // 分页
                searchBuilder.from((condition.getPageNum() - 1) * condition.getPageSize())
                    .size(condition.getPageSize());
                // 设置高亮显示
                searchBuilder.highlight(h -> h.fields(EsConsts.BookIndex.FIELD_BOOK_NAME,
                        t -> t.preTags("<em style='color:red'>").postTags("</em>"))
                    .fields(EsConsts.BookIndex.FIELD_AUTHOR_NAME,
                        t -> t.preTags("<em style='color:red'>").postTags("</em>")));

                return searchBuilder;
            },
            EsBookDto.class
        );

        TotalHits total = response.hits().total();

        List<BookInfoRespDto> list = new ArrayList<>();
        List<Hit<EsBookDto>> hits = response.hits().hits();
        // 类型推断 var 非常适合 for 循环,JDK 10 引入,JDK 11 改进
        for (var hit : hits) {
            EsBookDto book = hit.source();
            assert book != null;
            if (!CollectionUtils.isEmpty(hit.highlight().get(EsConsts.BookIndex.FIELD_BOOK_NAME))) {
                book.setBookName(hit.highlight().get(EsConsts.BookIndex.FIELD_BOOK_NAME).get(0));
            }
            if (!CollectionUtils.isEmpty(
                hit.highlight().get(EsConsts.BookIndex.FIELD_AUTHOR_NAME))) {
                book.setAuthorName(
                    hit.highlight().get(EsConsts.BookIndex.FIELD_AUTHOR_NAME).get(0));
            }
            list.add(BookInfoRespDto.builder()
                .id(book.getId())
                .bookName(book.getBookName())
                .categoryId(book.getCategoryId())
                .categoryName(book.getCategoryName())
                .authorId(book.getAuthorId())
                .authorName(book.getAuthorName())
                .wordCount(book.getWordCount())
                .lastChapterName(book.getLastChapterName())
                .build());
        }
        assert total != null;
        return RestResp.ok(
            PageRespDto.of(condition.getPageNum(), condition.getPageSize(), total.value(), list));

    }

    /**
     * 构建检索条件
     */
    private void buildSearchCondition(BookSearchReqDto condition,
        SearchRequest.Builder searchBuilder) {

        BoolQuery boolQuery = BoolQuery.of(b -> {

            // 只查有字数的小说
            b.must(RangeQuery.of(m -> m
                .field(EsConsts.BookIndex.FIELD_WORD_COUNT)
                .gt(JsonData.of(0))
            )._toQuery());

            if (!StringUtils.isBlank(condition.getKeyword())) {
                // 关键词匹配
                b.must((q -> q.multiMatch(t -> t
                    .fields(EsConsts.BookIndex.FIELD_BOOK_NAME + "^2",
                        EsConsts.BookIndex.FIELD_AUTHOR_NAME + "^1.8",
                        EsConsts.BookIndex.FIELD_BOOK_DESC + "^0.1")
                    .query(condition.getKeyword())
                )
                ));
            }

            // 精确查询
            if (Objects.nonNull(condition.getWorkDirection())) {
                b.must(TermQuery.of(m -> m
                    .field(EsConsts.BookIndex.FIELD_WORK_DIRECTION)
                    .value(condition.getWorkDirection())
                )._toQuery());
            }

            if (Objects.nonNull(condition.getCategoryId())) {
                b.must(TermQuery.of(m -> m
                    .field(EsConsts.BookIndex.FIELD_CATEGORY_ID)
                    .value(condition.getCategoryId())
                )._toQuery());
            }

            // 范围查询
            if (Objects.nonNull(condition.getWordCountMin())) {
                b.must(RangeQuery.of(m -> m
                    .field(EsConsts.BookIndex.FIELD_WORD_COUNT)
                    .gte(JsonData.of(condition.getWordCountMin()))
                )._toQuery());
            }

            if (Objects.nonNull(condition.getWordCountMax())) {
                b.must(RangeQuery.of(m -> m
                    .field(EsConsts.BookIndex.FIELD_WORD_COUNT)
                    .lt(JsonData.of(condition.getWordCountMax()))
                )._toQuery());
            }

            if (Objects.nonNull(condition.getUpdateTimeMin())) {
                b.must(RangeQuery.of(m -> m
                    .field(EsConsts.BookIndex.FIELD_LAST_CHAPTER_UPDATE_TIME)
                    .gte(JsonData.of(condition.getUpdateTimeMin().getTime()))
                )._toQuery());
            }

            return b;

        });

        searchBuilder.query(q -> q.bool(boolQuery));

    }
}
可知DbSearchServiceImpl和EsSearchServiceImpl都是对SearchService接口的实现,启动哪个实现类取决于配置文件中的spring.elasticsearch.enabled字段,
若其为true,则启用EsSearchServiceImpl,若其为false,则启用DbSearchServiceImpl;
application.yml
 spring:
  data:
    # Redis 配置
    redis:
      host: 192.168.189.129
      port: 6379
      password: 111111

  # Elasticsearch 配置
  elasticsearch:
    # 是否开启 Elasticsearch 搜索引擎功能:true-开启 false-不开启
    enabled: false
    uris:
      - https://my-deployment-ce7ca3.es.us-central1.gcp.cloud.es.io:9243
    username: elastic
    password: qTjgYVKSuExX6tWAsDuvuvwl
此时配置文件中spring.elasticsearch.enabled字段值为false,因此此时启用了DbSearchServiceImpl实现类;
五、需要其它依赖的注解
1.@Data
lombok提供的注解,用于快速生成实体类的get、set、equals、hashCode、toString方法,以及生成包含final和@NonNull注解的成员变量的构造器(若类中有手写的构造器则不会再生成其它构造器);
示例
 package com.tzc.springboot.entity;

import lombok.Data;

@Data
public class User {

    private Integer id;
    private String username;
    private String password;
    private String nickname;
    private String email;
    private String phone;
    private String address;

}
2.@NoArgsConstructor、@RequiredArgsConstructor、@AllArgsConstructor
参考文章:https://blog.csdn.net/cauchy6317/article/details/102579178
lombok提供的注解,为实体类生成空参、全参构造器,一般与@Data一起使用;
3.@Builder
参考文章:https://blog.csdn.net/qq_39249094/article/details/120881578
lombok提供的注解,为实体类提供builder()方法——相当于一个全参构造器,允许使用.builder().build()的方式创建对象;
示例:
@Data
@Builder
public class UserLoginRespDto {

    @Schema(description = "用户ID")
    private Long uid;

    @Schema(description = "用户昵称")
    private String nickName;

    @Schema(description = "用户token")
    private String token;
}


return RestResp.ok(UserLoginRespDto.builder()
            .token(jwtUtils.generateToken(userInfo.getId(), SystemConfigConsts.NOVEL_FRONT_KEY))
            .uid(userInfo.getId())
            .nickName(userInfo.getNickName()).build());
4.@UtilityClass
参考文章:https://blog.csdn.net/qq_43406318/article/details/134136849
lombok提供的注解,用于标记一个类,以表示它是一个实用工具类,具体作用如下:
①类的构造函数会被声明为私有,并且将该类标记为final,不允许实例化该类;
②所有字段都被声明为 static,因此可以直接通过类名称来调用其中的方法,而不需要创建类的实例;
5.@Valid及相关注解
注解所需依赖:
        <!-- 请求参数校验相关 -->
        <dependency>
            <groupId>org.hibernate.validator</groupId>
            <artifactId>hibernate-validator</artifactId>
        </dependency>
代码演示:
查看代码
 @RestController
@RequestMapping(ApiRouterConsts.API_FRONT_USER_URL_PREFIX)
@RequiredArgsConstructor
public class UserController {

    private final UserService userService;

    /**
     * 用户注册接口
     */
    @PostMapping("register")
    public RestResp<UserRegisterRespDto> register(@Valid @RequestBody UserRegisterRespDto userRegisterRespDto){
        return userService.register(userRegisterRespDto);
    }

}


@Data
public class UserRegisterReqDto {

    @NotBlank(message="手机号不能为空!")
    @Pattern(regexp="^1[3|4|5|6|7|8|9][0-9]{9}$",message="手机号格式不正确!")
    private String username;

    @NotBlank(message="密码不能为空!")
    private String password;

    @NotBlank(message="验证码不能为空!")
    @Pattern(regexp="^\\d{4}$",message="验证码格式不正确!")
    private String velCode;

    /**
     * 请求会话标识,用来标识图形验证码属于哪个会话
     * */
    @NotBlank
    @Length(min = 32,max = 32)
    private String sessionId;

}
可以看出,该注解的作用主要就是对前端传来的参数进行校验,具体校验方式在接收前端数据的dto类中进行规定;


【推荐】国内首个AI IDE,深度理解中文开发场景,立即下载体验Trae
【推荐】编程新体验,更懂你的AI,立即体验豆包MarsCode编程助手
【推荐】抖音旗下AI助手豆包,你的智能百科全书,全免费不限次数
【推荐】轻量又高性能的 SSH 工具 IShell:AI 加持,快人一步
· Manus重磅发布:全球首款通用AI代理技术深度解析与实战指南
· 被坑几百块钱后,我竟然真的恢复了删除的微信聊天记录!
· 没有Manus邀请码?试试免邀请码的MGX或者开源的OpenManus吧
· 园子的第一款AI主题卫衣上架——"HELLO! HOW CAN I ASSIST YOU TODAY
· 【自荐】一款简洁、开源的在线白板工具 Drawnix