

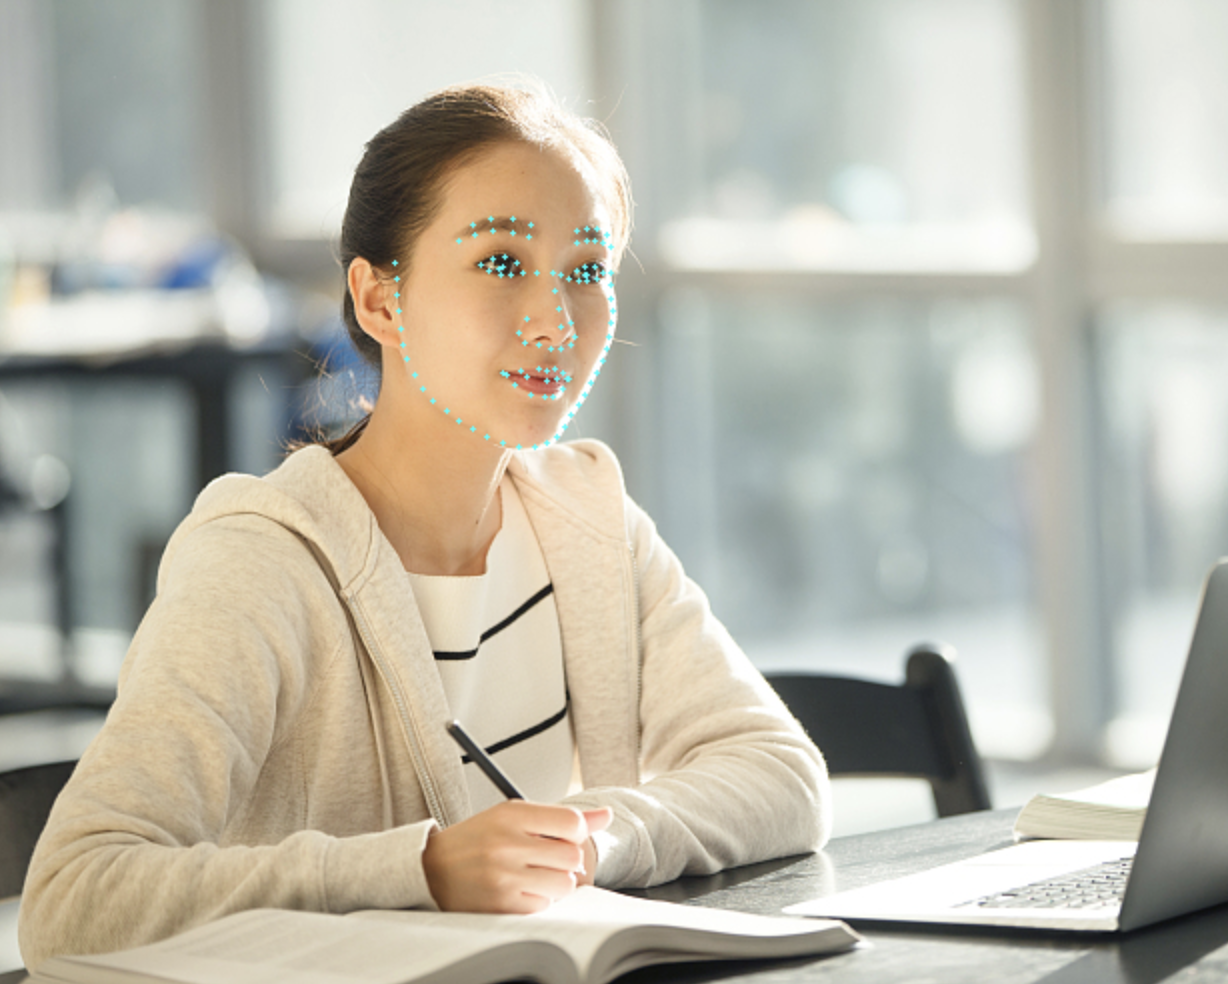
人脸关键点检测
人脸关键点检测
VisionKit 从基础库 2.25.0 版本 (安卓微信>=8.0.25,iOS微信>=8.0.24) 开始提供人脸关键点检测,作为与 marker 能力和 OSD 能力 平行的能力接口。
从 微信 >= 8.1.0 版本开始提供人脸3D关键点检测,作为人脸2D关键点检测的扩展能力接口。
方法定义
人脸关键点检测有2种使用方法,一种是输入一张静态图片进行检测,另一种是通过摄像头实时检测。
1. 静态图片检测
通过 VKSession.detectFace 接口 输入一张图像,算法检测到图像中的人脸,然后通过 VKSession.on 接口 输出人脸位置坐标、106个关键点坐标以及人脸在三维坐标系中的旋转角度。
示例代码:
const session = wx.createVKSession({
  track: {
    face: { mode: 2 } // mode: 1 - 使用摄像头;2 - 手动传入图像
  },
})
// 静态图片检测模式下,每调一次 detectFace 接口就会触发一次 updateAnchors 事件
session.on('updateAnchors', anchors => {
  anchors.forEach(anchor => {
    console.log('anchor.points', anchor.points)
    console.log('anchor.origin', anchor.origin)
    console.log('anchor.size', anchor.size)
    console.log('anchor.angle', anchor.angle)
  })
})

// 需要调用一次 start 以启动
session.start(errno => {
  if (errno) {
    // 如果失败,将返回 errno
  } else {
    // 否则,返回null,表示成功
    session.detectFace({
      frameBuffer, // 图片 ArrayBuffer 数据。人脸图像像素点数据,每四项表示一个像素点的 RGBA
      width, // 图像宽度
      height, // 图像高度
      scoreThreshold: 0.5, // 评分阈值
      sourceType: 1,
      modelMode: 1,
    })
  }
})
2. 通过摄像头实时检测
算法实时检测相机中的人脸,通过 VKSession.on 接口 实时输出人脸位置坐标、106个关键点坐标以及人脸在三维坐标系中的旋转角度。
示例代码:
const session = wx.createVKSession({
  track: {
    face: { mode: 1 } // mode: 1 - 使用摄像头;2 - 手动传入图像
  },
})

// 摄像头实时检测模式下,监测到人脸时,updateAnchors 事件会连续触发 (每帧触发一次)
session.on('updateAnchors', anchors => {
  anchors.forEach(anchor => {
    console.log('anchor.points', anchor.points)
    console.log('anchor.origin', anchor.origin)
    console.log('anchor.size', anchor.size)
    console.log('anchor.angle', anchor.angle)
  })
})

// 当人脸从相机中离开时,会触发 removeAnchors 事件
session.on('removeAnchors', () => {
  console.log('removeAnchors')
})

// 需要调用一次 start 以启动
session.start(errno => {
  if (errno) {
    // 如果失败,将返回 errno
  } else {
    // 否则,返回null,表示成功
  }
})
3. 开启3D关键点检测
想要开启人脸3D关键点检测能力,静态图片模式仅需要在2D调用基础上增加open3d字段,如下
// 静态图片模式调用
session.detectFace({
      ...,           // 同2D调用参数
      open3d: true,  // 开启人脸3D关键点检测能力,默认为false
    })
摄像头实时模式则在2D调用基础上增加3D开关更新函数,如下
// 摄像头实时模式调用
session.on('updateAnchors', anchors => {
  this.session.update3DMode({open3d: true})  // 开启人脸3D关键点检测能力,默认为false
  ...,  // 同2D调用参数
})
输出说明
1. 点位定义
人脸2D关键点与人脸3D关键点均为106点,定义方式如下图所示。在脸部姿态发生变化时,人脸2D关键点的轮廓点会始终沿着可见人脸边缘,而人脸3D关键点则维持立体结构。 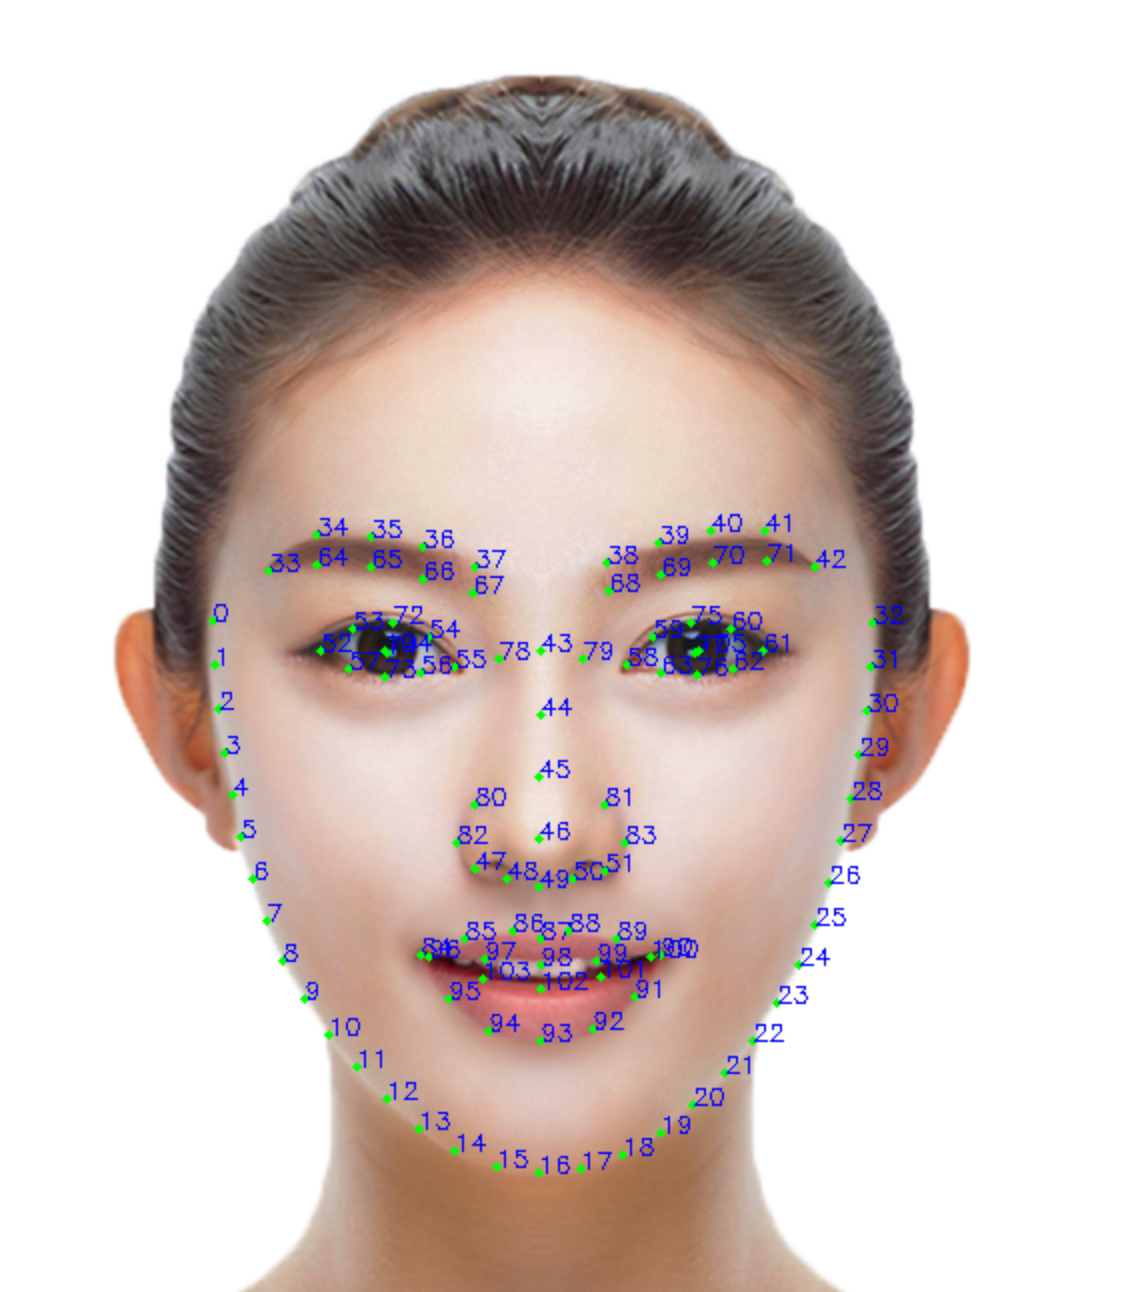
2. 人脸2D关键点
人脸2D关键点输出字段包括
struct anchor
{
  points,    // 106点在图像中的(x,y)坐标
  origin,    // 人脸框的左上角(x,y)坐标
  size,      // 人脸框的宽和高(w,h)
  angle,     // 人脸角度信息(pitch, yaw, roll)
  confidence // 人脸关键点的置信度
}
3. 人脸3D关键点
开启人脸3D关键点检测能力后,可以获取人脸2D及3D关键点信息,其中人脸3D关键点输出字段包括
struct anchor
{
  ...,               // 人脸关键点2D输出信息
  points3d,          // 人脸106点的(x,y,z)3D坐标
  camExtArray,       // 相机外参矩阵,定义为[R, T \\ 0^3 , 1], 使用相机内外参矩阵可将3D点位投影回图像
  ccamIntArray       // 相机内参矩阵,参考glm::perspective(fov, width / height, near, far);
}
应用场景示例
- 人脸检测。
- 人脸特效。
- 人脸姿态估计。
- 人脸 AR 游戏。
程序示例
特别说明
若小程序人脸识别功能涉及采集、存储用户生物特征(如人脸照片或视频、身份证和手持身份证、身份证照和免冠照等),此类型服务需使用微信原生人脸识别接口


【推荐】编程新体验,更懂你的AI,立即体验豆包MarsCode编程助手
【推荐】凌霞软件回馈社区,博客园 & 1Panel & Halo 联合会员上线
【推荐】抖音旗下AI助手豆包,你的智能百科全书,全免费不限次数
【推荐】博客园社区专享云产品让利特惠,阿里云新客6.5折上折
【推荐】轻量又高性能的 SSH 工具 IShell:AI 加持,快人一步
· DeepSeek “源神”启动!「GitHub 热点速览」
· 微软正式发布.NET 10 Preview 1:开启下一代开发框架新篇章
· C# 集成 DeepSeek 模型实现 AI 私有化(本地部署与 API 调用教程)
· DeepSeek R1 简明指南:架构、训练、本地部署及硬件要求
· 2 本地部署DeepSeek模型构建本地知识库+联网搜索详细步骤