Angular 学习笔记 (四) - Directive和Pipe
Directive
参考博客:https://segmentfault.com/a/1190000014704723
在Angular2中有三种类型的指令(Directive) ,如下:
1. 属性型指令 - 改变元素显示和行为的指令。例如:NgStyle, NgClass …
2. 结构型指令 - 通过添加和移除DOM元素来改变DOM结构的指令。例如:NgFor, NgIf, NgSwitch …
3. 组件 — 拥有模板的指令
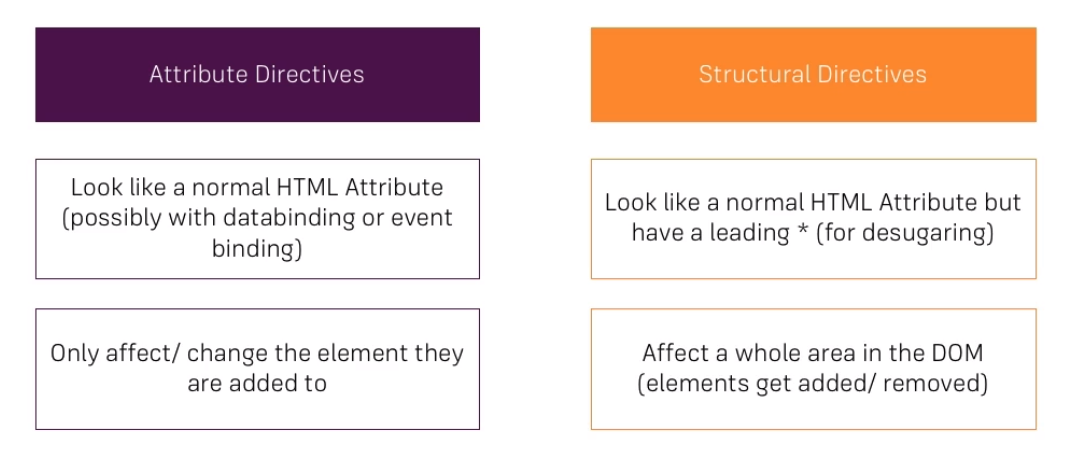
一. Attribute Directives
NgClass
利用NgClass指令,可以同时添加或移除多个类。NgClass绑定一个有形如CSS类名:value的对象,其中value的值是一个布尔型的值,当value值为true时,添加对应类型的模板元素,反之则移除。
 <div [ngClass]="{bordered: false}">此时div不包含bordered 类名</div>
 <div [ngClass]="{bordered: true}">此时div含有bordered 类名</div>
NgStyle
绑定一个有形如CSS属性名:value的对象,其中value为具体的css样式,eg:
<div [ngStyle]="{color: 'white','background-color':'green'}"></<div>
<span [ngStyle]="{color: color}">{{ color }} text</span>
二. Structural Directives
NgIf
ngIf指令在DOM中添加或移除HTML元素,基于表达式的值。如果表达式的计算结果为true,则插入元素DOM。否则,元素将从DOM中移除
[hidden]作为否定判断,有时可以代替NgIf
<p *ngIf="name === 'Boothstomper'">{{name}} hero works!</p>
<p [hidden]="name !== 'Boothstomper'">{{name}} hero works!</p>
NgFor
用于迭代一个含有Iterator的元素
假设定义了这样一个类:
1 export class Ingredient {
2   constructor(public name: string, public amount: number) {}
3 }
在appComponent中ts代码:

 1 import { Component, OnInit } from '@angular/core';
 2
 3 import { Ingredient } from '../shared/ingredient.model';
 4
 5 @Component({
 6   selector: 'app-shopping-list',
 7   templateUrl: './shopping-list.component.html',
 8   styleUrls: ['./shopping-list.component.css']
 9 })
10 export class ShoppingListComponent implements OnInit {
11   ingredients: Ingredient[] = [
12     new Ingredient('Apples', 5),
13     new Ingredient('Tomatoes', 10),
14   ];
15
16   constructor() { }
17
18   ngOnInit() {
19   }
20
21   onIngredientAdded(ingredient: Ingredient) {
22     if (this.ingredients.length < 5) {
23       this.ingredients.push(ingredient);
24     }
25   }
26
27   onIngredientCleared() {
28     this.ingredients.splice(0, this.ingredients.length);
29   }
30 }
NgFor的使用:
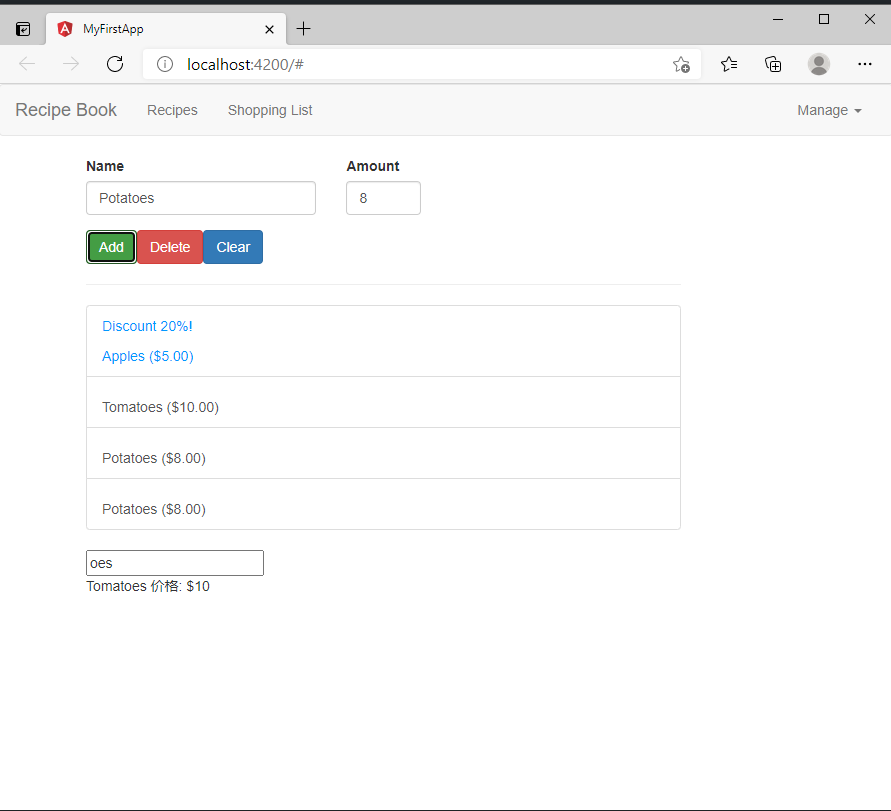
<a
    class="list-group-item"
    style="cursor: pointer"
    *ngFor="let ingredient of ingredients">
     {{ ingredient.name }} ({{ ingredient.amount | currency }})
</a>
NgSwitch
•ngSwitchCase
•ngSwitchDefault
示例:
<div [ngSwitch]="ingredient.name">
   <p *ngSwitchCase="'Apples'">Discount 20%!</p>
   <p *ngSwitchCase="'Oranges'">Discount 15%!</p>
   <p *ngSwitchDefault>NoDiscount</p>

  {{ ingredient.name }} ({{ ingredient.amount | currency }})
</div>
三. 自定义Directives
示例:添加一个Directive用于在网页中插入版权Copyright信息。并在外部支持一个选项选择是否总是显示
新建copyright.directive.ts
 1 import { Directive, ElementRef, OnInit, Renderer2, HostListener, HostBinding, Input } from '@angular/core';
 2
 3 @Directive({
 4     selector:'[appCopyright]'
 5 })
 6
 7 export class CopyrightDirective implements OnInit {
 8
 9     @Input() alwaysShow: boolean = false;
10
11     constructor(private elementRef: ElementRef, private renderer: Renderer2) {
12
13     }
14
15     ngOnInit() {
16         this.elementRef.nativeElement.innerText = '©Copyright: ' + this.elementRef.nativeElement.innerText;
17         this.elementRef.nativeElement.style.fontSize = '10px';
18         this.elementRef.nativeElement.style.float = 'right';
19         if (this.alwaysShow){
20             this.fontColor = 'black';
21         }
22     }
23
24     @HostBinding('style.color') fontColor: string = 'transparent';
25
26     @HostListener('mouseenter') mouseEnter(eventData: Event) {
27         this.fontColor = 'black';
28     }
29
30     @HostListener('mouseleave') mouseleave(eventData: Event) {
31         if (!this.alwaysShow){
32             this.fontColor = 'transparent';
33         }
34     }
35 }
使用这个Directive,需要在app.module.ts中加入依赖:
 1 @NgModule({
 2   declarations: [
 3     AppComponent,
 4     HeaderComponent,
 5     RecipesComponent,
 6     RecipeListComponent,
 7     RecipeDetailComponent,
 8     RecipeItemComponent,
 9     ShoppingListComponent,
10     ShoppingEditComponent,
11     CopyrightDirective,
12     ShowIfDirective,
13     DropdownDirective,
14     ShopItemPipe,
15     FilterPipe
16   ],
17   imports: [
18     BrowserModule,
19     FormsModule,
20   ],
21   providers: [],
22   bootstrap: [AppComponent]
23 })
24 export class AppModule { }
在html template中使用:
<p appCopyright [alwaysShow]="false">Aspirant</p>
PIPE
参考博客:https://blog.csdn.net/xnh_565175944/article/details/82115710
管道,简单来说,管道的作用就是传输。并且不同的管道具有不同的作用。(其实就是处理数据)
四. 常见的Pipe
DatePipe
日期管道,格式化日期
JsonPipe
将输入数据对象经过JSON.stringify()方法转换后输出对象的字符串
UpperCasePipe
将文本所有小写字母转换成大写字母
LowerCasePipe
将文本所有大写字母转换成小写字母
DecimalPipe
将数值按照特定的格式显示文本
CurrentcyPipe
将数值进行货币格式化处理
SlicePipe
将数组或者字符串裁剪成新子集
PercentPipe
将数值转百分比格式
使用方法示例:
person.name | uppercase
官方支持的Pipe从这里可以详细查阅:https://angular.io/api?type=pipe
五. 自定义Pipe
示例:添加一个Pipe为搜索输入框添加filter
 1 import {Pipe, PipeTransform} from '@angular/core';
 2 import { Ingredient } from './ingredient.model';
 3
 4 @Pipe({
 5     name: 'filter'
 6 })
 7 export class FilterPipe implements PipeTransform {
 8
 9     transform(value:Array<Ingredient>, filterString:string, propName:string): any {
10         if (value.length === 0) {
11             return value;
12         }
13         const resultArray = [];
14         for(const item of value) {
15             if (item.name.includes(filterString)) {
16                 resultArray.push(item);
17             }
18         }
19         return resultArray;
20     }
21
22 }
这里同样要在app.module.ts中添加依赖
这里所传参数,filterString在html template中使用示例如下:
<div class="list-temp" *appShowIf="true">
      <input type="text" [(ngModel)]="filteredItems">
      <div *ngFor="let ingredient of ingredients | filter:filteredItems:'filterString'">
        <p>{{ingredient}}</p>
      </div>
</div>
六. Pure Pipe和Impure Pipe
在app中有个添加按钮添加shopItem,但是可以发现添加的项目并不会自动添加到filter的过滤中。
这是因为默认pure的值为true,对于pure pipe,则在html中独立,不会收到以外元素的影响。
可以在filter.pipe.ts中设置pure值为false。设置以后,可以看到新add的项目自动添加到过滤后的列表中。
 1 import {Pipe, PipeTransform} from '@angular/core';
 2 import { Ingredient } from './ingredient.model';
 3
 4 @Pipe({
 5     name: 'filter',
 6     pure: false,
 7 })
 8 export class FilterPipe implements PipeTransform {
 9
10     transform(value:Array<Ingredient>, filterString:string, propName:string): any {
11         if (value.length === 0) {
12             return value;
13         }
14         const resultArray = [];
15         for(const item of value) {
16             if (item.name.includes(filterString)) {
17                 resultArray.push(item);
18             }
19         }
20         return resultArray;
21     }
22
23 }


【推荐】国内首个AI IDE,深度理解中文开发场景,立即下载体验Trae
【推荐】编程新体验,更懂你的AI,立即体验豆包MarsCode编程助手
【推荐】抖音旗下AI助手豆包,你的智能百科全书,全免费不限次数
【推荐】轻量又高性能的 SSH 工具 IShell:AI 加持,快人一步
· SQL Server 2025 AI相关能力初探
· Linux系列:如何用 C#调用 C方法造成内存泄露
· AI与.NET技术实操系列(二):开始使用ML.NET
· 记一次.NET内存居高不下排查解决与启示
· 探究高空视频全景AR技术的实现原理
· 阿里最新开源QwQ-32B,效果媲美deepseek-r1满血版,部署成本又又又降低了!
· Manus重磅发布:全球首款通用AI代理技术深度解析与实战指南
· 开源Multi-agent AI智能体框架aevatar.ai,欢迎大家贡献代码
· 被坑几百块钱后,我竟然真的恢复了删除的微信聊天记录!
· AI技术革命,工作效率10个最佳AI工具