Docker——安装
三、安装Docker
环境准备
- 需要会一点点的Linux的基础
- CentOs 7
- 使用XShell连接远程服务器进行操作
环境查看
#系统内核是 3.10 以上的
[root@iZwz908j8pbqd86doyrez5Z ~]# uname -r
3.10.0-1062.18.1.el7.x86_64
#系统版本
[root@iZwz908j8pbqd86doyrez5Z ~]# cat /etc/os-release
NAME="CentOS Linux"
VERSION="7 (Core)"
ID="centos"
ID_LIKE="rhel fedora"
VERSION_ID="7"
PRETTY_NAME="CentOS Linux 7 (Core)"
ANSI_COLOR="0;31"
CPE_NAME="cpe:/o:centos:centos:7"
HOME_URL="https://www.centos.org/"
BUG_REPORT_URL="https://bugs.centos.org/"

CENTOS_MANTISBT_PROJECT="CentOS-7"
CENTOS_MANTISBT_PROJECT_VERSION="7"
REDHAT_SUPPORT_PRODUCT="centos"
REDHAT_SUPPORT_PRODUCT_VERSION="7"
安装
-
卸载旧版本
sudo yum remove docker \ docker-client \ docker-client-latest \ docker-common \ docker-latest \ docker-latest-logrotate \ docker-logrotate \ docker-engine -
需要的安装包
yum install -y yum-utils -
设置镜像的仓库(需要将国外的修改为阿里云镜像)
yum-config-manager \ --add-repo \ http://mirrors.aliyun.com/docker-ce/linux/centos/docker-ce.repo -
更新yum软件包索引(附加操作)
yum makecache fase -
安装docker相关的包
yum install docker-ce docker-ce-cli containerd.io -
启动Docker
systemctl start docker -
查看安装的版本号以便确定是否安装成功
docker version -
Hello word!
docker run hello-world注:由于当前安装的docker还没有hello-world镜像,所以会进行下载
-
查看镜像
docker images -
卸载Docker
-
卸载依赖
yum remove docker-ce docker-ce-cli containerd.io -
删除目录
rm -rf /var/lib/docker

#/var/lib/docker:Docker的默认工作路径
-
-
阿里云镜像加速
-
进入阿里云,在服务中找到容器与镜像服务
-
设置密码
-
点击镜像加速,选择与操作系统相对应的文档
-
执行文档中相应的命令即可(这里以CentOs为例)
sudo mkdir -p /etc/docker
sudo tee /etc/docker/daemon.json <<-'EOF'
{
  "registry-mirrors": ["https://ltcwqcpi.mirror.aliyuncs.com"]
}
EOF
sudo systemctl daemon-reload
sudo systemctl restart docker
-
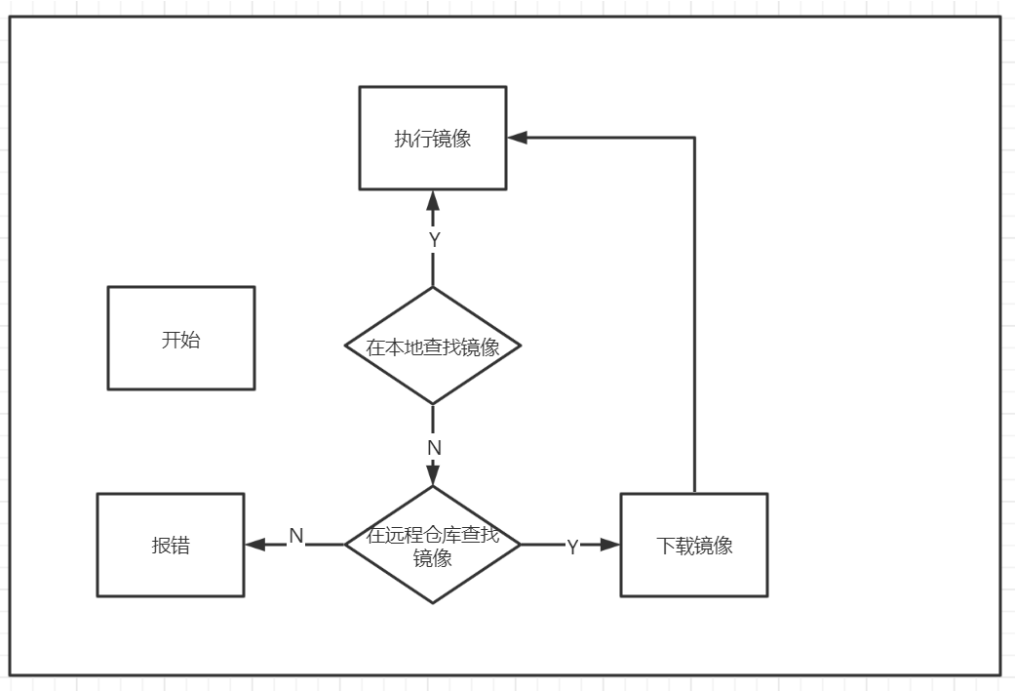
回顾hello-world镜像执行的流程
执行的指令:
#找不到
Unable to find image 'hello-world:latest' locally
#去远程仓库下载镜像
latest: Pulling from library/hello-world
#下载完成
0e03bdcc26d7: Pull complete
Digest: sha256:4cf9c47f86df71d48364001ede3a4fcd85ae80ce02ebad74156906caff5378bc
Status: Downloaded newer image for hello-world:latest

Hello from Docker!
This message shows that your installation appears to be working correctly.

To generate this message, Docker took the following steps:
 1. The Docker client contacted the Docker daemon.
 2. The Docker daemon pulled the "hello-world" image from the Docker Hub.
    (amd64)
 3. The Docker daemon created a new container from that image which runs the
    executable that produces the output you are currently reading.
 4. The Docker daemon streamed that output to the Docker client, which sent it
    to your terminal.

To try something more ambitious, you can run an Ubuntu container with:
 $ docker run -it ubuntu bash

Share images, automate workflows, and more with a free Docker ID:
 https://hub.docker.com/

For more examples and ideas, visit:
 https://docs.docker.com/get-started/

底层原理
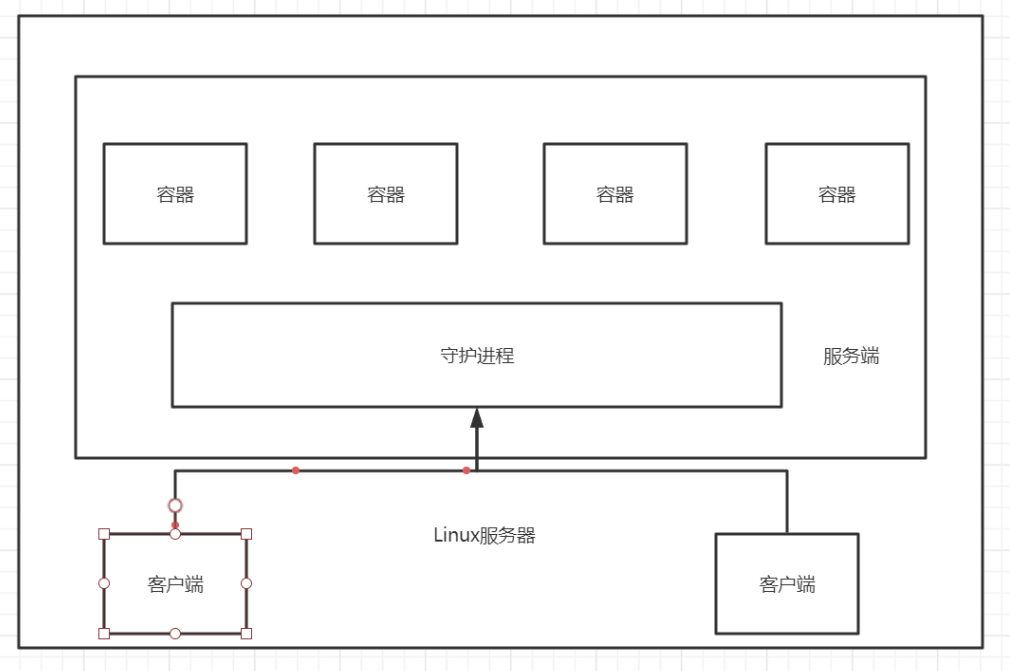
工作方式:
Docker是一个Client-Server结构的系统,Docker的守护进程运行在主机上.通过Socker从客户端访问.DockerServer接收到Docker-Client的指令,就会执行这个命令

- 每个容器有自己独立的端口号,这端口也只能在自己的容器内访问
- 客户端与容器间也存在通信
Docker为什么比VM块?
-
Docker有着比虚拟机更少的抽象层
-
docker利用的是宿主机的内核,vm需要的是Guest OS(虚拟机的os称为Guest OS,物理机的os称为Host OS)


