Nginx
 Nginx 应用服务
Nginx原理介绍
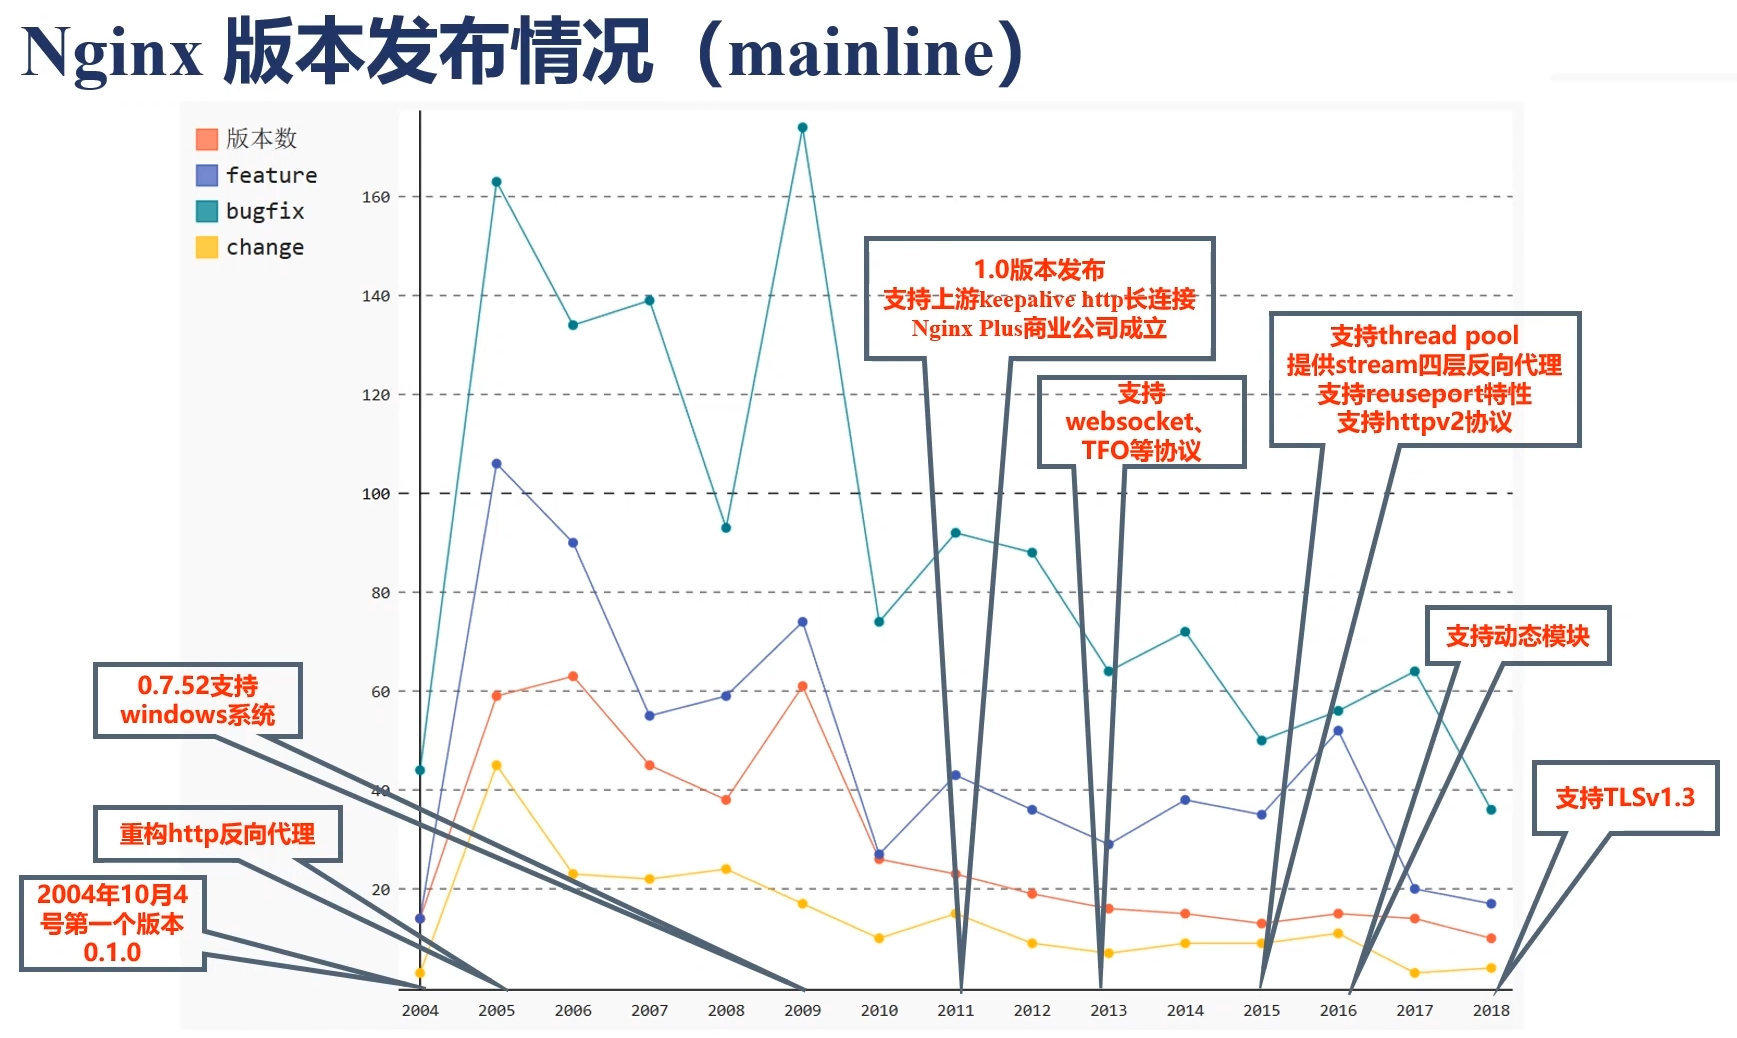
1.1 Nginx 概述
Nginx是⼀一个开源且⾼高性能、可靠的HTTP中间件、代理理服务。
开源: 直接获取源代码
高性能: 支持海海量量并发
1.2 Nginx的优缺点
-
优点
- 高并发量
- 根据官方给出的数据,能够支持高达 50000 个并发连接数的响应。
- 内存消耗少
- 处理静态文件,同样起web 服务,比apache 占用更少的内存及资源,所以它是轻量级的。
- 简单稳定
- 配置简单,基本在一个conf文件中配置,性能比较稳定,可以7*24小时长时间不间断运行。
- 支持Rwrite重写规则
- 能够根据域名、URL的不同, 将HTTP请求分发到不同的后端服务器群组。
- 功能多,低成本
- Nginx可以做高并发的负载均衡,且Nginx是开源免费的,如果使用F5等硬件来做负载均衡,硬件成本比较高。
- 高并发量
-
缺点
- 动态处理差
- Nginx处理静态文件好,耗费内存少,但是处理动态页面则很鸡肋
- rewrite弱
- 虽然Nginx支持rewrite功能,但是相比于Apache来说,Apache比nginx 的rewrite 要强大。
- 动态处理差
1.3 Nginx应用场景
静态处理
反向代理
负载均衡
资源缓存
安全防护
访问限制
访问认证
1.4 Nginx的进程模型
Nginx的启动方式有两种:
-
单进程启动:
- 此时系统中只有一个进程,这个进程既是master进程,也是worker进程。
-
多进程启动:
- 此时系统中有且仅有一个master进程,有多个worker进程,master进程主要是用来管理worker进程的。
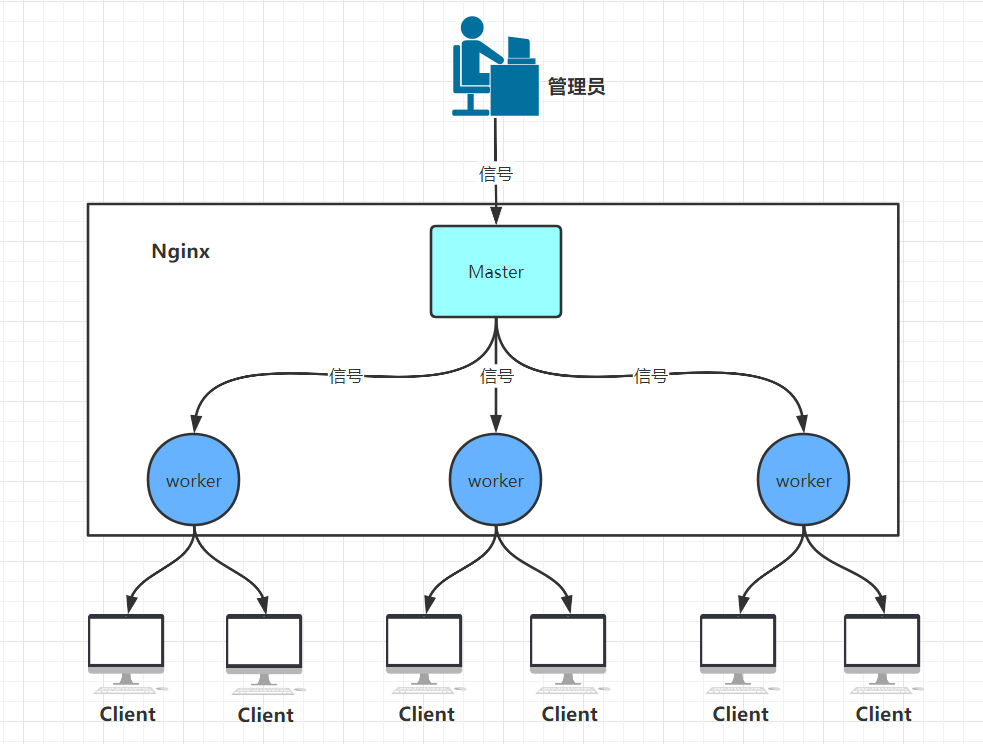
Nginx有两种进程:
Master主进程:
- 接收客户端的请求,然后在将客户端的请求交给他下面的子进程,子进程返回处理结果后,再将处理结果返回给客户端
- 监控并管理子进程的运行状态,当子进程出现异常情况下退出后,自动生成新的子进程
Worker子进程:
- 将主进程的请求交给内核去处理,然后在继续接收主进程发来的请求,当内核处理完后,返回给子进程处理结果,然后子进程再将结果返回给主进程。
- Nginx子进程的数量一般我们会设置与当前服务器的CPU核心数一致,可以使用
auto指令让Nginx跟进系统自动设置worker
1.5 Nginx的组成逻辑图

1.6 Nginx的模块是什么
Nginx之所以有如此多的特性和功能,就是因为有大量的第三方开发者为其开发第三方模块

上图中都可以在nginx官方文档中查询,这里就不再叙述了~~
Nginx应用部署
1.1 进入 nginx 官网,下载
Nginx官方网站:http://nginx.org/

1.2 安装Nginx依赖
安装 openssl、zlib
yum -y install make zlib zlib-devel gcc gcc-c++ libtool openssl openssl-devel pcre pcre-devel
1.3 安装Nginx并修改属主属祖
#解压
tar xf nginx-1.12.2.tar.gz -C /usr/src/ && cd /usr/src/nginx-1.12.2/

#配置、编译、安装
./configure --prefix=/usr/local/nginx --user=nginx --group=nginx --with-http_ssl_module --with-http_stub_status_module --with-threads --with-file-aio --with-http_sub_module --with-http_dav_module --with-http_flv_module --with-mail --with-mail_ssl_module --with-stream --with-stream_ssl_module --with-stream_realip_module && make && make install && cd

#修改属主属组
useradd -s /sbin/nologin -M nginx
chown -R nginx:nginx /usr/local/nginx/
编译参数解释:
# 这三个模块是用来做四层负载转发的
--with-stream
--with-stream_ssl_module
--with-stream_realip_module

#指定安装位置
--prefix=/usr/local/nginx

#指定worker进程运行的用户和组
--user=nginx --group=nginx

#开启状态监听模块
--with-http_stub_status_module

#指向配置文件存放位置
--conf-path=/xxx/xxx/

#指向错误日志存放位置
--error-log-path=/xxx/xxx/

#指向pid文件存放位置
--pid-path=/xxx/xxx/

#启用rtsig模块支持(实时信号)
--with-rtsig_module

# 临时缓存⽂文件
--http-client-body-temp-path=/xxx/xxx/client_tem
--http-proxy-temp-path=/xxx/xxx/proxy_temp
--http-fastcgi-temp-path=/xxx/xxx/fastcgi_temp
--http-uwsgi-temp-path=/xxx/xxx/uwsgi_temp
--http-scgi-temp-path=/xxx/xxx/scgi_temp

#添加模块
--add-module=/xxx/xxx/

#启用select模块支持(一种轮询模式,不推荐在高载环境下使用)禁用:--without-select_module
--with-select_module

#启用ngx_http_ssl_module支持(使支持https请求,需已安装openssl)
--with-http_ssl_module

#启用ngx_http_xslt_module支持(过滤转换XML请求)
--with-http_xslt_module

#启用ngx_http_image_filter_module支持(传输JPEG/GIF/PNG 图片的一个过滤器)(默认为不启用,要用到gd库)
--with-http_image_filter_module

#启用ngx_http_gzip_static_module支持(在线实时压缩输出数据流)
--with-http_gzip_static_module

#启用ngx_http_degradation_module支持(允许在内存不足的情况下返回204或444码)
--with-http_degradation_module

#禁用ngx_http_access_module支持(该模块提供了一个简单的基于主机的访问控制,允许或拒绝基于ip地址)
--without-http_access_module

#禁用ngx_http_auth_basic_module(该模块是可以使用用户名和密码基于http基本认证方法,来保护你的站点或其部分内容)
--without-http_auth_basic_module

#禁用ngx_http_rewrite_module支持(该模块允许使用正则表达式改变URL)
--without-http_rewrite_module

#禁用ngx_http_fastcgi_module支持(该模块允许Nginx 与FastCGI 进程交互,并通过传递参数来控制FastCGI 进程工作。)
--without-http_fastcgi_module
1.4 设置防火墙规则
开放80端口号
查看开放的端口号
firewall-cmd --list-all

设置开放的端口号
firewall-cmd --add-service=http -permanent
sudo firewall-cmd --add-port=80/tcp -permanent

重启防火墙
firewall-cmd -reload
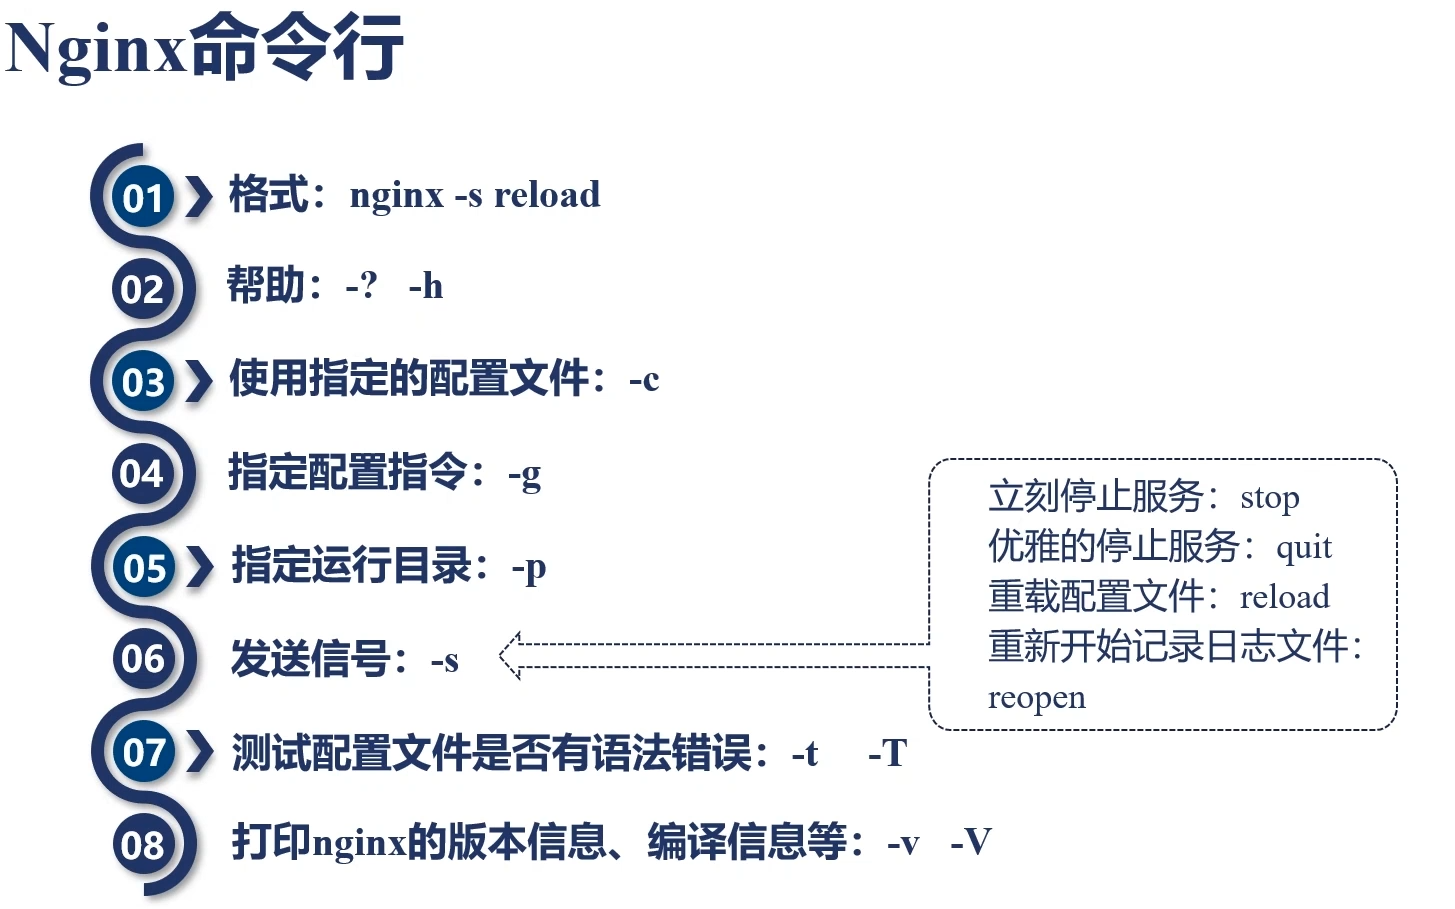
1.5 Nginx常用命令 及 信号
命令
信号
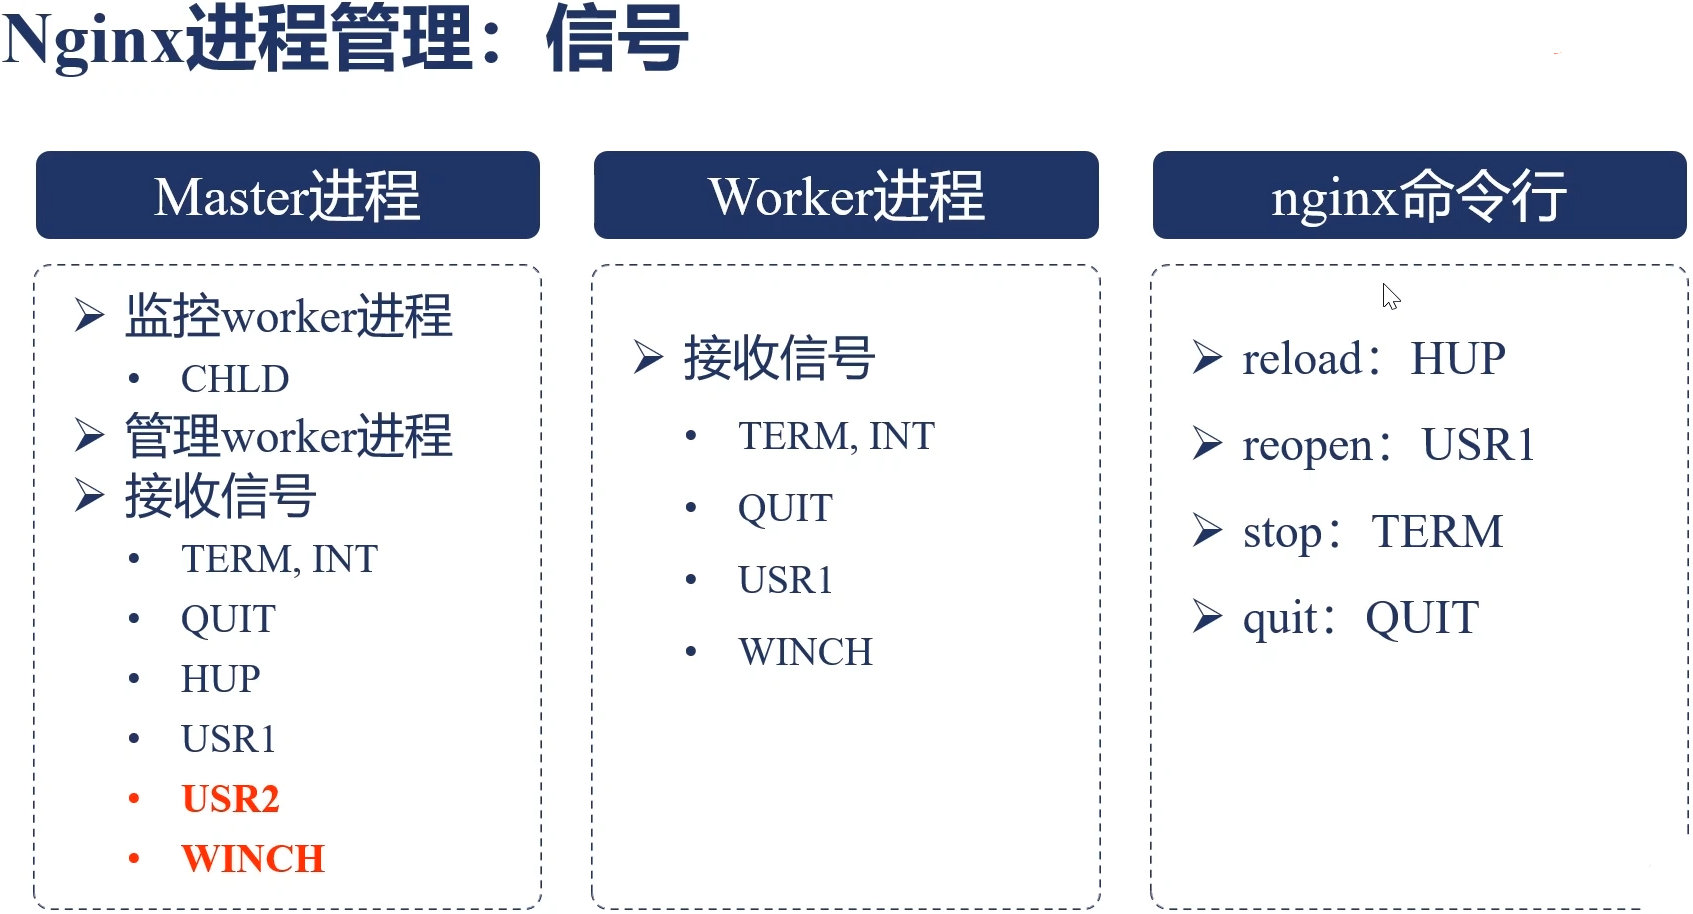
信号详解:
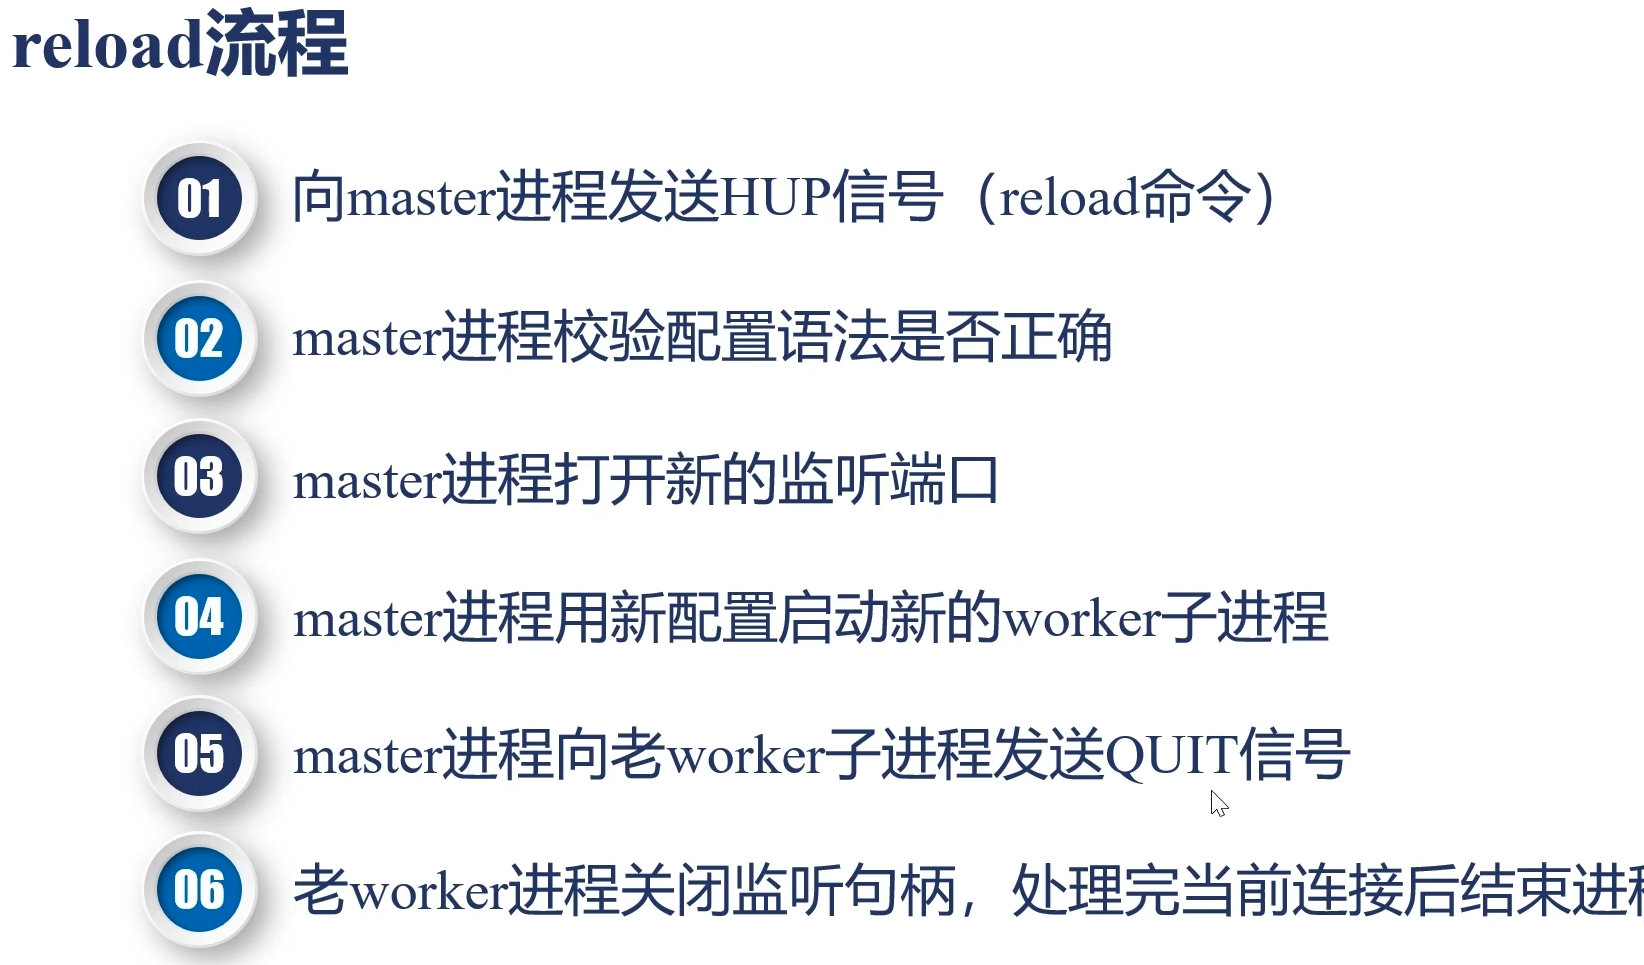
1、TERM,INT:nginx的主进程马上被关闭,不能完整处理正在使用的nginx的用户的请求,等同于 nginx -s stop。
2、QUIT:优雅的关闭nginx进程,在处理完所有正在使用nginx用户请求后再关闭nginx进程,等同于nginx -s quit。
3、HUP: nginx主进程不变,nginx进程不关闭,但是重新加载配置文件。等同于nginx -s reload。
4、USR1:不用关闭nginx进程就可以重读日志,此命令可以用于nginx的日志定时备份,按月/日等时间间隔分割有用。
5、USR2:nginx的版本需要升级的时候,不需要停止nginx,就能对nginx升级。
6、WINCH:配合USR2对nginx升级,优雅的关闭nginx旧版本的进程,
reload重载配置文件的过程
优化Nginx且编写启动脚本
1.6 优化Nginx且编写启动脚本
两者做一个就行,当然也可以都做
# Nginx软连接
ln -s /usr/local/nginx/sbin/* /usr/local/bin/

# Nginx启动脚本
cat <<EOF> /lib/systemd/system/nginx.service
[Unit]
Description=nginx
After=network.target

[Service]
Type=forking
ExecStart=/usr/local/nginx/sbin/nginx
ExecReload=/usr/local/nginx/sbin/nginx -s reload
ExecStop=/usr/local/nginx/sbin/nginx -s quit
PrivateTmp=true

[Install]
WantedBy=multi-user.target
EOF

# 给予启动脚本执行权限
chmod u+x /lib/systemd/system/nginx.service

# 上述脚本解释
[Unit]:服务的说明
Description:描述服务
After:描述服务类别
[Service]服务运行参数的设置,注意:[Service]的启动、重启、停止命令全部要求使用绝对路径
Type=forking是后台运行的形式
ExecStart为服务的具体运行命令
ExecReload为重启命令
ExecStop为停止命令
PrivateTmp=True表示给服务分配独立的临时空间
[Install]运行级别下服务安装的相关设置,可设置为多用户,即系统运行级别为3
1.7 启动Nginx服务
# 删除nginx.conf配置文件所有的注释行和空行(这步可有可无)
sed -i /#.*/d /usr/local/nginx/conf/nginx.conf
sed -i /^$/d /usr/local/nginx/conf/nginx.conf

# 启动nginx
systemctl start nginx
systemctl enable nginx

# 查看状态
netstat -anptu|grep "nginx"
#####################################################################################################
tcp        0      0 0.0.0.0:80              0.0.0.0:*               LISTEN      4827/nginx: master
#####################################################################################################

ps -aux|grep "nginx"
#####################################################################################################
root 4827  0.0  0.1  46108  1152 ?  Ss  21:56   0:00 nginx: master process /usr/local/nginx/sbin/nginx
nginx      4830  0.0  0.1  46556  1936 ?        S    21:56   0:00 nginx: worker process
root       4849  0.0  0.0 112676   980 pts/0    R+   21:57   0:00 grep --color=auto nginx
#####################################################################################################

# 查看安装Nginx时的编译参数和版本
nginx -V
#####################################################################################################
nginx version: nginx/1.12.2
built by gcc 4.8.5 20150623 (Red Hat 4.8.5-39) (GCC)
built with OpenSSL 1.0.2k-fips  26 Jan 2017
TLS SNI support enabled
configure arguments: --prefix=/usr/local/nginx --user=nginx --group=nginx --with-http_ssl_module --with-http_stub_status_module --with-threads --with-file-aio --with-http_sub_module --with-http_dav_module --with-http_flv_module --with-mail --with-mail_ssl_module --with-stream --with-stream_ssl_module --with-stream_realip_module
#####################################################################################################
Nginx常用模块及内置变量
1.1 Nginx常用模块
Nginx模块分为 Nginx官方模块 以及 Nginx第三方模块
| Nginx编译选项 | 模块作用 |
|---|---|
| ngx_http_core_module | 包含⼀些核心的http参数配置,对应Nginx的配置区块部分 |
| ngx_http_access_module | 访问控制模块,用来控制网站用户对Nginx的访问 |
| ngx_http_gzip_module | 压缩模块,对Nginx返回的数据压缩,属于性能优化模块 |
| ngx_http_fastcgi_module | fastci模块,和动态应用相关的模块,例如PHP |
| ngx_http_proxy_module | proxy代理模块 |
| ngx_http_upstream_module | 负载均衡模块,可以实现网站的负载均衡功能及节点的健康检查。 |
| ngx_http_rewrite_module | URL地址重写模块 |
| ngx_http_limit_conn_module | 限制用户并发连接数及请求数模块 |
| ngx_http_limit_req_module | 限制Nginx request processing rate根据定义的key |
| ngx_http_log_module | 访问日志模块,以指定的格式记录Nginx客户访问日志等信息 |
| ngx_http_auth_basic_module | Web认证模块,设置Web用户通过账号密码访问Nginx |
| nginx_http_ssl_module | ssl模块,用于加密的http连接,如https |
1.2 Nginx内置变量
http请求变量
Nginx内置变量
自定义变量
| 变量名 | 含义 |
|---|---|
| $uri | 当前请求的uri,不带参数 |
| $request_uri | 请求的uri,带完整参数 |
| $host | http请求报文中host首部,如果没有则以处理此请求的虚拟主机的主机名代替 |
| $hostname | nginx服务运行在主机的主机名 |
| $remote_addr | 客户端IP |
| $remote_port | 客户端口 |
| $remote_user | 用户认证时客户端用户输入的用户名 |
| $request_filename | 用户请求中的URI经过本地root或alias转换后映射的本地文件路径 |
| $request_method | 请求方法, GET POST PUT |
| $server_addr | 服务器地址 |
| $server_port | 服务器端口 |
| $server_name | 服务器名称 |
| $server_protocol | 服务器向客户端发送响应时的协议, 如http/1.1 http/1.0 |
| $scheme | 在请求中使用scheme, 如http://xxx.com中的http |
| $http_HEADER | 匹配请求报文中指定的HEADER |
| $http_host | 匹配请求报文中的host首部 |
| $document_root | 当前请求映射到的root配置 |
Nginx.conf 配置文件
1.1 Nginx配置文件语法

1.2 配置文件整体结构
Nginx主配置文件 nginx.conf,整个配置文件是以区块的形式组织的;一般,每个区块以一对大括号 {} 来表示开始与结束。
Main位于nginx.conf配置文件的最高层;Main层下可以有Event、HTTP层
HTTP层下面允许有多个Server层, 用于对不同的网站做不同的配置
Server层也允许有多个location, 用于对不同的路径资源进行不同模块的配置

1.2.1 main全局块
配置影响nginx全局的指令。主要包括:
- 配置运行Nginx服务器用户(组)
- worker process数
- Nginx进程
- PID存放路径错误日志的存放路径
- 配置文件的引入
1.2.2 events块
配置影响nginx服务器或与用户的网络连接。主要包括:
- 设置网络连接的序列化
- 是否允许同时接收多个网络连接
- 事件驱动模型的选择
- 最大连接数的配置
1.2.3 http块
可以嵌套多个server,配置代理,缓存,日志定义等绝大多数功能和第三方模块的配置。主要包括:
- 定义MIMI-Type
- 自定义服务日志
- 允许sendfile方式传输文件
- 连接超时时间
- 单连接请求数上限
1.2.4 server块
配置虚拟主机的相关参数,一个http中可以有多个server。主要包括:
- 配置网络监听
- 基于名称的虚拟主机配置
- 基于IP的虚拟主机配置
1.2.5 location块
配置请求的路由,以及各种页面的处理情况。主要包括:
- location配置
- 请求根目录配置更改
- location的URI
- 网站默认首页配置
1.3 Nginx的默认配置
#### main全局块 ####
worker_processes  1;                           // nginx的worker工作进程,一般数值为cpu核数

#### events事件块 ####
events {
    worker_connections  1024;                  // 每个后台worker process进程的最大并发连接数
}

#### http块 ####
http {
    include       mime.types;                  // 文件扩展名与类型映射表
    default_type  application/octet-stream;    // 默认文件类型
    sendfile        on;                        // 开启高效传输模式,默认为off
    keepalive_timeout  65;                     // 连接超时时间,单位是秒

    #### server块 ####
    server {
        listen       80;                       // 监听端口
        server_name  localhost;                // 提供服务的域名或主机名

        #### location块 ####
        location / {
            root   html;                       // 存放网站路径
            index  index.html index.htm;       // 默认访问首⻚文件
        }
        // 指定错误代码, 统一定义错误页面, 错误代码重定向到新的 Locaiton资源上
        error_page   500 502 503 504  /50x.html;
        location = /50x.html {
            root   html;
        }
    }
}
Nginx日志文件详解
1.1 Nginx日志配置
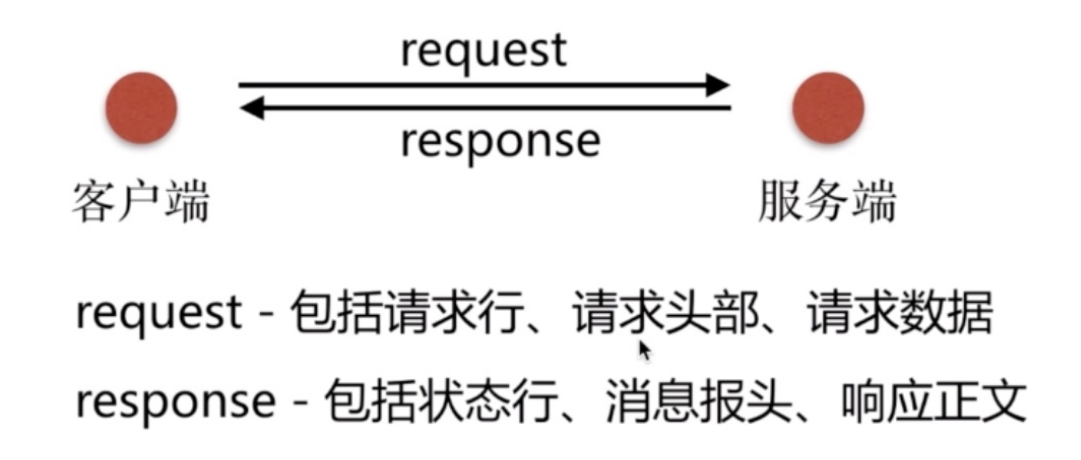
在学习日志之前, 我们需要先了解下HTTP请求和返回
curl -v https://www.baidu.com
log_format语法格式及参数语法说明如下:
### 配置语法: 包括: error.log access.log ###
Syntax: log_format  <NAME>  <String>;
Default: log_format combined "...";
Context: http

### Nginx默认日志格式 ###
log_format  main  '$remote_addr - $remote_user [$time_local] "$request" '
                  '$status $body_bytes_sent "$http_referer" '
                  '"$http_user_agent" "$http_x_forwarded_for"';

### Nginx日志变量解释 ###
log_format
    $remote_addr             #记录访问网站的客户端地址
    $remote_user             #nginx认证用户名
    $time_local              #记录访问时间与时区
    $request                 #用户的http请求行, GET等方法、http协议版本
    $status                  #http状态码,记录请求返回的状态码,例如:200、301、404等
    $body_bytes_sent         #服务器发送给客户端的响应body字节数大小,默认为B(byte)
    $http_referer            #记录此次请求是从哪个连接访问过来的,可以根据该参数进行防盗链设置。
    $http_user_agent         #记录客户端访问信息,例如:浏览器、手机客户端等
    $http_x_forwarded_for    #当前端有代理服务器时,设置web节点记录客户端地址的配置,此参数生效的前提是代理服务器也要进行相关的x_forwarded_for设置
1.2访问日志段分析
摘出来一段部分结果:
120.4.15.223 - lemon [22/Jun/2020:12:01:43 +0800] "GET /index.php/archives/56/ HTTP/1.1" 200 4865 "http://www.lemon-li.cn/" "Mozilla/5.0 (Windows NT 10.0; Win64; x64; rv:77.0) Gecko/20100101 Firefox/77.0" "-"
各个字段所对应的变量
192.168.2.254                            //$remote_addr
lemon                                    //$remote_user
[22/Jun/2020:12:01:43 +0800]             //$time_local
"GET /index.php/archives/56/ HTTP/1.1"   //$request
200                                      //$status
4865                                     //$body_bytes_sent
"http://www.lemon-li.cn/"                //$http_referer
"Mozilla/5.0 (Windows xx Firefox/77.0"   //$http_user_agent
"-"                                      //$http_x_forwarded_for
1.3 Nginx访问日志统计
##统计tcp连接数
netstat -anpt|awk 'NR>=3{print $6}'|sort -rn|uniq -c

##统计访问日志中访问量最多的10个IP地址, 这下面两个都行
awk '{print $1}' /usr/local/nginx/logs/access.log | sort | uniq -c | sort -nr -k1 | head -n 10
cat /usr/local/nginx/logs/access.log|awk '{a[$1]++} END {for(b in a) print b"\t"a[b]}'|sort -k2 -r|head -n 10

##统计HTTP状态码次数
awk '{S[$9]++};END{for(i in S) {print S[i],i}}' /usr/local/nginx/logs/access.log|sort -nr|head

##注解:
awk '{ print $1}':取数据的低1域(第1列)。
sort:对IP部分进行排序。
uniq -c:打印每一重复行出现的次数。(并去掉重复行)。
sort -nr -k1:按照重复行出现的次序倒序排列,-k1以第一列为标准排序。
head -n 10:取排在前5位的IP 。
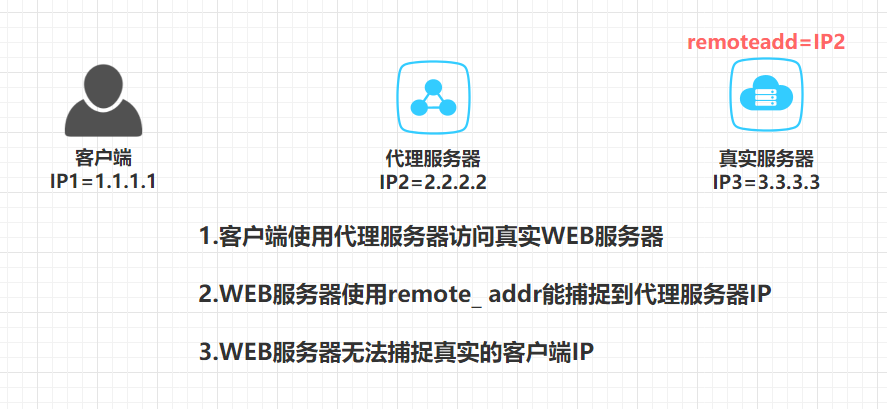
1.4 http_access_module局限性
下图是没有使用 http_x_forwarded_for 记录真实客户端IP地址以及代理服务器IP
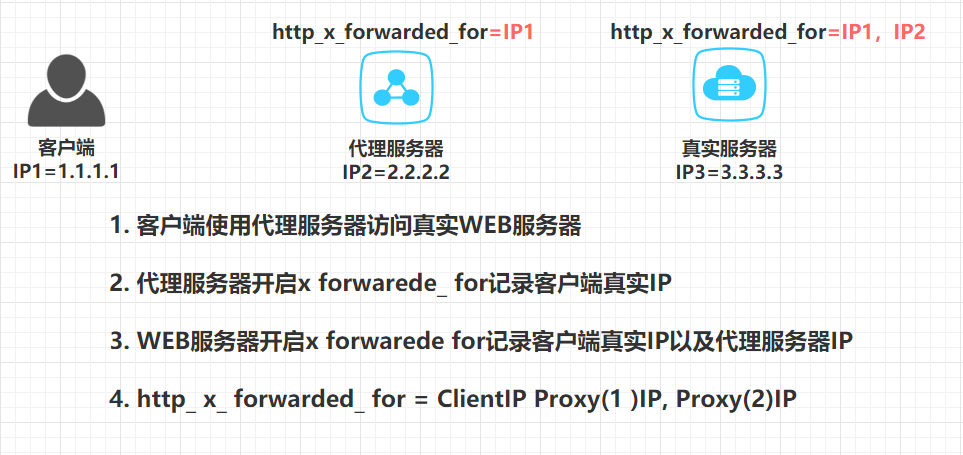
下图是使用 http_x_forwarded_for 记录真实客户端IP地址以及代理服务器IP
解决方式
-
采用HTTP头信息控制访问, 代理以及web服务开启 http_x_forwarded_for
-
结合geo模块作
-
通过HTTP自动以变量传递
Nginx常用的基本配置
1.1 Nginx 虚拟主机
所谓虚拟主机,在web服务器里就是一个独立的网站 站点,这个站点对应独立的域名(也可能是IP或端口),具有独立的程序及资源目录,可以独立地对外提供服务供用户访问。
1.1.1 配置基于域名虚拟主机(最常用的)
1.创建web站点⽬目录
[root@nginx conf]# mkdir -p /soft/code/{www,bbs}
[root@nginx conf]# echo "www" > /soft/code/www/index.html
[root@nginx conf]# echo "bbs" > /soft/code/bbs/index.html
[root@nginx conf]# tree /soft/
/soft/
└── code
    ├── bbs
    │   └── index.html
    └── www
        └── index.html

2.配置虚拟主机
[root@nginx conf]# cat vhosts/{www,bbs}.conf
server {
    listen 80;
    server_name www.lemon-li.cn;
    root /soft/code/www;
    index    index.html;
    ...
}
server {
    listen 80;
    server_name bbs.lemon-li.cn;
    root /soft/code/bbs;
    index    index.html;
    ...
}

3.访问
[root@nginx conf]# curl www.lemon-li.cn
www

[root@nginx conf]# curl bbs.lemon-li.cn
bbs
1.1.2 配置不同端口访问不同虚拟主机
// 仅修改 listen 监听端口即可 , 但不能和系统端口发生冲突!
server {
	...
	listen 8001;
    ...
}

server {
    ...
    listen 8002;
    ...
}
1.1.3 配置虚拟主机别名
所谓虚拟主机别名,就是虚拟主机设置除了主域名以外的一个域名,实现用户访问的多个域名对应同一个虚拟主机网站的功能
这里以bbs.lemon-li.cn域名的虚拟主机为例,为其增加一个别名lemon.com时,出现网站内容和访问bbs.lemon-li.cn是一样的
具体配置如下:
// 默认配置
[root@nginx conf]# vim /etc/nginx/nginx.conf
server {
    listen 80;
    server_name bbs.lemon-li.cn;
    ...
}

// 别名配置
[root@nginx conf]# vim /etc/nginx/nginx.conf
server {
    listen 80;
    server_name bbs.lemon-li.cn lemon-li-cn;
    ...
}

// 使用 Linux 下 curl 测试结果
[root@nginx conf]# curl lemon-li.cn
bbs.lemon-li.cn

[root@nginx conf]# curl bbs.lemon-li.cn
bbs.lemon-li.cn

// 访问带 bbs 和不带 bbs 是一样的, 当然除了别名实现也可以通过 rewrite 实现
1.2 Nginx 状态监控
--with-http_stub_status_module 记录 Nginx 客户端基本访问状态信息
默认用法:
Syntax: stub_status;
Default: off
Context: server, location
具体配置:
location /status {
	stub_status on;
	access_log off;
}
提供了以下状态信息:
Active connections: 1
## Nginx 当前活跃连接数, 有多少人在请求

server accepts handled requests
 1 1 1
## server表示Nginx处理接收握⼿总次数。
## accepts表示Nginx处理接收总连接数。
## 请求丢失数=(握⼿数-连接数)可以看出,本次状态显示没有丢失请求。
## handled requests,表示总共处理了了1次请求。

Reading: 0 Writing: 1 Waiting: 0
## Reading表示Nginx读取数据
## Writing表示Nginx写的情况
## Waiting表示Nginx开启keep-alive长连接情况下, 既没有读也没有写, 建立连接情况
使用ab命令测试压力
ab -c 10 -n 100 http://192.168.2.1:80/index.html
-c  并发数
-n  总的请求数
-k  是否开启长连接
访问查看

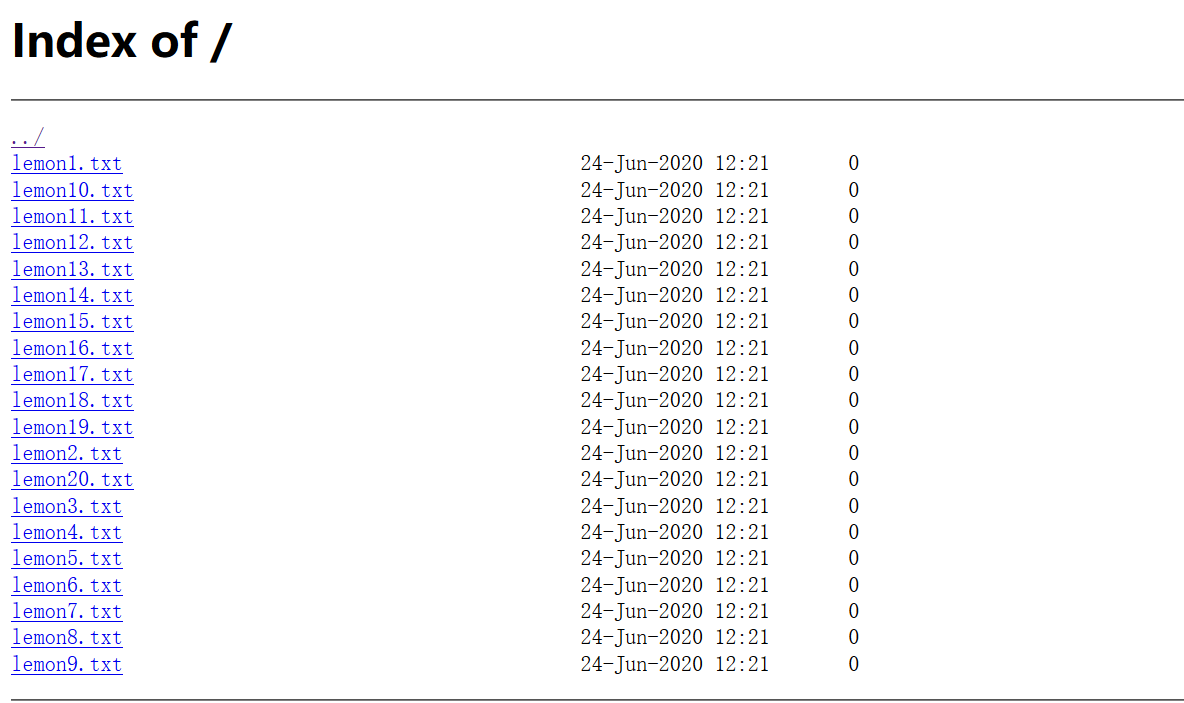
1.3 Nginx下载站点
Nginx默认是不允许列出整个目录浏览下载的 !
默认用法:
Syntax: autoindex on | off;
Default: off;
Context: http, server, location
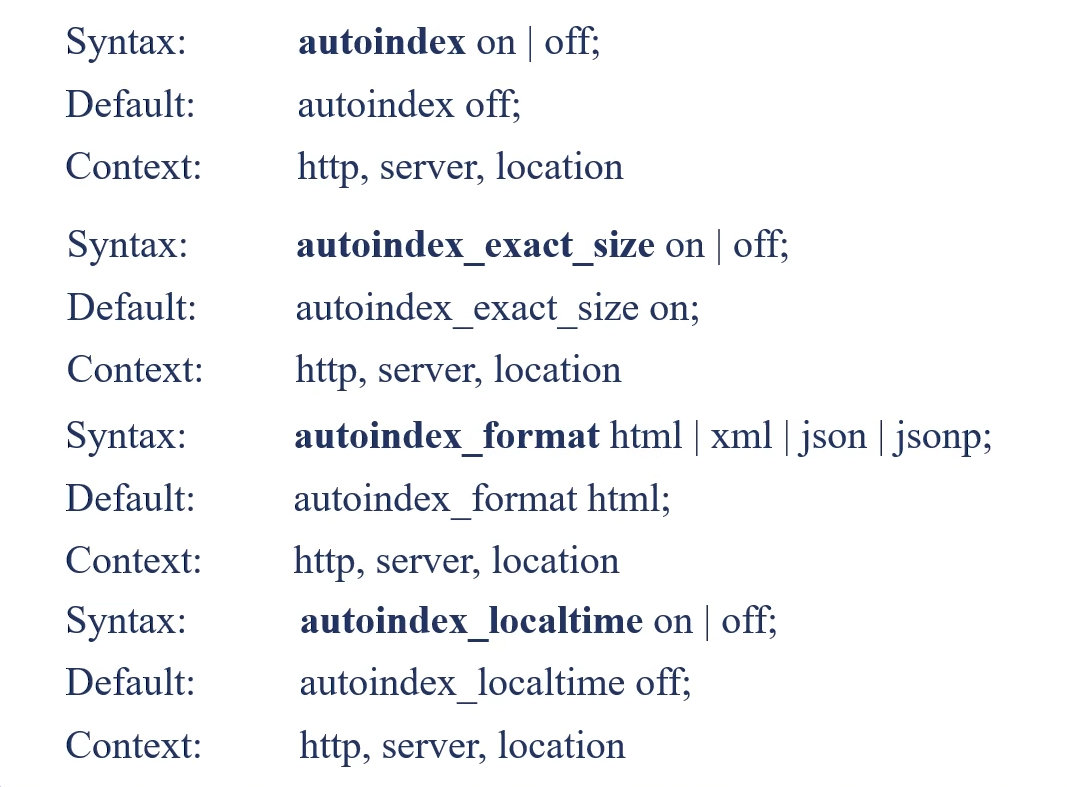
//autoindex常⽤用参数
autoindex_exact_size off;
默认为on, 显示出文件的确切大小,单位是bytes。
修改为off,显示出文件的大概大小,单位是kB或者MB或者GB。
autoindex_localtime on;
默认为off,显示的文件时间为GMT时间。
修改为on, 显示的文件时间为文件的服务器时间。
charset utf-8,gbk;
默认中文目录乱码,添加上解决乱码。
具体配置:
//开启目录浏览
location / {
    root  /download;
    autoindex  on;
    charset utf-8,gbk;
    autoindex_localtime on;
    autoindex_exact_size off;
}

//创建站点资源
[root@nginx /]# mkdir -p /download
[root@nginx /]# cd download/
[root@nginx download]# touch lemon{1..20}.txt
展示效果:
1.4 Nginx 访问控制
基于IP的访问控制 http_access_module
基于⽤用户登陆认证 http_auth_basic_module
1.4.1 基于IP的访问控制
语法格式如下:
// 允许配置语法
Syntax: allow address | CIDR | unix: | all;
Default: —
Context: http, server, location, limit_except

// 拒绝配置语法
Syntax: deny address | CIDR | unix: | all;
Default: —
Context: http, server, location, limit_except
具体配置如下:
// 配置拒绝某一个 IP, 其他全部允许
location /status {
    deny 192.168.2.254;
    allow all;
    stub_status on;
    access_log off;
}

// 只允许某一个网段访问 , 其它全部拒绝
location /status {
    allow 192.168.2.0/24;
    deny all;
    stub_status on;
    access_log off;
}
1.4.2 基于用户登陆认证
语法格式如下:
// 配置语法
Syntax:  auth_basic string | off;
Default: auth_basic off;
Context: http, server, location, limit_except

// ⽤户密码记录配置文件
Syntax:  auth_basic_user_file file;
Default: —
Context: http, server, location, limit_except
具体配置如下:
// 需要安装依赖组件
[root@nginx ~]# yum install httpd-tools
[root@nginx ~]# htpasswd -c /usr/local/nginx/conf/user.conf lemon
[root@nginx ~]# cat /usr/local/nginx/conf/user.conf
lemon:$apr1$TLvI5fjG$vOFaI7v3AxSFD/M/NO3TP/

// 可在 http,server,location 里添加如下信息
auth_basic "Auth access Blog Input your Passwd!";
auth_basic_user_file /usr/local/nginx/conf/user.conf;
1.4.3 上面两者也可以一起用
//想对哪个网页进行加密就在哪个里面加入以下配置:
auth_basic "Auth access Blog Input your Passwd!";
auth_basic_user_file /usr/local/nginx/conf/user.conf;
allow 192.168.2.254;
deny all;
1.5 Nginx 访问限制
1.5.1 http协议的连接与请求
HTTP是建立在TCP, 在完成HTTP请求需要先建立TCP三次握手(称为TCP连接),在连接的基础上在HTTP请求。
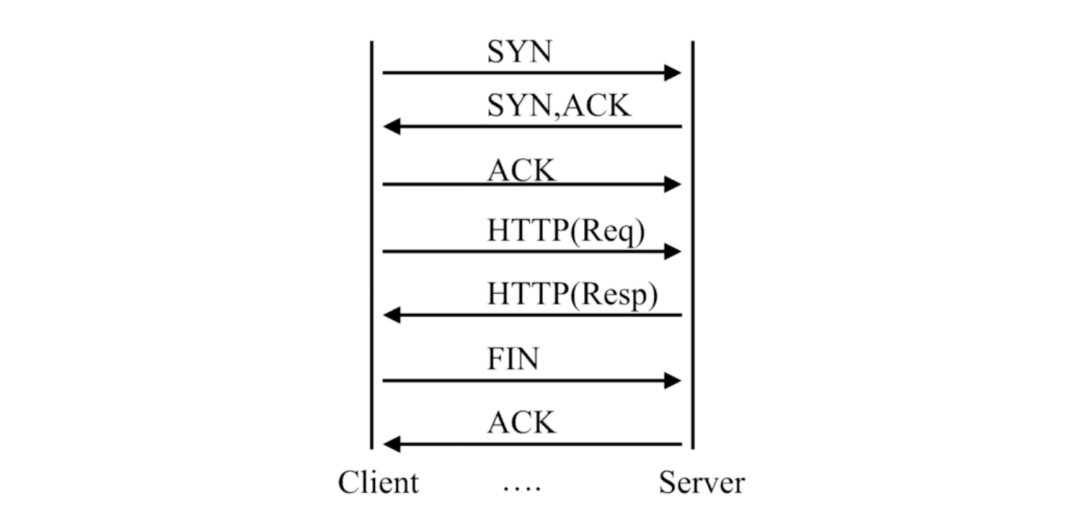
1.5.2 HTTP 协议的连接与请求
-
HTTP 请求建立在一次 TCP 连接基础上
-
一次 TCP 请求至少产生一次 HTTP 请求
| HTTP协议版本 | 连接关系 |
|---|---|
| HTTP1.0 | TCP不能复用 |
| HTTP1.1 | 顺序性TCP复用 |
| HTTP2.0 | 多路复用TCP复用 |
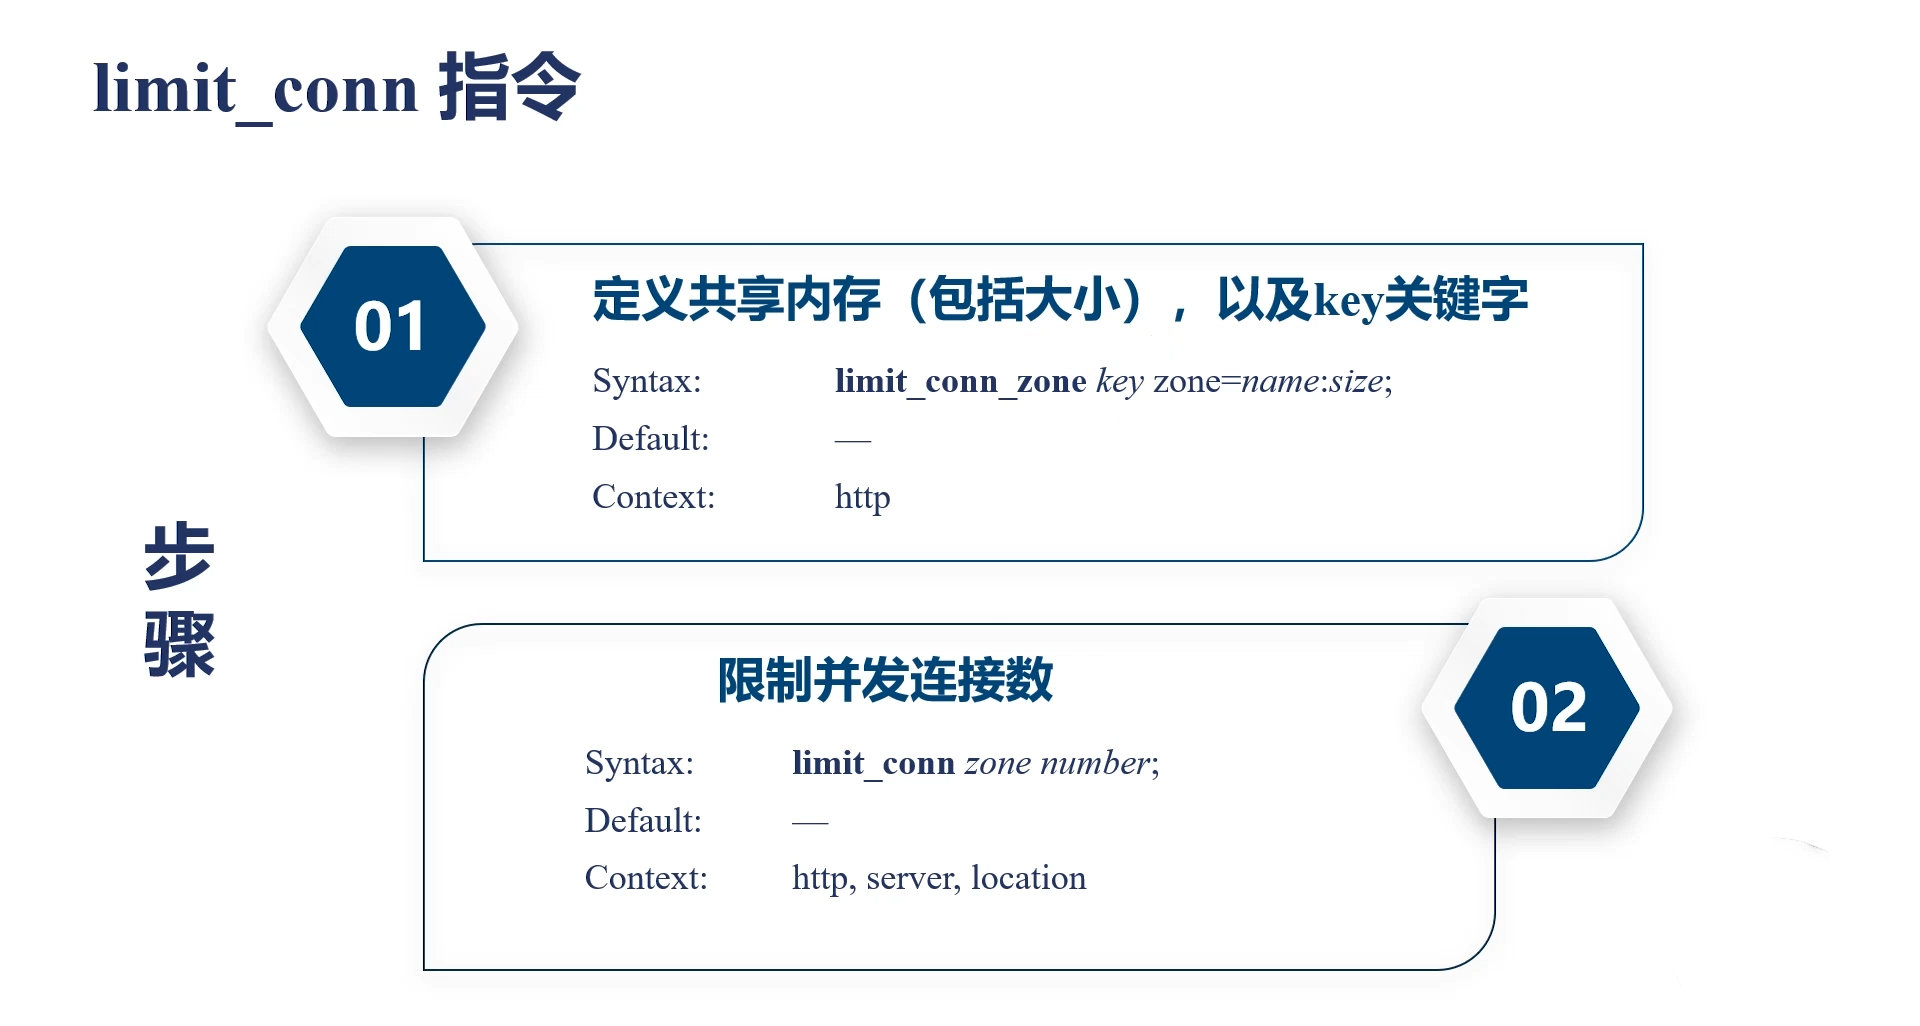
1.5.3 Nginx 连接限制
连接频率限制 limit_conn_module
连接限制语法:
具体配置如下 :
http {
//http 段配置连接限制 , 同一时刻只允许一个客户端 IP 连接
limit_conn_zone $binary_remote_addr zone=conn_zone:10m;
...
server {
...
location / {
// 限制向客户端返回的速度,每秒钟速率50字节,这个配置仅仅只是为了能看到效果
limit_rate 50;
// 同一时刻只允许一个客户端 IP 连接
limit_conn conn_zone 1;
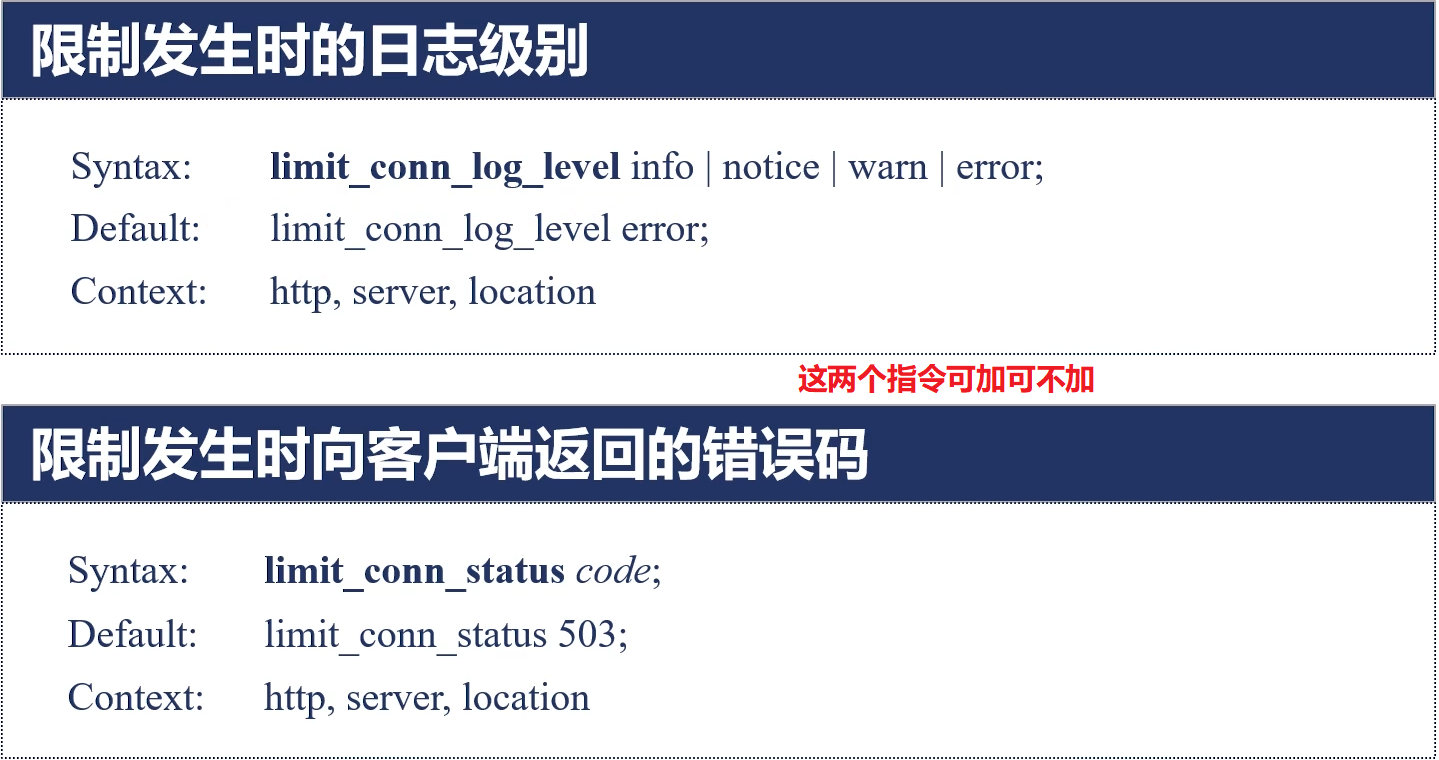
// 修改限制发生时向客户端返回的错误码,可做可不做
limit_conn_status 500;
// 修改限制发生时的日志级别,可做可不做
limit_conn_log_level warn;
...
}
}
}
打开两个终端同时请求
curl http://ttk.lemon-li.cn/
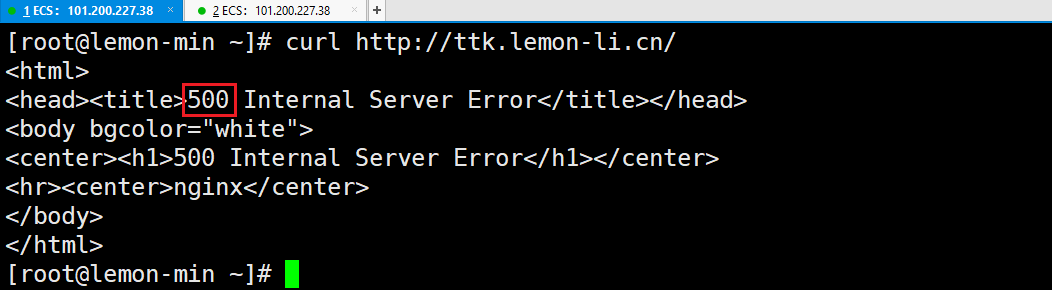

1.5.4 Nginx 请求限制
请求频率限制 limit_req_module
请求限制语法:

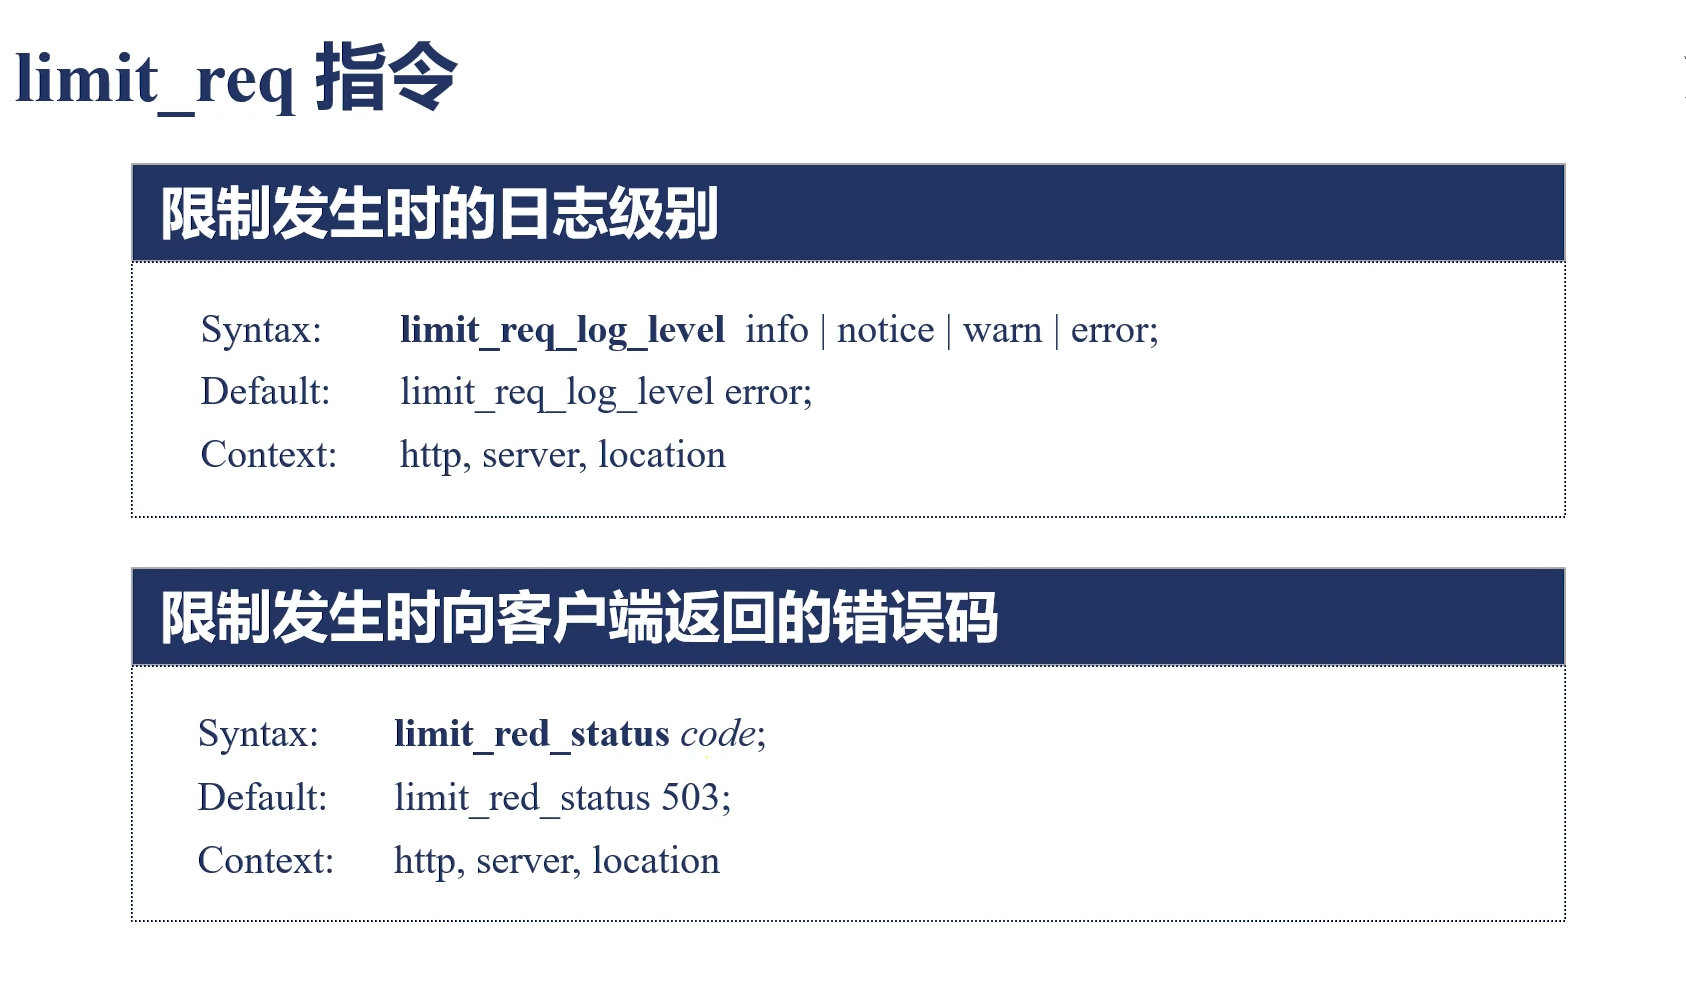
具体配置如下:
http {
    //http 段配置请求限制, rate 限制速率,限制一秒钟最多一个 IP 请求
    limit_req_zone $binary_remote_addr zone=req_zone:10m rate=1r/s;
    ...
    server {
		...
        location / {
// 1r/s 内只接收一个请求, 剩下的将被延迟处理, 请求数超过 burst 定义的数量, 多余请求拒绝处理并返回503错误码给客户端
            limit_req zone=req_zone burst=3 nodelay;
            ...
        }
    }
}
ab压力测试:
ab -c 10 -n 100 http://192.168.2.1:80/index.html


Benchmarking ttk.lemon-li.cn (be patient).....done


Server Software:        nginx
Server Hostname:        ttk.lemon-li.cn
Server Port:            80

Document Path:          /
Document Length:        25 bytes

Concurrency Level:      20
Time taken for tests:   0.033 seconds
Complete requests:      50
Failed requests:        46         # 可以看到这里,失败了46次,也就是说50次请求只成功了4次,也就是1 + 3 = 4
   (Connect: 0, Receive: 0, Length: 46, Exceptions: 0)
Write errors:           0
Non-2xx responses:      46
Total transferred:      18062 bytes
HTML transferred:       9576 bytes
Requests per second:    1503.17 [#/sec] (mean)
Time per request:       13.305 [ms] (mean)
Time per request:       0.665 [ms] (mean, across all concurrent requests)
Transfer rate:          530.28 [Kbytes/sec] received

Connection Times (ms)
              min  mean[+/-sd] median   max
Connect:        3    4   0.6      4       5
Processing:     3    4   0.6      4       5
Waiting:        3    4   0.6      4       5
Total:          6    8   1.1      8      10

Percentage of the requests served within a certain time (ms)
  50%      8
  66%      8
  75%      9
  80%      9
  90%      9
  95%      9
  98%     10
  99%     10
 100%     10 (longest request)
使用浏览器测试狂点刷新5次就会报503

查看错误日志信息
2020/06/24 16:27:04 [error] 960#0: *1903 limiting requests, excess: 3.486 by zone "req_zone", client: 101.200.227.38, server: ttk.lemon-li.cn, request: "GET / HTTP/1.0", host: "ttk.lemon-li.cn"
1.5.5 整体总结
连接限制 没有 请求限制有效?
-
前面说过, 多个请求可以建立在一次的TCP连接之上, 那么我们对请求的精度限制,当然比对一个连接的限制会更加的有效。
-
因为同一时刻只允许一个连接请求进入。
-
但是同一时刻多个请求可以通过一个连接进入。
-
所以请求限制才是比较合理的限制解决方案。
1.6 Nginx日志分割
技术要点:
剪切日志后,使用 kill -USR1 发送信号重新生成日志文件,同时还不影响网站请求处理进程。
错误时通过echo和tee -a命令将错误显示的同时写入到日志文件/var/log/messages。
1.6.1 手动日志分割
// 查看nginx日志文件
[root@nginx ~]# ll -h /usr/local/nginx/logs/
总用量 60K
-rw-r--r-- 1 root root 52K 6月  25 00:41 access.log
-rw-r--r-- 1 root root 478 6月  25 00:39 error.log
-rw-r--r-- 1 root root   4 6月  25 00:33 nginx.pid

// 先备份日志文件
[root@nginx logs]# pwd
/usr/local/nginx/logs
[root@nginx logs]# cp access.log access.log.bak
[root@nginx logs]# ll -h
总用量 60K
-rw-r--r-- 1 nginx root 52K 6月  25 00:51 access.log
-rw-r--r-- 1 root  root 52K 6月  25 00:41 access.log.bak
-rw-r--r-- 1 nginx root 829 6月  25 00:52 error.log
-rw-r--r-- 1 root  root   4 6月  25 00:33 nginx.pid

// 手动执行日志切割命令 或 发送信号
[root@nginx logs]# nginx -s reopen
[root@nginx logs]# ll -h
总用量 60K
-rw-r--r-- 1 nginx root   0 6月  25 00:51 access.log
-rw-r--r-- 1 root  root 52K 6月  25 00:41 access.log.bak
-rw-r--r-- 1 nginx root 829 6月  25 00:52 error.log
-rw-r--r-- 1 root  root   4 6月  25 00:33 nginx.pid
1.6.2 自动日志分割
就是写一个脚本,然后放到计划任务当中按时间自动切割日志
// 编写日志切割脚本
[root@nginx ~]# vi /root/cut_nginx_log.sh
#!/bin/bash
datetime=$(date -d "-1 day" "+%Y%m%d")
log_path="/usr/local/nginx/logs"
pid_path="/usr/local/nginx/logs/nginx.pid"
mkdir -p $log_path/backup
if [ -f $pid_path ];then
    mv $log_path/access.log $log_path/backup/access.log-$datetime
    kill -USR1 $(cat $pid_path)  #USR1通常被用来告知应用程序重载配置文件
    find $log_path/backup -mtime +30 | xargs rm -f
else
    echo "Error,Nginx is not working!"  >> /var/log/messages
fi

// 给予脚本执行权限
[root@nginx ~]# chmod +x /root/cut_nginx_log.sh

//添加至计划任务,每天的00:00点执行
[root@nginx ~]# echo "0 0 * * * /root/cut_nginx_log.sh" >> /var/spool/cron/root
[root@nginx ~]# crontab –l

//手动执行一下这个脚本验证下效果
[root@nginx ~]# bash -x /root/cut_nginx_log.sh
++ date -d '-1 day' +%Y%m%d
+ datetime=20200624
+ log_path=/usr/local/nginx/logs
+ pid_path=/usr/local/nginx/logs/nginx.pid
+ mkdir -p /usr/local/nginx/logs/backup
+ '[' -f /usr/local/nginx/logs/nginx.pid ']'
+ mv /usr/local/nginx/logs/access.log /usr/local/nginx/logs/backup/access.log-20200624
++ cat /usr/local/nginx/logs/nginx.pid
+ kill -USR1 968
+ find /usr/local/nginx/logs/backup -mtime +30
+ xargs rm -f

// 查看日志是否被切割及备份
[root@nginx ~]# ls /usr/local/nginx/logs/backup/
access.log-20200624
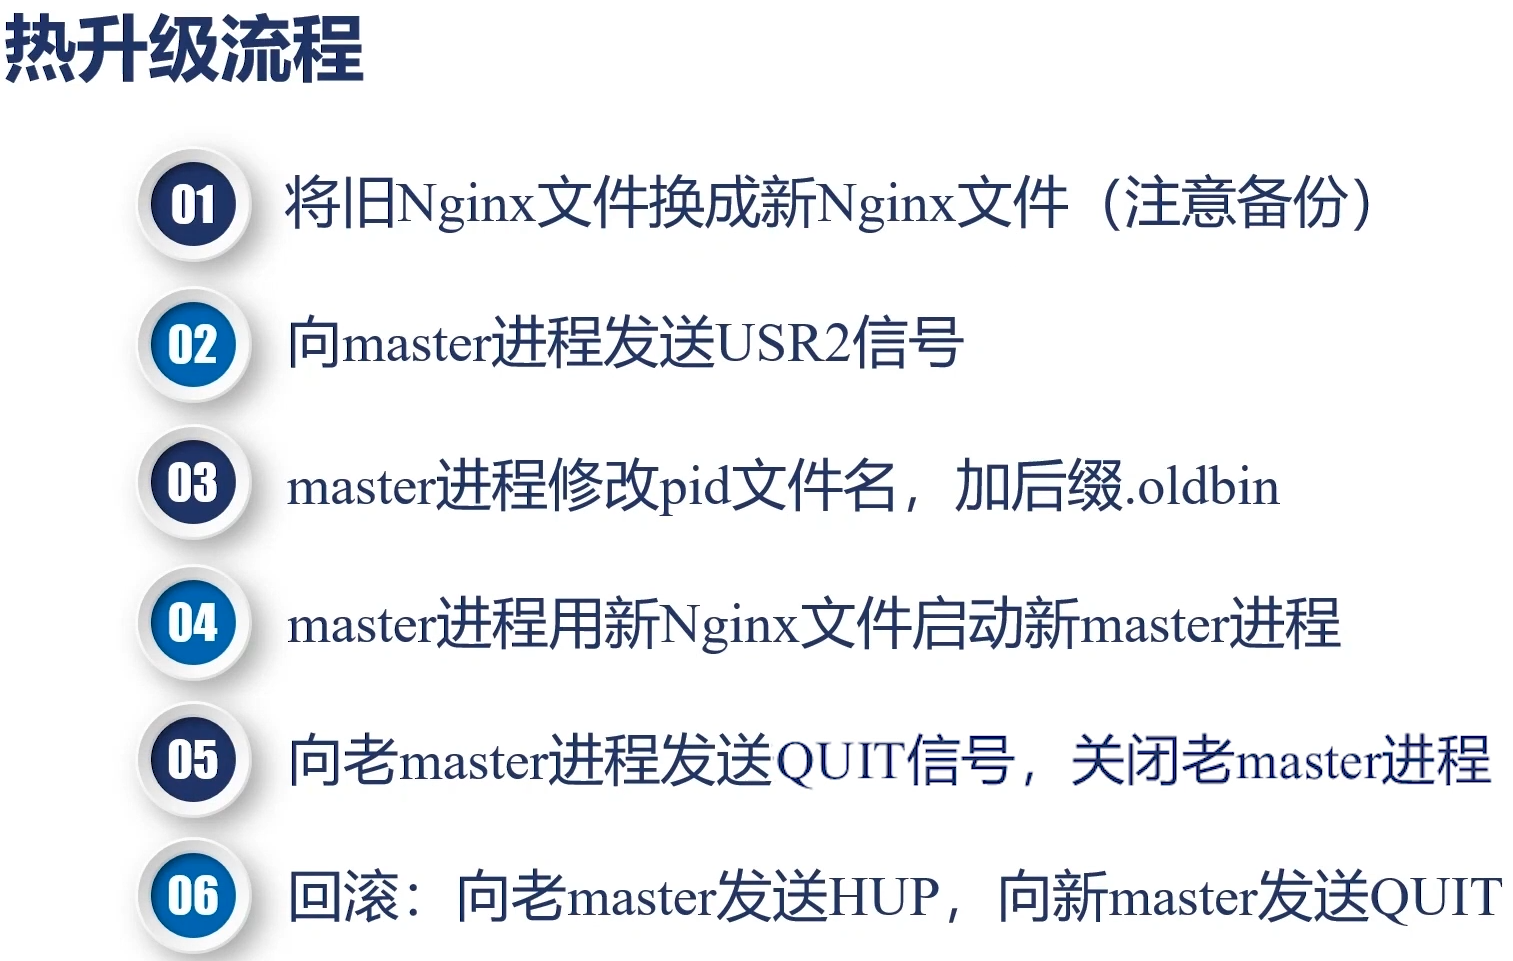
1.7 Nginx平滑升级部署
- 作用:在不影响客户端业务的情况下升级Nginx服务
- 切记,这里一定要使用绝对路径启动Nginx,才能够作热升级
Nginx信号详解:
1.TERM,INT:nginx的主进程马上被关闭,不能完整处理正在使用的nginx的用户的请求,等同于 nginx -s stop。
2.QUIT:优雅的关闭nginx进程,在处理完所有正在使用nginx用户请求后再关闭nginx进程,等同于nginx -s quit。
3.HUP: nginx主进程不变,nginx进程不关闭,但是重新加载配置文件。等同于nginx -s reload。
4.USR1:不用关闭nginx进程就可以重读日志,此命令可以用于nginx的日志定时备份,按月/日等时间间隔分割有用。
5.USR2:nginx的版本需要升级的时候,不需要停止nginx,就能对nginx升级。
6.WINCH:配合USR2对nginx升级,优雅的关闭nginx旧版本的进程
具体操作如下:
- 当前版本为:nginx-1.12.2
- 升级版本为:nginx-1.16.1
// 查看旧的nginx都编译了什么模块,一会编译新版本时就照着加就行了
[root@nginx ~]# nginx -V
nginx version: nginx/1.12.2
built by gcc 4.8.5 20150623 (Red Hat 4.8.5-39) (GCC)
built with OpenSSL 1.0.2k-fips 26 Jan 2017
TLS SNI support enabled
configure arguments: --prefix=/usr/local/nginx --user=nginx --group=nginx --with-http_ssl_module --with-http_stub_status_module --with-threads --with-file-aio --with-http_sub_module --with-http_dav_module --with-http_flv_module --with-mail --with-mail_ssl_module --with-stream --with-stream_ssl_module --with-stream_realip_module
// 查看旧版本nginx的后台进程PID,一会升级nginx时会用到
[root@nginx ~]# ps -aux|grep nginx
root 2241 0.0 0.1 56316 1156 ? Ss 01:53 0:00 nginx: master process /usr/local/nginx/sbin/nginx
nginx 2242 0.0 0.1 56700 1932 ? S 01:53 0:00 nginx: worker process
// 备份旧nginx的二进制命令文件
[root@nginx ~]# cp -r /usr/local/nginx/sbin/nginx /usr/local/nginx/sbin/nginx.old
[root@nginx ~]# ll /usr/local/nginx/sbin/
总用量 14888
-rwxr-xr-x 1 nginx nginx 7621776 6月 21 21:53 nginx
-rwxr-xr-x 1 root root 7621776 6月 25 02:01 nginx.old
// 准备nginx-1.16.1源码包
[root@nginx ~]# wget http://nginx.org/download/nginx-1.16.1.tar.gz
// 解压、配置、编译nginx-1.16.1源码包。注:#不能加make install,如若添加,则覆盖了!
[root@nginx ~]# tar xf nginx-1.16.1.tar.gz -C /usr/src/
[root@nginx ~]# cd /usr/src/nginx-1.16.1/
[root@nginx nginx-1.16.1]# ./configure --prefix=/usr/local/nginx --user=nginx --group=nginx --with-http_ssl_module --with-http_stub_status_module --with-threads --with-file-aio --with-http_sub_module --with-http_dav_module --with-http_flv_module --with-mail --with-mail_ssl_module --with-stream --with-stream_ssl_module --with-stream_realip_module && make
// 进入编译好的objs目录中将编译好的nginx1.16.1的二进制命令文件拷贝至对应位置
[root@nginx nginx-1.16.1]# cd objs/ && ll
总用量 7976
-rw-r--r-- 1 root root 18617 6月 25 01:55 autoconf.err
-rw-r--r-- 1 root root 56144 6月 25 01:55 Makefile
-rwxr-xr-x 1 root root 7961952 6月 25 01:56 nginx
-rw-r--r-- 1 root root 5341 6月 25 01:56 nginx.8
-rw-r--r-- 1 root root 7651 6月 25 01:55 ngx_auto_config.h
-rw-r--r-- 1 root root 657 6月 25 01:55 ngx_auto_headers.h
-rw-r--r-- 1 root root 9435 6月 25 01:55 ngx_modules.c
-rw-r--r-- 1 root root 93664 6月 25 01:56 ngx_modules.o
drwxr-xr-x 9 root root 91 6月 25 01:55 src
[root@nginx objs]# cp -rf nginx /usr/local/nginx/sbin/
cp:是否覆盖"/usr/local/nginx/sbin/nginx"? y
[root@nginx objs]# ll /usr/local/nginx/sbin/
总用量 15220
-rwxr-xr-x 1 root root 7961952 6月 25 02:04 nginx
-rwxr-xr-x 1 root root 7621776 6月 25 02:01 nginx.old
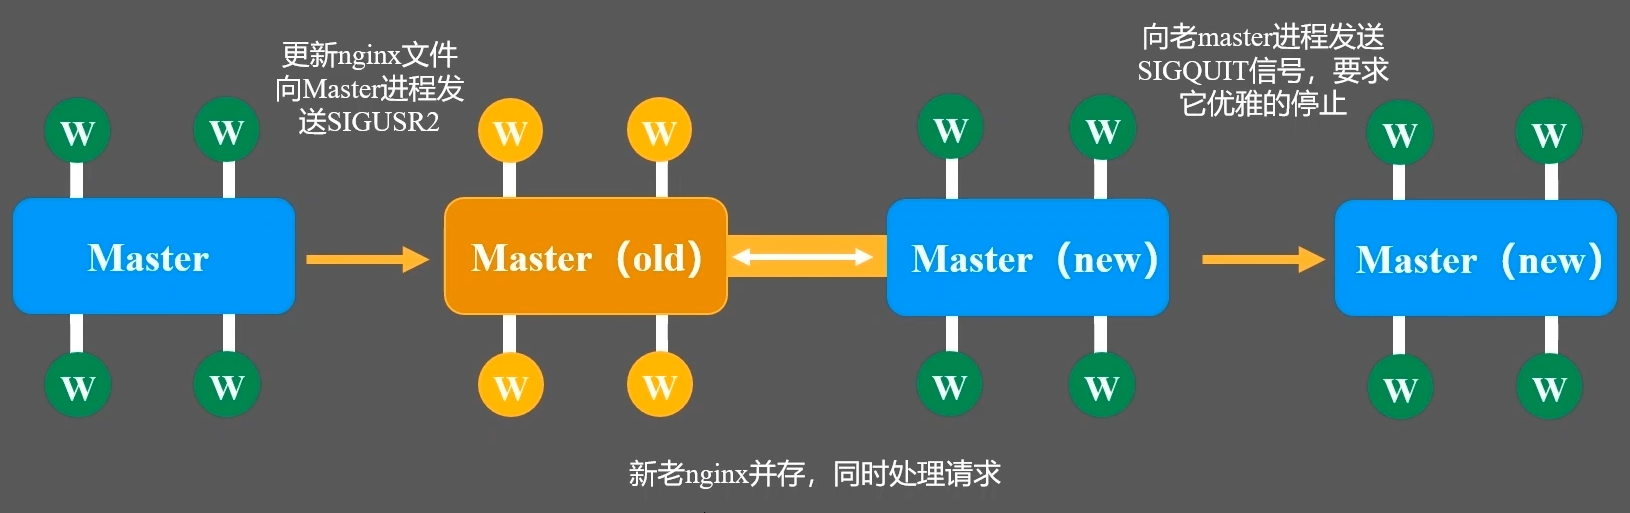
// 开始使用信号实现热升级nginx
## 发送 USR2 信号,向主进程( master)发送 USR2 信号,Nginx 会启动一个新版本的 master 进程和对应工作进程,和旧版一起处理请求。
[root@nginx objs]# kill -USR2 2241
[root@nginx objs]# ps -aux|grep nginx
root 2241 0.0 0.1 56316 1340 ? Ss 01:53 0:00 nginx: master process /usr/local/nginx/sbin/nginx
nginx 2242 0.0 0.1 56700 1932 ? S 01:53 0:00 nginx: worker process #老版本进程
root 5361 0.0 0.3 56348 3336 ? S 02:07 0:00 nginx: master process /usr/local/nginx/sbin/nginx
nginx 5362 0.0 0.1 56744 1928 ? S 02:07 0:00 nginx: worker process #新版本进程
[root@nginx objs]# kill -WINCH 2242 # 关闭老版本进程的worker进程
[root@nginx objs]# ps -aux|grep nginx
root 2241 0.0 0.1 56316 1340 ? Ss 01:53 0:00 nginx: master process /usr/local/nginx/sbin/nginx
root 5361 0.0 0.3 56348 3336 ? S 02:07 0:00 nginx: master process /usr/local/nginx/sbin/nginx
nginx 5362 0.0 0.1 56744 1928 ? S 02:07 0:00 nginx: worker process
nginx 5366 0.0 0.1 56700 1928 ? S 02:10 0:00 nginx: worker process #这是关掉老版本woker之后新生成的woker进程
[root@nginx objs]# kill -QUIT 2241 # 关闭老版本进程的master进程
[root@nginx objs]# ps -aux|grep nginx
root 5361 0.0 0.3 56348 3336 ? S 02:07 0:00 nginx: master process /usr/local/nginx/sbin/nginx
nginx 5362 0.0 0.1 56744 1928 ? S 02:07 0:00 nginx: worker process
[root@nginx objs]# nginx -V # 至此,nginx就算是热升级成功了
nginx version: nginx/1.16.1
built by gcc 4.8.5 20150623 (Red Hat 4.8.5-39) (GCC)
built with OpenSSL 1.0.2k-fips 26 Jan 2017
TLS SNI support enabled
configure arguments: --prefix=/usr/local/nginx --user=nginx --group=nginx --with-http_ssl_module --with-http_stub_status_module --with-threads --with-file-aio --with-http_sub_module --with-http_dav_module --with-http_flv_module --with-mail --with-mail_ssl_module --with-stream --with-stream_ssl_module --with-stream_realip_module
1.8 index 和 autoindex的区别
index模块
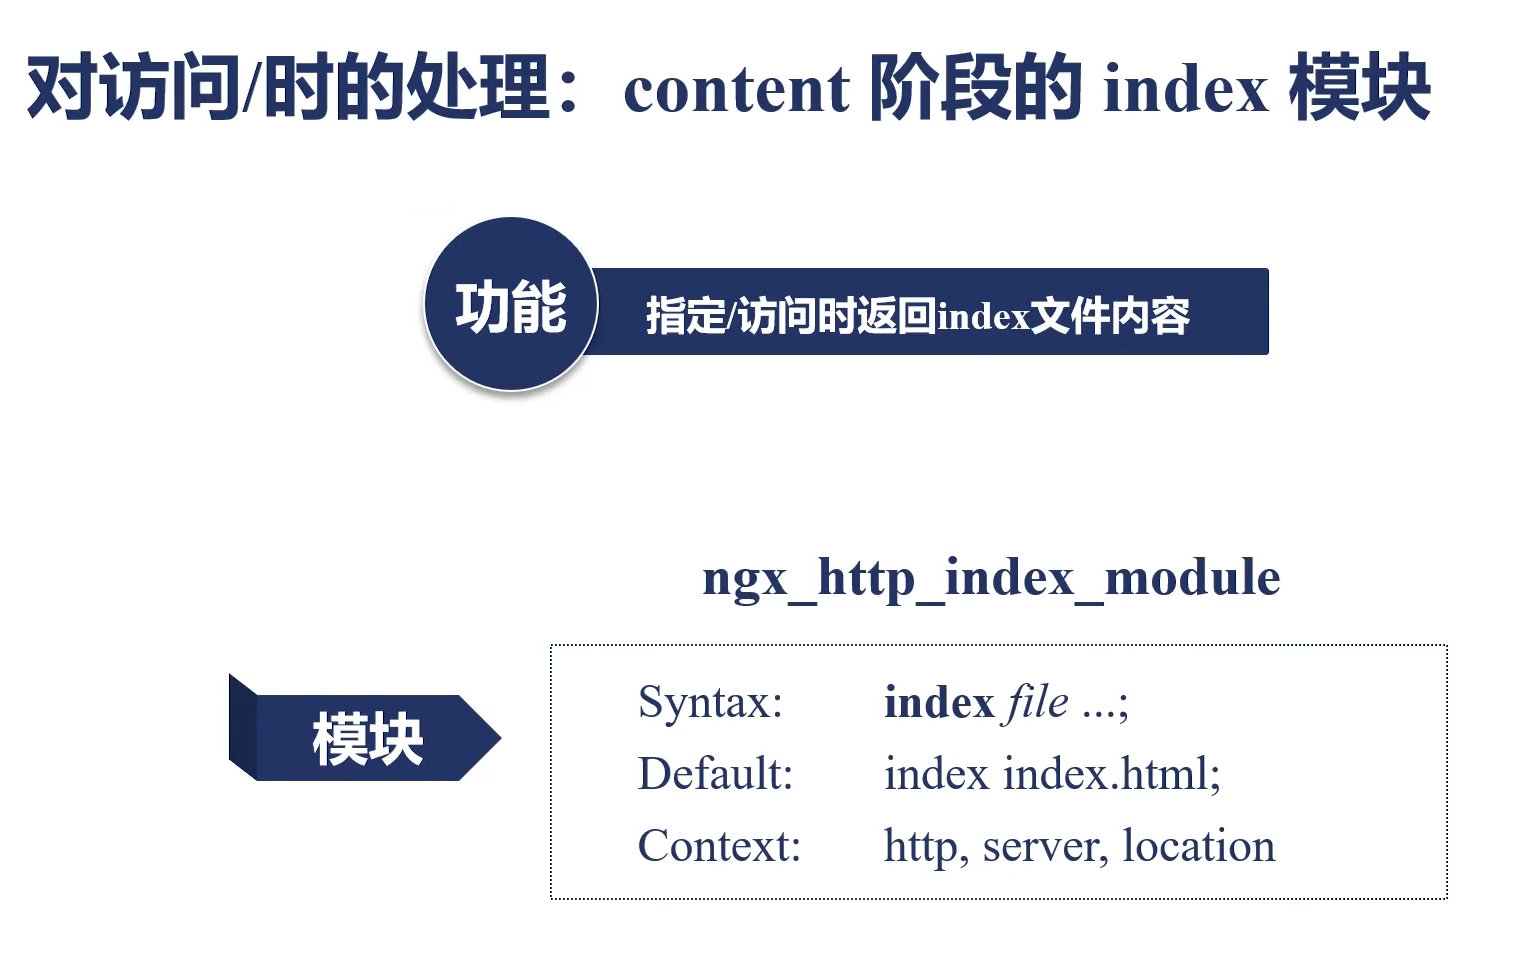
autoindex模块

autoindex 主要有下面四个指令:
1.9 root 和 alias 的区别(重点)
root属性指定的值是要加入到最终路径的,所以访问的位置变成了 root的值/locaiton的值。而我不想把访问的URI加入到路径中。所以就需要使用alias属性,其会抛弃URI,直接访问alias指定的位置
1.9.1 root属性
结论: root属性,会把root的值(这里是yyy)加入到访问路径(locaition)之前
location xxx {
    root yyy
}
浏览器访问 http://URL/aaa.html ,实际访问的是 http://URL/yyy/xxx/aaa.html
浏览器访问 http://URL/xxx/abc.html ,实际访问的是 http://URL/yyy/xxx/abc.html
浏览器访问 http://URL/xxx/ccc/abc.html ,实际访问的是 http://URL/yyy/xxx/ccc/abc.html
1.9.2 alias属性(别名)
结论:alias属性,会把alias的值(这里是yyy)替代访问路径匹配的部分(这里是xxx)
locaiton xxx {
    # alias必须以 / 结束,否则无效!!!
    alias /yyy/;
}
浏览器访问 http://URL/xxx.html ,实际访问的是 http://URL/yyy/xxx.html
浏览器访问 http://URL/xxx/abc.html ,实际访问的是 http://URL/yyy/abc.html
浏览器访问 http://URL/xxx/ccc/abc.html ,实际访问的是 http://URL/yyy/ccc/abc.html
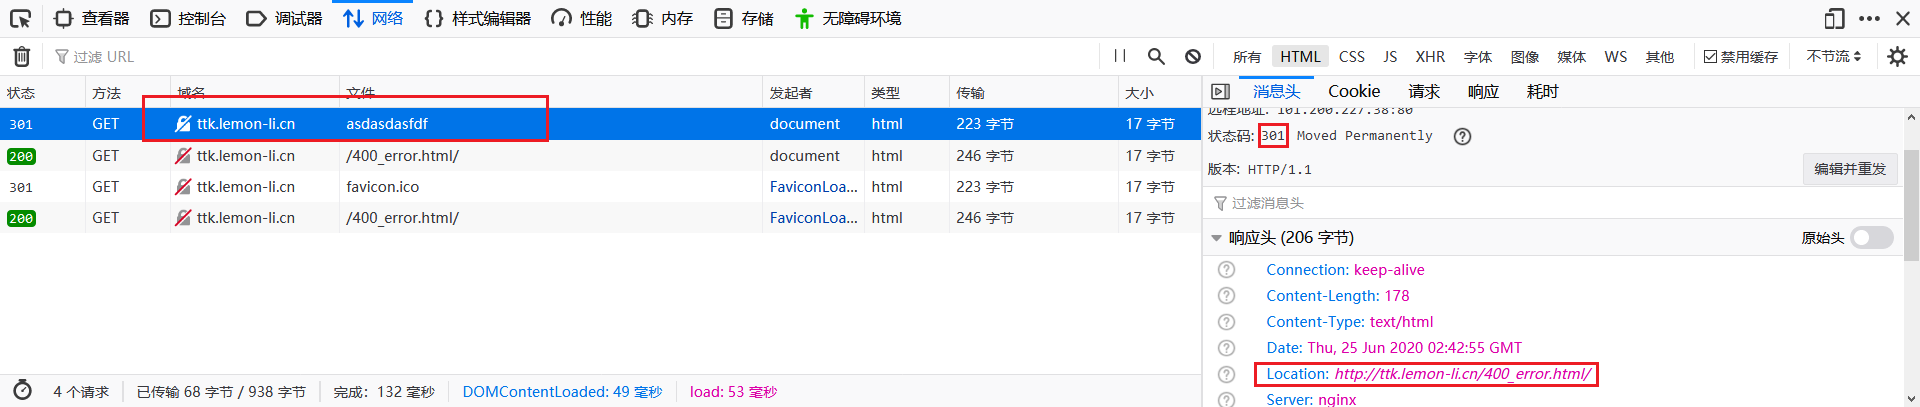
1.10 定义错误页面
模块:error_page,作用是根据客户端的访问网站的返回状态码,为其指定到特定的错误页面
语法:
error_page code [ code... ] [ = | =answer-code ] uri | @named_location
简单示例:
// 编写错误页面
echo 'client_4xx_error' > /www/test/400_error.html
echo 'client_5xx_error' > /www/test/500_error.html

// 定义客户端错误页面
error_page 400 401 402 403 404 /400_error.html;
location /400_error.html {
	root /www/test;
}

// 定义服务端错误页面
error_page 500 501 502 503 504 /500_error.html;
location /500_error.html {
	root /www/test;
}
验证一下效果


1.11 设置Nginx防盗链
zhen主机配置防盗链
[root@zhen ~]# vi /usr/local/nginx/conf/nginx.conf
在server{}区域里添加以下配置:
        location ~* \.(wma|wmv|asf|mp3|mmf|zip|rar|gif|png|swf|flv|jpeg) {
            valid_referers nonde blocked  *.zhen.com  zhen.com;
            if ($invalid_referer) {
               rewrite  ^/  http://www.zhen.com/error.jpg;
            }
        }
#注意:不能存在以下缓存配置:
     55         location  ~  \.(gif|jpg|jpeg|png|bmp|ico)$   {
     56             expires 1d;
     57         }
wq!
[root@zhen html]# systemctl restart nginx
解释:
第一行: wma|wmv|asf|mp3|mmf|zip|rar|jpg|gif|png|swf|flv 表示对这些后缀的文件进行防盗链。
第二行:valid_referers表示被允许的URL,none表示浏览器中 referer(Referer 是 header 的一部分,当浏览器向 web 服务器发送请求时,一般会带上 Referer,告诉服务器我是从哪个页面链接过来的,服务器基此可以获得一些信息用于处理) 为空的情况,就直接在浏览器访问图片,blocked referer 不为空的情况,但是值被代理或防火墙删除了,这些值不以http://或 https://开头,*.zhen是匹配URL的域名。
第三行:if{}判断如果是来自于invalid_referer(不被允许的URL)链接,即不是来自第二行指定的URL,就强制跳转到错误页面,当然直接返回 404 (return 404)也是可以的,也可以是图片。
注意:防盗链测试时,不要和expires配置一起使用。
1.12 如何在已经安装好的nginx中添加模块
// 原已经安装好的nginx,现在需要添加一个未被编译安装的模块:

// 查看原来编译时都带了哪些参数
# /usr/local/nginx/sbin/nginx -V
nginx version: nginx/1.12.2
built by gcc 4.4.7 20120313 (Red Hat 4.4.7-16) (GCC)
configure arguments: --prefix=/usr/local/nginx --with-http_realip_module --with-http_sub_module --with-http_gzip_static_module --with-http_stub_status_module --with-pcre

进入nginx源码目录
# cd nginx-1.12.2

// 添加的参数 (要加之前已经过的编译模块,不然最后只有新编译模块)
# ./configure --prefix=/usr/local/nginx --with-http_realip_module --with-http_sub_module --with-http_gzip_static_module --with-http_stub_status_module --with-pcre --with-http_ssl_module

// 编译,make完之后在objs目录下就多了个nginx,这个就是新版本的程序了。注意 {不要make install,否则就是覆盖安装}
# make

// 替换nginx二进制文件
# cp /usr/local/nginx/sbin/nginx /usr/local/nginx/sbin/nginx.bak    (备份之前的nginx二进文件)
# cp ./objs/nginx  /usr/local/nginx/sbin/

// 测试新的nginx程序是否正确
# /usr/local/nginx/sbin/nginx -t
nginx: theconfiguration file /usr/local/nginx/conf/nginx.conf syntax is ok
nginx:configuration file /usr/local/nginx/conf/nginx.conf test issuccessful

// 重新加载nginx
# /usr/local/nginx/sbin/nginx -s reload

// 查看ngixn版本极其编译参数
# /usr/local/nginx/sbin/nginx -V
nginx version: nginx/1.12.2
built by gcc 4.4.7 20120313 (Red Hat 4.4.7-16) (GCC)
built with OpenSSL 1.0.1e-fips 11 Feb 2013
TLS SNI support enabled
configure arguments: --prefix=/usr/local/nginx --with-http_realip_module --with-http_sub_module --with-http_gzip_static_module --with-http_stub_status_module --with-pcre --with-http_ssl_module
1.13 Nginx中的location指令(重点)
location的作用是根据用户请求的URI来执行不同的应用,就是根据用户请求的网站URL进行匹配,匹配成功即进行相关的操作
1.13.1 安装第三方的模块
- 下载第三方模块echo
[root@nginx ~]# wget https://github.com/openresty/echo-nginx-module/archive/v0.61.tar.gz
- 重新编译添加三方echo模块
[root@nginx ~]# nginx -V
nginx version: nginx/1.16.1
built by gcc 4.8.5 20150623 (Red Hat 4.8.5-39) (GCC)
built with OpenSSL 1.0.2k-fips  26 Jan 2017
TLS SNI support enabled
configure arguments: --prefix=/usr/local/nginx --user=nginx --group=nginx --with-http_ssl_module --with-http_stub_status_module --with-threads --with-file-aio --with-http_sub_module --with-http_dav_module --with-http_flv_module --with-mail --with-mail_ssl_module --with-stream --with-stream_ssl_module --with-stream_realip_module

[root@nginx ~]# tar -xf  v0.61.tar.gz -C /usr/src/
[root@nginx ~]# cd /usr/src/nginx-1.16.1/
[root@nginx nginx-1.16.1]# ./configure --prefix=/usr/local/nginx --user=nginx --group=nginx --with-http_ssl_module --with-http_stub_status_module --with-threads --with-file-aio --with-http_sub_module --with-http_dav_module --with-http_flv_module --with-mail --with-mail_ssl_module --with-stream --with-stream_ssl_module --with-stream_realip_module --add-module=/usr/src/echo-nginx-module-0.61/ && make
[root@nginx nginx-1.16.1]# cp /usr/local/nginx/sbin/nginx /usr/local/nginx/sbin/nginx.old
[root@nginx nginx-1.16.1]# cp -rf objs/nginx /usr/local/nginx/sbin/

[root@nginx nginx-1.16.1]# nginx -V
nginx version: nginx/1.16.1
built by gcc 4.8.5 20150623 (Red Hat 4.8.5-39) (GCC)
built with OpenSSL 1.0.2k-fips  26 Jan 2017
TLS SNI support enabled
configure arguments: --prefix=/usr/local/nginx --user=nginx --group=nginx --with-http_ssl_module --with-http_stub_status_module --with-threads --with-file-aio --with-http_sub_module --with-http_dav_module --with-http_flv_module --with-mail --with-mail_ssl_module --with-stream --with-stream_ssl_module --with-stream_realip_module --add-module=/usr/src/echo-nginx-module-0.61/
1.13.2 location语法 及 符号规则
- location语法格式:
Syntax: location [ = | ~ | ~* | ^~ ] uri { ... }
Syntax: location @name { ... }
Default: —
Context: server, location
- location的符号:
| 符号 | 说明 |
|---|---|
| = | 表示精确匹配 |
| ^~ | 表示uri以指定字符或字符串开头 |
| ~ | 表示区分大小写的正则匹配 |
| ~* | 表示不区分大小写的正则匹配 |
| / | 通用匹配,任何请求都会匹配到 |
- 注意事项:
有些资料上介绍location支持 不匹配 !~,
如: location !~ 'png'{ ... }
这是错误的,location不支持 !~

如果有这样的需求,可以通过if来实现,
如: if ($uri !~ 'png') { ... }

注意:location优先级小于if
1.13.3 location优先级及案例
总结一句话:= 符号优先级最高,/ 符号优先级最低
- 规则优先级:
= 高于 ^~ 高于 ~* 等于 ~ 高于 /
- 对比 / 和 ~
示例1:
server {
    listen    80;
    server_name  location;

    location  /abc {
        echo '/';
    }

    location ~ abc {
        echo '~';
    }
}

测试命令:curl http://127.0.0.1/abc/1.html
结果是:~
- 对比 ~ 和 ~*
示例1:
server {
    listen    80;
    server_name  location;
    root  html;

    location ~ /abc {
        echo '~';
    }

    location ~* /abc {
        echo '~*';
    }
}
测试命令:curl http://127.0.0.1/abc/1.html
结果是:~

示例2:把他们两个的顺序调整一下
server {
    listen    80;
    server_name  location;
    root  html;

    location ~* /abc {
        echo '~*';
    }

    location ~ /abc {
        echo '~';
    }
}
测试命令:curl http://127.0.0.1/abc/1.html
结果是:~*
结论是:~和~*优先级其实是一样的,如果两个同时出现,配置文件中哪个location靠前,哪个生效。
- 对比 ^~ 和 ~
示例1:
server {
    listen    80;
    server_name  location;
    root  html;

    location ~ /abc {
        echo '~';
    }

    location ^~ /abc {
        echo '^~';
    }
}

测试命令:curl http://127.0.0.1/abc/1.html
结果是:^~
- 对比 = 和 ^~
示例1:
server {
    listen 80;
    server_name location;
    root  html;

    location ^~ /abc.html {
        echo '^~';
    }

    location = /abc.html {
        echo '=';
    }
}

测试命令:curl http://127.0.0.1/abc.html
结果是:=
Nginx静态资源控制
1. 静态资源类型
Nginx 作为静态资源 Web 服务器部署配置, 传输非常的高效, 常常用于静态资源处理, 请求, 动静分离

非服务器动态运行 生成的文件就属于静态资源!
静态资源:可以理解为前端的固定页面,这里面包含HTML、CSS、JS、图片等等,不需要查数据库也不需要程序处理,直接就能够显示的页面,如果想修改内容则必须修改页面,但是访问效率相当高。
动态资源:需要程序处理或者从数据库中读数据,能够根据不同的条件在页面显示不同的数据,内容更新不需要修改页面但是访问速度不及静态页面。
| 类型 | 种类 |
|---|---|
| 浏览器端渲染 | HTML、CSS、JS |
| 图片 | JPEG、GIF、PNG |
| 音频 | FLV、Mp4 |
| 文件 | TXT、任意下载文件 |
2. 静态资源基本配置
2.1 文件读取高效 sendfile
作用简介:
sendfile可以让Nginx在传输文件时直接在磁盘和tcp socket之间传输数据;开启这个参数后可以让数据不用经过用户buffer。如果这个参数不开启,会先在用户空间(Nginx进程空间)申请一个buffer,用read函数把数据从磁盘读到cache,再从cache读取到用户空间的buffer,再用write函数把数据从用户空间的buffer写入到内核的buffer,最后到tcp socket。
语法格式:
Syntax: sendfile on | off;
Default: sendfile off;
Context: http, server, location, if in location
2.2 提高网络传输效率 tcp_nopush
作用简介:
告诉nginx在一个数据包里发送所有头文件,而不一个接一个的发送。就是说数据包不会马上传送出去,等到数据包最大时,一次性的传输出去,这样有助于解决网络堵塞。
语法格式:
Syntax: tcp_nopush on | off;
Default: tcp_nopush off;
Context: http, server, location
2.3 与 tcp_nopush 对应的配置 tcp_nodelay
作用简介:
告诉nginx不要缓存数据,而是一段一段的发送---当需要及时发送数据时,就应该给应用设置这个属性,这样发送一小块数据信息时就不能立即得到返回值。作用: 在keepalive连接下,提高网络的传输 '实时性'
语法格式:
Syntax: tcp_nodelay on | off;
Default: tcp_nodelay on;
Context: http, server, location
2.4 注意事项
-
tcp_nopush配置 与 tcp_nodelay 互斥。
-
在nginx中tcp_nopush必须和sendfile配合使用。
3. 静态资源文件压缩配置
Nginx 将响应报文发送至客户端之前可以启用压缩功能,这能够有效的节约带宽,并提高响应至客户端的速度。

3.1 gzip 压缩配置语法
Syntax: gzip on | off;
Default: gzip off;
Context: http, server, location, if in location

作用: 数据传输时压缩
3.2 gzip 压缩比率配置语法
Syntax: gzip_comp_level level;
Default: gzip_comp_level 1;
Context: http, server, location

作用: 压缩本身比较耗费服务端性能
3.3 gzip 压缩协议版本
Syntax: gzip_http_version 1.0 | 1.1;
Default: gzip_http_version 1.1;
Context: http, server, location

作用: 压缩使用在http哪个协议, 主流版本1.1
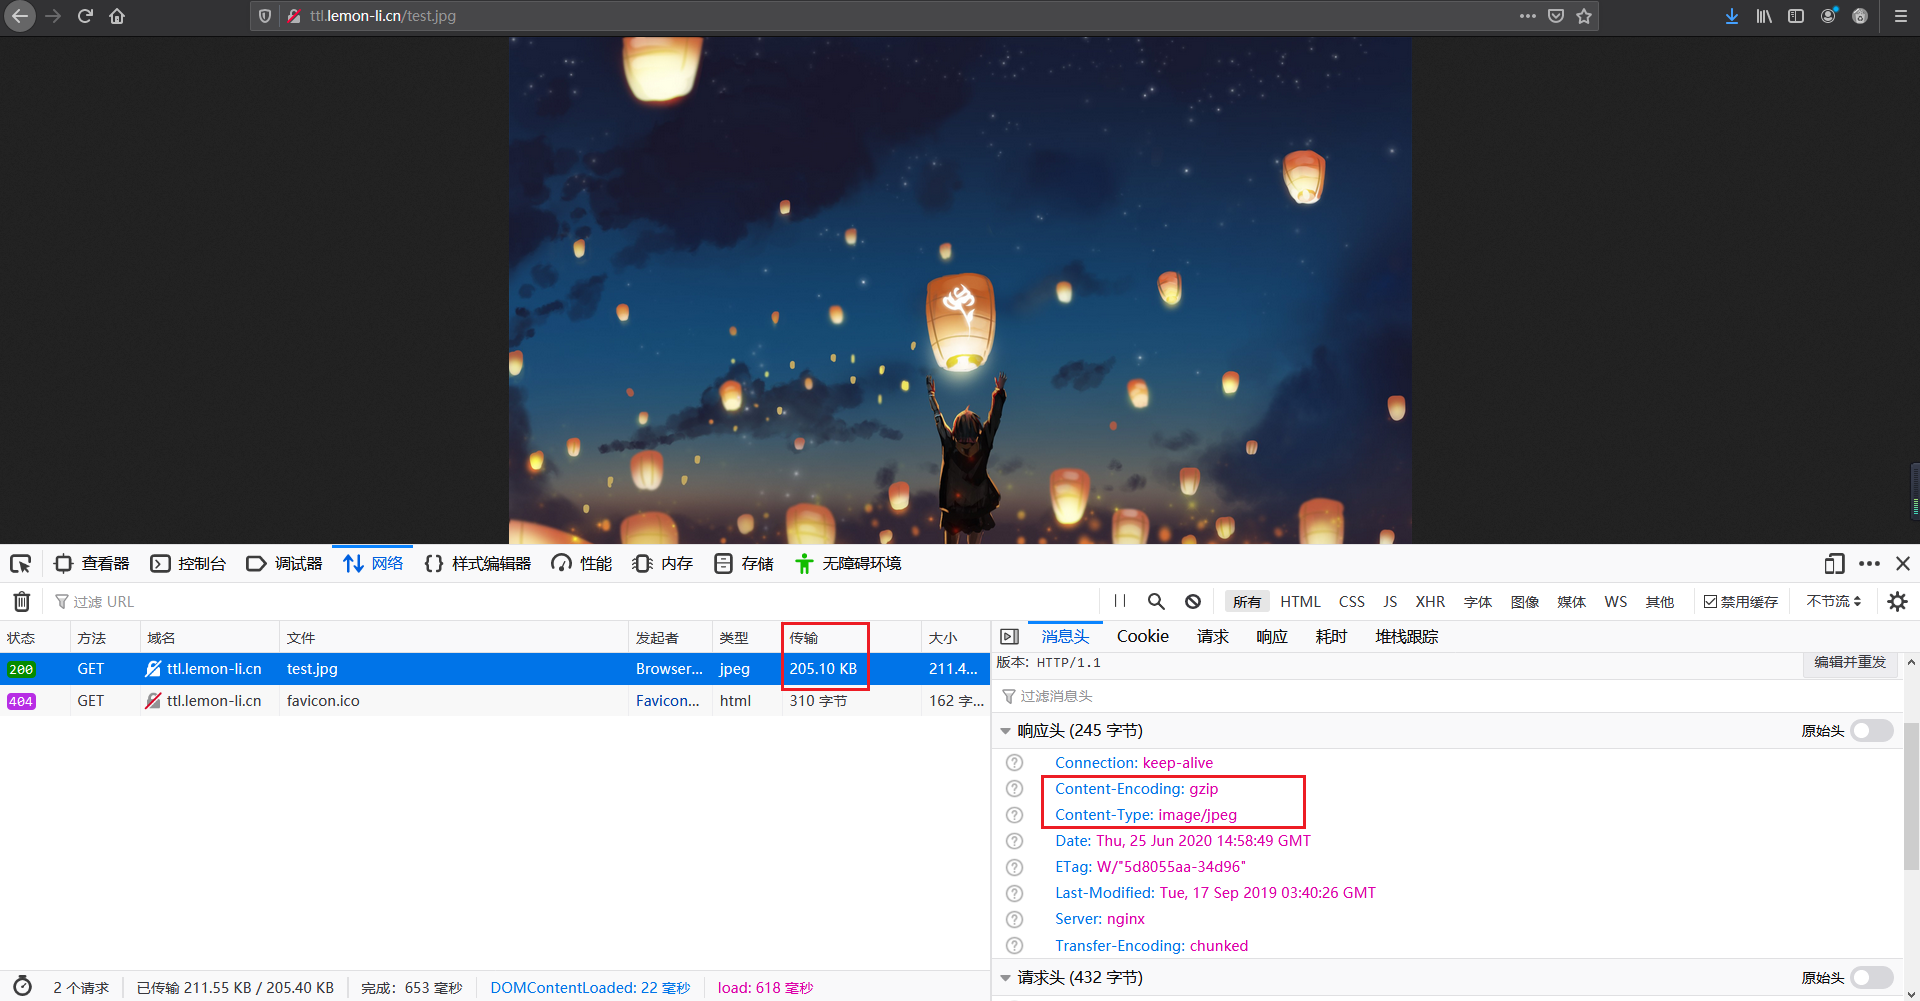
3.4 图片压缩案例(不建议开启图片压缩)
[root@lemon-min vhosts]# mkdir -p /www/images
[root@lemon-min vhosts]# cat ttl.lemon-li.cn.conf
server {
     listen    80;
     server_name  ttl.lemon-li.cn;
     access_log   logs/ttl_logs/access_ttl.lemon.cn.log    main;
     error_log    logs/ttl_logs/error_ttl.lemon.cn.log     info;
     location ~ .*\.(gif|jpg|jpeg)$ {
     	 root /www/images;
         sendfile on;
         gzip   on;
         gzip_comp_level 2;
         gzip_http_version 1.1;
         gzip_types text/plain application/json application/x-javascript application/css application/xml application/xml+rss text/javascript application/x-httpd-php image/jpeg image/gif image/png;
     }
}

没有开启 gzip 图片压缩时
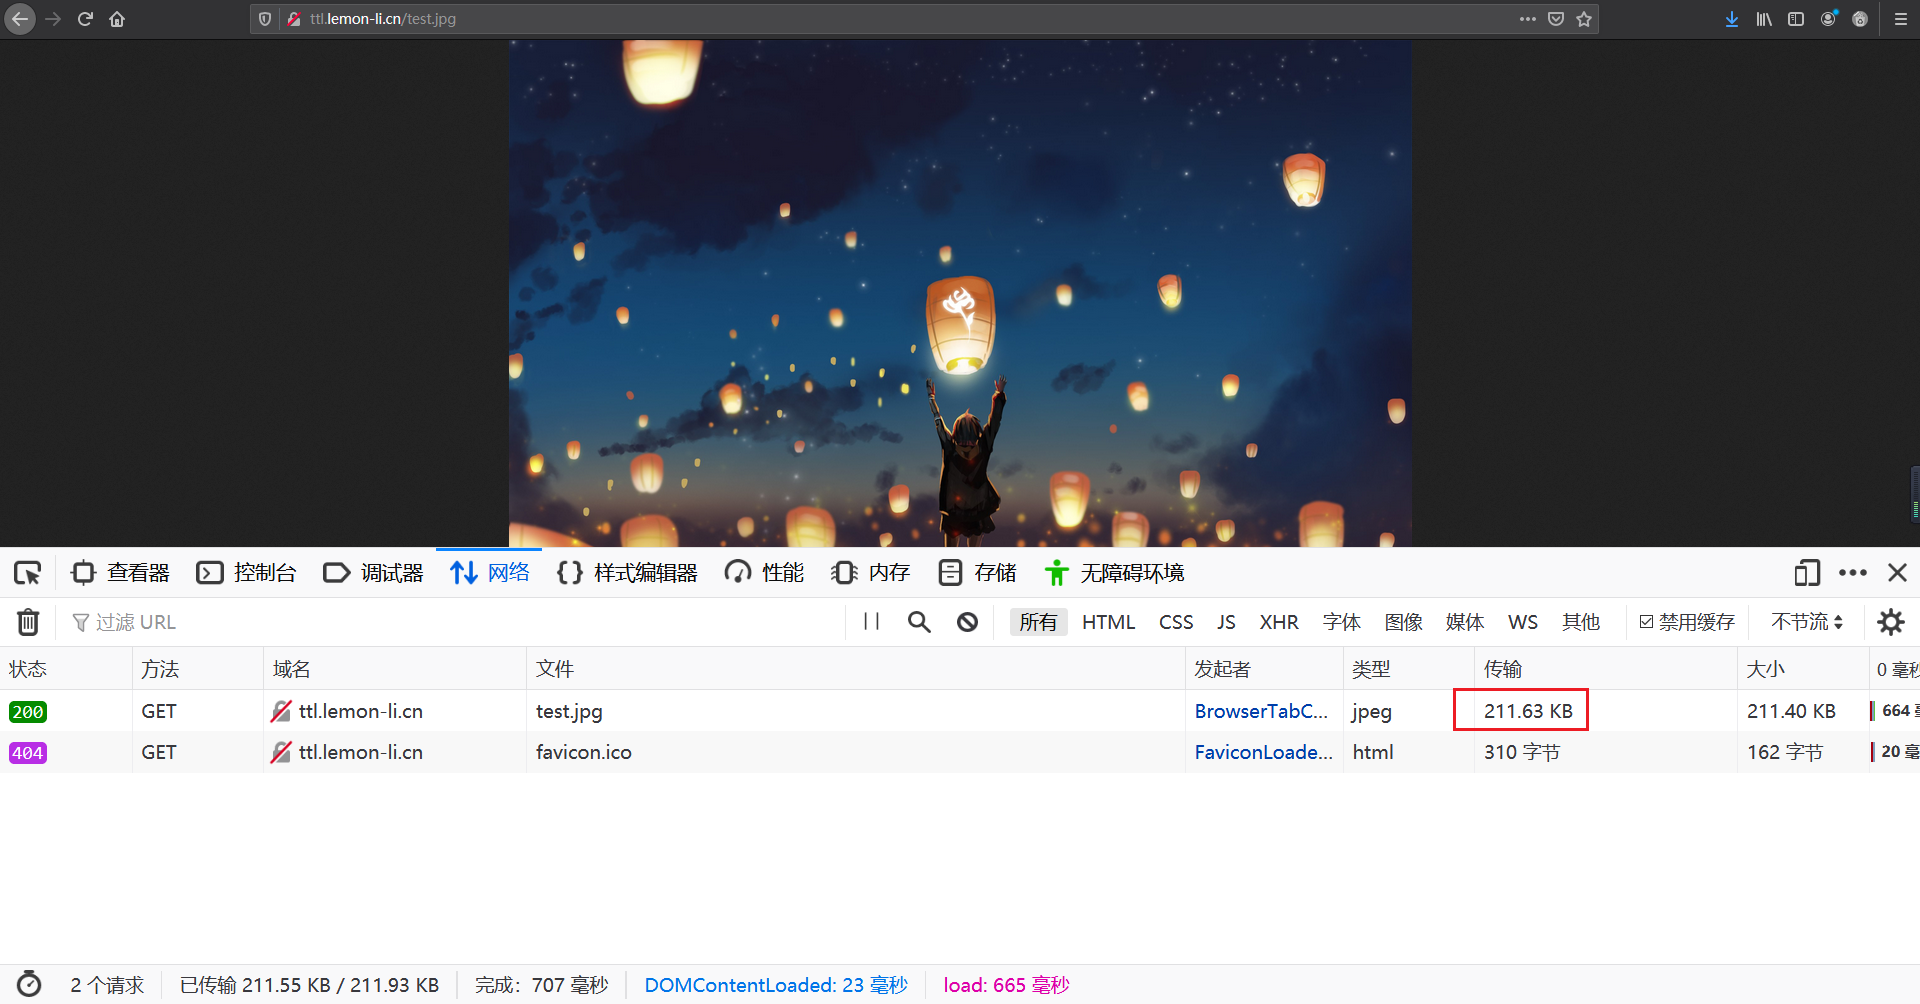
开启 gzip 图片压缩时(关于图片的压缩比率不是太过明显)
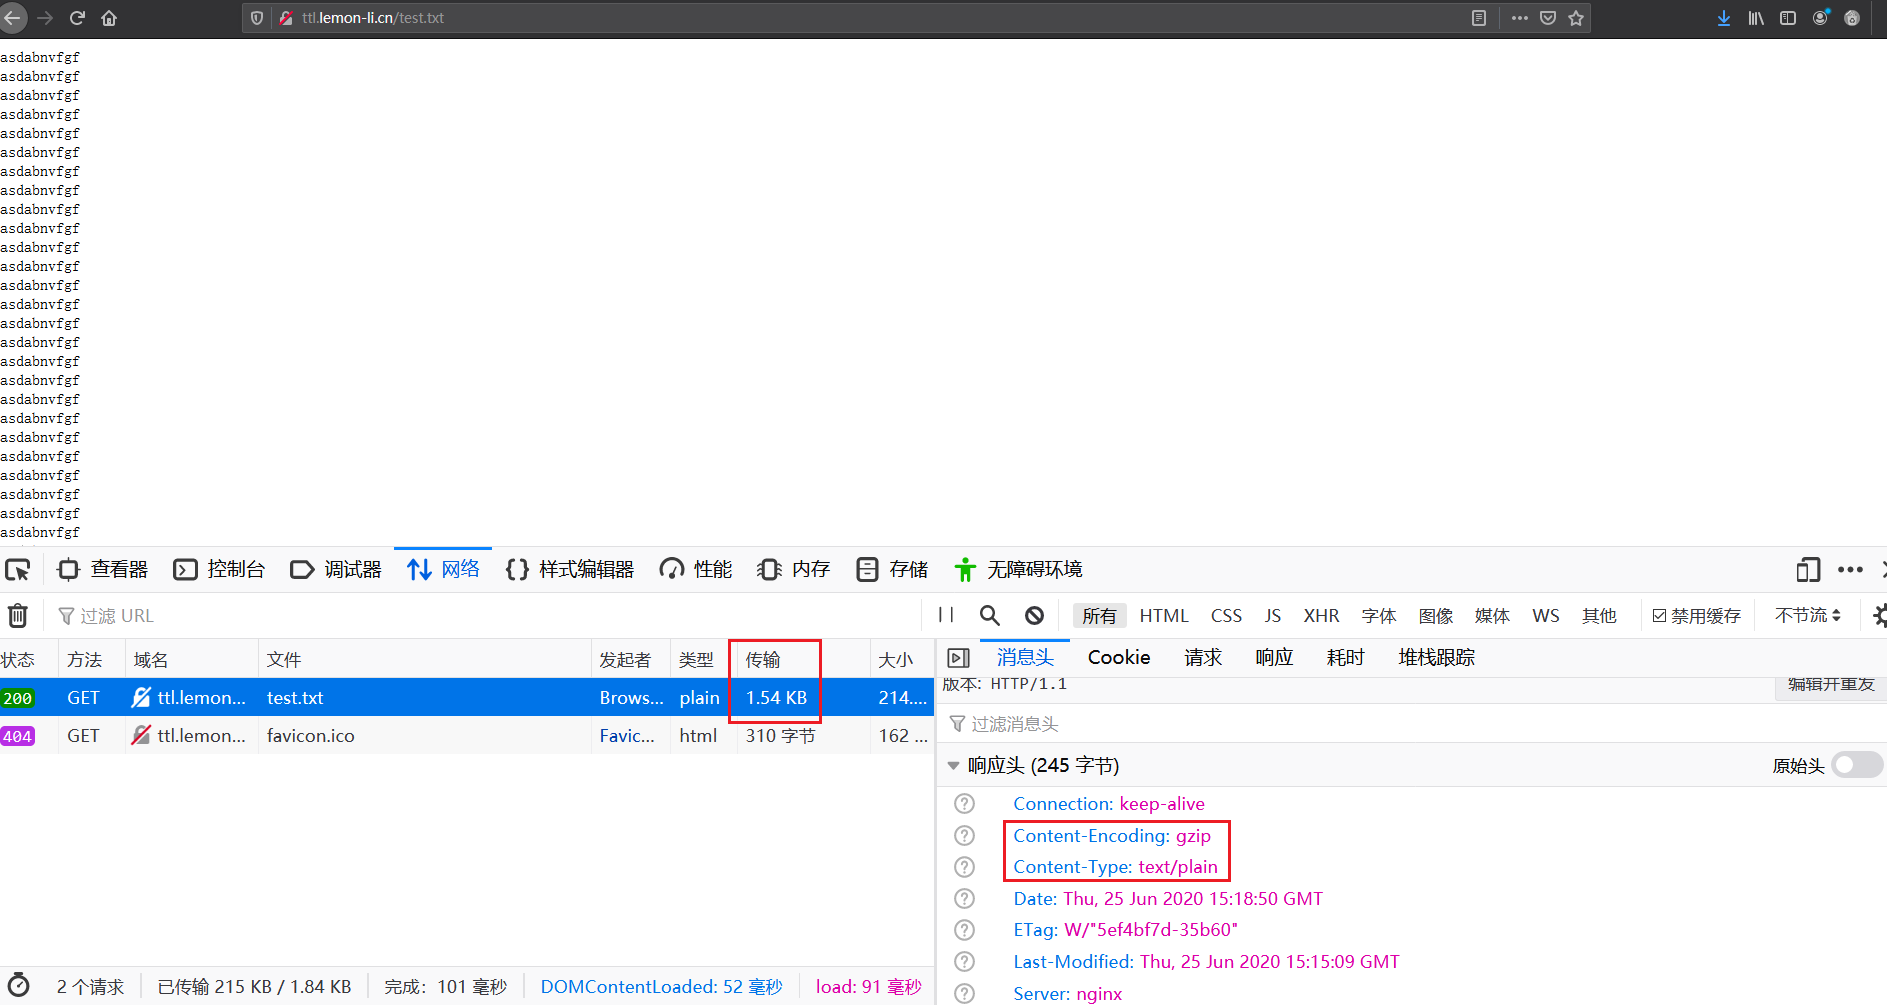
3.5 文本压缩案例
[root@lemon-min vhosts]# mkdir -p /www/doc
[root@lemon-min vhosts]# for i in {1..20000};do echo "asdabnvfgf" >> /www/doc/test.txt ; done
[root@lemon-min vhosts]# ll -h /www/doc/
总用量 216K
-rw-r--r-- 1 root root 215K 6月  25 23:15 test.txt
[root@lemon-min vhosts]# cat ttl.lemon-li.cn.conf
server {
     listen    80;
     server_name  ttl.lemon-li.cn;
     access_log   logs/ttl_logs/access_ttl.lemon.cn.log    main;
     error_log    logs/ttl_logs/error_ttl.lemon.cn.log     info;
     location ~ .*\.(txt|xml)$ {
     	root /www/doc;
	    sendfile on;
        gzip   on;
        gzip_comp_level 2;
        gzip_http_version 1.1;
        gzip_types text/plain application/json application/x-javascript application/css application/xml application/xml+rss text/javascript application/x-httpd-php image/jpeg image/gif image/png;
     }
}
没有启用 gzip 文件压缩时

启用 gzip 文件压缩时(可见压缩的重要性)
4. 静态资源浏览器缓存
HTTP协议定义的缓存机制 (如: Expires; Cache-control 等)
1、浏览器无缓存
浏览器请求->无缓存->请求WEB服务器->请求响应->呈现
2、浏览器有缓存
浏览器请求->有缓存->校验过期->是否有更新->呈现
校验是否过期 Expires HTTP1.0, Cache-Control(max-age) HTTP1.1
协议中Etag头信息校验 Etag ()
Last-Modified头信息校验 Last-Modified (具体时间)
1.缓存配置语法 expires
Syntax: expires [modified] time;
expires epoch | max | off;
Default: expires off;
Context: http, server, location, if in location
2.配置静态资源缓存
location ~ .*\.(js|css|html)$ {
    root /soft/code/js;
    expires 1h;
}

location ~ .*\.(jpg|gif|png)$ {
    root /soft/code/images;
    expires 1d;
}
3.开发代码没有正式上线时, 希望静态文件不被缓存
//取消js css html等静态文件缓存
location ~ .*\.(css|js|swf|json|mp4|htm|html)$ {
    add_header Cache-Control no-store;
    add_header Pragma no-cache;
}
5. 静态资源防盗链
防盗链就是防止别人盗用服务器中的图片、文件、视频等相关资源。防盗链:是通过location + rewrite + http_refer实现的。
1. 基于 http_refer 防盗链配置模块
Syntax: valid_referers none | blocked | server_names | string ...;
Default: —
Context: server, location
2. 准备html文件
<html>
<head>
    <meta charset="utf-8">
    <title>pachong<title>
 </head>
    <body style="background-color:red;">
    <img src="http://192.168.69.113/test.jpg">
    </body>
</html>
3. 启动防盗链
location ~* \.(wma|wmv|asf|mp3|mmf|zip|rar|gif|png|swf|flv|jpeg) {
    valid_referers nonde blocked  *.zhen.com  zhen.com;
    if ($invalid_referer) {
        rewrite  ^/  http://www.zhen.com/error.jpg;
    }
}

#注意:不能存在以下缓存配置:
location  ~  \.(gif|jpg|jpeg|png|bmp|ico)$   {
    expires xxx;
}
4. 验证
// 伪造协议头访问
[root@C-Server ~]# curl -e "http://www.baidu.com" -I http://192.168.69.113/test.jpg
HTTP/1.1 403 Forbidden
Server: nginx/1.12.2
Date: Tue, 17 Apr 2018 04:55:18 GMT
Content-Type: text/html
Content-Length: 169
Connection: keep-alive

// 伪造协议头访问
[root@C-Server ~]# curl -e "http://www.xuliangwei.com" -I http://192.168.69.113/tes
t.jpg
HTTP/1.1 200 OK
Server: nginx/1.12.2
Date: Tue, 17 Apr 2018 04:55:27 GMT
Content-Type: image/jpeg
Content-Length: 174315
Last-Modified: Wed, 29 Nov 2017 03:16:08 GMT
Connection: keep-alive
ETag: "5a1e2678-2a8eb"
Expires: Tue, 17 Apr 2018 16:55:27 GMT
Cache-Control: max-age=43200
Accept-Ranges: bytes

 浙公网安备 33010602011771号