apollo基本搭建
1.数据库的准备
# 下载源码  1.7.2 分支
git clone --branch 1.7.2 https://hub.fastgit.org/ctripcorp/apollo.git
# 创建 apolloportaldb
sql文件地址: https://hub.fastgit.org/ctripcorp/apollo/tree/1.7.2/scripts/sql/apolloportaldb.sql
# 创建 apolloconfigdb
sql文件地址: https://hub.fastgit.org/ctripcorp/apollo/tree/1.7.2/scripts/sql/apolloconfigdb.sql
说明:
    Apollo服务端共需要两个数据库:ApolloPortalDB和ApolloConfigDB,ApolloPortalDB只需要在生产环境部署一个即可,而ApolloConfigDB需要在每个环境部署一套,如dev、test、和pro分别部署3套ApolloConfigDB,sql文件(/root/apollo/scripts/sql)。
2、修改自定义环境
	# apollo-core/src/main/java/com/ctrip/framework/apollo/core/enums/Env.java

	修改com.ctrip.framework.apollo.core.enums.Env类,在其中加入TEST枚举:
    	public enum Env{
            LOCAL, DEV, TEST, BETA, FWS, FAT, UAT, LPT, PRO, TOOLS, UNKNOWN;
            ...
            }

     # apollo-core/src/main/java/com/ctrip/framework/apollo/core/enums/EnvUtils.java

     修改com.ctrip.framework.apollo.core.enums.EnvUtils类,在其中加入TEST枚举的转换逻辑:
    public final class EnvUtils {
        public static Env transformEnv(String envName) {
         if (StringUtils.isBlank(envName)) {
           return Env.UNKNOWN;
         }
         switch (envName.trim().toUpperCase()) {
           ...
           case "TEST":
             return Env.TEST;
           ...
           default:
             return Env.UNKNOWN;
         }
        }
        }
2.配置文件修改
1)修改build.sh配置文件
# 修改连接数据库信息
# apollo config db info
apollo_config_db_url=jdbc:mysql://10.2.1.15:3306/apolloconfigdb?characterEncoding=utf8
apollo_config_db_username=apollo
apollo_config_db_password=123

# apollo portal db info
apollo_portal_db_url=jdbc:mysql://10.2.1.15:3306/apolloportaldb?characterEncoding=utf8
apollo_portal_db_username=apollo
apollo_portal_db_password=123
2) 修改三个服务配置文件
[root@localhost ~]# cat apollo/apollo-adminservice/src/main/resources/application.yml
spring:
  application:
    name: apollo-adminservice
  profiles:
    active: ${apollo_profile}
  cloud:
    inetutils:
      ignoredInterfaces:
        - docker0
        - eth1
ctrip:
  appid: 100003172
server:
  port: 8090
logging:
  file:
    name: /opt/logs/100003172/apollo-adminservice.log
eureka:
  instance:
    ip-address: 10.2.1.15 # 服务器ip
————————
[root@localhost ~]# cat apollo/apollo-adminservice/src/main/resources/application.yml
spring:
  application:
    name: apollo-adminservice
  profiles:
    active: ${apollo_profile}
  cloud:
    inetutils:
      ignoredInterfaces:
        - docker0
        - eth1
ctrip:
  appid: 100003172
server:
  port: 8090
logging:
  file:
    name: /opt/logs/100003172/apollo-adminservice.log
eureka:
  instance:
    ip-address: 10.2.1.15
[root@localhost ~]# cat apollo/apollo-co/src/main/resources/application.yml
apollo-common/        apollo-configservice/ apollo-core/
[root@localhost ~]# cat apollo/apollo-co/src/main/resources/application.yml
apollo-common/        apollo-configservice/ apollo-core/
[root@localhost ~]# cat apollo/apollo-configservice/src/main/resources/application.yml
spring:
  application:
    name: apollo-configservice
  profiles:
    active: ${apollo_profile}

ctrip:
  appid: 100003171

server:
  port: 8080

logging:
  file: /opt/logs/100003171/apollo-configservice.log
——————
[root@localhost ~]# cat apollo/apollo-portal/src/main/resources/application.yml
spring:
  application:
    name: apollo-portal
  profiles:
    active: ${apollo_profile}
  jpa:
    properties:
      hibernate:
        query:
          plan_cache_max_size: 192 # limit query plan cache max size

server:
  port: 8070
  compression:
    enabled: true
  tomcat:
    use-relative-redirects: true

logging:
  file: /opt/logs/100003173/apollo-portal.log

management:
  health:
    status:
      order: DOWN, OUT_OF_SERVICE, UNKNOWN, UP

说明:
    ignoredInterfaces: 忽略某些网卡
    eureka.instance.ip-address: 指定应用homePageUrl的地址(及部署的服务器ip即可)
    server.port: 服务端口
3.制作镜像
1) 代码打包(依赖java、mvn环境,需要提前安装)
# 以上配置文件修改后,直接执行build.sh文件即可
./scripts/build.sh
2) 构建镜像
代码打包成功后,可以使用mvn进行镜像制作:
    cd apollo
    mvn docker:build -pl apollo-configservice,apollo-adminservice,apollo-portal
也可以自定义构建(因为端口已经修改,所以采用自定义):
    官方提供的Dockerfile文件位置: apollo/apollo-${service}/src/main/docker/
    这里以apollo-adminservice为例(需要修改Dockerfile中暴露的端口号)
    	cd apollo/apollo-adminservice/target
        cp apollo/apollo-adminservice/src/main/docker/Dockerfile .
        docker build -t  .
3) 镜像制作后,上传到对应的镜像仓库,后面在服务器部署时,直接pull对应的镜像地址即可
4.运行
#  apollo-configservice、apollo-adminservice
[root@localhost ~]# docker run -p 18080:8080 -d -v /store/logs:/opt/logs --name apollo-configservice apolloconfig/apollo-configservice
[root@localhost ~]# docker run -p 18090:8090 -d -v /store/logs:/opt/logs --name apollo-adminservice apolloconfig/apollo-adminservice
# apollo-portal
[root@localhost ~]# docker run -p 18070:8070 -d -v /store/logs:/opt/logs --name apollo-portal apolloconfig/apollo-portal
5.配置调整(以下调整均为对应数据库字段数据修改)
ApolloPortalDB库
apolloportaldb.ServerConfig
配置项统一存储在ApolloPortalDB.ServerConfig表中,也可以通过管理员工具 - 系统参数页面进行配置,无特殊说明则修改完一分钟实时生效。
# 可支持的环境列表
1. apollo.portal.envs
    默认是dev,如果需要多环境的话,直接配置一下参数:
        DEV,TEST,PRO  (大小写不敏感)
# 各环境Meta Service列表
2. apollo.portal.meta.servers  - 该配置优先级高于其它方式设置的Meta Service地址
{
    "DEV":"http://1.1.1.1:8080",
    "TEST":"http://apollo.fat.xxx.com",
    "PRO":"http://apollo.xxx.com"
}
说明:
    以上仅仅从官方文档复制而来,所以具体的环境设置需要根据自己的需求来设置不同的参数,目前所使用环境参数如下
    apollo.portal.envs : DEV
    apollo.portal.meta.servers  : { "DEV":"http://172.17.0.40:18080" }
#  部门列表
3. apolloportaldb.organizations
[{"orgId":"TEST1","orgName":"样例部门1"},{"orgId":"TEST2","orgName":"样例部门2"}]
-- 自定义
[{"orgId":"SH","orgName":"上海技术部"},]
# 只对项目成员显示配置信息的环境列表
4. configView.memberOnly.envs  -- 目前仅配置dev环境
对设定了只对项目成员显示配置信息的环境,只有该项目的管理员或拥有该namespace的编辑或发布权限的用户才能看到该私有namespace的配置信息和发布历史。公共namespace始终对所有用户可见。
5.更多配置参考官方文档
    https://ctripcorp.github.io/apollo/#/zh/deployment/distributed-deployment-guide?id=_31-%e8%b0%83%e6%95%b4apolloportaldb%e9%85%8d%e7%bd%ae
6、更改完数据库需要配置不生效需要重启一下portal

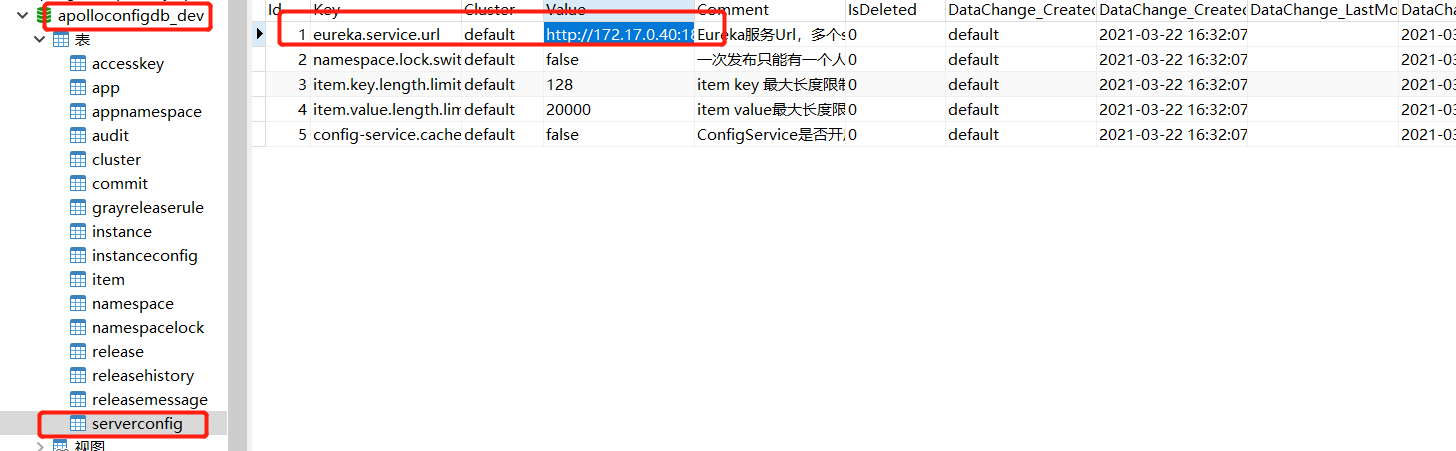
ApolloConfigDB库
apolloconfigdb_dev.ServerConfig 表
# 配置eureka服务地址
1. eureka.service.url
    http://172.17.0.40:18080/eureka/

参考文档:
    https://ctripcorp.github.io/apollo/#/zh/deployment/distributed-deployment-guide?id=_321-eurekaserviceurl-eureka%e6%9c%8d%e5%8a%a1url
6.新增环境
以上仅仅是配置了开发环境,如果有新增环境的话,需要进行以下步骤:
1、ApolloPortalDB调整
2、Apollo Config Service、Apollo Admin Service应用部署
    1) 通过源码需要自定义修改配置文件,指定应用部署地址
    2) 构建测试环境镜像,指定镜像仓库地址
    3) 到部署机器pull构建的镜像启动即可
3、创建ApolloConfigDB库并调整
添加test环境
apolloportaldb.ServerConfig

# apollo.portal.envs
    DEV,TEST
# apollo.portal.meta.servers
{
    "DEV":"http://172.17.0.40:18080",
    "TEST":"http://172.17.10.40:18080"
}
建ApolloConfigDB库并调整
# 数据库创建
数据库创建导入参考DEV环境,需要说明的是,这里仅仅需要ApolloConfigDB即可
# 调整 eureka.service.url字段(ApolloConfigDB.ServerConfig表),添加test环境注册地址
http://172.17.10.40:18080/eureka/

 浙公网安备 33010602011771号