快速搭建springboot工程
一、创建SpringBoot的三种方式
- 在线创建: https://start.spring.io
- 在IntelliJ IDEA中选择Spring Initializr创建;或者在Eclipse中选择 New -> Spring Starter Project创建(本质于第一种创建方式相同)
- 通过Maven创建,选择maven-archetype-quickstart骨架并在pom文件见中添加如下依赖:
<parent>
    <groupId>org.springframework.boot</groupId>
    <artifactId>spring-boot-starter-parent</artifactId>
    <version>2.5.4</version>
    <relativePath/> <!-- lookup parent from repository -->
  </parent>

<dependencies>
    <dependency>
      <groupId>org.springframework.boot</groupId>
      <artifactId>spring-boot-starter-web</artifactId>
    </dependency>
</dependencies>
二、配置启动类
配置App 的启动类,如下:
@SpringBootApplication
public class App
{
    public static void main(String[] args) {
    SpringApplication.run(App. class,args);
    }
}
这就可以启动一个SpringBoot工程了。
三、整合MyBatis
依次添加mysql数据库、druid数据库连接池、mybatis依赖
<dependency>
      <groupId>mysql</groupId>
      <artifactId>mysql-connector-java</artifactId>
      <version>8.0.16</version>
    </dependency>
    <!-- https://mvnrepository.com/artifact/com.alibaba/druid -->
    <dependency>
      <groupId>com.alibaba</groupId>
      <artifactId>druid</artifactId>
      <version>1.1.13</version>
    </dependency>
    <!-- https://mvnrepository.com/artifact/org.mybatis.spring.boot/mybatis-spring-boot-starter -->
    <dependency>
      <groupId>org.mybatis.spring.boot</groupId>
      <artifactId>mybatis-spring-boot-starter</artifactId>
      <version>1.3.2</version>
    </dependency>
配置mybatis逆向工程插件
<plugin>
          <groupId>org.mybatis.generator</groupId>
          <artifactId>mybatis-generator-maven-plugin</artifactId>
          <version>1.3.7</version>
          <!--要使用该插件还需要依赖generator-core          -->
          <dependencies>
            <dependency>
              <groupId>org.mybatis.generator</groupId>
              <artifactId>mybatis-generator-core</artifactId>
              <version>1.3.7</version>
            </dependency>
            <!--需要对mysql数据库解析的依赖            -->
            <dependency>
              <groupId>mysql</groupId>
              <artifactId>mysql-connector-java</artifactId>
              <version>8.0.16</version>
            </dependency>
          </dependencies>
          <!--在构建生命周期中执行一组目标的配置。每个目标可能有不同的配置。-->
          <!--简单来说:这段配置是用来启动逆向工程配置文件的          -->
          <executions>
            <!--execution元素包含了插件执行需要的信息-->
            <execution>
              <!--执行目标的标识符,用于标识构建过程中的目标,或者匹配继承过程中需要合并的执行目标-->
              <id>mybatis-generator</id>
              <!--绑定了目标的构建生命周期阶段,如果省略,目标会被绑定到源数据里配置的默认阶段-->
              <phase>package</phase>
              <!--配置的执行目标-->
              <goals>
                <goal>generate</goal>
              </goals>
            </execution>
          </executions>
          <!--作为DOM对象的配置-->
          <configuration>
            <!--允许移动生成的文件            -->
            <verbose>true</verbose>
            <!--允许自动覆盖文件,注意:在企业中,不要设置为true,容易毁掉别人的劳动成果            -->
            <overwrite>true</overwrite>
            <!--配置文件路径            -->
            <configurationFile>src/main/resources/mybatis-generator.xml</configurationFile>
          </configuration>
        </plugin>
编写mybatis-generator.xml配置文件
<?xml version="1.0" encoding="UTF-8"?>
<!DOCTYPE generatorConfiguration PUBLIC "-//mybatis.org//DTD MyBatis Generator Configuration 1.0//EN" "http://mybatis.org/dtd/mybatis-generator-config_1_0.dtd">

<generatorConfiguration>
        <!-- targetRuntime 可以设置生成代码的版本:
                    1. MyBatis3 功能复杂版本(豪华版)
                    2. MyBatis3Simple 只有简单的CRUD功能版本
           -->
    <context id="DB2Tables" targetRuntime="MyBatis3">
        <commentGenerator>
            <!-- 是否去除自动生成的注释 -->
            <property name="suppressAllComments" value="true" />
        </commentGenerator>
        <!-- Mysql数据库连接的信息:驱动类、连接地址、用户名、密码 -->
        <jdbcConnection driverClass="com.mysql.cj.jdbc.Driver"
                        connectionURL="jdbc:mysql://localhost:3306/Ecommerce_spike?serverTimezone=Asia/Shanghai"
                        userId="root"
                        password="root" />

        <!-- 默认为false,把JDBC DECIMAL 和NUMERIC类型解析为Integer,
        为true时 把JDBC DECIMAL 和NUMERIC类型解析为java.math.BigDecimal -->
        <javaTypeResolver>
            <property name="forceBigDecimals" value="false" />
        </javaTypeResolver>

        <!--
            javaModelGenerator 生成JavaBean
            targetPackage 指定生成包的位置
            targetProject:指定生成项目位置
         -->
        <javaModelGenerator
                targetPackage="com.miaoshaProject.Entity" targetProject="src/main/java">
            <!-- enableSubPackages:是否让schema作为包的后缀 -->
            <property name="enableSubPackages" value="false" />
            <!-- 从数据库返回的值被清理前后的空格 -->
            <property name="trimStrings" value="true" />
        </javaModelGenerator>

        <!--
            sqlMapGenerator 生成Mapper.xml配置信息
            targetPackage 指定生成包的位置
            targetProject:指定生成项目位置
         -->
        <sqlMapGenerator targetPackage="mapper"
                         targetProject="src/main/resources">
            <!-- enableSubPackages:是否让schema作为包的后缀 -->
            <property name="enableSubPackages" value="false" />
        </sqlMapGenerator>

        <!--
            javaClientGenerator 生成Mapper接口信息
            targetPackage 指定生成包的位置
            targetProject:指定生成项目位置
         -->
        <javaClientGenerator type="XMLMAPPER"
                             targetPackage="com.miaoshaProject.Dao" targetProject="src/main/java">
            <!-- enableSubPackages:是否让schema作为包的后缀 -->
            <property name="enableSubPackages" value="false" />
        </javaClientGenerator>

        <!-- 指定数据表:
            table标签:一个标签对应一个数据库表
            tableName:对应数据库表名
            domainObjectName:对应生成JavaBean类名
            enableCountByExample="false"  可以避免生成-Example类
            因为在实际生产中,遇到复杂的sql语句是通过自己编写完成的而不是通过使用-Example类完成
            这样就只会生成简单的sql方法
         -->
        <table tableName="user_info" domainObjectName="User"
               enableCountByExample="false" enableUpdateByExample="false"
               enableDeleteByExample="false" enableSelectByExample="false"></table>
        <table tableName="user_password" domainObjectName="Password"
               enableCountByExample="false" enableUpdateByExample="false"
               enableDeleteByExample="false" enableSelectByExample="false"></table>

    </context>

</generatorConfiguration>
运行该配置文件Run->Edit Configurations...,创建一个Maven,重点是配置Command line 要与上面pox文件中
<execution>标签中的内容对应。
mybatis-generator:generate对应<execution>标签中的<id>和<goal>
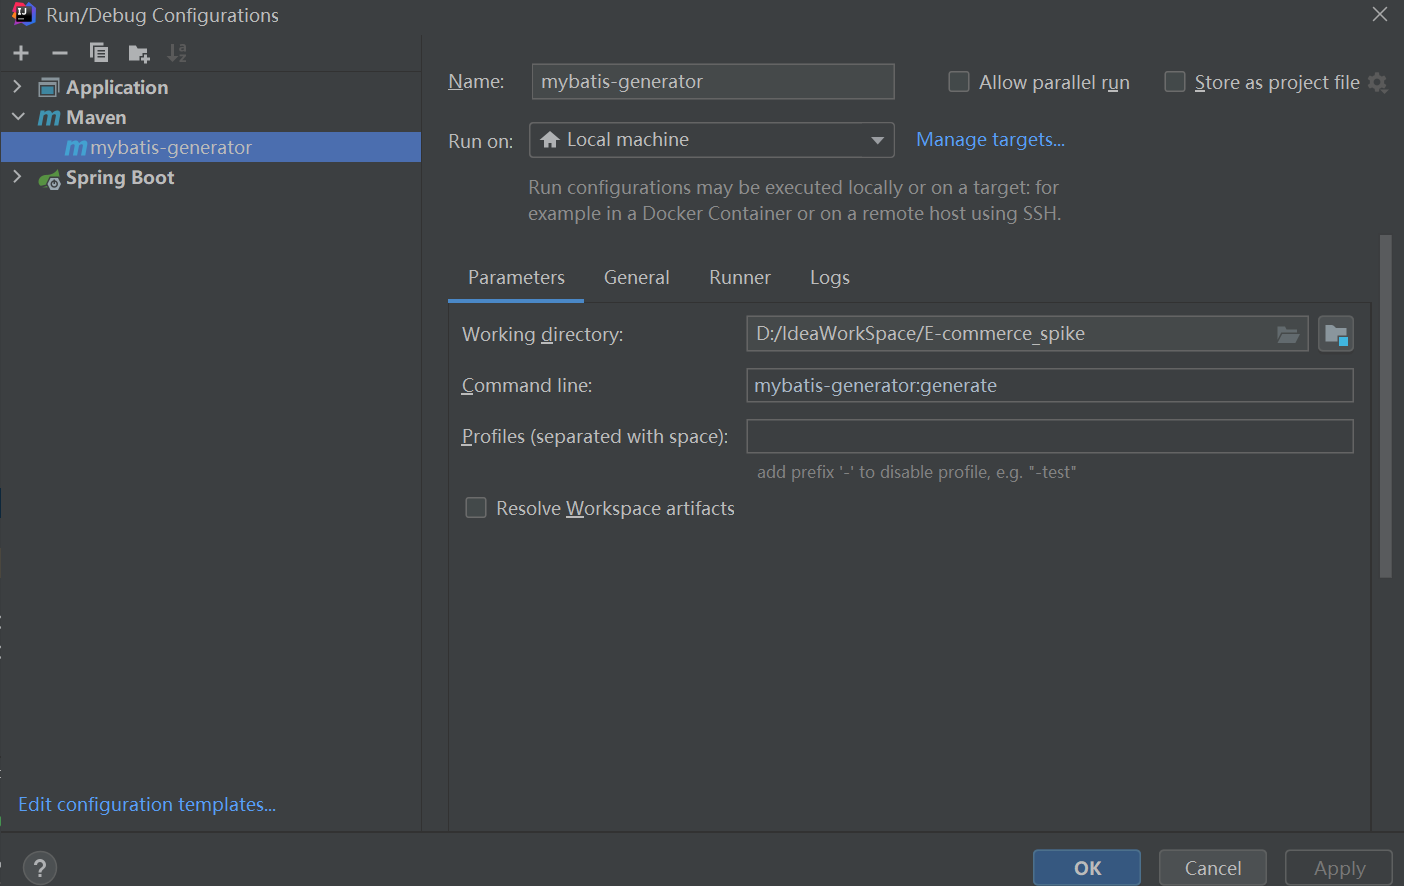
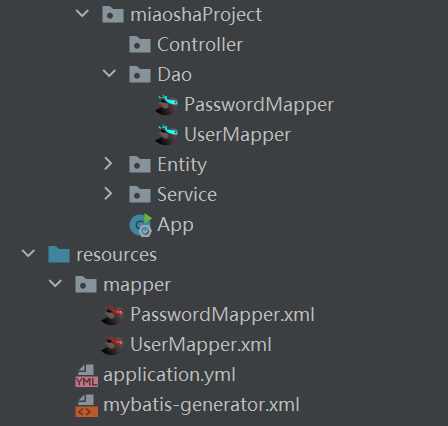
运行即可生成相应的实体类、mapper文件等。
再配置application.yml文件
server:
  port: 8080
spring:
  application:
    name: E-commerce_spike
  datasource:
    driver-class-name: com.mysql.cj.jdbc.Driver
    url: jdbc:mysql://localhost:3306/Ecommerce_spike?useUnicode=true&characterEncoding=UTF-8&useSSL=false&serverTimezone=Asia/Shanghai
    username: root
    password: root
    #配置druid数据连接池
    type: com.alibaba.druid.pool.DruidDataSource

mybatis:
  mapper-locations: classpath:mapper/*.xml
注意:mapper.xml文件放在了resource目录下。
若和mapper接口放在一起,maven工程在打包时会将xml文件忽略,需要在pom文件中添加以下配置:
<build>
    <resources>
      <resource>
        <directory>src/main/java</directory>
        <includes>
          <include>**/*.xml</include>
        </includes>
      </resource>
      <resource>
        <directory>src/main/resources</directory>
      </resource>
    </resources>
</build>
四、测试
@SpringBootApplication
//@EnableAutoConfiguration   表示开启自动化配置,与上面的注解异曲同工的功能
public class App
{
    public static void main(String[] args) {SpringApplication.run(App. class,args);}

    @Resource
    private UserMapper userMapper;

    @GetMapping("/hello")
    public String Hello(){
        User user = userMapper.selectByPrimaryKey(1);
        if (user == null){
            return "对象不存在";
        }else{
            System.out.println(user.getName());
            return "yes";
        }
    }
}
访问localhost:8080/hello查看返回结果。
