
[Nuxt] Performance Optimizations
Performance is vital for the long-term success of a modern web application as it impacts things like SEO, user experience, engagement, and conversion rates.
When used to its max potential, Nuxt can be a performance powerhouse. With built-in performance features like Server Side Rendering (SSR) and code splitting. In this lesson, we’re going to explore techniques that can help us improve and maintain the performance of our applications over time.
Let’s take a look at this simple news app.

Although this app is purely presentational, we can introduce several techniques to improve its overall performance.
We’re going to look at implementing delayed hydration, image optimization and dynamic imports to boost our app’s performance.
Delayed Hydration
First, let’s take a look at implementing delayed-hydration. Delaying hydration is a technique used to hint Google that our scripts are not required for our app to function. By doing this on our site, we can improve its performance by reducing the “Blocking Time” for our apps.
Nuxt offers a nuxt-delay-hydration module that facilitates delayed hydration. This module injects a promise into your app using a location that is determined by the module. The promise resolves upon any user interaction (such as mouse move, scroll, click, etc.) or an idle callback with a set timeout.
Let’s go ahead and install the nuxt-delay-hydration module.
yarn add -D nuxt-delay-hydrationThen we’ll simply configure this module in our nuxt.config.ts file by adding it to the modules array.
📄 nuxt.config.ts
export default defineNuxtConfig({
...
  modules: [
    'nuxt-delay-hydration',
  ],
...
});
We can configure the optimization of our app with the delayHydration object. The debug option allows us to hydrate our app in development mode and view hydration logs in the browser console after our app loads.
📄 nuxt.config.ts
export default defineNuxtConfig({
...
  modules: [
    'nuxt-delay-hydration',
  ],
  delayHydration: {
    // enables nuxt-delay-hydration in dev mode for testing
    debug: process.env.NODE_ENV === 'development',
   },
});
We can also add an option to determine the hydration mode we want. Several mode options are available, including:
initwill delay all scripts from loading until the hydration promise is resolved.- Whereas,
mountwill only delay Nuxt during the mounting process. This ensures that plugins and certain third-party scripts function properly, but the rendering of layout and page components will be postponed.
export default defineNuxtConfig({
...
  modules: [
    'nuxt-delay-hydration',
  ],
  delayHydration: {
    // enables nuxt-delay-hydration in dev mode for testing
    debug: process.env.NODE_ENV === 'development',
    mode: 'mount' //set the mode to mount
  },
});
Optimizing Images
Next, let’s discuss images. Often times, images significantly impact page load time, especially when you have multiple large images.
A great way to ensure our images are optimized is to use the NuxtImage module to render your images. This module helps resize and transform images using the built-in optimizer or your preferred image CDN, it also offers support for webp and avif image formats
We can install the image module using this command:
yarn add @nuxt/image@rcAfter installation, we’ll need to include the module in our modules array in our Nuxt Config file like we did earlier:
module: ['@nuxt/image', 'nuxt-delay-hydration']Once we’ve done that, we can use it by simply replacing our <img/> tags with <NuxtImg/> tags, like so
<template>
  <div class="article__div">
    <NuxtImg class="article__img" :src="article.urlToImage" :alt="article.title" />
    <div class="article__item-div">
      <p>{{ article.title }}</p>
      <p>{{ article.author }}</p>
    </div>
  </div>
</template>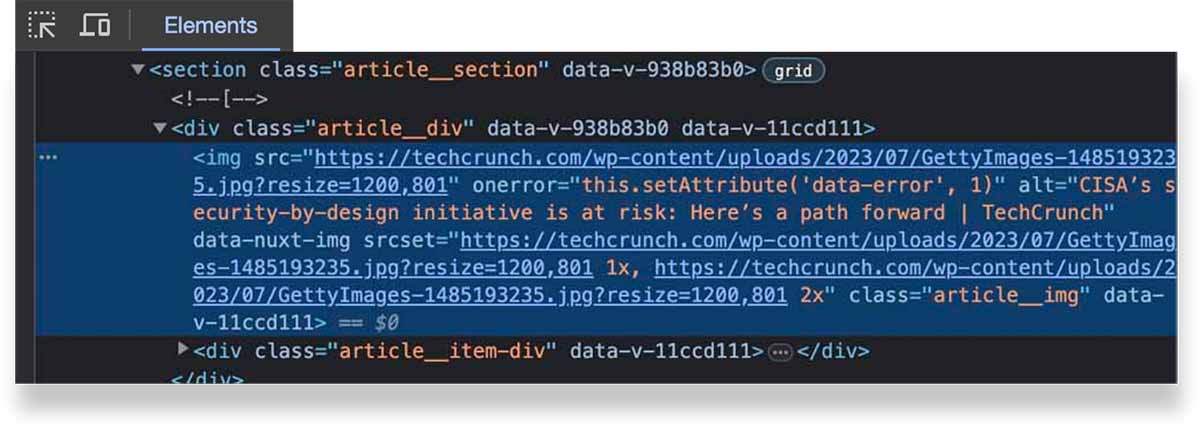
If we inspect what is being rendered in the browser, we will note a few things:
- It renders with the native
<img/>tag and the attributes attached to it. <NuxtImage/>attaches an@errorevent, assisting us in handling situations when image loading fails. This prevents a negative user experience in the event of image loading failure.- Finally, we have a
srcsetattribute that ensures the correct size and image are being applied during render.
There is a long list of configuration options that allow users to set parameters such as quality and format, if needed. Please visit the official Nuxt Image documentation to learn more.
Dynamic imports
Another technique we’re going to take a look at is dynamic imports. By dynamic imports, we’re essentially referring to lazy loading content as it’s needed.
This could be useful for loading a page only when a user routes to it, or loading content only when it becomes visible in the viewport.
To implement lazy loading in Nuxt 3, we just need to tack the “Lazy” prefix onto the name of the Component that we want to lazy load.
In our case, it’s the ArticleCard that we’ll change to LazyArticleCard
<template>
  <main>
    <h1 class="article__heading">Hello</h1>
      <section class="article__section">
        <LazyArticleCard
          v-for="article in articles"
          :key="article.id"
          :article="article"
        />
      </section>
  </main>
</template>
More Performance Enhancement Tools
There are additional tools that can positively impact the performance of our Nuxt app. For example
partytown
The partytown integration for Nuxt relocates resource intensive scripts into a web worker (a JavaScript script that runs in the background, separate from the main thread of a web page. Allowing the performance of more computationally expensive tasks without affecting the responsiveness of the web app UI). This significantly speeds up your site as your app can now focus on important tasks such as rendering the UI and handling user interactions without being bogged down. This essentially leads to a smoother user experience.
Setting up partytown is straightforward and requires little to no config.
Install the @nuxtjs/partytown module:
yarn add --dev @nuxtjs/partytown # or npm install --save-dev @nuxtjs/partytownAdd it to the modules section of nuxt.config.ts
export default defineNuxtConfig({
  modules: ['@nuxtjs/partytown'],
})
Add type: 'text/partytown' attribute to any scripts you want to be handled by partytown and you’re good to go.
<template>
  <div>
    <Script type="text/partytown" src="https://example.com/analytics.js" />
  </div>
</template>
vite-pwa-nuxt
Another really helpful tool is the vite-pwa-nuxt module. This module is designed to help you easily turn your Nuxt.js apps into a Progressive Web App (PWA). PWAs use performance optimization techniques like code splitting and caching to load apps quickly, even on slower internet connections. This can give your app a performance boost and ensure a smooth user experience.
This module offers sensible defaults for common PWA functionalities such as automatic web app manifest injection directly embedded within your app’s Javascript code. For context, a web app manifest is essentially a JSON file that provides detailed information about a web application such as the app name, color theme, start-up URL and more to the browser. This information allows the browser to offer enhanced functionality for web apps, such as displaying an install prompt, creating a home screen icon, or providing offline functionality which which are key features of PWAs.
This makes it easy to get started right away without any configuration.
All you need to do is install the module:
npx nuxi@latest module add @vite-pwa/nuxtand add it to the modules section of nuxt.config.ts
// nuxt.config.ts
import { defineNuxtConfig } from 'nuxt/config'

export default defineNuxtConfig({
  modules: [
    '@vite-pwa/nuxt'
  ],
})
Fontaine
Finally let’s look at Fontaine, a module that can make your web fonts load faster and appear smoother on screen. Sometimes web fonts can take a while to load and this can be bad for the user experience. Fontaine automatically generates the appropriate fallback fonts as well as font metrics (which are essentially instructions for the browser on how to display the font).
Setting up fontaine is as easy as installing the module:
yarn add -D @nuxtjs/fontaineAnd configuring it in your nuxt.config.ts file
export default defineNuxtConfig({
  modules: ['@nuxtjs/fontaine'],
  // If you are using a Google font or you don't have a @font-face declaration
  // for a font you're using, you can declare them here.
  //
  // In most cases this is not necessary.
  //
  // fontMetrics: {
  //   fonts: ['Inter', { family: 'Some Custom Font', src: '/path/to/custom/font.woff2' }],
  // },
})
Nuxt will then scan your @font-face rules and generate fallback rules with the correct metrics. For example:
@font-face {
  font-family: 'Roboto';
  font-display: swap;
  src: url('/fonts/Roboto.woff2') format('woff2'), url('/fonts/Roboto.woff') format('woff');
  font-weight: 700;
}
/* This will be generated. */
@font-face {
  font-family: 'Roboto fallback';
  src: local('BlinkMacSystemFont'), local('Segoe UI'), local('Roboto'), local('Helvetica Neue'),
    local('Arial'), local('Noto Sans');
  ascent-override: 92.7734375%;
  descent-override: 24.4140625%;
  line-gap-override: 0%;
}
Then, whenever you use font-family: 'Roboto', Nuxt will add the fallback to the font-family:
:root {
  font-family: 'Roboto';
  /* This becomes */
  font-family: 'Roboto', 'Roboto fallback';
}
Please note that the @nuxtjs/fontaine module is currently under active development. For optimal performance, you will need to inline all your CSS, not just the font-face fallback rules (which this module does automatically), to prevent inconsistencies in your layout.

 浙公网安备 33010602011771号