[Kubernates] Kubernetes Intro on Google cloud
Provision a Kubernetes Cluster with GKE using gcloud
To complete the work in this course you going to need some tools. Kubernetes can be configured with many options and add-ons, but can be time consuming to bootstrap from the ground up. In this section you will bootstrap Kubernetes using Google Container Engine (GKE).
GKE is a hosted Kubernetes by Google. GKE clusters can be customized and supports different machine types, number of nodes, and network settings.
gcloud container clusters create k0
Launch a single instance:
kubectl run nginx --image=nginx:1.10.0Get pods
kubectl get podsExpose nginx
kubectl expose deployment nginx --port 80 --type LoadBalancerList services
kubectl get servicesTo help out, here’s a Kubernetes command cheat sheet. http://kubernetes.io/docs/user-guide/kubectl-cheatsheet/

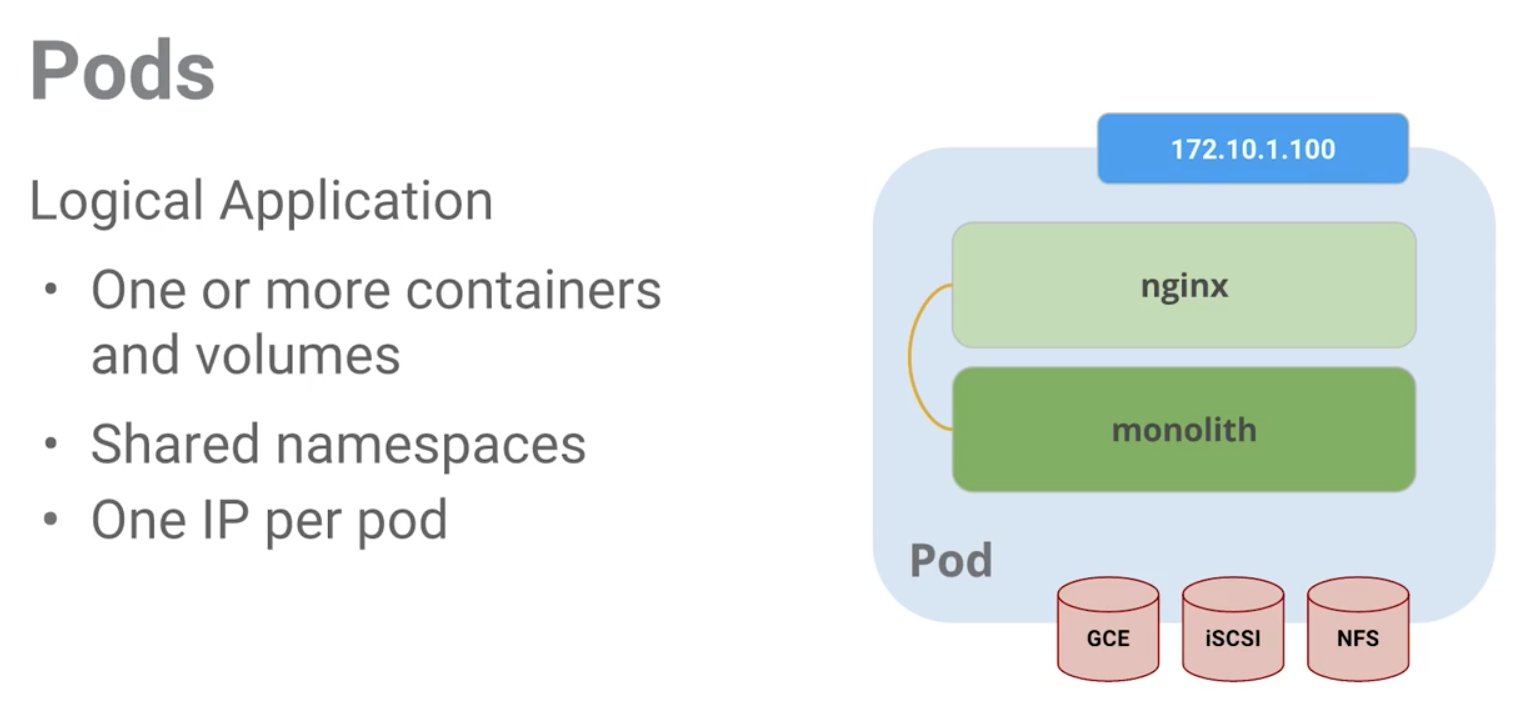
Create Pods
Explore config file
cat pods/monolith.yamlapiVersion: v1
kind: Pod
metadata:
name: monolith
labels:
app: monolith
spec:
containers:
- name: monolith
image: udacity/example-monolith:1.0.0
args:
- "-http=0.0.0.0:80"
- "-health=0.0.0.0:81"
- "-secret=secret"
ports:
- name: http
containerPort: 80
- name: health
containerPort: 81
resources:
limits:
cpu: 0.2
memory: "10Mi"Create the monolith pod
kubectl create -f pods/monolith.yamlExamine pods
kubectl get podsIt may take a few seconds before the monolith pod is up and running as the monolith container image needs to be pulled from the Docker Hub before we can run it.
Use the kubectl describe command to get more information about the monolith pod.
kubectl describe pods monolithInteracting with Pods
Cloud shell 1: set up port-forwarding
kubectl port-forward monolith 10080:80Open new Cloud Shell session 2
curl http://127.0.0.1:10080

curl http://127.0.0.1:10080/secure
Cloud shell 2 - log in
curl -u user http://127.0.0.1:10080/login

curl -H "Authorization: Bearer <token>" http://127.0.0.1:10080/secure
View logs
kubectl logs monolithkubectl logs -f monolith # realtimeIn Cloud Shell 3
curl http://127.0.0.1:10080In Cloud Shell 2
Exit log watching (Ctrl-C)
You can use the kubectl exec command to run an interactive shell inside the monolith Pod. This can come in handy when you want to troubleshoot from within a container:
kubectl exec monolith --stdin --tty -c monolith /bin/shFor example, once we have a shell into the monolith container we can test external connectivity using the ping command.
ping -c 3 google.comWhen you’re done with the interactive shell be sure to logout.
exitMHC Overview
http://kubernetes.io/docs/user-guide/liveness/
apiVersion: v1
kind: Pod
metadata:
  name: "healthy-monolith"
  labels:
    app: monolith
spec:
  containers:
    - name: monolith
      image: udacity/example-monolith:1.0.0
      ports:
        - name: http
          containerPort: 80
        - name: health
          containerPort: 81
      resources:
        limits:
          cpu: 0.2
          memory: "10Mi"
      livenessProbe:
        httpGet:
          path: /healthz
          port: 81
          scheme: HTTP
        initialDelaySeconds: 5
        periodSeconds: 15
        timeoutSeconds: 5
      readinessProbe:
        httpGet:
          path: /readiness
          port: 81
          scheme: HTTP
        initialDelaySeconds: 5
        timeoutSeconds: 1
kubectl describe pods healthy-monolith | grep Readniess
# Readniess:
# http-get http://:81/readiness
# delay=5s
# timeout=1s
# period=10s
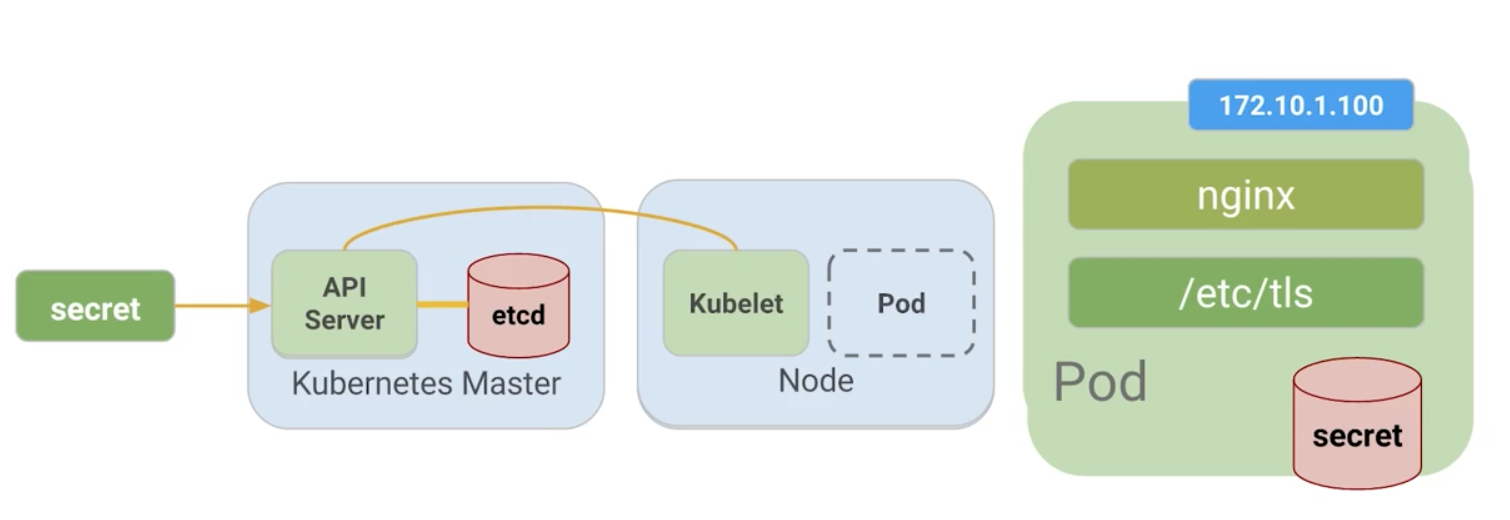
Secrets and Configmaps
Config docs - http://kubernetes.io/docs/user-guide/configmap/
Secrets - http://kubernetes.io/docs/user-guide/secrets/

ls tlsca-key.pem ca.pem cert.pem key.pem ssl-extensions-x509.cnf update-tls.sh
The cert.pem and key.pem files will be used to secure traffic on the monolith server and the ca.pem will be used by HTTP clients as the CA to trust. Since the certs being used by the monolith server where signed by the CA represented by ca.pem, HTTP clients that trust ca.pem will be able to validate the SSL connection to the monolith server.
to create the tls-certs secret from the TLS certificates stored under the tls directory:
kubectl create secret generic tls-certs --from-file=tls/kubectl will create a key for each file in the tls directory under the tls-certs secret bucket. Use the kubectl describe command to verify that:
kubectl describe secrets tls-certs
Name: tls-certs
Namespace: default
Labels: <none>
Annotations: <none>
Type: Opaque
Data
====
ca.pem: 1099 bytes
cert.pem: 1253 bytes
key.pem: 1679 bytes
ssl-extensions-x509.cnf: 275 bytes
update-tls.sh: 610 bytes
ca-key.pem: 1675 bytes
Next we need to create a configmap entry for the proxy.conf nginx configuration file using the kubectl create configmap command:
kubectl create configmap nginx-proxy-conf --from-file=nginx/proxy.confUse the kubectl describe configmap command to get more details about the nginx-proxy-conf configmap entry:
kubectl describe configmap nginx-proxy-conf Name: nginx-proxy-conf
Namespace: default
Labels: <none>
Annotations: <none>
Data
====
proxy.conf:
----
server {
listen 443;
ssl on;
ssl_certificate /etc/tls/cert.pem;
ssl_certificate_key /etc/tls/key.pem;
location / {
proxy_pass http://127.0.0.1:80;
}
}
BinaryData
====
TLS and SSL can be confusing topics. Here’s a good primer for understanding the basics: https://en.wikipedia.org/wiki/Transport_Layer_Security
Accessing a Secure HTTPS Endpoint
cat pods/secure-monolith.yamlapiVersion: v1
kind: Pod
metadata:
name: "secure-monolith"
labels:
app: monolith
spec:
containers:
- name: nginx
image: "nginx:1.9.14"
lifecycle:
preStop:
exec:
command: ["/usr/sbin/nginx","-s","quit"]
volumeMounts:
- name: "nginx-proxy-conf"
mountPath: "/etc/nginx/conf.d"
- name: "tls-certs"
mountPath: "/etc/tls"
- name: monolith
image: "udacity/example-monolith:1.0.0"
ports:
- name: http
containerPort: 80
- name: health
containerPort: 81
resources:
limits:
cpu: 0.2
memory: "10Mi"
livenessProbe:
httpGet:
path: /healthz
port: 81
scheme: HTTP
initialDelaySeconds: 5
periodSeconds: 15
timeoutSeconds: 5
readinessProbe:
httpGet:
path: /readiness
port: 81
scheme: HTTP
initialDelaySeconds: 5
timeoutSeconds: 1
volumes:
- name: "tls-certs"
secret:
secretName: "tls-certs"
- name: "nginx-proxy-conf"
configMap:
name: "nginx-proxy-conf"
items:
- key: "proxy.conf"
path: "proxy.conf"Create the secure-monolith Pod using kubectl.
kubectl create -f pods/secure-monolith.yaml
kubectl get pods secure-monolith

kubectl port-forward secure-monolith 10443:443

curl --cacert tls/ca.pem https://127.0.0.1:10443

kubectl logs -c nginx secure-monolith
Services
https://kubernetes.io/docs/concepts/services-networking/service/

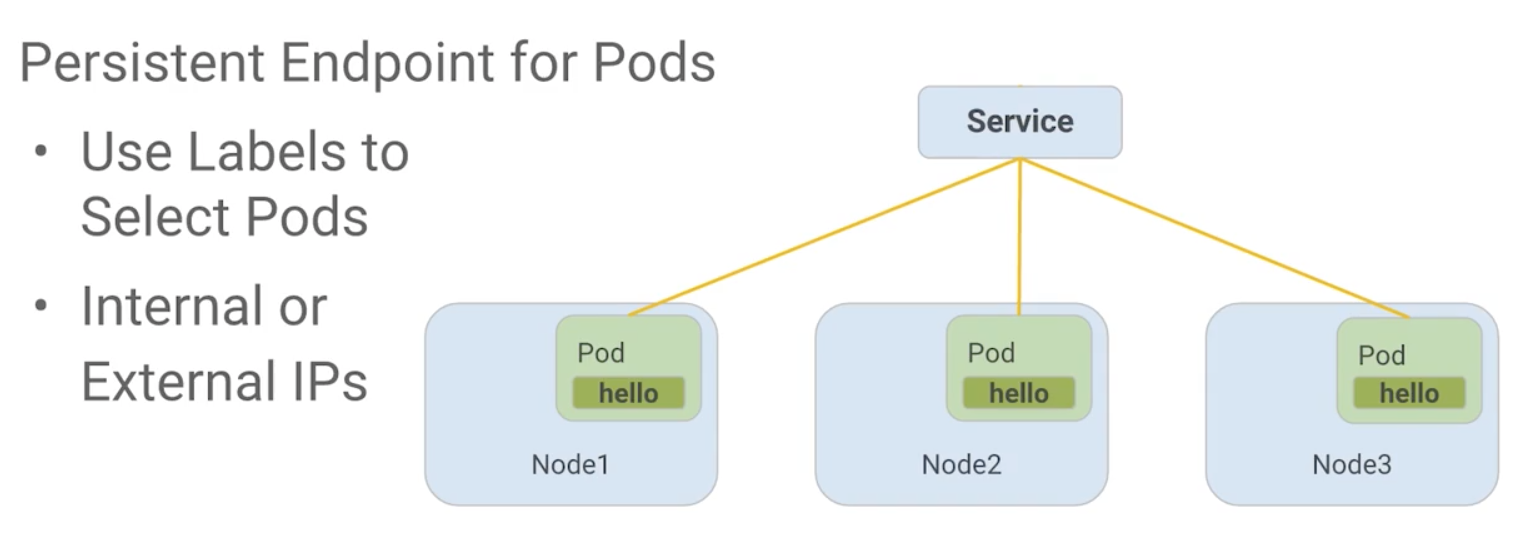
An abstract way to expose an application running on a set of Pods as a network service.
With Kubernetes you don't need to modify your application to use an unfamiliar service discovery mechanism. Kubernetes gives Pods their own IP addresses and a single DNS name for a set of Pods, and can load-balance across them.
kubectl create -f services/monolith.yamlkind: Service
apiVersion: v1
metadata:
name: "monolith"
spec:
selector:
app: "monolith"
secure: "enabled"
ports:
- protocol: "TCP"
port: 443
targetPort: 443
nodePort: 31000


 浙公网安备 33010602011771号