[AWS] Lab: Network Load Balancer
In this hands-on exercise, you will learn to create a network load balancer (NLB), and see the role of an NLB.
An NLB serves as the single point of contact for clients and automatically distributes the incoming traffic uniformly across multiple targets. The targets are the EC2 instances within the same or different AZs.
Prerequisites:
- An AWS account
- A default VPC. It is a VPC in a default region and has a public subnet in each Availability Zone. Refer to the create a default VPC for more details. Just to ensure you have the right set of VPC, subnet, route table, and internet gateway available, refer to the snapshots below.
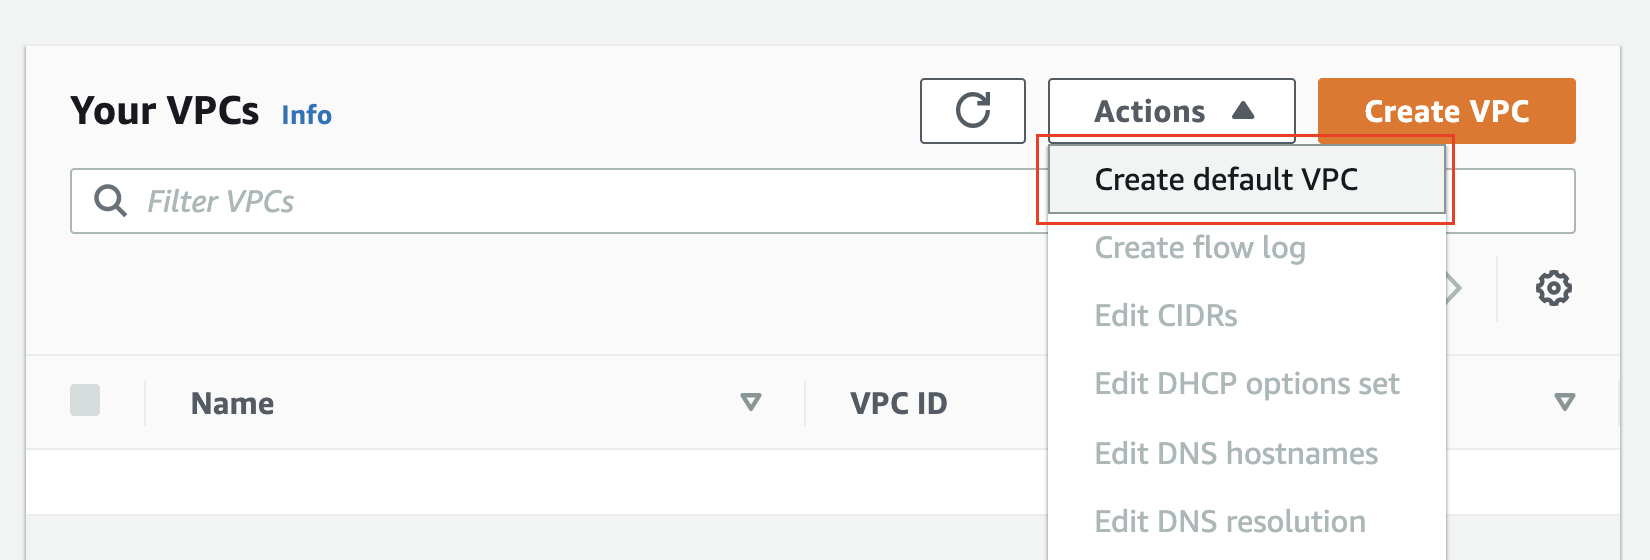
Create a default VPC
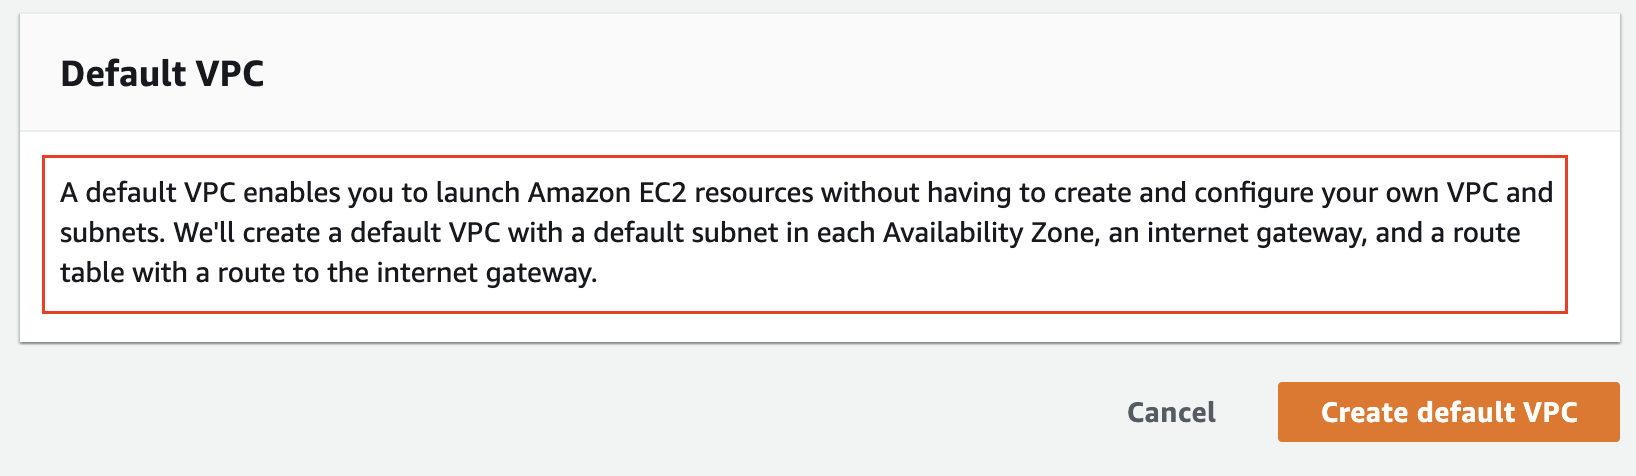
Info about a default VPC

Prerequisite 1: A default VPC
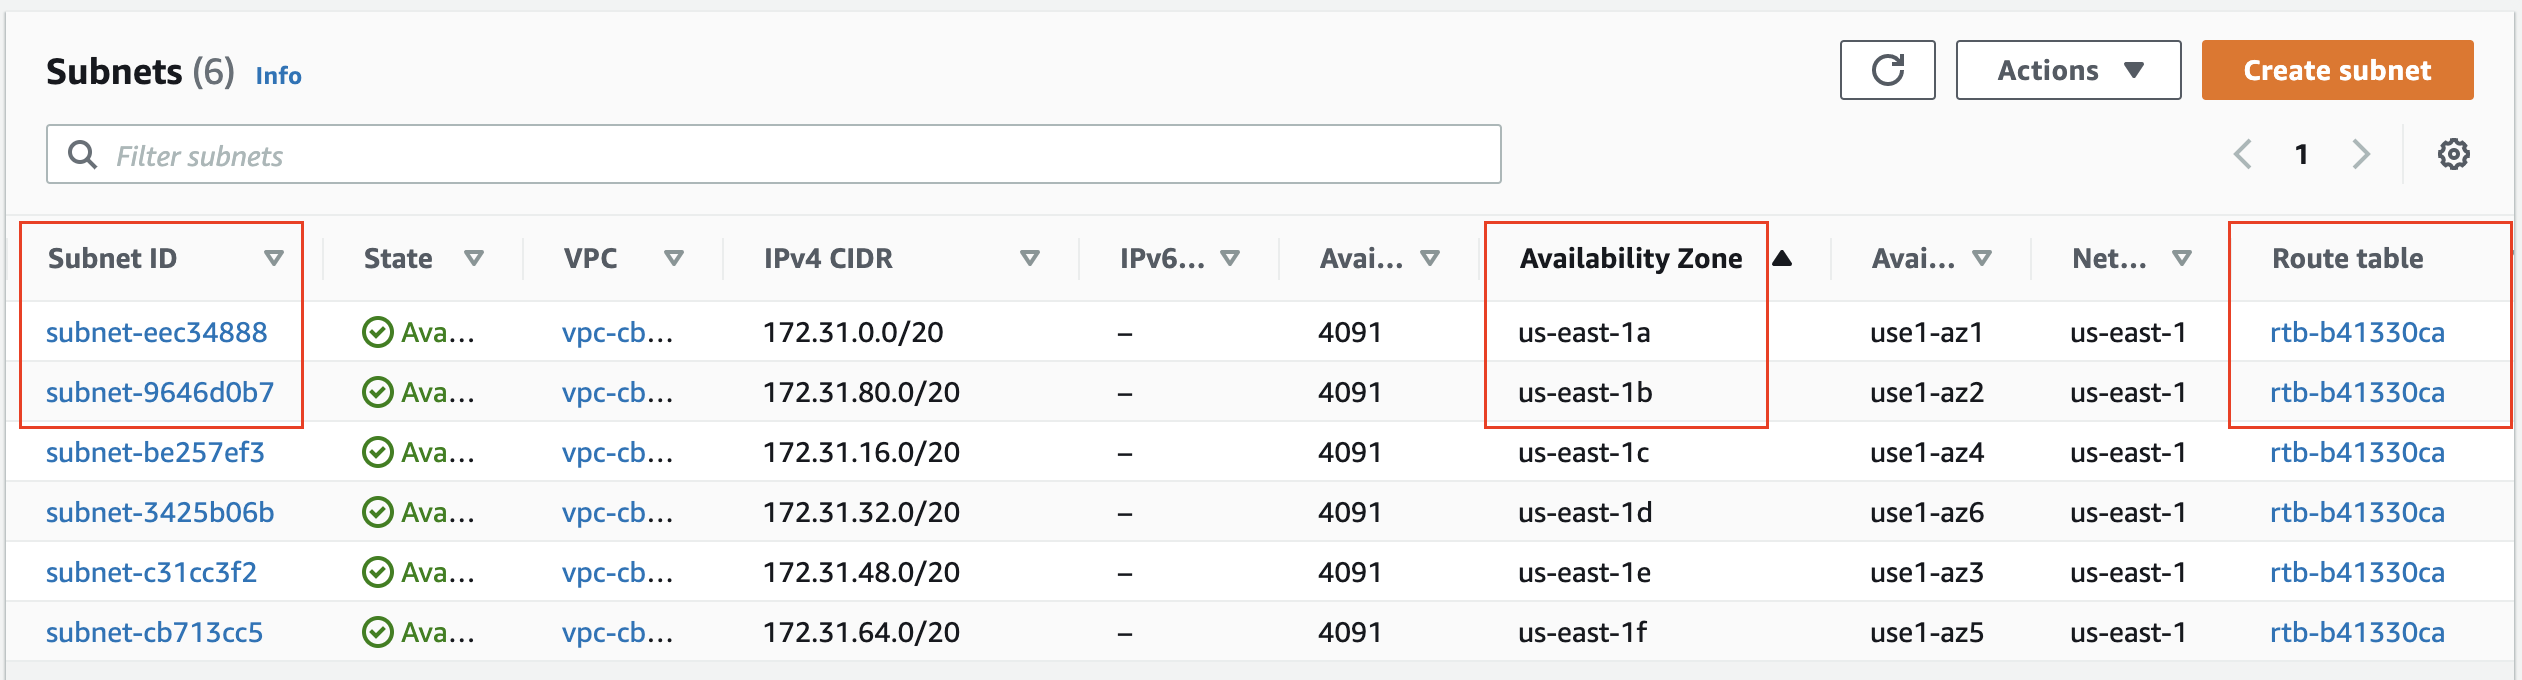
Prerequisite 2: Subnets in each AZ in the default VPC. Also, notice that a common route table is attached to all subnets.
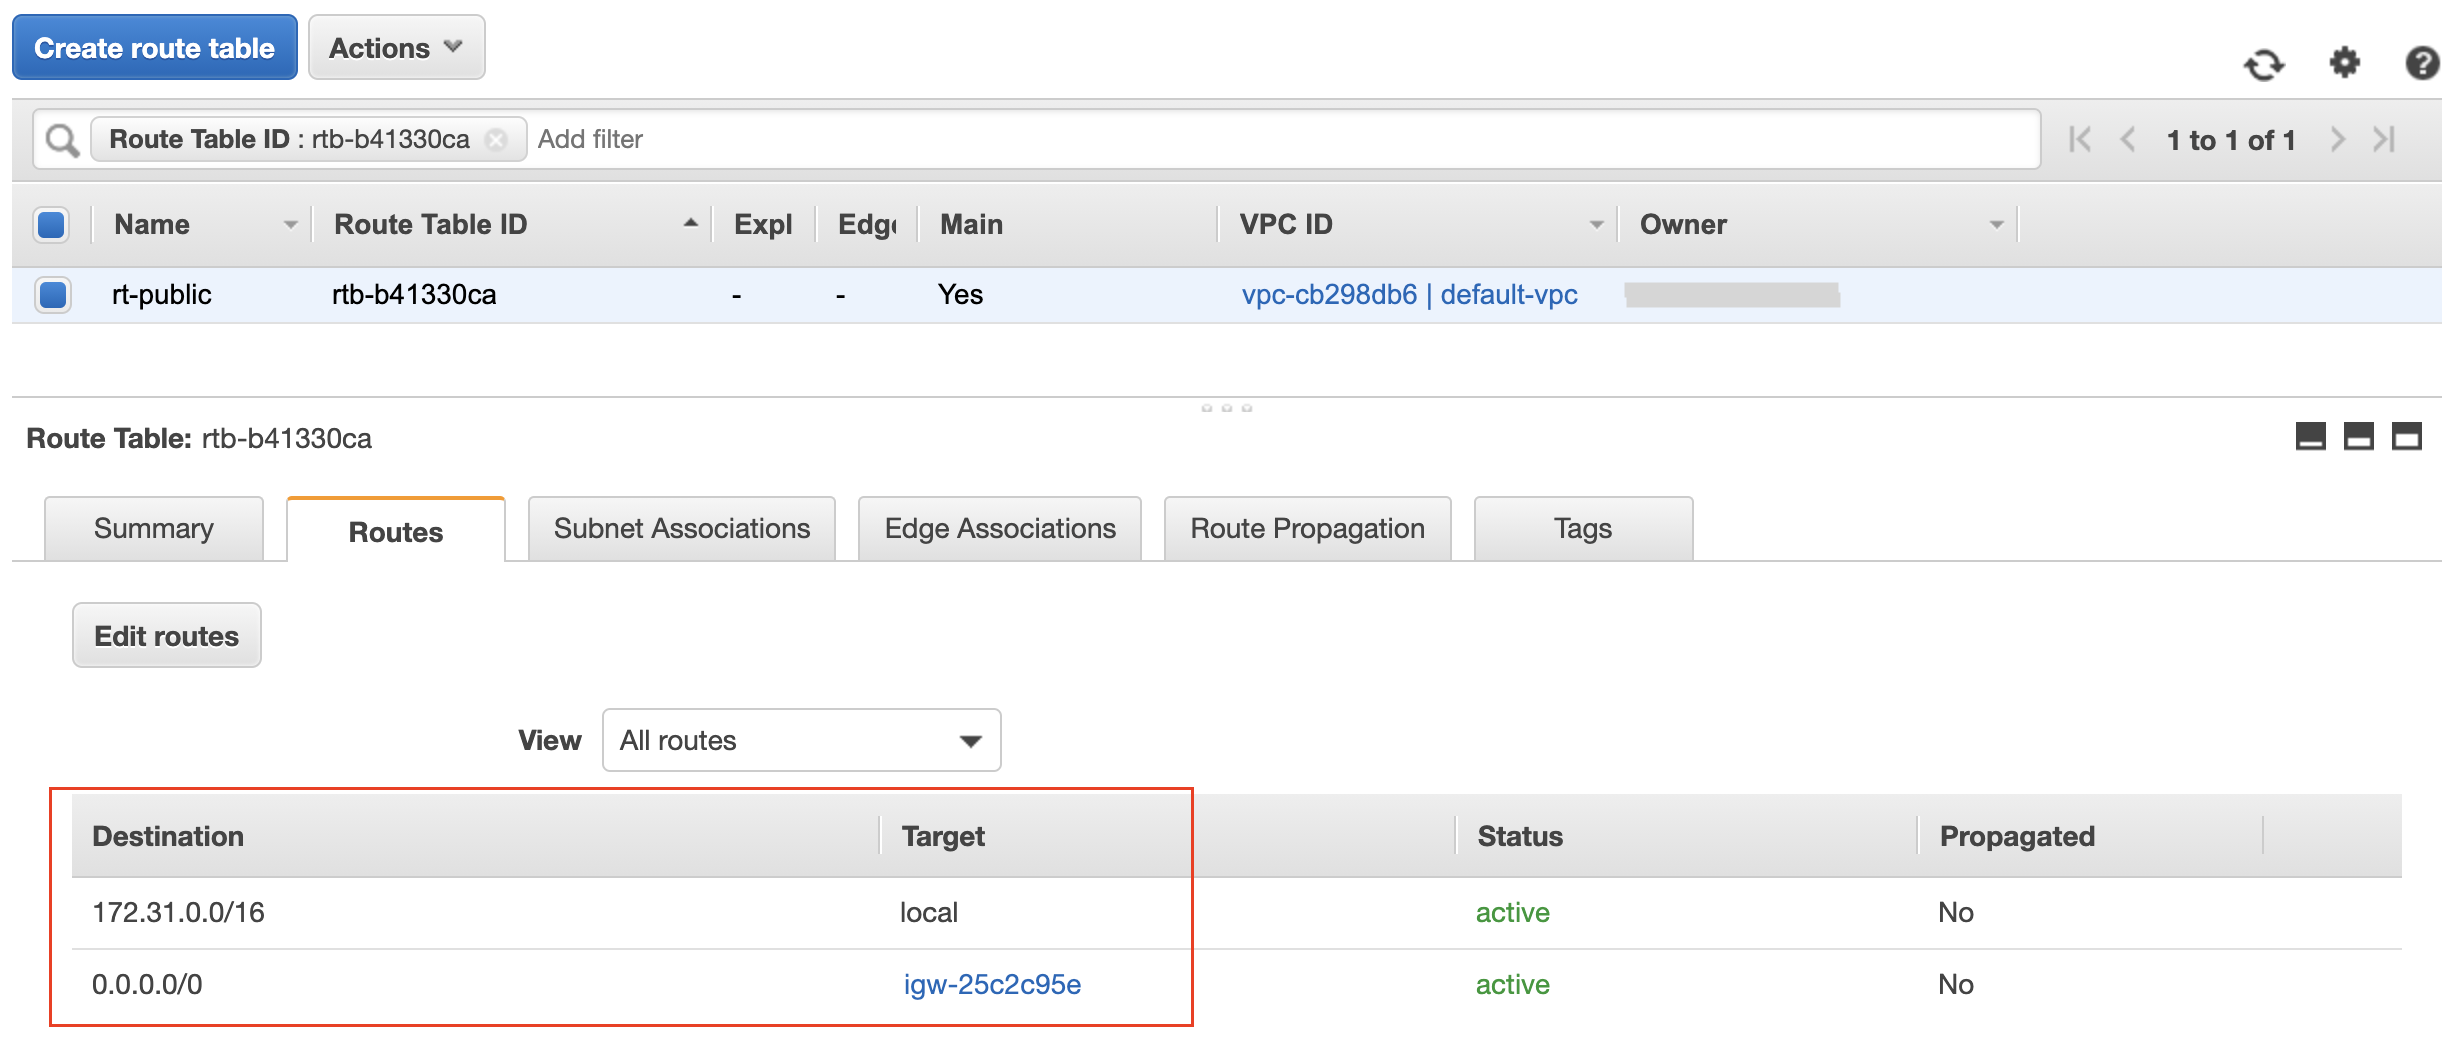
Prerequisite 3: A route table with a rule for internet facing communication. See that it requires an internet gateway
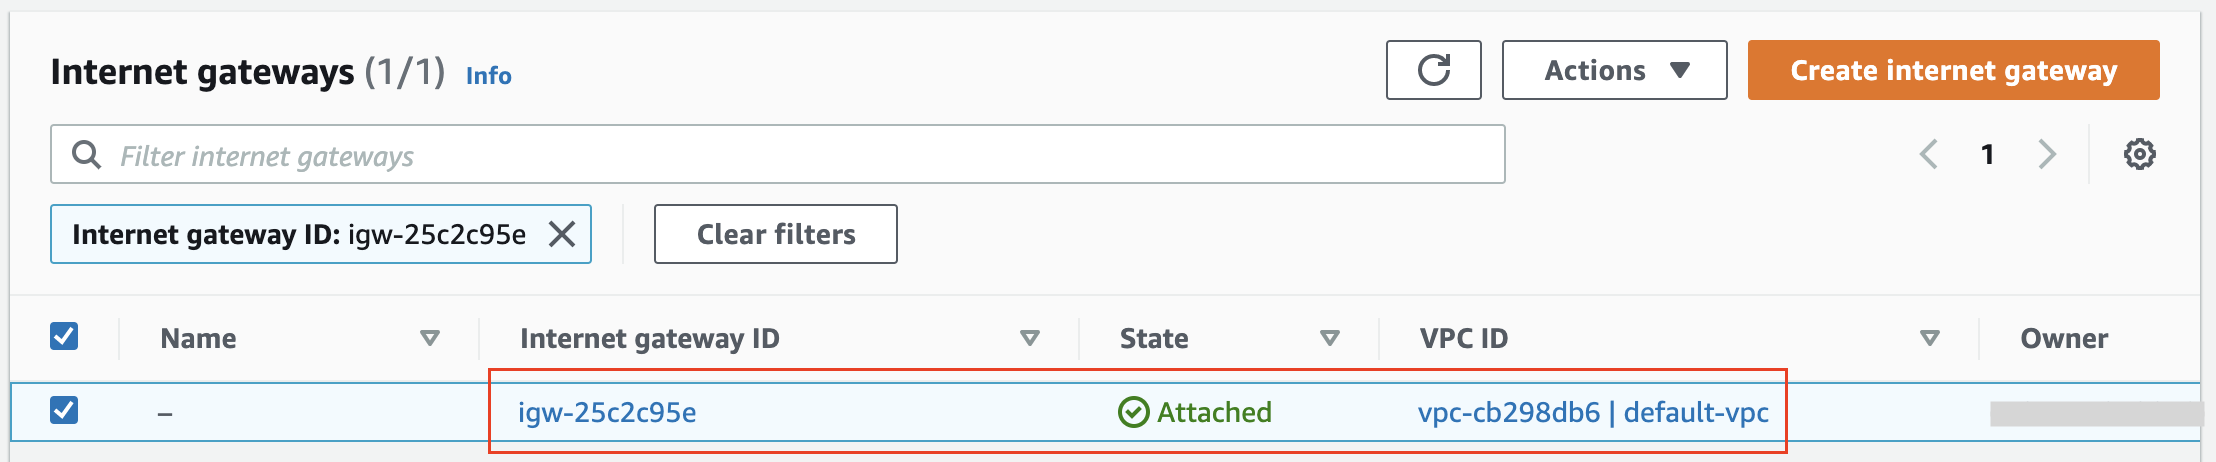
Prerequisite 4: The Internet gateway is a managed service. See an internet gateway attached to the default vpc.
Step 1. Create the first EC2 instance
The steps below show how to create the first EC2 instance in a public subnet in any one Availability Zone, and install the Apache webserver on it. Use the following configuration, and leave the remaining values as the defaults.
- Navigate to the EC2 Dashboard page, and click on the Launch Instance wizard to launch an instance. Choose the AMI and instance type as:
| Step | Value |
|---|---|
| 1. Amazon Machine Image (AMI) | Amazon Linux 2 AMI (HVM), SSD Volume TypeNote: You have chosen a Free Tier Eligible AMI |
| 2. Instance Type | t2.micro |
- At the next step, Configure Instance Details, use the following values:
| Field | Value |
|---|---|
| Number of Instances | 1 |
| Network | Select the default VPC that has public subnets in different AZs |
| Subnet | Choose anyone, say us-east-2a |
| Auto-assign Public IP | Enable |
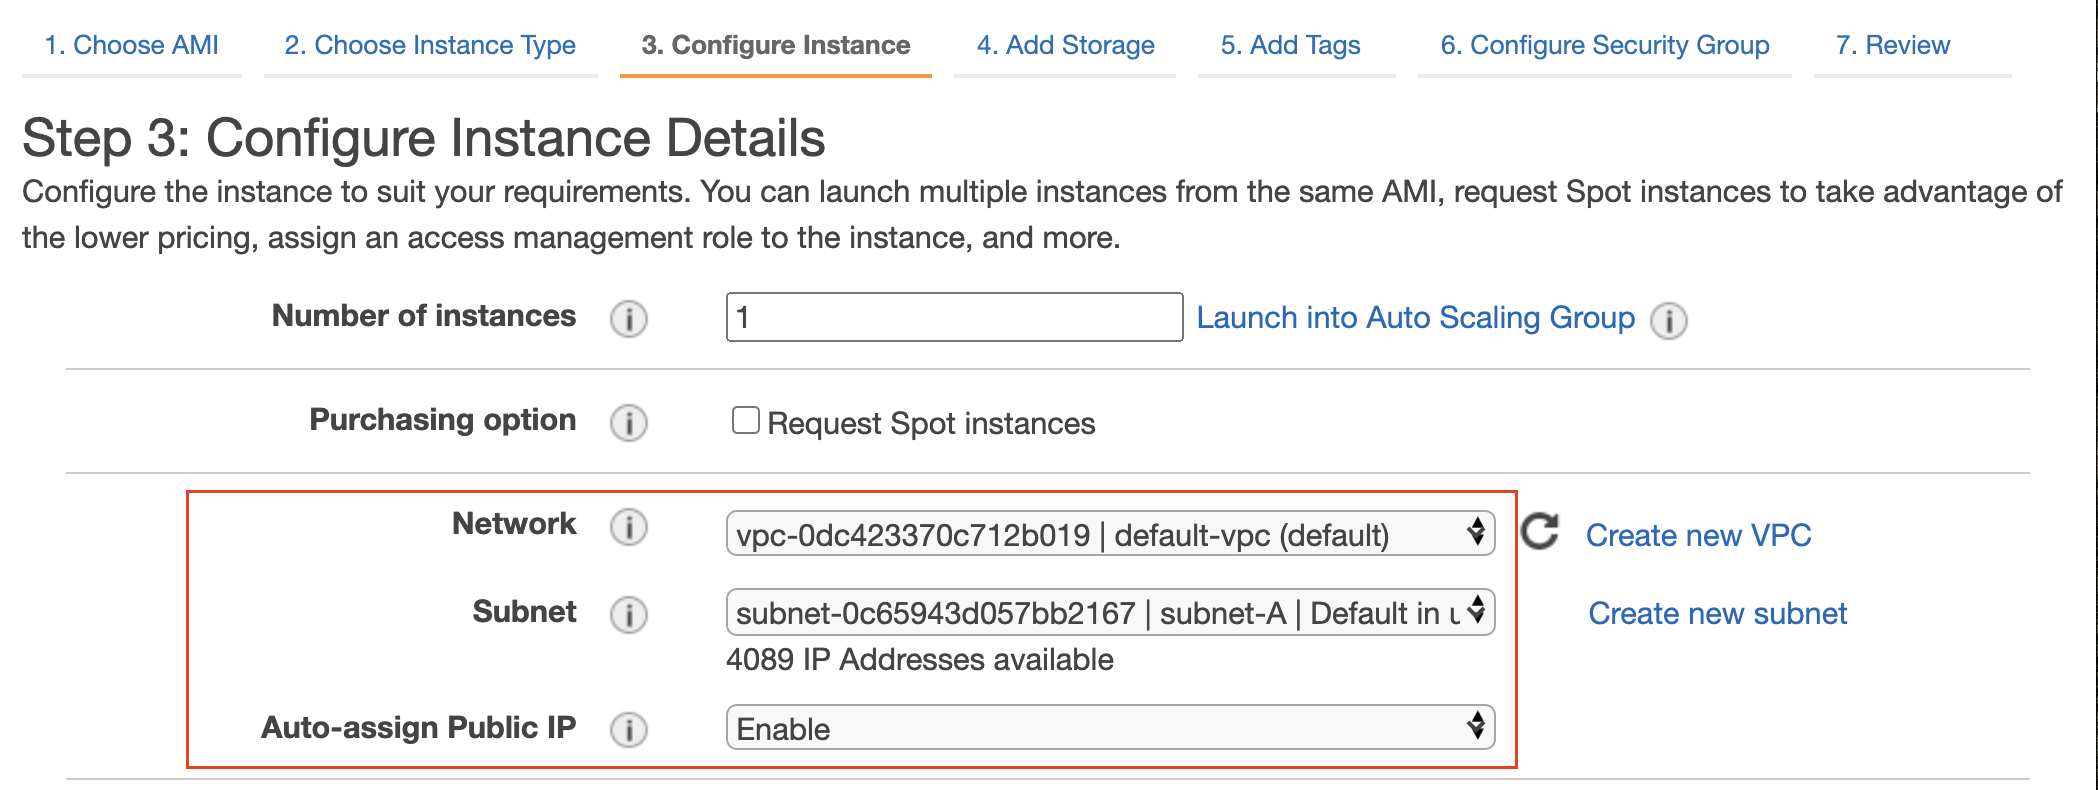
A default VPC and a public subnet chosen to launch the first EC2 instance.
- Under the Advanced Details → User data section, add the following configuration script to run automatically during launch.
#!/bin/bash
sudo yum update -y
sudo amazon-linux-extras install -y lamp-mariadb10.2-php7.2 php7.2
sudo yum install -y httpd mariadb-server
sudo systemctl start httpd
sudo systemctl enable httpd
sudo chkconfig httpd on
# Set file permissions for the Apache web server
sudo groupadd www
sudo usermod -a -G www ec2-user
sudo chgrp -R www /var/www
sudo chmod 2775 /var/www
find /var/www -type d -exec sudo chmod 2775 {} +
find /var/www -type f -exec sudo chmod 0664 {} +
# Create a new PHP file at  /var/www/html/ path
echo "<?php phpinfo(); ?>" > /var/www/html/phpinfo.php
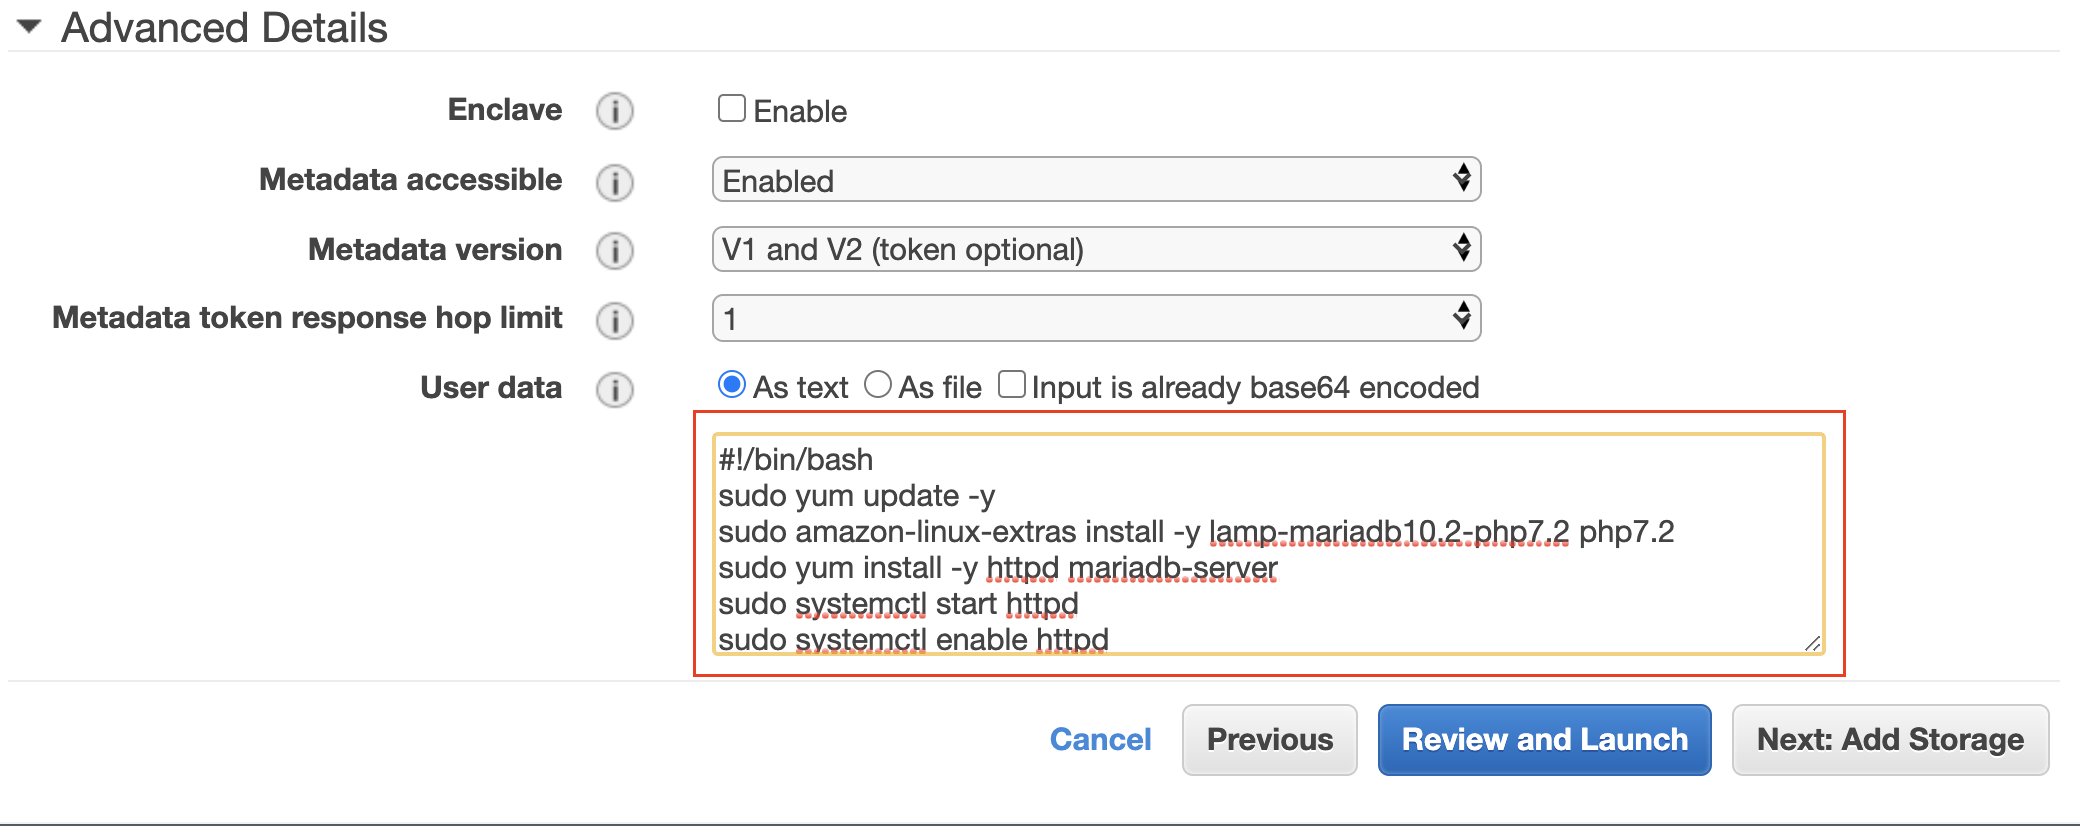
Specify the user data to configure the EC2 instance
- Keep the storage as default, and use a tag as
Name: Server-A
- At the Configure Security Group step, you can create a new one, and ensure to have a firewall rule to allow incoming HTTP traffic on port 80.
| Type | Protocol | Port | Source |
|---|---|---|---|
| HTTP | TCP | 80 | 0.0.0.0/0It will allow all IPv4 addresses to access your instance. |
| SSH | TCP | 22 | 0.0.0.0/0 |
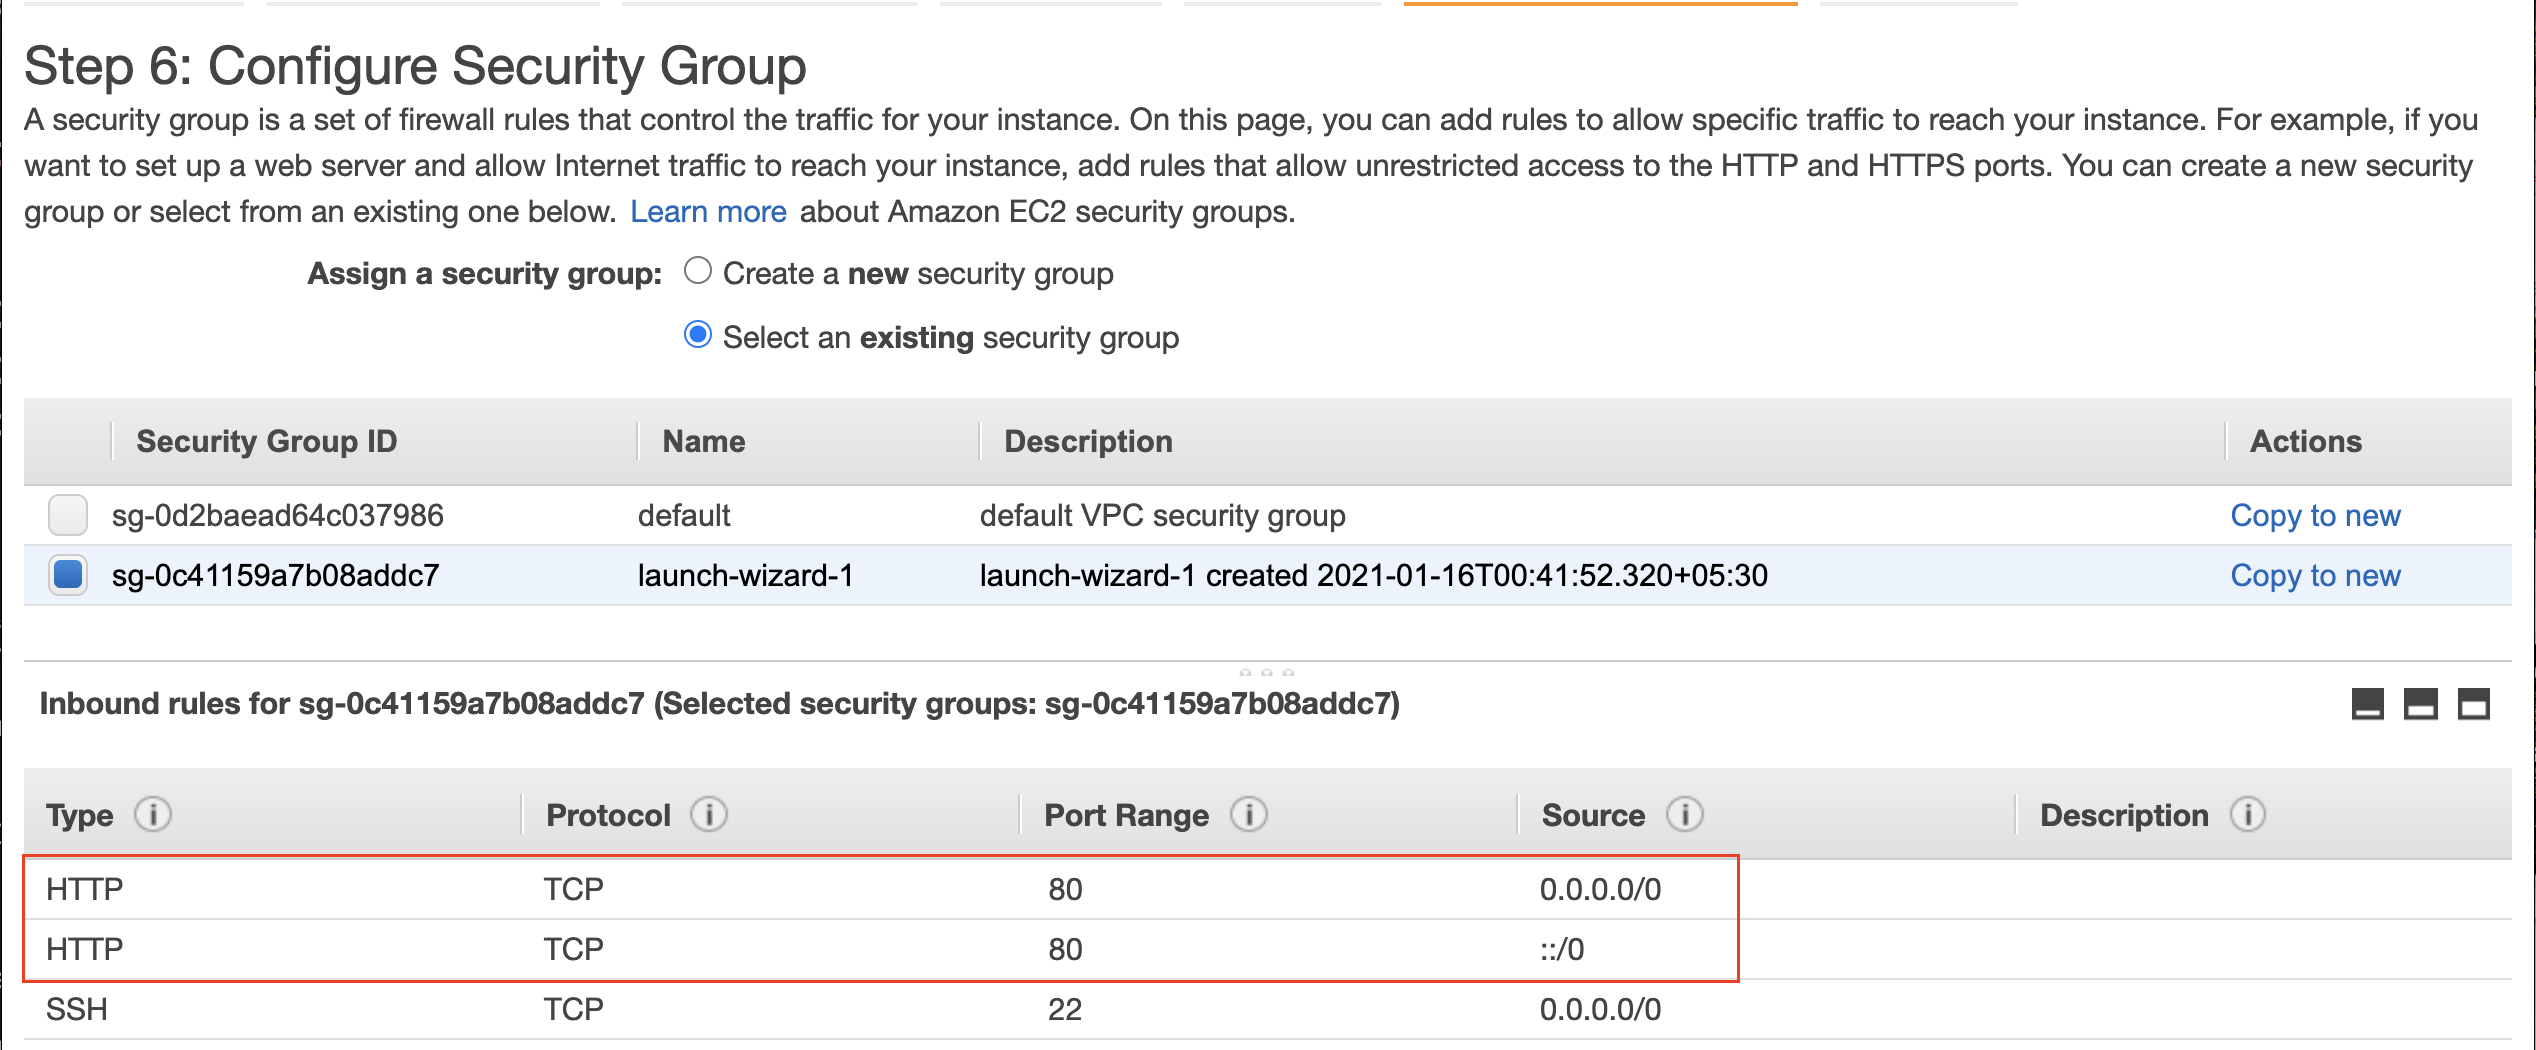
Configure firewall rule to allow HTTP traffic on port 80
- Generate and download a new key pair, at the last stage of the Launch Instance wizard.
Important: This key-pair will allow you to log into your instance, using SSH, from your local machine. Save the key-pair carefully, because the same private key cannot be re-generated.
Step 2. Create the second EC2 instance, in a separate Availability Zone
Launch the second EC2 instance using the same steps above, except for the following changes at the Configure Instance Details step:
- Select another public subnet in a different AZ, say
us-east-2b - Replace the last line of the user data (shell script) with
echo "<? echo "<h1>Welcome to server 2</h1>" ?>" > /var/www/html/phpinfo.phpName: Server-B.
Step 3. Verify the Apache webserver installation
- Confirm that the newly created EC2 instances are in the
runningstate.
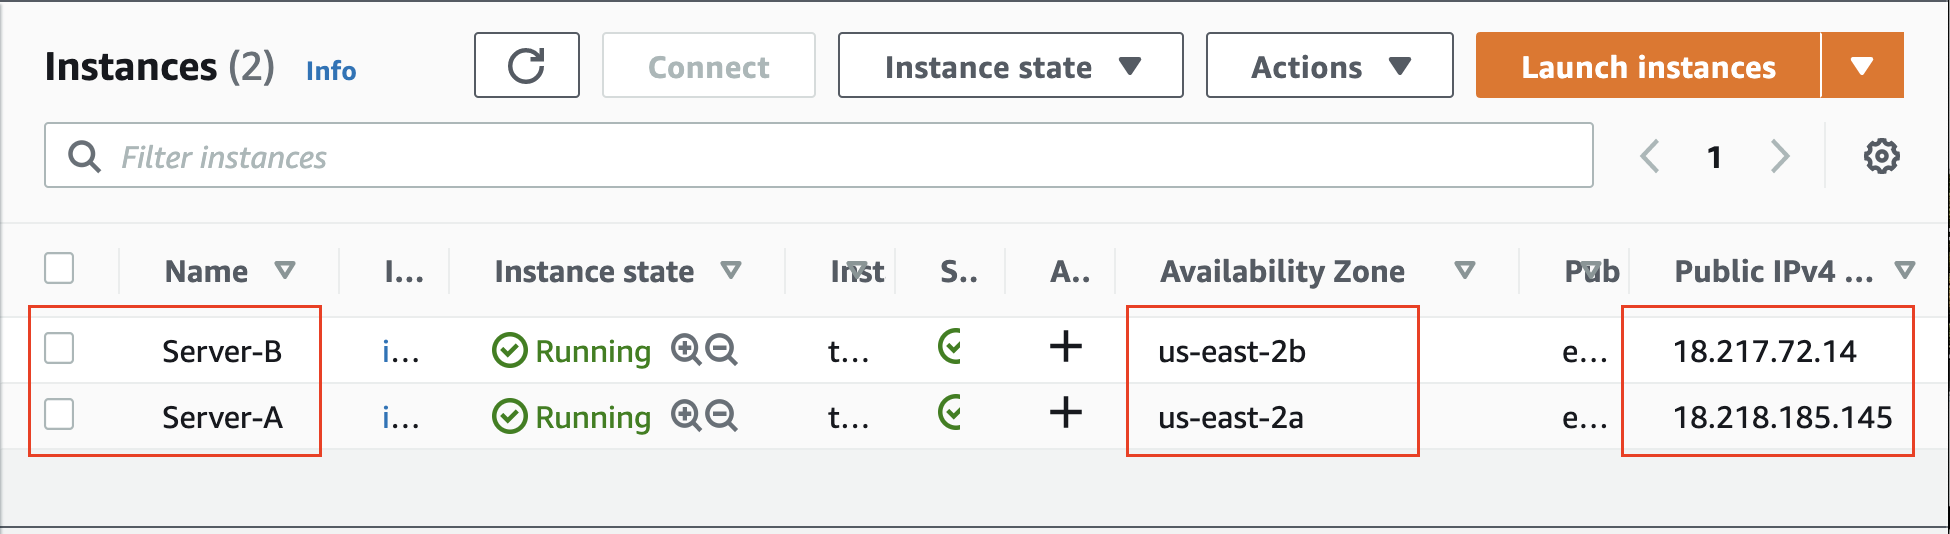
Two instances running in different AZs. Server-A is running in us-east-2a, while Server-B is running in us-east-2b.
- Verify that the Apache server is running successfully on both the EC2 instances. Simply copy, and paste the public IPv4 address of each instance in a new browser window. If the Apache is configured successfully, you will see the Apache welcome page.
Note: We have opened the HTTP traffic on the default port, therefore the public IPv4 address should be prepended with
http://, instead ofhttps://.
- Configuring the secure HTTPS on EC2 will add overhead to the current experiment, and you may deviate from the intent of learning an NLB.
Need help?: Refer to the How do I troubleshoot an unresponsive website hosted on my EC2 instance or clean restart the exercise by deleting the VPC, and EC2 resources again.
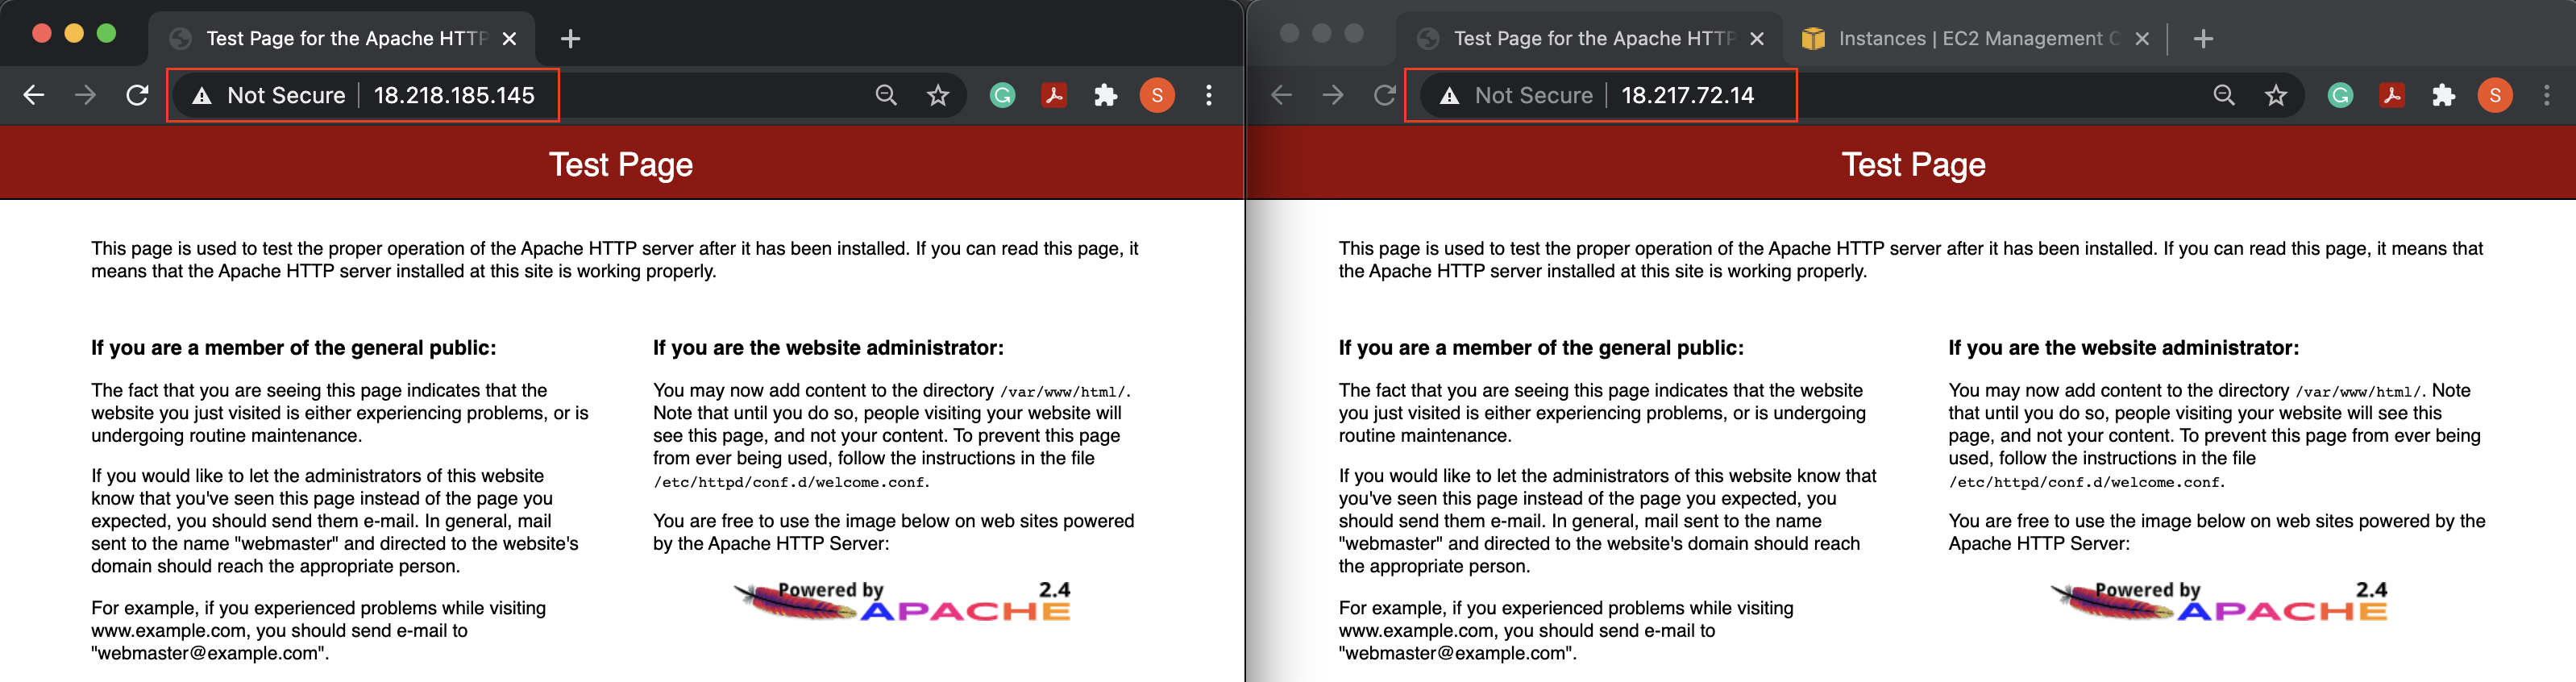
The image above shows the output at HTTP (not HTTPS), such as, http://18.218.185.145 and http://18.217.72.14
- View the content of the PHP page that you configured using the shell script.
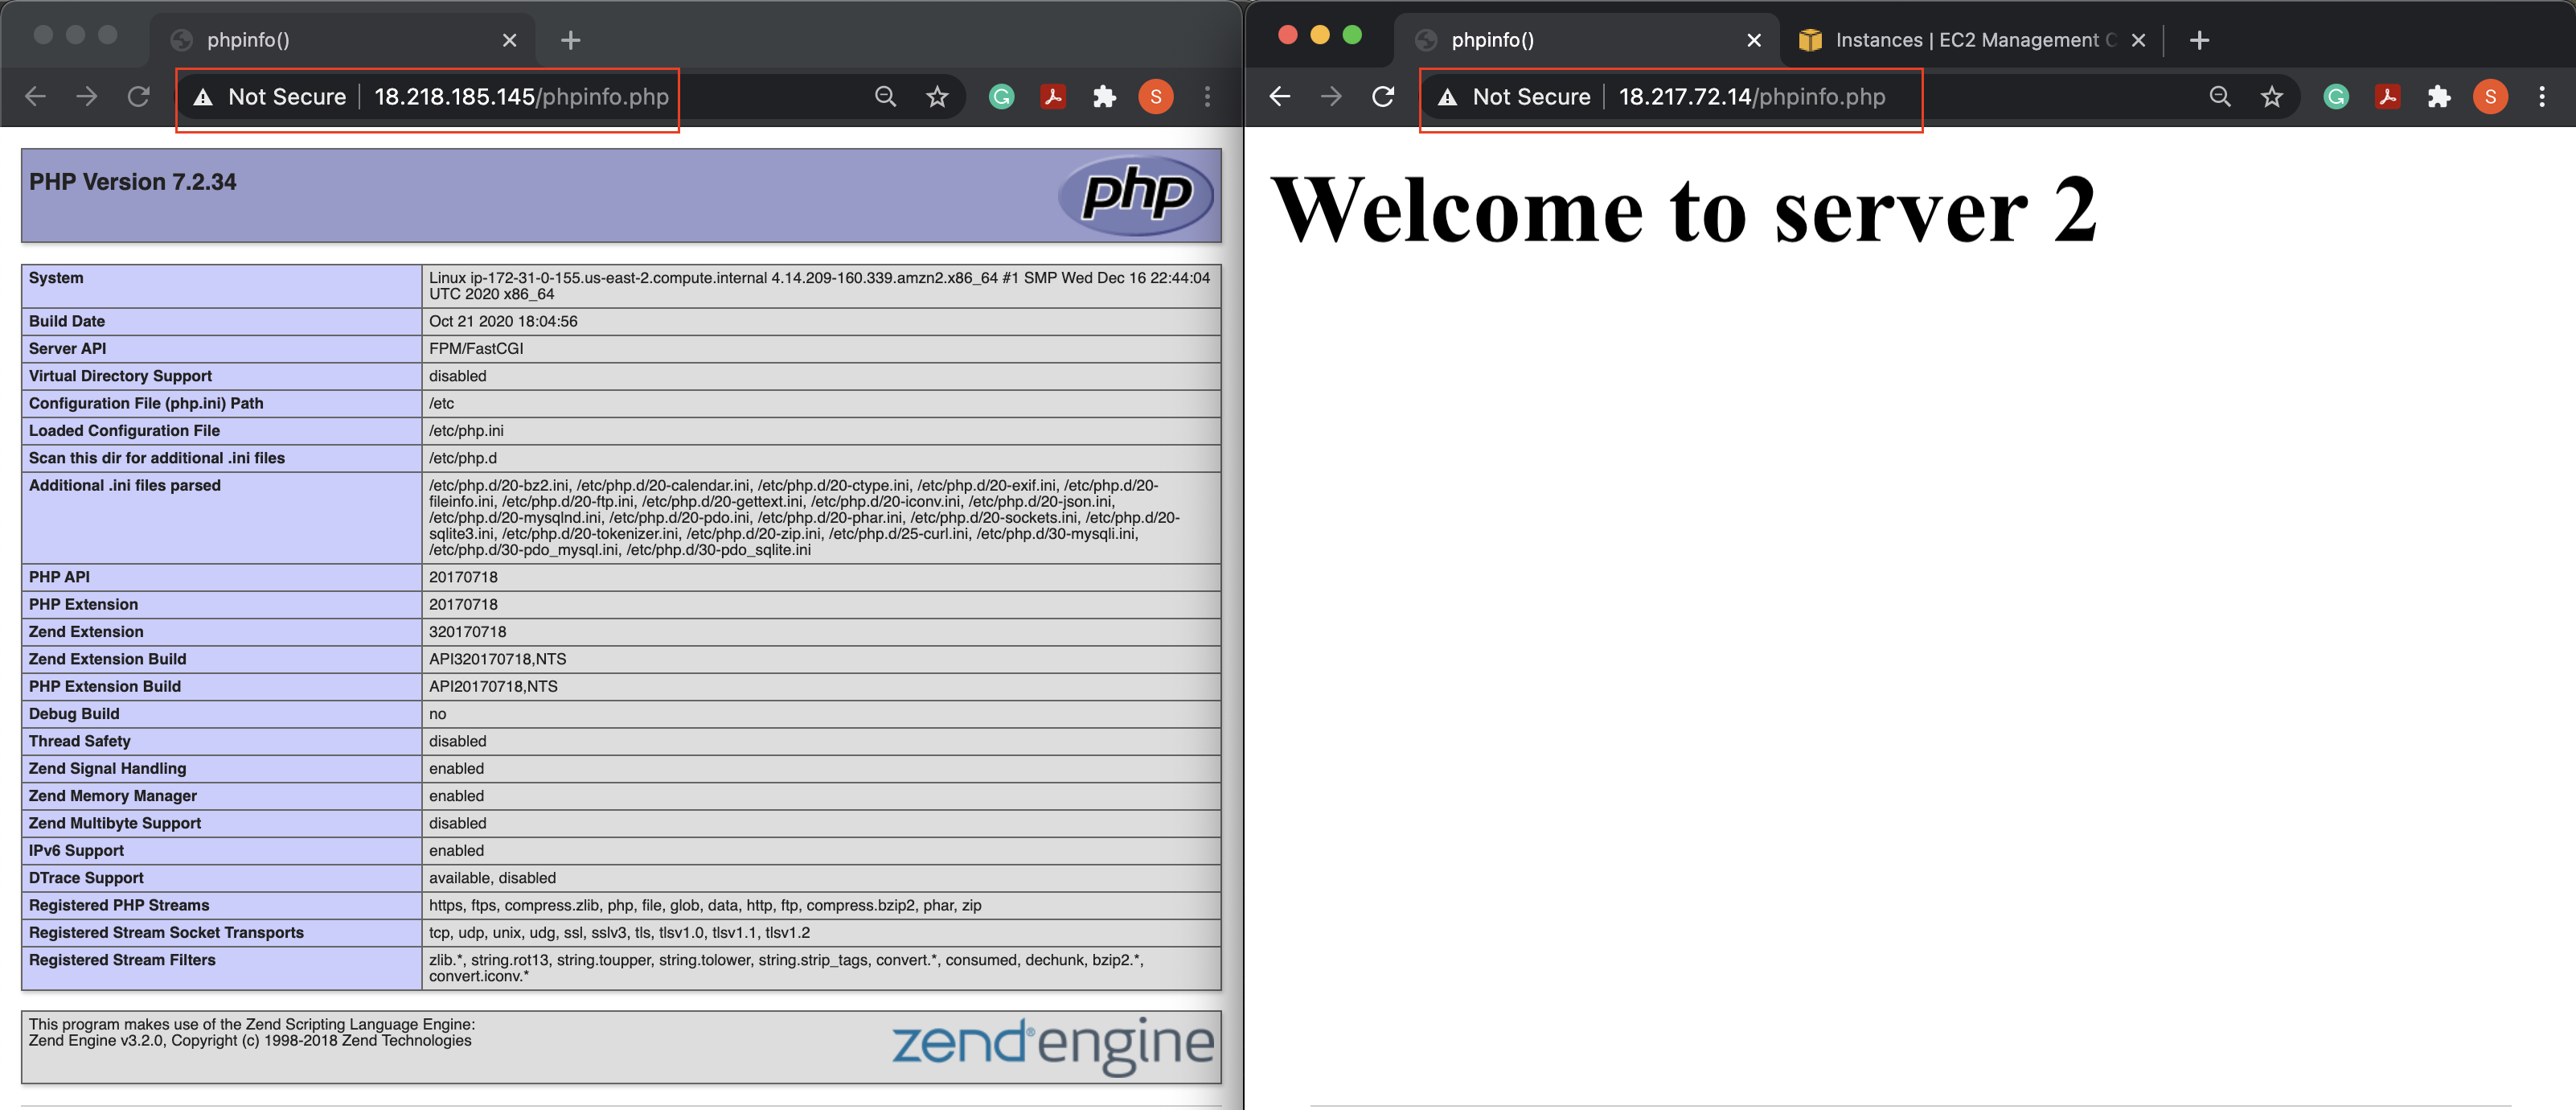
The image above shows the output at HTTP (not HTTPS), such as, http://18.218.185.145/phpinfo.php and http://18.217.72.14/phpinfo.php
Step 4. Create an NLB
- Select the Load Balancers service on the left-hand side menu of the EC2 dashboard, and click on the Create Load Balancer button.
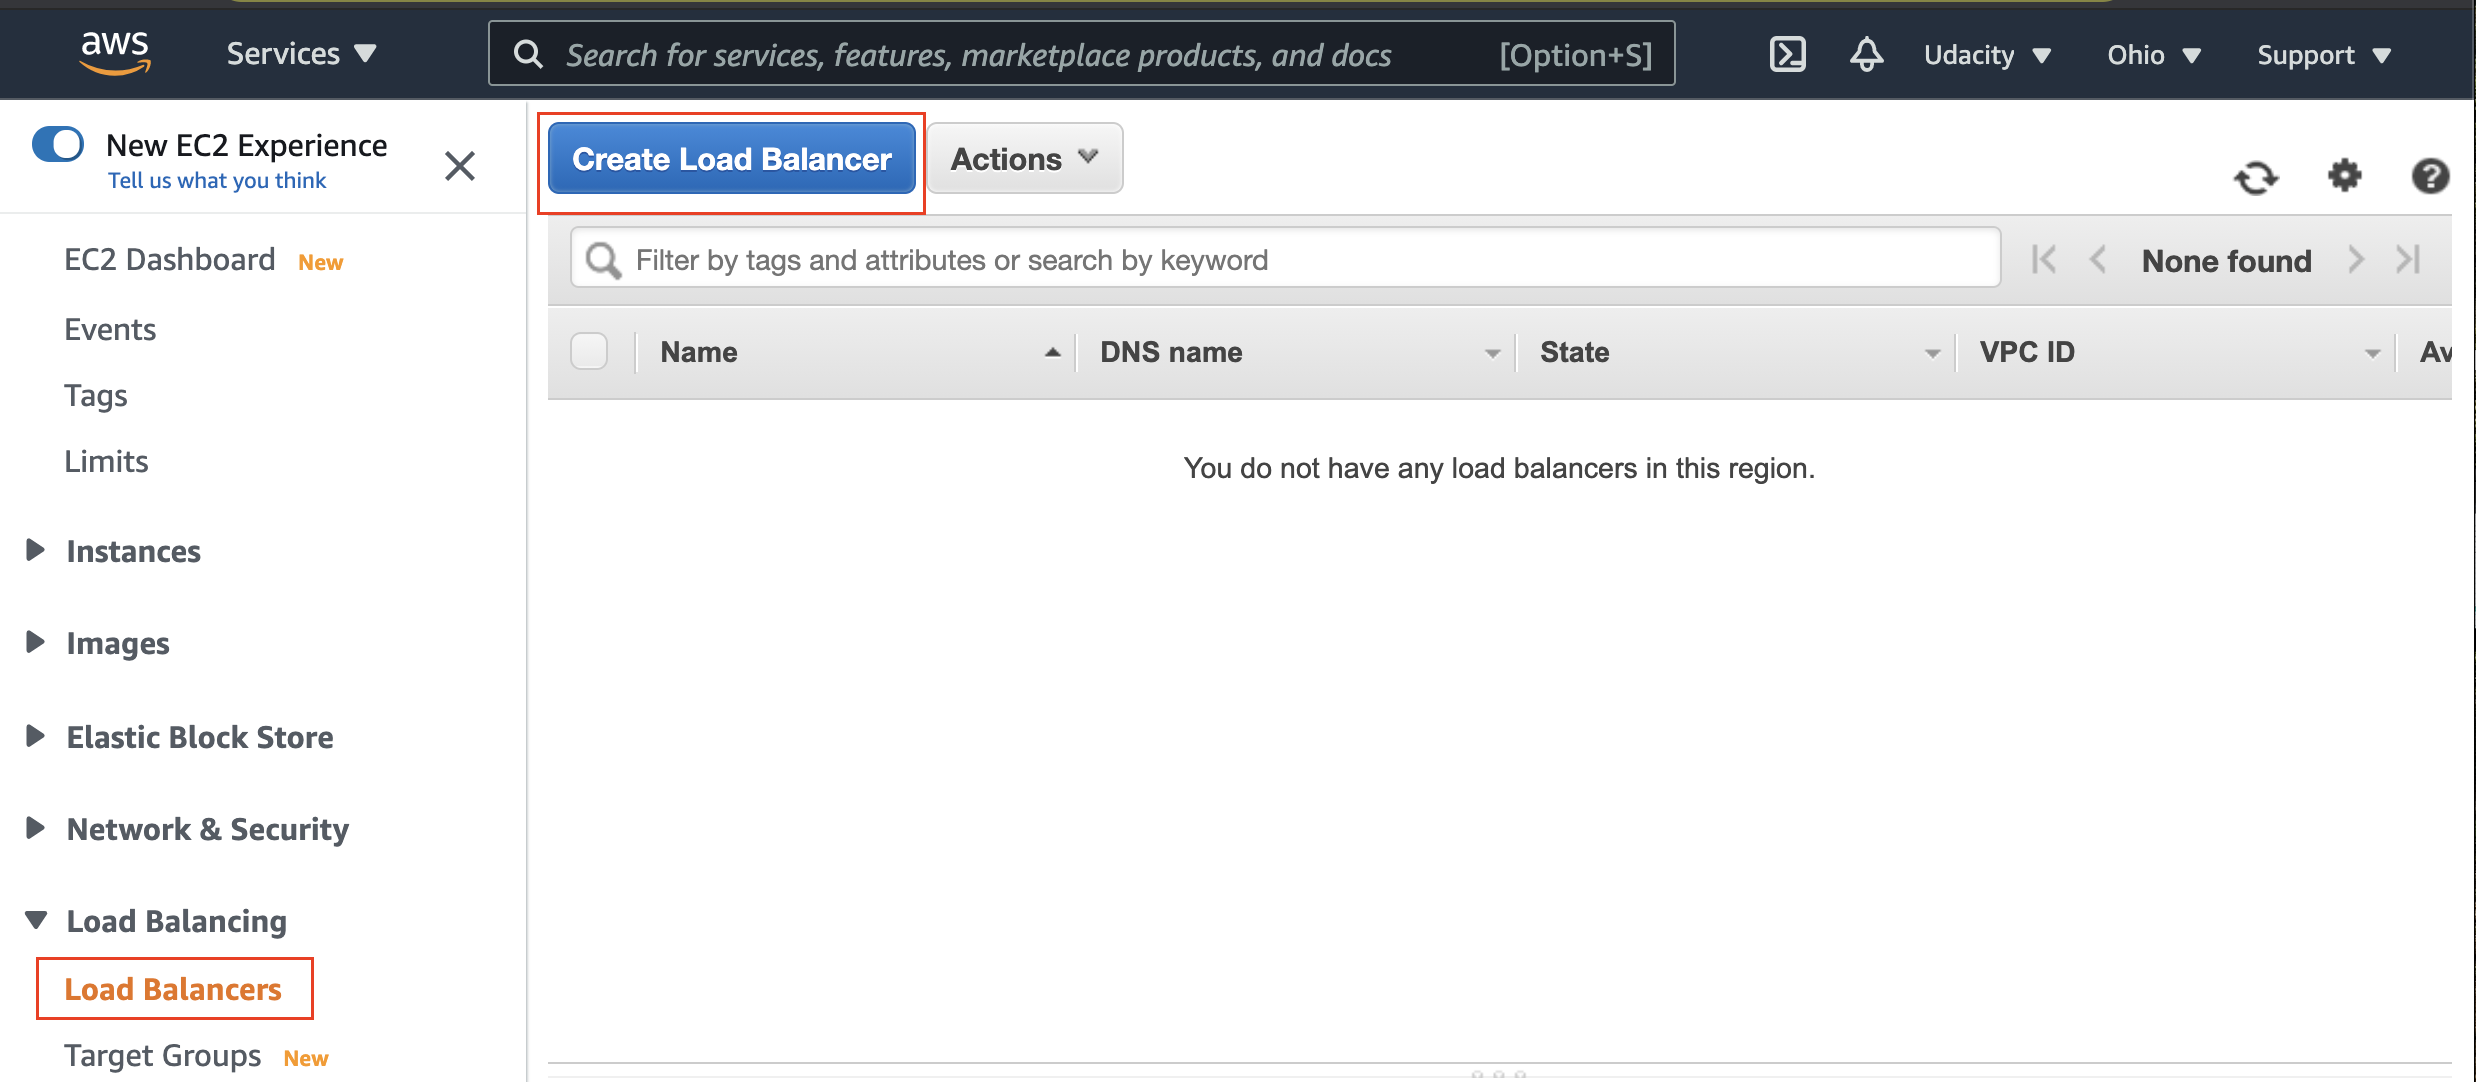
Click on the Create Load Balancer button
- You will be prompt to choose the type of load balancer: Application, Network, or Classical load balancer. Choose to create a Network Balancer.
- At the first step, Configure Load Balancer, use the following basic configuration details
| Section | Field | Value |
|---|---|---|
| Basic Configuration | Name | udacity-nlb |
| Scheme | internet-facing |
|
| Availability Zones | VPC | Choose default-vpc |
| Availability Zones | Check the two where you've launched the EC2 instances, such as us-east-2a and us-east-2b |
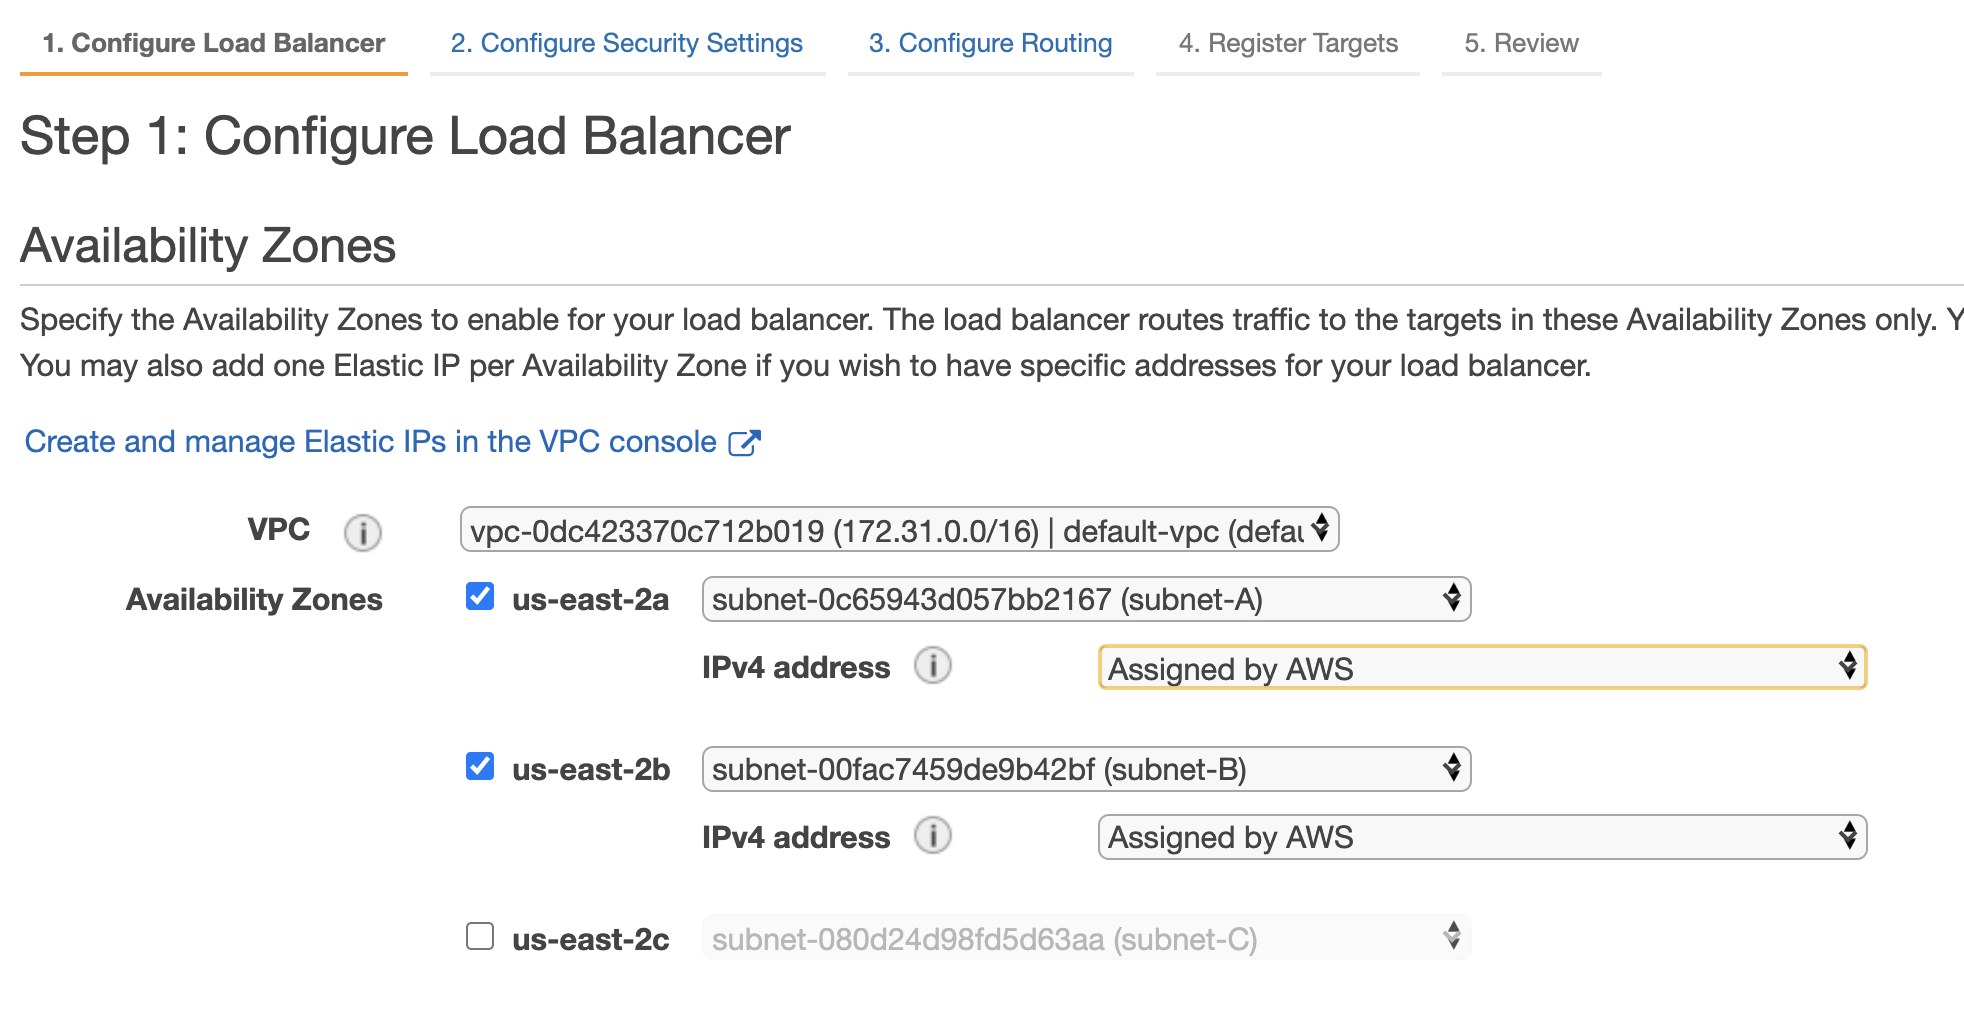
Add VPC and AZs to the load balancer
- Skip the Configure Security Settings step, by clicking the Next button.
- At the Configure Routing step, use the following configuration details in the Target group section:
| Field | Value |
|---|---|
| Target group | New target group |
| Name | UdacityNLBTarget |
| Target type | Instance |
| Protocol | TCP |
| Port | 80 |
- At the Register Targets step, add the two EC2 instances created previously to the target group.
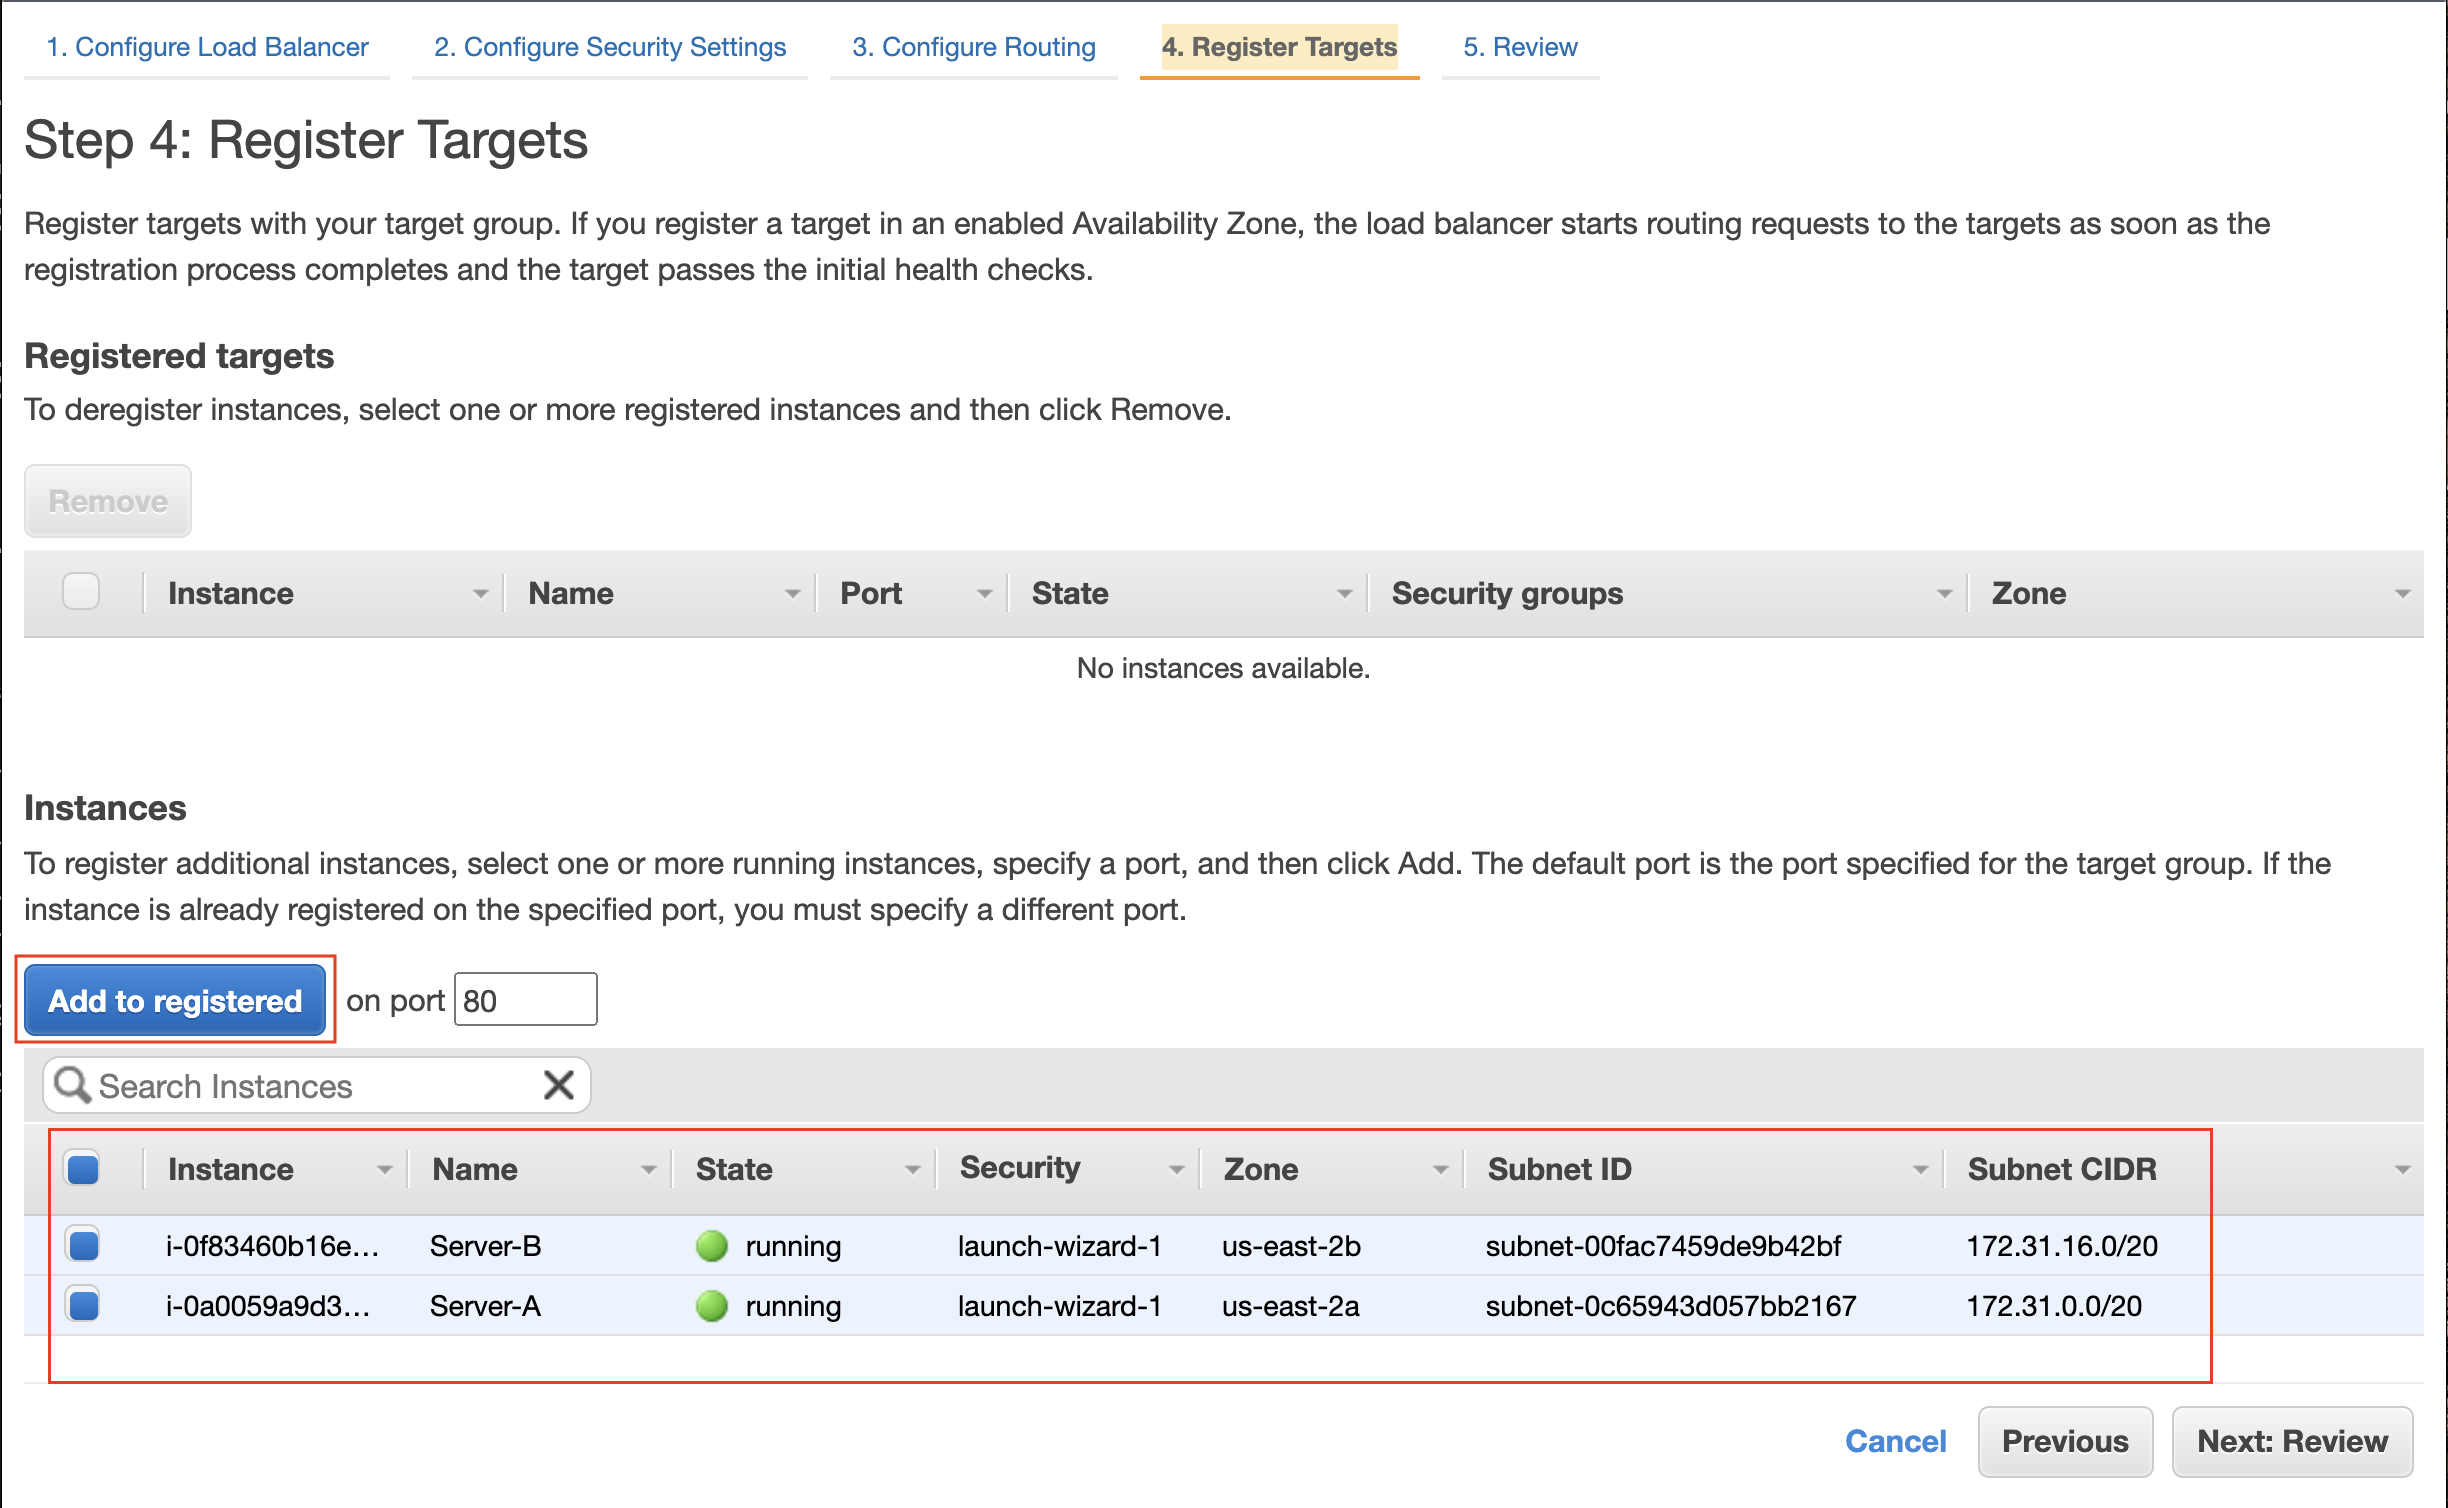
Add instances to the registered target group. Do not forget to click on the Add to registered button after selecting the instances from the list.
- Leave the remaining things as default, and finish creating the NLB.
Step 5. Test the NLB
- You will be taken back to the Load Balancers dashboard. Copy the DNS name of the newly created NLB, and append the
/phpinfo.phpat the end of it. A sample DNS name appended with the file name looks like this:http://udacity-nlb-f00b2cb9e62f5c2a.elb.us-east-2.amazonaws.com/phpinfo.php - Paste the copied DNS name to a new browser window and refresh the browser a few times, each after a few seconds. You will notice that sometimes the request is redirected to Server-A and other times, it is routed to Server-B.


The NLB is getting the output from the two different webservers. Notice that the DNS name (URL) is the same in the above two cases.
Step 6. Delete the resources
- Delete the NLB by going to the Load Balancer dashboard.
- Stop and terminate the EC2 instances by going to the Instances dashboard.

 浙公网安备 33010602011771号