Postman界面介绍及实例(转)
1、首先安装chrome,然后在chrome的商店里搜postman,https://chrome.google.com/webstore/search/postman?t=http://webstore.google.com ,然后有位同学对整个界面做了介绍, 转一下:http://bayescafe.com/tools/use-postman-to-test-api-automatically.html

-
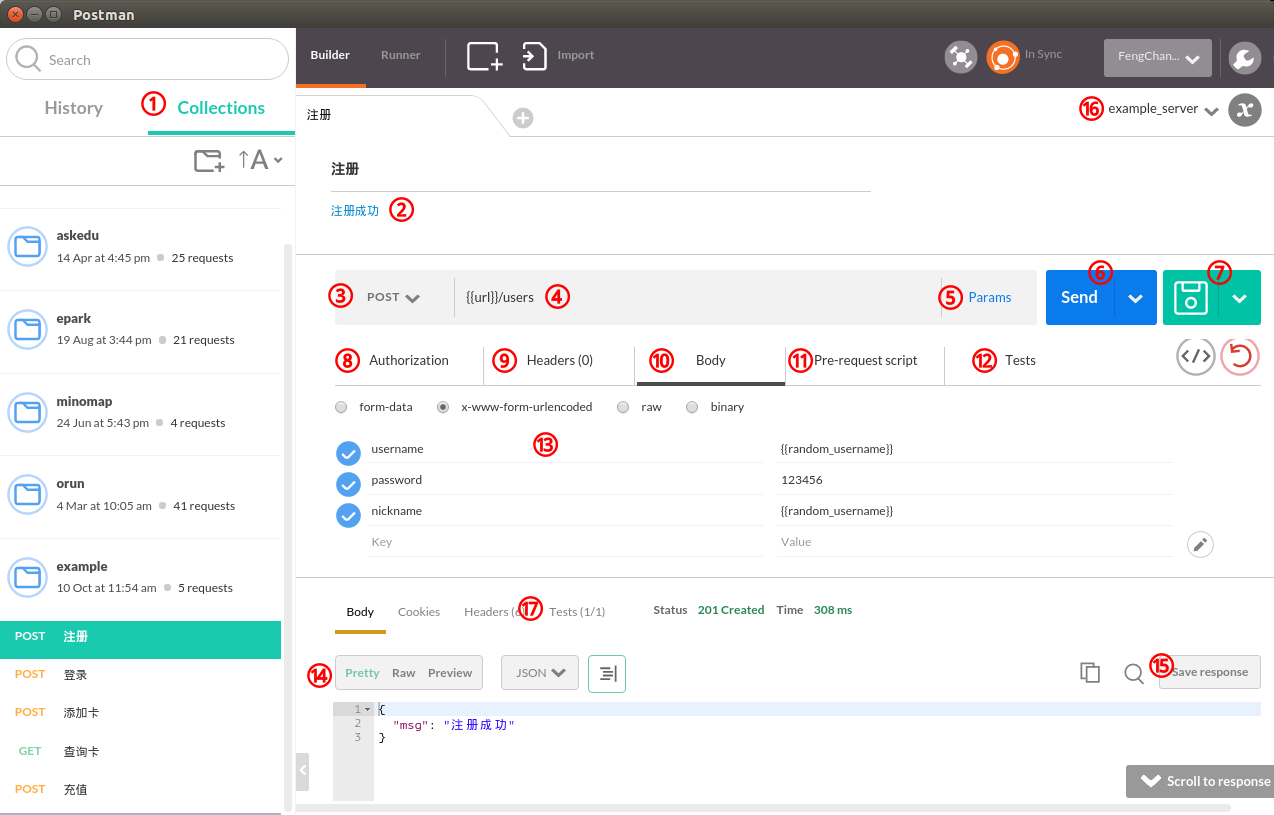
Collections:在Postman中,Collection类似文件夹,可以把同一个项目的请求放在一个Collection里方便管理和分享,Collection里面也可以再建文件夹。如果做API文档的话,可以每个API对应一条请求,如果要把各种输入都测到的话,就需要每条测试一条请求了。这里我新建了一个example用于介绍整个流程,五个API对应五条请求。这个Collection可以通过
https://www.getpostman.com/collections/96b64a7c604072e1e4ee导入你自己的Postman中。 -
上面的黑字注册是请求的名字,如果有Request description的话会显示在这下面。下面的蓝字是保存起来的请求结果,点击可以载入某次请求的参数和返回值。我会用这个功能给做客户端的同事展示不同情况下的各种返回值。保存请求的按钮在15.
-
选择HTTP Method的地方,各种常见的不常见的非常全。
-
请求URL,两层大括号表示这是一个环境变量,可以在16的位置选择当前的environment,环境变量就会被替换成该environment里variable的值。
-
点击可以设置URL参数的key和value
-
点击发送请求
-
点击保存请求到Collection,如果要另存为的话,可以点击右边的下箭头
-
设置鉴权参数,可以用OAuth之类的
-
自定义HTTP Header,有些因为Chrome原因不能自定义的需要另外装一个插件Interceptor,在16上面一行的卫星那里
-
设置Request body,13那里显示的就是body的内容
-
在发起请求之前执行的脚本,例如request body里的那两个random变量,就是每次请求之前临时生成的。
-
在收到response之后执行的测试,测试的结果会显示在17的位置
-
有四种形式可以选择,form-data主要用于上传文件。x-www-form-urlencoded是表单常用的格式。raw可以用来上传JSON数据
-
返回数据的格式,Pretty可以看到格式化后的JSON,Raw就是未经处理的数据,Preview可以预览HTML页面
-
点击这里把请求保存到2的位置
-
设置environment variables和global variables,点击右边的x可以快速查看当前的变量。
-
测试执行的结果,一共几个测试,通过几个。
这个界面就是免费版的主要内容,和其他API测试工具相比,已经足够好用。如果要使用自动化测试,需要购买9.99美金的Jetpacks,暂时不想购买的话可以试一下Team版Postman。现在是可以免费试用的,不但拥有Jetpacks的功能,还能与其他账户同步Collection。
(三)实例
这里就以我的一个模块的返回验证来做例子了,两个模块间是http请求,返回的是xml数据,要验证,返回数据的个数,传递的参数

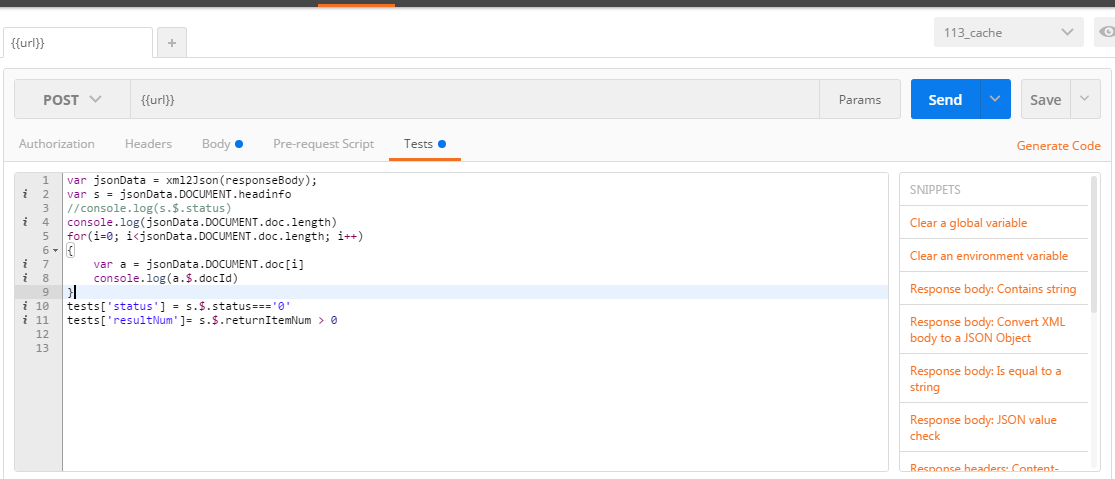
再看验证点Tests:这里的几种snippets很好用,而且这里使用的是js,所以会点js就可以自己写逻辑啦

点击send之后,可以看到返回的数据

tests的结果:

我要验证的是headinfo里的status=0和returnNum>0,下面是test的结果,说明测试通过,这时再回头看Tests中的内容就会发现,tests['status'] = s.$.status==='0'中tests['status'] 被赋成s.$.status==='0',若s.$.status==='0'为true,则case通过,否则fail,就是这么简单,其实主要的关键就是要找到你的验证点,如果只验证返回code,直接用右侧的snipplets中的 就可以,tests["Status code is 200"] = responseCode.code === 200; snipplets就自己用蹩脚的英语理解下吧,responsebody包含字符串、xml转json、responsebody是一个字符串、json变量校验、response header 校验、返回时间、status code、还有tiny validator,其实在Tests里是支持js的,所以想怎么写就怎么写,前提是得会点js。
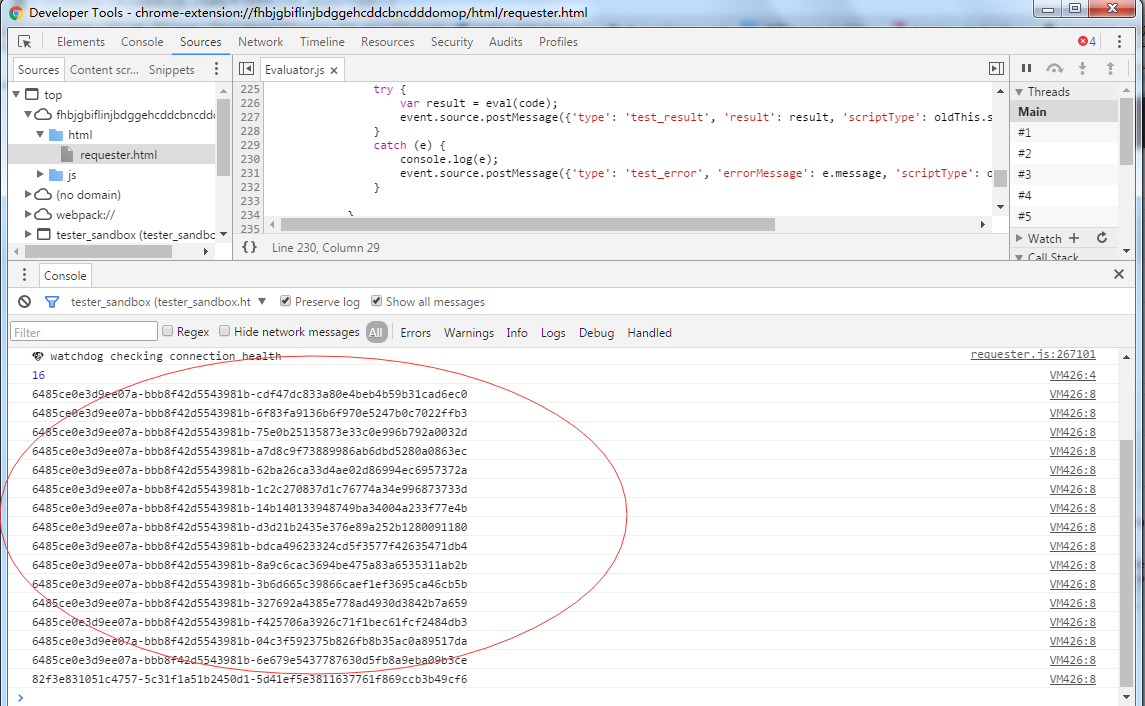
在使用js的时候,需要调试变量,或者说怎么知道我要验证的变量取值是什么呢?想到了windows.alert(),可是什么也没出,然后就是console.log(),发现没有地方能出console,然后google了下,发现chrome是支持的,就是使google develop tools 支持postman :
http://blog.getpostman.com/2014/01/27/enabling-chrome-developer-tools-inside-postman/
(1)chrome://flags/ ,启用下面这个

(2) 然后重启chrome和postman,F12打开chrome develop tools ,再点send,就可以log出我们要的东西了

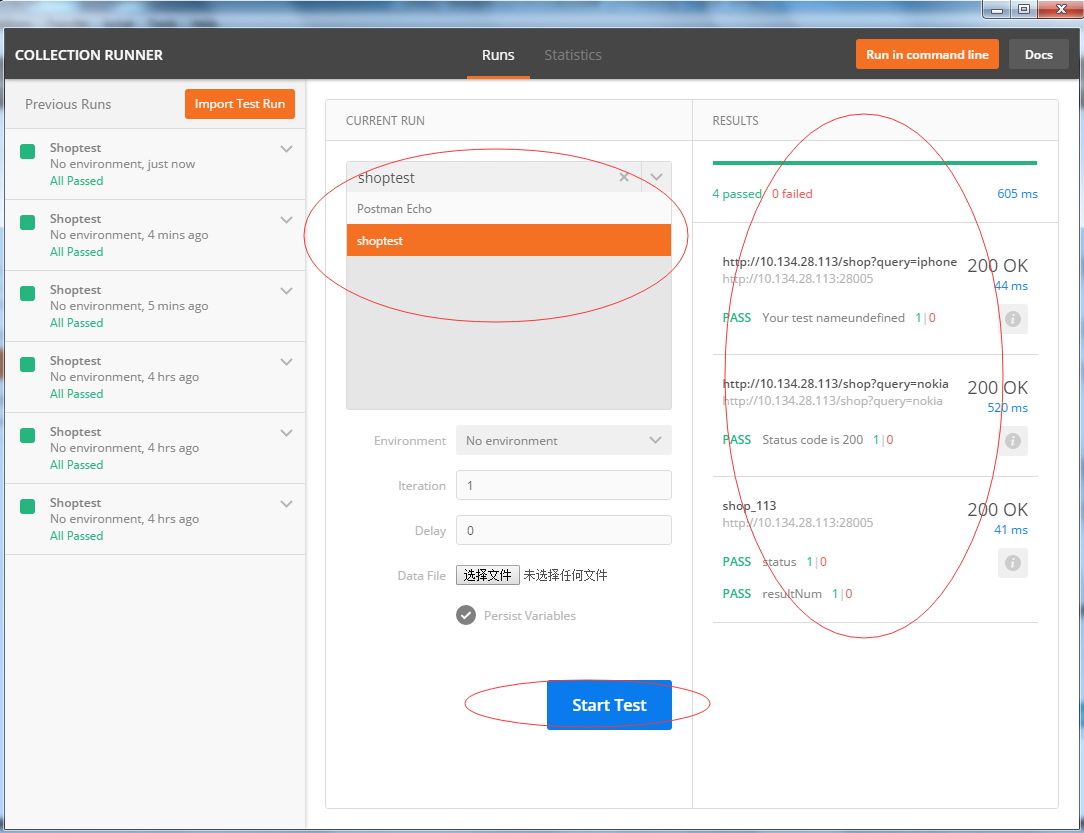
有了上面这些方法,再复杂的接口测试我们都能搞定,然后就是把设计好的case都放在一个collection中,就是类似于testsuite,然后点击左上角的Runner来执行collection

附录:这位同学的例子很好的展示了通过设置环境变量来处理这类请求有先后关系的case,很好的例子,转过来啦
http://bayescafe.com/tools/use-postman-to-test-api-automatically.html
1. 注册
生成一个随机字符串作为用户名和昵称
postman.setEnvironmentVariable("random_username", ("0000" + (Math.random()*Math.pow(36,4) << 0).toString(36)).slice(-4));
发起请求
POST /index.php/users HTTP/1.1
Host: postmanexample.sinaapp.com
Cache-Control: no-cache
Postman-Token: 76791813-aac2-71fb-cad4-3e737f37c4d0
Content-Type: application/x-www-form-urlencoded

username=2mjk&password=123456&nickname=2mjk
运行测试、检查结果
tests["Status code is 201"] = responseCode.code === 201;
2. 登录
直接用刚才生成的环境变量发起请求
POST /index.php/authentication HTTP/1.1
Host: postmanexample.sinaapp.com
Cache-Control: no-cache
Postman-Token: aac7d0ac-e0e3-ecf2-39da-b8dca672e3d7
Content-Type: application/x-www-form-urlencoded

username=2mjk&password=123456
运行测试、检查结果,并将返回的token记录下来
tests["Status code is 200"] = responseCode.code === 200;

var data = JSON.parse(responseBody);
postman.setEnvironmentVariable("token", data.token);
3. 添加一张卡
先生成一个卡号和卡名
postman.setEnvironmentVariable("random_cardno", Math.round(Math.random()*9999999));

postman.setEnvironmentVariable("random_cardname", ("0000" + (Math.random()*Math.pow(36,4) << 0).toString(36)).slice(-4));
然后发起请求,这里调用了刚才获取到的Token,放在header的自定义字段里作为鉴权(SAE不能用Authorization这个字段,不清楚原因)
POST /index.php/cards HTTP/1.1
Host: postmanexample.sinaapp.com
X-Authorization: d4c4a0b7b36c73e7a13b7e24a596093b
Cache-Control: no-cache
Postman-Token: d44d573f-f17a-366c-2cd7-1d5b8b709233
Content-Type: application/x-www-form-urlencoded

cardno=1385526&desc=2mo8
运行测试
tests["Status code is 200"] = responseCode.code === 200;
4. 查询刚才生成的卡
发起请求,调用了刚才生成的卡号
GET /index.php/cards/1385526 HTTP/1.1
Host: postmanexample.sinaapp.com
Cache-Control: no-cache
Postman-Token: 1e5aca57-c3bb-7404-2791-c639cd60b5c8
运行验证,和刚才生成的卡名对比,并记录新卡的ID
var data = JSON.parse(responseBody);
tests["check cardname"] = data.desc === environment.random_cardname;

postman.setEnvironmentVariable("new_card_id", data.id);
5. 充值
发起请求,使用了刚才获得的新卡ID
POST /index.php/deposit HTTP/1.1
Host: postmanexample.sinaapp.com
X-Authorization: d4c4a0b7b36c73e7a13b7e24a596093b
Cache-Control: no-cache
Postman-Token: 388c95e0-b5ce-9bbf-5816-084db7523384
Content-Type: application/x-www-form-urlencoded

cardid=1&amount=10
运行验证(由于是新建的用户,没有余额,无法给卡片充值,故返回403 Forbidden)
tests["Status code is 403"] = responseCode.code === 403;


 浙公网安备 33010602011771号