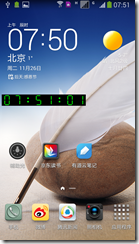
桌面小部件----LED电子时钟实现
2013-11-26 07:52 Andy Ge 阅读(726) 评论(0) 收藏 举报桌面控件是通过 Broadcast 的形式来进行控制的,因此每个桌面控件都对应于一个BroadcastReceiver。为了简化桌面控件的开发,Android 系统提供了一个 AppWidgetProvider类 , 它 就 是 BroadcastReceiver 的 子 类 , 也 就 是 说 开 发 者 开 发 桌 面 控 件 只 要 继 承
AppWidgetProvider 类即可。
为了开发桌面控件,开发者只要开发一个继承 AppWidgetProvider 的子类,并重写AppWidgetProvider 不同状态的生命周期方法即可。AppWidgetProvider 里提供如下 4 个不同的生命周期方法。
- onUpdate():负责更新桌面控件的方法;实现桌面控件通常会考虑重写该方法。
- onDeleted():当一个或多个桌面控件被删除时回调该方法。
- onEnabled():当接收到ACTION_APPWIDGET_ENABLED Broadcast 时回调该方法。
- onDisabled():当接收到 ACTION_APPWIDGET_DISABLED Broadcast 时回调该方法。
一般来说,开发桌面控件只需要定义一个 AppWidgetProvider 的子类,并重写它的onUpdate()方法即可,重写该方法按如下步骤进行。
- 创建一个 RemoteViews 对象,创建该对象时可以指定加载指定的界面布局文件。
- 如果需要改变上一步所加载的界面布局文件的的内容,可通过 RemoteViews 对象进行修改。
- 创建一个 ComponentName 对象。
- 调用 AppWidgetManager 更新桌面控件。
如下代码简单的将一张图片作为部件放到桌面上:
public class DesktopApp extends AppWidgetProvider
{
    @Override
    public void onUpdate(Context context, AppWidgetManager appWidgetManager,
        int[] appWidgetIds)
    {
        // 加载指定界面布局文件,创建RemoteViews对象
        RemoteViews remoteViews = new RemoteViews(
            context.getPackageName(),
            R.layout.main);  //①
        // 为show ImageView设置图片
        remoteViews.setImageViewResource(R.id.show
            , R.drawable.logo);   //②
        // 将AppWidgetProvider子类实例包装成ComponentName对象
        ComponentName componentName = new ComponentName(
            context, DesktopApp.class);  //③
        // 调用AppWidgetManager将remoteViews添加到ComponentName中
        appWidgetManager.updateAppWidget(componentName
            , remoteViews);  //④
    }
}
为了实现一个液晶时钟的桌面组件,开发者需要在程序界面上定义 8 个 ImageView,其中 6 个 ImageView 用于显示小时、分钟、秒钟的数字,另外两个 ImageView 用于显示小时、分钟、秒钟之间的冒号。
为了让桌面组件实时地显示当前时间,程序需要每隔 1 秒更新一次程序界面上的 6 个ImageView,让它们显示当前小时、分钟、秒钟的数字即可。
LED电子时钟桌面部件依赖如下代码实现:
main.xml
<?xml version="1.0" encoding="utf-8"?>
<LinearLayout xmlns:android="http://schemas.android.com/apk/res/android"
    android:orientation="horizontal"
    android:layout_width="fill_parent"
    android:layout_height="fill_parent"
    >
<!-- 定义5个ImageView来显示液晶数字 -->
<ImageView
    android:id="@+id/img01"
    android:layout_width="wrap_content"
    android:layout_height="wrap_content"
    />
<ImageView
    android:id="@+id/img02"
    android:layout_width="wrap_content"
    android:layout_height="wrap_content"
    />
<ImageView
    android:id="@+id/img03"
    android:layout_width="wrap_content"
    android:layout_height="wrap_content"
    android:src="@drawable/su00"
    />
<ImageView
    android:id="@+id/img04"
    android:layout_width="wrap_content"
    android:layout_height="wrap_content"
    />
<ImageView
    android:id="@+id/img05"
    android:layout_width="wrap_content"
    android:layout_height="wrap_content"
    />
<ImageView
    android:id="@+id/img06"
    android:layout_width="wrap_content"
    android:layout_height="wrap_content"
    android:src="@drawable/su00"
    />
<ImageView
    android:id="@+id/img07"
    android:layout_width="wrap_content"
    android:layout_height="wrap_content"
    />
<ImageView
    android:id="@+id/img08"
    android:layout_width="wrap_content"
    android:layout_height="wrap_content"
    />
</LinearLayout>
Manifest.xml
<?xml version="1.0" encoding="utf-8"?>
<manifest
    xmlns:android="http://schemas.android.com/apk/res/android"
    package="org.crazyit.desktop"
    android:versionCode="1"
    android:versionName="1.0">
    <uses-sdk
        android:minSdkVersion="10"
        android:targetSdkVersion="17" />
    <application
        android:icon="@drawable/ic_launcher"
        android:label="@string/app_name">
        <receiver
            android:name=".LedClock"
            android:label="@string/app_name">
            <!-- 将该BroadcastReceiver当成桌面控件 -->
            <intent-filter>
                <action android:name="android.appwidget.action.APPWIDGET_UPDATE" />
            </intent-filter>
            <!-- 指定桌面控件的meta-data -->
            <meta-data
                android:name="android.appwidget.provider"
                android:resource="@xml/my_clock" />
        </receiver>
    </application>
</manifest>
my_clock.xml
<?xml version="1.0" encoding="utf-8"?>
<!-- 指定该桌面组件的基本配置信息:
    minWidth:桌面控件的最小宽度。
    minWidth:桌面控件的最小高度。
    updatePeriodMillis:更新频率
    initialLayout:初始时显示的布局 -->
<appwidget-provider
    xmlns:android="http://schemas.android.com/apk/res/android"
    android:minWidth="800px"
    android:minHeight="30px"
    android:updatePeriodMillis="1000"
    android:initialLayout="@layout/main"/>
LedClock.java
package org.crazyit.desktop;

import java.text.SimpleDateFormat;
import java.util.Date;
import java.util.Timer;
import java.util.TimerTask;

import android.appwidget.AppWidgetManager;
import android.appwidget.AppWidgetProvider;
import android.content.ComponentName;
import android.content.Context;
import android.os.Handler;
import android.os.Message;
import android.widget.RemoteViews;

/**
 * Description:
 * <br/>site: <a href="http://www.crazyit.org">crazyit.org</a>
 * <br/>Copyright (C), 2001-2014, Yeeku.H.Lee
 * <br/>This program is protected by copyright laws.
 * <br/>Program Name:
 * <br/>Date:
 * @author  Yeeku.H.Lee kongyeeku@163.com
 * @version  1.0
 */
public class LedClock extends AppWidgetProvider
{
    private Timer timer = new Timer();
    private AppWidgetManager appWidgetManager;
    private Context context;
    // 将0~9的液晶数字图片定义成数组
    private int[] digits = new int[]
    {
        R.drawable.su01,
        R.drawable.su02,
        R.drawable.su03,
        R.drawable.su04,
        R.drawable.su05,
        R.drawable.su06,
        R.drawable.su07,
        R.drawable.su08,
        R.drawable.su09,
        R.drawable.su10,
    };
    // 将显示小时、分钟、秒钟的ImageView定义成数组
    private int[] digitViews = new int[]
       {
           R.id.img01,
           R.id.img02,
           R.id.img04,
           R.id.img05,
           R.id.img07,
           R.id.img08
       };
    @Override
    public void onUpdate(Context context, AppWidgetManager appWidgetManager,
            int[] appWidgetIds)
    {
        System.out.println("--onUpdate--");
        this.appWidgetManager = appWidgetManager;
        this.context = context;
        // 定义计时器
        timer = new Timer();
        // 启动周期性调度
        timer.schedule(new TimerTask()
        {
            public void run()
            {
                // 发送空消息,通知界面更新
                handler.sendEmptyMessage(0x123);
            }
        }, 0, 1000);
    }

    private Handler handler = new Handler()
    {
        public void handleMessage(Message msg)
        {
            if (msg.what == 0x123)
            {
                RemoteViews views = new RemoteViews(context
                        .getPackageName(), R.layout.main);
                // 定义SimpleDateFormat对象
                SimpleDateFormat df = new SimpleDateFormat(
                        "HHmmss");
                // 将当前时间格式化成HHmmss的形式
                String timeStr = df.format(new Date());
                for(int i = 0 ; i < timeStr.length() ;i++)
                {
                    // 将第i个数字字符转换为对应的数字,charAt函数返回的是ASCII编码,1的ASCII编码是49,所以需要减去偏移量48。
                    int num = timeStr.charAt(i) - 48;
                    // 将第i个图片的设为对应的液晶数字图片
                    views.setImageViewResource(digitViews[i], digits[num]);
                }
                // 将AppWidgetProvider子类实例包装成ComponentName对象
                ComponentName componentName = new ComponentName(context,
                    LedClock.class);
                // 调用AppWidgetManager将remoteViews添加到ComponentName中
                appWidgetManager.updateAppWidget(componentName, views);
            }
            super.handleMessage(msg);
        }
    };
}
效果:


 浙公网安备 33010602011771号