Postman与ElasticSearch交互
为了方便测试,修改ES安装路径下的config/elasticsearch.yml中的安全配置,不使用密钥访问。
以下配置的enabled都改为false
# Enable security features
xpack.security.enabled: false

xpack.security.enrollment.enabled: false

# Enable encryption for HTTP API client connections, such as Kibana, Logstash, and Agents
xpack.security.http.ssl:
  enabled: false
  keystore.path: certs/http.p12

# Enable encryption and mutual authentication between cluster nodes
xpack.security.transport.ssl:
  enabled: false
  verification_mode: certificate
  keystore.path: certs/transport.p12
  truststore.path: certs/transport.p12
启动ES,打开postman
1:查看所有索引
GET http://localhost:9200/_cat/indices?v
2:创建索引
//这里的overseas是要创建的索引名,要注意的是keyword类型的字段不会进行分词,只有text字段会分词
//在创建索引的时候也可以指定分词器(对于中文适用),后面再做相关测试
PUT http://localhost:9200/overseas
{
    "mappings":{
      "properties":{
               "id": {
                    "type": "keyword"
                },
        "country": {
                    "type": "keyword"
                },
        "company_name": {
                    "type": "text"
                },
        "company_id": {
                    "type": "keyword"
                }

            }
    }
}
3:添加文件到指定索引
POST http://localhost:9200/overseas/_doc
{
    "id": "1",
    "country": "Indonesia",
    "company_name": "PT AKSES NUSA KARYA INFRATEK",
    "company_id": "123456001"
}
删除指定文档,最后的参数是添加文档成功后ES生成的_id
DELETE http://localhost:9200/overseas/_doc/gxtYNJQBFqcfhlb6Gxii
4:获取全部文档
//可通过?from=XX&size=XX指定查询起始位置、返回长度等参数
GET http://localhost:9200/overseas/_search
5:精确匹配的查询
比较有趣的是ES的查询用GET方法,但却传递body内容
GET http://localhost:9200/overseas/_search
{
  "query": {
    "match": {
      "id": "1"
    }
  }
}
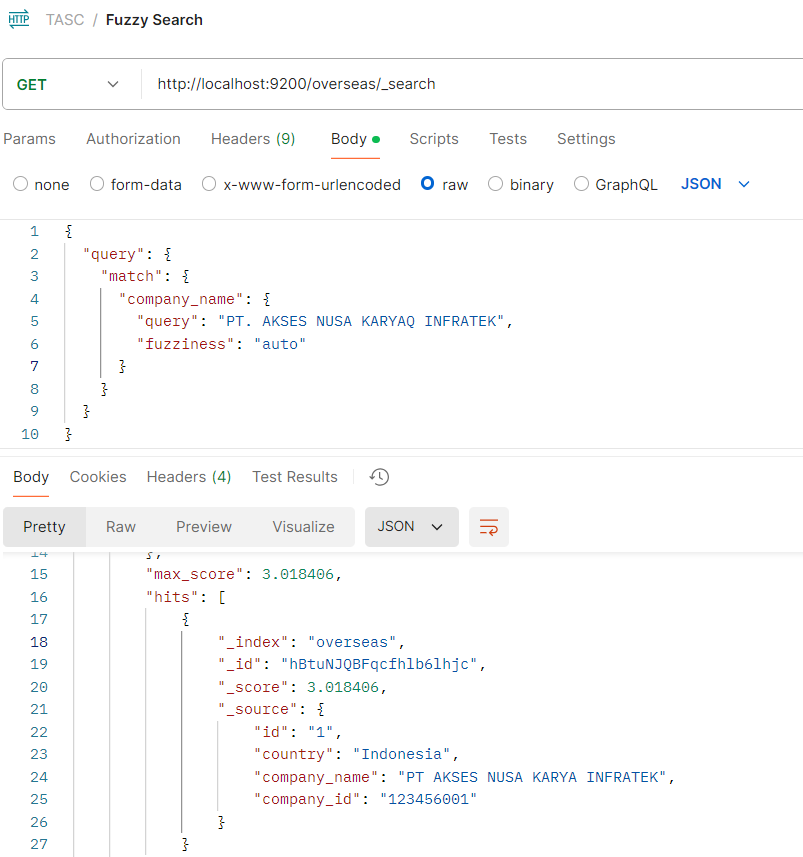
6:Fuzzy search(模糊查询)
GET http://localhost:9200/overseas/_search
{
  "query": {
    "match": {
      "company_name": {
        "query": "PT. AKSES NUSA KARYAQ INFRATEK",
        "fuzziness": "auto"
      }
    }
  }
}
值得注意的是,这里的查询内容和之前输入的内容(company_name)并不相同,有故意写错两个单词(一个多加了点,一个多加了个字母),依旧可以查询出结果。
7:analyze
GET http://localhost:9200/_analyze
{
  "analyzer": "standard",
  "text" : "Beijing is a beautiful city"
}
8:Wildcard 通配符查询
新建一个索引
PUT http://localhost:9200/wildcard_demo
{
  "settings": {
    "analysis": {
      "normalizer": {
        "lowercase_normalizer": {
          "type": "custom",
          "char_filter": [],
          "filter": [
            "lowercase",
            "asciifolding"
          ]
        }
      }
    }
  },
  "mappings": {
    "properties": {
      "text-field": {
        "type": "text"
      },
      "keyword-field": {
        "type": "keyword",
        "normalizer": "lowercase_normalizer"
      }
    }
  }
}
添加文档
POST http://localhost:9200/wildcard_demo/_doc
{
  "text-field": "Mockingbirds don’t do one thing but make music for us to enjoy.",
  "keyword-field": "Mockingbirds don’t do one thing but make music for us to enjoy."
}
通配符搜索
GET http://localhost:9200/wildcard_demo/_search?filter_path=**.hits
{
  "_source": false,
  "fields": [
    "text-field"
  ],
  "query": {
    "wildcard": {
      "text-field": {
        "value": "*birds*"
      }
    }
  }
}
9:别名 - 使用别名可以为数个索引指定同一个别名,这样查询该别名就会查询所有绑定的索引。从而实现动态索引绑定。
查询别名
GET http://localhost:9200/_cat/aliases?v
添加、删除、修改别名
POST http://localhost:9200/_aliases
{
  "actions": [
    {
      "remove": {
        "index": "overseas",
        "alias": "overseas_alias"
      }
    },
    {
      "remove": {
        "index": "overseas_20250107",
        "alias": "overseas_alias"
      }
    },
    {
      "add": {
        "index": "overseas",
        "alias": "overseas_alias_1"
      }
    }
  ]
}
POST http://localhost:9200/_aliases
{
  "actions": [
    {
      "remove": {
        "index": "overseas",
        "alias": "overseas_alias_1"
      }
    }
  ]
}

 浙公网安备 33010602011771号