Struts2学习(一)
简介
1、Apache Struts的前世今生
- Apache Struts 1 实在2009前应用广泛的web开发框架(最后一个版本是1.3.10)
- Apache Struts 2是在Apache 在webwork基础上重新开发出来的新一代web开发框架,在目前的Apache Struts 2框架中依然有 webwork的印记:xwork2包
2、Apache Struts 2的执行流程:

- 客户端发出请求到web服务器
- 请求经过一系列filter,最终到达Struts2核心控制器
- 核心控制器查看ActionMapper,判断该请求是请求action还是其他资源(如:jsp页面文件)
- 如果请求action,则核心控制器创建一个ActionProxy代理,并把请求交给代理进行处理。ActionProxy是通过ConfigurationManager读取structs.xml配置文件来创建的,所以包含了配置文件中的一切信息
- ActionProxy根据请求,创建相应的action调用实例ActionInvocation,ActionInvocation实例不仅仅只有action对象,还包括在配置文件中配置好的拦截器、action实例、结果集等
- 依次执行ActionInvocation实例中的拦截器、action实例,返回result,根据result决定响应页面,倒序继续执行拦截器剩下的部分,最终通过response进行响应,返回客户端
3、由上面可知Struts2开发需要用到:
- 处理请求的Action类以及拦截器类
- 配置Action、拦截器、结果响应行为等的struts.xml
- 在web.xml中配置核心控制器
搭建环境
1、创建 动态的 WEB 工程
2、在 WEB-INF/lib 中添加,下载链接:https://files.cnblogs.com/files/AmyZheng/struts-2.5.10.1-min-lib.zip
commons-fileupload-1.3.2.jar
commons-io-2.4.jar
commons-lang3-3.4.jar
freemarker-2.3.23.jar
javassist-3.20.0-GA.jar
log4j-api-2.7.jar
ognl-3.1.12.jar
struts2-core-2.5.10.1.jar
3、在 web.xml 中部署 Struts 对应 过滤器
<?xml version="1.0" encoding="UTF-8"?>

<web-app xmlns:xsi="http://www.w3.org/2001/XMLSchema-instance"
               xmlns="http://java.sun.com/xml/ns/javaee"
               xsi:schemaLocation="http://java.sun.com/xml/ns/javaee
                                                http://java.sun.com/xml/ns/javaee/web-app_3_0.xsd"
               id="WebApp_ID"
               version="3.0">
   <!-- 配置 Struts 过滤器 -->
    <filter>
        <filter-name>ApacheStruts2</filter-name>
        <filter-class>org.apache.struts2.dispatcher.filter.StrutsPrepareAndExecuteFilter</filter-class>
    </filter>

    <filter-mapping>
        <filter-name>ApacheStruts2</filter-name>
        <url-pattern>/*</url-pattern>
    </filter-mapping>

</web-app>
注意:
Struts 2.5 开始使用org.apache.struts2.dispatcher.filter.StrutsPrepareAndExecuteFilter
在Struts 2.5 之前使用org.apache.struts2.dispatcher.ng.filter.StrutsPrepareAndExecuteFilter
4、验证 Struts 已经起作用
<%@ page language = "java" pageEncoding = "UTF-8" %>
<%@ page contentType = "text/html; charset= UTF-8"%>
<%@ taglib prefix = "s" uri = "/struts-tags"%>
<!DOCTYPE html>
<html>
<head>
<meta charset="UTF-8">
<title>Apache Struts</title>
</head>
<body>
        <h1>Apache Struts</h1>
    <s:debug />
</body>
</html>
第一个实例
1、开发一个Action
- 可以实现 com.opensymphony.xwork2.Action 接口,实现execute 方法
- 可以继承 com.opensymphony.xwork2.ActionSupport类,重写execute 方法
- 可以单独写一个类,其中有一个execute方法即可:
package ecut.first.action;

public class RegistAction {

    private String username ;
    private String password ;
    private String confirm ;
    private char gender ;

    public String execute() throws Exception {

        System.out.println( "username : " + username );
        System.out.println( "password : " + password );
        System.out.println( "confirm : " + confirm );
        System.out.println( "gender : " + gender );
        return "成功" ;
    }

    public String getUsername() {
        return username;
    }

    public void setUsername(String username) {
        this.username = username;
    }

    public String getPassword() {
        return password;
    }

    public void setPassword(String password) {
        this.password = password;
    }

    public String getConfirm() {
        return confirm;
    }

    public void setConfirm(String confirm) {
        this.confirm = confirm;
    }

    public char getGender() {
        return gender;
    }

    public void setGender(char gender) {
        this.gender = gender;
    }

}
2、在src目录下新建 struts.xml(必须在src目录底下)
参照struts2-core-2.5.10.1.jar中struts-2.5.dtd中的说明编写struts.xml

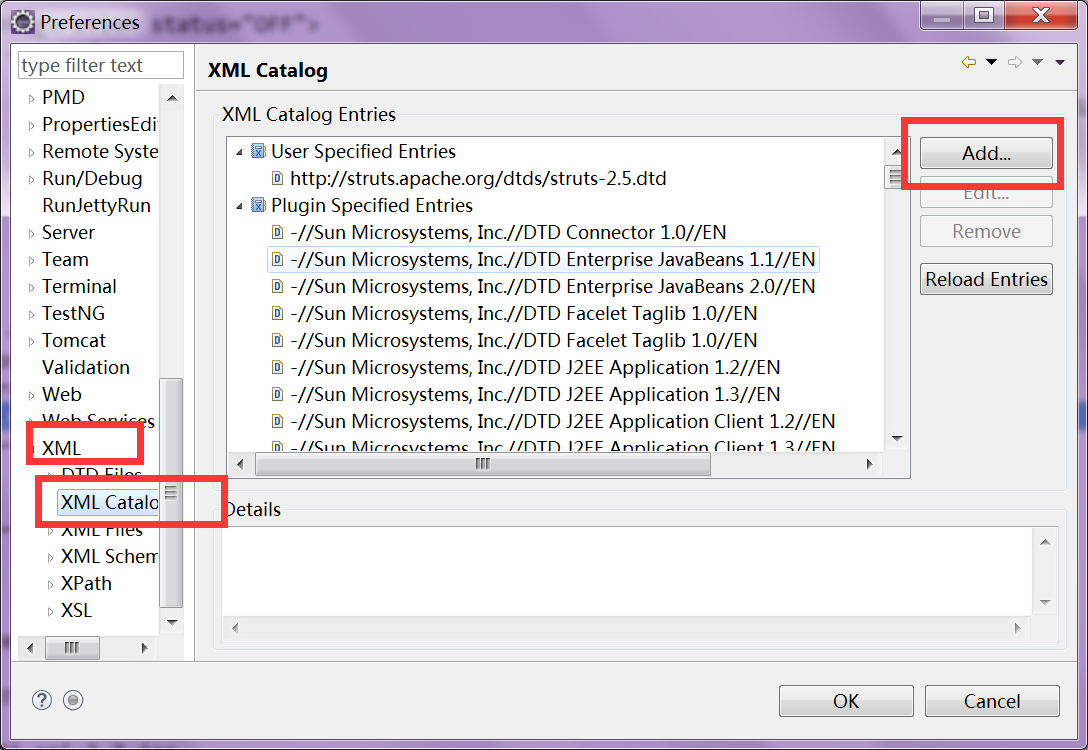
让Eclipse支持struts.xml的智能提示,将dtd文件复制到容易查找的目录下,在Eclipse的导航选择Widow下的preferences,选择如下目录

点击Add,显示如下页面,Key Type选择URI

Location 选择dtd文件所在路径,Key填入http://struts.apache.org/dtds/struts-2.5.dtd

<?xml version="1.0" encoding="UTF-8"?>

<!DOCTYPE struts PUBLIC
    "-//Apache Software Foundation//DTD Struts Configuration 2.5//EN"
    "http://struts.apache.org/dtds/struts-2.5.dtd">

<struts>
    <!-- first -->
    <!-- @WebServlet( "/customer/regist" ) -->
    <!-- 用 name 属性 指定 package 的名称 , 用 namespace 指定命名空间,必须 用 extends 指定继承哪个包 -->
    <package name="customer" namespace="/customer" extends="struts-default">

        <action name="regist" class="ecut.first.action.RegistAction" method="execute">
            <result name="成功">/first/success.jsp</result>
            <result name="失败">/first/fail.jsp</result>
        </action>

    </package>

</struts>
struts 标签是配置文件的根元素
package 标签用来声明一个“包”(不是Java语言中的包)
name 属性用来指定报名通常建议跟namespace保持一致
namespace属性用来指定命名空间,与URL中的路径保持一致
extends属性用来指定继承那个包(只能继承一个包)
action 标记定义个action
name属性与URL中的对应
class属性指定该action 对应的Action类(ActionClassName)
result 标记是action内部的一个子标记,用来声明返回的结果
name属性指定将来在Action类中的execute方法返回的结果的名称
(name属性的默认值是"success")
type属性用来指定打开结果对应页面或资源的方式,默认是dispatch
(相当于Servlet 中 RequestDispatch#forward操作)
3、提供页面,访问已经配置好的Action
<%@ page language = "java" pageEncoding = "UTF-8" %>
<%@ page contentType = "text/html; charset= UTF-8"%>
<%@ taglib prefix = "s" uri = "/struts-tags"%>
<!DOCTYPE html>
<html>
<head>
<meta charset="UTF-8">
<title>Apache Struts</title>
</head>
<body>

    <h1>Apache Struts</h1>

    <a href="http://struts.apache.org">Apache Struts</a>

    <br>

    <a href="http://commons.apache.org">Apache Commons</a>

    <br>

    <form action="${ pageContext.request.contextPath }/customer/regist" method="post" >
            <input type="text" name="username" placeholder="用户名">
            <input type="password" name="password" placeholder="密码">
            <input type="password" name="confirm" placeholder="确认密码">
            性别:
            <input type="radio" name="gender" value="女" >女
            <input type="radio" name="gender" value="男" >男
            <input type="submit" >
    </form>

    <hr>

    <s:debug />

</body>
</html>
<%@ page language = "java" pageEncoding = "UTF-8" %>
<%@ page contentType = "text/html; charset= UTF-8"%>
<!DOCTYPE html>
<html>
<head>
<meta charset="UTF-8">
<title>注册失败</title>
</head>
<body>

    <h1>fail</h1>

</body>
</html>
<%@ page language = "java" pageEncoding = "UTF-8" %>
<%@ page contentType = "text/html; charset= UTF-8"%>
<!DOCTYPE html>
<html>
<head>
<meta charset="UTF-8">
<title>注册成功</title>
</head>
<body>

    <h1>success</h1>

</body>
</html>
4、启动Tomcat,输入http://localhost:8080/Struts/first/index.jsp,跳转success页面


添加对log4j的支持
1、 解决启动服务日志中两个问题
解决:
ERROR StatusLogger Log4j2 could not find a logging implementation. Please add log4j-core to the classpath. Using SimpleLogger to log to the console...
在WEB-INFO/lib目录下贴加:log4j-core-2.7.jar
解决:
ERROR StatusLoggVer No log4j2 configuration file found. Using default configuration: logging only errors to the console.
src 目录创建 log4j2.xml 文件
2、 log4j2 日志组件的使用
- log4j2 是 Apache 提供的 日志组件 ( Struts 2 中默认采用了 该组件 )
- 提供 log4j2 所必须的 jar 文件:log4j-api-2.7.jar, log4j-core-2.7.jar
- 提供 log4j2 配置文件,在 WEB 工程的 src 目录创建 log4j2.xml 文件,其中内容如下:
<?xml version="1.0" encoding="UTF-8"?>

                <configuration status="OFF">
                    <appenders>
                        <console name="Console" target="SYSTEM_OUT">
                            <PatternLayout  pattern="%d{HH:mm:ss.SSS} [%t] %-5level %logger{36} - %msg%n" />
                        </console>
                    </appenders>
                    <loggers>
                        <!-- 指定日志的级别 -->
                        <root level="trace" >
                            <appender-ref ref="Console" />
                        </root>
                    </loggers>
                </configuration>
日志的级别可以指定为 all 、 trace 、debug 、info 、warn 、log 、error 、fatal 、off 中的任意一个
按照优先级从低到高依次排列为: all < trace < debug < info < warn < log < error < fatal < off
优先级越低,输出的内容越多;优先级越高,输出的内容越少。 - 在相应的类中使用 log4j2 输出日志:
package ecut.first.logger.test;

import org.apache.logging.log4j.Level;
import org.apache.logging.log4j.LogManager;
import org.apache.logging.log4j.Logger;

public class Log4j2Test {

    private static final Logger logger = LogManager.getLogger();

    public static void main(String[] args) {

        logger.log( Level.ALL ,  "all message" );// Level.ALL

        logger.trace( "trace message" ); // 对应 logger.log(  Level.TRACE , message );
        logger.debug( "debug message" ); // 对应 logger.log( Level.DEBUG, message );
        logger.info( "info message" ); // 对应  logger.log( Level.INFO, message );
        logger.warn( "warn message" ); // 对应  logger.log( Level.WARN, message );
        logger.error( "error message" ); // 对应  logger.log( Level.ERROR, message );
        logger.fatal( "fatal message" ); // 对应  logger.log( Level.FATAL , message );
        logger.log( Level.FATAL , "FATAL" );

        logger.log( Level.OFF , "off message" );// Level.OFF

    }

}
<PatternLayout pattern="%d{yyyy-MM-dd HH:mm:ss.SSS} [%t] %p %l - %m %n" />
模式转换字符:
转换字符 表示的意思
c 用于输出的记录事件的类别。例如,对于类别名称"a.b.c" 模式 %c{2} 会输出 "b.c"
C 用于输出呼叫者发出日志请求的完全限定类名。例如,对于类名 "org.apache.xyz.SomeClass", 模式 %C{1} 会输出 "SomeClass".
d 用于输出的记录事件的日期。例如, %d{HH:mm:ss,SSS} 或 %d{yyyy-MM-dd HH:mm:ss.SSS}
F 用于输出被发出日志记录请求,其中的文件名
l 用于将产生的日志事件调用者输出位置信息
L 用于输出从被发出日志记录请求的行号
m 用于输出使用日志事件相关联的应用程序提供的消息
M 用于输出发出日志请求所在的方法名称
n 输出平台相关的行分隔符或文字
p 用于输出的记录事件的优先级
r 用于输出毫秒从布局的结构经过直到创建日志记录事件的数目
t 用于输出生成的日志记录事件的线程的名称
x 用于与产生该日志事件的线程相关联输出的NDC(嵌套诊断上下文)
X 在X转换字符后面是键为的MDC。例如 X{clientIP} 将打印存储在MDC对键clientIP的信息
% 文字百分号 %%将打印%标志
参考博客链接:
http://www.cnblogs.com/ygj0930/p/6807539.html
转载请于明显处标明出处


