MFC学习笔记——07-MFC_20day
在学习MFC总结了笔记,并分享出来。有问题请及时联系博主:Alliswell_WP,转载请注明出处。
07-MFC_20day
目录:
一、项目配置
二、CInfoFile引入
三、登录窗口实现
四、静态拆分窗口
五、树视图功能实现
六、个人信息管理窗口
七、销售管理界面
八、库存信息窗口
九、库存添加
十、库存删除
十一、菜单栏添加
销售管理系统
一、项目配置
1、创建项目
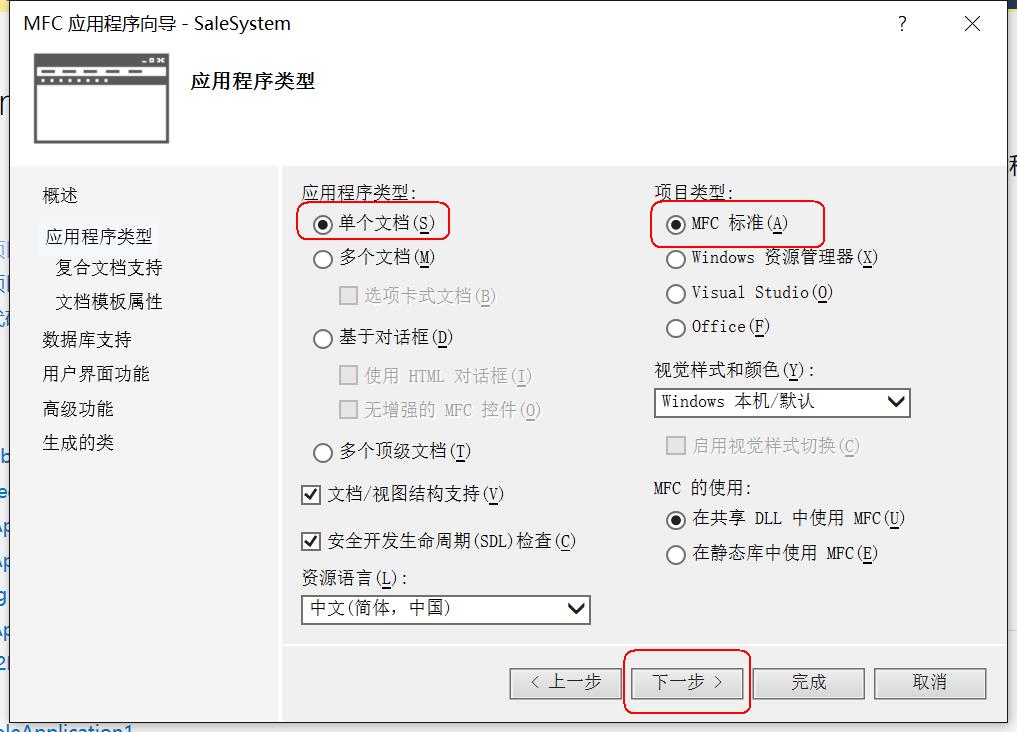
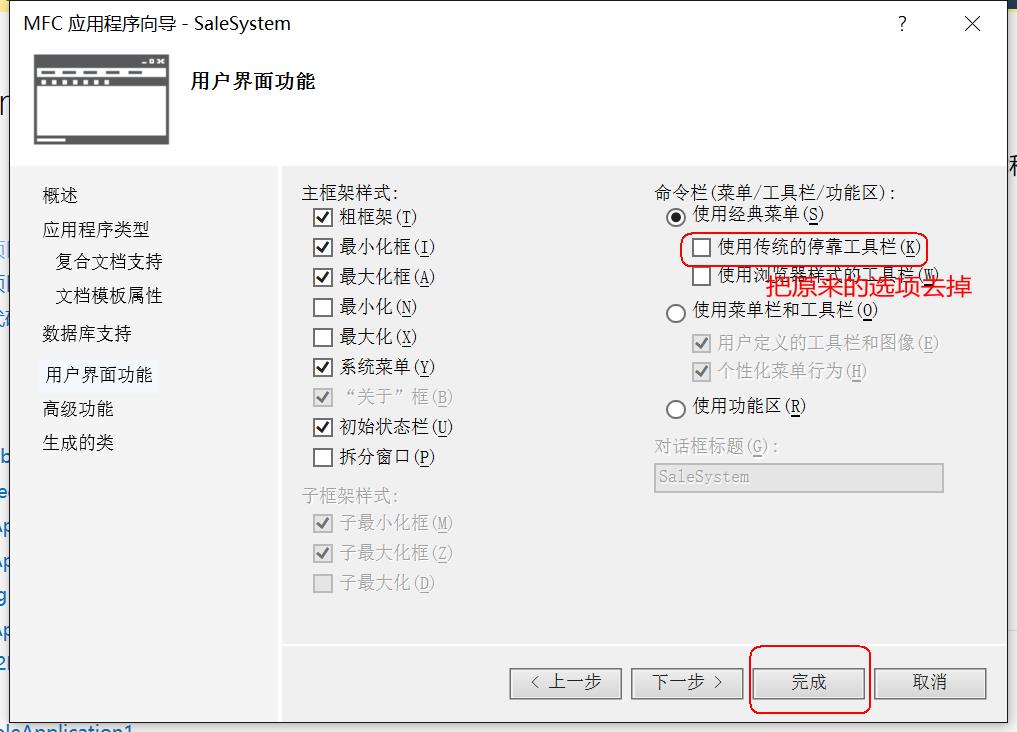
首先,新建MFC项目(SaleSystem),基于单文档,MFC标准项目,同时,去掉工具栏:
2、预处理 C4996 :_CRT_SECURE_NO_WARNINGS
由于微软在VS2013后不建议再使用C/C++的传统库函数scanf,strcpy,sprintf等,所以直接使用这些库函数会提示C4996错误。
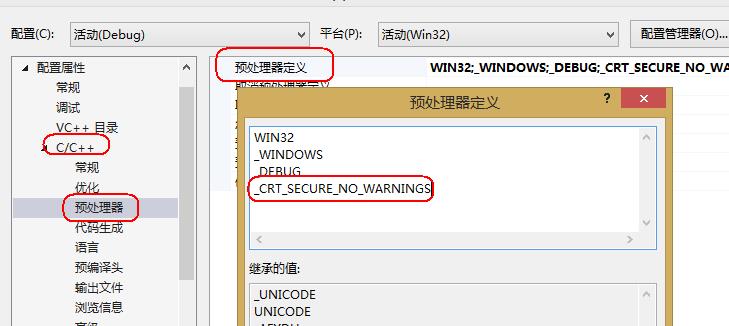
VS建议采用带_s的函数,如scanf_s、strcpy_s,但这些并不是标准C/C++函数。要想继续使用此函数,需要添加 _CRT_SECURE_NO_WARNINGS这个预定义。
在项目 -> 属性 -> C/C++->预处理器 -> 预处理器定中添加 _CRT_SECURE_NO_WARNINGS:
3、窗口进行简单处理
(1)修改窗口图标,setClassLong(窗口句柄,修改图标,具体图标加载)
1)打开资源视图,添加本地ICO图标,在res文件夹中添加我们提前准备的图标资源;
2)在资源的属性中修改ID(IDI_ICON_WIN);
3)在CMainFrame的 OnCreate()中添加如下代码;

1 //设置图标,IDI_ICON_WIN为图标资源ID,此为WINAPI函数
2 SetClassLong(m_hWnd, GCL_HICON, (LONG)AfxGetApp()->LoadIconW(IDI_ICON_WIN));
(2)标题 setTitle 分左右侧:左侧:CSaleSystemDoc-OnNewDocument;右侧:CMainFrame-OnCreate中修改
设置窗口标题
右侧标题:在CMainFrame的OnCreate()中接着写代码:
1     //修改标题 右侧标题
2     SetTitle(TEXT("2020/06/26"));
左侧标题:在CSaleSystemDoc文档类中的OnNewDocument()函数中添加如下代码:
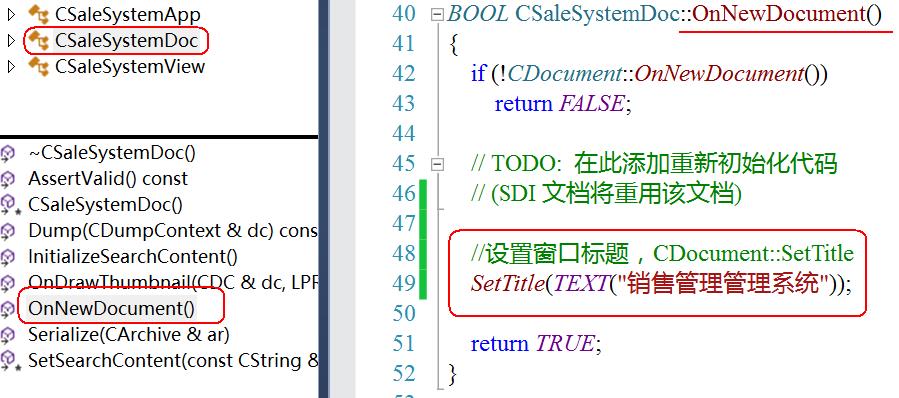
1     //设置窗口标题,CDocument::SetTitle
2     SetTitle(TEXT("销售管理系统"));
(3)设置窗口大小:MoveWindow
(4)居中CenterWindow
CMainFrame-OnCreate中:
 1     //设置图标,IDI_ICON_WIN为图标资源ID,此为WINAPI函数
 2     SetClassLong(m_hWnd, GCL_HICON, (LONG)AfxGetApp()->LoadIconW(IDI_ICON_WIN));
 3
 4     //修改标题 右侧标题
 5     SetTitle(TEXT("2020/06/26"));
 6
 7     //修改窗口大小
 8     MoveWindow(0, 0, 800, 500);
 9
10     //居中显示
11     CenterWindow();
CSaleSystemDoc-OnNewDocument中:
1     //左侧标题设置
2     SetTitle(TEXT("销售管理系统"));
二、CInfoFile引入
1、文件内容及格式 添加资源
在项目文件夹下添加login.ini,中:
1 斧头帮帮主
2 123456
在项目文件夹下添加stock.txt,中:
 1 商品ID|商品名称|商品价格|库存
 2 1|商品1|123|440
 3 2|商品2|1123|555
 4 3|商品3|1333|541
 5 4|商品4|144423|547
 6 5|商品5|14423|555
 7 6|商品6|1123|554
 8 7|商品7|1223|544
 9 8|商品8|1233|555
10 9|商品9|1234|554
11 10|商品10|1523|555
12 11|商品11|5123|555
13 12|商品12|133|333
14 13|商品13|444|444
15 14|商品14|1111|111
16 15|测试|10|8
2、将CInfoFile类导入到项目中
(1)添加CInfoFile类
(2)头文件(InfoFile.h)的设计
定义两个配置文件路径宏:
1 #define _F_LOGIN "./login.ini"
2 #define _F_STOCK "./stock.txt"
添加文件信息结构体,具体如下:
1 struct msg
2 {
3     int id;        //商品id
4     string name;    //商品名,别忘包含相应头文件
5     int price;    //商品价格
6     int num;    //商品个数
7 };
商品很多,而且要经常添加删除,可以考虑用链表来存储,所以,在成员变量中添加list类型的成员变量:
1     list<msg> ls;    //存储商品容器,别忘包含相应头文件
2     int num;    //用来记录商品个数
项目中需要读写的文件有两种,用户信息配置文件和商品信息文件。具体 API 接口如下:
 1 //读取登陆信息
 2     void ReadLogin(CString &name, CString &pwd);
 3
 4     //修改密码
 5     void WritePwd(char* name, char* pwd);
 6
 7     // 读取商品数据
 8     void ReadDocline();
 9
10     //商品写入文件
11     void WirteDocline();
12
13     //添加新商品
14     void Addline(CString name, int num, int price);
InfoFile.h全部代码如下:
 1 #pragma once
 2
 3 #include <list>
 4 #include <fstream>
 5 #include <iostream>
 6 #include <string>
 7
 8 #define _F_LOGIN "./login.ini"
 9 #define _F_STOCK "./stock.txt"
10
11 using namespace std;
12
13 struct msg
14 {
15     int id;                //商品id
16     string name;    //商品名
17     int price;            //商品价格
18     int num;            //商品个数
19 };
20
21 class CInfoFile
22 {
23 public:
24     CInfoFile();
25     ~CInfoFile();
26
27     //读取登陆信息
28     void ReadLogin(CString &name, CString &pwd);
29
30     //修改密码
31     void WritePwd(char* name, char* pwd);
32
33     // 读取商品数据
34     void ReadDocline();
35
36     //商品写入文件
37     void WirteDocline();
38
39     //添加新商品
40     void Addline(CString name, int num, int price);
41
42     list<msg> ls;    //存储商品容器
43     int num;            //用来记录商品个数
44 };
InfoFile.cpp全部代码如下:
  1 #include "stdafx.h"
  2 #include "InfoFile.h"
  3
  4
  5 CInfoFile::CInfoFile()
  6 {
  7 }
  8
  9
 10 CInfoFile::~CInfoFile()
 11 {
 12 }
 13
 14 //读取登录信息
 15 void CInfoFile::ReadLogin(CString &name, CString &pwd)
 16 {
 17     ifstream ifs; //创建文件输入对象
 18     ifs.open(_F_LOGIN); //打开文件
 19
 20     char buf[1024] = { 0 };
 21
 22     ifs.getline(buf, sizeof(buf)); //读取一行内容
 23     name = CString(buf);             //char *转换为CString
 24
 25     ifs.getline(buf, sizeof(buf));
 26     pwd = CString(buf);
 27
 28     ifs.close(); //关闭文件
 29 }
 30
 31 //修改密码
 32 void CInfoFile::WritePwd(char* name, char* pwd)
 33 {
 34     ofstream ofs;     //创建文件输出对象
 35     ofs.open(_F_LOGIN); //打开文件
 36
 37     ofs << name << endl; //name写入文件
 38     ofs << pwd << endl;    //pwd写入文件
 39
 40     ofs.close();    //关闭文件
 41 }
 42
 43 //读取商品信息
 44 void CInfoFile::ReadDocline()
 45 {
 46     ifstream ifs(_F_STOCK); //输入方式打开文件
 47
 48     char buf[1024] = { 0 };
 49     num = 0;    //初始化商品数目为0
 50     ls.clear();
 51     //取出表头
 52     ifs.getline(buf, sizeof(buf));
 53
 54     while (!ifs.eof()) //没到文件结尾
 55     {
 56         msg tmp;
 57
 58         ifs.getline(buf, sizeof(buf)); //读取一行
 59         num++;    //商品数目加一
 60
 61                 //AfxMessageBox(CString(buf));
 62         char *sst = strtok(buf, "|"); //以“|”切割
 63         if (sst != NULL)
 64         {
 65             tmp.id = atoi(sst); //商品id
 66         }
 67         else
 68         {
 69             break;
 70         }
 71
 72         sst = strtok(NULL, "|");
 73         tmp.name = sst;    //商品名称
 74
 75         sst = strtok(NULL, "|");
 76         tmp.price = atoi(sst);    //商品价格
 77
 78         sst = strtok(NULL, "|");
 79         tmp.num = atoi(sst);    //商品数目
 80
 81         ls.push_back(tmp); //放在链表的后面
 82     }
 83
 84     ifs.close(); //关闭文件
 85 }
 86
 87 //商品写入文件
 88 void CInfoFile::WirteDocline()
 89 {
 90     ofstream ofs(_F_STOCK);//输出方式打开文件
 91
 92     if (ls.size() > 0)    //商品链表有内容才执行
 93     {
 94         ofs << "商品ID|商品名称|商品价格|库存" << endl; //写入表头
 95
 96                                             //通过迭代器取出链表内容,写入文件,以“|”分隔,结尾加换行
 97         for (list<msg>::iterator it = ls.begin(); it != ls.end(); it++)
 98         {
 99             ofs << it->id << "|";
100             ofs << it->name << "|";
101             ofs << it->price << "|";
102             ofs << it->num << endl;
103         }
104     }
105
106     ofs.close();//关闭文件
107 }
108
109 //添加新商品
110 //name:商品名称,num:库存,price:价格
111 void CInfoFile::Addline(CString name, int num, int price)
112 {
113     msg tmp;
114
115     if (ls.size() > 0)
116     {
117         //商品名称,库存,价格有效
118         if (!name.IsEmpty() && num > 0 && price > 0)
119         {
120             tmp.id = ls.size() + 1;    //id自动加1
121             CStringA str;
122             str = name;    //CString转CStirngA
123             tmp.name = str.GetBuffer(); //CStirngA转char *,商品名称
124             tmp.num = num;    //库存
125             tmp.price = price;    //价格
126
127             ls.push_back(tmp);    //放在链表的后面
128         }
129     }
130 }
3、进行简单测试,读取用户名、密码、修改密码
三、登录窗口实现
1、插入对话框
添加对话框资源(ID修改为DIALOG_LOGIN),添加所需控件
2、对界面进行布局
3、添加类:
选中对话框 -> 右击 -> 添加类 -> 类名:CLoginDlg
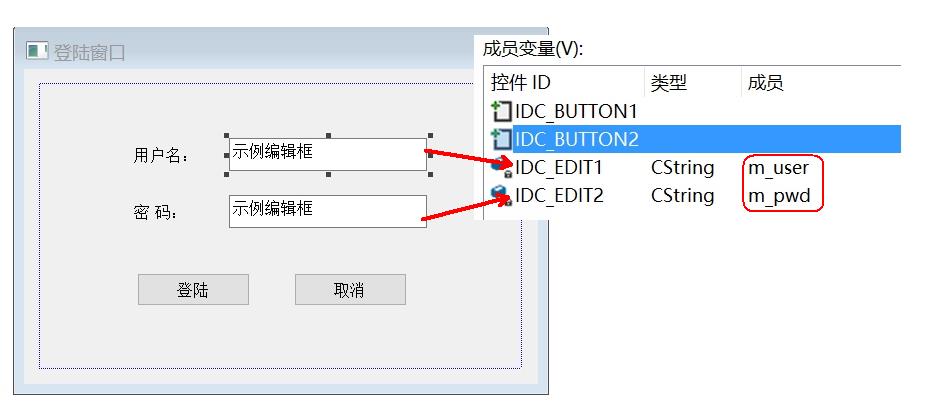
4、添加变量 m_user、m_pwd;根据需求,控件关联所需变量;用户名编辑区关联CString m_user,密码登陆框关联CString m_pwd。
5、初始化:用户名、密码
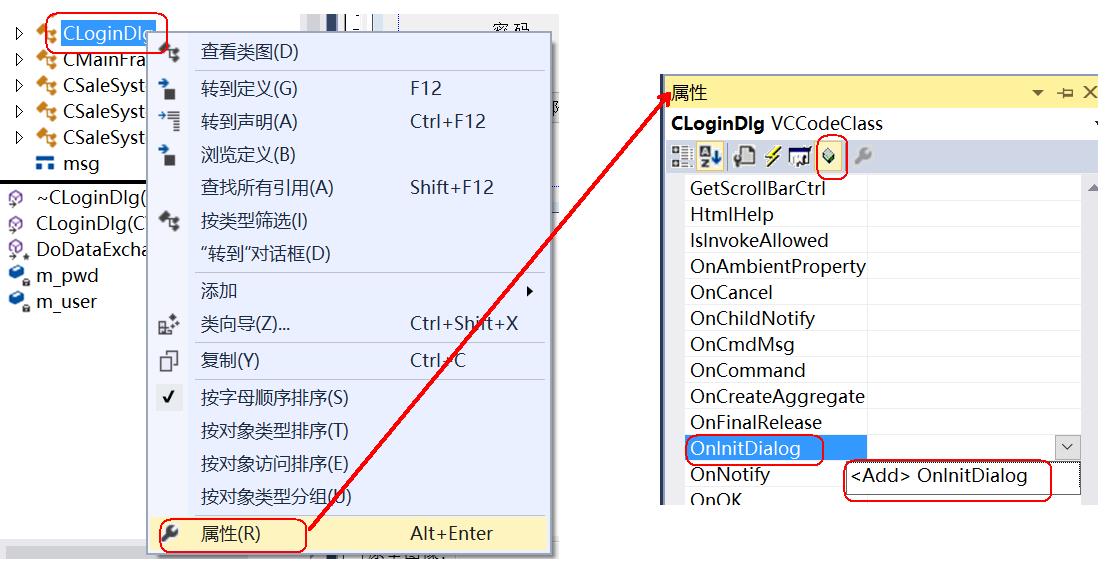
(1)在对话框类中,重写 OnInitDialog 函数,进行初始化,设置一些默认登录信息
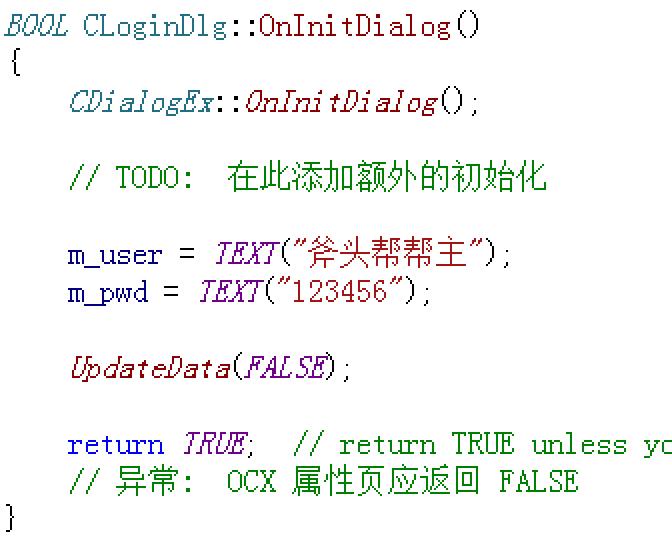
1     m_user = TEXT("斧头帮帮主");    //用户名
2     m_pwd = TEXT("123456");//密码
3     UpdateData(FALSE); //内容更新到对应的控件
(2)登陆窗口的创建
在应用程序类CSaleSystemApp的InitInstance() 里面的APP 创建之前创建登陆对话框:

1     CLoginDlg dlg;    //创建登陆对话框,需要头文件#include "LoginDlg.h"
2     dlg.DoModal();    //以模态方式运行
6、功能实现
(1)登录按钮
 1 //登陆按钮处理函数
 2 void CLoginDlg::OnBnClickedButton1()
 3 {
 4     // TODO:  在此添加控件通知处理程序代码
 5
 6     UpdateData(TRUE); //更新控件的数据到对应的变量
 7
 8     CInfoFile file; //创建操作文件类对象,需要头文件#include "InfoFile.h"
 9     CString user, pwd;
10
11     //读取配置文件,获取用户名密码,参数为引用传递
12     file.ReadLogin(user, pwd);
13
14     if (m_user == user)//用户名相等
15     {
16         if (m_pwd != pwd)
17         {
18             MessageBox(_T("密码错误"));
19             m_user.Empty(); //清空
20             m_pwd.Empty();
21         }
22         else
23         {
24             CDialogEx::OnOK();
25         }
26     }
27     else
28     {
29         MessageBox(_T("用户名不存在"));
30         m_user.Empty();
31         m_pwd.Empty();
32     }
33 }
(2)取消按钮
1 //取消按钮功能实现
2 void CLoginDlg::OnBnClickedButton2()
3 {
4     // TODO:  在此添加控件通知处理程序代码
5     exit(0);    //结束整个程序
6 }
(3)右上角关闭按钮功能实现
选中对话框模板 -> 右击 -> 属性 -> 消息 -> WM_CLOSE
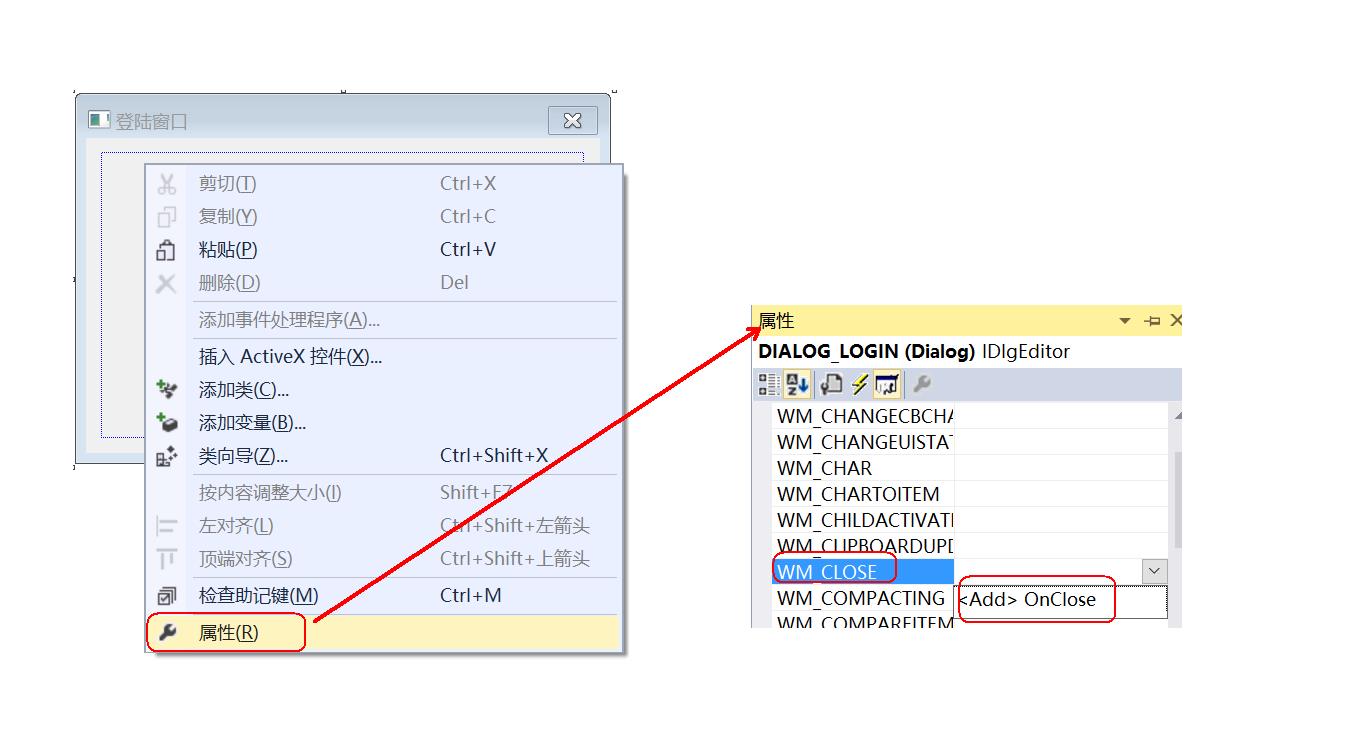
1 //关闭按钮
2 void CLoginDlg::OnClose()
3 {
4     // TODO:  在此添加消息处理程序代码和/或调用默认值
5     exit(0);    //结束整个程序
6
7     CDialogEx::OnClose();
8 }
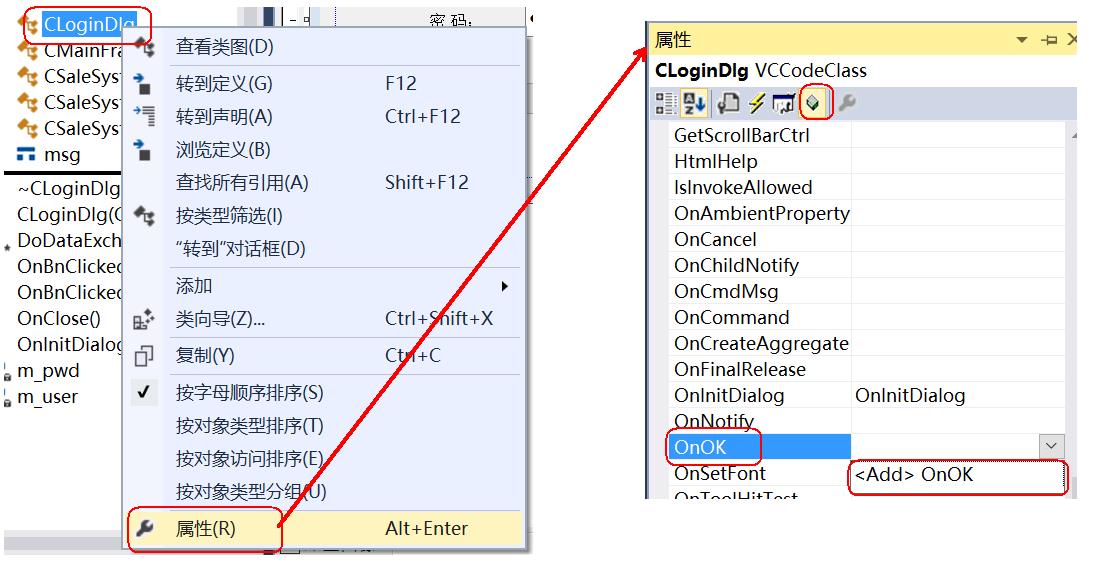
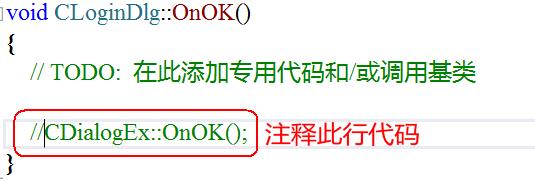
(4)编辑区回车键关闭对话框问题解决——重写OnOk
四、静态拆分窗口
1、拆分窗口对象
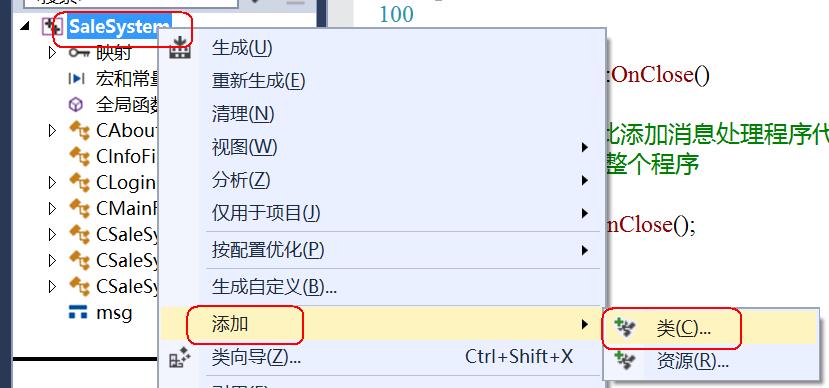
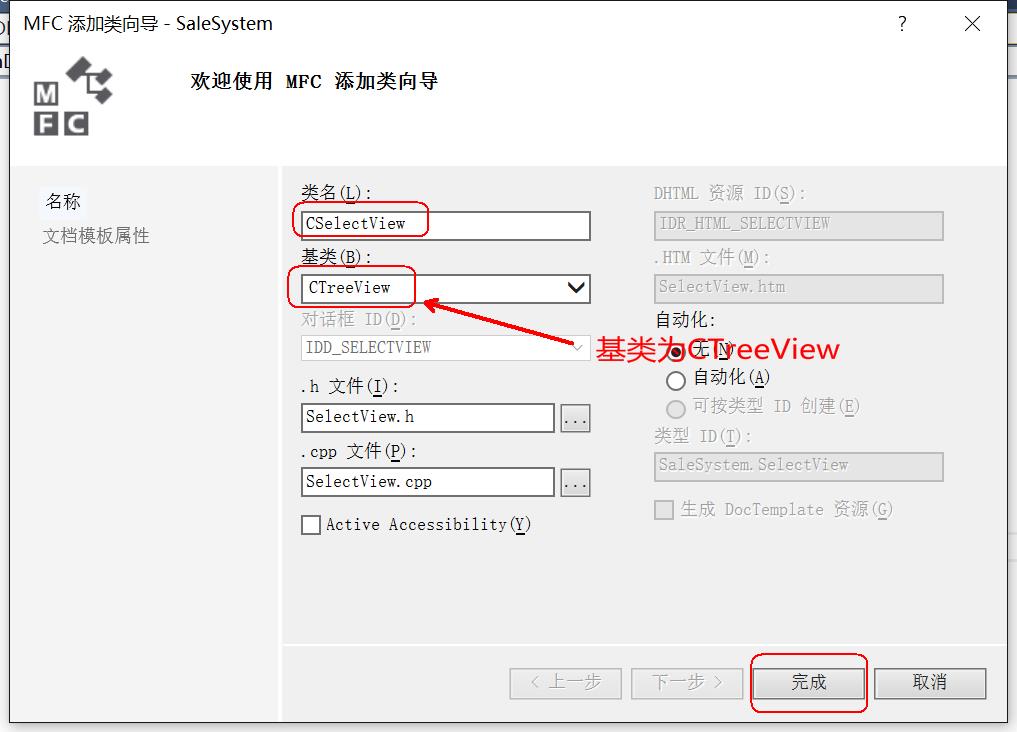
自定义MFC视图类
》自定义两个类:CSelectView和CDispalyView(它的基类必须是视图类)。
》CSelectView继承于CTreeView,CDispalyView继承于CFormView。
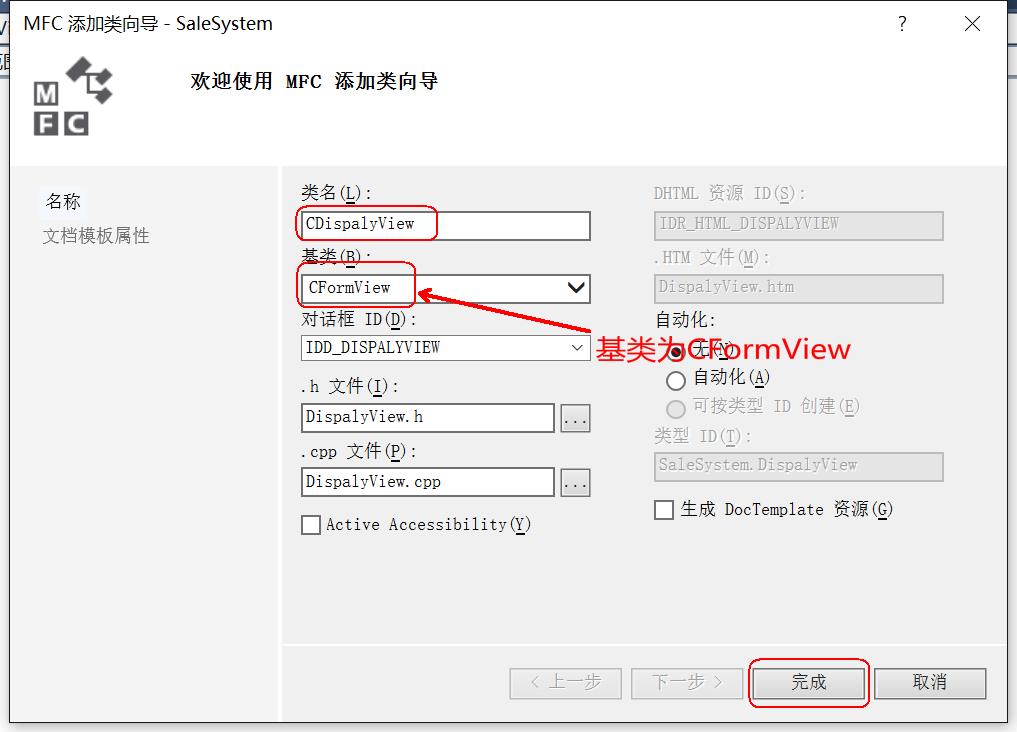
2、创建静态拆分
通过CSplitterWnd类拆分窗口
CMainFrame类中,声明CSplitterWnd类型的对象:

3、具体拆分窗口
重写框架类CMainFrame的OnCreateClient函数
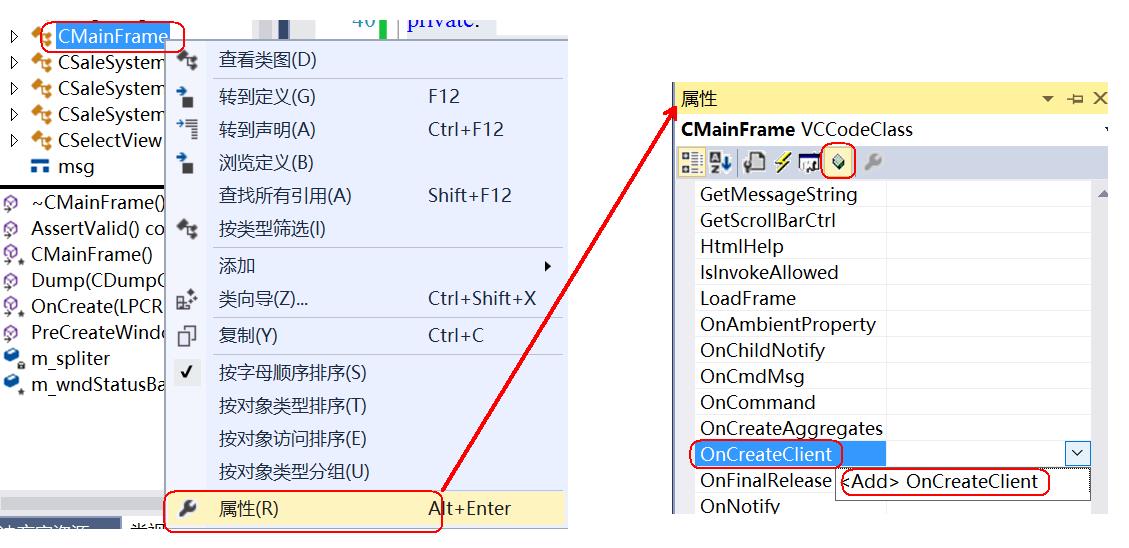
把OnCreateClient()函数的返回值改为Return TRUE:

静态拆分实现代码如下:
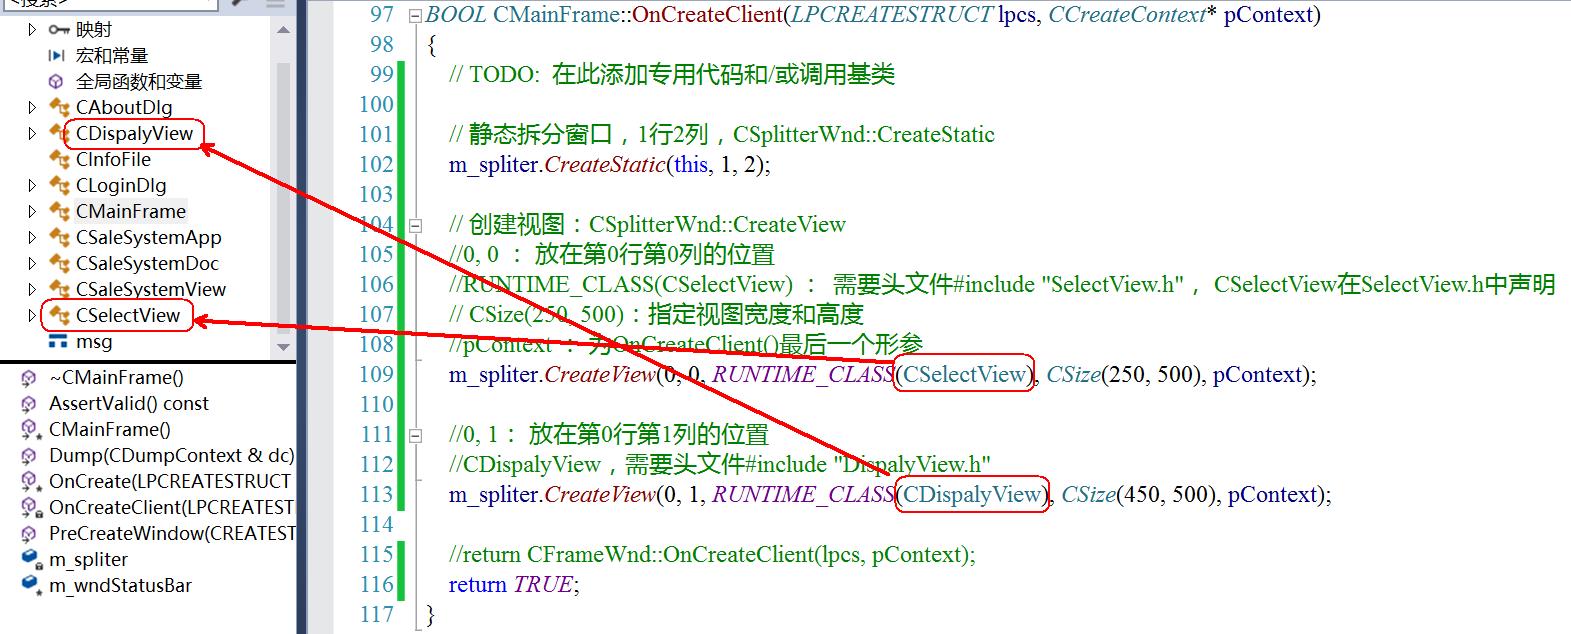
 1 BOOL CMainFrame::OnCreateClient(LPCREATESTRUCT lpcs, CCreateContext* pContext)
 2 {
 3     // TODO:  在此添加专用代码和/或调用基类
 4
 5     // 静态拆分窗口,1行2列,CSplitterWnd::CreateStatic
 6     m_spliter.CreateStatic(this, 1, 2);
 7
 8     // 创建视图:CSplitterWnd::CreateView
 9     //0, 0 : 放在第0行第0列的位置
10     //RUNTIME_CLASS(CSelectView) :需要头文件#include "SelectView.h", CSelectView在SelectView.h中声明
11     // CSize(250, 500):指定视图宽度和高度
12     //pContext : 为OnCreateClient()最后一个形参
13     m_spliter.CreateView(0, 0, RUNTIME_CLASS(CSelectView), CSize(200, 500), pContext);
14
15     //0, 1: 放在第0行第1列的位置
16     //CDispalyView,需要头文件#include "DispalyView.h"
17     m_spliter.CreateView(0, 1, RUNTIME_CLASS(CDispalyView), CSize(600, 500), pContext);
18
19     //return CFrameWnd::OnCreateClient(lpcs, pContext);
20     return TRUE;
21 }
五、树视图功能实现
1、数据准备
(1)加载图标资源

(2)图标资源ID改为:IDI_ICON_RE
2、获取到树控件 GetTreeCtrl()
CSelectView类中声明相应变量:

3、设置图片集合 、设置节点
重写CSelectView的OnInitUpdate函数,在CSelectView的OnInitUpdate函数中,完成初始化功能
 1 void CSelectView::OnInitialUpdate()
 2 {
 3     CTreeView::OnInitialUpdate();
 4
 5     // TODO:  在此添加专用代码和/或调用基类
 6
 7     //图标资源的加载 CWinApp::LoadIcon
 8 //IDI_ICON_RE为图标资源ID
 9     HICON icon = AfxGetApp()->LoadIconW(IDI_ICON_RE);
10
11     //图片列表的创建 CImageList::Create
12     //30, 30:指定图标的宽度和高度
13     //ILC_COLOR32:图标格式
14     //1, 1:有多少图标就写多少
15     m_imageList.Create(30, 30, ILC_COLOR32, 1, 1);
16
17     //图片列表追加图标 CImageList::Add
18     m_imageList.Add(icon);
19
20     //获取数视图中的树控件 CTreeView::GetTreeCtrl
21     m_treeCtrl = &GetTreeCtrl();
22
23     //数控件设置图片列表 CTreeCtrl::SetImageList
24     m_treeCtrl->SetImageList(&m_imageList, TVSIL_NORMAL);
25
26     //树控件设置节点 CTreeCtrl::InsertItem
27     m_treeCtrl->InsertItem(TEXT("个人信息"), 0, 0, NULL);
28     m_treeCtrl->InsertItem(TEXT("销售管理"), 0, 0, NULL);
29     m_treeCtrl->InsertItem(TEXT("库存信息"), 0, 0, NULL);
30     m_treeCtrl->InsertItem(TEXT("库存添加"), 0, 0, NULL);
31     m_treeCtrl->InsertItem(TEXT("库存删除"), 0, 0, NULL);
32 }
4、捕获事件(选项修改事件)
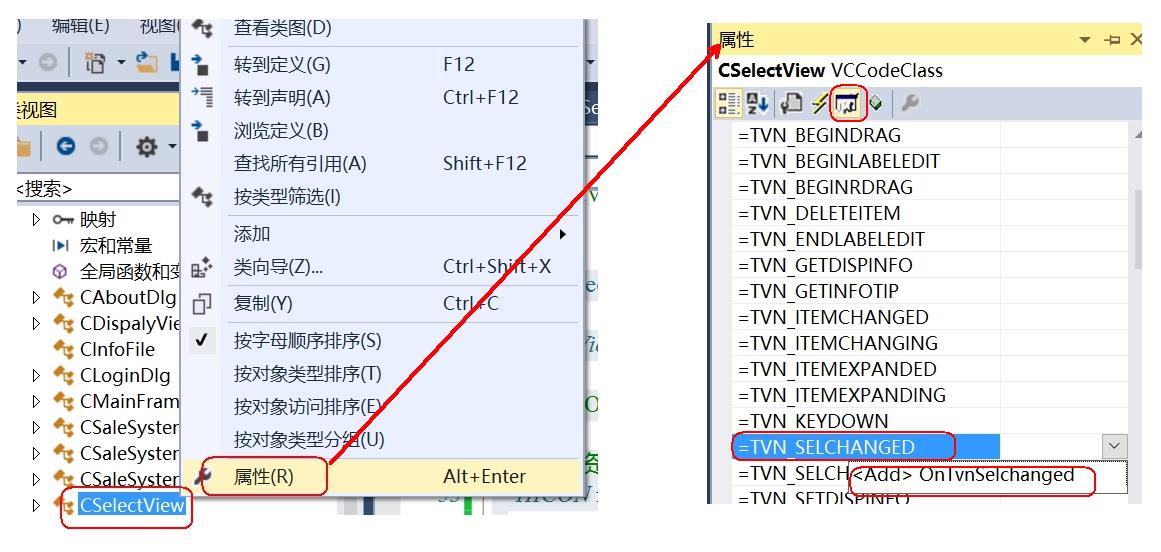
 1 void CSelectView::OnTvnSelchanged(NMHDR *pNMHDR, LRESULT *pResult)
 2 {
 3     LPNMTREEVIEW pNMTreeView = reinterpret_cast<LPNMTREEVIEW>(pNMHDR);
 4     // TODO:  在此添加控件通知处理程序代码
 5     *pResult = 0;
 6
 7     //获取当前节点选中项目 CTreeCtrl::GetSelectedItem
 8     HTREEITEM item = m_treeCtrl->GetSelectedItem();
 9
10     //获取选中项的文本内容 CTreeCtrl::GetItemText
11     CString str = m_treeCtrl->GetItemText(item);
12     //MessageBox(str);
13
14     if (str == TEXT("个人信息"))
15     {
16     }
17     else if (str == TEXT("销售管理"))
18     {
19     }
20     else if (str == TEXT("库存信息"))
21     {
22     }
23     else if (str == TEXT("库存增加"))
24     {
25     }
26     else if (str == TEXT("库存删除"))
27     {
28     }
29 }
六、个人信息管理窗口
1、个人信息界面布局
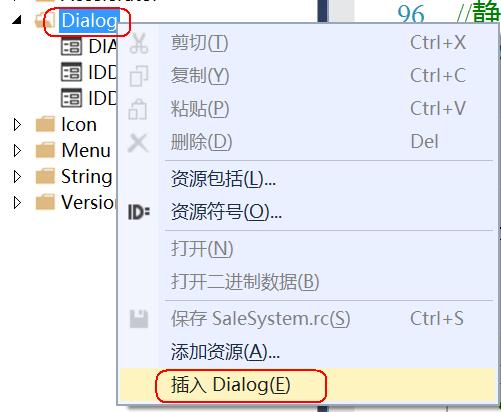
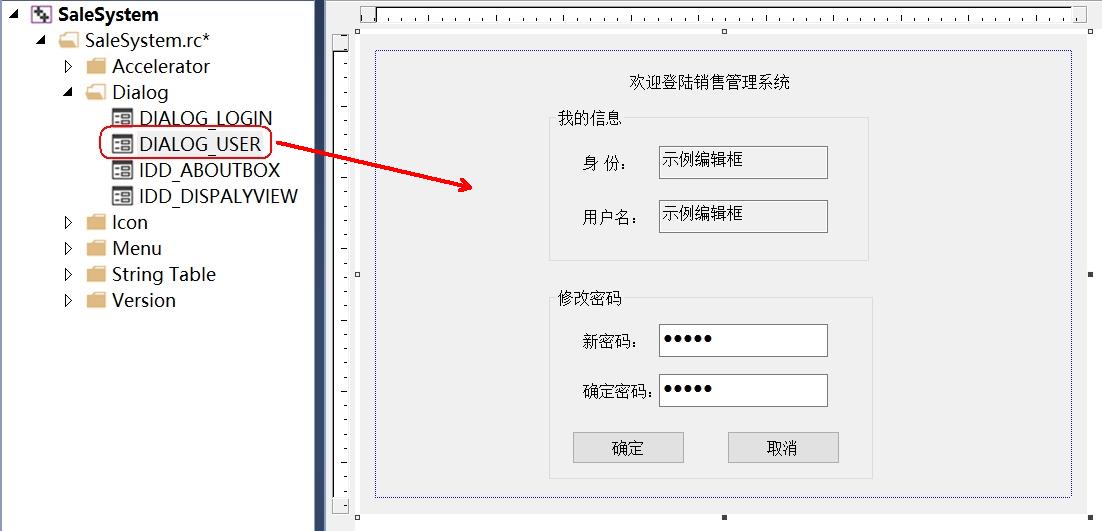
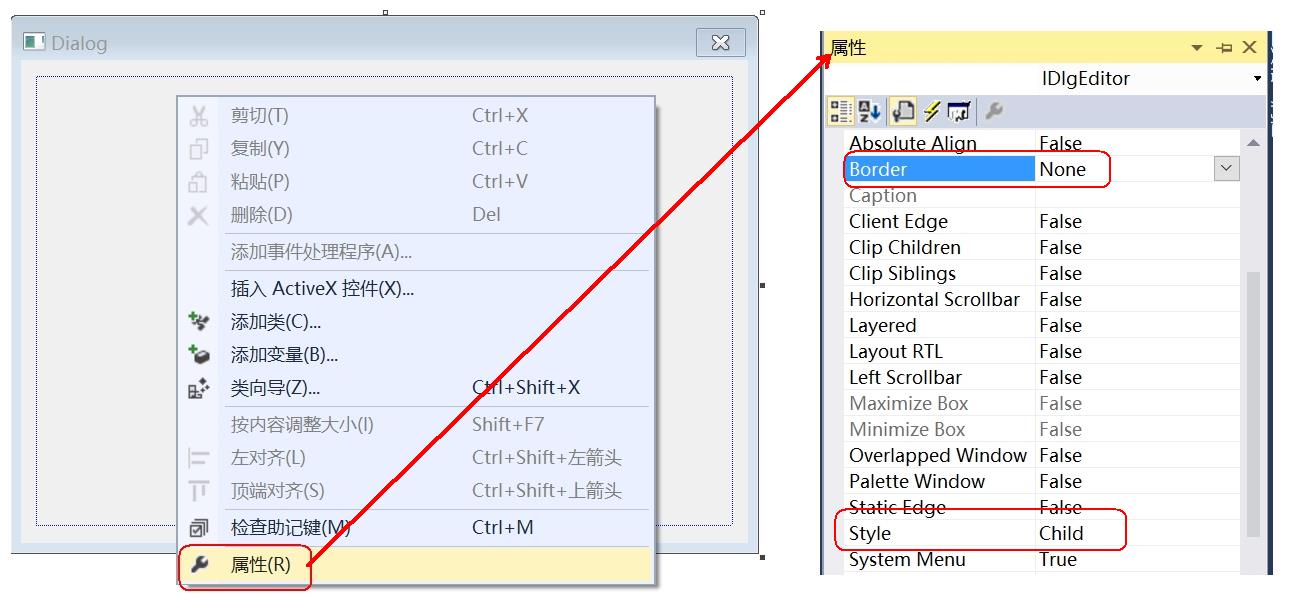
(1)添加对话框资源(ID修改为DIALOG_USER),添加所需控件:
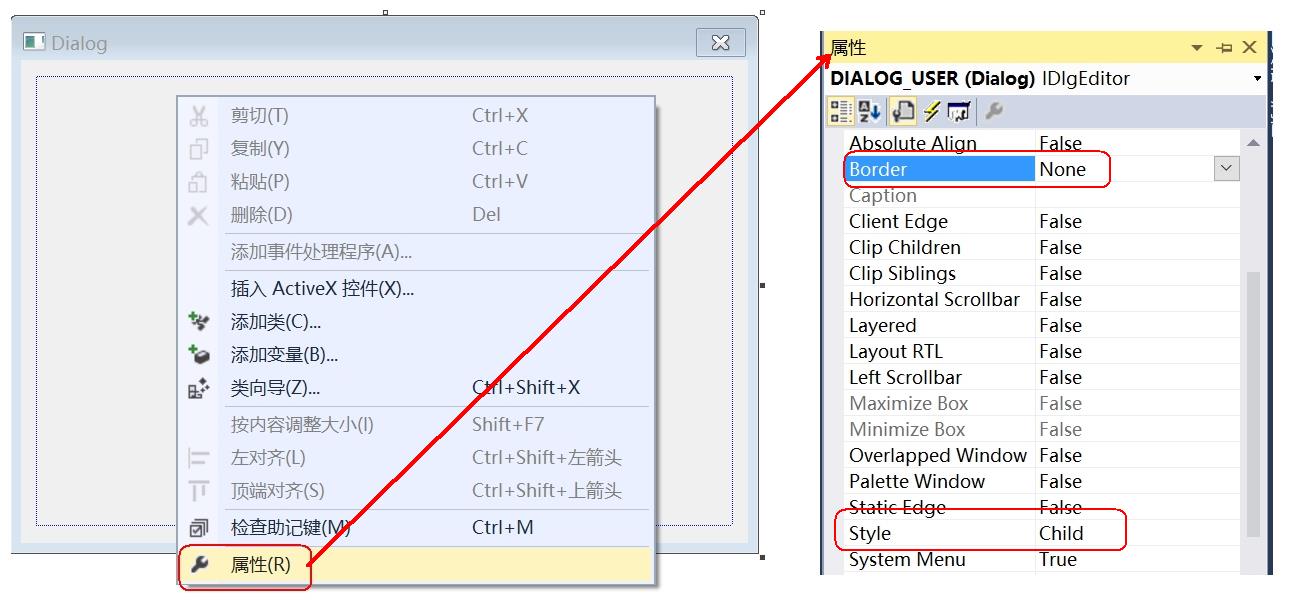
在窗口属性中,Border改为None,Style改为Child:
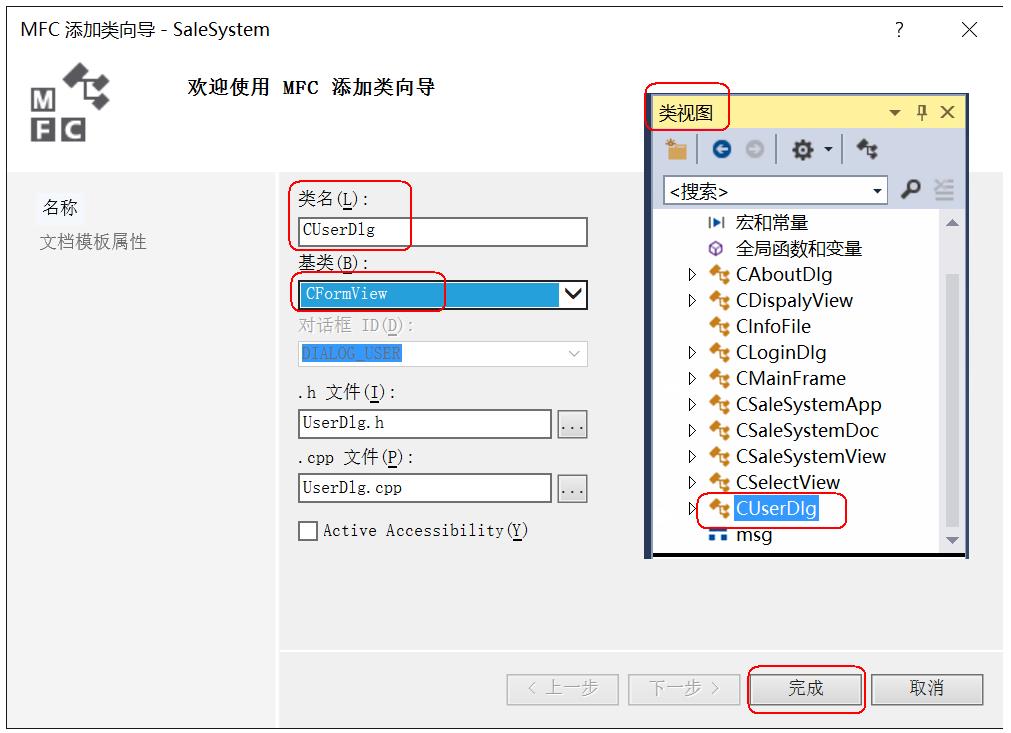
(2)选中对话框 -> 右击 -> 添加类 -> 类名:CUserDlg,基类选择CFormView
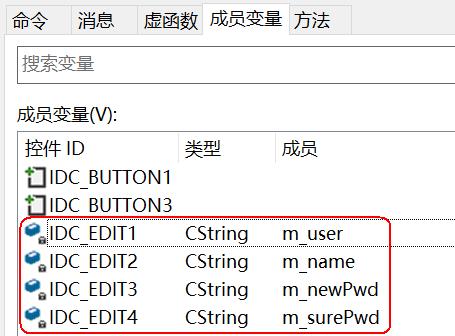
(3)根据需求,控件关联所需变量
身份编辑区关联CString m_user,用户名编辑框关联CString m_name,
新密码编辑框关联CString m_newPwd,确定密码编辑框关联CString m_surePwd。
2、功能实现
(1)在对话框类中,重写 OnInitDialog 函数,进行初始化。
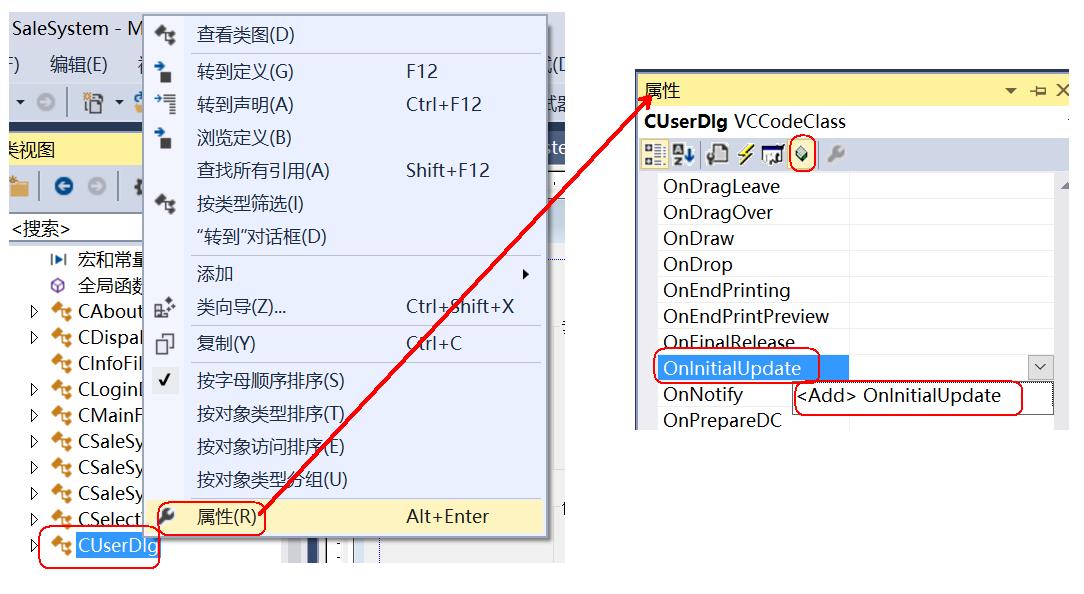
 1 void CUserDlg::OnInitialUpdate()
 2 {
 3     CFormView::OnInitialUpdate();
 4
 5     // TODO:  在此添加专用代码和/或调用基类
 6
 7     CInfoFile file;    //需要头文件#include "InfoFile.h"
 8     CString name, pwd;
 9     file.ReadLogin(name, pwd); //读取文件的用户名和密码
10
11     //初始化个人信息
12     m_user = TEXT("销售员");    //身份
13     m_name = name;    //用户名
14
15     UpdateData(FALSE); //把数据更新到控件上
16 }
(2)确定修改密码按钮功能实现
有效性验证:内容不能为空,密码两次输入要一致,与原密码不一样
 1 void CUserDlg::OnBnClickedButton1()
 2 {
 3     // TODO:  在此添加控件通知处理程序代码
 4
 5     UpdateData(TRUE);//更新控件内容到对应的变量中
 6
 7     if (m_newPwd.IsEmpty() || m_surePwd.IsEmpty())
 8     {
 9         MessageBox(TEXT("输入密码不能为空"));
10         return;
11     }
12
13     if (m_newPwd != m_surePwd)
14     {
15         MessageBox(TEXT("输入密码和确定密码不相等"));
16         return;
17     }
18
19     CInfoFile file;    //需要头文件#include "InfoFile.h"
20     CString name, pwd;
21     file.ReadLogin(name, pwd); //读取文件的用户名和密码
22
23     if (m_surePwd == pwd)
24     {
25         MessageBox(TEXT("输入密码和旧密码相等"));
26         return;
27     }
28
29     //把用户名和密码的CString类型转为char *
30     char *tmpName, *tmpPwd;
31     //用户名
32     CStringA tmp1;
33     tmp1 = name;
34     tmpName = tmp1.GetBuffer();
35     //密码
36     CStringA tmp2;
37     tmp2 = m_surePwd;
38     tmpPwd = tmp2.GetBuffer();
39
40     file.WritePwd(tmpName, tmpPwd); //修改密码
41
42     MessageBox(TEXT("密码修改成功"));
43
44     //输入框内容清空
45     m_surePwd.Empty();
46     m_newPwd.Empty();
47     UpdateData(FALSE); //把数据更新到控件上
48 }
(3)取消按钮功能实现
1 void CUserDlg::OnBnClickedButton3()
2 {
3     // TODO:  在此添加控件通知处理程序代码
4
5     //输入框内容清空
6     m_surePwd.Empty();
7     m_newPwd.Empty();
8     UpdateData(FALSE); //把数据更新到控件上
9 }
3、个人信息的界面挂载
(1)自定义信息发送,消息 define 宏 NM_A~E
在CMainFrame 框架类中,添加自定义消息宏

1 //WM_USER 是用户自定义消息的一个起始值
2 //WM_USER+100是为了区分系统消息和用户消息,避免冲突
3 #define NM_A    (WM_USER + 100)
4 #define NM_B    (WM_USER + 101)
5 #define NM_C    (WM_USER + 102)
6 #define NM_D    (WM_USER + 103)
7 #define NM_E    (WM_USER + 104)
(2)在分界宏声明自定义消息 :ON_MESSAGE(NM_A, OnMyChange)
在CMainFrame框架类BEGIN_MESSAGE_MAP和END_MESSAGE_MAP之间添加自定义消息入口,与自定义消息处理函数绑定。

1     //ON_MESSAGE响应的是自定义消息
2     //产生NM_X消息,自动调用OnMyChange函数
3     ON_MESSAGE(NM_A, OnMyChange)
4     ON_MESSAGE(NM_B, OnMyChange)
5     ON_MESSAGE(NM_C, OnMyChange)
6     ON_MESSAGE(NM_D, OnMyChange)
7     ON_MESSAGE(NM_E, OnMyChange)
8
(3)实现OnMyChange函数:
在CMainFrame框架类中添加自定义消息处理函数:

1 //自定义消息处理函数
2 afx_msg LRESULT OnMyChange(WPARAM wParam, LPARAM lParam);
(4)在SelectView发送自定义消息
对应的.cpp定义其函数
1 LRESULT CMainFrame::OnMyChange(WPARAM wParam, LPARAM lParam)
2
3 {
4
5
6
7 }
(5)在CSelectView的OnTvnSelchanged函数中,发送自定义信号:

 1 if (str == TEXT("个人信息"))
 2 {
 3     //需要包含框架类头文件#include "MainFrm.h"
 4     //CWnd::PostMessage 将一个消息放入窗口的消息队列
 5     //AfxGetMainWnd():框架窗口对象的指针
 6     //AfxGetMainWnd()->GetSafeHwnd():获取返回窗口的句柄,CWnd::GetSafeHwnd
 7     //NM_A:发送自定义消息
 8     //(WPARAM)NM_A:指定了附加的消息信息
 9     //(LPARAM)0:指定了附加的消息信息,此参数这里没有意义
10 ::PostMessage(AfxGetMainWnd()->GetSafeHwnd(), NM_A, (WPARAM)NM_A, (LPARAM)0);
11 }
12 else if (str == TEXT("销售管理"))
13 {
14 ::PostMessage(AfxGetMainWnd()->GetSafeHwnd(), NM_B, (WPARAM)NM_B, (LPARAM)0);
15 }
16 else if (str == TEXT("库存信息"))
17 {
18 ::PostMessage(AfxGetMainWnd()->GetSafeHwnd(), NM_C, (WPARAM)NM_C, (LPARAM)0);
19 }
20 else if (str == TEXT("库存添加"))
21 {
22 ::PostMessage(AfxGetMainWnd()->GetSafeHwnd(), NM_D, (WPARAM)NM_D, (LPARAM)0);
23 }
24 else if (str == TEXT("库存删除"))
25 {
26 ::PostMessage(AfxGetMainWnd()->GetSafeHwnd(), NM_E, (WPARAM)NM_E, (LPARAM)0);
27 }
(6)自定义信息处理
在CMainFrame框架类OnMyChange函数中处理相应消息
 1 LRESULT CMainFrame::OnMyChange(WPARAM wParam, LPARAM lParam)
 2 {
 3     switch (wParam)
 4     {
 5     case NM_A:
 6         MessageBox(_T("NM_A"));
 7         break;
 8     case NM_B:
 9         MessageBox(_T("NM_B"));
10         break;
11     case NM_C:
12         MessageBox(_T("NM_C"));
13         break;
14     case NM_D:
15         MessageBox(_T("NM_D"));
16         break;
17     case NM_E:
18         MessageBox(_T("NM_E"));
19         break;
20     default:
21         MessageBox(_T("error"));
22     }
23     return 0;
24 }
(7)界面挂载
如果是NM_A信号,则挂载CUserDlg窗口,后面界面的挂载以此类推。
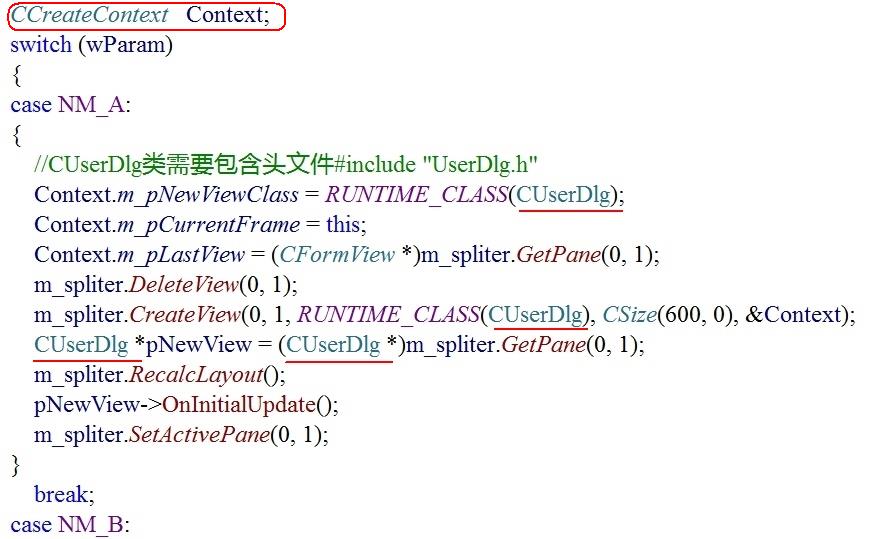
 1 CCreateContext   Context;
 2 switch (wParam)
 3 {
 4 case NM_A:
 5 {
 6     //CUserDlg类需要包含头文件#include "UserDlg.h"
 7     Context.m_pNewViewClass = RUNTIME_CLASS(CUserDlg);
 8     Context.m_pCurrentFrame = this;
 9     Context.m_pLastView = (CFormView *)m_spliter.GetPane(0, 1);
10     m_spliter.DeleteView(0, 1);
11     m_spliter.CreateView(0, 1, RUNTIME_CLASS(CUserDlg), CSize(600,500), &Context);
12     CUserDlg *pNewView = (CUserDlg *)m_spliter.GetPane(0, 1);
13     m_spliter.RecalcLayout();
14     pNewView->OnInitialUpdate();
15     m_spliter.SetActivePane(0, 1);
16 }
17     break;
18 case NM_B:
19 //……………
七、销售管理界面
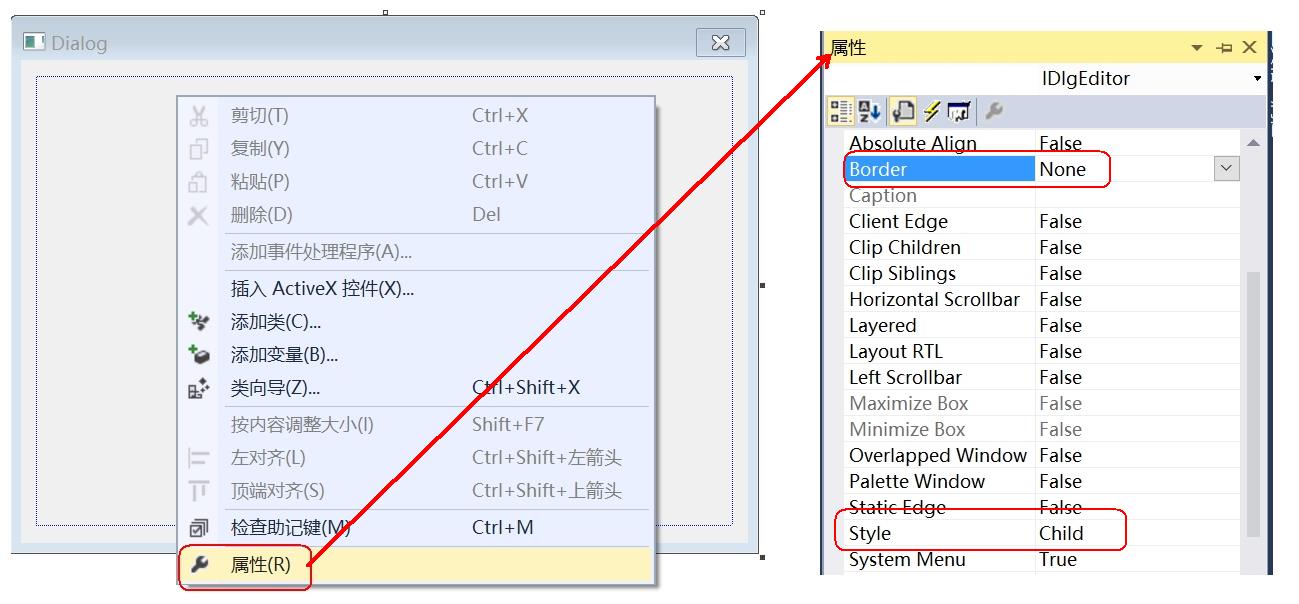
1、创建窗口,修改属性
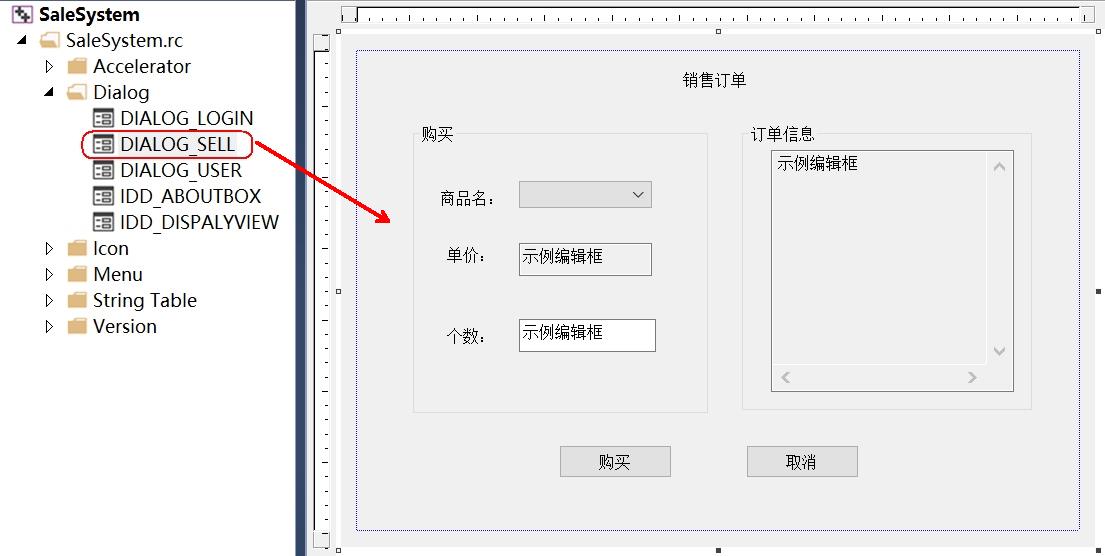
添加对话框资源(ID修改为DIALOG_SELL),添加所需控件
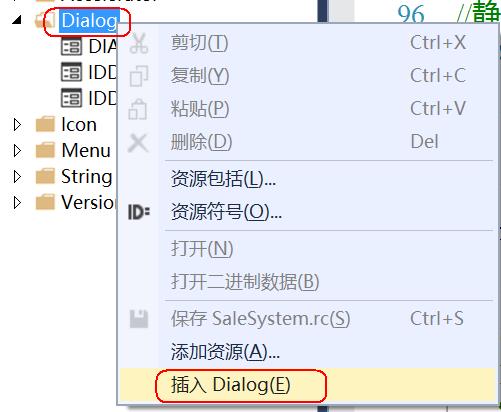
在窗口属性中,Border改为None,Style改为Child:
2、布局界面
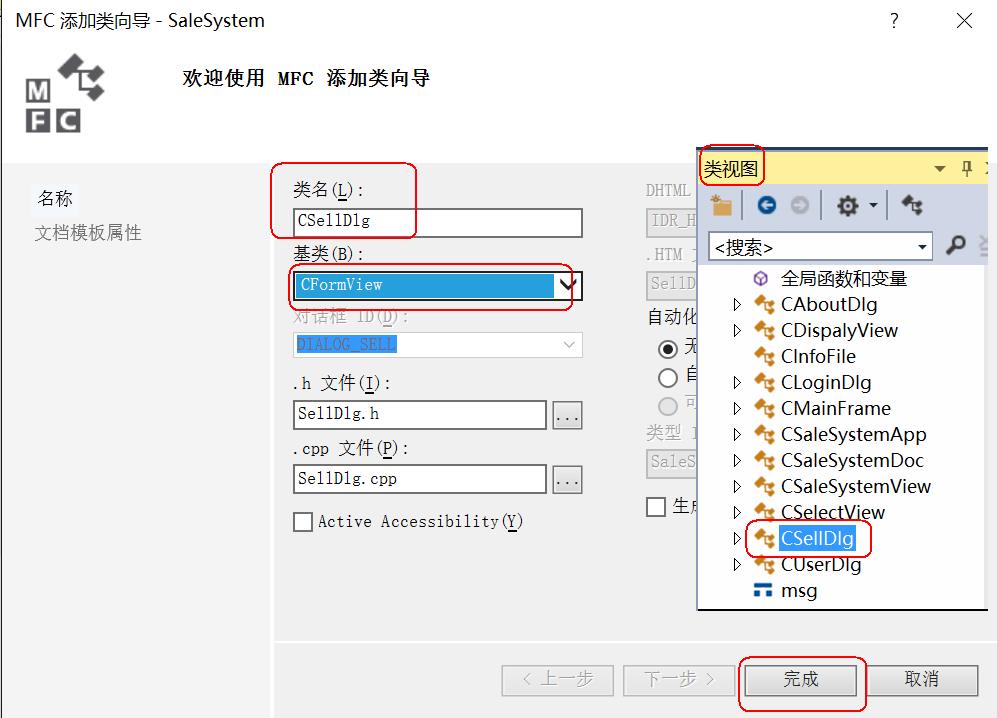
3、添加类
选中对话框 -> 右击 -> 添加类 -> 类名:CSellDlg,基类选择CFormView
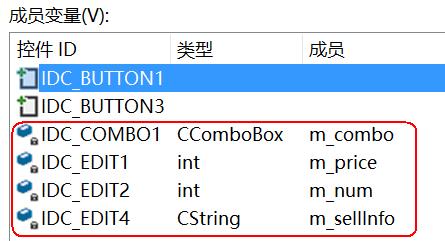
4、添加变量
根据需求,控件关联所需变量
商品名组合框关联CComboBox m_combo,单价编辑框关联int m_price,
个数编辑框关联int m_num,销售信息编辑框关联CString m_sellInfo。
5、界面挂载
在CMainFrame类中OnMyChange函数,添加如下代码:
 1     case NM_B:
 2     {
 3         //CSellDlg类需要包含头文件#include "SellDlg.h"
 4         Context.m_pNewViewClass = RUNTIME_CLASS(CSellDlg);
 5         Context.m_pCurrentFrame = this;
 6         Context.m_pLastView = (CFormView *)m_spliter.GetPane(0, 1);
 7         m_spliter.DeleteView(0, 1);
 8         m_spliter.CreateView(0, 1, RUNTIME_CLASS(CSellDlg), CSize(600, 0), &Context);
 9         CSellDlg *pNewView = (CSellDlg *)m_spliter.GetPane(0, 1);
10         m_spliter.RecalcLayout();
11         pNewView->OnInitialUpdate();
12         m_spliter.SetActivePane(0, 1);
13     }
14         break;
6、初始化下拉框
在对话框类中,重写 OnInitDialog 函数,进行初始化。
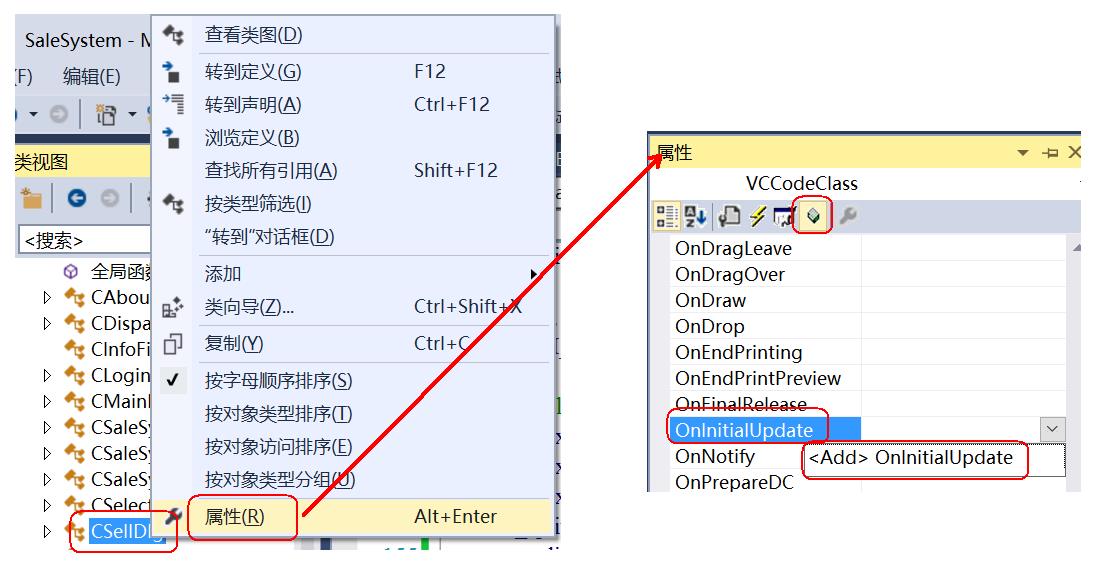
 1 void CSellDlg::OnInitialUpdate()
 2 {
 3     CFormView::OnInitialUpdate();
 4
 5     // TODO:  在此添加专用代码和/或调用基类
 6
 7     //读取文件,获取商品名,给组合框添加字符串
 8     //需要包含#include "InfoFile.h"
 9     CInfoFile file;
10     file.ReadDocline(); //读取商品信息
11     for (list<msg>::iterator it = file.ls.begin(); it != file.ls.end(); it++)
12     {
13         m_combo.AddString((CString)it->name.c_str());
14     }
15
16     file.ls.clear(); //清空list的内容
17
18     //将第一个商品名设为默认选中项
19     m_combo.SetCurSel(0);
20 }
7、根据用户选择的不同商品,更新商品的库存和单价
处理组合框所需控制事件
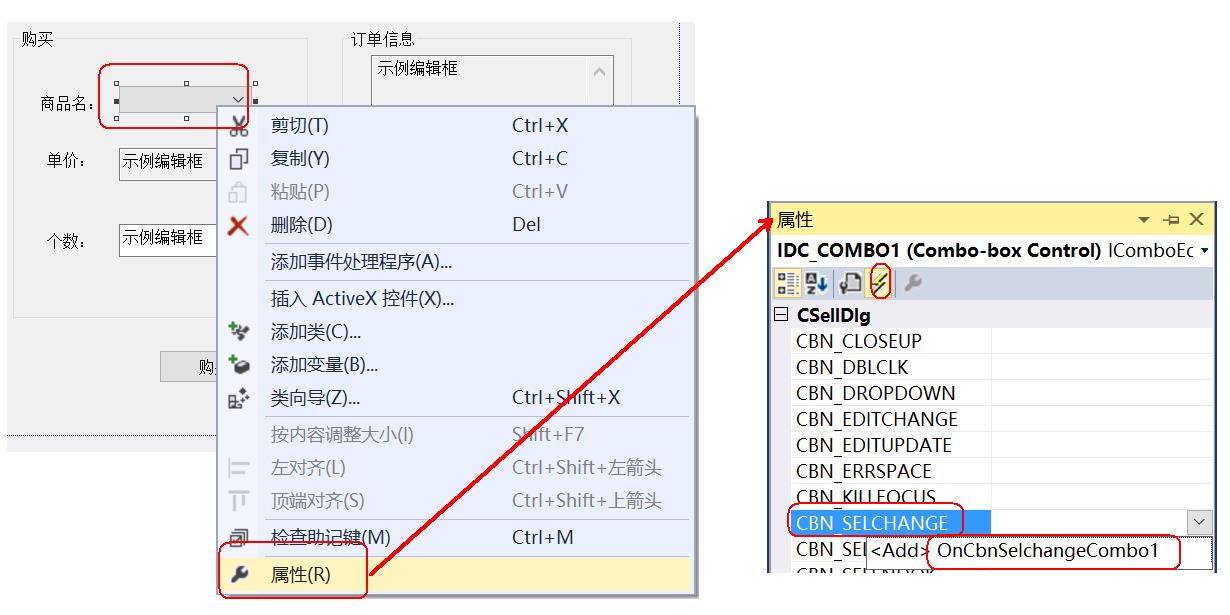
 1 void CSellDlg::OnCbnSelchangeCombo1()
 2 {
 3     // TODO:  在此添加控件通知处理程序代码
 4
 5     CString text;
 6     //获取当前选中项
 7     int index = m_combo.GetCurSel();
 8     //获取当前内容
 9     m_combo.GetLBText(index, text);
10
11     //需要包含#include "InfoFile.h"
12     CInfoFile file;
13     file.ReadDocline(); //读取商品信息
14     for (list<msg>::iterator it = file.ls.begin(); it != file.ls.end(); it++)
15     {
16         if (text == it->name.c_str())
17         {
18             m_price = it->price;
19             m_num = 0;
20             UpdateData(FALSE); //内容更新到对应的控件
21         }
22     }
23
24     file.ls.clear(); //清空list的内容
25 }
8、购买功能实现
(1)有效性验证
(2)读取购买的商品,更新库存量
(3)提示用户购买成功,显示到右侧购买信息
(4)将数据同步到文件中
 1 void CSellDlg::OnBnClickedButton1()
 2 {
 3     // TODO:  在此添加控件通知处理程序代码
 4
 5     //获取控件上的内容,更新到对应关联的变量中
 6     UpdateData(TRUE);
 7
 8     if (m_num == 0)
 9     {
10         MessageBox(TEXT("个数不能为0"));
11         return;
12     }
13
14     CString type;
15     //获取当前选中项
16     int index = m_combo.GetCurSel();
17     //获取组合框当前内容
18     m_combo.GetLBText(index, type);
19
20     CString str;
21     str.Format(_T("商品:%s \r\n单价:%d \r\n个数:%d \r\n总价:%d"), type, m_price, m_num, m_price*m_num);
22
23     m_sellInfo = str; //销售信息
24     UpdateData(FALSE);
25     MessageBox(str);
26
27
28     //需要包含#include "InfoFile.h"
29     CInfoFile file;
30     file.ReadDocline(); //读取商品信息
31     for (list<msg>::iterator it = file.ls.begin(); it != file.ls.end(); it++)
32     {
33         if (type == it->name.c_str())
34         {
35             it->num = it->num - m_num;
36         }
37     }
38     file.WirteDocline(); //更新文件内容
39
40     file.ls.clear(); //清空list的内容
41
42     m_sellInfo.Empty();
43     m_num = 0;
44     UpdateData(FALSE); //更新到对应的控件
45 }
9、取消按钮——清空内容
1 void CSellDlg::OnBnClickedButton3()
2 {
3     // TODO:  在此添加控件通知处理程序代码
4
5     m_combo.SetCurSel(0); //选择第0项目
6     m_sellInfo = "";
7     m_num = 0;
8     OnCbnSelchangeCombo1();
9 }
八、库存信息窗口
1、ui设计
1)添加对话框资源(ID修改为DIALOG_INFO),添加所需控件。
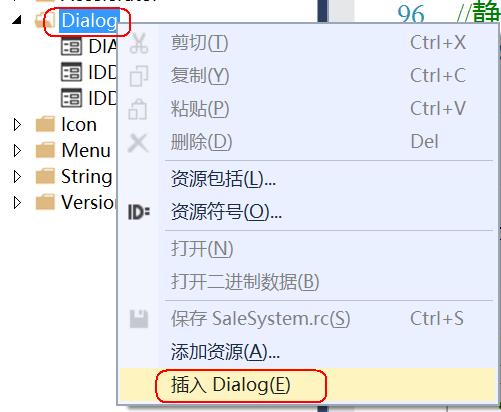
在窗口属性中,Border改为None,Style改为Child:
View 属性为 Report(报表表模式):
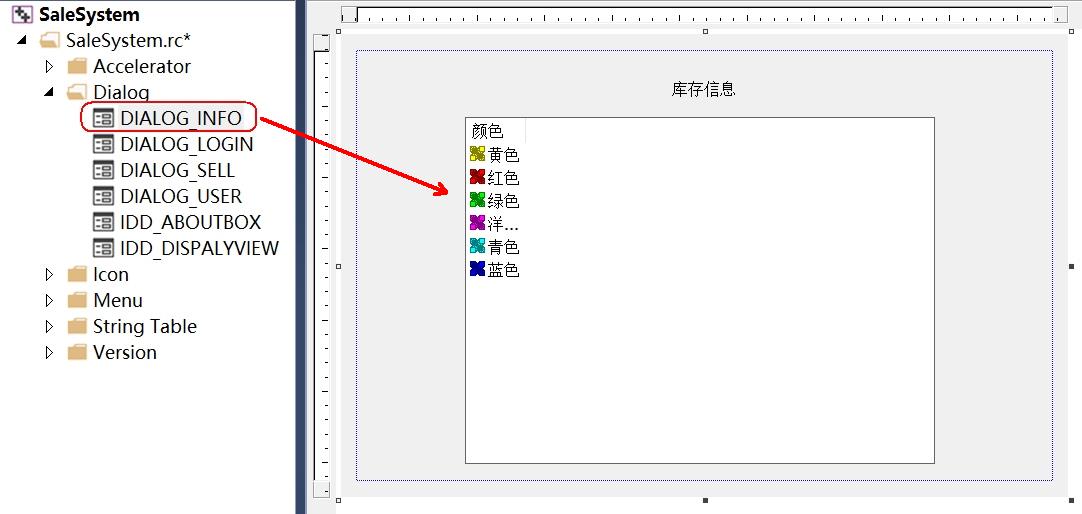
2)选中对话框 -> 右击 -> 添加类 -> 类名:CInfoDlg,基类选择CFormView
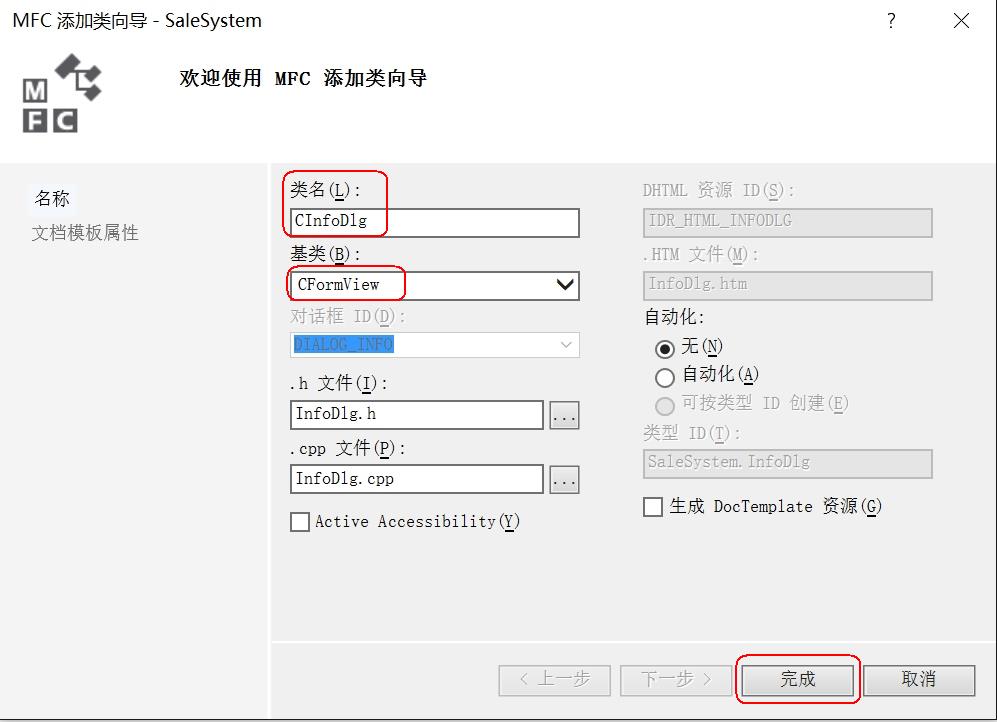
3)根据需求,控件关联所需变量
列表控件关联CListCtrl m_list:

2、界面挂载
在CMainFrame类中OnMyChange函数,添加如下代码:
 1     case NM_C:
 2     {
 3         //CInfoDlg类需要包含头文件#include "InfoDlg.h"
 4         Context.m_pNewViewClass = RUNTIME_CLASS(CInfoDlg);
 5         Context.m_pCurrentFrame = this;
 6         Context.m_pLastView = (CFormView *)m_spliter.GetPane(0, 1);
 7         m_spliter.DeleteView(0, 1);
 8         m_spliter.CreateView(0, 1, RUNTIME_CLASS(CInfoDlg), CSize(600, 0), &Context);
 9         CInfoDlg *pNewView = (CInfoDlg *)m_spliter.GetPane(0, 1);
10         m_spliter.RecalcLayout();
11         pNewView->OnInitialUpdate();
12         m_spliter.SetActivePane(0, 1);
13     }
14         break;
3、功能实现
在对话框类中,重写 OnInitDialog 函数,进行商品信息初始化:
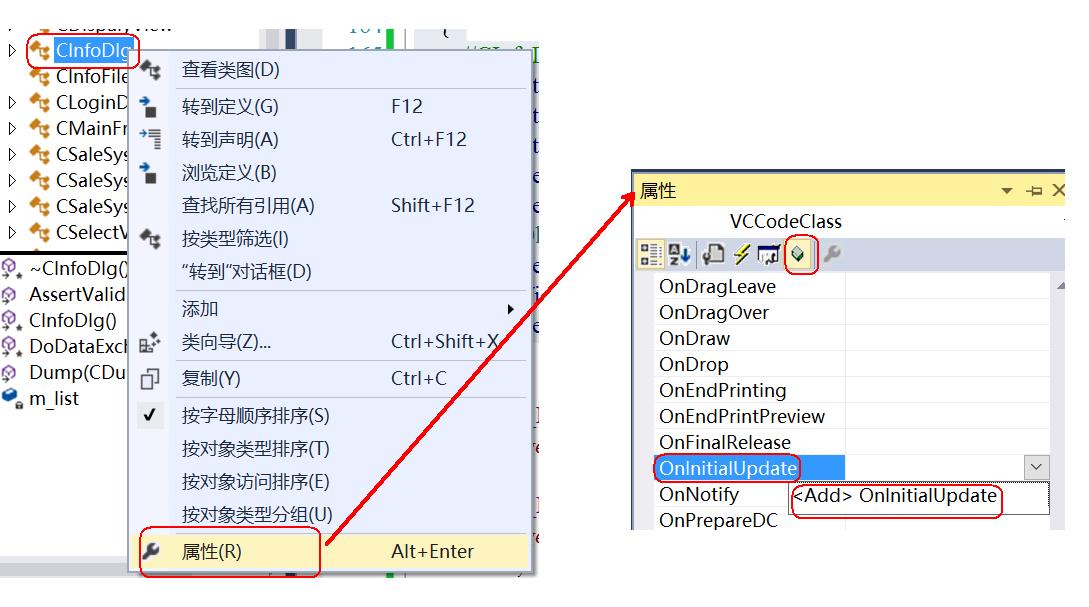
 1 void CInfoDlg::OnInitialUpdate()
 2 {
 3     CFormView::OnInitialUpdate();
 4
 5     // TODO:  在此添加专用代码和/或调用基类
 6     // 设置扩展风格
 7     //LVS_EX_FULLROWSELECT选中整行,LVS_EX_GRIDLINES网格
 8     m_list.SetExtendedStyle(m_list.GetExtendedStyle() | LVS_EX_FULLROWSELECT | LVS_EX_GRIDLINES);
 9
10     // 初始化表头
11     CString field[] = { _T("商品ID"), _T("商品名称"), _T("商品价格"), _T("库存数量") };
12     for (int i = 0; i < sizeof(field) / sizeof(field[0]); ++i)
13     {
14         m_list.InsertColumn(i, field[i], LVCFMT_CENTER, 90);
15     }
16
17     //需要包含#include "InfoFile.h"
18     CInfoFile file;
19     file.ReadDocline(); //读取商品信息
20
21     //添加数据
22     int i = 0;
23     CString str;
24     for (list<msg>::iterator it = file.ls.begin(); it != file.ls.end(); it++)
25     {
26         str.Format(_T("%d"), it->id);
27         m_list.InsertItem(i, str);
28         int column = 1;
29         m_list.SetItemText(i, column++, (CString)it->name.c_str());
30         str.Format(_T("%d"), it->price);
31         m_list.SetItemText(i, column++, str);
32         str.Format(_T("%d"), it->num);
33         m_list.SetItemText(i, column++, str);
34         i++;
35     }
36
37
38 }
九、库存添加
1、添加商品,界面布局
(1)添加对话框资源(ID修改为DIALOG_ADD),添加所需控件。
(2)在窗口属性中,Border改为None,Style改为Child。
2、添加类
选中对话框 -> 右击 -> 添加类 -> 类名:CAddDlg,基类选择CFormView
3、添加变量
根据需求,控件关联所需变量
添加个数:
商品组合框关联CComboBox m_combo,单价编辑框关联int m_price1,
个数编辑框关联int m_num1。
添加新产品:
商品组合框关联CString m_name2,单价编辑框关联int m_price2,
个数编辑框关联int m_num2。
4、界面挂载
在CMainFrame类中OnMyChange函数,添加如下代码:
 1     case NM_D:
 2     {
 3         //CInfoDlg类需要包含头文件#include "AddDlg.h"
 4         Context.m_pNewViewClass = RUNTIME_CLASS(CAddDlg);
 5         Context.m_pCurrentFrame = this;
 6         Context.m_pLastView = (CFormView *)m_spliter.GetPane(0, 1);
 7         m_spliter.DeleteView(0, 1);
 8         m_spliter.CreateView(0, 1, RUNTIME_CLASS(CAddDlg), CSize(600, 0), &Context);
 9         CAddDlg *pNewView = (CAddDlg *)m_spliter.GetPane(0, 1);
10         m_spliter.RecalcLayout();
11         pNewView->OnInitialUpdate();
12         m_spliter.SetActivePane(0, 1);
13     }
14
15         break;
5、初始化左列,下拉框
在对话框类中,重写OnInitialUpdate 函数,进行商品信息初始化:
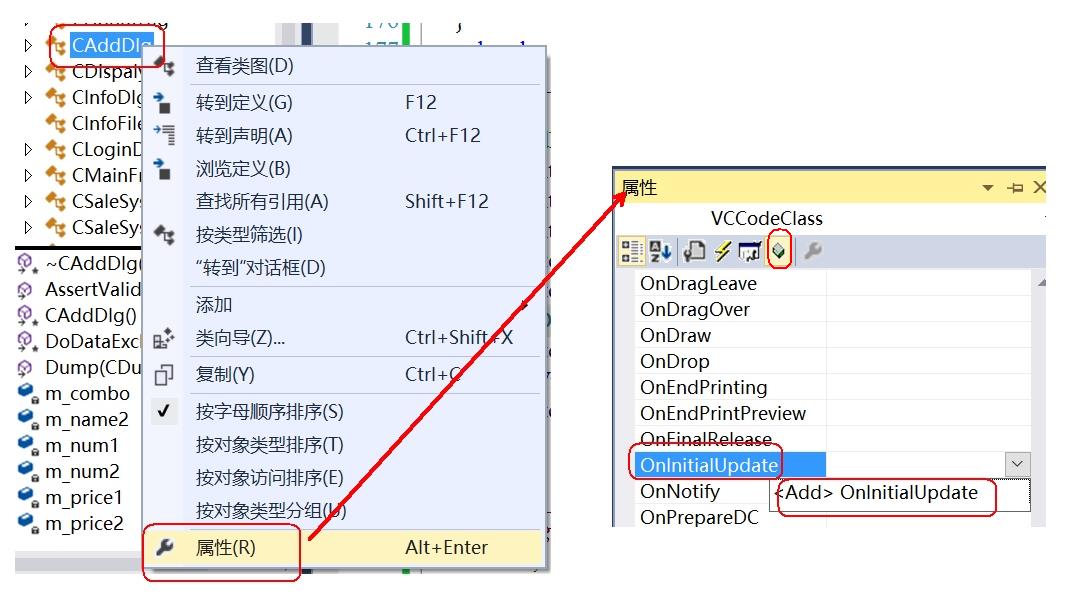
 1 void CAddDlg::OnInitialUpdate()
 2 {
 3     CFormView::OnInitialUpdate();
 4
 5     // TODO:  在此添加专用代码和/或调用基类
 6
 7     //读取文件,获取商品名,给组合框添加字符串
 8     //需要包含#include "InfoFile.h"
 9     CInfoFile file;
10     file.ReadDocline(); //读取商品信息
11     for (list<msg>::iterator it = file.ls.begin(); it != file.ls.end(); it++)
12     {
13         m_combo.AddString((CString)it->name.c_str());
14     }
15
16     file.ls.clear(); //清空list的内容
17
18     //将第一个商品名设为默认选中项
19     m_combo.SetCurSel(0);
20 }
6、处理组合框所需控制事件
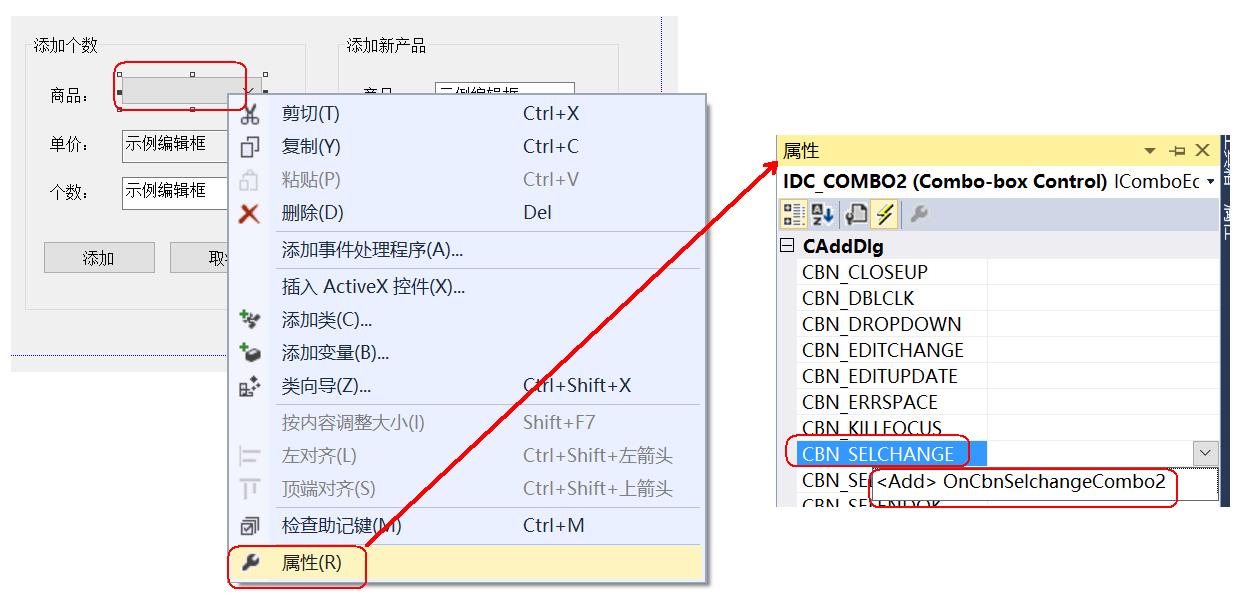
 1 void CAddDlg::OnCbnSelchangeCombo2()
 2 {
 3     // TODO:  在此添加控件通知处理程序代码
 4
 5     CString text;
 6     //获取当前选中项
 7     int index = m_combo.GetCurSel();
 8     //获取当前内容
 9     m_combo.GetLBText(index, text);
10
11     //需要包含#include "InfoFile.h"
12     CInfoFile file;
13     file.ReadDocline(); //读取商品信息
14     for (list<msg>::iterator it = file.ls.begin(); it != file.ls.end(); it++)
15     {
16         if (text == it->name.c_str())
17         {
18             m_price1 = it->price;
19             m_num1 = 0;
20             UpdateData(FALSE); //内容更新到对应的控件
21         }
22     }
23
24     file.ls.clear(); //清空list的内容
25 }
7、添加个数按钮实现
 1 void CAddDlg::OnBnClickedButton1()
 2 {
 3     // TODO:  在此添加控件通知处理程序代码
 4
 5     //获取控件上的内容,更新到对应关联的变量中
 6     UpdateData(TRUE);
 7
 8     if (m_num1 == 0)
 9     {
10         MessageBox(TEXT("个数不能为0"));
11         return;
12     }
13
14     CString type;
15     //获取当前选中项
16     int index = m_combo.GetCurSel();
17     //获取组合框当前内容
18     m_combo.GetLBText(index, type);
19
20     CString str;
21     str.Format(_T("添加了 商品:%s \r\n单价:%d \r\n个数:%d"), type, m_price1, m_num1);
22     MessageBox(str);
23
24
25     //需要包含#include "InfoFile.h"
26     CInfoFile file;
27     file.ReadDocline(); //读取商品信息
28     for (list<msg>::iterator it = file.ls.begin(); it != file.ls.end(); it++)
29     {
30         if (type == it->name.c_str())
31         {
32             it->num +=  m_num1;
33         }
34     }
35     file.WirteDocline(); //更新文件内容
36
37     file.ls.clear(); //清空list的内容
38
39     m_num1 = 0;
40     UpdateData(FALSE); //更新到对应的控件
41 }
8、添加个数取消按钮实现
1 void CAddDlg::OnBnClickedButton2()
2 {
3     // TODO:  在此添加控件通知处理程序代码
4
5     m_combo.SetCurSel(0);
6     m_num1 = 0;
7     OnCbnSelchangeCombo2();
8 }
9、添加新商品按钮实现
 1 void CAddDlg::OnBnClickedButton4()
 2 {
 3     // TODO:  在此添加控件通知处理程序代码
 4
 5     UpdateData(TRUE); //获取控件内容
 6
 7     if (m_num2 <= 0 || m_price2 <= 0 || m_name2.IsEmpty())
 8     {
 9         MessageBox(TEXT("输入信息有误"));
10         return;
11     }
12
13     //需要包含#include "InfoFile.h"
14     CInfoFile file;
15     file.ReadDocline(); //读取商品信息
16     file.Addline(m_name2, m_num2, m_price2); //添加商品
17     file.WirteDocline(); //写文件
18     file.ls.clear(); //清空list的内容
19     MessageBox(_T("添加成功"));
20
21     m_name2.Empty();
22     m_num2 = 0;
23     m_price2 = 0;
24     UpdateData(FALSE);
25 }
10、添加新商品取消按钮实现
1 void CAddDlg::OnBnClickedButton5()
2 {
3     // TODO:  在此添加控件通知处理程序代码
4     m_name2.Empty();
5     m_num2 = 0;
6     m_price2 = 0;
7     UpdateData(FALSE);
8 }
十、库存删除
1、UI设计
(1)添加对话框资源(ID修改为DIALOG_DEL),添加所需控件。
在窗口属性中,Border改为None,Style改为Child。
(2)选中对话框 -> 右击 -> 添加类 -> 类名:CDelDlg,基类选择CFormView
(3)根据需求,控件关联所需变量
商品名组合框关联CComboBox m_combo,单价编辑框关联int m_price,
个数编辑框关联int m_num。
2、界面挂载
在CMainFrame类中OnMyChange函数,添加如下代码:
 1     case NM_E:
 2     {
 3         //CDelDlg类需要包含头文件#include "DelDlg.h"
 4         Context.m_pNewViewClass = RUNTIME_CLASS(CDelDlg);
 5         Context.m_pCurrentFrame = this;
 6         Context.m_pLastView = (CFormView *)m_spliter.GetPane(0, 1);
 7         m_spliter.DeleteView(0, 1);
 8         m_spliter.CreateView(0, 1, RUNTIME_CLASS(CDelDlg), CSize(600, 0), &Context);
 9         CDelDlg *pNewView = (CDelDlg *)m_spliter.GetPane(0, 1);
10         m_spliter.RecalcLayout();
11         pNewView->OnInitialUpdate();
12         m_spliter.SetActivePane(0, 1);
13     }
14         break;
3、功能实现
(1)在对话框类中,重写 OnInitDialog 函数,进行初始化。
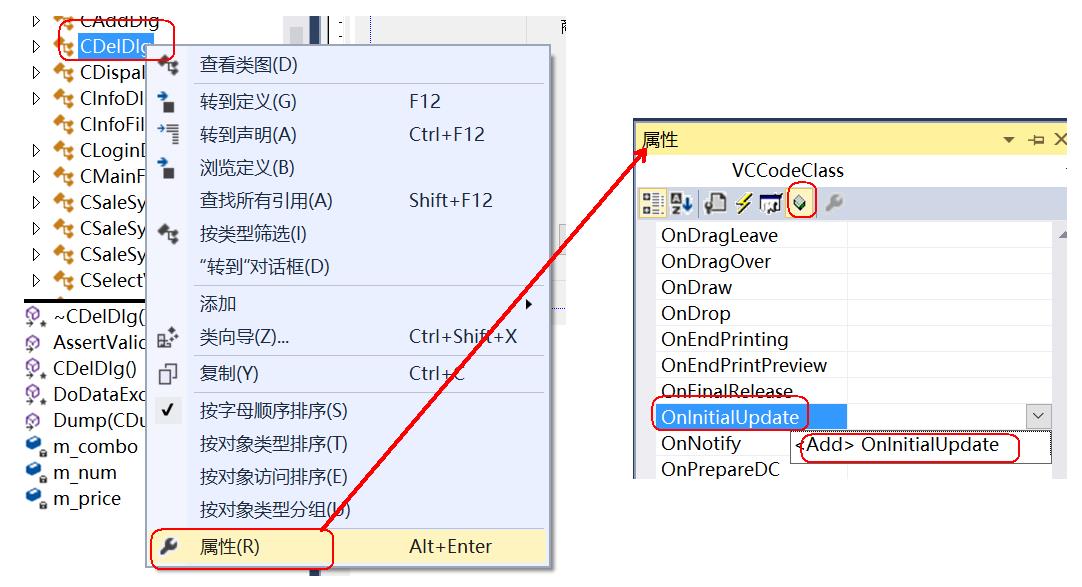
 1 void CDelDlg::OnInitialUpdate()
 2 {
 3     CFormView::OnInitialUpdate();
 4
 5     //读取文件,获取商品名,给组合框添加字符串
 6     //需要包含#include "InfoFile.h"
 7     CInfoFile file;
 8     file.ReadDocline(); //读取商品信息
 9     for (list<msg>::iterator it = file.ls.begin(); it != file.ls.end(); it++)
10     {
11         m_combo.AddString((CString)it->name.c_str());
12     }
13
14
15     //将第一个商品名设为默认选中项
16     m_combo.SetCurSel(0);
17 }
(2)处理组合框所需控制事件
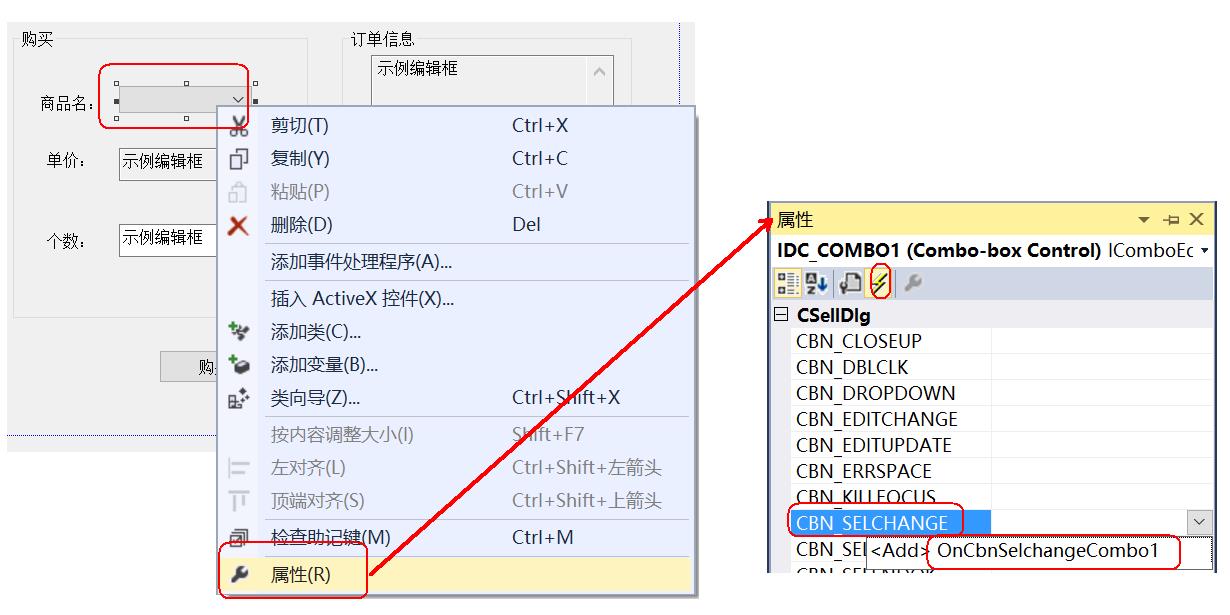
 1 void CDelDlg::OnCbnSelchangeCombo1()
 2 {
 3     // TODO:  在此添加控件通知处理程序代码
 4
 5     CString text;
 6     //获取当前选中项
 7     int index = m_combo.GetCurSel();
 8     //获取当前内容
 9     m_combo.GetLBText(index, text);
10
11     //需要包含#include "InfoFile.h"
12     CInfoFile file;
13     file.ReadDocline(); //读取商品信息
14     for (list<msg>::iterator it = file.ls.begin(); it != file.ls.end(); it++)
15     {
16         if (text == it->name.c_str())
17         {
18             m_price = it->price;
19             m_num = 0;
20             UpdateData(FALSE); //内容更新到对应的控件
21         }
22     }
23
24
25 }
(3)确定按钮功能实现
 1 void CDelDlg::OnBnClickedButton1()
 2 {
 3     // TODO:  在此添加控件通知处理程序代码
 4
 5     //获取控件上的内容,更新到对应关联的变量中
 6     UpdateData(TRUE);
 7
 8     if (m_num == 0)
 9     {
10         MessageBox(TEXT("个数不能为0"));
11         return;
12     }
13
14     CString type;
15     //获取当前选中项
16     int index = m_combo.GetCurSel();
17     //获取组合框当前内容
18     m_combo.GetLBText(index, type);
19
20     CString str;
21     str.Format(_T("删除商品:%s \r\n单价:%d \r\n个数:%d "), type, m_price, m_num);
22     MessageBox(str);
23
24
25     //需要包含#include "InfoFile.h"
26     CInfoFile file;
27     file.ReadDocline(); //读取商品信息
28     for (list<msg>::iterator it = file.ls.begin(); it != file.ls.end(); it++)
29     {
30         if (type == it->name.c_str())
31         {
32             it->num = it->num - m_num;
33         }
34     }
35     file.WirteDocline(); //更新文件内容
36
37
38
39     m_num = 0;
40     UpdateData(FALSE); //更新到对应的控件
41 }
(4)取消按钮功能实现
1 void CDelDlg::OnBnClickedButton2()
2 {
3     // TODO:  在此添加控件通知处理程序代码
4
5     m_combo.SetCurSel(0); //选择第0项目
6     m_num = 0;
7     OnCbnSelchangeCombo1();
8 }
十一、菜单栏添加
1、找Menu菜单
切换到资源视图的Menu,删除掉所有默认(帮助除外):
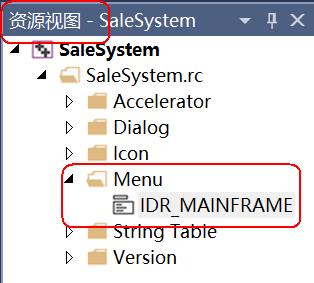
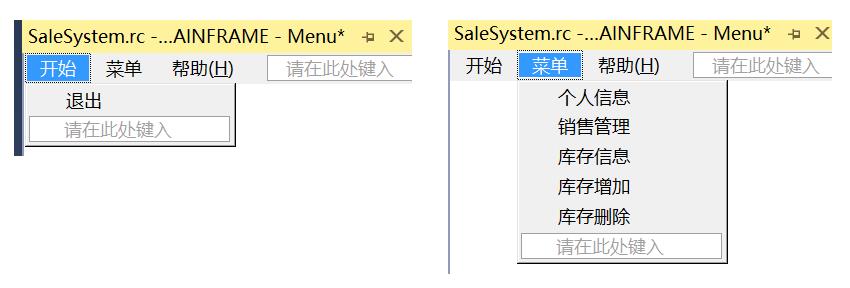
2、添加事件处理程序
右键菜单栏项,添加事件处理程序,选择COMMAND 消息类型,添加至CMainFrame框架类中。
3、在事件处理函数中发送自定义信号,其它菜单操作类似。
1 //个人信息菜单
2 void CMainFrame::On32772()
3 {
4     // TODO:  在此添加命令处理程序代码
5 ::PostMessage(AfxGetMainWnd()->GetSafeHwnd(), NM_A, (WPARAM)NM_A, (LPARAM)0);
6 }
在学习MFC总结了笔记,并分享出来。有问题请及时联系博主:Alliswell_WP,转载请注明出处。
posted on 2020-06-26 18:17 Alliswell_WP 阅读(548) 评论(0) 编辑 收藏 举报


