Linux命令基础——makefile+gdb+IO
在学习Linux命令基础总结了笔记,并分享出来。有问题请及时联系博主:Alliswell_WP,转载请注明出处。
08-linux-day03(makefile-gdb-IO)
目录:
附:ftp工具介绍——FlashFXP
一、学习目标
二、makefile
1、makefile编写1
2、makefile编写2
3、makefile编写3
4、makefile补充
三、gdb
1、gdb调试
2、gdb调试core文件
四、系统函数
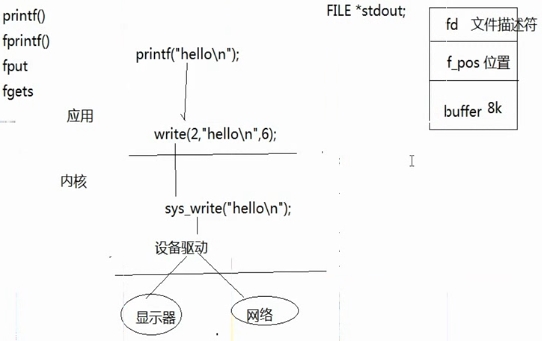
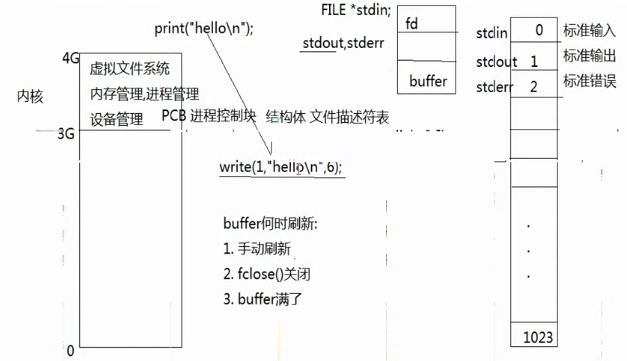
1、系统api与库函数的关系
2、open、close函数介绍
3、open、close实现
4、read、write
5、lseek实现文件读写位置改变
6、lseek计算文件大小
7、lseek拓展文件
8、阻塞和非阻塞相关的概念
9、fcntl函数设置非阻塞
附:ftp工具介绍——FlashFXP
FlashFXP允许你从任何FTP服务器直接传输文件到你的本地硬盘,或者在两个FTP站点之间传输文件,即站点到站点传输,而无须经过自己的计算机。要实现站点至站点的文件传递,我们需要将本地文件浏览器界面切换至远程文件浏览器界面,并且需要两个站点都支持此功能。
FlashFXP下载(免安装):https://www.cr173.com/soft/15632.html
FlashFXP与虚拟机VMware进行文件传输——http://www.linuxidc.com/Linux/2010-07/26992.htm
ubuntu安装ftp服务器(一般配置)+FlashFXP与虚拟机传输文件——https://www.cnblogs.com/wolf-sky/archive/2012/09/19/2694311.html
使用:打开“站点”——>“站点管理器”——>“新建站点”,名字随便起(如:new),确定——>连接类型:选择“SFTP over SSH”;地址输入:“192.168.5.100”(Ubuntu的IP地址),用户名输入:wang,密码输入:root;远程路径输入:/home/wang(也可以不配置)——>点击“应用”;点击“连接”。
连接成功后,左侧为“Windows系统的文件”,右侧为“Ubuntu的文件”,将左右侧分别选择到文件位置和待拷贝的位置,然后鼠标选中“准备拷贝的文件”,然后鼠标右键“传输选定项”,就会传到“待拷贝位置”。
一、学习目标
1、熟练使用规则编写简单的makefile文件
2、熟练使用makefile中的变量
3、熟练使用makefie中的函数
4、熟练掌握gdb相关调试命令的使用
5、了解概念:pcb和文件描述符,虚拟地址空间
6、熟练掌握Linux系统IO函数的使用(open、read、write、lseek)
7、了解阻塞和非阻塞的概念
二、makefile
文件准备:head.h main.c add.c sub.c div.c mul.c
新建目录include,将head.h放入其中,head.h:
1 int add(int a, int b);
2 int sub(int a, int b);
3 int div(int a, int b);
4 int mul(int a, int b);
main.c:
1 #include <stdio.h>
2 #include "head.h"
3 int main(int a, int b)
4 {
5     int sum = add(2, 24);
6     printf("sum = %d\n", sum);
7     return 0;
8 }
add.c:
1 #include "head.h"
2 int add(int a, int b)
3 {
4     int result = a + b;
5     return result;
6 }
sub.c:
1 #include "head.h"
2 int sub(int a, int b)
3 {
4     int result = a - b;
5     return result;
6 }
div.c:
1 #include "head.h"
2 int div(int a, int b)
3 {
4     int result = a / b;
5     return result;
6 }
mul.c:
1 #include "head.h"
2 int mul(int a, int b)
3 {
4     int result = a * b;
5     return result;
6 }
1、makefile编写1
(1)makefile的命名规则:
makefile
Makefile
(2) makefile的三要素
目标
依赖
规则命令
(3)写法
目标:依赖
Tab键 规则命令
如:(第1版makefile)
app:main.c add.c sub.c div.c mul.c
gcc -o app -I./include main.c add.c sub.c div.c mul.c
如果更改其中一个文件,所有的源码都重新编译
可以考虑编译过程分解,先生成.o文件,然后使用.o文件生成结果(规则是递推的,依赖文件如果比目标文件新,则重新生成目标)
如:(第二版makefile)
app:main.o add.o sub.o div.o mul.o
gcc -o app -I./include main.o add.o sub.o div.o mul.o
main.o:main.c
gcc -c main.c -I ./include
add.o:add.c
gcc -c add.c -I ./include
sub.o:sub.c
gcc -c sub.c -I ./include
div.o:div.c
gcc -c div.c -I ./include
mul.o:mul.c
gcc -c mul.c -I ./include
更改:
#ObjFiles定义目标文件
ObjFiles=main.o add.o sub.o div.o mul.o
#目标文件用法:$(var)
app:$(ObjFiles)
gcc -o app -I./include main.o add.o sub.o div.o mul.o
main.o:main.c
gcc -c main.c -I ./include
add.o:add.c
gcc -c add.c -I ./include
sub.o:sub.c
gcc -c sub.c -I ./include
div.o:div.c
gcc -c div.c -I ./include
mul.o:mul.c
gcc -c mul.c -I ./include
2、makefile编写2
makefile的隐含规则:默认处理第一个目标
》函数:
wildcard可以进行文件匹配
patsubst内容的替换
》变量:
$@——代表目标
$^——代表全部依赖
$<——第一个依赖
$?——第一个变化的依赖
继续更改:(第三版makefile)
#get all .c files
SrcFiles=$(wildcard *.c)
#all .c files --> .o files
ObjFiles=$(patsubst %.c,%.o,$(SrcFiles))
#目标文件用法:$(var)
app:$(ObjFiles)
gcc -o app -I./include $(ObjFiles)
#模式匹配规则,$@,$<,这样的变量,只能在规则中出现
%.o:%.c
gcc -c $< -I./include -o $@
#测试变量
test:
echo $(SrcFiles)
echo $(ObjFiles)
》测试变量:make test
3、makefile编写3
》增加清理功能,
继续更改:(第四版makefile)
#get all .c files
SrcFiles=$(wildcard *.c)
#all .c files --> .o files
ObjFiles=$(patsubst %.c,%.o,$(SrcFiles))
#目标文件用法:$(var)
app:$(ObjFiles)
gcc -o app -I./include $(ObjFiles)
#模式匹配规则,$@,$<,这样的变量,只能在规则中出现
%.o:%.c
gcc -c $< -I./include -o $@
#测试变量:@命令不输出
test:
@echo $(SrcFiles)
@echo $(ObjFiles)
#清理功能:-f强制删除;规则前的@命令代表不输出该条规则的命令;规则前的-代表该条规则执行报错,继续执行;
clean:
-@rm *.o
rm -f app
》清理文件:make clean
》在本目录下增加clean文件,clean不能使用
继续更改:(第五版makefile)
#get all .c files
SrcFiles=$(wildcard *.c)
#all .c files --> .o files
ObjFiles=$(patsubst %.c,%.o,$(SrcFiles))
all:app app1
(空行)
#目标文件用法:$(var)
app:$(ObjFiles)
gcc -o $@ -I./include $(ObjFiles)
app1:$(ObjFiles)
gcc -o $@ -I./include $(ObjFiles)
#模式匹配规则,$@,$<,这样的变量,只能在规则中出现
%.o:%.c
gcc -c $< -I./include -o $@
#测试变量:@命令不输出
test:
@echo $(SrcFiles)
@echo $(ObjFiles)
#清理功能:-f强制删除;规则前的@命令代表不输出该条规则的命令;规则前的-代表该条规则执行报错,继续执行;
#定义伪目标,防止有歧义
.PHONY:clean all
clean:
-@rm -f *.o
-@rm -f app app1
》清理文件:make clean
4、makefile补充
(1)头文件更改,.o需要重新编译,所以不推荐把头文件放到app:$(ObjFiles) include/head.h
(2)指定编译某个文件:make -f makefile1
三、gdb
文件准备:head.h fun.c main.c(在目录gdb0629下)
main.c:
 1 #include <stdio.h>
 2 #include <string.h>
 3 #include <stdlib.h>
 4 #include "head.h"
 5 typedef struct TTfunInfo
 6 {
 7     int fun_type;//函数的类型
 8     int a;//函数的第一个参数
 9     int b;//函数的第二个参数
10     char funname[10];//函数名称
11 }TfunInfo;
12 int main(int argc, char* argv[])
13 {
14     int a = 2;
15     int i = 0;
16     int a1 = 10, b1 =5;
17     TfunInfo funinfo[2];
18     char *Msg = "I will die!";
19     //Msg[0] = '1';
20     if(argc == 3)
21     {
22         a1 = atoi(argv[1]);
23         b1 = atoi(argv[2]);
24         funinfo[0].a = a1;
25         funinfo[0].b = b1;
26         funinfo[1].a = a1;
27         funinfo[1].b = b1;
28     }
29     for(i = 0; i < 2; i++)
30     {
31         printf("i===%d,LINE=%d\n",i,__LINE__);
32         if(i == 0)
33         {
34             funinfo[i].fun_type = 1;//call sum
35             printf("begin call sum\n");
36             strcpy(funinfo[i].funname, "sum");
37             sum(funinfo[i].a, funinfo[i].b);
38         }
39         if(i == 1)
40         {
41             funinfo[i].fun_type = 2;//call mul
42             printf("begin call mul\n");
43             strcpy(funinfo[i].funname, "mul");
44             mul(funinfo[i].a, funinfo[i].b);
45         }
46     }
47     printf("byebye\n");
48     return 0;
49 }
head.h:
1 int sum(int a, int b);
2 int mul(int a, int b);
func.c:
 1 #include <stdio.h>
 2 #include "head.h"
 3
 4 int sum(int a, int b)
 5 {
 6     printf("weldome call %s,a=%d,b=%d\n",__FUNCTION__,a,b);
 7     return a+b;
 8 }
 9 int mul(int a, int b)
10 {
11     printf("weldome call %s,a=%d,b=%d\n",__FUNCTION__,a,b);
12     return a*b;
13 }
1、gdb调试
使用gdb:编译的时候加-g参数
如:gcc func.c main.c -o app -I./ -g
启动gdb:gdb app(对应可执行程序名)
按回车可以继续执行下一条指令
r(un)——启动
run也可以指定参数,如:r 12 7(相当于./app 12 7)
start——启动,停留在main函数,分步调试
n(ext)——下一条指令,
s(tep)——下一条指令,可以进入函数内部,库函数不能进
q(uit)——退出gdb
set——给参数或变量赋值
设置启动参数:set args 10 6(相当于./app 10 6)
set 变量名=值(如:set args=3——当函数执行至断点前,临时把判断条件的值改变)
(如:set argv[1]="12";(回车)set argv[2]="7"——临时把argv[1]和argv[2]赋值)
l(ist)——默认查看还有main函数的代码,默认10行,回车,继续10行
l 文件名:行号(如:l func.c:1——查看func.c从第1行开始的10行代码)
b(reak)——增加断点
b 行号(如:b 17——默认在main函数第17行设置了断点)
b 函数名(如:b sum——在func.c的sum函数处设置了断点)
b 文件名:行号(如:b func.c:6——func.c第6行设置了断点)
设置条件断点
b 行号 条件(如:b 32 if i==1——只有if=1的时候才进入断点,即停止)
i(nfo) b——查看所有断点编号
d(elete)——删除断点
d 断点标号(如:d 4——删除info表中的4号断点)
c(ontinue)——继续执行,直到下一个断点
p(rint)——打印变量的值
p 变量名(如:p argc——打印变量argc的值:$1 = 3)
p 结构体名(如:p funinfo——打印结构体funinfo中各个值的信息:$2 = {{fun_type = 1, a = 10, b = 419666005, funname = }...})
p 变量名(如:p i——打印i的值:$3 = 0)
ptype——打印 变量的类型
ptype 变量(如:ptype i——打印i的类型:type = int)
display——追踪某个变量的值,查看变量具体什么时候变化,每步执行,都打印
display 变量名(如:display argc——跟踪输出argc的值:argc = 1)
info display——查看所有跟踪的变量名及编号
undisplay——删除显示变量,需要查看编号
undisplay 编号(如:undisplay 1——删除跟踪编号为1的变量)
2、gdb调试core文件
设置生成core:ulimit -c unlimited
取消生成core:ulimit -c 0
设置core文件格式:/proc/sys/kernel/core_pattern
文件不能vi,可以用后面的套路 echo "/corefile/core-%e-%p-%t">/proc/sys/kernel/core_pattern
%e:添加命令名;%p添加pid;%t添加core文件生成时的unix时间
core记录了案发现场
gdb app core——将会显示在哪里出错了,如果还是看不到,输入where查看
四、系统函数
1、系统api与库函数的关系


2、open、close函数介绍
》open
查看man 2 open
int open(const char* pathname, int flags);
int open(const char* pathname, int flags, mode_t mode);
pathname 文件名
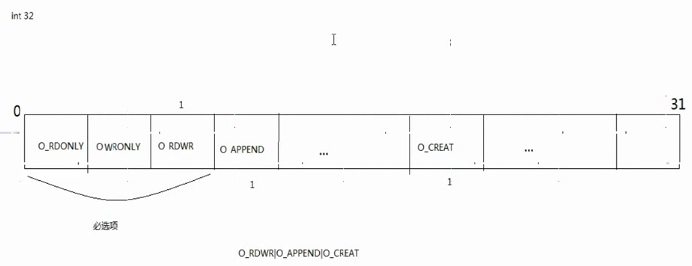
flags
必选项:
O_RDONLY只读;
O_WRONLY只写;
O_RDWR读写
可选项:
O_APPEND追加;
O_CREAT创建文件
O_EXCL与O_CREAT一起使用,如果文件存在,则报错
mode权限位,最终(mode &~ umask)
ONONBLOCK非阻塞
返回值:返回最小的可用文件描述符,失败返回-1,设置errno
》close
查看:man 2 close
int close(int fd);
fd open打开的文件描述符
返回值:成功返回0,失败返回-1,设置errno
3、open、close实现

练习:mytouch.c(open与close实现touch的弱化功能)
>touch mytouch.c
>vi mytouch.c
 1 #include<stdio.h>
 2 #include<sys/types.h>
 3 #include<sys/stat.h>
 4 #include<fcntl.h>
 5 #include<unistd.h>
 6
 7 int main(int argc,char* argv[])
 8 {
 9     if(argc != 2)
10     {
11         printf("./a.out filename\n");
12         return -1;
13     }
14     int fd = open(argv[1], O_RDONLY | O_CREAT, 0666);
15     close(fd);
16     return 0;
17 }
>gcc mytouch.c
>./a.out
>./a.out xxx
4、read、write
》read
查看:man 2 read
ssize_t read(int fd,void *buf,size_t count);
fd:文件描述符
buf:缓冲区
count:缓冲区大小
返回值:失败返回-1,设置errno;成功返回读到的字节数,0代表读到文件末尾
非阻塞的情况下read返回值为-1,但是此时需要判断errno的值
》write
查看:man 2 write
ssize_t write(int fd, const void* buf, size_t count);
fd:文件描述符
buf:缓冲区
count:缓冲区大小
返回值:失败返回-1,设置errno;成功返回写入的字节数,0代表未写入
需求:实现一个cat功能,读文件,输出到屏幕
>touch mycat.c
>vi mycat.c
 1 #include<stdio.h>
 2 #include<sys/types.h>
 3 #include<sys/stat.h>
 4 #include<fcntl.h>
 5 #include<unistd.h>
 6
 7 int main(int argc,char* argv[])
 8 {
 9     if(argc != 2)
10     {
11         printf("./a.out filename\n");
12         return -1;
13     }
14     int fd = open(argv[1], O_RDONLY);
15
16     //读,输出到屏幕
17     char buf[256];
18     int ret = read(fd,buf,sizeof(buf));
19     //循环读取,读到0,结束
20     while(ret != 0)
21     {
22         write(STDOUT_FILENO, buf, ret);
23         ret = read(fd,buf,sizeof(buf));
24     }
25     write(STDOUT_FILENO, buf, ret);
26
27     close(fd);
28     return 0;
29 }
>gcc mycat.c
>./a.out mycat.c
5、lseek实现文件读写位置改变
lseek作用:
》lseek移动文件读写位置
》lseek计算文件大小
》拓展文件
需求:打开一个文件,写入内容:helloworld,然后读取一下文件内容,输出到屏幕。
》lseek移动文件读写位置
man 2 lseek
off_t lseek(int fd, off_t offset, int whence);
fd 文件描述符
offset 偏移量
whence
SEEK_SET 文件开始位置
SEEK_CUR 当前位置
SEEK_END 结尾
返回值:成功返回当前位置到开始的长度,失败返回-1,设置errno
代码如下:(lseek解决了写入文件后文件指针已经在文件末尾,读取读不到的问题)
>touch myreadwrite.c
>vi myreadwrite.c
 1 #include<stdio.h>
 2 #include<sys/types.h>
 3 #include<sys/stat.h>
 4 #include<fcntl.h>
 5 #include<unistd.h>
 6
 7 int main(int argc,char* argv[])
 8 {
 9     if(argc != 2)
10     {
11         printf("./a.out filename\n");
12         return -1;
13     }
14     int fd = open(argv[1], O_RDONLY|O_CREAT,0666);
15
16     write(fd, "helloworld", 11);
17
18     //文件读写位置此时到末尾,需要移动读写位置
19     lseek(fd,0,SEEK_SET);
20     char buf[256] = {0};
21     int ret = read(fd, buf, sizeof(buf));
22
23     if(ret)
24     {
25         write(STDOUT_FILENO, buf, ret);
26
27     }
28
29
30     close(fd);
31     return 0;
32 }
>gcc myreadwrite.c
>./a.out 111
6、lseek计算文件大小
》lseek计算文件大小
>touch filesize.c
>vi filesize.c
 1 #include<stdio.h>
 2 #include<sys/types.h>
 3 #include<sys/stat.h>
 4 #include<fcntl.h>
 5 #include<unistd.h>
 6
 7 int main(int argc, char* argv[])
 8 {
 9     if(argc != 2)
10     {
11         printf("./a.out filename\n");
12         return -1;
13     }
14
15     //1.open
16     int fd = open(argv[1],O_RDONLY);
17     //2.lseek,得到返回值
18     int ret = lseek(fd, 0, SEEK_END);
19     printf("file size is %d\n", ret);
20     //3.close
21     close(fd);
22     return 0;
23 }
>gcc filesize.c
>./a.out mycat.c
7、lseek拓展文件
》拓展文件
>touch filecreate.c
>vi filecreate.c
 1 #include<stdio.h>
 2 #include<sys/types.h>
 3 #include<sys/stat.h>
 4 #include<fcntl.h>
 5 #include<unistd.h>
 6
 7 int main(int argc, char* argv[])
 8 {
 9     if(argc != 2)
10     {
11         printf("./a.out filename\n");
12         return -1;
13     }
14
15     //1.open
16     int fd = open(argv[1],O_WRONLY|O_CREAT,0666);
17     //2.lseek,拓展文件
18     int ret = lseek(fd, 1024, SEEK_END);
19     //需要至少写一次,否则不能保存
20     write(fd, "a", 1);
21     //3.close
22     close(fd);
23     return 0;
24 }
>gcc filecreate.c
>./a.out xxx.avi
>vi xxx.avi
8、阻塞和非阻塞相关的概念
》阻塞的概念:
read函数在读设备或者读管道,或者读网络的时候
输入输出设备对应/dev/tty
>touch read_tty.c
>vi read_tty.c
 1 #include<stdio.h>
 2 #include<sys/types.h>
 3 #include<sys/stat.h>
 4 #include<fcntl.h>
 5 #include<unistd.h>
 6 #include<string.h>
 7
 8 int main(int argc, char* argv[])
 9 {
10     int fd = open("/dev/tty",O_RDWR|O_NONBLOCK);
11
12     char buf[256];
13     int ret = 0;
14     while(1)
15     {
16         ret = read(fd, buf, sizeof(buf));
17         if(ret < 0) //如果没有输入,会报错
18         {
19             perror("read err:");
20             printf("ret is %d\n", ret);
21         }
22         if(ret) //输入,阻塞
23         {
24             printf("buf is %s\n", buf);
25         }
26         printf("haha\n");
27         sleep(1);
28     }
29     close(fd);
30     return 0;
31
32 }
>gcc read_tty.c
>./a.out
>xxx
9、fcntl函数设置非阻塞
》fcntl函数
man 2 fcntl
int fcntl(int fd, int cmd, .../* arg */);
>touch read_tty.c
>vi read_tty.c
 1 #include<stdio.h>
 2 #include<sys/types.h>
 3 #include<sys/stat.h>
 4 #include<fcntl.h>
 5 #include<unistd.h>
 6 #include<string.h>
 7
 8 int main(int argc, char* argv[])
 9 {
10     int fd = open("/dev/tty",O_RDWR);
11
12     //fcntl()函数,设置非阻塞
13     int flags = fcntl(fd, F_GETFL);
14     flags |= O_NONBLOCK;
15     fcntl(fd, F_SETFL, flags);
16
17     char buf[256];
18     int ret = 0;
19     while(1)
20     {
21         ret = read(fd, buf, sizeof(buf));
22         if(ret < 0) //如果没有输入,会报错
23         {
24             perror("read err:");//perror函数可以把read函数的错误信息打印出来
25             printf("ret is %d\n", ret);
26         }
27         if(ret) //输入,阻塞
28         {
29             printf("buf is %s\n", buf);
30         }
31         printf("haha\n");
32         sleep(1);
33     }
34     close(fd);
35     return 0;
36
37 }
>gcc read_tty.c
>./a.out
>xxx
在学习Linux命令基础总结了笔记,并分享出来。有问题请及时联系博主:Alliswell_WP,转载请注明出处。
posted on 2020-06-28 20:40 Alliswell_WP 阅读(377) 评论(0) 收藏 举报


 浙公网安备 33010602011771号