数据库编程——MongoDB json
在学习数据库编程总结了笔记,并分享出来。有问题请及时联系博主:Alliswell_WP,转载请注明出处。
09-数据库编程day05(mongodb json)
目录:
一、学习目标
二、复习
三、作业
四、MongoDB
1、MongoDB安装
2、MongoDB的简介
3、MongoDB库的操作
4、新增文档
5、查看文档
6、更新文档
7、删除文档
8、MongoDB的索引
9、聚合函数
10、副本集实验
11、API 使用
(1)vs配置方法
(2)通过API连接到MongoDB
(3)通过API删除文档
(4)通过API新增文档
一、学习目标
1.mongodb的安装
2.mongodb库的操作
3.mongodb文档的增删改查
4.mongodb的索引
5.mongodb的api连接数据库
二、复习
mysql约束的种类? 主键,外键,非空,唯一
mysql如何解决主键冲突问题? auto_increment
create table student (
id INT(11) primary key auto_increment,
name varchar(20) unique,
passwd varchar(15) not null,
classid INT(11),
constraint stu_classid_FK foreign key(classid) references myclass(id)
);
》mysql中文乱码问题
--6个字符集
○ 登录可以引起字符集变化
○ LANG环境变量修改也会引起变化
》mysql-api编程的一般流程
--初始化 mysql_init
--连接 mysql_real_connect
….do sth mysql_query
○ mysql_store_result
○ 打印表头,打印数据
--关闭连接 mysql_close
三、作业
》分析代码(work_pfetch.c):

#include <stdio.h>
#include "mysql.h"
#include <stdlib.h>
#include <string.h>
#define STRING_SIZE 50
//create table test_table2(col1 int, col2 varchar(30), col3 smallint, col4 timestamp);
//insert into test_table2(col1,col2,col3) values(10111,'yekai',10);
//insert into test_table2(col1,col2,col3) values(10112,'yekai1',20);
//insert into test_table2(col1,col2,col3) values(10113,'yekai1',20);
#define SELECT_SAMPLE "SELECT col1, col2, col3, col4 FROM test_table2 where col1=?"

void process_fetch(MYSQL *mysql);
int main()
{
    MYSQL *mysql=NULL;
    printf("欢迎来到mysql\n");
    mysql = mysql_init(NULL);
    if(mysql == NULL)
    {
        printf("init err!\n");
        return -1;
    }
    mysql=mysql_real_connect(mysql,"localhost","root","123456","scott",0,NULL,0);
    if(mysql == NULL)
    {
        printf("connect to mysql err!\n");
        return -1;
    }
    printf("connect to mysql ok!\n");
    process_fetch(mysql);
    mysql_close(mysql);
    return 0;
}

void process_fetch(MYSQL *mysql)
{
    MYSQL_STMT    *stmt;
    MYSQL_BIND    bind[4];//和结果集绑定
    MYSQL_BIND    sbind;//查询条件
    MYSQL_RES     *prepare_meta_result;
    MYSQL_TIME    ts;
    unsigned long length[4];
    int           param_count, column_count, row_count;
    short         small_data;
    int           int_data;
    char          str_data[STRING_SIZE];
    my_bool       is_null[4];

    /* Prepare a SELECT query to fetch data from test_table */
    stmt = mysql_stmt_init(mysql);
    if (!stmt)
    {
      fprintf(stderr, " mysql_stmt_init(), out of memory\n");
      exit(0);
    }
    if (mysql_stmt_prepare(stmt, SELECT_SAMPLE, strlen(SELECT_SAMPLE)))
    {
      fprintf(stderr, " mysql_stmt_prepare(), SELECT failed\n");
      fprintf(stderr, " %s\n", mysql_stmt_error(stmt));
      exit(0);
    }
    fprintf(stdout, " prepare, SELECT successful\n");

    /* Get the parameter count from the statement */
    param_count= mysql_stmt_param_count(stmt);
    fprintf(stdout, " total parameters in SELECT: %d\n", param_count);

//    if (param_count != 0) /* validate parameter count */
//    {
//      fprintf(stderr, " invalid parameter count returned by MySQL\n");
//      exit(0);
//    }

    //bind param
    int sel_col1 ;
    memset(&sbind,0x00,sizeof(sbind));
    sbind.buffer_type= MYSQL_TYPE_LONG;
    sbind.buffer= (char *)&sel_col1;
    sbind.is_null= 0;
    sbind.length= &length[0];

    /* Bind the buffers */
    if (mysql_stmt_bind_param(stmt, &sbind))
    {
      fprintf(stderr, " mysql_stmt_bind_param() failed\n");
      fprintf(stderr, " %s\n", mysql_stmt_error(stmt));
      exit(0);
    }


    /* Fetch result set meta information */
    prepare_meta_result = mysql_stmt_result_metadata(stmt);
    if (!prepare_meta_result)
    {
      fprintf(stderr,
             " mysql_stmt_result_metadata(), returned no meta information\n");
      fprintf(stderr, " %s\n", mysql_stmt_error(stmt));
      exit(0);
    }

    /* Get total columns in the query */
    column_count= mysql_num_fields(prepare_meta_result);
    fprintf(stdout, " total columns in SELECT statement: %d\n", column_count);

    if (column_count != 4) /* validate column count */
    {
      fprintf(stderr, " invalid column count returned by MySQL\n");
      exit(0);
    }

    sel_col1 = 10111;

    /* Execute the SELECT query */
    if (mysql_stmt_execute(stmt))
    {
      fprintf(stderr, " mysql_stmt_execute(), failed\n");
      fprintf(stderr, " %s\n", mysql_stmt_error(stmt));
      exit(0);
    }

    /* Bind the result buffers for all 4 columns before fetching them */

    memset(bind, 0, sizeof(bind));

    /* INTEGER COLUMN */
    bind[0].buffer_type= MYSQL_TYPE_LONG;
    bind[0].buffer= (char *)&int_data;
    bind[0].is_null= &is_null[0];
    bind[0].length= &length[0];

    /* STRING COLUMN */
    bind[1].buffer_type= MYSQL_TYPE_STRING;
    bind[1].buffer= (char *)str_data;
    bind[1].buffer_length= STRING_SIZE;
    bind[1].is_null= &is_null[1];
    bind[1].length= &length[1];

    /* SMALLINT COLUMN */
    bind[2].buffer_type= MYSQL_TYPE_SHORT;
    bind[2].buffer= (char *)&small_data;
    bind[2].is_null= &is_null[2];
    bind[2].length= &length[2];

    /* TIMESTAMP COLUMN */
    bind[3].buffer_type= MYSQL_TYPE_TIMESTAMP;
    bind[3].buffer= (char *)&ts;
    bind[3].is_null= &is_null[3];
    bind[3].length= &length[3];

    /* Bind the result buffers */
    if (mysql_stmt_bind_result(stmt, bind))
    {
      fprintf(stderr, " mysql_stmt_bind_result() failed\n");
      fprintf(stderr, " %s\n", mysql_stmt_error(stmt));
      exit(0);
    }

    /* Now buffer all results to client */
    if (mysql_stmt_store_result(stmt))//预处理取回结果集
    {
      fprintf(stderr, " mysql_stmt_store_result() failed\n");
      fprintf(stderr, " %s\n", mysql_stmt_error(stmt));
      exit(0);
    }

    /* Fetch all rows */
    row_count= 0;
    fprintf(stdout, "Fetching results ...\n");
    while (!mysql_stmt_fetch(stmt))
    {
      row_count++;
      fprintf(stdout, "  row %d\n", row_count);

      /* column 1 */
      fprintf(stdout, "   column1 (integer)  : ");
      if (is_null[0])
        fprintf(stdout, " NULL\n");
      else
        fprintf(stdout, " %d(%ld)\n", int_data, length[0]);

      /* column 2 */
      fprintf(stdout, "   column2 (string)   : ");
      if (is_null[1])
        fprintf(stdout, " NULL\n");
      else
        fprintf(stdout, " %s(%ld)\n", str_data, length[1]);

      /* column 3 */
      fprintf(stdout, "   column3 (smallint) : ");
      if (is_null[2])
        fprintf(stdout, " NULL\n");
      else
        fprintf(stdout, " %d(%ld)\n", small_data, length[2]);

      /* column 4 */
      fprintf(stdout, "   column4 (timestamp): ");
      if (is_null[3])
        fprintf(stdout, " NULL\n");
      else
        fprintf(stdout, " %04d-%02d-%02d %02d:%02d:%02d (%ld)\n",
                         ts.year, ts.month, ts.day,
                         ts.hour, ts.minute, ts.second,
                         length[3]);
      fprintf(stdout, "\n");
    }

    /* Validate rows fetched */
    fprintf(stdout, " total rows fetched: %d\n", row_count);
//    if (row_count != 2)
//    {
//      fprintf(stderr, " MySQL failed to return all rows\n");
//      exit(0);
//    }

    /* Free the prepared result metadata */
    mysql_free_result(prepare_meta_result);//释放结果集


    sel_col1 = 10112;

    /* Execute the SELECT query */
    if (mysql_stmt_execute(stmt))
    {
      fprintf(stderr, " mysql_stmt_execute(), failed\n");
      fprintf(stderr, " %s\n", mysql_stmt_error(stmt));
      exit(0);
    }


    /* Now buffer all results to client */
    if (mysql_stmt_store_result(stmt))
    {
      fprintf(stderr, " mysql_stmt_store_result() failed\n");
      fprintf(stderr, " %s\n", mysql_stmt_error(stmt));
      exit(0);
    }

    /* Fetch all rows */
    row_count= 0;
    fprintf(stdout, "Fetching results ...\n");
    while (!mysql_stmt_fetch(stmt))
    {
      row_count++;
      fprintf(stdout, "  row %d\n", row_count);

      /* column 1 */
      fprintf(stdout, "   column1 (integer)  : ");
      if (is_null[0])
        fprintf(stdout, " NULL\n");
      else
        fprintf(stdout, " %d(%ld)\n", int_data, length[0]);

      /* column 2 */
      fprintf(stdout, "   column2 (string)   : ");
      if (is_null[1])
        fprintf(stdout, " NULL\n");
      else
        fprintf(stdout, " %s(%ld)\n", str_data, length[1]);

      /* column 3 */
      fprintf(stdout, "   column3 (smallint) : ");
      if (is_null[2])
        fprintf(stdout, " NULL\n");
      else
        fprintf(stdout, " %d(%ld)\n", small_data, length[2]);

      /* column 4 */
      fprintf(stdout, "   column4 (timestamp): ");
      if (is_null[3])
        fprintf(stdout, " NULL\n");
      else
        fprintf(stdout, " %04d-%02d-%02d %02d:%02d:%02d (%ld)\n",
                         ts.year, ts.month, ts.day,
                         ts.hour, ts.minute, ts.second,
                         length[3]);
      fprintf(stdout, "\n");
    }


    /* Close the statement */
    if (mysql_stmt_close(stmt))
    {
      fprintf(stderr, " failed while closing the statement\n");
      fprintf(stderr, " %s\n", mysql_stmt_error(stmt));
      exit(0);
    }


}
》分析代码(MysqlTran.h和MysqlTran.cpp)
四、MongoDB
1、MongoDB安装
》mongodb安装
1)数据库的安装
开机自动启动:
▪ /usr/local/mongodb/bin/mongod --config /usr/local/mongodb/bin/mongodb.conf
2)驱动的安装
▪ boost 安装
▪ pcre 安装 --- 正则表达式
▪ scons 编译驱动的程序
▪ 编译驱动
2、MongoDB的简介
》为什么学习mongodb?
○ 扩展知识面nosql=not only sql,非关系型数据库
○ 跨平台
○ 排名(第5)
○ 非关系型里最像关系型的
○ 特点:高性能,易使用,易部署
》简介:
2007年10gen推出的产品
10gen后来更名为mongodb M
ongoDB是一个开源的,基于分布式的,面向文档存储的非关系型数据库,是非关系型数据库当 中比较像关系型数据库的
》分布式数据库: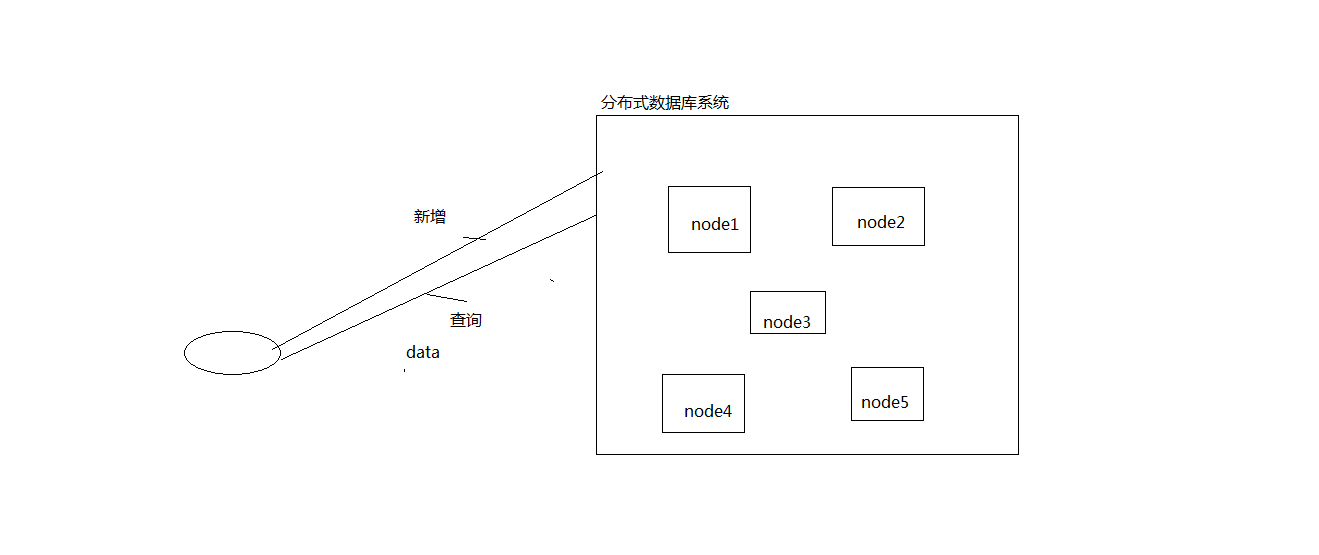
文档:json,键值对,对应关系型数据库的一行
集合:文档的集合,多个文档组合在一起,对应关系型数据库的 表
》关系型数据库特点:
○ 表之间有关系(外键)
○ 表数据的存储是由行和列固定组成
○ 支持事务
3、MongoDB库的操作
》mysql和mongodb对比
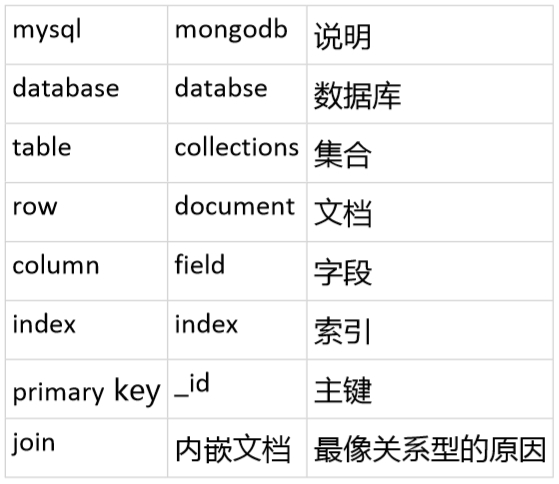
》mongodb组织结构:
库——集合(没有用户)
》库的操作:
--mongodb登录:
shell>mongo
默认连接到test库,test可以不存在
--查看有哪些库
show dbs

--退出
>exit
--指定ip,端口(登录)
>mongo localhost:27017/mydb1

登录指令总结:mongo [ip[:port[/dbname]]]
--切换或创建库 yekai
> use yekai
默认情况下库名不会保留,如果不做任何操作(登录仍没有!)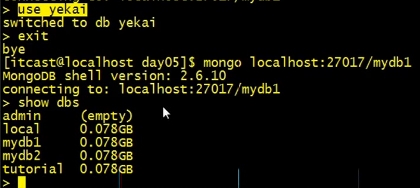
--如何删库?
○ 切库use dbname
○ 删库db.dropDatabase()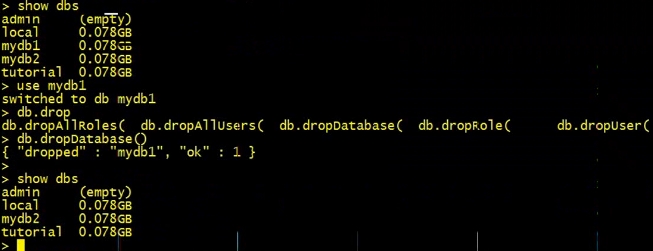
--查看当前库名
> db
mydb2
>db.getName()

--查看当前库有哪些集合?两种(一般用第一种,简单)
> show tables
Barca
person
system.indexes
>show collections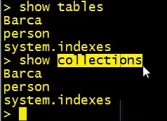
4、新增文档
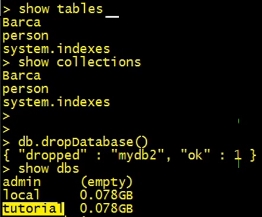
--新增/创建 一个文档biancheng 是集合名(yekai是库名)
>db.biancheng.insert({id:1,name:'yekai',age:25,sex:'man'})

> db.biancheng.find()

>db.biancheng.insert({id:2,name:'fuhongxue',age:'25',sex:'woman'})

>db.biancheng.insert({id:3,name:'luxiaojia',age:23,sex:'woman',like:['杀人','花生']})
>db.biancheng.insert({id:4,name:'lixunhuan',age:50,sex:'man',info:{like:'drink',wuqi:'feidao'}})
总结:支持数组,info为内嵌文档。

》save与insert的区别:
○ 一般情况下没有区别
○ 如果指定_id,相当于update,会修改原数据

--如何批量新增数据?
格式:db.SRC_COLL.find().forEach( function(x){ db.NEW_COLL.insert(x)} )

>db.biancheng.find().forEach(function(x){ db.langzi.insert(x)})

注意:上述反复执行,只会插入一次!
5、查看文档
》mongo常用数据类型:
数据类型 描述
String 字符串。存储数据常用的数据类型。在 MongoDB 中,UTF-8 编码的字符串才是合法的。
Integer 整型数值。用于存储数值。根据你所采用的服务器,可分为 32 位或 64 位。
Boolean 布尔值。用于存储布尔值(真/假)。
Double 双精度浮点值。用于存储浮点值。
Arrays 用于将数组或列表或多个值存储为一个键。
Timestamp 时间戳。记录文档修改或添加的具体时间。
Object 用于内嵌文档。
Null 用于创建空值。
Symbol 符号。该数据类型基本上等同于字符串类型,但不同的是,它一般用于采用特殊符号类型的语言。
Date 日期时间。用 UNIX 时间格式来存储当前日期或时间。你可以指定自己的日期时间:创建 Date 对象,传入年月日信息。
Object ID 对象 ID。用于创建文档的 ID。
Binary Data 二进制数据。用于存储二进制数据。
Code 代码类型。用于在文档中存储 JavaScript 代码。
Regular expression 正则表达式类型。用于存储正则表达式。
》练习:
--数据准备
>show tables
把文档内容复制粘贴执行

db.Barca.insert({_id:'10001',name:'messi',number:10,age:29,pos:'CF',height:169,weight:68,lgdata:[40,30]})
db.Barca.insert({_id:'10002',name:'neymar',number:11,age:24,pos:'CF',height:176,weight:55,lgdata:[20,15]})
db.Barca.insert({_id:'10003',name:'suarez',number:9,age:29,pos:'CF',height:182,weight:82,lgdata:[40,15]})
db.Barca.insert({_id:'10004',name:'Ter Stegen',number:1,age:24,pos:'GK',height:193,weight:82})
db.Barca.insert({_id:'10005',name:'pique',number:3,age:29,pos:'CB',height:195,weight:82})
db.Barca.insert({_id:'10006',name:'rakitic',number:4,age:28,pos:'MF',height:182,weight:72})
db.Barca.insert({_id:'10007',name:'busquets',number:5,age:28,pos:'CF',height:182,weight:82})
db.Barca.insert({_id:'10008',name:'iniesta',number:8,age:31,pos:'CF',height:182,weight:82})
db.Barca.insert({_id:'10009',name:'mascherano',number:14,age:32,pos:'CF',height:182,weight:82})
db.Barca.insert({_id:'10010',name:'alba',number:18,age:27,pos:'SB',height:182,weight:82})
db.Barca.insert({_id:'10011',name:'rebeto',number:20,age:24,pos:'SB',height:182,weight:82})
db.Barca.insert({_id:'10012',name:'munir',number:17,age:24,pos:'SS',height:169,weight:68})
db.Barca.insert({_id:'10013',name:'Mathieu',number:24,age:32,pos:'CB',height:176,weight:55})
db.Barca.insert({_id:'10014',name:'sandero',number:29,age:29,pos:'CF',height:182,weight:82})
db.Barca.insert({_id:'10015',name:'Cillessen',number:13,age:30,pos:'GK',height:185,weight:82})
db.Barca.insert({_id:'10016',name:'Denis Suayes',number:18,age:31,pos:'MF',height:169,height:185,weight:82})
db.Barca.insert({_id:'10017',name:'Samuel Umtiti',number:2,age:31,pos:'CB',height:171,weight:71})
db.Barca.insert({_id:'10018',name:'wheremalun',number:23,age:28,height:182,weight:82})
db.Barca.insert({_id:'10019',name:'rafnia',number:12,age:24,pos:'MF',height:182,weight:82})
db.Barca.insert({_id:'10020',name:'vhalirvic',number:19,age:23,pos:'null,height:182,weight:82})
db.Barca.insert({_id:'10021',name:'Lucas Digne',number:21,age:22,pos:'SB',height:182,weight:82})
db.Barca.insert({_id:'10022',name:'Aleix Vidal',number:26,age:24,pos:'SB',height:182,weight:82})
>show tables
>db.Barca.find()
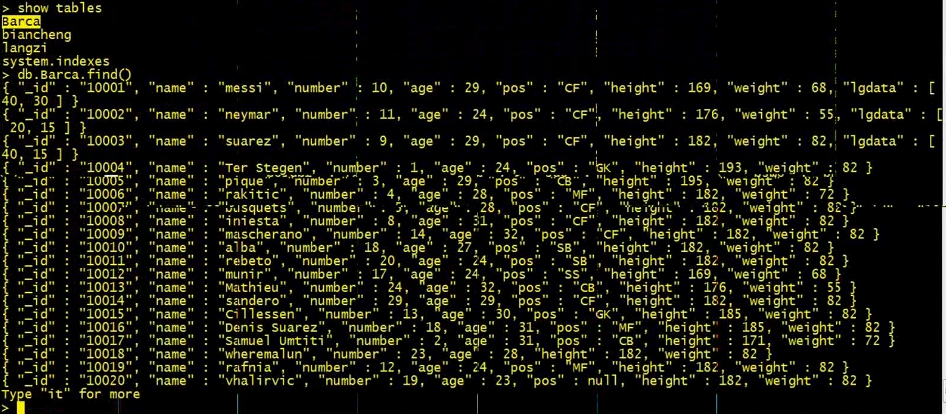
》语法:db.COLLECTION_NAME.find(COND_JSON,SHOW_JSON)
--查看巴萨队内全部球员 select * from Barca ;
>DBQuery.shellBatchSize=30 ——注意:默认显示20,改为30
>db.Barca.find()
--查看梅西的详细信息 select * from Barca where name='messi'
>db.Barca.find({name:'messi'})
--查看年龄为29,并且是踢中后卫(pos为CB)的球员 select * from Barca where age=24 and pos='MF'; >db.Barca.find({age:29,pos:'CB'})
--查看年龄大于25,并且是中场的球员(MF)(需要知道小于lt,大于gt,小于等于lte,大于等于gte,不等 于ne)
$gt = greater than 大于
$lt = less than 小于
$lte = less than equal 小于等于
$gte = greater than equal 大于等于
$ne = not equal 不等于
>db.Barca.find({ age:{$gt:25},pos:'MF' })

——注意:上述查询只返回一条记录,findOne到一个就返回
>db.Barca.find({ age:{$gt:25},pos:'MF' }).pretty()
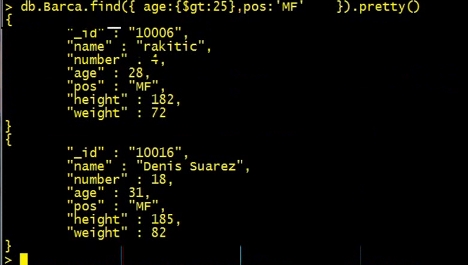
--显示球员姓名,年龄,位置 ——注意:显示部分列
>db.Barca.find({},{name:1,age:1,pos:1})
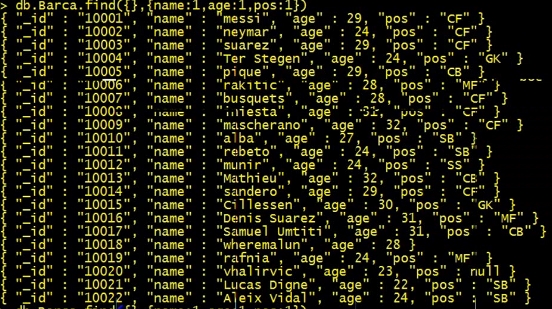
>db.Barca.find({},{name:1,age:1,pos:1,_id:0}) ——注意:不显示id
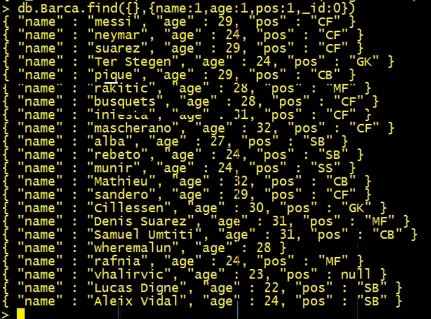
--显示球员的不同年龄 select distinct age from Barca;
>db.Barca.distinct('age')

--显示进球数超过30的球员信息 lgdata 的第一个值代表进球数,第二个值代表助攻数 (查找数组中的元素)
>db.Barca.find( { "lgdata.0":{$gt:30} })
--显示助攻数超过20的球员信息
>db.Barca.find( { "lgdata.1":{$gt:20} })
--显示年龄是24或者29的球员信息 select * from Barca where age=24 or age =29;
>db.Barca.find( { $or:[{age:24},{age:29}] })
>db.Barca.find( { age:{$in:[24,29]})
--显示年龄不是24或者29的球员信息
>db.Barca.find( { age:{$nin:[24,29]} })
--显示位置为空的球员信息pos is null
>db.Barca.find( { pos:null})

——注意:没有该字段也符合条!
--将球员按照年龄排序
>db.Barca.find().sort({age:1}) (默认升序)
>db.Barca.find().sort({age:-1})
--显示第11名球员信息
——注意:skip代表跳过的记录数,limit代表取记录数
>db.Barca.find({name:'rebeto'}) ——看文档,查看第11个是谁,不推荐。
>db.Barca.find().skip(10).limit(1)

6、更新文档
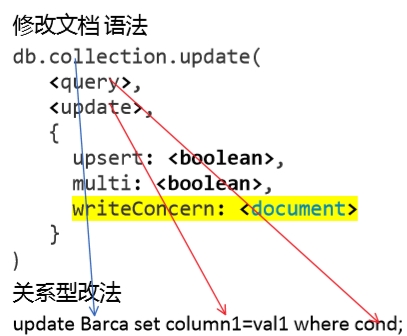
upsert:如果条件不存在是否新增记录,默认是false (不更新)
multi:是否修改多条,默认是false,只更新找到的第一条
--将vhalirvic的位置修改为中场MF
> db.Barca.update({name:'vhalirvic'},{$set:{pos:'MF'}}) 
--将vhalirvic的位置修改为null
>db.Barca.update({name:'vhalirvic'},{$set:{pos:null}})
--将vhalirvic 的年龄改为25岁,位置改成SB
>db.Barca.update({name:'vhalirvic'},{$set:{pos:'SB',age:25}})
--将pos为null的球员信息修改为pos=MF
>db.Barca.update({pos:null},{$set:{pos:'MF'}})
--将年龄为24的球员年龄全部修改为25
>db.Barca.update({age:24},{$set:{age:25}})
——注意:上述语句只更改一条
>db.Barca.update({age:24},{$set:{age:25}},{upsert:false,multi:true})

--使用upsert,如果不存在新增
>db.Barca.update({age:24},{$set:{age:25}},{upsert:true,multi:true})

》操作:langzi 集合
--如果不指定set,直接覆盖
>db.langzi.update({id:1},{name:'yekai2',age:25})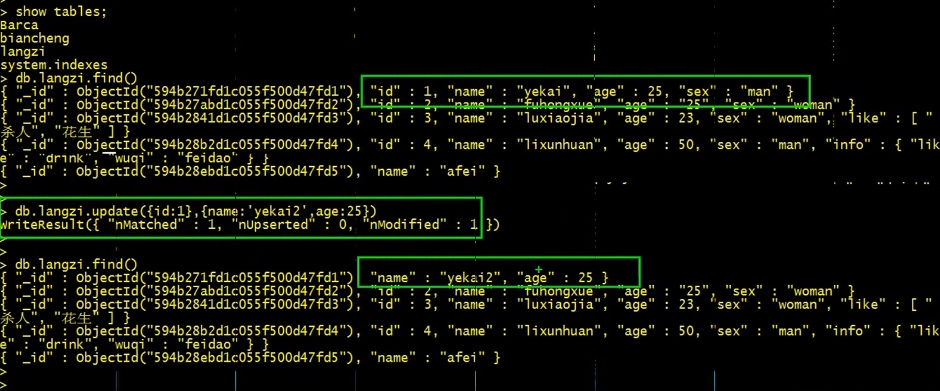
所以,set相当于精确修改,可以指定具体字段
7、删除文档
》语法: 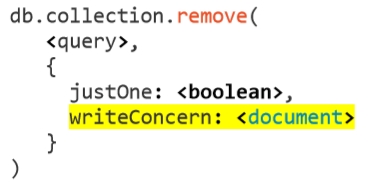
justOne 是否只删除一个,默认是false(全删)
默认使用WriteConcern.NORMAL 仅仅抛出网络异常,没有服务器错误异常
--删除球员年龄为25的球员信息
>db.Barca.remove({age:25})


--删除集合(创建集合:第一条insert语句)
>db.Barca.drop()

》查看时间:
>Date()
>ISODate()

如何使用?

8、MongoDB的索引
》索引作用:提高查询效率
默认主键自动创建了索引!
--创建索引
> db.Barca.ensureIndex({name:1}) 
--查看执行计划
如果显示的是"cursor":"BasicCursor" 代表未使用索引
> db.Barca.find({age:24}).explain() 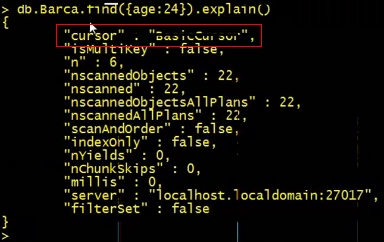
如果显示的是"cursor" :BtreeCursor 代表使用索引
> db.Barca.find({name:'messi'}).explain() 
“cursor”:“BasicCursor”表示本次查询没有使用索引;
“BtreeCursor name_1 ”表示使用了name上的索引;
“isMultikey”表示是否使用了多键索引;
“n”:本次查询返回的文档数量;
“nscannedObjects”:表示按照索引指针去磁盘上实际查 找实际文档的次数;
”nscanned“:如果没有索引,这个数字就是查找过的索 引条目数量;
“scanAndOrder”:是否对结果集进行了排序;
“indexOnly”:是否利用索引就能完成查询;
db.Barca.find( {name:'neymar'},{_id:0,name:1} ).explain( )
“nYields”:如果在查询的过程中有写操作,查询就会暂 停;这个字段代表在查询中因写操作而暂停的次数;
“ millis”:本次查询花费的毫秒数,数字越小说明查 询的效率越高;
“indexBounds”:这个字段描述索引的使用情况,给出 索引遍历的范围。
"filterSet" : 是否使用和索引过滤;
--删除索引
> db.Barca.dropIndex({name:1})

9、聚合函数
--显示集合的记录总数
>db.Barca.find().count()
--求各个位置的最小年龄 select pos,min(age) minage from Barca group by pos
>db.Barca.aggregate({ $group:{_id:"$pos",minage:{$min:"$age"}} }) (aggregate为聚合函数)
——需要使用group关键字
——可以使用>db.Barca.find({pos:'SS'}) 查看是否统计正确
--求各个位置的最大年龄
>db.Barca.aggregate({ $group:{_id:"$pos",maxage:{$max:"$age"}} })
--求各个位置的平均年龄
>db.Barca.aggregate({ $group:{_id:"$pos",avgage:{$avg:"$age"}} })
--求各个位置的年龄和
>db.Barca.aggregate({ $group:{_id:"$pos",sumage:{$sum:"$age"}} })
--统计各个位置的人数 select count(*),pos from Barca group by pos;
>db.Barca.aggregate({ $group:{_id:"$pos",count:{$sum:1}} })

——可以使用>db.Barca.find({pos:'SB'})查看是否统计正确
--统计不同位置不同年龄的人数 group by age,pos
>db.Barca.aggregate({ $group:{_id:{age:"$age",pos:"$pos"},count:{$sum:1}} })
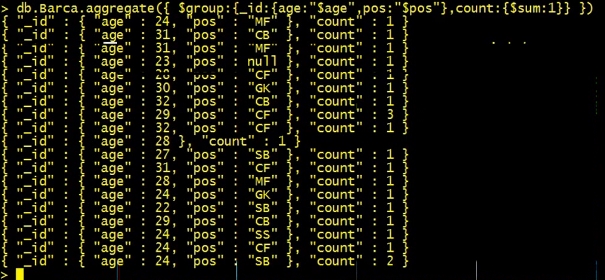
——可以使用>db.Barca.find({age:24,pos:'SB'}) 查看是否统计正确
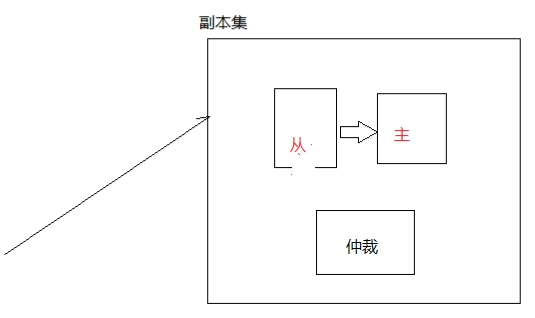
10、副本集实验
》实验:
准备运行1个主节点,2个从节点,从节点中其中是一个是仲裁节点(Arb)。
--登录root用户,创建三个目录
$mkdir –p /data/node1
$mkdir –p /data/node2
$mkdir –p /data/arbiter
--启动三个mongod服务
$nohup /usr/local/mongodb/bin/mongod --replSet application --dbpath /data/node1/ --port 9927 --oplogSize 1024 &
$nohup /usr/local/mongodb/bin/mongod --replSet application --dbpath /data/node2/ --port 9928 --oplogSize 1024 &
$nohup /usr/local/mongodb/bin/mongod --replSet application --dbpath /data/arbiter/ --port 9929 --oplogSize 1024 &
其中application是副本集的名称,节点必须相同,–dbpath指定数据库储存路径,–port指定侦听端口,–oplogSize指定数据同步之前的缓存的空间大小,暂时指定1G。(可以设置小点,如512。)
可以使用(shell>ps aux|grep mongod)查看启动三个mongod服务进程

选择9927端口的实例为主节点,进入9927的shell:
$mongo localhost:9927
--初始化副本集需要配置表,申明配置表如下:
>config = {_id: "application", members: []}
注意_id和副本集启动的共享名称一致。下面来逐步添加节点的数据信息:
>config.members.push({_id: 0, host: "localhost:9927"})
>config.members.push({_id: 1, host: "localhost:9928"})
>config.members.push({_id: 2, host: "localhost:9929", arbiterOnly: true})
也可以使用rs.add和rs.addArb函数来实现同样的操作。然后需要用这个表作为参数初始化副本集,在9927端口的shell执行:
> rs.initiate(config)
{
"info" : "Config now saved locally. Should come online in about a minute.",
"ok" : 1
}
返回ok为1表示初始化成功,三个节点互相检测通信,需要1分钟左右(反应够慢的 ^-),可以查看三个终端窗口的信息确认,完成通信后,在9927端口的shell回车执行命令确认配置:
复制代码
> rs.isMaster()

{
        "setName" : "application",
        "ismaster" : true,
        "secondary" : false,
        "hosts" : [
                "localhost:9927",
                "localhost:9928"
        ],
        "arbiters" : [
                "localhost:9929"
        ],
        "primary" : "localhost:9927",
        "me" : "localhost:9927",
        "maxBsonObjectSize" : 16777216,
        "maxMessageSizeBytes" : 48000000,
        "localTime" : ISODate("2016-09-04T05:23:09.359Z"),
        "ok" : 1
}
注意到9927端口的实例ismaster是true,secondary为false,hosts有2个实例,arbiter有1个元素,primary关键key表示了主节点,通信完成几次回车后可以看到9927的端口的实例shell的提示符已经改变,更改为application:PRIMARY,查看更详细的信息:
application:PRIMARY> rs.status()

application:PRIMARY> rs.status()
{
        "set" : "application",
        "date" : ISODate("2016-09-04T05:24:16Z"),
        "myState" : 1,
        "members" : [
                {
                        "_id" : 0,
                        "name" : "localhost:9927",
                        "health" : 1,
                        "state" : 1,
                        "stateStr" : "PRIMARY",
                        "uptime" : 430,
                        "optime" : Timestamp(1472966482, 1),
                        "optimeDate" : ISODate("2016-09-04T05:21:22Z"),
                        "self" : true
                },
                {
                        "_id" : 1,
                        "name" : "localhost:9928",
                        "health" : 1,
                        "state" : 2,
                        "stateStr" : "SECONDARY",
                        "uptime" : 170,
                        "optime" : Timestamp(1472966482, 1),
                        "optimeDate" : ISODate("2016-09-04T05:21:22Z"),
                        "lastHeartbeat" : ISODate("2016-09-04T05:24:14Z"),
                        "lastHeartbeatRecv" : ISODate("2016-09-04T05:24:15Z"),
                        "pingMs" : 0,
                        "syncingTo" : "localhost:9927"
                },
                {
                        "_id" : 2,
                        "name" : "localhost:9929",
                        "health" : 1,
                        "state" : 7,
                        "stateStr" : "ARBITER",
                        "uptime" : 170,
                        "lastHeartbeat" : ISODate("2016-09-04T05:24:14Z"),
                        "lastHeartbeatRecv" : ISODate("2016-09-04T05:24:15Z"),
                        "pingMs" : 0
                }
        ],
        "ok" : 1
}
显示了每个节点的健康状况,名称,启动的时间,节点的类型等。查看当前副本集的配置表:
application:PRIMARY> rs.conf()

pplication:PRIMARY> rs.conf()
{
  "_id" : "application",
  "version" : 1,
  "members" : [
      {
          "_id" : 0,
          "host" : "localhost:9927"
      },
      {
          "_id" : 1,
          "host" : "localhost:9928"
      },
      {
          "_id" : 2,
          "host" : "localhost:9929",
          "arbiterOnly" : true
      }
  ]
}
》开始插入测试数据
application:PRIMARY> db.users.insert({username:'yekai',age:34})
application:PRIMARY> db.users.find()
{ "_id" : ObjectId("57cbb364fb371700037ff587"), "username" : "yekai", "age" : 34 }
进入9928从节点,执行查看集合
$mongo localhost:9928
application:SECONDARY> show collections;
Sun Sep 4 13:39:46.607 error: { "$err" : "not master and slaveOk=false", "code" : 13435 } at src/mongo/shell/query.js:128
发现shell抛出了异常,显示slaveOK为false,当前副本集需要明确从节点参数,执行函数:
application:SECONDARY> rs.slaveOk()
application:SECONDARY> show collections;
system.indexes
users
--查看数据
application:SECONDARY> db.users.find()
{ "_id" : ObjectId("57cbb364fb371700037ff587"), "username" : "yekai", "age" : 34 }
--从节点执行操作
application:SECONDARY> db.users.insert({username:'fuhongxue',age:25})
not master
显示not master,代表当前从节点只读.
--进入9929端口,可以看到仲裁节点的提示符号
itcast@itcast:~$ mongo localhost:9929
MongoDB shell version: 2.4.9
connecting to: localhost:9929/test
application:ARBITER>
》执行故障转移测试:
1)可以杀掉9927的主节点
--再在从节点执行一下查询,发现从节点意见自己变成主节点
application:SECONDARY> db.users.find()
{ "_id" : ObjectId("57cbb364fb371700037ff587"), "username" : "yekai", "age" : 34 }
--再次执行插入操作
application:PRIMARY> db.users.insert({username:'fuhongxue',age:25})
application:PRIMARY> db.users.find()
{ "_id" : ObjectId("57cbb364fb371700037ff587"), "username" : "yekai", "age" : 34 }
{ "_id" : ObjectId("57cbb5f2438350de0981fa09"), "username" : "fuhongxue", "age" : 25 }
已经可以插入成功
2)再将9927上线
--9927将变为从节点
itcast@itcast:~$ mongo localhost:9927
MongoDB shell version: 2.4.9
connecting to: localhost:9927/test
application:SECONDARY> show tables;
Sun Sep 4 13:55:33.333 error: { "$err" : "not master and slaveOk=false", "code" : 13435 } at src/mongo/shell/query.js:128
application:SECONDARY> rs.slaveOk()
application:SECONDARY> show tables
system.indexes
users
--查看数据
application:SECONDARY> db.users.find()
{ "_id" : ObjectId("57cbb364fb371700037ff587"), "username" : "yekai", "age" : 34 }
{ "_id" : ObjectId("57cbb5f2438350de0981fa09"), "username" : "fuhongxue", "age" : 25 }
仲裁节点的作用是协调leader选举,监测系统运行状态,提供节点互相通讯的数据信息。
11、API 使用
》文件准备:
\project\mongo\include\mongo文件夹及目录下pch.h、server.h、targetver.h

   /** @file pch.h : include file for standard system include files,
 *  or project specific include files that are used frequently, but
 *  are changed infrequently
 */

/*    Copyright 2009 10gen Inc.
 *
 *    Licensed under the Apache License, Version 2.0 (the "License");
 *    you may not use this file except in compliance with the License.
 *    You may obtain a copy of the License at
 *
 *    http://www.apache.org/licenses/LICENSE-2.0
 *
 *    Unless required by applicable law or agreed to in writing, software
 *    distributed under the License is distributed on an "AS IS" BASIS,
 *    WITHOUT WARRANTIES OR CONDITIONS OF ANY KIND, either express or implied.
 *    See the License for the specific language governing permissions and
 *    limitations under the License.
 */

#ifndef MONGO_PCH_H
#define MONGO_PCH_H

// our #define macros must not be active when we include
// system headers and boost headers
#include "mongo/client/undef_macros.h"

#include "mongo/platform/basic.h"

#include <ctime>
#include <cstring>
#include <string>
#include <memory>
#include <string>
#include <iostream>
#include <map>
#include <vector>
#include <set>
#include <stdio.h>
#include <stdlib.h>
#include <signal.h>

#include "time.h"
#include "string.h"
#include "limits.h"

#define BOOST_FILESYSTEM_VERSION 3//modify by yekai 20161104
#include <boost/shared_ptr.hpp>
#include <boost/smart_ptr.hpp>
#include <boost/function.hpp>
#include <boost/bind.hpp>
#include <boost/version.hpp>

#include "mongo/client/redef_macros.h"

#include "mongo/util/exit_code.h"

namespace mongo {

    using namespace std;
    using boost::shared_ptr;

    void dbexit( ExitCode returnCode, const char *whyMsg = "" );

    /**
       this is here so you can't just type exit() to quit the program
       you should either use dbexit to shutdown cleanly, or ::exit to tell the system to quit
       if you use this, you'll get a link error since mongo::exit isn't defined
     */
    void exit( ExitCode returnCode );
    bool inShutdown();

}


#include "mongo/util/assert_util.h"
#include "mongo/util/debug_util.h"
#include "mongo/util/goodies.h"
#include "mongo/util/allocator.h"
#include "mongo/util/log.h"

#endif // MONGO_PCH_H

/** @file server.h

    This file contains includes commonly needed in the server files (mongod, mongos, test).  It is *NOT* included in the C++ client; i.e.
    this is a very good place for global-ish things that you don't need to be in the client lib.

    Over time we should move more here, and more out of pch.h.  And get rid of pch.h at some point.
*/

#pragma once

#if !defined(MONGO_EXPOSE_MACROS)
# error this file is for mongo server programs not client lib
#endif

#include <map>
#include <vector>
#include <set>

#include "bson/inline_decls.h"

//using namespace std;
//using namespace bson;

/* Note: do not clutter code with these -- ONLY use in hot spots / significant loops. */

// branch prediction.  indicate we expect to be true
#define likely MONGO_likely

// branch prediction.  indicate we expect to be false
#define unlikely MONGO_unlikely

// prefetch data from memory
//#define PREFETCH MONGOPREFETCH

// logs at most once per secs
#define LOGATMOST(secs) static time_t __last = 0; time_t __now=time(0); if(__last+secs>__now) {} else if ( ( __last = __now ) > 0 ) log()

// log but not too fast.  this is rather simplistic we can do something fancier later
#define LOGSOME LOGATMOST(20)

/**
*    Copyright (C) 2008 10gen Inc.
*
*    This program is free software: you can redistribute it and/or  modify
*    it under the terms of the GNU Affero General Public License, version 3,
*    as published by the Free Software Foundation.
*
*    This program is distributed in the hope that it will be useful,
*    but WITHOUT ANY WARRANTY; without even the implied warranty of
*    MERCHANTABILITY or FITNESS FOR A PARTICULAR PURPOSE.  See the
*    GNU Affero General Public License for more details.
*
*    You should have received a copy of the GNU Affero General Public License
*    along with this program.  If not, see <http://www.gnu.org/licenses/>.
*/

#pragma once
#ifndef _WIN32_WINNT            // Allow use of features specific to Windows Vista or later.
#define _WIN32_WINNT 0x0600     // Change this to the appropriate value to target other versions of Windows.
#endif
(1)vs配置方法
打开VS2015,新建项目:选择“Visusl C++”,右侧选择“空项目”,名称:mongoapi,位置改为project所在目录(我的为 F:\Download\06-数据库编程day05(mongodb json)\4-源码\project);
创建成功后,在“mongoapi”右键选择“属性”,选择“VC++目录”进行配置:选择“包含目录”,在其后加入到include一级的目录(我的为 F:\Download\06-数据库编程day05(mongodb json)\4-源码\project\mongo\include);
注意:以上把mongo的include头文件配置为绝对路径;推荐使用相对路径:寻找自己的相对路径 ..\..\mongo\include
(2)通过API连接到MongoDB
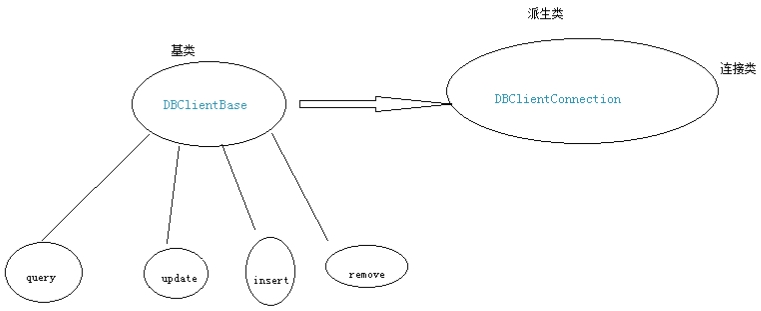
DBClientConnection类(通过VS可以方便的查看API函数)
》构造函数
DBClientConnection(bool _autoReconnect=false, DBClientReplicaSet* cp=0, double so_timeout=0)
○ _autoReconnect 是否自动重连,默认false
○ cp 不需要关心
○ so_timeout超时时间,单位是秒
》连接函数
bool connect(const char * hostname, string& errmsg)
○ hostname 主机 类似这样: 127.0.0.1 , 127.0.0.1:5555
○ errmsg 错误信息,传出
在“mongoapi”右键添加源文件:main.cpp,然后编写代码:
#include <iostream>
#include <string>
#include <mongo/client/dbclient.h>

using namespace std;
using namespace mongo;

int main(int argc,char *argv[])
{
    //构造连接
    DBClientConnection conn(false,0,3);
    std::string errmsg;
    if (!conn.connect("localhost", errmsg)){
        cout << "connect to mongo err" << endl;
        return -1;
    }
    cout << "connect ok" << endl;
    return 0;
}
将main.cpp传至Linux上,然后编译
>g++ -o main main.cpp -lmongoclient -lboost_thread -lboost_filesystem -lboost_program_options -L/home/itcast/driver/boost/lib -L/home/itcast/driver/mongo/lib -I/home/itcast/driver/mongo/include -I/home/itcast/driver/boost/include
>./main
(3)通过API删除文档
》删除文档
void remove( const string &ns , Query q , bool justOne = 0 )
○ ns 库名.集合名
○ q 是一个查询条件
○ justOne 是否删除一条,默认false
》Query 是一个类
○ Query(const char * json);构造函数,可以构造
--在VS中更改main.cpp
#include <iostream>
#include <string>
#include <mongo/client/dbclient.h>

using namespace std;
using namespace mongo;

int main(int argc,char *argv[])
{
    //构造连接
    DBClientConnection conn(false,0,3);
    std::string errmsg;
    if (!conn.connect("localhost", errmsg)){
        cout << "connect to mongo err" << endl;
        return -1;
    }
    cout << "connect ok" << endl;

    //remove
    //删除id>=2 {id:{$gte:2}}
    Query qry("{id:{$gte:2}}");
    conn.remove("yekai.biancheng", qry);

    return 0;
}
原终端删除前后数据对比:(将main.cpp传至Linux上,然后打开另一个终端重新编译执行)

(4)通过API新增文档
》新增文档
void insert( const string &ns , BSONObj obj , int flags=0)
○ ns 库名.集合名
○ BSONObj obj对象
》新增的核心问题—如何构造bsonobj?
BSONObjBuilder 可以构造
》增加一个字符型的key:value
append(const StringData& fieldName, const char *str)
BSONObj obj() 可以返回BSONObj对象
/** Use BSON macro to build a BSONObj from a stream
e.g.,
BSON( "name" << "joe" << "age" << 33 )
with auto-generated object id:
BSON( GENOID << "name" << "joe" << "age" << 33 )
The labels GT, GTE, LT, LTE, NE can be helpful for stream-oriented construction
of a BSONObj, particularly when assembling a Query. For example,
BSON( "a" << GT << 23.4 << NE << 30 << "b" << 2 ) produces the object
{ a: { \$gt: 23.4, \$ne: 30 }, b: 2 }. */
#define BSON(x) (( mongo::BSONObjBuilder(64) << x ).obj())
--在VS中更改main.cpp

#include <iostream>
#include <string>
#include <mongo/client/dbclient.h>

using namespace std;
using namespace mongo;

int main(int argc,char *argv[])
{
    if (argc != 2){
        cout << "./main 1|2|3|4 ---- 1-insert,2-remove,3-update,4-query" << endl;
        return -1;
    }
    int op = atoi(argv[1]);

    //构造连接
    DBClientConnection conn(false,0,3);
    std::string errmsg;
    if (!conn.connect("localhost", errmsg)){
        cout << "connect to mongo err" << endl;
        return -1;
    }
    cout << "connect ok" << endl;
    if (op == 1){
        //insert
        //第一种玩法
        BSONObjBuilder b1;
        b1.append("id", 1);
        b1.append("name", "yekai");//{id:1,name:'yekai'}
        conn.insert("yekai.langzi", b1.obj());//如果有langzi集合,db.langzi.drop()删除langzi集合
        //第二种玩法
        BSONObjBuilder b2;
        b2 << "id" << 2 << "name" << "fuhongxue";
        conn.insert("yekai.langzi", b2.obj());
        //第三种玩法
        conn.insert("yekai.langzi", BSON("id" << 3 << "name" << "luxiaojia"));
        //第四种玩法
        Query ins("{id:4,name:'lixunhuan',age:50,info:{like:'drink',wuqi:'feidao'}}");
        conn.insert("yekai.langzi", ins.obj);
    }
    else if (op == 2){
        //remove
        //删除id》=2 {id:{$gte:2}}
        Query qry("{id:{$gte:2}}");
        conn.remove("yekai.biancheng", qry);
    }

    return 0;
}
原终端改变前后数据(>db.langzi.find())对比:
注意:如果有langzi集合,>db.langzi.drop()删除langzi集合。

(将main.cpp传至Linux上,然后打开另一个终端重新编译,执行shell>./main 1)
在原终端查询结果:

如果别人传来一个字字符串,自己需要解析,推荐第4种。
》小技巧:解决每次编译输入语句过长
>touch mk.sh
>vi mk.sh
g++ -o main main.cpp -lmongoclient -lboost_thread -lboost_filesystem -lboost_program_options -L/home/itcast/driver/boost/lib -L/home/itcast/driver/mongo/lib -I/home/itcast/driver/mongo/include -I/home/itcast/driver/boost/include
>chmod +x mk.sh(赋予执行权限)
>./mk.sh
>./main 1
在学习数据库编程总结了笔记,并分享出来。有问题请及时联系博主:Alliswell_WP,转载请注明出处。
posted on 2020-07-21 15:41 Alliswell_WP 阅读(398) 评论(0) 收藏 举报


 浙公网安备 33010602011771号