20220321 day15--scp,systemctl原理,ntp服务
昨日作业知识点
1. tar; tar.gz; tgz; gz;
.tar 是通过tar -cvf 创建打包的文件,文件大小不变。

.tar.gz  是通过tar -zcvf 创建打包并压缩的文件。

.tgz   其实就是tar+gz,是分两个步骤来的,先tar -cvf 创建打包文件xx.tar 然后再 gzip 压缩为xx.tgz
gzip -d(-d参数为解压缩) xx.tgz 得到的就是 xx.tar。然后再tar -xvf  xx.tar拆包。或者使用tar -xzvf命令直接解压缩加拆包。

.gz  为压缩文件,使用gzip -d 直接解压,具体解压完是.tar或直接是.txt,.png,.log等等格式


[root@yuanlai-0224 test_tar]# # 看到此tgz,就得记住,它是2个打包+压缩步骤,tar + gz
[root@yuanlai-0224 test_tar]#
[root@yuanlai-0224 test_tar]#
[root@yuanlai-0224 test_tar]# # 万能解压命令 tar -zxvf
[root@yuanlai-0224 test_tar]#
[root@yuanlai-0224 test_tar]# tar -zxvf all_nginx.tgz

# 第二条命令,分别进行先解压缩gz后缀,再拆包tar归档操作,最终得到,原本的零散文件
gzip -d all_nginx.tgz
tar -xvf all_nginx.tar


http://yuchaoit.cn/all_nginx.tar
tar -xf all_nginx.tar

http://yuchaoit.cn/all_nginx.tar.gz
tar -zxvf all_nginx.tar.gz


http://yuchaoit.cn/nginx-logo.png.gz

[root@yuanlai-0224 test_tar]# gzip -d nginx-logo.png.gz
[root@yuanlai-0224 test_tar]# ll
总用量 4
-rw-r--r--. 1 root root 368 10月 19 07:55 nginx-logo.png
[root@yuanlai-0224 test_tar]#
[root@yuanlai-0224 test_tar]#
[root@yuanlai-0224 test_tar]# file nginx-logo.png
nginx-logo.png: PNG image data, 121 x 32, 1-bit colormap, non-interlaced
2.生成随机数,排序,去重
生成随机数命令:生成30个随机数

for i in {1..30};do echo $(expr $RANDOM / 1000 ) ;done> t1.txt
步骤1.
测试数据为:
[root@yuanlai-0224 test_tar]# cat  t1.txt
20
26
13
18
28
7
14
30
8
15
3
18
10
25
25
7
30
28
28
23
0
4
30
14
32
3
9
20
31
5


步骤2.
读取文件内容且倒叙排序,从小到大,从大到小,
# sort是对文本排序的,默认是以第一位字符进行大小比较, -n参数是把整个数字当成一个整体比较大小。
                                               -r参数是倒叙

[root@yuanlai-0224 test_tar]# cat t1.txt  | sort -n -r


步骤3.
读取文件内容,先排序,再统计重复行的次数           #先排序再去重,因为uniq 是去比较相邻的行的,所以要先排序,uniq的  -c 参数是统计数据出现的次数。

[root@yuanlai-0224 test_tar]# cat t1.txt  | sort -n | uniq -c
      1 0
      2 3
      1 4
      1 5
      2 7
      1 8
      1 9
      1 10
      1 13
      2 14
      1 15
      2 18
      2 20
      1 23
      2 25
      1 26
      3 28
      3 30
      1 31
      1 32
3.给启动django的命令做一个别名
python3 manage.py runserver 0.0.0.0:8000
alias startdj='python3 manage.py runserver 0.0.0.0:8000'

取消别名
unalias startjd
4.设置DNS服务器的配置文件,设置本地hosts的文件
vim /etc/resolv.conf
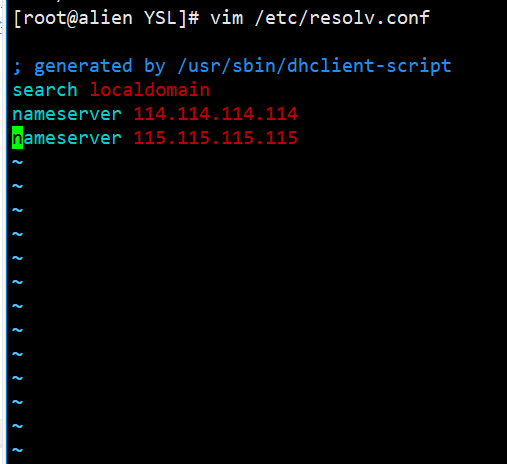
本地hosts 文件 /etc/hosts

格式: ip     域名
5.查看域名解析的命令:dig nslookup
dig 命令:
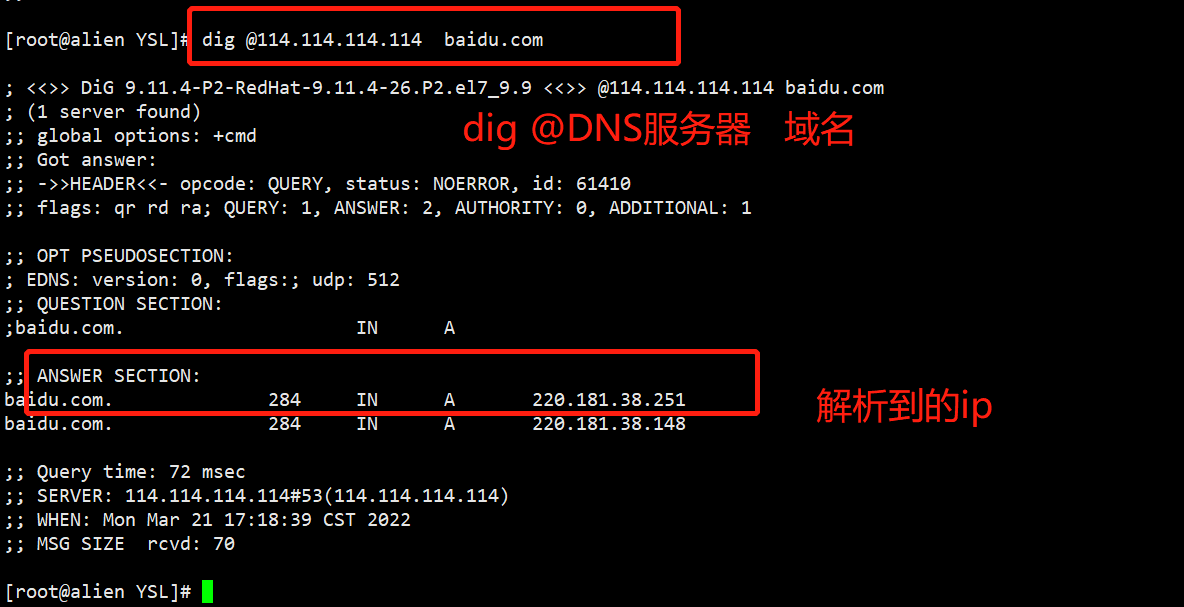
nslookup 命令:

- nslookup (name server look up 名称服务器查找,简称,域名查找 )
提供了交互式(等待你输入,然后等待给结果),非交互式(命令下去,直接出结果)两种方式

# 交互式,直接输入该命令
[root@yuanlai-0224 test_tar]# nslookup
> www.yuchaoit.cn

Server:		114.114.114.114
Address:	114.114.114.114#53

Non-authoritative answer:
Name:	www.yuchaoit.cn
Address: 123.206.16.61


# 非交互式
[root@yuanlai-0224 test_tar]# nslookup apecome.com

Server:		114.114.114.114
Address:	114.114.114.114#53

Non-authoritative answer:
Name:	apecome.com
Address: 123.57.242.10
6. gcp 远程传输
你的linux虚拟机(自己本地的局域网),和你的阿里云(互联网中的公网),有什么限制?
1.虚拟机,能找到 阿里云
你的虚拟机(192.168.0.xx)
↓
宿主机windows
↓
交换机,路由器(有绑定的中国移动的公网宽带ip)
↓
阿里云(购买阿里云时候,人家绑定了一个固定的公网ip,全世界都可以访问到的)
2. 阿里云找不到你的虚拟机
阿里云(购买阿里云时候,人家绑定了一个固定的公网ip,全世界都可以访问到的)
×
你们家,你的学校的路由器的公网ip(这里就没有)
×
你的虚拟机
scp(远程传输,基于ssh协议认证的传输,机器1,要传文件给机器2,需要进行ssh机器二并输入机器2的账户密码认证)
scp语法:
首先先准备两台机器。 机器A:192.168.0.166 机器B:192.168.0.188
将机器A的 /etc/passwd 发送到机器B /opt 目录下 # A主动
使用机器A进行操作: scp /etc/passwd root@192.168.0.188:/opt
下载机器A的 /etc/passwd 到机器B的 /opt 目录下 # B主动
使用机器B进行操作: scp root@192.168.0.166:/etc/passwd /opt
将机器A的 /var/log/ 目录下载到 机器B的 /tmp 目录下 # B主动
使用机器B进行操作: scp -r root@192.168.0.166:/var/log/ /tmp
将机器A的 /var/log/ 目录传输到 机器B的 /tmp 目录下 # A主动
使用机器A进行操作: scp -r /var/log/ root@192.168.0.188:/tmp
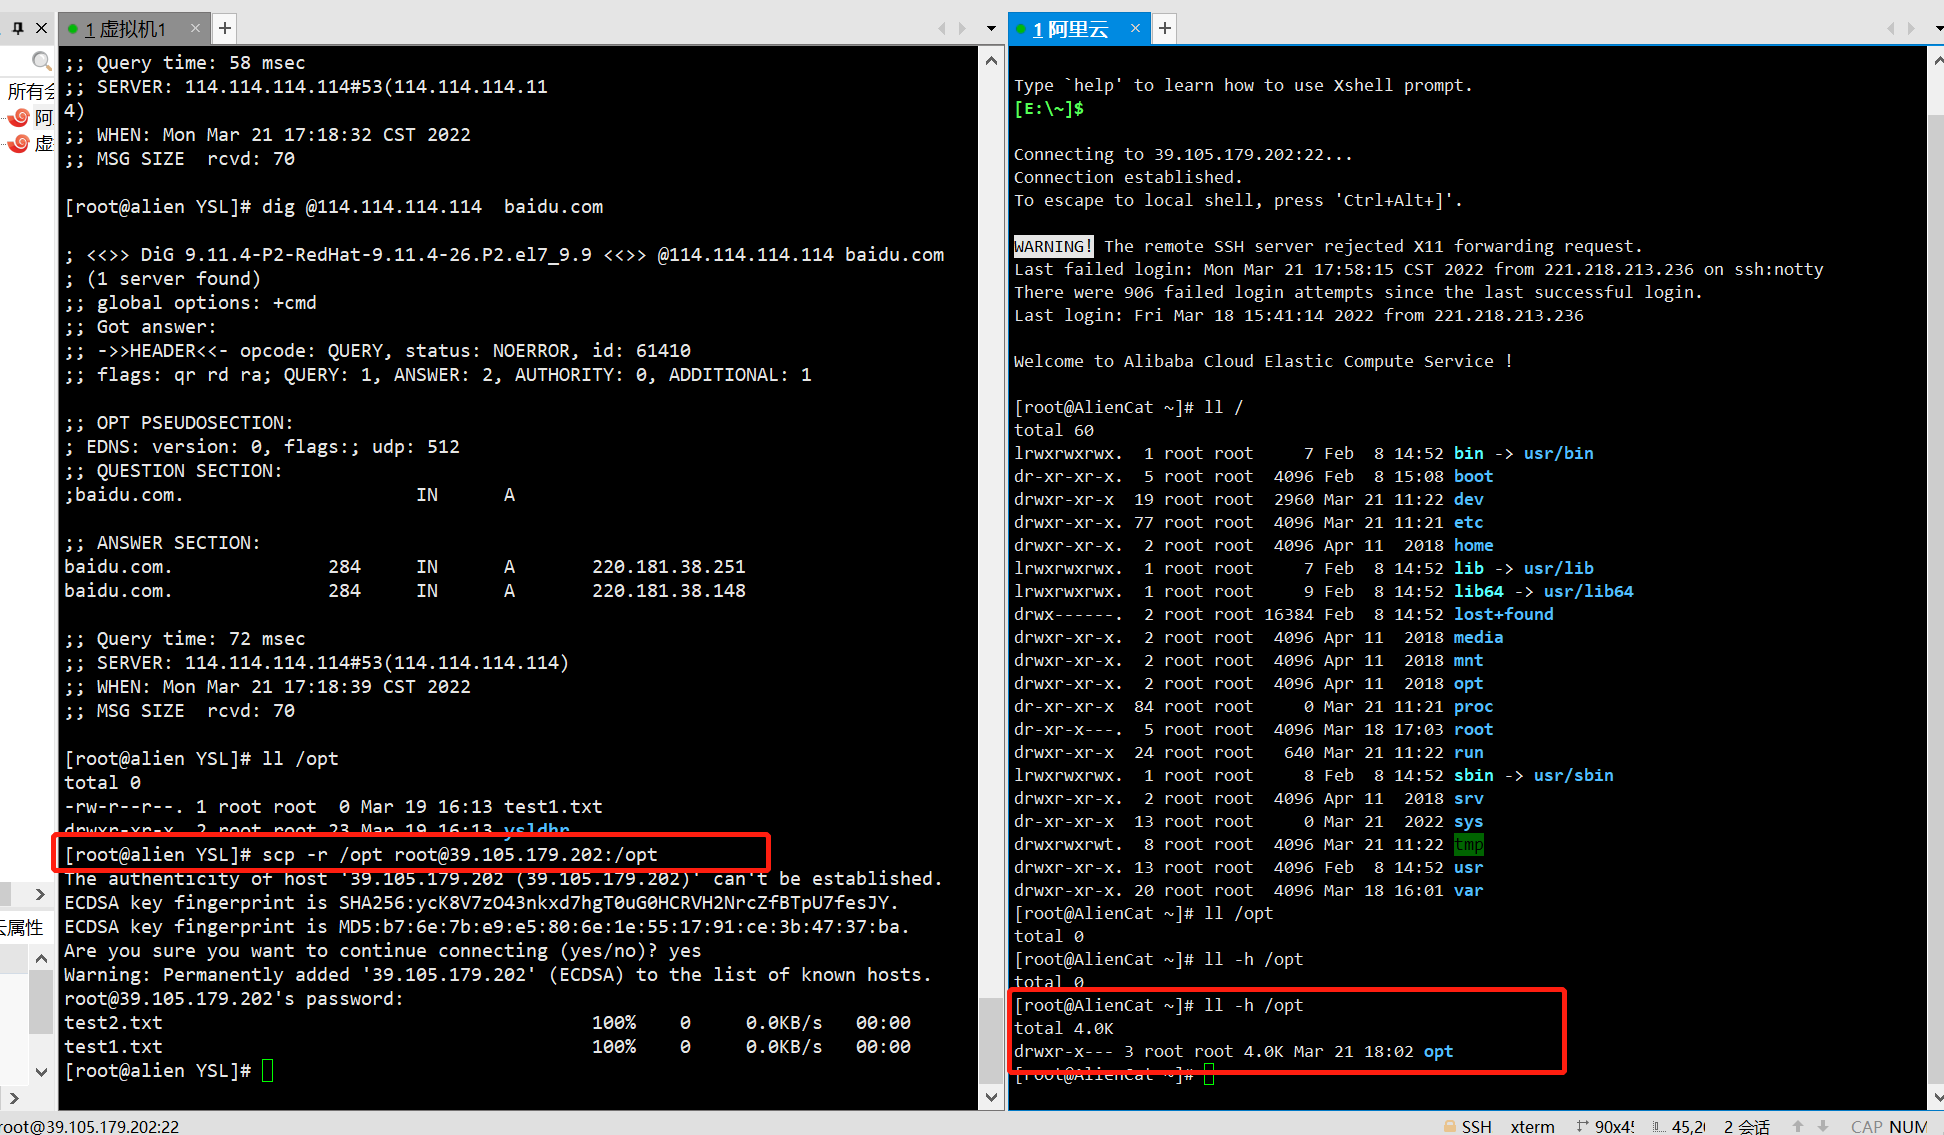
将你本地的/opt下所有数据,发到阿里云的/opt目录下:
[root@alien YSL]# scp -r /opt root@39.105.179.202:/opt
7.彻底粉碎文件
# rm命令,删除文件,其实还是可以恢复的,现在的文件系统,都是日志型系统(你的操作,其实被系统监控,录制,做了个备份)
# rm删除数据后,磁盘其实还未立即彻底删除,根据磁盘恢复数据手段,还是可以把数据拿回来的

shred 文件名
这个命令之所以叫粉碎文件,是随机写入一堆二进制数据,导致原文件无法使用

随机写入二进制数据到文件中,比较危险,不推荐使用
[root@yuanlai-0224 test_tar]# shred gushi.txt
今日笔记
回顾systemctl
-
你的机器,会有默认的软件(服务),network管理网络的软件,sshd提供远程连接的软件
-
对这些服务,进行管理
- 启动
- 停止
- 重启
- 重新加载
- 开机自启(持久化)
- 禁止开机自启
- 查询是否持久化(是否开机自启)
centos7,用这个命令,同时对服务进行启停管理,以及开机自启
systemctl start/stop/restart/reload/enable/disable/is-enabled   服务的名


这个命令属于对centos6提供的2个命令,做了一个整合
service
	这个命令,linux的命令,大多数都是去机器上找到某个文件,然后读取文件配置,加载功能
	service旧的命令,是默认去 /etc/init.d/目录下寻找(服务管理脚本文件)
	然后根据你的指令 service start/stop  network (/etc/init.d/network)

	service 服务名  启停指令
		然后会去读取 /etc/init.d目录下的脚本
	我们在用centos6的时候,自己安装了某软件,比如nginx网站,但是没有方便的启停管理脚本
	自己写nginx启停脚本,然后放到/etc/init.d/nginx
	然后就可以调用
		serivce nginx start


chkconfig
两个命令整合了


现在,都用这个指令了更方便,强大

# 这个命令是去
systemctl  启停指令  服务名

查看网络服务状态
systemctl status network
关于systemctl命令其实是找到脚本
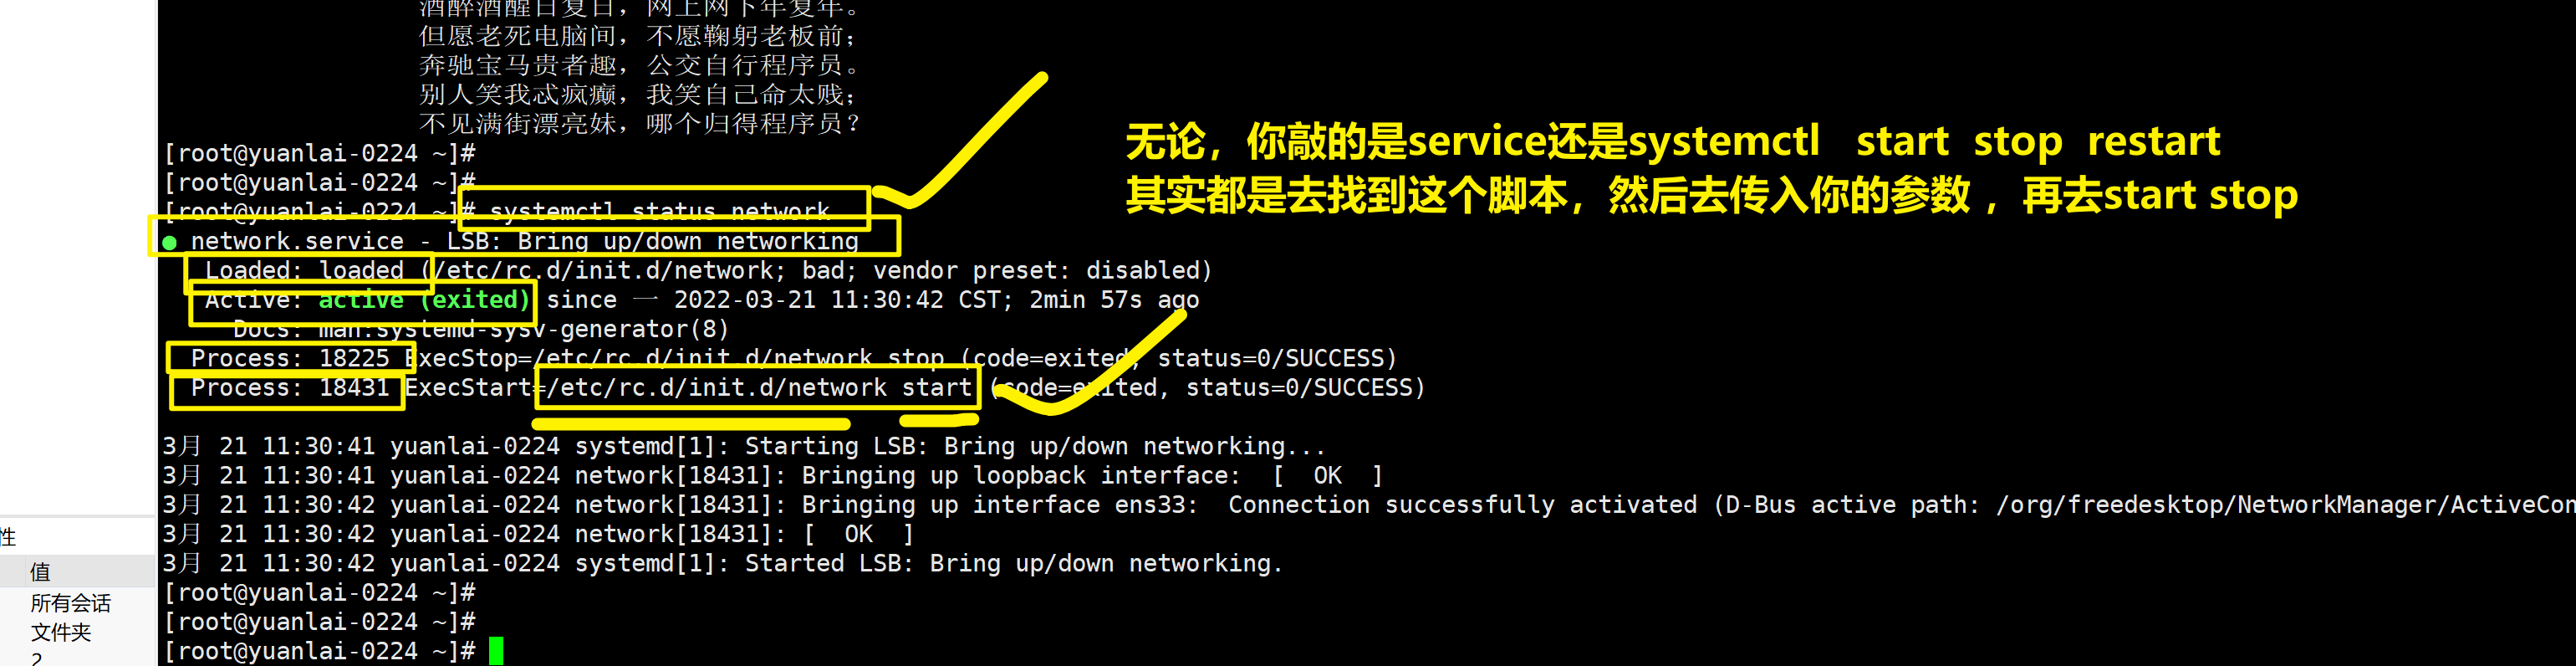
service启动网络

等于脚本去启动

也等于systemctl start network
刚才关注到 service是去读取 /etc/init.d/目录下的脚本
centos7中的脚本目录不一样
系统默认的所有服务,管理脚本的存放目录,以及你自己安装了某软件,也可以放入到这个目录下,就可以通过systemctl start/stop 去管理了
比如,我安装nginx软件,查看启动命令,以及脚本在哪
yum install nginx -y
[root@yuanlai-0224 ~]# yum install nginx -y
已加载插件:fastestmirror, langpacks
Loading mirror speeds from cached hostfile
* base: mirrors.aliyun.com
* extras: mirrors.aliyun.com
* updates: mirrors.aliyun.com
软件包 1:nginx-1.20.1-9.el7.x86_64 已安装并且是最新版本
无须任何处理
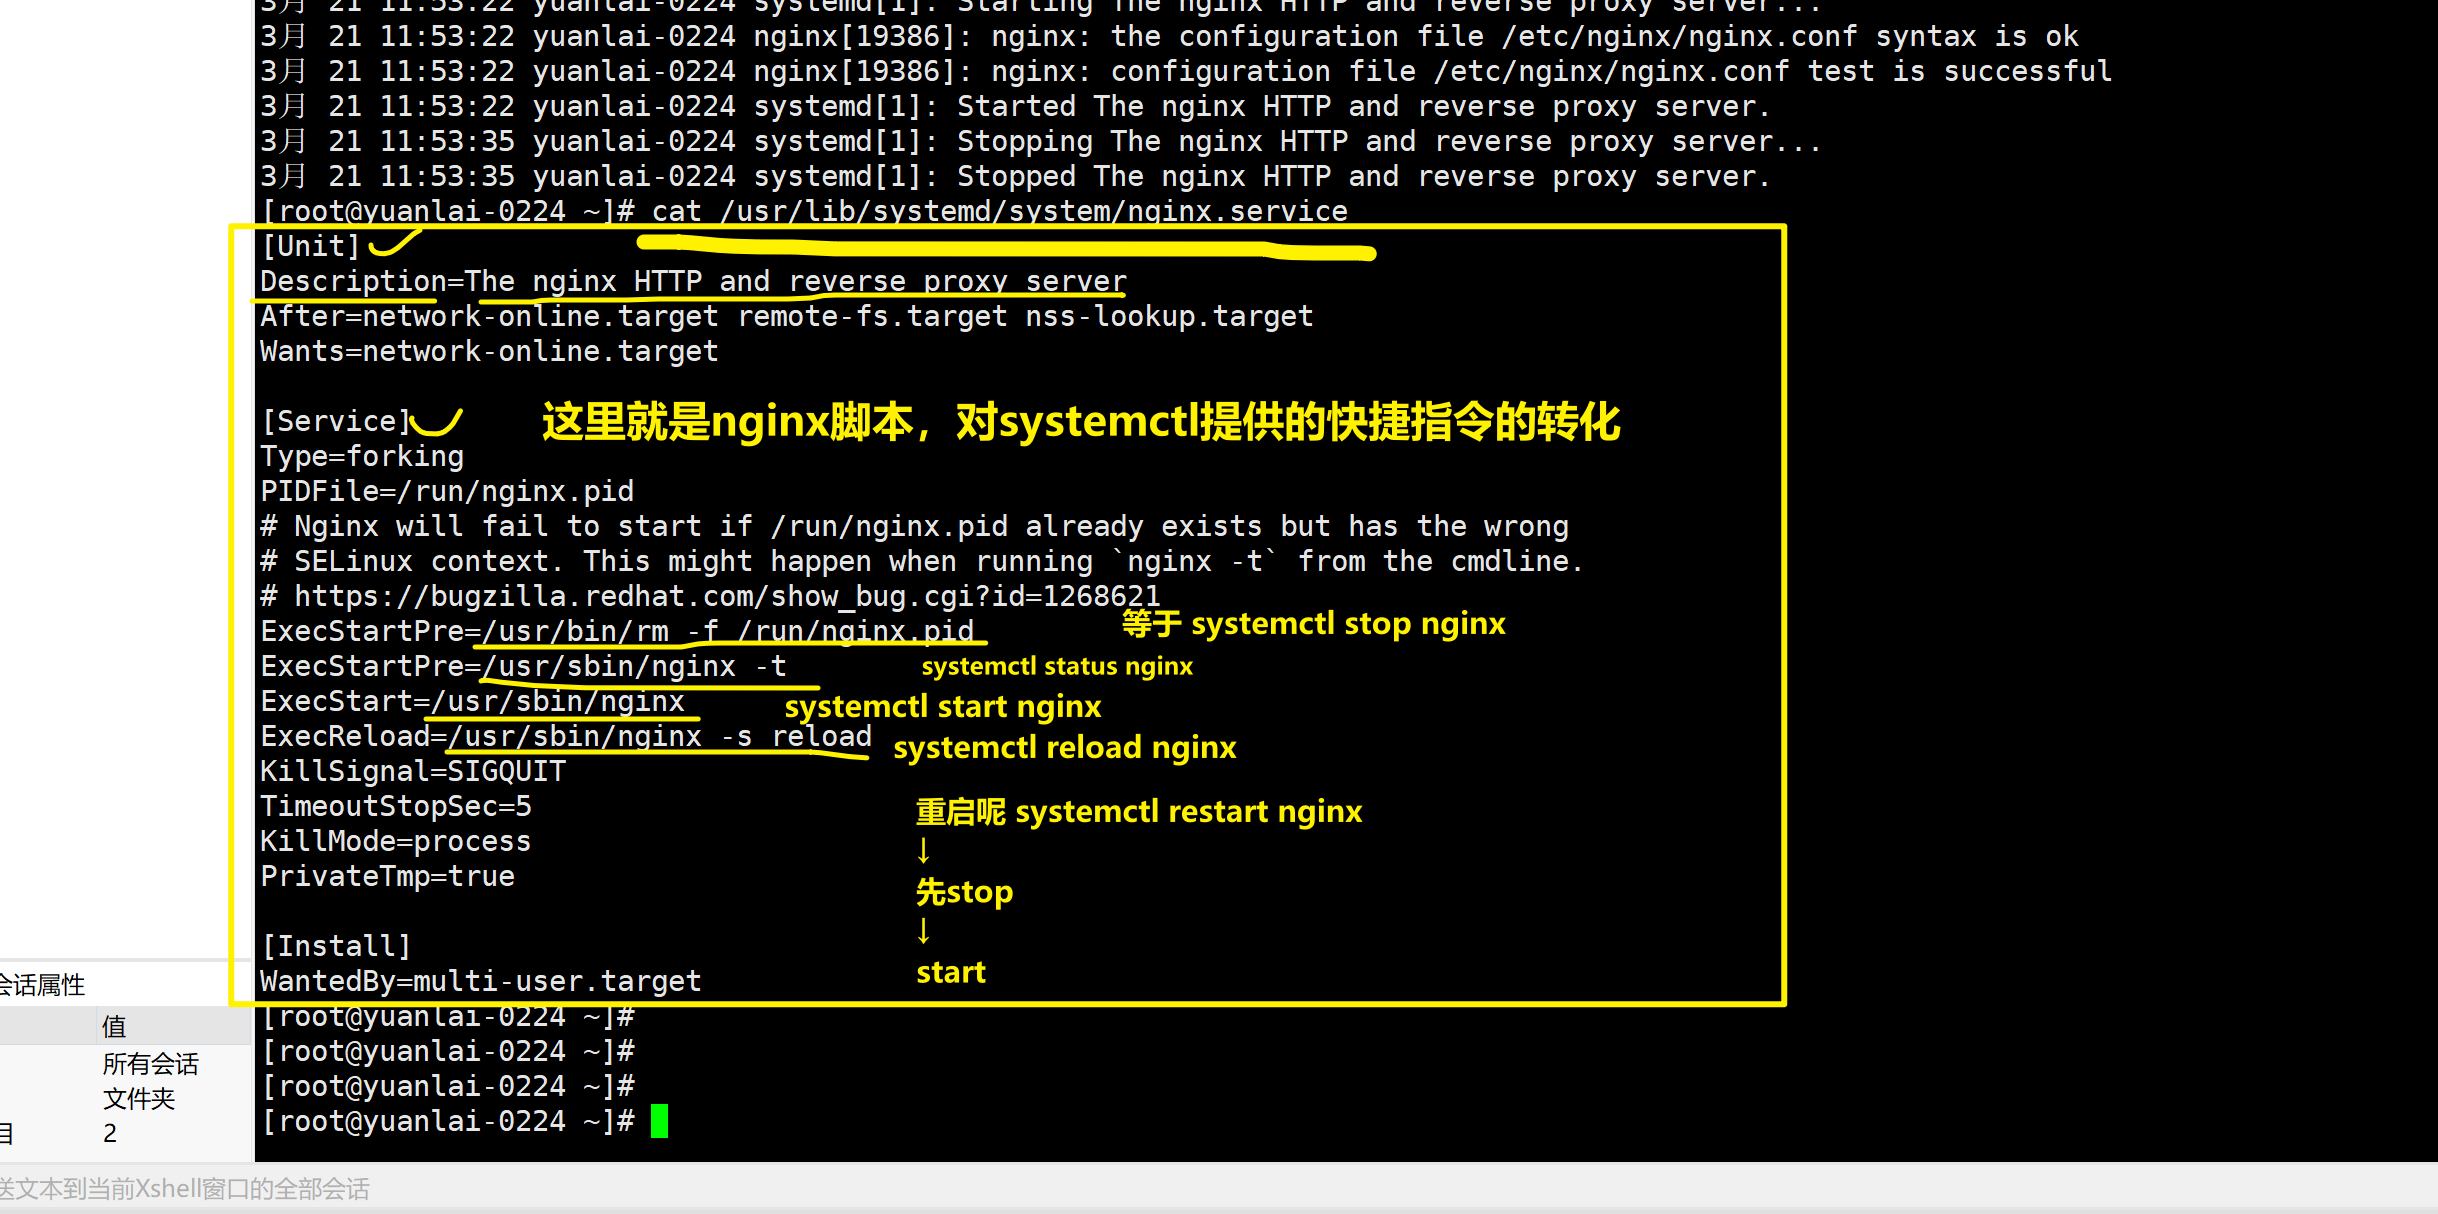
记住一个概念,通过yum安装的程序,会自动生成nginx管理脚本,自动的在systemctl管理脚本目录下,请看
# nginx这个服务名,只是一个缩写,完整的服务名是 nginx.service
# nginx的运行脚本在/usr/lib/systemd/system/nginx.service
# systemctl统一管理脚本目录在 /usr/lib/systemd/system/
# 比如sshd这个服务,它的脚本,就可以在这目录搜索到
[root@yuanlai-0224 ~]# ll /usr/lib/systemd/system/ssh*
-rw-r--r--. 1 root root 313 4月 11 2018 /usr/lib/systemd/system/sshd-keygen.service
-rw-r--r--. 1 root root 373 4月 11 2018 /usr/lib/systemd/system/sshd.service
-rw-r--r--. 1 root root 260 4月 11 2018 /usr/lib/systemd/system/sshd@.service
-rw-r--r--. 1 root root 181 4月 11 2018 /usr/lib/systemd/system/sshd.socket
[root@yuanlai-0224 ~]# systemctl status nginx
● nginx.service - The nginx HTTP and reverse proxy server
Loaded: loaded (/usr/lib/systemd/system/nginx.service; disabled; vendor preset: disabled)
Active: inactive (dead)
[root@yuanlai-0224 ~]#
理解systemctl管理脚本的流程

实践上述所说
以nginx为例,可以有2个运行方式
- 直接运行指令
1.启动nginx,以命令形式运行
[root@yuanlai-0224 ~]# /usr/sbin/nginx

2.关闭防火墙,查看nginx是否可以看到
已确认,可以看到页面

3. 关闭nginx程序
ps -ef |grep nginx
kill nginx的进程id(包工头进程id)

4.下次在运行nginx,还要吧这个流程走一遍,并且还要重新的去找进程id,判断干掉某个id号
以服务管理模式运行 systemctl
2条命令完事
systemctl start nginx.serivce
systemctl stop  nginx.service
systemctl status nginx.service
要知道,这个nginx管理脚本在哪,本质上要理解,还是去执行/usr/sbin/nginx


查看nginx的管理脚本,以后我们自己安装软件,也都参照这个写法即可
cat /usr/lib/systemd/system/nginx.service
ntp时间服务部署
- 先理解时间对服务器的重要性
- 全世界的服务器,时间统一标准,可以以这个为准,cn.ntp.org.cn
- 学习linux的各种命令,对时间来修改,以及同步
timedatectl
可以修改linux的日期,时间
centos7,cetnso6
	systemctl
		service
		chkconfig
	timedatectl
		date 改时间日期(软件时间,你的系统运行了,程序计算的时间)
		hwclock  改硬件时间(计算的主板上,有一个BISO系统,以及纽扣电池,提供电量)


centos6时代,修改系统的时区、时间,需要用到
修改时间、日期、date命令
centos6的修改时区的操作,时区就以亚洲上海为准了
修改时区,cp /usr/share/zoneinfo/Asia/Shanghai /etc/localtime

# 查看系统中有哪些时区文件
ls /usr/share/zoneinfo/
ll /usr/share/zoneinfo/Asia/Shanghai


修改硬件时间、hwclock命令
查看当前时间
[root@yuanlai-0224 ~]# timedatectl
      Local time: 一 2022-03-21 12:21:42 CST(中国时区)
  Universal time: 一 2022-03-21 04:21:42 UTC
        RTC time: 一 2022-03-21 04:21:38
       Time zone: Asia/Shanghai (CST, +0800)
     NTP enabled: no
NTP synchronized: no
 RTC in local TZ: no
      DST active: n/a
[root@yuanlai-0224 ~]#
[root@yuanlai-0224 ~]#

[root@yuanlai-0224 ~]# timedatectl status
      Local time: 一 2022-03-21 12:21:46 CST
  Universal time: 一 2022-03-21 04:21:46 UTC
        RTC time: 一 2022-03-21 04:21:42
       Time zone: Asia/Shanghai (CST, +0800)
     NTP enabled: no
NTP synchronized: no
 RTC in local TZ: no
      DST active: n/a
修改时间、修改时区
[root@yuanlai-0224 ~]# timedatectl --help
timedatectl [OPTIONS...] COMMAND ...

Query or change system time and date settings.

  -h --help                Show this help message
     --version             Show package version
     --no-pager            Do not pipe output into a pager
     --no-ask-password     Do not prompt for password
  -H --host=[USER@]HOST    Operate on remote host
  -M --machine=CONTAINER   Operate on local container
     --adjust-system-clock Adjust system clock when changing local RTC mode

指令
Commands:
  status                   Show current time settings 查看当前状态
  set-time TIME            Set system time  设置当前的时间
  set-timezone ZONE        Set system time zone 设置当前的时区
  list-timezones           Show known time zones 查看系统支持哪些时区


  set-local-rtc BOOL       Control whether RTC is in local time
  set-ntp BOOL             Control whether NTP is enabled


[root@yuanlai-0224 ~]# timedatectl set-time '10:00'

[root@yuanlai-0224 ~]# timedatectl set-time '2018-11-8 10:00'

查看系统支持多少个时区
[root@yuanlai-0224 ~]# timedatectl list-timezones | wc -l
425

找出关于上海的时区,具体名字
[root@yuanlai-0224 ~]# timedatectl list-timezones | grep  -i   'shanghai'
Asia/Shanghai

[root@yuanlai-0224 ~]# timedatectl set-timezone Asia/Shanghai
[root@yuanlai-0224 ~]#
[root@yuanlai-0224 ~]#
[root@yuanlai-0224 ~]# timedatectl status
      Local time: 四 2018-11-08 10:02:39 CST
  Universal time: 四 2018-11-08 02:02:39 UTC
        RTC time: 四 2018-11-08 02:02:40
       Time zone: Asia/Shanghai (CST, +0800)
     NTP enabled: no
NTP synchronized: no
 RTC in local TZ: no
      DST active: n/a
[root@yuanlai-0224 ~]#
ntp时间同步
- 强制性更新整个系统的时间,ntpdate,不友好的强制同步时间
- 搭建ntp服务,自动的,友好的更新,校准系统时间
其强制性ntpdate命令
1.找到时间服务器地址,强制更新即可
[root@yuanlai-0224 ~]# ntpdate -u ntp.aliyun.com


[root@yuanlai-0224 ~]# ntpdate -u ntp.aliyun.com
21 Mar 12:31:11 ntpdate[19892]: step time server 203.107.6.88 offset 106194278.720730 sec


[root@yuanlai-0224 ~]# timedatectl status
      Local time: 一 2022-03-21 12:31:32 CST
  Universal time: 一 2022-03-21 04:31:32 UTC
        RTC time: 四 2018-11-08 02:06:54
       Time zone: Asia/Shanghai (CST, +0800)
     NTP enabled: no
NTP synchronized: no
 RTC in local TZ: no
      DST active: n/a
搭建ntpd服务
所有linux的软件,用法都一样
- 安装
- 改配置
- 启动
- 使用
- 以后,就是继续改配置,重新加载,重启
- 继续使用
1.安装ntp软件
yum install  ntp -y

2.查看ntp软件信息
[root@yuanlai-0224 ~]# ls /usr/lib/systemd/system/ |grep ntp
ntpdate.service
ntpd.service


3.找到ntp软件的配置文件
[root@yuanlai-0224 ~]# rpm -ql ntp |grep conf
/etc/ntp.conf
/etc/sysconfig/ntpd
/usr/share/man/man5/ntp.conf.5.gz


4.修改ntp配置文件,
vim /etc/ntp.conf, 做如下修改

driftfile /var/lib/ntp/drift


# 添加ntp的运行日志
logfile /var/log/my_ntp.log

# 记录程序的运行进程号的,可以用于写脚本,读取这个文件,就找到了程序的进程id
pidfile /var/run/ntpd.pid


# Permit time synchronization with our time source, but do not
# permit the source to query or modify the service on this system.
restrict default nomodify notrap nopeer noquery

# Permit all access over the loopback interface.  This could
# be tightened as well, but to do so would effect some of
# the administrative functions.
restrict 127.0.0.1
restrict ::1

# Hosts on local network are less restricted.
#restrict 192.168.1.0 mask 255.255.255.0 nomodify notrap

# Use public servers from the pool.ntp.org project.
# Please consider joining the pool (http://www.pool.ntp.org/join.html).


server ntp.aliyun.com iburst prefer
server cn.pool.ntp.org iburst


5.修改机器的时间为错误时间
[root@yuanlai-0224 ~]# timedatectl set-time '2018-11-8 10:00'
[root@yuanlai-0224 ~]#
[root@yuanlai-0224 ~]#
[root@yuanlai-0224 ~]#
[root@yuanlai-0224 ~]# timedatectl
      Local time: 四 2018-11-08 10:00:04 CST
  Universal time: 四 2018-11-08 02:00:04 UTC
        RTC time: 四 2018-11-08 02:00:04
       Time zone: Asia/Shanghai (CST, +0800)
     NTP enabled: no
NTP synchronized: no
 RTC in local TZ: no
      DST active: n/a


6.启动ntpd服务,等待时间是否同步
关于ntpd的服务脚本文件/usr/lib/systemd/system/ntpd.service

[root@yuanlai-0224 ~]# systemctl start  ntpd
[root@yuanlai-0224 ~]#
[root@yuanlai-0224 ~]#
[root@yuanlai-0224 ~]# systemctl status ntpd
● ntpd.service - Network Time Service
   Loaded: loaded (/usr/lib/systemd/system/ntpd.service; disabled; vendor preset: disabled)
   Active: active (running) since 四 2018-11-08 10:01:43 CST; 1s ago
  Process: 20653 ExecStart=/usr/sbin/ntpd -u ntp:ntp $OPTIONS (code=exited, status=0/SUCCESS)
 Main PID: 20654 (ntpd)
    Tasks: 1
   CGroup: /system.slice/ntpd.service
           └─20654 /usr/sbin/ntpd -u ntp:ntp -g

11月 08 10:01:43 yuanlai-0224 systemd[1]: Starting Network Time Service...
11月 08 10:01:43 yuanlai-0224 systemd[1]: Started Network Time Service.
11月 08 10:01:43 yuanlai-0224 ntpd[20654]: proto: precision = 0.026 usec
11月 08 10:01:43 yuanlai-0224 ntpd[20654]: 0.0.0.0 c01d 0d kern kernel time sync enabled
[root@yuanlai-0224 ~]#
[root@yuanlai-0224 ~]#
[root@yuanlai-0224 ~]#


7.查看ntp是否和上游服务器同步
[root@yuanlai-0224 ~]# ntpstat
unsynchronised
   polling server every 64 s


8.查看时间同步的状态
uanlai-0224 ~]# ntpq -p
     remote           refid      st t when poll reach   delay   offset  jitter
==============================================================================
 120.25.115.20   .STEP.          16 u    -   64    0    0.000    0.000   0.000
 203.107.6.88    10.137.38.86     2 u   28   64    1   26.495   -5.532  20.580
 a.chl.la        131.188.3.222    2 u   25   64    1  275.482   52.054  13.988
[root@yuanlai-0224 ~]#


9. 这台机器,就是一个时间服务器了,可以作为上游机器使用
date命令和hwclock命令
可以直接用timedatectl替代了
timedatectl直接修改硬件+软件时间了。
让软件时间和硬件时间同步

hwclock 可以将硬件和软件时间做同步
 -s, --hctosys        从硬件时钟设置系统时间
 -w, --systohc        从当前系统时间设置硬件时钟

 浙公网安备 33010602011771号