Spring IOC学习笔记
Spring IOC学习笔记
1. 什么是spring框架
Spring是一个轻量级的控制反转(IoC)和面向切面(AOP)的容器框架。
具体的百度很多解释。
简单来说,一句话: 用来简化开发的框架
2. spring安装环境
第一步: 在Maven项目的pom文件中,加入一下构件坐标
    <dependency>
      <groupId>org.springframework</groupId>
      <artifactId>spring-context</artifactId>
      <version>5.3.3</version>
    </dependency>
第二步:在Maven项目的resources文件夹创建spring.xml文件,并填入spring.xml的规范
<?xml version="1.0" encoding="UTF-8"?>
<beans xmlns="http://www.springframework.org/schema/beans"
    xmlns:xsi="http://www.w3.org/2001/XMLSchema-instance"
    xsi:schemaLocation="http://www.springframework.org/schema/beans
        https://www.springframework.org/schema/beans/spring-beans.xsd">

    <bean id="..." class="...">
        <!-- collaborators and configuration for this bean go here -->
    </bean>

    <bean id="..." class="...">
        <!-- collaborators and configuration for this bean go here -->
    </bean>

    <!-- more bean definitions go here -->

</beans>
这样即可完成spring框架的安装!
3. spring IOC/DI
什么是控制反转?什么是依赖注入?
这个对于才学习了几天的我来说,深度理解是不可能滴,只能看看网上大神的理解来参考参考。
1、IoC是什么
Ioc—Inversion of Control,即“控制反转”,不是什么技术,而是一种设计思想。在Java开发中,Ioc意味着将你设计好的对象交给容器控制,而不是传统的在你的对象内部直接控制。如何理解好Ioc呢?理解好Ioc的关键是要明确“谁控制谁,控制什么,为何是反转(有反转就应该有正转了),哪些方面反转了”,那我们来深入分析一下:●谁控制谁,控制什么:传统Java SE程序设计,我们直接在对象内部通过new进行创建对象,是程序主动去创建依赖对象;而IoC是有专门一个容器来创建这些对象,即由Ioc容器来控制对象的创建;谁控制谁?当然是IoC 容器控制了对象;控制什么?那就是主要控制了外部资源获取(不只是对象包括比如文件等)。
●为何是反转,哪些方面反转了:有反转就有正转,传统应用程序是由我们自己在对象中主动控制去直接获取依赖对象,也就是正转;而反转则是由容器来帮忙创建及注入依赖对象;为何是反转?因为由容器帮我们查找及注入依赖对象,对象只是被动的接受依赖对象,所以是反转;哪些方面反转了?依赖对象的获取被反转了。
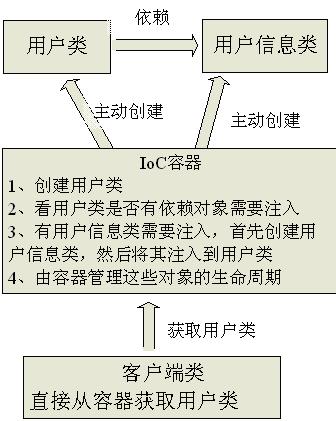
当有了IoC/DI的容器后,在客户端类中不再主动去创建这些对象了,如图2所示
我也有一点自己的小理解:
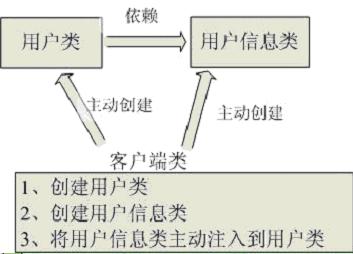
	1. 在以前的开发中,一个a对象想要使用另外一个b对象的方法,就必须a对象要new一个b对象,这样子才能够调用b对象的方法,但是呢,**这样子就会产生一个依赖关系,a依赖b,产生耦合度高的关系,不符合高内聚,低耦合的原则**。 而spring有一个叫做IOC的容器,他能够作为中间商来帮我创建b对象,这样子a和b既无依赖关系,又能够相互调用。
	2. 而依赖注入只是IOC管理对象的一种方式,**IOC更多的是一种思想,是一种降低程序代码间耦合度的思想**。
spring 的使用
1. 如何注入对象
这里我们常用的有3种常用的注入方法。
第一种:set注入
    //注入对象userService
	private UserService userService;

	//提供该对象的set方法
    public void setUserService(UserService userService) {
        this.userService = userService;
    }
<!-- 在spring.xml中配置Bean对象 -->
    <bean name="userController" class="org.example.controller.UserController">
        <property name="userService" ref="userService"></property>
    </bean>

    <bean name="userService" class="org.example.service.UserService"></bean>
bean标签中,name属性一般为对象的类名且首字母小写。set注入中为property标签,标签中有两个属性值,name和ref,name属性和ref属性均为需要注入的对象的类名且首字母小写。
第二种:构造器注入
构造器注入和Set注入的区别就是,Set注入需要提供set方法,而构造器注入则需要提供有参构造方法,且spring配置文件也有不同。
    private UserService userService;

    public UserController(UserService userService) {
        this.userService = userService;
    }
Spring.xml
    <bean name="userController" class="org.example.controller.UserController">
        <!-- Set注入为property标签,而构造器注入则为constructor-arg标签 -->
        <constructor-arg name="userService" ref="userService"></constructor-arg>
    </bean>

    <bean name="userService" class="org.example.service.UserService"></bean>
第三种:注解注入
注解注入与Set注入和构造器注入有很大区别,首先需要修改spring的配置文件
<?xml version="1.0" encoding="UTF-8"?>
<beans xmlns="http://www.springframework.org/schema/beans"
       xmlns:xsi="http://www.w3.org/2001/XMLSchema-instance"
       xmlns:context="http://www.springframework.org/schema/context"
       xsi:schemaLocation="http://www.springframework.org/schema/beans
        https://www.springframework.org/schema/beans/spring-beans.xsd
        http://www.springframework.org/schema/context
        http://www.springframework.org/schema/context/spring-context.xsd">

	<!-- 开启注解注入 -->
    <context:annotation-config></context:annotation-config>

</beans>
然后在需要注入处,写上注解
@Autowired 或者 @Resource 都可以
@Autowired
private UserService userService;
@Resource
private UserService userService;
即可进行注解注入
2. 扫描器
什么是扫描器? 扫描器是可以让你在不用配置xml文件的基础上,通过注解,达到自动识别bean对象的效果,在之前我们注入对象都需要在spring.xml中对bean对象进行配置,而开启扫描器后,我们只要写上一行注解,即可让spring自动识别我们的bean对象。
开启扫描器
<?xml version="1.0" encoding="UTF-8"?>
<beans xmlns="http://www.springframework.org/schema/beans"
       xmlns:xsi="http://www.w3.org/2001/XMLSchema-instance"
       xmlns:context="http://www.springframework.org/schema/context"
       xsi:schemaLocation="http://www.springframework.org/schema/beans
        https://www.springframework.org/schema/beans/spring-beans.xsd
        http://www.springframework.org/schema/context
        http://www.springframework.org/schema/context/spring-context.xsd">


    <context:component-scan base-package="需要扫描的包"></context:component-scan>

</beans>
第二步:使用指定的注解 beand对象的id属性默认是类的首字母小写
	Dao层:
		@Responsity
	Service层:
		@Service
	Controller层:
		@Controller
	任意类:
		@Component
注:在开发过程中尽量按照指定规则声明注解
@Controller
public class UserController {

    private UserService userService;

 浙公网安备 33010602011771号