【SpringAop】【统一日志处理】注解方式理解以及使用
【注意:本次代码的demo会存在百度网盘,由于公司的保密,禁止上传,所以仅本人可见】
目前公司在做数据资产项目,数据质量部分使用到了springaop做统一日志处理,以前对这块有了解,有点模糊不清,今天重新复习了一次,发现之前的概念理解有误,这里再做一次记忆。
一、概念【手敲增加记忆】
=====================================转乔志勇【csdn】=============================
1,aop:是对OOP编程方式的一种补充,翻译为“面向切面编程”
可以理解为一个拦截器框架,但是这个拦截器会非常武断,如果它拦截一个类,那么它就会拦截这个类的所有方法。就像对一个目标类的代理,增强了目标类的所有方法。
两个解决办法:
- 不优雅的做法:在添加增强时,根据方法名去判断,是否添加增强,但是这样就得一直去维护这个增强类;
- 面向切面:将增强类和拦截条件组合在一起,然后将这个切面配置到ProxyFactory中,从而生成代理。
2,aop和切面的关系
- 类与对象相比,aop和切面就是这样的一种关系【实例关系】;
- 也可以将切面看成是aop的一个工具【实现关系】;
3,几个概念
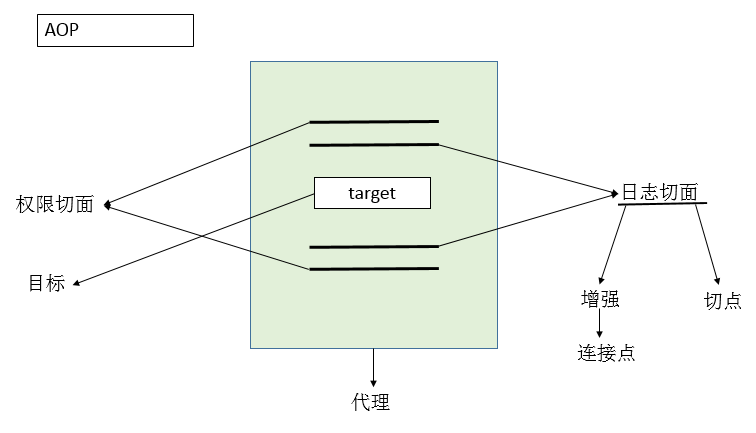
切面(Advidsor):是aop中的一个术语,表示从业务逻辑中分离出来的横切逻辑,比如性能监控,日志记录,权限控制等。
这些功能都可以从核心的业务逻辑中抽离出去,可以解决代码耦合问题,职责更加单一。封装了增强和切点。
自己理解:切面就是一个抽象的概念,本身就是一个类,包含了增强通知与切点的定义;
增强(Advice):增强代码的功能的类,横切到代码中。
自己理解:增强通知就是要给你的目标类或者方法进行动态增强处理
目标:接口目标方法(JDK代理)或目标类(CGLIB代理)
代理:JDK代理,CGLIB代理,或者通过ProxyFactory类生产。
切点:通过一个条件来匹配要拦截的类,这个条件称为切点。如拦截所有带Controller注解的类,增强的条件。
自己理解:就是代理的一个对象或者方法,通过这个切点可以找到对应的目标;
连接点:作为增强方法的入参,可以获取到目标方法的信息;
自己理解:其实就是找到具体需要增强的地方,通过切点连接到目标类或者方法
4,概括一张图
5,增强
-
- Weaving(织入):对方法进行增强
- 前置增强(BeforeAdvice):在目标方法前调用。
- 后置增强(AfterAdvice):在目标方法后调用。
- 环绕增强(AroundAdvice):将Before和After,甚至抛出增强和返回增强合到一起。
- 返回增强(AfterReturningAdvice):在方法返回结果后执行,该增强可以接收到目标方法返回结果。
- 抛出增强(AfterThrowingAdvice):在目标方法抛出对应的类型后执行,可以接收到对应的异常信息。
- INtroduction(引入) :对类进行增强
- 引入增强(DeclareParentsAdvice):想让程序在运行的时候动态去实现 某个接口,需要引入增强。
- Weaving(织入):对方法进行增强
6,SpringAop实现方式
-
- 编程式【实现接口方式】
- 前置增强,需要实现:MethodBeforeAdvice接口
- 编程式【实现接口方式】
增强类:
public class CarBeforeAdvice implements MethodBeforeAdvice{
    @Override
    public void before(Method method, Object[] objects, Object o) throws Throwable {
        System.out.println("before");
    }
}
测试方法:
@Test
public void test03() {
  ProxyFactory proxyFactory = new ProxyFactory();
  proxyFactory.setTarget(new Car());
  proxyFactory.addAdvice(new CarBeforeAdvice());
  Wheel carProxy = (Wheel)proxyFactory.getProxy();
  carProxy.run();
}
-
-
- 后置增强:实现AfterReturningAdvice接口
- 环绕增强:实现org.aopalliance.intercept.MethodInterceptor 接口,使用Object result = methodInvocation.proceed();调用目标方法,在目标方法前后添加增强。
- 声明式【xml形式】:spring+Aspect
-
开发步骤:
1,定义切面类,将该切面类放入到IOC容器中
@Component
public class XMLLoggingAspect {

    public void beforeAdvice(JoinPoint point) {
        System.out.println("xml aspects logging before");
    }
    public void afterAdvice(JoinPoint point) {
        System.out.println("xml aspects logging after");
    }
    public void afterReturningAdvice(JoinPoint point, Object result) {
        System.out.println("xml aspects logging afterReturningAdvice");
    }
    public void afterThrowingAdvice(JoinPoint point, Exception e) {
        System.out.println("xml aspects logging afterThrowingAdvice");
    }
    public Object aroundAdvice(ProceedingJoinPoint point) throws Throwable {
        Object result = point.proceed();
        System.out.println("xml aspects logging aroundAdvice");
        return result;
    }
}
2,SpringAop配置都必须定义在<aop:config>元素内部
3,在<aop:config>中,每个切面都需要创建一个<aop:aspect>元素
4,为具体的切面实现引用后端的bean实例。
下面展示 前置增强,后置增强,环绕增强,返回增强,抛出增强的【织入增强】例子:
<aop:config>
  <aop:aspect ref="XMLLoggingAspect">
    <aop:pointcut id="carPointcut" expression="execution(void run())"/>
    <aop:before method="beforeAdvice" pointcut-ref="carPointcut"/>
    <aop:after method="afterAdvice" pointcut-ref="carPointcut"/>
    <aop:after-returning method="afterReturningAdvice" pointcut-ref="carPointcut" returning="result"/>
    <aop:after-throwing method="afterThrowingAdvice" pointcut-ref="carPointcut" throwing="e"/>
    <aop:around method="aroundAdvice" pointcut-ref="carPointcut"/>
  </aop:aspect>
</aop:config>
控制台输出:
xml aspects logging before
i am a car, i can run.
xml aspects logging aroundAdvice
xml aspects logging afterReturningAdvice
xml aspects logging after
基于声明式的spring aspect织入增强配置说明:
支持配置两个级别的公共切点表达式,一个是针对某个切面的所有方法(定义在<aop:aspect>节点内),另一个是针对所有切面(定义在<aop:config>节点内),使用ponitcut-ref来引入切点。
下面展示【引入增强】的一个例子:
对于引入增强,只需要配置<aop:aspect>节点下就可以,不需要去切面类中添加任何属性
//types-matching这是目标类
//implement-interface 这是代理的接口,default-impl这是代理接口的实现类
<aop:config>
  <aop:aspect ref="XMLLoggingAspect">
    <aop:declare-parents
          types-matching="com.nucsoft.spring.target.impl.Student"
           implement-interface="com.nucsoft.spring.target.Fly"
           default-impl="com.nucsoft.spring.target.impl.SuperMan"/>
  </aop:aspect>
</aop:config>
测试:
@Test
public void test04() {
  Person student = context.getBean(Student.class);
  System.out.println(student.say("james"));
  Fly fly = (Fly) student;
  fly.fly();
}
控制台输出
hello,james
i am super man, i can fly.
基于声明式的spring aspect 引入增强配置说明:
1,引入增强是类级别,所以不存在切点表达式
2,利用<aop:declare-parents>节点在<aop:aspect>内部声明
3,types-matching属性,要增强的目标类,这里需要全类名
4,implement-interface属性:动态的增强类接口
5,default-impl属性:动态增强类接口的实现
-
- 注解方式【注解方式】:spring+aspect
对切面类添加@Aspect注解,将切面类和目标类放入到IOC容器中,可以通过<context :component-scan base-package=""/>进行扫描
添加增强方法(包括增强类型和切点表达式,以及连接点)
在Spring Config文件中添加(<aop:aspectj-autoproxy proxytarget-class="true">,proxy-target-class属性,false只能代理接口(JDK动态代理),true代理类(CGLIB动态代理))
---------------------------------------------------------------------------------------------------------------------------
1,通过切点表达式(AspectJ execution)进行拦截
spring-congfig.xml
<context:component-scan base-package="com.nucsoft.spring"/>
<aop:aspectj-autoproxy proxy-target-class="true"/>
Person接口:
public interface Person {
    String say(String name);
}
Person实现类Student:
@Component
public class Student implements Person{
    @Override
    public String say(String name) {
        return "hello," + name;
    }
}
测试类:
public class SpringTest {
    @Test
    public void test01() {
        ApplicationContext context = new ClassPathXmlApplicationContext("spring-config.xml");
        Student student = context.getBean(Student.class);
        String james = student.say("james");
        System.out.println(james);
    }
}
(1)前置增强:关键字:@Before,JoinPoint,execution切点表达式,表达式内容支持通配符;
@Aspect
@Component
public class LoggingAspect {
    @Before("execution(String say(String))")
    public void before(JoinPoint point) {
        System.out.println("before");
    }
}
控制台输出:
before
hello,james
(2)后置增强:关键字:@After
@Aspect
@Component
public class LoggingAspect {
    @After("execution(String say(String))")
    public void afterAdvice(JoinPoint point) {
        System.out.println("after...");
    }
}
控制台输出:
hello,james
after...
(3)环绕增强,关键字:@around,Proceeding JoinPoint
将Student类还原,切面类:
@Aspect
@Component
public class LoggingAspect {

    @Around("execution(String say(String))")
    public Object aroundAdvice(ProceedingJoinPoint point) throws Throwable {
        before();
        Object result = point.proceed();
        after();
        return result;
    }
    private void before(){
        System.out.println("before");
    }
    private void after(){
        System.out.println("after");
    }
}
控制台输出:
before
hello james
after
注意:
<1>增强方法的返回值为Object类型,该返回值与目标方法返回值一致
<2>Object rusult = point.proceed();该result即为目标方法执行后的返回值
<3>在环绕通知中需要明确调用ProceedingJoinPoint的proceed()方法来执行被代理的方法,如果忘记这样做会导致通知被执行了,但是目标方法没有被执行;
<4>环绕通知的方法需要返回目标方法执行之后的结果,即调用joinPoint.proceed()的返回值,否则会出现空指针异常
(4)返回增强:关键字:@AfterReturning,returning,JoinPoint
@Aspect
@Component
public class LoggingAspect {
    @AfterReturning(value = "execution(String say(String))", returning = "str")
    public void aferRetruningAdvice(JoinPoint point, String str) {
        System.out.println("str:" + str);
        System.out.println("aferRetruningAdvice");
    }
}
控制台输出:
str:hello,james
aferRetruningAdvice
hello,james
(4)抛出增强:关键字:@AfterThrowing,throwing。注意:抛出的异常类型必须和切面抛出增强接收的异常类型相同或是其子类。
更改Student类,手动抛出一个异常:
@Component
public class Student implements Person{
    @Override
    public String say(String name) {
        throw new RuntimeException("exception");
    }
}
切面类:
@Aspect
@Component
public class LoggingAspect {

    @AfterThrowing(value = "execution(String say(String))", throwing = "e")
    public void AfterThrowingAdvice(JoinPoint point, Exception e) {
        String message = e.getMessage();
        System.out.println(message);
        System.out.println("AfterThrowingAdvice");
    }
}
控制台输出:
exception
AfterThrowingAdvice
---------------------------------------------------------------------------------------------------------------------------
2,通过切点注解表达式(AspectJ @annotation)进行拦截
开发步骤:
(1)自定义定义注解类
@Target(ElementType.METHOD)
@Retention(RetentionPolicy.RUNTIME)
public @interface AuthorityTag {}
(2)为切面类中增强指定注解表达式
@Aspect
@Component
public class AuthorityAspect {
    @Before("@annotation(com.nucsoft.spring.annotation.AuthorityTag)")
    public void before(JoinPoint point) {
        System.out.println("authority before");
    }
}
(3)在目标类目标方法上标注注解
@Component
public class Car implements Wheel{
    @AuthorityTag
    @Override
    public void run() {
        System.out.println("i am a car, i can run.");
    }
}
------------------------------------------------------------------------------------------------------------------------------
各种增强的使用:
1,前置增强
上面的步骤就是一个前置增强
控制台输出:
authority before
i am a car, i can run.
2,后置增强
@Aspect
@Component
public class AuthorityAspect {
    @Before("@annotation(com.nucsoft.spring.annotation.AuthorityTag)")
    public void before(JoinPoint point) {
        System.out.println("authority before");
    }

    @After("@annotation(com.nucsoft.spring.annotation.AuthorityTag)")
    public void afterAdvice(JoinPoint point) {
        System.out.println("authority after");
    }
}
控制台输出:
authority before
i am a car, i can run.
authority after
3,为每个增强使用不同的注解
@Target(ElementType.METHOD)
@Retention(RetentionPolicy.RUNTIME)
public @interface BeforeAuthorityTag {}


@Target(ElementType.METHOD)
@Retention(RetentionPolicy.RUNTIME)
public @interface AfterAuthorityTag {}
切面:
@Aspect
@Component
public class AuthorityAspect {
    @Before("@annotation(com.nucsoft.spring.annotation.BeforeAuthorityTag)")
    public void before(JoinPoint point) {
        System.out.println("authority before");
    }

    @After("@annotation(com.nucsoft.spring.annotation.AfterAuthorityTag)")
    public void afterAdvice(JoinPoint point) {
        System.out.println("authority after");
    }
}
使用:
@Component
public class Car implements Wheel{
    @BeforeAuthorityTag
    @AfterAuthorityTag
    @Override
    public void run() {
        System.out.println("i am a car, i can run.");
    }
}
控制台输出:
authority before
i am a car, i can run.
authority after
4,环绕增强
注解类:
@Target(ElementType.METHOD)
@Retention(RetentionPolicy.RUNTIME)
public @interface AroundAuthorityTag {}
切面增强:
@Around(value = "@annotation(com.nucsoft.spring.annotation.AroundAuthorityTag)")
public Object aroundAdvice(ProceedingJoinPoint point) throws Throwable {
  Object result = point.proceed();
  after();
  System.out.println("authority aroundAdvice");
  return result;
}

private void after() {
  System.out.println("after");
}
目标类:
@Component
public class Car implements Wheel{
    @AroundAuthorityTag
    @Override
    public void run() {
        System.out.println("i am a car, i can run.");
    }
}
控制台输出:
i am a car, i can run.
after
authority aroundAdvice
(5)返回增强
注解类:
@Target(ElementType.METHOD)
@Retention(RetentionPolicy.RUNTIME)
public @interface AfterReturningAuthorityTag {}
切面增强:
@AfterReturning(value = "@annotation(com.nucsoft.spring.annotation.AfterReturningAuthorityTag)", returning = "result")
public void afterReturningAdvice(JoinPoint point, Object result) {
  System.out.println("authority afterReturning");
}
目标类:
@Component
public class Car implements Wheel{
    @AfterReturningAuthorityTag
    @Override
    public void run() {
        System.out.println("i am a car, i can run.");
    }
}
控制台输出:
i am a car, i can run.
authority afterReturning
(6)抛出增强
注解类:
@Target(ElementType.METHOD)
@Retention(RetentionPolicy.RUNTIME)
public @interface AfterThrowingAuthorityTag {}
切面增强:
@AfterThrowing(value = "@annotation(com.nucsoft.spring.annotation.AfterThrowingAuthorityTag)", throwing = "e")
public void afterThrowAdvice(JoinPoint point, Exception e) {
  System.out.println(e.getMessage());
  System.out.println("authority afterThrowing");
}
目标类:
@Component
public class Car implements Wheel{
    @AfterThrowingAuthorityTag
    @Override
    public void run() {
        System.out.println("i am a car, i can run.");
        throw new RuntimeException("throw a new runtimeException");
    }
}
控制台输出:
i am a car, i can run.
throw a new runtimeException
java.lang.RuntimeException: throw a new runtimeException
authority afterThrowing
(7)引入增强:关键字:@DeclareParents
被代理的类与接口实现类实现了同一个接口,也就是说,A类被增强(被接口代理,实现接口),接口实现类B类与A类共同实现了接口,在A类多态转向接口时,可以直接调用接口实现类B类中的方法
将要引入的接口:
public interface Fly {
    void fly();
}
将要引入的接口的实现:
public class SuperMan implements Fly{
    @Override
    public void fly() {
        System.out.println("i am super man, i can fly.");
    }
}
切面类:
@Aspect
@Component
public class LoggingAspect {
    @DeclareParents(value = "com.nucsoft.spring.target.impl.Student", defaultImpl = SuperMan.class)
    private Fly fly;
}
测试类:
public class SpringTest {
    @Test
    public void test01() {
        ApplicationContext context = new ClassPathXmlApplicationContext("spring-config.xml");
        Person student = context.getBean(Student.class);
        String james = student.say("james");
        System.out.println(james);
        Fly fly = (Fly) student;
        fly.fly();
    }
}
控制台输出:
hello,james
i am super man, i can fly.
说明:
1,在Aspect类中定义一个需要引入增强的接口,它也就是运行时需要动态实现的接口。
2,@DeclareParents注解:
value属性:目标类,可以是一个Aspect类型的表达式,可以引入到多个类中;
defaultImpl属性:引入接口的默认实现类。
3,虽然切面类中标注有@DeclareParents注解的属性可以是任意的,但是一般还是将其设置为引入增强类型。
4,从ApplicationContext中获取到的student对象其实是一个代理对象,可以转型为自己静态实现的接口Person,也可以转型为动态实现接口fly,切换起来非常方便。【个人感觉有点像包装类型与基本数据类型的装箱与拆箱】
注意:
1,可以为多个增强使用同一个注解;
2,也可以为每个增强使用不同的注解【例如下面的例子,可以为Controller层和Service层分别编写各自的自定义注解,或者在同一个方法上使用不同的注解】;
3.3对比基于xml声明的切点表达式和注解表达式
注解表达式:更加灵活,但是在开发过程中,需要程序员手动的去为每个需要添加增强的方法添加对应的注解,更加容易扩散。
切点表达式:可以写出通用的增强,也不需要程序员手动的去为每个方法添加增强,但是需要切点表达式适配。
------------------------------------------------------------------------------------------------------------------------------
小结:
1,利用方法签名编写AspectJ切点表达式:execution * com.alan.spring.Calcultor.*(..);匹配Calcultor中声明的所有方法;
第一个*代表任意修饰符以及任意返回值,第二个*代表任意方法..匹配任意数量的参数,若目标类与接口与该切面在同一个包中,可以省略包名。
execution public * com.alan.spring.Calcultor.*(..); 匹配ArthmeticCalculator接口的所有公共方法;
execution public double com.alan.spring.Calcultor.*(..);匹配Calculator中返回double类型的所有公共方法
execution * com.alan.spring.Calcultor.*(double,..);匹配Calculator中第一个参数为double类型的方法
ecution * com.alan.spring.Calcultor.*(double,double);匹配Calculator中参数为double,double类型的方法
2,可以合并切点表达式 使用&& || ! 来合并,如:
execution(void run()) || execution(void say())
3,切面优先级
可以通过实现Order接口或者利用@Order注解指定
(1)实现Orderd接口,getOrder()方法返回的值越小,优先级就越高
(2)使用@Order注解,需要出现在注解中,同样是值越小优先级越高。
4,重用切点定义
在Aspect切面中,可以通过@pointcut注解讲一个切入点声明成简单的方法,切入点的方法体通常是空的,因为将切入点定义与应用程序逻辑混在一起是不合理的。
切入点方法的访问控制符同时也控制着这个切入点的可见性【也就是与目标连接的条件】。如果切入点要在多个切面中共用,最好将它们集中在一个公共的类中【抽取成父类】。
在这种情况下,它们必须被声明为public。在引入这个切入点时,必须将类名也包括在内,如果类没有与这个切面放在同一个包中,还必须包含包名。
其他增强通知可以通过方法名称引入该切入点。
例如:
@Pointcut("execution(void run())")
public void LoggingPointcut(){};

@Before("LoggingPointcut()")
public void before() {
  System.out.println("before");
}
总结:
1,在学习springAOP之前,最好先理解了静态代理(普通对象),JDK动态代理(接口),CGLIB动态代理(类)。其springaop就是一个拦截,可以定义权限认证,统一日志,统一异常,事务,减少代码复用性等等,很强大。
2,明白切面和增强以及切点之间的关系:切面包含增强和切点,切点可以通过注解条件/通则表达式找到目标类/方法,增强(通知)就是对目标的增强(前置,后置,环绕)。
3,几个增强之间的区别
除了环绕增强外,所有的连接点使用的都是JoinPoint类型的入参,而环绕增强使用的是ProceedingJoinPoint
返回增强可以接收到返回值
抛出增强可以接收到抛出的异常
环绕增强的返回值类型为目标方法返回值类型
4,springaop支持xml声明式和注解方式,注解优先。
5,步骤:
1,定义切面,以及增强,编写切点表达式
2,如果切点表达式是基于注解的,还需要对目标方法添加对应的注解。
=====================================转乔志勇【csdn】=============================
二、小demo【通过切点注解表达式、织入方式对其增强】
==============================================小demo开始==============================================
1.创建一个maven_web工程【具体参考maven-web工程的创建】,然后导入依赖
 <properties>
    <project.build.sourceEncoding>UTF-8</project.build.sourceEncoding>
    <maven.compiler.source>1.8</maven.compiler.source>
    <maven.compiler.target>1.8</maven.compiler.target>
    <version.spring>4.3.3.RELEASE</version.spring>
  </properties>

  <dependencies>
      <dependency>
        <groupId>junit</groupId>
        <artifactId>junit</artifactId>
        <version>4.11</version>
        <scope>test</scope>
      </dependency>

      <!-- javax.servlet -->
      <dependency>
        <groupId>javax.servlet</groupId>
        <artifactId>servlet-api</artifactId>
        <version>2.5</version>
      </dependency>
      <!-- spring framework -->
      <dependency>
        <groupId>org.springframework</groupId>
        <artifactId>spring-web</artifactId>
        <version>${version.spring}</version>
      </dependency>
      <dependency>
        <groupId>org.springframework</groupId>
        <artifactId>spring-webmvc</artifactId>
        <version>${version.spring}</version>
      </dependency>
      <dependency>
        <groupId>org.springframework</groupId>
        <artifactId>spring-core</artifactId>
        <version>${version.spring}</version>
      </dependency>
      <dependency>
        <groupId>org.springframework</groupId>
        <artifactId>spring-beans</artifactId>
        <version>${version.spring}</version>
      </dependency>
      <dependency>
        <groupId>org.springframework</groupId>
        <artifactId>spring-orm</artifactId>
        <version>${version.spring}</version>
      </dependency>
      <dependency>
        <groupId>org.springframework</groupId>
        <artifactId>spring-context</artifactId>
        <version>${version.spring}</version>
      </dependency>
      <dependency>
        <groupId>org.springframework</groupId>
        <artifactId>spring-context-support</artifactId>
        <version>${version.spring}</version>
      </dependency>
      <dependency>
        <groupId>org.springframework</groupId>
        <artifactId>spring-aop</artifactId>
        <version>${version.spring}</version>
      </dependency>
      <dependency>
        <groupId>org.springframework</groupId>
        <artifactId>spring-jdbc</artifactId>
        <version>${version.spring}</version>
      </dependency>
      <dependency>
        <groupId>org.springframework</groupId>
        <artifactId>spring-tx</artifactId>
        <version>${version.spring}</version>
      </dependency>
      <dependency>
        <groupId>org.springframework</groupId>
        <artifactId>spring-test</artifactId>
        <version>${version.spring}</version>
        <scope>test</scope>
      </dependency>
      <dependency>
        <groupId>javax.inject</groupId>
        <artifactId>javax.inject</artifactId>
        <version>1</version>
      </dependency>
      <dependency>
        <groupId>cglib</groupId>
        <artifactId>cglib</artifactId>
        <version>2.2.2</version>
      </dependency>
      <dependency>
        <groupId>org.slf4j</groupId>
        <artifactId>slf4j-api</artifactId>
        <version>1.7.10</version>
      </dependency>
      <dependency>
        <groupId>org.apache.logging.log4j</groupId>
        <artifactId>log4j-1.2-api</artifactId>
        <version>2.6.2</version>
      </dependency>
      <!-- 切面aspectj -->
      <dependency>
        <groupId>org.aspectj</groupId>
        <artifactId>aspectjweaver</artifactId>
        <version>1.8.8</version>
      </dependency>
      <!-- springmvc依赖jar包jackson -->
      <dependency>
        <groupId>com.fasterxml.jackson.core</groupId>
        <artifactId>jackson-core</artifactId>
        <version>2.6.2</version>
      </dependency>
      <dependency>
        <groupId>com.fasterxml.jackson.core</groupId>
        <artifactId>jackson-databind</artifactId>
        <version>2.6.2</version>
      </dependency>
      <dependency>
        <groupId>com.fasterxml.jackson.core</groupId>
        <artifactId>jackson-annotations</artifactId>
        <version>2.6.2</version>
      </dependency>
      <!-- fastjson -->
      <dependency>
        <groupId>com.alibaba</groupId>
        <artifactId>fastjson</artifactId>
        <version>1.1.39</version>
      </dependency>
  </dependencies>
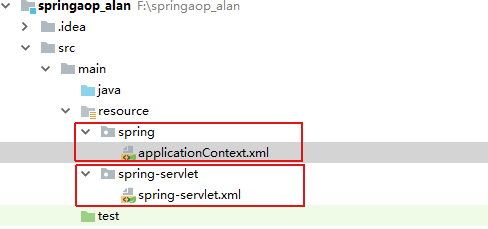
2.配置springmvc 与spring配置文件
关于spring-servlet.xml与applicationContext.xml的区别:
1,用途不同:
    applicationContext-*.xml文件通常用于加载spring系统级别的组件,比如bean的初始化;
    spring-servlet.xml文件通常用于加载controller层需要的类,比如拦截器,mvc标签加载的类
2,加载位置不同:
    applicationContext-*.xml加载在标签中,作位FrameworkServlet的参数属性
    spring-servlet.xml文件当做DispatcherServlet的参数属性进行加载
3,补充:
    classpath*与classpath的区别:
    classpath:指classes路径下文件
    classpath*:除了classes路径下文件,还包含jar包中文件
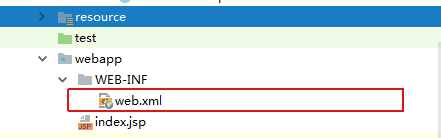
3,然后我们创建一个接口,并配置好web.xml
4,可以访问成功,使用postman即可【接口不要忘记添加responseBody注解】
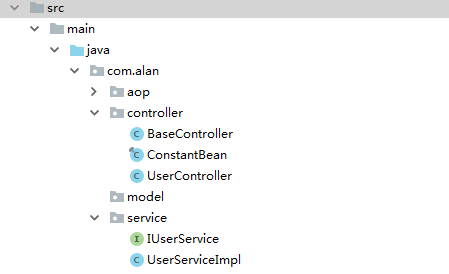
5,编写自定义注解,因为此springaop代码是通过注解方式实现,其实也可以通过xml形式实现,网上有很多相关资料,因为公司项目用的注解,我理解的也快,也方便记忆,好维护。
springaop是通过此注解定义切点,然后定位到对应的连接点;
/**
 * 此注解作用到方法和参数上,运行时加载有效,这个切点对应的注解作用于Controller层上
 */
@Target({ElementType.METHOD,ElementType.PARAMETER})
@Retention(RetentionPolicy.RUNTIME)
@Documented
public @interface ControllerLogAnnotation {

    /**
     * 描述
     */
    String description() default "";

    /**
     * 是否记录返回内容
     */
    boolean isContent() default false;

    /**
     * 返回内容是否需要加密
     */
    boolean isContentEncrypted() default false;

    /**
     * 参数是否需要加密
     */
    boolean isParametersEncrypted() default false;
/**
 * 这个切点对应的注解作用于service层
 */
@Target({ElementType.PARAMETER,ElementType.METHOD})
@Retention(RetentionPolicy.RUNTIME)
@Documented
public @interface ServiceLogAnnotation {
    /**
     * 描述
     */
    String description() default "";

    /**
     * 是否记录返回内容
     */
    boolean isContent() default false;

    /**
     * 返回内容是否需要加密
     */
    boolean isContentEncrypted() default false;

    /**
     * 参数是否需要加密
     */
    boolean isParametersEncrypted() default false;
}
6,编写切面类,idea很智能,在新建时直接可以新建一个切面类,新建Aspect,选择下拉@Aspect

7,关于切面类:
-
- 首先配置切点,根据这个切点找到对应的自定义注解上,也就连接上实际注解对应的方法
     //service aspect 服务层切点
    @Pointcut("@annotation(ServiceLogAnnotation)")
    public void serviceAspect() {

    }

    //controller aspect 控制层切点
    @Pointcut("@annotation(ControllerLogAnnotation)")
    public void controllerAspect() {

    }
-
- 然后开始配置通知,根据连接点可以获取相应的信息,以及session等,其实就是对这个切点进行动态增强,本来这个代理切点方法中没有任何内容,连接点会重新对这个切点对应的方法进行增强,前置、后置、环绕等;
- 这里只以before前置通知为例
/**
* 前置通知 用于拦截Controller层记录用户的操作
*
* @param joinPoint 切点
*/
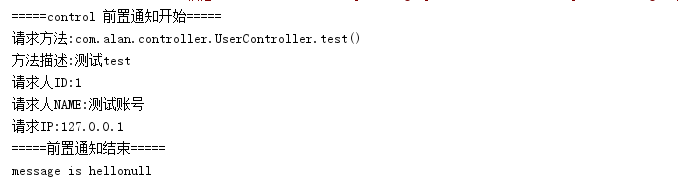
@Before("controllerAspect()")
public void doBefore4control(JoinPoint joinPoint) {
HttpServletRequest request = ((ServletRequestAttributes) RequestContextHolder.getRequestAttributes()).getRequest();
HttpSession session = request.getSession();
//读取session中的用户
User user = (User) session.getAttribute("USER");
if( user == null ) {
user = new User();
user.setId("1");
user.setName("测试账号");
}
//请求的IP
String ip = request.getRemoteAddr();
try {
//*========控制台输出=========*//
System.out.println("=====control 前置通知开始=====");
System.out.println("请求方法:" + (joinPoint.getTarget().getClass().getName() + "." + joinPoint.getSignature().getName() + "()"));
System.out.println("方法描述:" + getControllerMethodDescription(joinPoint));
System.out.println("请求人ID:" + user.getId());
System.out.println("请求人NAME:" + user.getName());
System.out.println("请求IP:" + ip);
System.out.println("=====前置通知结束=====");
Map<String, Object> map = new HashMap<>();
map.put("controlPath", (joinPoint.getTarget().getClass().getName() + "." + joinPoint.getSignature().getName() + "()"));
map.put("menthodDescr", getControllerMethodDescription(joinPoint));
map.put("id", user.getId());
map.put("name", user.getName());
map.put("ip", ip);
map.put("date", new Date());
} catch (Exception e) {
//记录本地异常日志
logger.error("==前置通知异常==");
logger.error("异常信息:{}", e.getMessage());
}
}
7,然后在你想要增强的方法上标记你的自定义注解即可。这样,在执行这个方法前,就会执行前置通知方法中对应的操作;

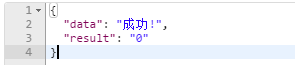
@ControllerLogAnnotation(description = "测试test")
控制台输出结果:
==============================================小demo结束==============================================

 浙公网安备 33010602011771号