

maven项目管理工具
maven依赖信息下载地址
tips:Tomcat容器管理的官方网站:cargo.codehaus.org
maven项目的目录机构
src
-main
-java
-package
-test
-java
-package
resource
pom.xml文件:
struts-2.3.31-all\struts-2.3.31\lib文件夹下
解压struts-core-1.3.10.jar
struts-core-1.3.10\META-INF\maven\org.apache.struts\struts-core文件夹下
复制出pom.xml
maven案例测试
进入项目所在目录: cd F:\代码\Maven\第一个maven案例HelloWord\MavenCode
对项目进行编译: mvn compile
测试项目: mvn test
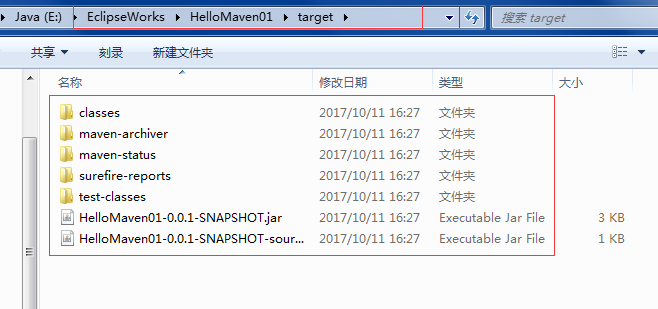
打包项目: mvn package
查看maven版本: mvn -v
删除target: mvn clean
安装jar包到本地仓库中: mvn install (如果本地不存在该jar包,会去中央仓库联网下载。都不存在就会报错)
archetype插件:用于创建符合maven规定的目录骨架(HelloWord)
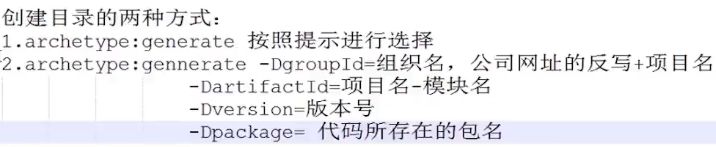
选择第一种方式:
cd F:\代码\Maven\第一个maven案例HelloWord
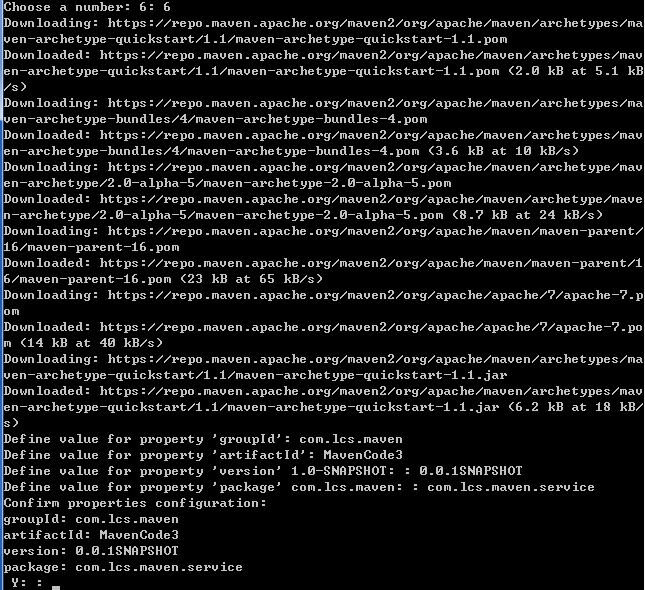
mvn archetype:generate
archetype版本选择 Choose a number: 6
maven的生命周期和插件
①清理项目 clean
三个阶段: pre-clean 执行清理前的工作
clean 清理上次构建生成的所有文件
post-clean 执行清理后的文件
②构建项目(核心) default
常用阶段: compile test package install
③生成项目站点 site
以下阶段: pre-site 在生成项目站点前要完成的工作
site 生成项目的站点文档
post-site 在生成项目站点后要完成的工作
site-deploy 发布生成的站点到服务器上
maven官网:http://maven.apache.org/
maven-source-plugin插件地址:http://maven.apache.org/plugins/maven-source-plugin/
在pom.xml中添加插件:
<!-- 添加插件 -->
  <build>
     <plugins>
           <plugin>
                <groupId>org.apache.maven.plugins</groupId>
                <artifactId>maven-source-plugin</artifactId>
                <version>2.4</version>
                <!-- 绑定sourse插件到default生命周期的package阶段
                     即在package阶段会运行source插件
                 -->
                <executions>
                     <execution>
                           <phase>package</phase>
                           <!-- 运行目标 -->
                           <goals>
                                <goal>jar-no-fork</goal>
                           </goals>
                     </execution>
                </executions>
           </plugin>
     </plugins>
  </build>
mvn clean package 执行结果:
pom的常用元素(pom.xml文件)
<project xmlns="http://maven.apache.org/POM/4.0.0"
         xmlns:xsi="http://www.w3.org/2001/XMLSchema-instance"
         xsi:schemaLocation="http://maven.apache.org/POM/4.0.0 http://maven.apache.org/maven-v4_0_0.xsd">

    <!-- 指定了当前pom的版本 -->
    <modelVersion>4.0.0</modelVersion>

    <groupId>反写的公司网址+项目名</groupId>
    <artifactId>项目名+模块名</artifactId>

    <!-- 第一位表示大版本号;第二位表示分支版本号;第三位表示小版本号
            [0.0.1]
        snapshot  快照
        alpha      内部测试
        beta     公测
        Release    稳定
        GA       正式发布
    -->
    <version>版本号</version>

    <!-- 默认是jar/ war/ zip/ pom -->
    <packaging>jar</packaging>

    <!-- name
        一般在产生项目文档时使用
    -->
    <name>项目描述名</name>

    <url>项目地址</url>
    <description>项目描述</description>
    <developers>开发人员列表</developers>
    <licenses>开源框架等许可证信息</licenses>
    <organization>组织信息</organization>

    <!-- 依赖列表 -->
    <dependencies>
        <dependency>
            <groupId>junit</groupId>
            <artifactId>junit</artifactId>
            <version>3.8.1</version>
            <type>pom</type>
            <!-- 依赖范围 -->
            <scope>test</scope>
            <!-- 设置依赖是否可选,默认为false -->
            <optional></optional>
            <!-- 排除依赖传递列表 -->
            <exclusions>
                <exclusion></exclusion>
            </exclusions>
        </dependency>
    </dependencies>

    <!-- 依赖的管理 -->
    <dependencyManagement>
        <dependencies>
            <dependency></dependency>
        </dependencies>
    </dependencyManagement>

    <build>
        <!-- 插件列表 -->
        <plugins>
            <plugin>
                <groupId>org.apache.maven.plugins</groupId>
                <artifactId>maven-source-plugin</artifactId>
                <version>2.4</version>
                <!-- 绑定sourse插件到default生命周期的package阶段
                    即在package阶段会运行source插件
                 -->
                <executions>
                    <execution>
                        <phase>package</phase>
                        <!-- 运行目标 -->
                        <goals>
                            <goal>jar-no-fork</goal>
                        </goals>
                    </execution>
                </executions>
            </plugin>
        </plugins>
    </build>

    <!-- 对父模块pom的继承 -->
    <parent></parent>

    <!-- 指定多个maven模块共同编译(maven的聚合) -->
    <modules>
        <module></module>
    </modules>
</project>
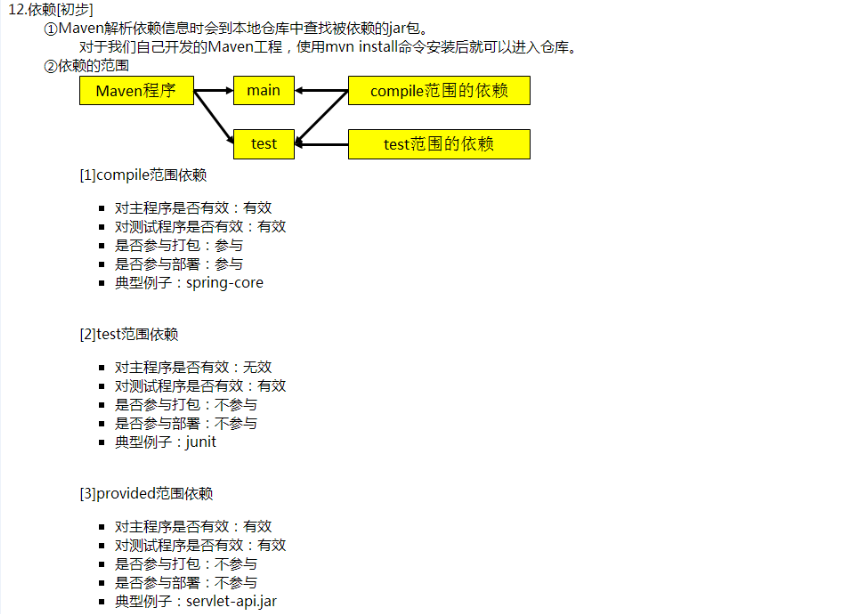
maven依赖的范围<scope></scope>
依赖范围是用来控制依赖和3种classpath的关系
3种classpath:编译、测试、运行
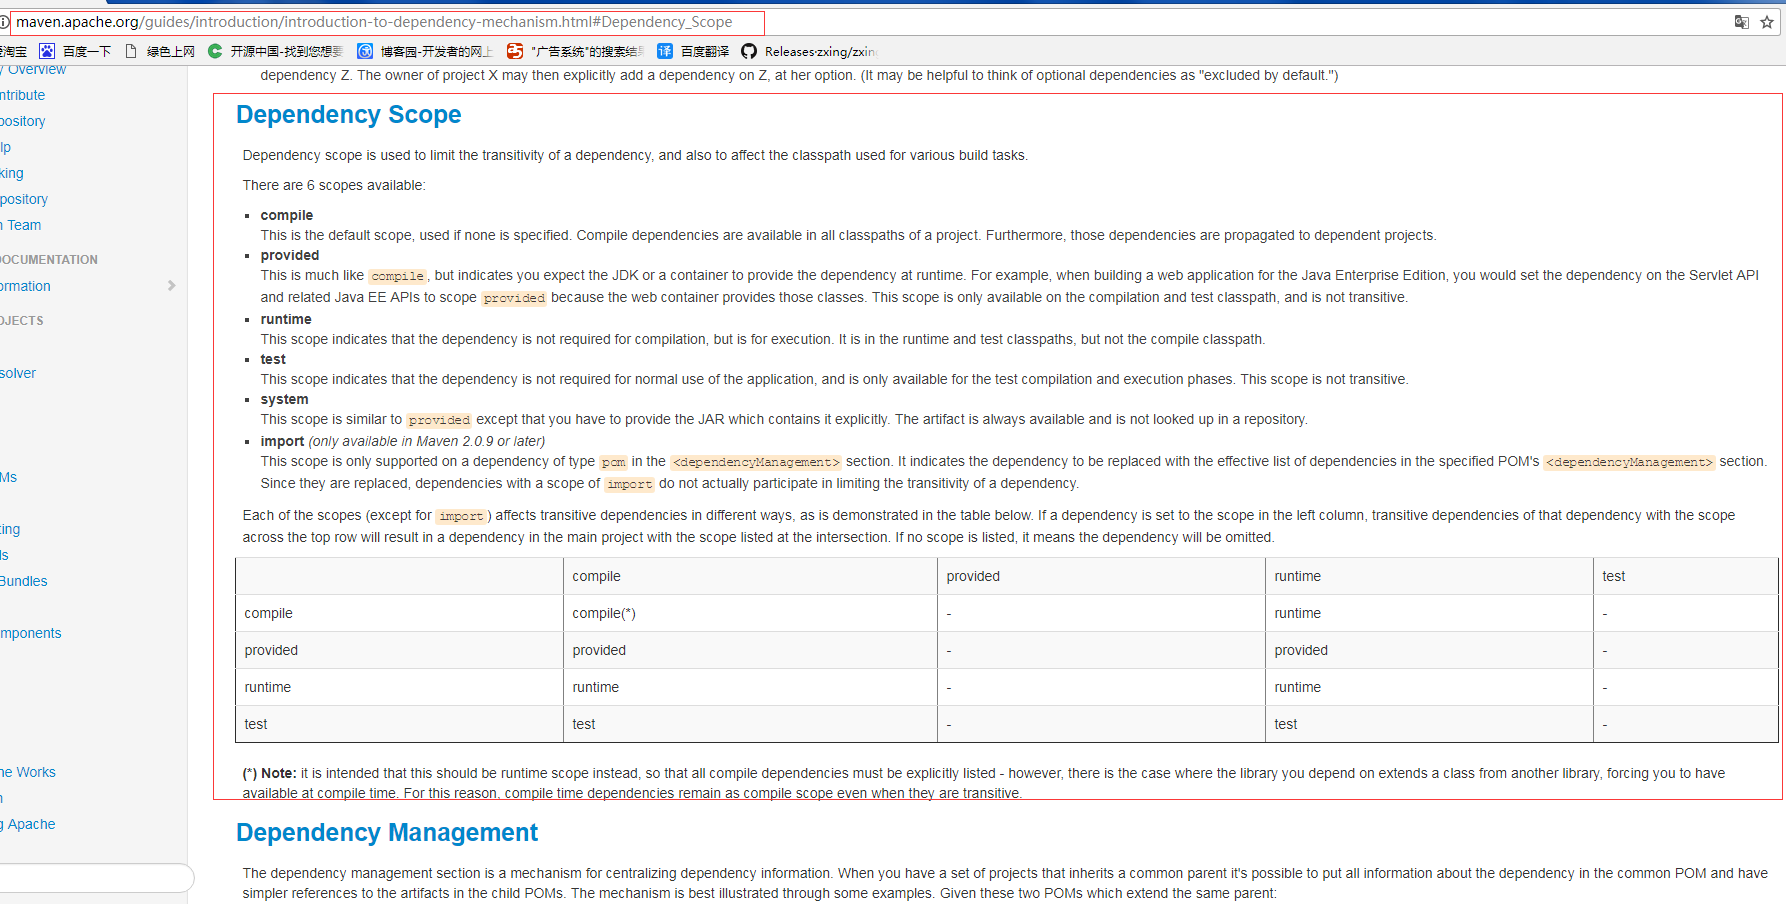
compile:默认的依赖范围, 如果没有指定,则使用。 在项目的所有类路径中都有效
provided: 仅适用于编译和测试类路径,不可传递。
runtime: 此范围表示编译不需要依赖关系,而是用于执行。在运行和测试类路径有效
test:表示正常使用应用程序时不需要依赖关系。仅适用于测试类路径,不可传递(典型应用:junit)
system:仅适用于编译和测试类路径,不可传递。与本机系统相关联,可移植性差
import:导入的依赖范围,只使用在<dependencyManagement>标签中,表示从其他的pom中继承的依赖(导入dependency的配置 )
maven的依赖传递和排除依赖
依赖的传递:
  <dependencies>
    <dependency>
      <groupId>junit</groupId>
      <artifactId>junit</artifactId>
      <version>3.8.1</version>
      <scope>test</scope>
    </dependency>
    <!-- 在南哥的pom,引入B哥的依赖 -->
    <dependency>
       <groupId>com.hongxing</groupId>
       <artifactId>hongxing-bge</artifactId>
       <version>0.0.1-SNAPSHOT</version>
    </dependency>
  </dependencies>
排除依赖:
<dependencies>
    <dependency>
      <groupId>junit</groupId>
      <artifactId>junit</artifactId>
      <version>3.8.1</version>
      <scope>test</scope>
    </dependency>
    <!-- 山鸡依赖于南哥 -->
    <dependency>
           <groupId>com.hongxing</groupId>
           <artifactId>hongxing-nange</artifactId>
           <version>0.0.1-SNAPSHOT</version>
           <!-- 在山鸡的pom,排除B哥的依赖传递 -->
           <exclusions>
                <exclusion>
                     <groupId>com.hongxing</groupId>
                     <artifactId>hongxing-bge</artifactId>
                </exclusion>
           </exclusions>
    </dependency>
</dependencies>
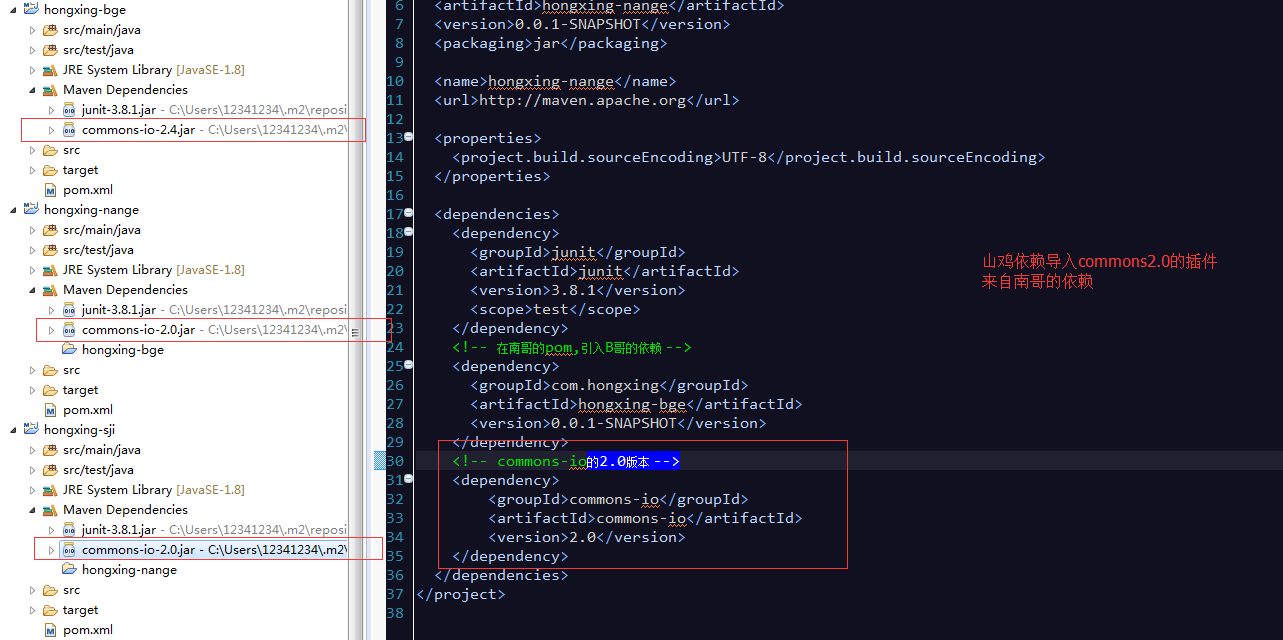
maven依赖冲突
1、短路优先:优先解析路径短的版本
A -> B -> C -> D ->X(jar)
(1.0 -1.0 -2.0 -3.0 -n.0 )
commons-io插件为例:
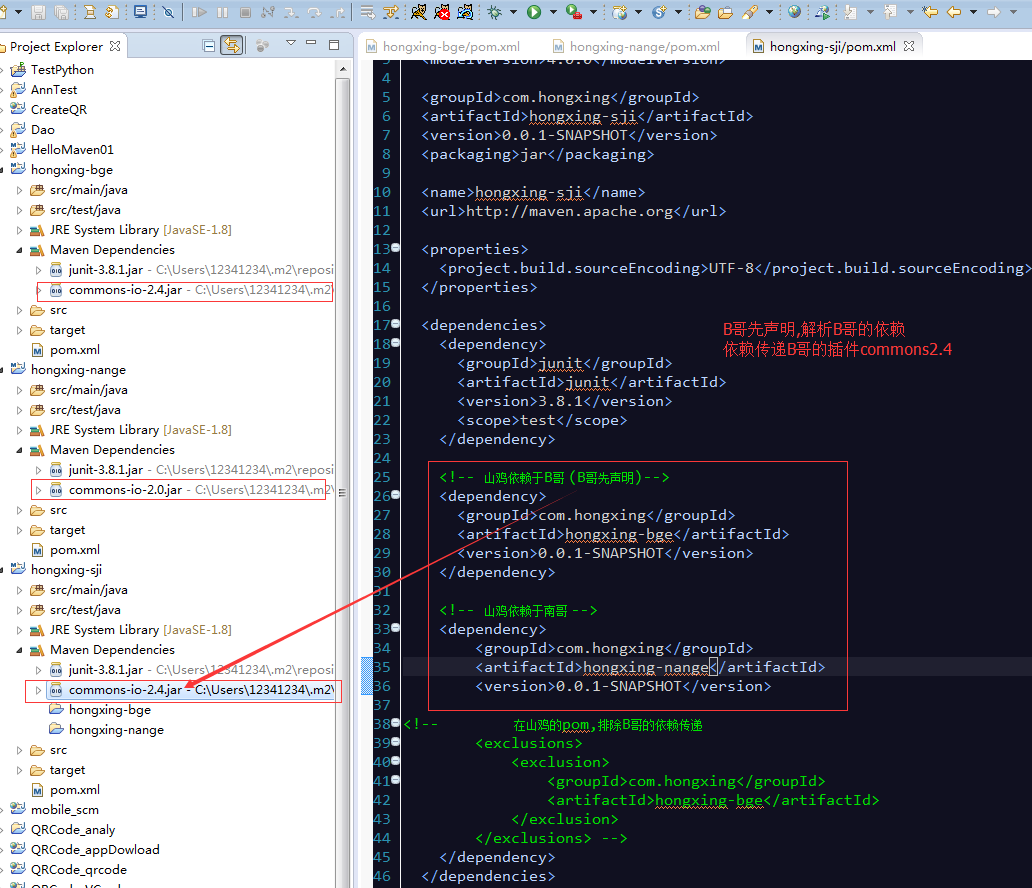
2、先声明的优先:如果路径长度相同,谁先声明,先解析谁
以山鸡同时依赖B哥和南哥为例:
maven的聚合(多个项目一起执行install操作,安装到本地仓库)和继承(将共同特性封装成一个父类)
以B哥、南哥、山鸡代码为例实现项目的聚合:
新建项目hongxing-aggregation,在pom中进行聚合配置

执行 mvn clean install:生成所有的jar,并安装到本地仓库中
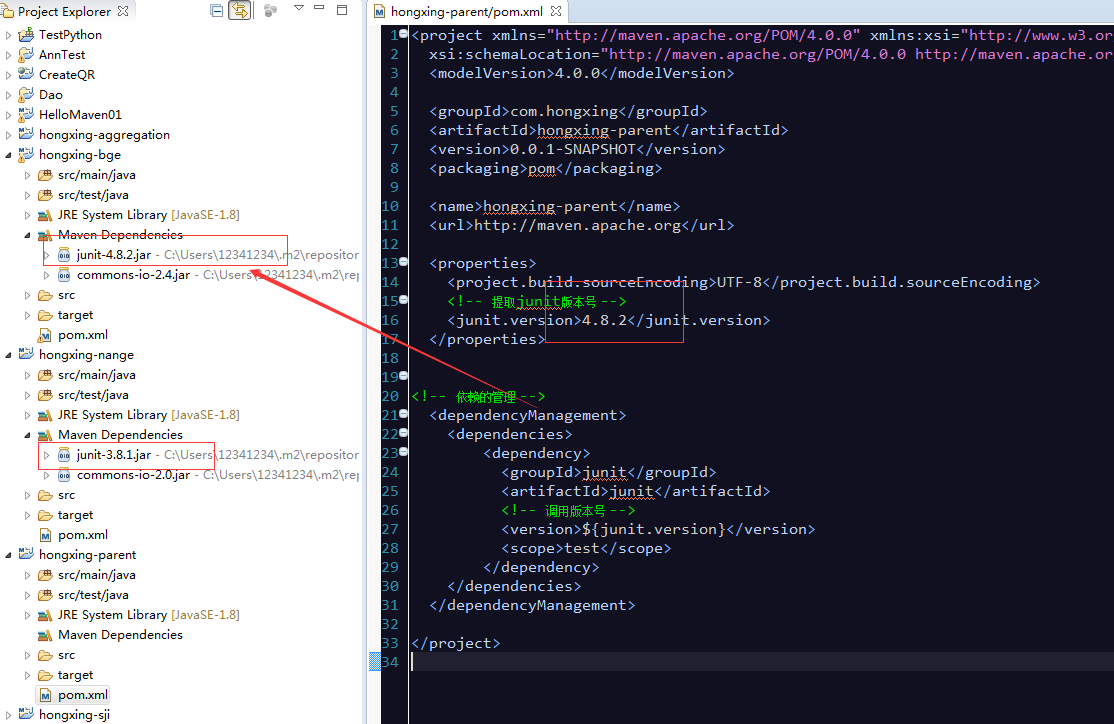
以B哥代码为例实现项目的继承:
>1 新建项目hongxing-parent,在pom中配置依赖的管理
  <properties>
    <project.build.sourceEncoding>UTF-8</project.build.sourceEncoding>
    <!-- 提取junit版本号 -->
    <junit.version>4.8.2</junit.version>
  </properties>

<!-- 依赖的管理 -->
  <dependencyManagement>
     <dependencies>
         <dependency>
           <groupId>junit</groupId>
           <artifactId>junit</artifactId>
           <!-- 调用版本号 -->
           <version>${junit.version}</version>
           <scope>test</scope>
         </dependency>
     </dependencies>
  </dependencyManagement>
>2 在项目hongxing-bge的pom中配置,继承项目hongxing-parent中的junit
  <!-- 继承项目hongxing-parent中的junit -->
  <parent>
     <!-- 引入父类pom的坐标 -->
       <groupId>com.hongxing</groupId>
       <artifactId>hongxing-parent</artifactId>
       <version>0.0.1-SNAPSHOT</version>
  </parent>

  <dependencies>
    <dependency>
      <groupId>junit</groupId>
      <artifactId>junit</artifactId>
    </dependency>

 浙公网安备 33010602011771号