多线程学习笔记
一、Java实现多线程的方式
主要有四种
1.继承Thread类
public class MyThread extends Thread {
    @Override
    public void run() {
        for (int i = 0; i < 10; i++) {
            System.out.println("Thread name:" + Thread.currentThread().getName());
        }
    }

    public static void main(String[] args) {
        MyThread myThread1 = new MyThread();
        myThread1.setName("Thread-1");
        MyThread myThread2 = new MyThread();
        myThread2.setName("Thread-2");
        myThread1.start();
        myThread2.start();
    }
}
2.实现Runnable接口
public class MyRunnable implements Runnable {
    @Override
    public void run() {
        for (int i = 0; i < 10; i++) {
            System.out.println("Thread name:" + Thread.currentThread().getName());
        }
    }

    public static void main(String[] args) {
        Thread thread1 = new Thread(new MyRunnable());
        thread1.setName("thread-1");
        Thread thread2 = new Thread(new MyRunnable());
        thread2.setName("thread-2");

        thread1.start();
        thread2.start();
    }
}
3.实现Callable接口
public class MyCallable implements Callable<Integer> {
    @Override
    public Integer call() {
        int a = 5;
        int b = 10;
        System.out.println("Thread name:" + Thread.currentThread().getName());
        return a + b;
    }

    public static void main(String[] args) throws ExecutionException, InterruptedException {
        FutureTask<Integer> futureTask1 = new FutureTask<>(new MyCallable());
        FutureTask<Integer> futureTask2 = new FutureTask<>(new MyCallable());

        Thread thread1 = new Thread(futureTask1);
        Thread thread2 = new Thread(futureTask2);

        thread1.setName("thread-1");
        thread2.setName("thread-2");

        thread1.start();
        thread2.start();

        System.out.println("返回值为:" + futureTask1.get());
        System.out.println("返回值为:" + futureTask2.get());

    }
}
4.使用Executor线程池
介绍三种
//这边三种方式,注释其中两个,打开其中一个运行即可
public class MyExecutor {
    public static void main(String[] args) throws ExecutionException, InterruptedException {
        /**
         * 第一种newFixedThreadPool()
         * 1.构造一个固定大小的线程池,空闲的线程会一直保留着
         * 2.提交的任务数多于空闲线程数,就会把未得到服务的任务放到队列中等待。
         */
        ExecutorService executorService = Executors.newFixedThreadPool(3);

//        /**
//         * 第二种newCachedThreadPool()
//         * 1.构建的线程池会立即执行任务
//         * 2.当前存在空闲线程,直接执行任务
//         * 3.当前不存在空闲线程,则创建一个新线程执行任务
//         * 4.该线程池内的空闲线程只会保留 60 秒
//         */
//        ExecutorService executorService = Executors.newCachedThreadPool();
//
//        /**
//         *第三种newSingleThreadExecutor()
//         * 构建的线程池只存在一个线程,会顺序地执行所提交的任务。
//         */
//        ExecutorService executorService = Executors.newSingleThreadExecutor();

        for (int i = 0; i < 5; i++) {
            // 2.调用 Runnable 任务
            executorService.execute(new TestRunnable());
        }

        for (int i = 0; i < 5; i++) {
            // 2.调用 Callable 任务
            Future<Integer> submit = executorService.submit(new TestCallable());
            System.out.println("Callable返回值:" + submit.get());
        }

        //关闭连接
        executorService.shutdown();
    }
}

class TestRunnable implements Runnable {
    @Override
    public void run() {
        System.out.println("Thread name::" + Thread.currentThread().getName());
    }
}

class TestCallable implements Callable<Integer> {
    @Override
    public Integer call() throws Exception {
        System.out.println("Thread name::" + Thread.currentThread().getName());
        return 666;
    }
}
二、多线程的使用
1.停止线程
推荐的使用方式
//核心思想就是用一个方法去改变flag的值,如果flag等于false就停止线程
public class MyRunnable implements Runnable {
    private boolean flag = true;

    @Override
    public void run() {
        while (flag) {
            System.out.println("Thread name:" + Thread.currentThread().getName());
        }
    }

    public void stop() {
        this.flag = !this.flag;
    }

    public static void main(String[] args) throws InterruptedException {
        MyRunnable myRunnable = new MyRunnable();
        Thread thread1 = new Thread(myRunnable);
        thread1.setName("thread-1");
        thread1.start();
        //由于电脑性能不同,有可能线程没启动就执行完循环了,多重启几次试试。
        for (int i = 1; i < 1000; i++) {
            System.out.println("main" + i);
            if (i == 800) {
                myRunnable.stop();
                System.out.println("停止线程");
                break;
            }
        }
    }
}
2.线程休眠Sleep
每个对象都有一个锁,sleep不会释放锁
    public static void main(String[] args) {
        while (true) {
            try {
                Thread.sleep(1000);
                System.out.println(new SimpleDateFormat("HH:mm:ss").format(new Date()));
            } catch (InterruptedException e) {
                e.printStackTrace();
            }
        }
    }
3.Thread.yield()
线程礼让,让CPU重新调度,但不一定礼让成功
public class test {
    public static void main(String[] args) {
        MyYield myYield = new MyYield();
        new Thread(myYield, "a").start();
        new Thread(myYield, "b").start();
    }
}

class MyYield implements Runnable {
    @Override
    public void run() {
        System.out.println(Thread.currentThread().getName() + "开始");
        Thread.yield();
        System.out.println(Thread.currentThread().getName() + "结束");
    }
}
4.join
强行插队,少使用,容易堵塞线程
//运行代码,刚开始两个线程一起跑,当主线程的循环i == 300时“线程a”插队进来,主线程得等“线程a”执行完才能继续执行。
public class test {
    public static void main(String[] args) throws InterruptedException {
        Thread thread = new Thread(new MyJoin(), "线程a");
        thread.start();

        for (int i = 0; i < 600; i++) {
            if (i == 300) {
                //当i等于300的时候让“线程a”插队进来执行
                thread.join();
            }
            System.out.println("main-----" + i);
        }
    }
}
class MyJoin implements Runnable {
    @Override
    public void run() {
        for (int i = 0; i < 1000; i++) {
            System.out.println(Thread.currentThread().getName() + "我浅浅的插个队--------" + i);
        }
    }
}
5.线程状态
new->runnable->timed_waiting<->执行->terminated
public class test {
    public static void main(String[] args) throws InterruptedException {
        Thread thread = new Thread(() -> {
            for (int i = 0; i < 2; i++) {
                try {
                    Thread.sleep(1000);
                } catch (InterruptedException e) {
                    e.printStackTrace();
                }
                System.out.println("线程执行");
            }
        });
        Thread.State state = thread.getState();
        System.out.println("新建" + state);

        thread.start();
        state = thread.getState();
        System.out.println("启动" + state);

        while (state != Thread.State.TERMINATED) {
            Thread.sleep(100);
            state = thread.getState();
            System.out.println(state);
        }


    }
}
6.线程优先级
先设置优先级,再启动。优先级是1-10之间,主线程默认优先级是5
public class test {
    public static void main(String[] args) throws InterruptedException {
        //特别说明主线程得优先级是默认的
        System.out.println(Thread.currentThread().getName() + "--------->" + Thread.currentThread().getPriority());

        MyPriority myPriority = new MyPriority();

        Thread thread1 = new Thread(myPriority);
        Thread thread2 = new Thread(myPriority);
        Thread thread3 = new Thread(myPriority);
        Thread thread4 = new Thread(myPriority);
        Thread thread5 = new Thread(myPriority);
        Thread thread6 = new Thread(myPriority);

        thread1.setPriority(Thread.MIN_PRIORITY);//最小优先级1
        thread2.setPriority(2);
        thread3.setPriority(4);
        thread4.setPriority(7);
        thread5.setPriority(6);
        thread6.setPriority(Thread.MAX_PRIORITY);//最大优先级10

        thread1.start();
        thread2.start();
        thread3.start();
        thread4.start();
        thread5.start();
        thread6.start();
    }
}

class MyPriority implements Runnable {
    @Override
    public void run() {
        System.out.println(Thread.currentThread().getName() + "--------->" + Thread.currentThread().getPriority());
    }
}
7.守护线程
public class test {
    public static void main(String[] args) throws InterruptedException {
        God god = new God();
        You you = new You();

        Thread thread = new Thread(god);
        //设置为守护线程,默认为false
        thread.setDaemon(true);
        thread.start();

        new Thread(you).start();

    }
}

class God implements Runnable {
    @Override
    public void run() {
        while (true) {
            System.out.println("上帝在守护着你,直到你死亡");
        }
    }
}

class You implements Runnable {
    @Override
    public void run() {
        for (int i = 1; i <= 3650; i++) {
            System.out.println("我活着的第" + i + "天");
            if (i == 3650) {
                System.out.println("终于走到人生的镜头,你死了,上帝发现你死了,一会他也就退出对你的守护了-------------------------------");
            }
        }
    }
}
三、线程同步
形成条件:队列+锁(解决线程不安全的问题,锁机制:synchronized)
下面举出三个线程不全的案例:
1.买票
public class test {
    public static void main(String[] args) throws InterruptedException {
        BuyTicket buyTicket = new BuyTicket();

        new Thread(buyTicket, "小红").start();
        new Thread(buyTicket, "小白").start();
        new Thread(buyTicket, "小绿").start();
    }
}

class BuyTicket implements Runnable {
    //十张票
    private int ticketNums = 10;
    private boolean flag = true;

    @Override
    public void run() {
        while (flag) {
            try {
                buy();
            } catch (InterruptedException e) {
                e.printStackTrace();
            }
        }
    }

    private void buy() throws InterruptedException {
        if (this.ticketNums <= 0) {
            this.flag = false;
            return;
        }
        Thread.sleep(300);
        System.out.println(Thread.currentThread().getName() + "拿到" + this.ticketNums-- + "张票");
    }
}
2.取钱
public class test {
public static void main(String[] args) throws InterruptedException {
Account account = new Account(100, "结婚基金");
Drawing you = new Drawing(account,50,"you");
Drawing girlFriend = new Drawing(account,100,"girlFriend");
you.start();
girlFriend.start();
}
}
//账户
class Account {
int money;//余额
String name;//卡名
public Account(int money, String name) {
this.money = money;
this.name = name;
}
}
//银行
class Drawing extends Thread {
Account account;//账户
int drawingMoney;//取了多少钱
int nowMoney;//现在还有多少钱
public Drawing(Account account, int drawingMoney, String name) {
super(name);
this.account = account;
this.drawingMoney = drawingMoney;
}
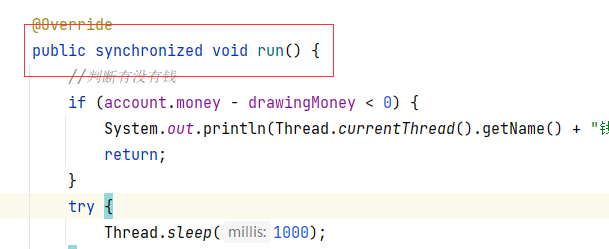
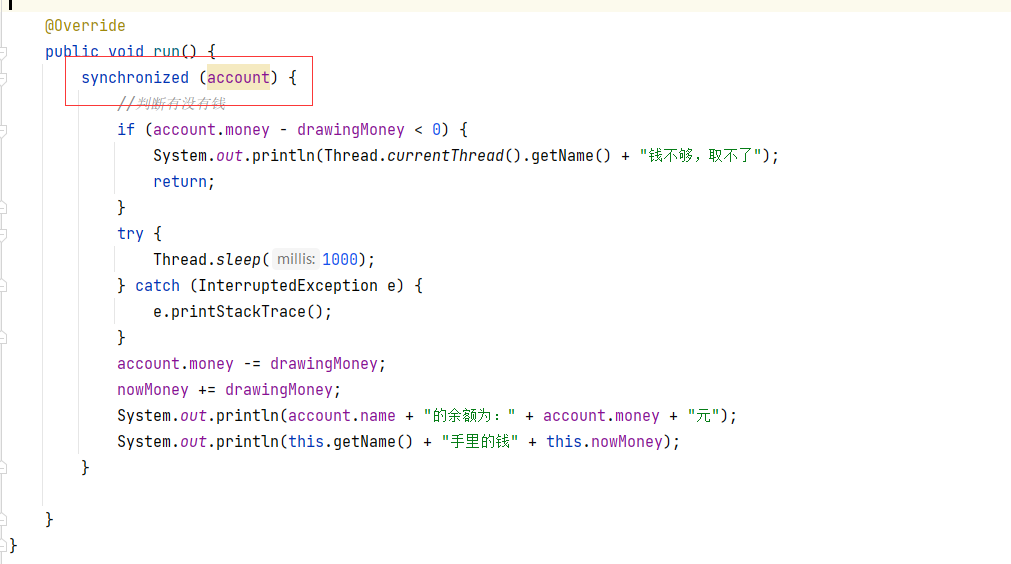
@Override
public void run() {
//判断有没有钱
if (account.money - drawingMoney < 0) {
System.out.println(Thread.currentThread().getName() + "钱不够,取不了");
return;
}
try {
Thread.sleep(1000);
} catch (InterruptedException e) {
e.printStackTrace();
}
account.money -= drawingMoney;
nowMoney += drawingMoney;
System.out.println(account.name + "的余额为:" + account.money + "元");
System.out.println(this.getName() + "手里的钱" + this.nowMoney);
}
}
3.list添加
public class test {
    public static void main(String[] args) throws InterruptedException {
        List<String> list = new ArrayList<>();
        for (int i = 0; i < 10000; i++) {
            new Thread(() -> {
                list.add(Thread.currentThread().getName());
            }).start();
        }
        Thread.sleep(3000);
        System.out.println(list.size());
    }
}
4.synchronized锁 同步方法,同步代码块
5.lock锁
JDK5.0开始,显示定义同步锁
public class test {
    public static void main(String[] args) {
        MyLock myLock = new MyLock();

        new Thread(myLock).start();
        ;
        new Thread(myLock).start();
        ;
        new Thread(myLock).start();
        ;
    }

}

class MyLock implements Runnable {

    private int ticketNums = 10;

    //定义lock锁
    private final ReentrantLock lock = new ReentrantLock();

    @Override
    public void run() {
        while (true) {
            try {
                //加锁
                lock.lock();
                if (ticketNums > 0) {
                    try {
                        Thread.sleep(1000);
                    } catch (InterruptedException e) {
                        e.printStackTrace();
                    }
                    System.out.println(ticketNums--);
                } else {
                    break;
                }
            } finally {
                lock.unlock();
            }
        }
    }
}
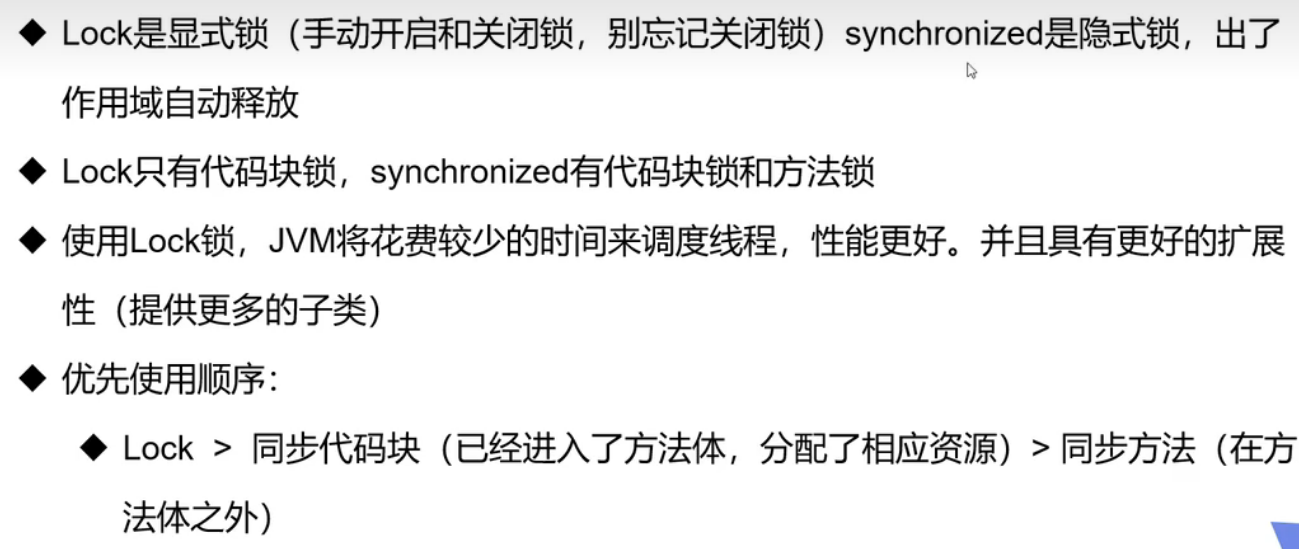
6.synchronized 与 Lock 对比
四、线程协作
1.管程法
public class test {
public static void main(String[] args) {
SynContainer synContainer = new SynContainer();
new Producers(synContainer).start();
new Consumer(synContainer).start();
}
}
//生产者
class Producers extends Thread {
SynContainer synContainer;
public Producers(SynContainer synContainer) {
this.synContainer = synContainer;
}
@Override
public void run() {
for (int i = 0; i < 10000; i++) {
synContainer.push(new Chicken(synContainer.count));
}
}
}
//消费者
class Consumer extends Thread {
SynContainer synContainer;
public Consumer(SynContainer synContainer) {
this.synContainer = synContainer;
}
@Override
public void run() {
for (int i = 0; i < 10000; i++) {
synContainer.pop();
}
}
}
//产品
class Chicken {
int id;//产品编号
public Chicken(int id) {
this.id = id;
}
public Chicken() {
}
}
//缓存区
class SynContainer {
//容器大小
Chicken[] chickens = new Chicken[1000];
//容器技术器
int count = 0;
//生产者放入产品
public synchronized void push(Chicken chicken) {
//如果容器满了通知消费者消费
if (count == chickens.length) {
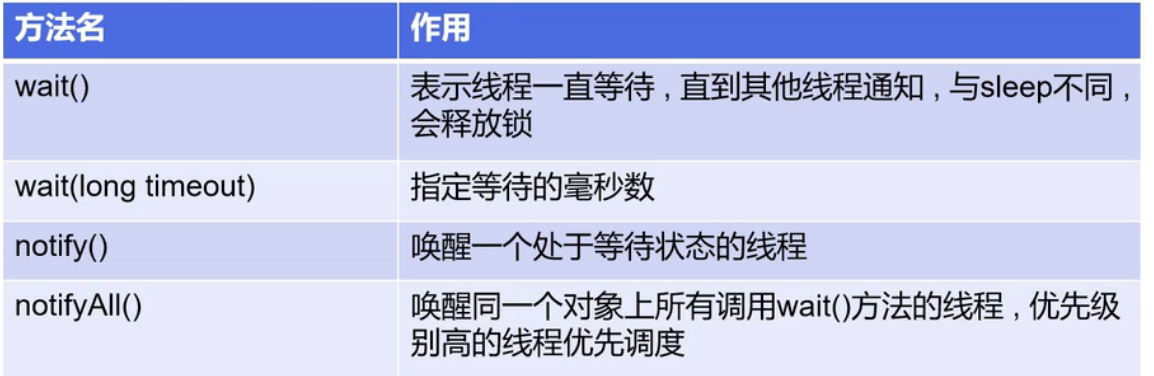
//通知消费者,生产者等待
try {
this.wait();
} catch (InterruptedException e) {
e.printStackTrace();
}
}
//如果容器没有满,放入产品
chickens[count] = chicken;
count++;
System.out.println("生产了1只鸡" + "当前有" + count + "只鸡");
this.notifyAll();
}
//消费者去除产品
public synchronized void pop() {
//判断能否消费
if (count == 0) {
//没有产品了,等待生产者生产
try {
this.wait();
} catch (InterruptedException e) {
e.printStackTrace();
}
}
count--;
System.out.println("消费了1只鸡" + "当前有" + count + "只鸡");
//消费了一个产品通知生产者生产
this.notifyAll();
}
}
2.信号灯法
//信号灯法,通过标志位解决。
public class test {
   public static void main(String[] args) {
       TV tv = new TV();
       new Player(tv).start();
       new Watcher(tv).start();
   }
}

//演员
class Player extends Thread {
   TV tv;

   public Player(TV tv) {
       this.tv = tv;
   }

   @Override
   public void run() {
       for (int i = 0; i < 20; i++) {
           if (i % 2 == 0) {
               this.tv.play("快乐大本营");
           } else {
               this.tv.play("抖音激励美好生活");
           }
       }
   }
}

//观众
class Watcher extends Thread {
   TV tv;

   public Watcher(TV tv) {
       this.tv = tv;
   }

   @Override
   public void run() {
       for (int i = 0; i < 20; i++) {
           this.tv.watch();
       }
   }
}

//产品
class TV {
   //演员表演,观众等待 T
   //观众观看。演员等待 F
   String voice;//表演的节目
   boolean flag = true;

   //表演
   public synchronized void play(String voice) {
       if (!flag) {
           try {
               this.wait();
           } catch (InterruptedException e) {
               e.printStackTrace();
           }
       }
       System.out.println("演员表演了:" + voice);

       //通知观众观看
       this.notifyAll();
       this.voice = voice;
       this.flag = !this.flag;

   }

   //观看
   public synchronized void watch() {
       if (flag) {
           try {
               this.wait();
           } catch (InterruptedException e) {
               e.printStackTrace();
           }
       }
       System.out.println("观众观看了:" + voice);
       this.notifyAll();
       this.flag = !this.flag;
   }
}

 浙公网安备 33010602011771号